lock MERCEDES-BENZ CL CLASS 2013 Workshop Manual
[x] Cancel search | Manufacturer: MERCEDES-BENZ, Model Year: 2013, Model line: CL CLASS, Model: MERCEDES-BENZ CL CLASS 2013Pages: 496, PDF Size: 7.5 MB
Page 107 of 496

should have a good overview of traffic
conditions.
Folding the exterior mirrors in or out
electrically
XMake sure that the SmartKey is in position
1 or 2 in the ignition lock.XBriefly press button :.
Both exterior mirrors fold in or out.
i Make sure that the exterior mirrors are
always folded out fully while driving. They
could otherwise vibrate.
Folding the exterior mirrors in or out
automatically
When the "Automatic mirror folding" function
is activated in COMAND ( Y page 236):
R the exterior mirrors fold in automatically as
soon as you lock the vehicle from the
outside.
R the exterior mirrors fold out again
automatically as soon as you unlock the
vehicle and then open the driver's or front-
passenger door.
i If the exterior mirrors have been folded in
manually, they do not fold out.
Exterior mirror out of position
If an exterior mirror has been pushed out of
position, proceed as follows:
XPress the mirror-folding button
( Y page 105) repeatedly until you hear the
mirror engage in position.
The mirror housing is engaged again and
you can adjust the exterior mirrors as usual
( Y page 104).
Automatic anti-glare mirrors
GWARNING
If incident light from headlamps is prevented
from striking the sensor in the rear-view
mirror, for instance, by luggage piled too high
in the vehicle, the mirror's automatic anti-
glare function will not operate.
Incident light could then blind you. This may
distract you from the traffic conditions and,
as a result, you may cause an accident.
The rear-view mirror and the exterior mirror
on the driver's side automatically go into anti-
glare mode if the ignition is switched on and
incident light from headlamps strikes the
sensor in the rear-view mirror.
The mirrors do not go into anti-glare mode if
reverse gear is engaged or the interior lighting
is switched on.
Parking position for the exterior
mirror on the front-passenger side
Setting and storing the parking position
You can position the front-passenger side
exterior mirror in such a way that you can see
the rear wheel on that side as soon as you
engage reverse gear. You can store this
position.
Mirrors105Seats, steering wheel and mirrorsZ
Page 108 of 496

XMake sure that the vehicle is stationary and
that the SmartKey is in position 2 in the
ignition lock.XPress button = for the exterior mirror on
the front-passenger side.XEngage reverse gear.
The exterior mirror on the front-passenger
side moves to the preset parking position.XUse adjustment button ; to adjust the
exterior mirror. You should see the rear
wheel and the curb in the exterior mirror.
The parking position is stored.
i If you shift the transmission to another
position, the exterior mirror on the front-
passenger side returns to the driving
position.
i You can also store the parking position
using memory button M : .
XMake sure that the SmartKey is in
position 2 in the ignition lock.XWith the exterior mirror on the front-
passenger side activated, use
adjustment button ; to adjust the
exterior mirror. You should see the
rear wheel and the curb in the exterior
mirror on the front-passenger side.XPress memory button M : and one of
the arrows on adjustment button ;
within three seconds.
The parking position is stored if the
exterior mirror does not move.
If the mirror moves out of position, repeat
the steps.
Calling up a stored parking position
settingXTurn the SmartKey to position 2 in the
ignition lock.XAdjust the exterior mirror on the front-
passenger side with the corresponding
button ( Y page 104).XEngage reverse gear.
The exterior mirror on the front-passenger
side moves to the stored parking position.
The exterior mirror on the front-passenger
side moves back to its original position:
R as soon as you exceed a speed of 9 mph
(15 km/h)
R about ten seconds after you have
disengaged reverse gear
R if you press button ? for the exterior
mirror on the driver's side
Memory function
Storing settings
GWARNING
Do not activate the memory function while
driving. Activating the memory function while
driving could cause the driver to lose control
of the vehicle.
With the memory function, you can store up
to three different settings, e.g. for three
different people.
The following settings are stored as a single
memory preset:
R seat, backrest, head restraint position and
contour of the backrest in the lumbar
region
R active multicontour seat: activated/
deactivated
R multicontour seat: the side bolsters of the
seat cushion and the backrest as well as
the contour of the backrest in the lumbar
and shoulder regions
106Memory functionSeats, steering wheel and mirrors
Page 115 of 496
The COMAND controller can be:
R pressed briefly or pressed and held W
R turned clockwise or counter-clockwise
cVd
R slid left or right XVY
R slid forwards or back ZVÆ
R slid diagonally aVb
In the instructions, operating sequences are
described as follows:XPress the R button.
Audio mode is activated.XSelect Audio by sliding VÆ and turning
cVd the COMAND controller and press
W to confirm.
The audio menu appears.
Back button
:Back buttonXTo exit the menu: press back button :
briefly.
COMAND changes to the next higher menu
level in the current operating mode.
i You can also exit a menu by sliding XVY
or ZV Æ the COMAND controller.
XTo switch to the basic display: press and
hold back button :.
COMAND changes to the basic display of
the current operating mode.Function buttons
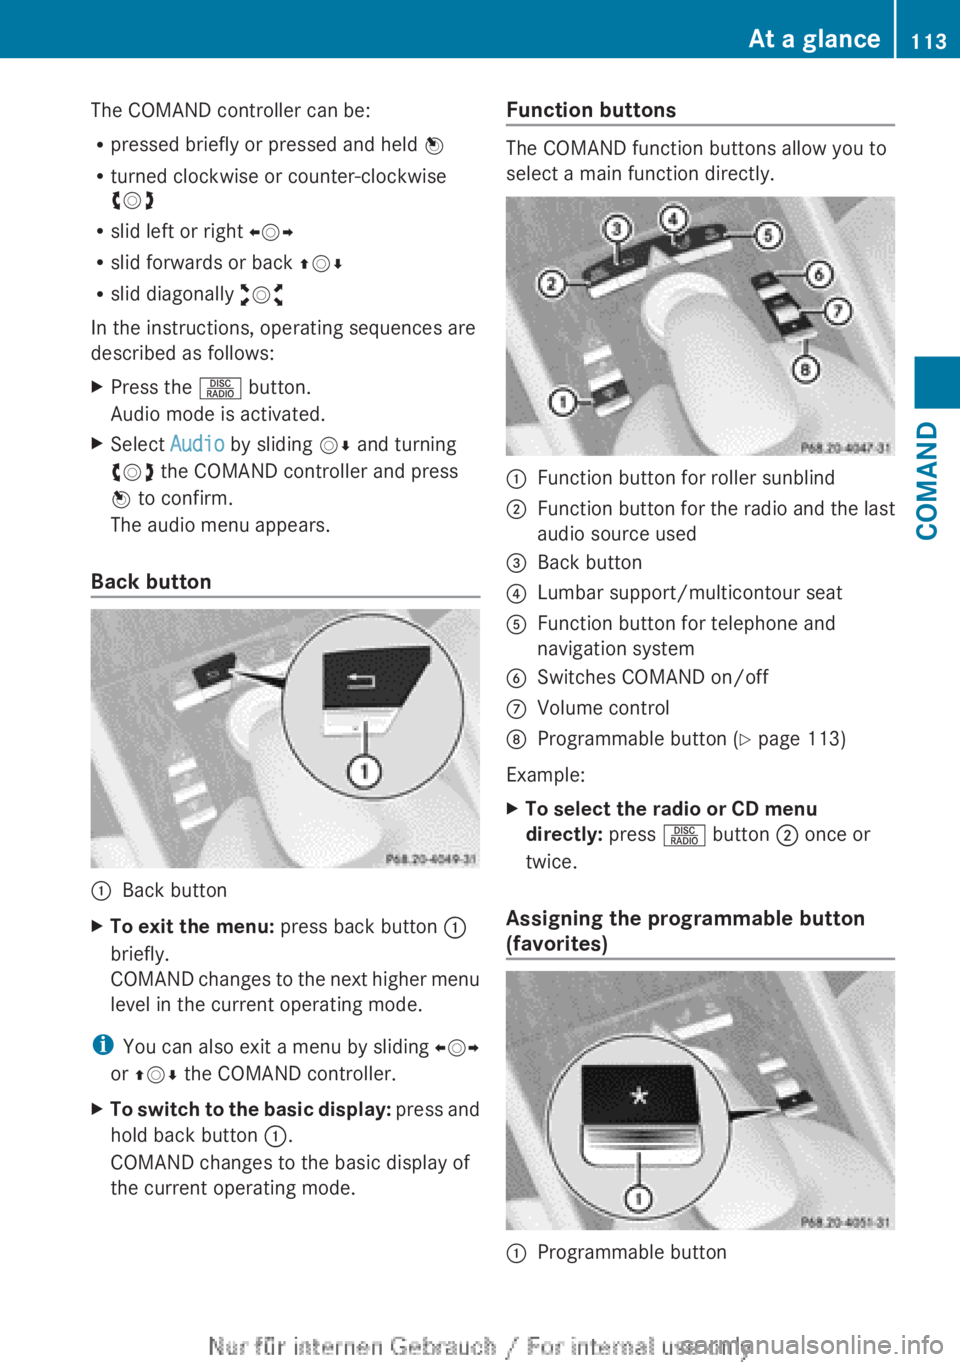
The COMAND function buttons allow you to
select a main function directly.
:Function button for roller sunblind;Function button for the radio and the last
audio source used=Back button?Lumbar support/multicontour seatAFunction button for telephone and
navigation systemBSwitches COMAND on/offCVolume controlDProgrammable button ( Y page 113)
Example:
XTo select the radio or CD menu
directly: press R button ; once or
twice.
Assigning the programmable button
(favorites)
:Programmable buttonAt a glance113COMANDZ
Page 118 of 496
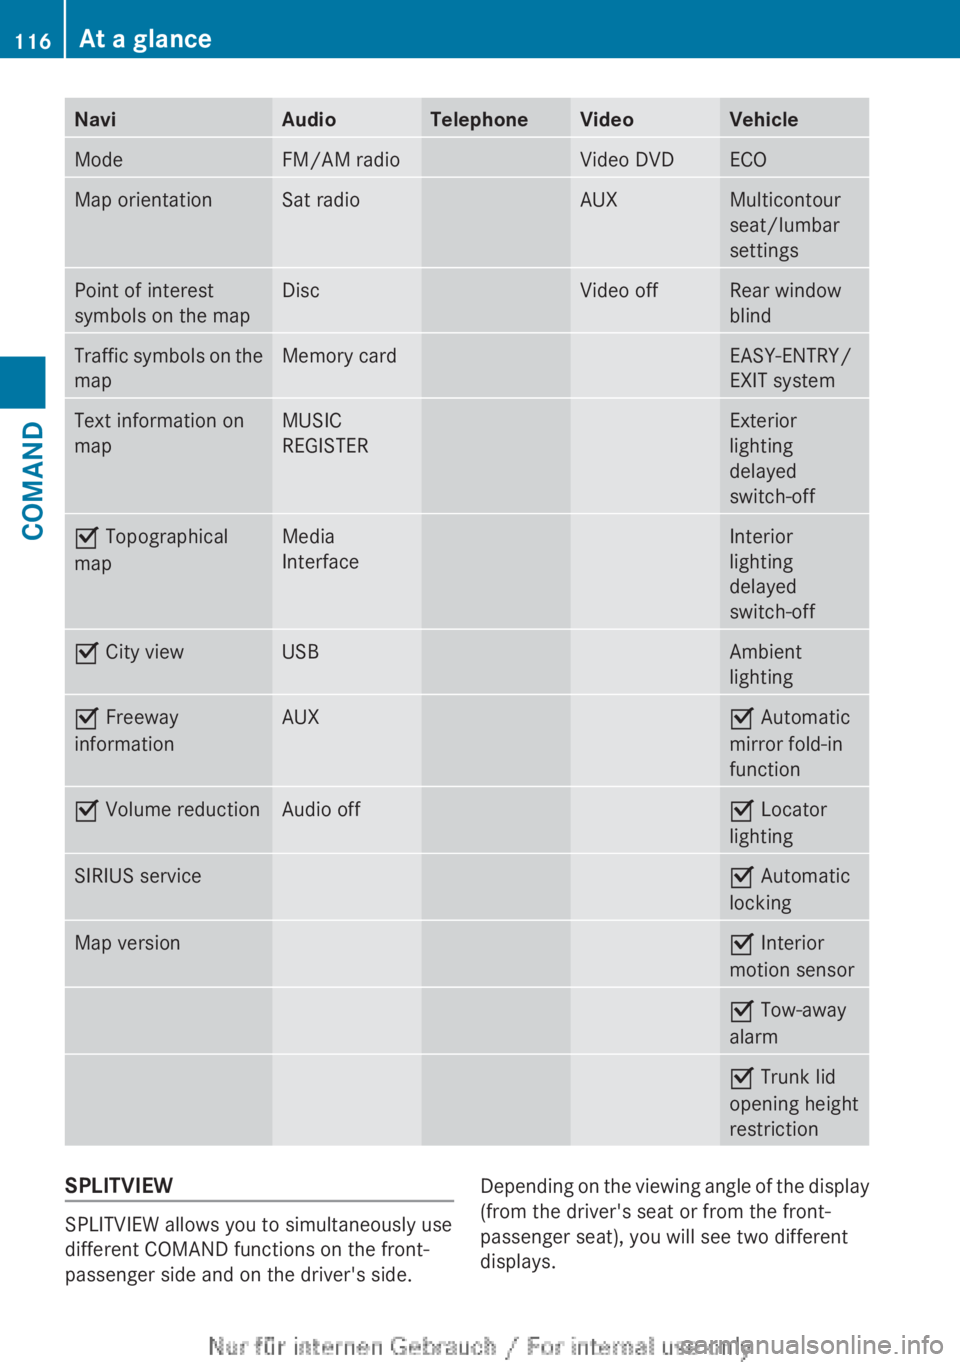
NaviAudioTelephoneVideoVehicleModeFM/AM radioVideo DVDECOMap orientationSat radioAUXMulticontour
seat/lumbar
settingsPoint of interest
symbols on the mapDiscVideo offRear window
blindTraffic symbols on the
mapMemory cardEASY-ENTRY/
EXIT systemText information on
mapMUSIC
REGISTERExterior
lighting
delayed
switch-offO Topographical
mapMedia
InterfaceInterior
lighting
delayed
switch-offO City viewUSBAmbient
lightingO Freeway
informationAUXO Automatic
mirror fold-in
functionO Volume reductionAudio offO Locator
lightingSIRIUS serviceO Automatic
lockingMap versionO Interior
motion sensorO Tow-away
alarmO Trunk lid
opening height
restrictionSPLITVIEW
SPLITVIEW allows you to simultaneously use
different COMAND functions on the front-
passenger side and on the driver's side.
Depending on the viewing angle of the display
(from the driver's seat or from the front-
passenger seat), you will see two different
displays.116At a glanceCOMAND
Page 120 of 496
switch SPLITVIEW on and off
( Y page 119).
The SPLITVIEW screen remains on for
approximately 30 minutes after the SmartKey
has been turned to position 0 in the ignition
lock. After this time or after the SmartKey has
been removed, the settings on the front-
passenger side are saved for approximately
30 minutes longer. After this period,
reactivation on the front-passenger side
means that the settings from the driver's side
will be used.
Swiveling the COMAND display and
setting the brightness
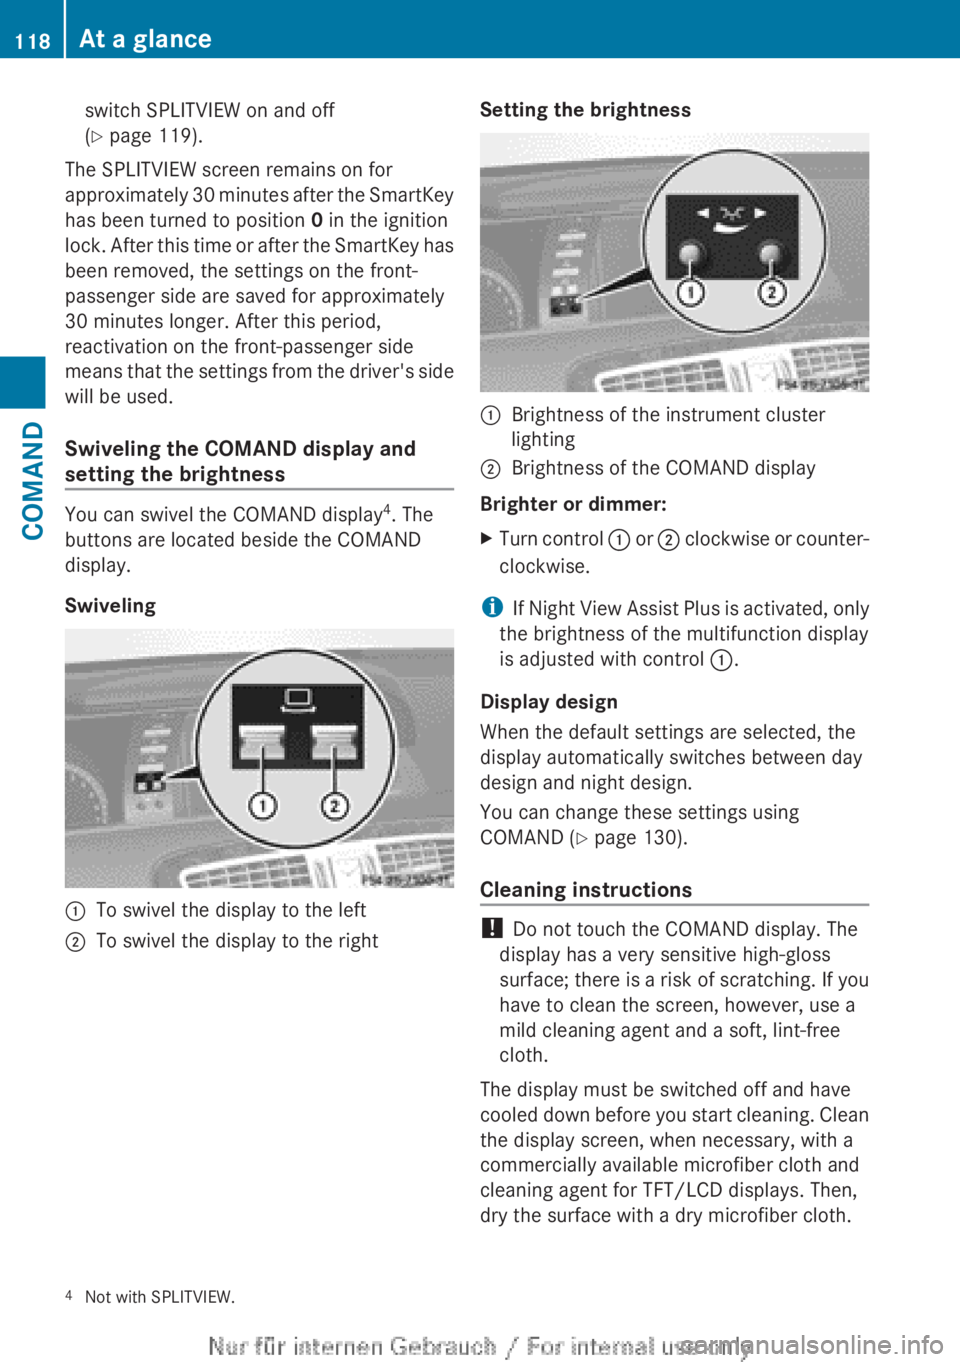
You can swivel the COMAND display 4
. The
buttons are located beside the COMAND
display.
Swiveling
:To swivel the display to the left;To swivel the display to the rightSetting the brightness:Brightness of the instrument cluster
lighting;Brightness of the COMAND display
Brighter or dimmer:
XTurn control : or ; clockwise or counter-
clockwise.
i If Night View Assist Plus is activated, only
the brightness of the multifunction display
is adjusted with control :.
Display design
When the default settings are selected, the
display automatically switches between day
design and night design.
You can change these settings using
COMAND ( Y page 130).
Cleaning instructions
! Do not touch the COMAND display. The
display has a very sensitive high-gloss
surface; there is a risk of scratching. If you
have to clean the screen, however, use a
mild cleaning agent and a soft, lint-free
cloth.
The display must be switched off and have
cooled down before you start cleaning. Clean
the display screen, when necessary, with a
commercially available microfiber cloth and
cleaning agent for TFT/LCD displays. Then,
dry the surface with a dry microfiber cloth.
4 Not with SPLITVIEW.118At a glanceCOMAND
Page 141 of 496
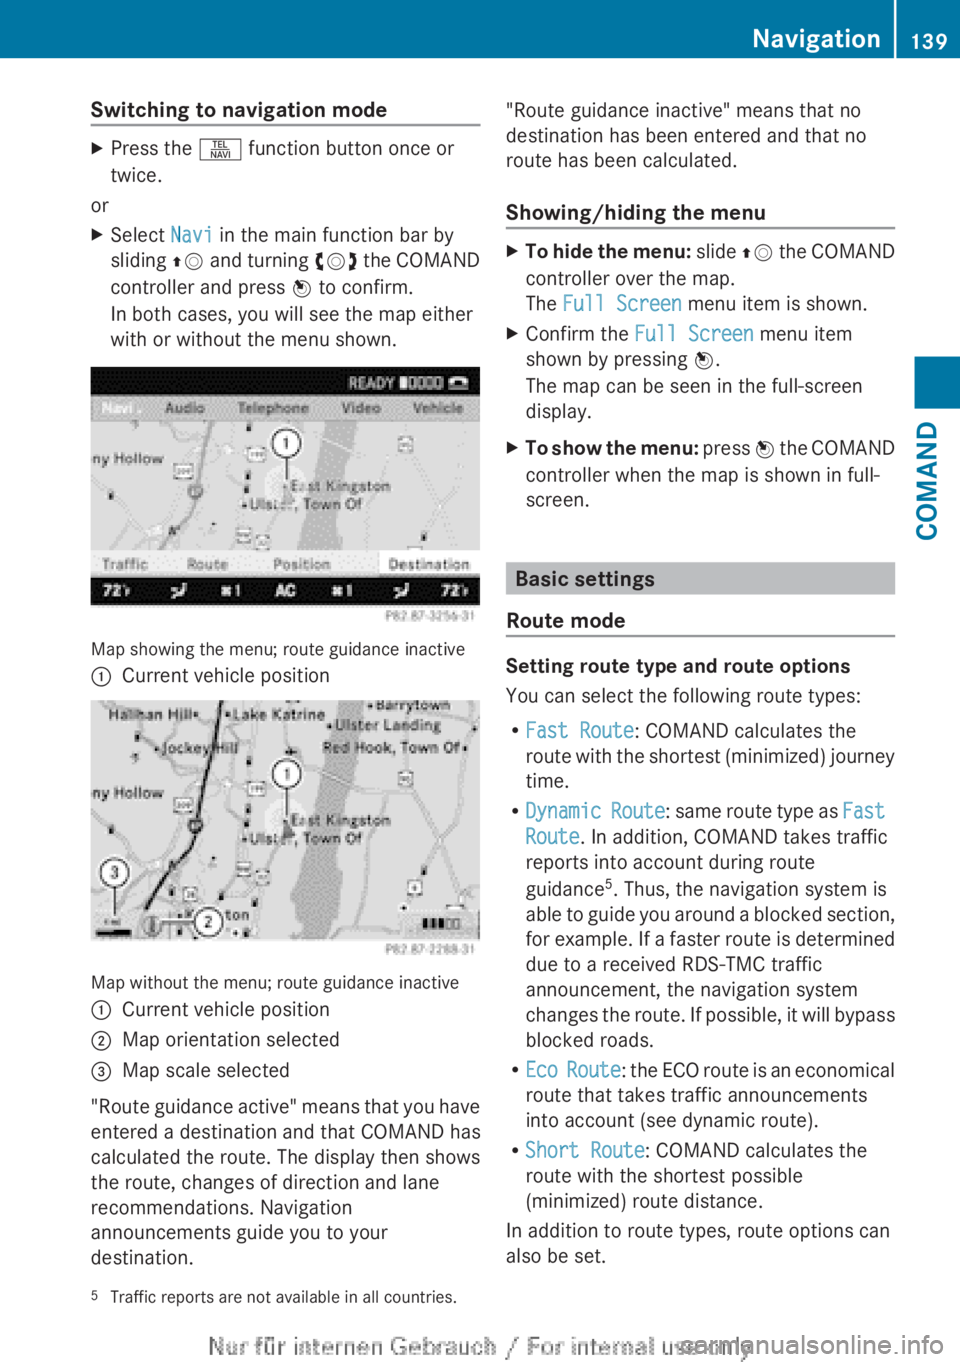
Switching to navigation modeXPress the S function button once or
twice.
or
XSelect Navi in the main function bar by
sliding ZV and turning cVd the COMAND
controller and press W to confirm.
In both cases, you will see the map either
with or without the menu shown.
Map showing the menu; route guidance inactive
:Current vehicle position
Map without the menu; route guidance inactive
:Current vehicle position;Map orientation selected=Map scale selected
" Route guidance active" means that you have
entered a destination and that COMAND has
calculated the route. The display then shows
the route, changes of direction and lane
recommendations. Navigation
announcements guide you to your
destination.
"Route guidance inactive" means that no
destination has been entered and that no
route has been calculated.
Showing/hiding the menuXTo hide the menu: slide ZV the COMAND
controller over the map.
The Full Screen menu item is shown.XConfirm the Full Screen menu item
shown by pressing W.
The map can be seen in the full-screen
display.XTo show the menu: press W the COMAND
controller when the map is shown in full-
screen.
Basic settings
Route mode
Setting route type and route options
You can select the following route types:
R Fast Route : COMAND calculates the
route with the shortest (minimized) journey
time.
R Dynamic Route : same route type as Fast
Route . In addition, COMAND takes traffic
reports into account during route
guidance 5
. Thus, the navigation system is
able to guide you around a blocked section,
for example. If a faster route is determined
due to a received RDS-TMC traffic
announcement, the navigation system
changes the route. If possible, it will bypass
blocked roads.
R Eco Route : the ECO route is an economical
route that takes traffic announcements
into account (see dynamic route).
R Short Route : COMAND calculates the
route with the shortest possible
(minimized) route distance.
In addition to route types, route options can
also be set.
5 Traffic reports are not available in all countries.Navigation139COMANDZ
Page 150 of 496
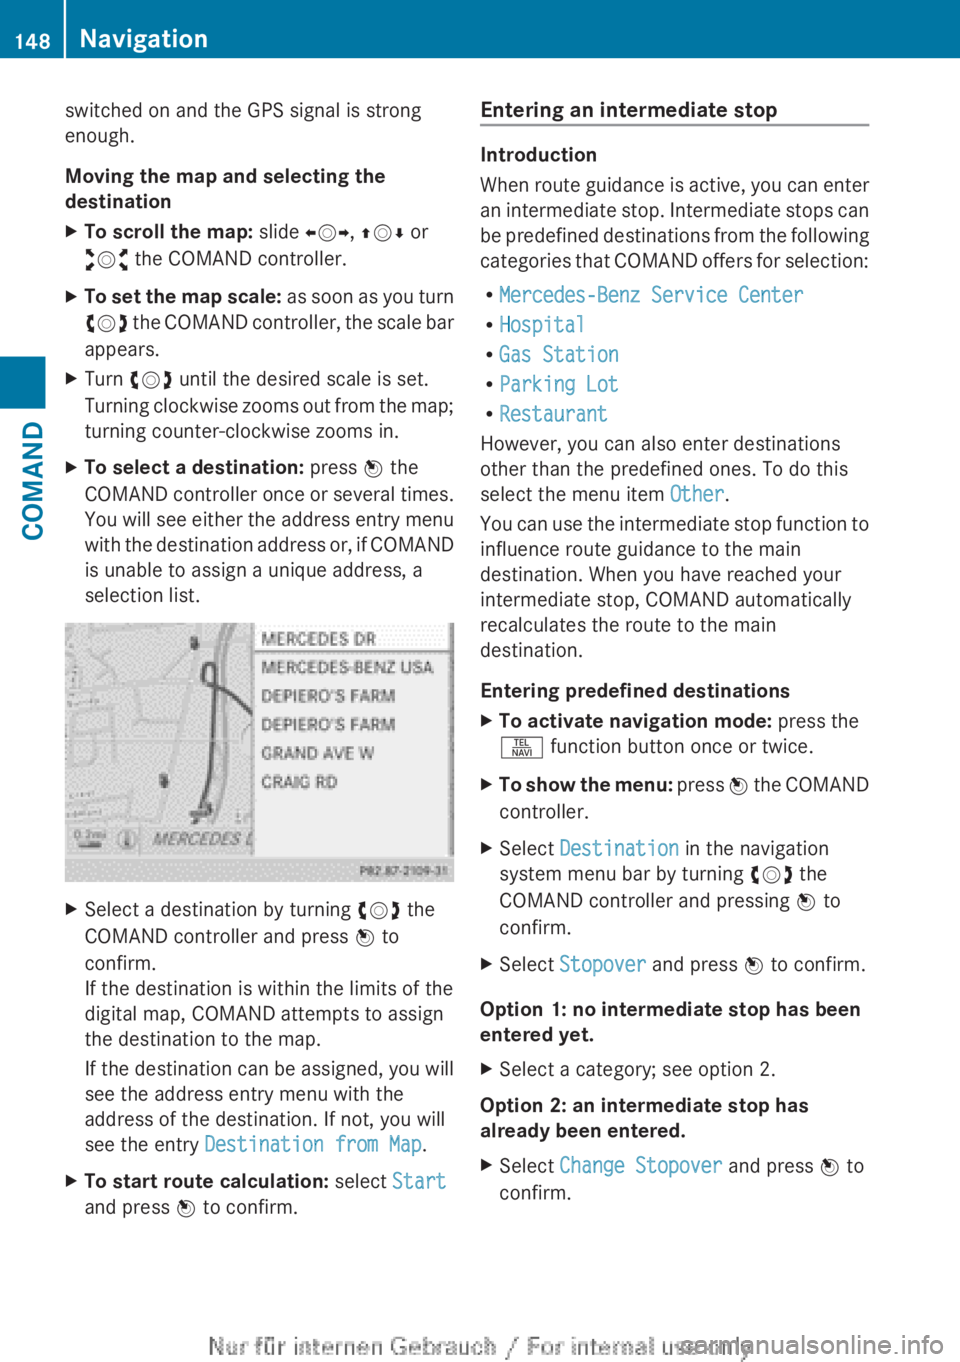
switched on and the GPS signal is strong
enough.
Moving the map and selecting the
destinationXTo scroll the map: slide XVY, ZV Æ or
aVb the COMAND controller.XTo set the map scale: as soon as you turn
cVd the COMAND controller, the scale bar
appears.XTurn cVd until the desired scale is set.
Turning clockwise zooms out from the map;
turning counter-clockwise zooms in.XTo select a destination: press W the
COMAND controller once or several times.
You will see either the address entry menu
with the destination address or, if COMAND
is unable to assign a unique address, a
selection list.XSelect a destination by turning cVd the
COMAND controller and press W to
confirm.
If the destination is within the limits of the
digital map, COMAND attempts to assign
the destination to the map.
If the destination can be assigned, you will
see the address entry menu with the
address of the destination. If not, you will
see the entry Destination from Map .XTo start route calculation: select Start
and press W to confirm.Entering an intermediate stop
Introduction
When route guidance is active, you can enter
an intermediate stop. Intermediate stops can
be predefined destinations from the following
categories that COMAND offers for selection:
R Mercedes-Benz Service Center
R Hospital
R Gas Station
R Parking Lot
R Restaurant
However, you can also enter destinations
other than the predefined ones. To do this
select the menu item Other.
You can use the intermediate stop function to
influence route guidance to the main
destination. When you have reached your
intermediate stop, COMAND automatically
recalculates the route to the main
destination.
Entering predefined destinations
XTo activate navigation mode: press the
S function button once or twice.XTo show the menu: press W the COMAND
controller.XSelect Destination in the navigation
system menu bar by turning cVd the
COMAND controller and pressing W to
confirm.XSelect Stopover and press W to confirm.
Option 1: no intermediate stop has been
entered yet.
XSelect a category; see option 2.
Option 2: an intermediate stop has
already been entered.
XSelect Change Stopover and press W to
confirm.148NavigationCOMAND
Page 161 of 496
Avoiding a section of the route blocked
by a traffic jam
This function blocks a section of the route
ahead of you. You can set the length of the
blocked route section. If possible, COMAND
calculates a detour around the blocked
section of the route.
XTo activate navigation mode: press the
S function button once or twice.XTo show the menu: press W the COMAND
controller.XSelect Route in the navigation system
menu bar by turning cVd the COMAND
controller and press W to confirm.XSelect Detour and press W to confirm.XTo block a section of the route: select
More or Less repeatedly and confirm using
W until the desired section has been
selected.
i The total length of the section that can be
blocked is defined by the digital map. The
menu items are available accordingly.
XTo start route calculation: select Start
and press W to confirm.XTo delete the blocked section: select
Delete while the message is shown and
press W to confirm.
COMAND calculates the route without the
block.
Selecting an alternative route
With the "Alternative route" function, routes
other than the original one can be calculated.
XTo activate navigation mode: press the
S function button once or twice.XTo show the menu: press W the COMAND
controller.XSelect Route in the navigation system
menu bar by turning cVd the COMAND
controller and press W to confirm.XSelect Alternative Route and press W
to confirm.
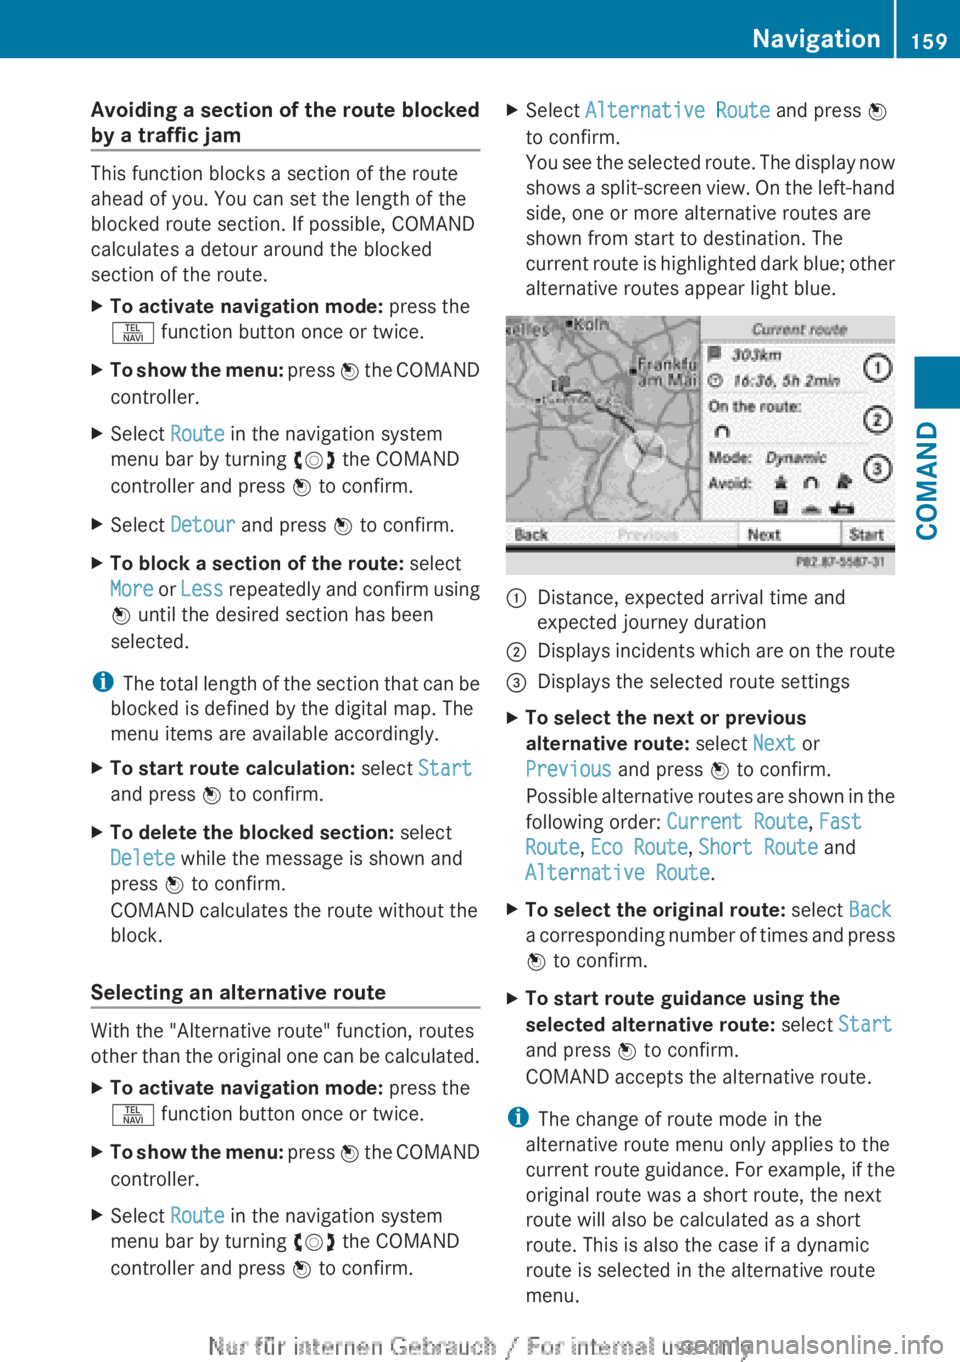
You see the selected route. The display now
shows a split-screen view. On the left-hand
side, one or more alternative routes are
shown from start to destination. The
current route is highlighted dark blue; other
alternative routes appear light blue.:Distance, expected arrival time and
expected journey duration;Displays incidents which are on the route=Displays the selected route settingsXTo select the next or previous
alternative route: select Next or
Previous and press W to confirm.
Possible alternative routes are shown in the
following order: Current Route, Fast
Route , Eco Route , Short Route and
Alternative Route .XTo select the original route: select Back
a corresponding number of times and press
W to confirm.XTo start route guidance using the
selected alternative route: select Start
and press W to confirm.
COMAND accepts the alternative route.
i The change of route mode in the
alternative route menu only applies to the
current route guidance. For example, if the
original route was a short route, the next
route will also be calculated as a short
route. This is also the case if a dynamic
route is selected in the alternative route
menu.
Navigation159COMANDZ
Page 166 of 496
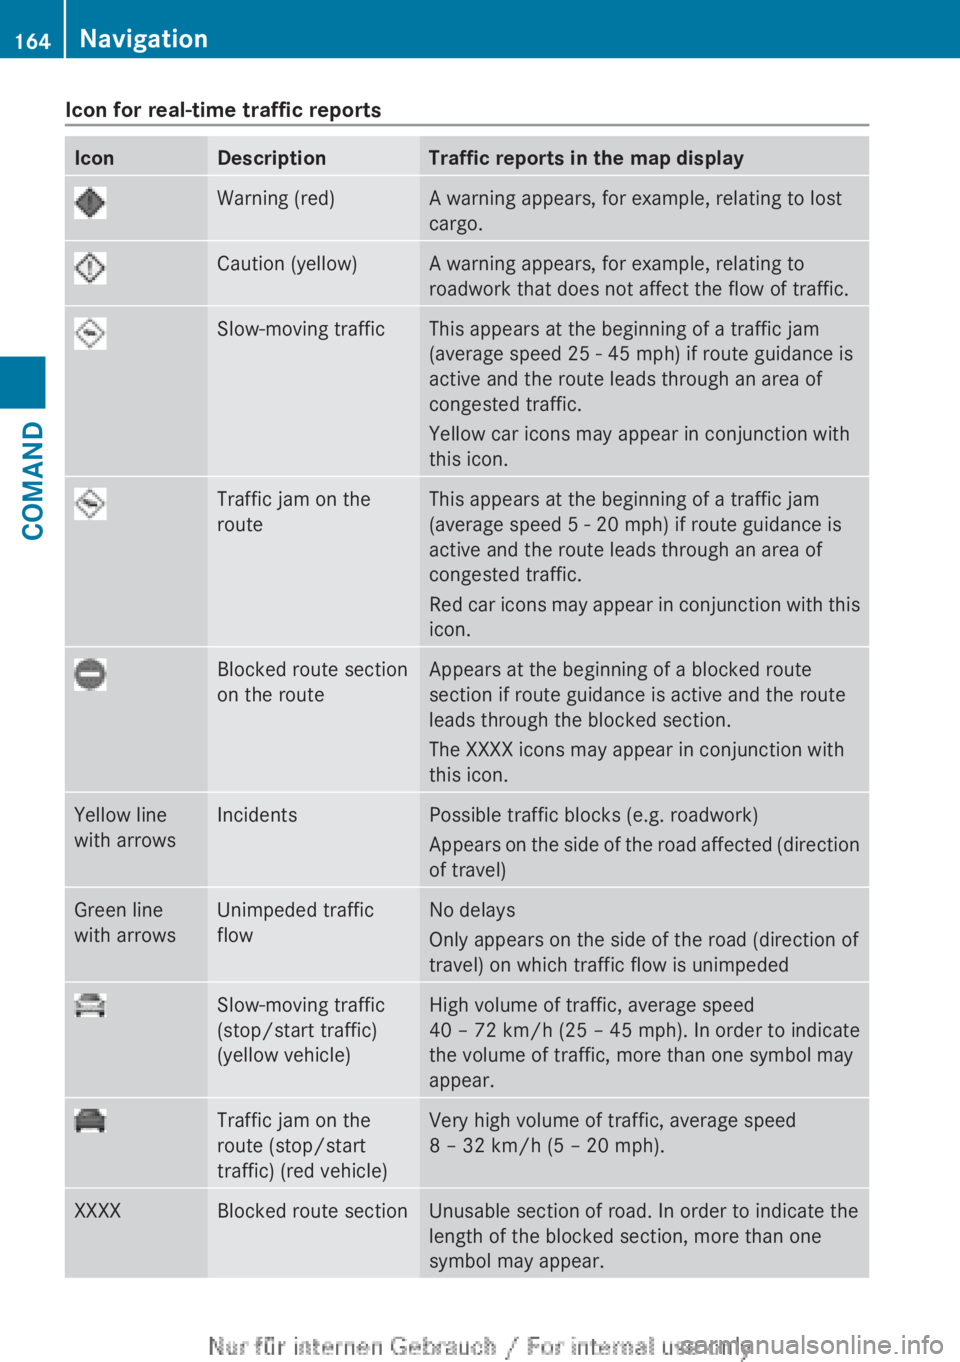
Icon for real-time traffic reportsIconDescriptionTraffic reports in the map displayWarning (red)A warning appears, for example, relating to lost
cargo.Caution (yellow)A warning appears, for example, relating to
roadwork that does not affect the flow of traffic.Slow-moving trafficThis appears at the beginning of a traffic jam
(average speed 25 - 45 mph) if route guidance is
active and the route leads through an area of
congested traffic.
Yellow car icons may appear in conjunction with
this icon.Traffic jam on the
routeThis appears at the beginning of a traffic jam
(average speed 5 - 20 mph) if route guidance is
active and the route leads through an area of
congested traffic.
Red car icons may appear in conjunction with this
icon.Blocked route section
on the routeAppears at the beginning of a blocked route
section if route guidance is active and the route
leads through the blocked section.
The XXXX icons may appear in conjunction with
this icon.Yellow line
with arrowsIncidentsPossible traffic blocks (e.g. roadwork)
Appears on the side of the road affected (direction
of travel)Green line
with arrowsUnimpeded traffic
flowNo delays
Only appears on the side of the road (direction of
travel) on which traffic flow is unimpededSlow-moving traffic
(stop/start traffic)
(yellow vehicle)High volume of traffic, average speed
40 – 72 km/h (25 – 45 mph). In order to indicate
the volume of traffic, more than one symbol may
appear.Traffic jam on the
route (stop/start
traffic) (red vehicle)Very high volume of traffic, average speed
8 – 32 km/h (5 – 20 mph).XXXXBlocked route sectionUnusable section of road. In order to indicate the
length of the blocked section, more than one
symbol may appear.164NavigationCOMAND
Page 184 of 496
Call disconnection while the vehicle is
in motion
A call may be disconnected if:
R there is insufficient network coverage in
certain areas.
R you move from one transmitter/receiver
area (cell) into another and no channels are
free.
R you use a SIM card which is not compatible
with the network available.
R you are using a mobile phone with
"Twincard" and the mobile phone with the
second SIM card is already logged into the
network.
Operating options
You can operate the telephone by:
R using the COMAND controller:
turn cVd .
slide XVY or ZV Æ.
press W.
R the 6 or ~ button on the telephone
keypad on the center console
R the 6 or ~ button on the
multifunction steering wheel
R using the Voice Control System (see the
separate Voice Control System operating
instructions)
Unless otherwise indicated, the descriptions
and illustrations in this section refer to
COMAND and the telephone keypad. This
also means that to carry out the functions
described here, you must always be in the
Telephone menu. The fastest way to access
the Telephone menu is to press the S
function button.
Function restrictions
You will not be able to use the telephone, will
no longer be able to use the telephone, or you
may have to wait before using it, in the
following situations:
R when the mobile phone is switched off
R when the "Bluetooth ®
" function is switched
off in COMAND
R when the "Bluetooth ®
" function is switched
off on the mobile phone
R if the mobile phone is not logged into a
mobile phone network
i The telephone automatically tries to log
on to a network. If no network is available,
you will not be able to make a " 911"
emergency call. If you attempt to make an
outgoing call, the NO SERVICE message will
appear for a short while.
R if you remove the SmartKey from the
ignition lock during an active conversation
in hands-free mode, the conversation may
be continued for up to 30 minutes. After
that time, it will be interrupted.
You can prevent this interruption by switching
to "private call" ("private mode") on the
mobile phone before deactivating COMAND
(see mobile phone operating instructions).
If you wish to switch off COMAND during an
active conversation in hands-free mode, the
following message will appear: You cannot
shut off COMAND until you have
finished your telephone call
911 emergency call
GWARNING
The 911 emergency call system is a public
service. Using it without due cause is a
criminal offense.
The following requirements must be fulfilled
for a 911 emergency call:
R the mobile phone must be switched on.
R a network must be available.
182TelephoneCOMAND