lock MERCEDES-BENZ CL CLASS 2013 Owners Manual
[x] Cancel search | Manufacturer: MERCEDES-BENZ, Model Year: 2013, Model line: CL CLASS, Model: MERCEDES-BENZ CL CLASS 2013Pages: 496, PDF Size: 7.5 MB
Page 289 of 496
! Do not use diesel to refuel vehicles with a
gasoline engine. Even small amounts of the
wrong fuel result in damage to the fuel
system and engine.
! Do not switch on the ignition if you
accidentally refuel with the wrong fuel.
Otherwise, the fuel will enter the fuel lines.
Notify a qualified specialist workshop and
have the fuel tank and fuel lines drained
completely.
! Overfilling the fuel tank could damage the
fuel system.
! Take care not to spill any fuel on painted
surfaces. You could otherwise damage the
paintwork.
! Use a filter when refueling from a fuel can.
Otherwise, the fuel lines and/or injection
system could be blocked by particles from
the fuel can.
Further information on fuel and on fuel grades
can be found in the "Fuel" section
( Y page 484).
Refueling
Fuel filler flap
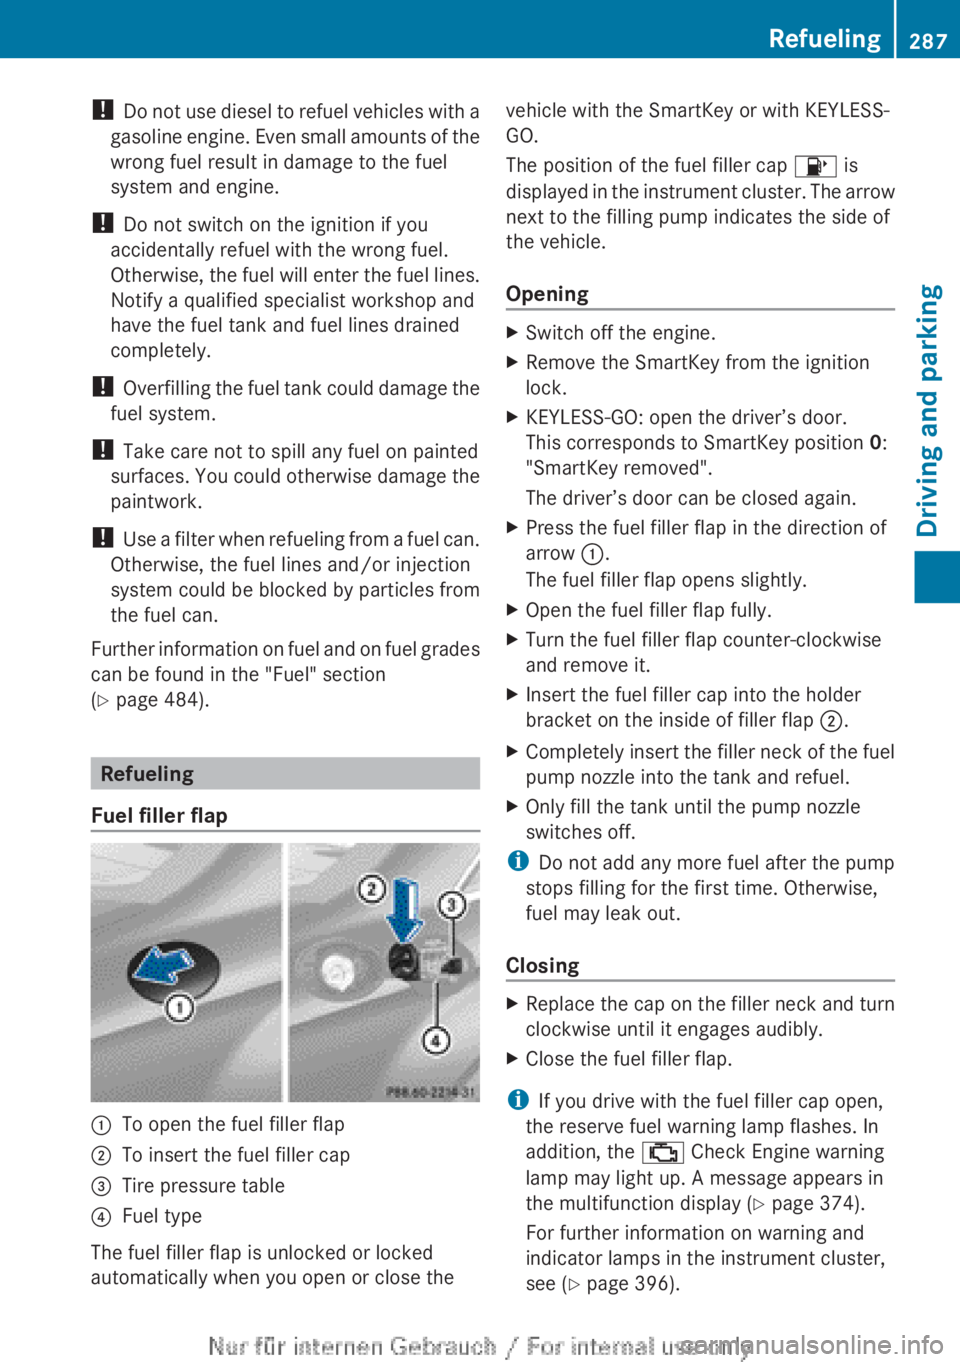
:To open the fuel filler flap;To insert the fuel filler cap=Tire pressure table?Fuel type
The fuel filler flap is unlocked or locked
automatically when you open or close the
vehicle with the SmartKey or with KEYLESS-
GO.
The position of the fuel filler cap 8 is
displayed in the instrument cluster. The arrow
next to the filling pump indicates the side of
the vehicle.
OpeningXSwitch off the engine.XRemove the SmartKey from the ignition
lock.XKEYLESS-GO: open the driver’s door.
This corresponds to SmartKey position 0:
"SmartKey removed".
The driver’s door can be closed again.XPress the fuel filler flap in the direction of
arrow :.
The fuel filler flap opens slightly.XOpen the fuel filler flap fully.XTurn the fuel filler flap counter-clockwise
and remove it.XInsert the fuel filler cap into the holder
bracket on the inside of filler flap ;.XCompletely insert the filler neck of the fuel
pump nozzle into the tank and refuel.XOnly fill the tank until the pump nozzle
switches off.
i Do not add any more fuel after the pump
stops filling for the first time. Otherwise,
fuel may leak out.
Closing
XReplace the cap on the filler neck and turn
clockwise until it engages audibly.XClose the fuel filler flap.
i If you drive with the fuel filler cap open,
the reserve fuel warning lamp flashes. In
addition, the ; Check Engine warning
lamp may light up. A message appears in
the multifunction display ( Y page 374).
For further information on warning and
indicator lamps in the instrument cluster,
see ( Y page 396).
Refueling287Driving and parkingZ
Page 290 of 496
iClose the fuel filler flap before locking the
vehicle. Otherwise, the locking pin of the
central locking prevents the fuel filler flap
from closing.288RefuelingDriving and parking
Page 291 of 496
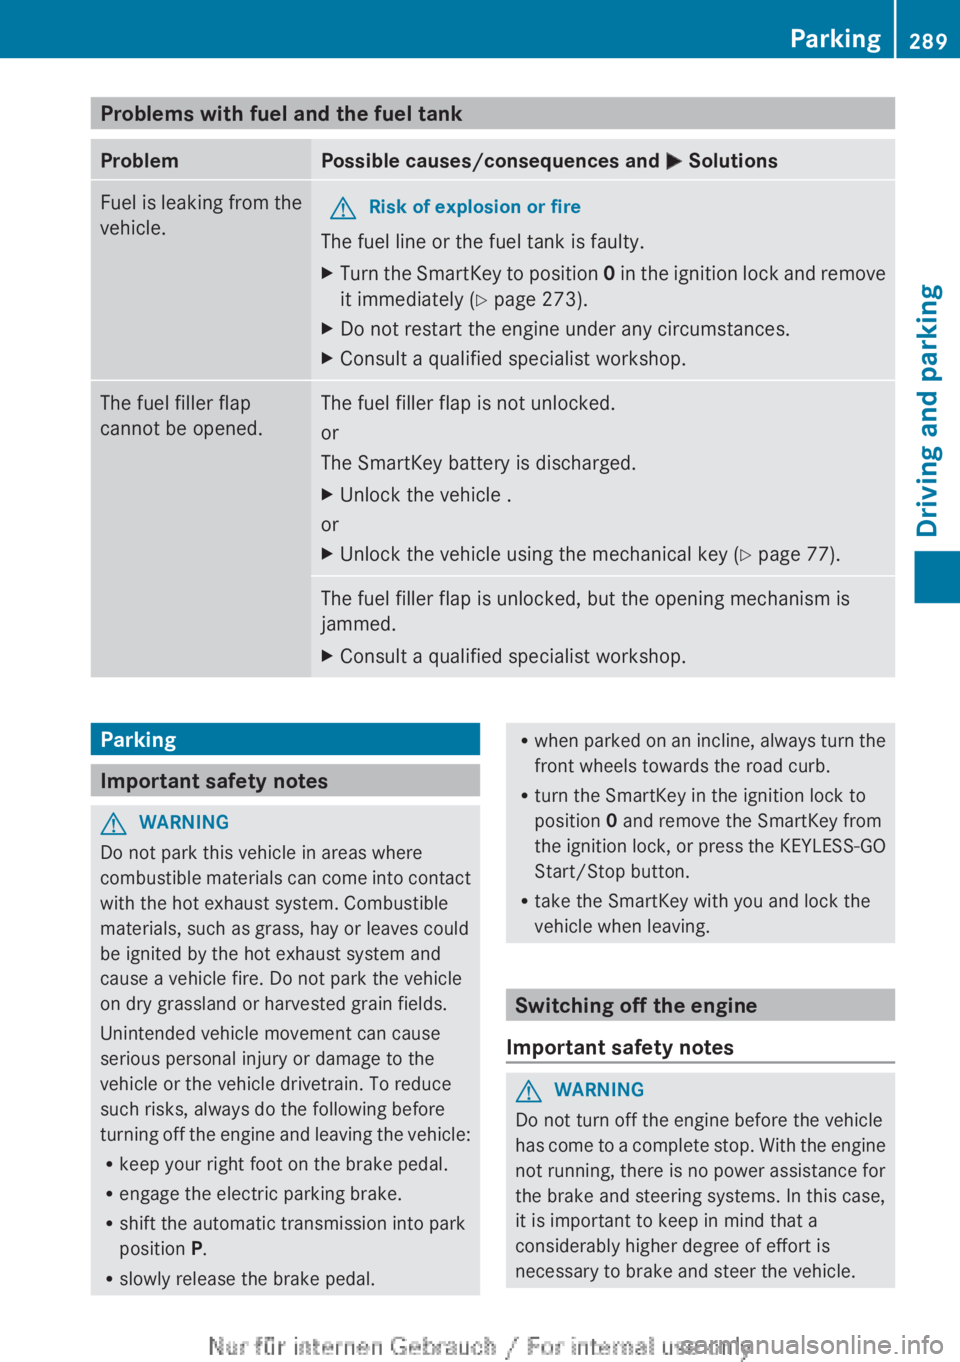
Problems with fuel and the fuel tankProblemPossible causes/consequences and M SolutionsFuel is leaking from the
vehicle.GRisk of explosion or fire
The fuel line or the fuel tank is faulty.
XTurn the SmartKey to position 0 in the ignition lock and remove
it immediately ( Y page 273).XDo not restart the engine under any circumstances.XConsult a qualified specialist workshop.The fuel filler flap
cannot be opened.The fuel filler flap is not unlocked.
or
The SmartKey battery is discharged.XUnlock the vehicle .
or
XUnlock the vehicle using the mechanical key ( Y page 77).The fuel filler flap is unlocked, but the opening mechanism is
jammed.XConsult a qualified specialist workshop.Parking
Important safety notes
GWARNING
Do not park this vehicle in areas where
combustible materials can come into contact
with the hot exhaust system. Combustible
materials, such as grass, hay or leaves could
be ignited by the hot exhaust system and
cause a vehicle fire. Do not park the vehicle
on dry grassland or harvested grain fields.
Unintended vehicle movement can cause
serious personal injury or damage to the
vehicle or the vehicle drivetrain. To reduce
such risks, always do the following before
turning off the engine and leaving the vehicle:
R keep your right foot on the brake pedal.
R engage the electric parking brake.
R shift the automatic transmission into park
position P.
R slowly release the brake pedal.
Rwhen parked on an incline, always turn the
front wheels towards the road curb.
R turn the SmartKey in the ignition lock to
position 0 and remove the SmartKey from
the ignition lock, or press the KEYLESS-GO
Start/Stop button.
R take the SmartKey with you and lock the
vehicle when leaving.
Switching off the engine
Important safety notes
GWARNING
Do not turn off the engine before the vehicle
has come to a complete stop. With the engine
not running, there is no power assistance for
the brake and steering systems. In this case,
it is important to keep in mind that a
considerably higher degree of effort is
necessary to brake and steer the vehicle.
Parking289Driving and parkingZ
Page 292 of 496
GWARNING
Keep in mind that turning off the engine alone
only will shift the automatic transmission into
neutral position N automatically.
Always shift the automatic transmission into
park position P before turning off the engine.
Otherwise the vehicle could roll away which
could result in an accident and/or serious
personal injury.
i If you cannot turn off the engine as
described here, see "Engine emergency
stop" ( Y page 451).
Vehicles with automatic transmission
XApply the electric parking brake.XShift the transmission to position P.
Using the SmartKey
XTurn the SmartKey to position 0 in the
ignition lock and remove it.
The immobilizer is activated.
i If you turn off the engine with the
SmartKey and then remove it from the
ignition lock or open a front door, the
automatic transmission shifts to P
automatically.
Using KEYLESS-GO
XPress the Start/Stop button (Y page 273).
The engine stops and all the indicator
lamps in the instrument cluster go out.
i When the driver's door is closed, this
corresponds to SmartKey position 1. When
the driver's door is open, it corresponds to
SmartKey position 0 or "SmartKey
removed".
i If you use the Start/Stop button to switch
off the engine, the automatic transmission
shifts to N automatically. If you then open
the driver's or front-passenger door, the
automatic transmission shifts to P.
i In an emergency, the engine can be
turned off while the vehicle is in motion by
pressing and holding the Start/Stop button
for 3 seconds. This function operates
independently from the ECO start/stop
automatic engine switch-off function.
Electric parking brake
General notes
GWARNING
When leaving the vehicle, always remove the
SmartKey from the starter switch, take it with
you, and lock the vehicle. Do not leave
children unattended in the vehicle, or with
access to an unlocked vehicle. Children could
release the parking brake and/or shift the
automatic transmission out of park position
P , either of which could result in an accident
and/or serious personal injury.
Applying/releasing manually
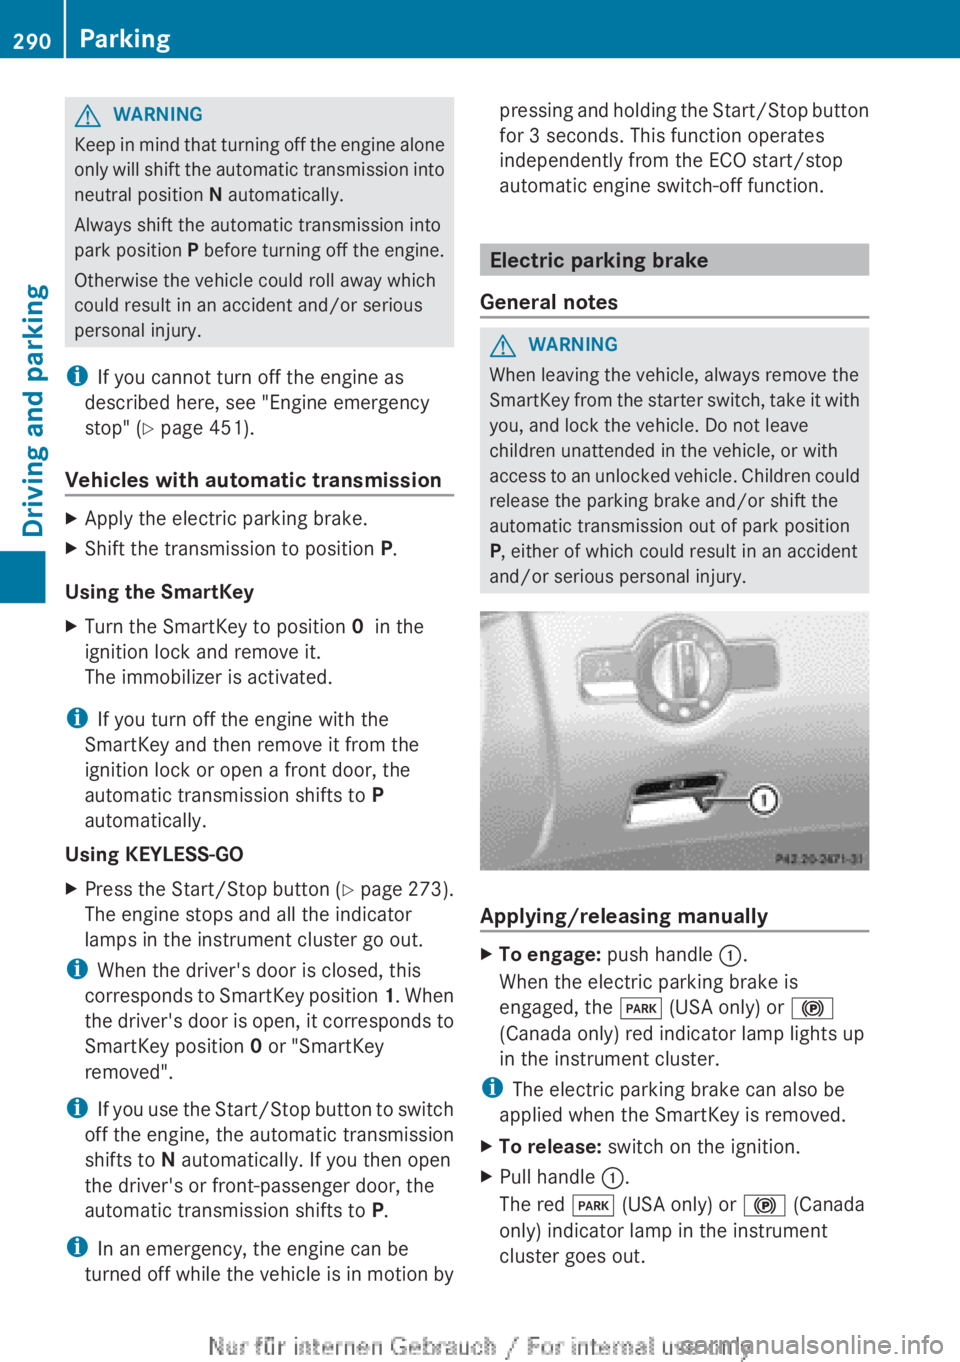
XTo engage: push handle :.
When the electric parking brake is
engaged, the F (USA only) or !
(Canada only) red indicator lamp lights up
in the instrument cluster.
i The electric parking brake can also be
applied when the SmartKey is removed.
XTo release: switch on the ignition.XPull handle :.
The red F (USA only) or ! (Canada
only) indicator lamp in the instrument
cluster goes out.290ParkingDriving and parking
Page 293 of 496
iThe electric parking brake can only be
released:
R if the SmartKey is in position 1 in the
ignition lock or
R if the ignition was switched on using the
Start/Stop button.
Engaging the electric parking brake
automatically
If the HOLD function or DISTRONIC PLUS
brake the vehicle until it is stationary, the
electric parking brake is automatically
applied. Additionally, at least one of the
following conditions must be fulfilled:
R the engine is switched off.
R the driver's door is open and the seat belt
is not fastened.
R the hood is released.
R the trunk lid is opened while the automatic
transmission is in position R.
R the vehicle is stationary for a lengthy
period.
The red F (USA only) or ! (Canada
only) indicator lamp in the instrument cluster
lights up.
i In addition to the electric parking brake,
P may also be engaged automatically.
Releasing the electric parking brake
automatically
The electric parking brake is released
automatically when the following conditions
are simultaneously fulfilled:
R the engine is running.
R the automatic transmission is in position
D or R.
R the hood is closed.
R your seat belt is fastened.
R you accelerate.
If the automatic transmission is in position
R , the trunk lid must be closed.
If your seat belt is not fastened, the following
conditions must be fulfilled to automatically
release the electric parking brake:
R the driver's door is closed.
R you have shifted out of P or you have
previously driven faster than 3 km/h.
R you have shifted out of P or you have
previously driven faster than 2 mph
(3 km/h).
Emergency braking
The vehicle can also be braked during an
emergency by using the electric parking
brake.
XWhile driving, push handle : of the electric
parking brake ( Y page 290).
i
The vehicle is braked as long as you keep
the handle of the electric parking brake
pressed. The longer the electric parking
brake handle is depressed, the greater the
braking force.
During braking:
R a warning tone sounds.
R the Please Release Parking Brake
message appears
R the red F (USA only) or ! (Canada
only) indicator lamp in the instrument
cluster appears.
When the vehicle has been braked to a
standstill, the electric parking brake is
engaged.
Parking the vehicle for a long period
If you leave the vehicle parked for longer than
four weeks, the battery may be damaged by
exhaustive discharging.
XConnecting a trickle charger.
i You can obtain information about trickle
chargers from a qualified specialist
workshop.
Parking291Driving and parkingZ
Page 296 of 496
more firmly. Maintain a safe distance from
vehicles in front.
After driving on a wet road or having the
vehicle washed, brake firmly while paying
attention to the traffic conditions. This will
warm up the brake discs, thereby drying them
more quickly and protecting them against
corrosion.
Limited braking performance on salt-
treated roadsGWARNING
The layer of salt on the brake discs and the
brake pads/linings may cause a delay in the
braking effect, resulting in a significantly
longer braking distance, which could lead to
an accident.
To avoid this danger, you should:
R occasionally brake carefully, without
putting other road users at risk, when you
are driving on salted roads. This helps to
remove any salt that may have started to
build up on the brake discs and the brake
pads/linings.
R maintain a greater distance to the vehicle
ahead and drive with particular care.
R carefully apply the brakes at the end of a
trip and immediately after commencing a
new trip, so that salt residues are removed
from the brake discs.
Servicing the brakes
! If the red brake warning lamp lights up in
the instrument cluster and you hear a
warning tone while the engine is running,
the brake fluid level may be too low.
Observe additional warning messages in
the multifunction display.
The brake fluid level may be too low due to
brake pad wear or leaking brake lines.
Have the brake system checked
immediately. This work should be carried
out at a qualified specialist workshop.
All checks and maintenance work on the
brake system must be carried out at a
qualified specialist workshop. Consult a
qualified specialist workshop to arrange this.
Have brake pads installed and brake fluid
replaced at a qualified specialist workshop.GWARNING
If brake pads or brake fluid other than those
recommended are used, the braking
properties of the vehicle can be degraded to
an extent that safe braking is substantially
impaired. This could result in an accident.
! Vehicles with 4MATIC: function or
performance tests may only be carried out
on a 2-axle dynamometer. If you are
planning to have the vehicle tested on such
a dynamometer, contact an authorized
Mercedes-Benz Center to obtain further
information first. Otherwise, you could
damage the drive train or the brake system.
! Vehicles with 4MATIC: as the ESP®
system operates automatically, the engine
and the ignition must be switched off
(SmartKey in position 0 or 1 in the ignition
lock or Start/Stop button in position 0 or
1 ) when the electric parking brake is being
tested on a brake dynamometer.
Braking maneuvers triggered automatically
by ESP ®
may seriously damage the brake
system.
! Vehicles with 4MATIC: as the ESP®
system operates automatically, the engine
and the ignition system must be switched
off (SmartKey in position 0 or 1 in the
ignition lock or Start/Stop button in
position 0 or 1) when:
R testing the electric parking brake on a
brake dynamometer.
R you intend to have the vehicle towed with
one of the axles raised.
Braking maneuvers triggered automatically
by ESP ®
may seriously damage the brake
system.
294Driving tipsDriving and parking
Page 300 of 496
of the vehicle could cause an accident and/
or serious injury to you and others.XPress the cruise control lever up : for a
higher speed or down ; for a lower speed.XTo adjust the speed in 1 mph
increments (1 km/h increments): briefly
press the cruise control lever up : or
down ; to the pressure point.
The last speed stored is increased or
decreased every time the cruise control
lever is pushed up : or down ;.XTo adjust the speed in 5 mph
increments (10 km/h increments):
briefly press the cruise control lever
up : or down ; beyond the pressure
point.
The last speed stored is increased or
decreased every time the cruise control
lever is pushed up : or down ;.
i
Cruise control is not deactivated if you
depress the accelerator pedal. For
example, if you accelerate briefly to
overtake, cruise control adjusts the
vehicle's speed to the last speed stored
after you have finished overtaking.
Deactivating cruise control
There are several ways to deactivate cruise
control:
XBriefly press the cruise control lever
forwards =.
or
XBrake.
Cruise control is automatically deactivated if:
R you engage the electric parking brake.
R you are driving at less than 20 mph
(30 km/h)
R ESP ®
intervenes or you deactivate ESP ®
.
R you shift the transmission to position N
while driving.
If cruise control is deactivated, you will hear
a warning tone. You will see the Cruise
Control Off message in the multifunction
display for approximately five seconds.
i When you switch off the engine, the last
speed stored is cleared.
DISTRONIC PLUS
Important safety notes
DISTRONIC PLUS regulates the speed and
automatically helps you maintain the
distance to the vehicle detected in front.
DISTRONIC PLUS brakes automatically so
that the set speed is not exceeded.
On long and steep downhill gradients,
especially if the vehicle is laden, you must
select shift range 1, 2 or 3 in good time. By
doing so, you will make use of the braking
effect of the engine. This relieves the load on
the brake system and prevents the brakes
from overheating and wearing too quickly.
If DISTRONIC PLUS detects a slower-moving
vehicle in front, your vehicle is braked in order
to maintain the preset distance to the vehicle
in front.
GWARNING
The DISTRONIC PLUS requires familiarity with
its operational characteristics. We strongly
recommend that you review the following
information carefully before operating the
system.
GWARNING
When DISTRONIC brakes, the brake pedal is
pulled back (i.e. operated automatically). The
area around the pedal must not be blocked by
obstacles:
R do not place any objects in the footwell.
R ensure that floormats and carpets are fixed
securely. In particular, do not place several
floormats on top of one another.
R do not place your foot under the brake
pedal, as it could become trapped.
298Driving systemsDriving and parking
Page 311 of 496
AIRMATIC
Vehicle level
Important safety notes
Your vehicle regulates its height
automatically. All-round level control ensures
the best possible suspension and constant
ground clearance, even with a laden vehicle.
When you drive fast, the vehicle is lowered
automatically to improve driving safety and to
reduce fuel consumption.
The following vehicle levels are possible:
R Normal
R raised: the vehicle is raised by about
1.20 in (30 mm) when compared with the
normal level
R lowered: the vehicle is lowered by about
0.40 in (10 mm) when compared with the
normal level
The "Normal" and "Raised" vehicle levels can
be set manually.
The "Lowered" vehicle level is set
automatically at speeds over 60 mph
(100 km/h).
Setting the vehicle level
Select the "Normal" setting for normal road
surfaces and "Raised" for driving with snow
chains or on particularly poor road surfaces.
Your selection remains stored even if you
remove the SmartKey from the ignition lock.
GWARNING
To help avoid personal injury, keep hands and
feet away from wheel housing area, and stay
away from under the vehicle when lowering
the vehicle chassis.
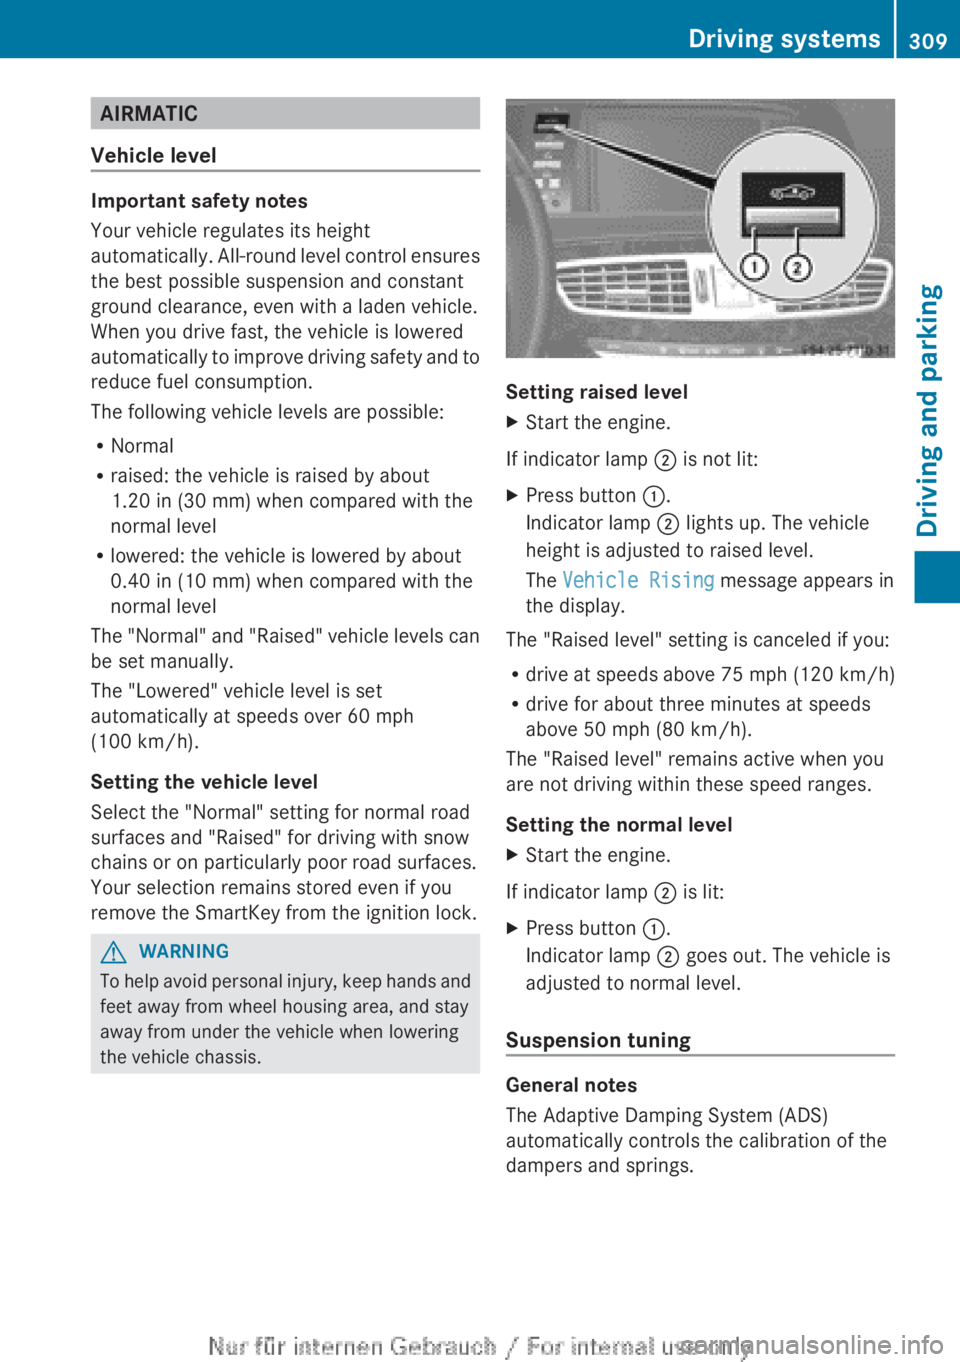
Setting raised level
XStart the engine.
If indicator lamp ; is not lit:
XPress button :.
Indicator lamp ; lights up. The vehicle
height is adjusted to raised level.
The Vehicle Rising message appears in
the display.
The "Raised level" setting is canceled if you:
R drive at speeds above 75 mph (120 km/h)
R drive for about three minutes at speeds
above 50 mph (80 km/h).
The "Raised level" remains active when you
are not driving within these speed ranges.
Setting the normal level
XStart the engine.
If indicator lamp ; is lit:
XPress button :.
Indicator lamp ; goes out. The vehicle is
adjusted to normal level.
Suspension tuning
General notes
The Adaptive Damping System (ADS)
automatically controls the calibration of the
dampers and springs.
Driving systems309Driving and parkingZ
Page 312 of 496
The damping is tuned individually to each
wheel and depends on:
R your driving style, e.g. sporty
R the road surface condition, e.g. bumps
R your individual selection, i.e. sports or
comfort
Your selection remains stored even if you
remove the SmartKey from the ignition lock.
Sports tuning
The firmer suspension tuning in Sport mode
ensures even better contact with the road.
Select this mode when employing a sporty
driving style, e.g. on winding country roads.
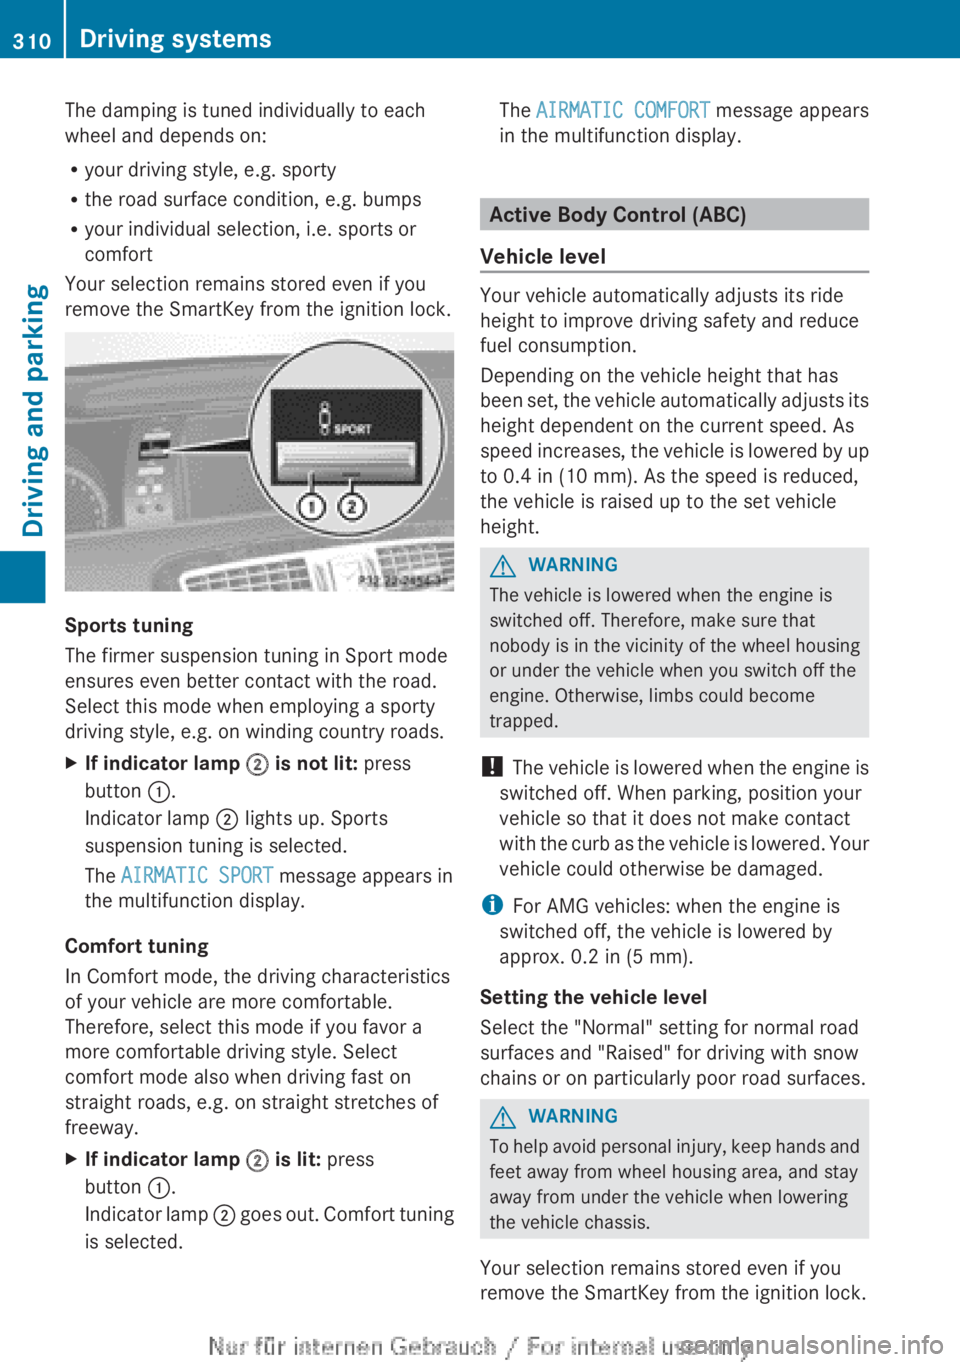
XIf indicator lamp ; is not lit: press
button :.
Indicator lamp ; lights up. Sports
suspension tuning is selected.
The AIRMATIC SPORT message appears in
the multifunction display.
Comfort tuning
In Comfort mode, the driving characteristics
of your vehicle are more comfortable.
Therefore, select this mode if you favor a
more comfortable driving style. Select
comfort mode also when driving fast on
straight roads, e.g. on straight stretches of
freeway.
XIf indicator lamp ; is lit: press
button :.
Indicator lamp ; goes out. Comfort tuning
is selected.The AIRMATIC COMFORT message appears
in the multifunction display.
Active Body Control (ABC)
Vehicle level
Your vehicle automatically adjusts its ride
height to improve driving safety and reduce
fuel consumption.
Depending on the vehicle height that has
been set, the vehicle automatically adjusts its
height dependent on the current speed. As
speed increases, the vehicle is lowered by up
to 0.4 in (10 mm). As the speed is reduced,
the vehicle is raised up to the set vehicle
height.
GWARNING
The vehicle is lowered when the engine is
switched off. Therefore, make sure that
nobody is in the vicinity of the wheel housing
or under the vehicle when you switch off the
engine. Otherwise, limbs could become
trapped.
! The vehicle is lowered when the engine is
switched off. When parking, position your
vehicle so that it does not make contact
with the curb as the vehicle is lowered. Your
vehicle could otherwise be damaged.
i For AMG vehicles: when the engine is
switched off, the vehicle is lowered by
approx. 0.2 in (5 mm).
Setting the vehicle level
Select the "Normal" setting for normal road
surfaces and "Raised" for driving with snow
chains or on particularly poor road surfaces.
GWARNING
To help avoid personal injury, keep hands and
feet away from wheel housing area, and stay
away from under the vehicle when lowering
the vehicle chassis.
Your selection remains stored even if you
remove the SmartKey from the ignition lock.
310Driving systemsDriving and parking
Page 313 of 496
Setting raised level
XStart the engine.
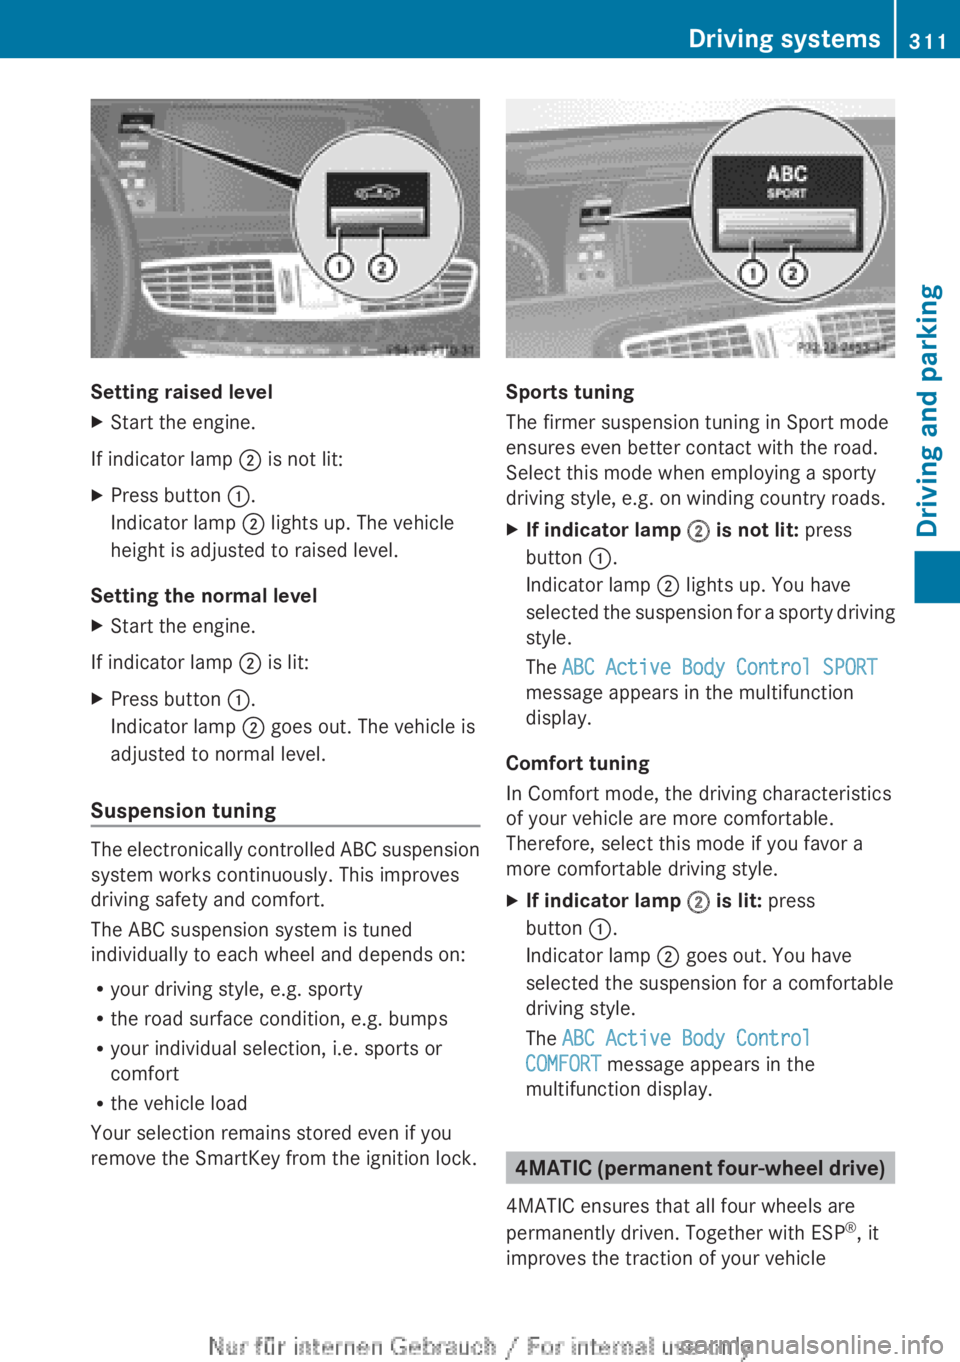
If indicator lamp ; is not lit:
XPress button :.
Indicator lamp ; lights up. The vehicle
height is adjusted to raised level.
Setting the normal level
XStart the engine.
If indicator lamp ; is lit:
XPress button :.
Indicator lamp ; goes out. The vehicle is
adjusted to normal level.
Suspension tuning
The electronically controlled ABC suspension
system works continuously. This improves
driving safety and comfort.
The ABC suspension system is tuned
individually to each wheel and depends on:
R your driving style, e.g. sporty
R the road surface condition, e.g. bumps
R your individual selection, i.e. sports or
comfort
R the vehicle load
Your selection remains stored even if you
remove the SmartKey from the ignition lock.
Sports tuning
The firmer suspension tuning in Sport mode
ensures even better contact with the road.
Select this mode when employing a sporty
driving style, e.g. on winding country roads.
XIf indicator lamp ; is not lit: press
button :.
Indicator lamp ; lights up. You have
selected the suspension for a sporty driving
style.
The ABC Active Body Control SPORT
message appears in the multifunction
display.
Comfort tuning
In Comfort mode, the driving characteristics
of your vehicle are more comfortable.
Therefore, select this mode if you favor a
more comfortable driving style.
XIf indicator lamp ; is lit: press
button :.
Indicator lamp ; goes out. You have
selected the suspension for a comfortable
driving style.
The ABC Active Body Control
COMFORT message appears in the
multifunction display.
4MATIC (permanent four-wheel drive)
4MATIC ensures that all four wheels are
permanently driven. Together with ESP ®
, it
improves the traction of your vehicle
Driving systems311Driving and parkingZ