lock MERCEDES-BENZ CL CLASS 2013 Repair Manual
[x] Cancel search | Manufacturer: MERCEDES-BENZ, Model Year: 2013, Model line: CL CLASS, Model: MERCEDES-BENZ CL CLASS 2013Pages: 496, PDF Size: 7.5 MB
Page 207 of 496
Displaying program informationXSelect Audio in the main function bar by
sliding ZV and turning cVd the COMAND
controller and press W to confirm.XSelect Audio by sliding ZV the COMAND
controller and pressing W to confirm.
The audio menu appears.XSelect HD Radio by sliding ZV the
COMAND controller and press W to
confirm.XSelect Info in the HD Radio display by
sliding ZV the COMAND controller and
press W to confirm.
Information on the currently selected
station is displayed. The contents and
purpose of the information depend on the
HD Radio station.
Satellite radio
Important notes
This section provides detailed information on
the following topics:
R selecting a channel and program category
R memory functions
R sound settings
i The satellite radio mode described below
requires optionally available satellite radio
equipment and registration with a satellite
radio provider.
i Note that the categories and channels
shown in the illustrations depend on the
program content offered by the provider.
The program contents may vary. The
illustrations and descriptions in these
operating instructions may therefore differ
from the channels and categories offered
by the provider.
Satellite radio mode may be temporarily
unavailable or interrupted for a variety of
reasons. These reasons include
environmental or topographical conditions
as well as other issues beyond the control
of Mercedes-Benz USA, LLC. Operation
may also be impaired in certain locations
(e.g. tunnels, multi-storey car parks or
within as well as close to buildings).
i SIRIUS XM Radio offers more than 130
digital-quality radio channels providing
100% commercial-free music, sport, news
and entertainment.
SIRIUS XM Radio employs a fleet of high-
performance satellites to broadcast around
the clock throughout the USA and Canada.
The satellite radio program is available for
a monthly fee. Details are available from
the SIRIUS XM Service Center and at
http://www.sirius.com (USA) or
http://www.siriuscanada.com
(Canada).
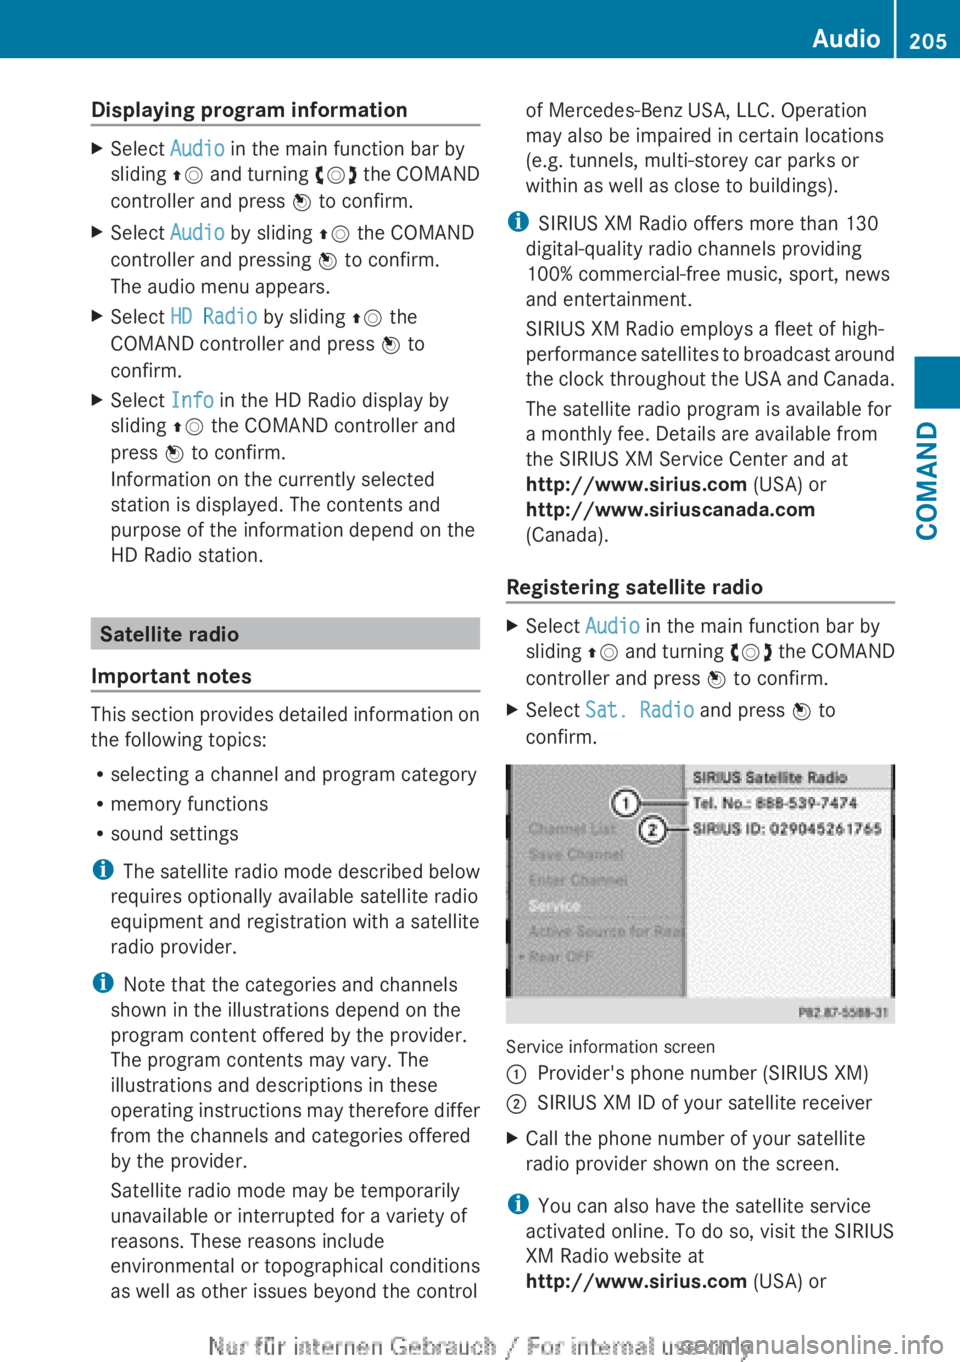
Registering satellite radioXSelect Audio in the main function bar by
sliding ZV and turning cVd the COMAND
controller and press W to confirm.XSelect Sat. Radio and press W to
confirm.
Service information screen
1Provider's phone number (SIRIUS XM)2SIRIUS XM ID of your satellite receiverXCall the phone number of your satellite
radio provider shown on the screen.
i You can also have the satellite service
activated online. To do so, visit the SIRIUS
XM Radio website at
http://www.sirius.com (USA) or
Audio205COMANDZ
Page 232 of 496
authorized Mercedes-Benz Center. This will
allow you to play video DVDs with a
different region code, provided that they
are produced in accordance with the PAL
or NTSC standard. The region code can be
changed up to five times.
Function restrictions
Depending on the DVD, it is possible that
certain functions or actions will be
temporarily blocked or may not function at all.
As soon as you try to activate these functions
or actions, you will see the K symbol in the
display.
Inserting and removing DVDs
XProceed as described in the "Inserting and
ejecting CDs and DVDs" section
( Y page 209).
Activating video DVD mode
Option 1
XInsert a video DVD.
COMAND loads the medium inserted and
starts to play it.
Option 2
XSelect Video in the main function bar by
sliding ZV and turning cVd the COMAND
controller and press W to confirm.
Video DVD mode is switched on.
Hiding/showing the navigation menu
XTo show: turn cVd or slide ZVÆ the
COMAND controller.
i This function is not available while the
DVD's own menu ( Y page 232) is being
displayed.
XTo hide: slide ZVÆ the COMAND
controller.
or
XWait for approximately eight seconds.
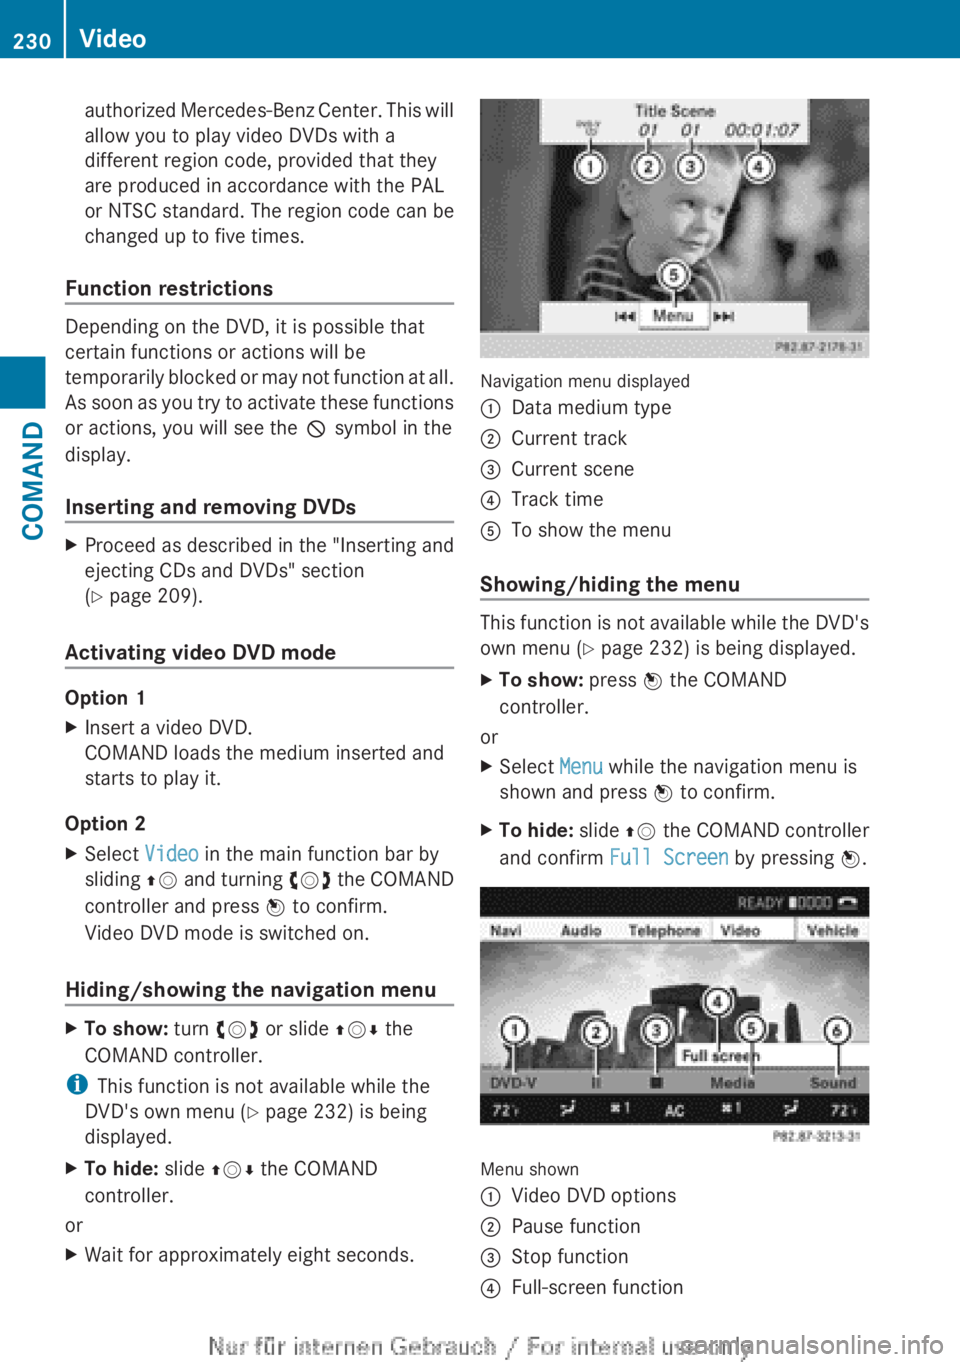
Navigation menu displayed
:Data medium type;Current track=Current scene?Track timeATo show the menu
Showing/hiding the menu
This function is not available while the DVD's
own menu ( Y page 232) is being displayed.
XTo show: press W the COMAND
controller.
or
XSelect Menu while the navigation menu is
shown and press W to confirm.XTo hide: slide ZV the COMAND controller
and confirm Full Screen by pressing W.
Menu shown
:Video DVD options;Pause function=Stop function?Full-screen function230VideoCOMAND
Page 237 of 496
gradually. This enables you to determine
whether the system is able to play the
music at high volume without distorting it.
Vehicle
Vehicle functions
General information
In this menu, you can set the following vehicle
functions:
R ECO
R multicontour seat settings
R rear window blind
R EASY-ENTRY/EXIT feature
R exterior lighting delayed switch-off
R interior lighting delayed switch-off
R ambient lighting
R automatic folding mirror function
R locator lighting
R automatic locking feature
R trunk lid opening height restriction
You can open the "Vehicle" menu in one of
two ways.
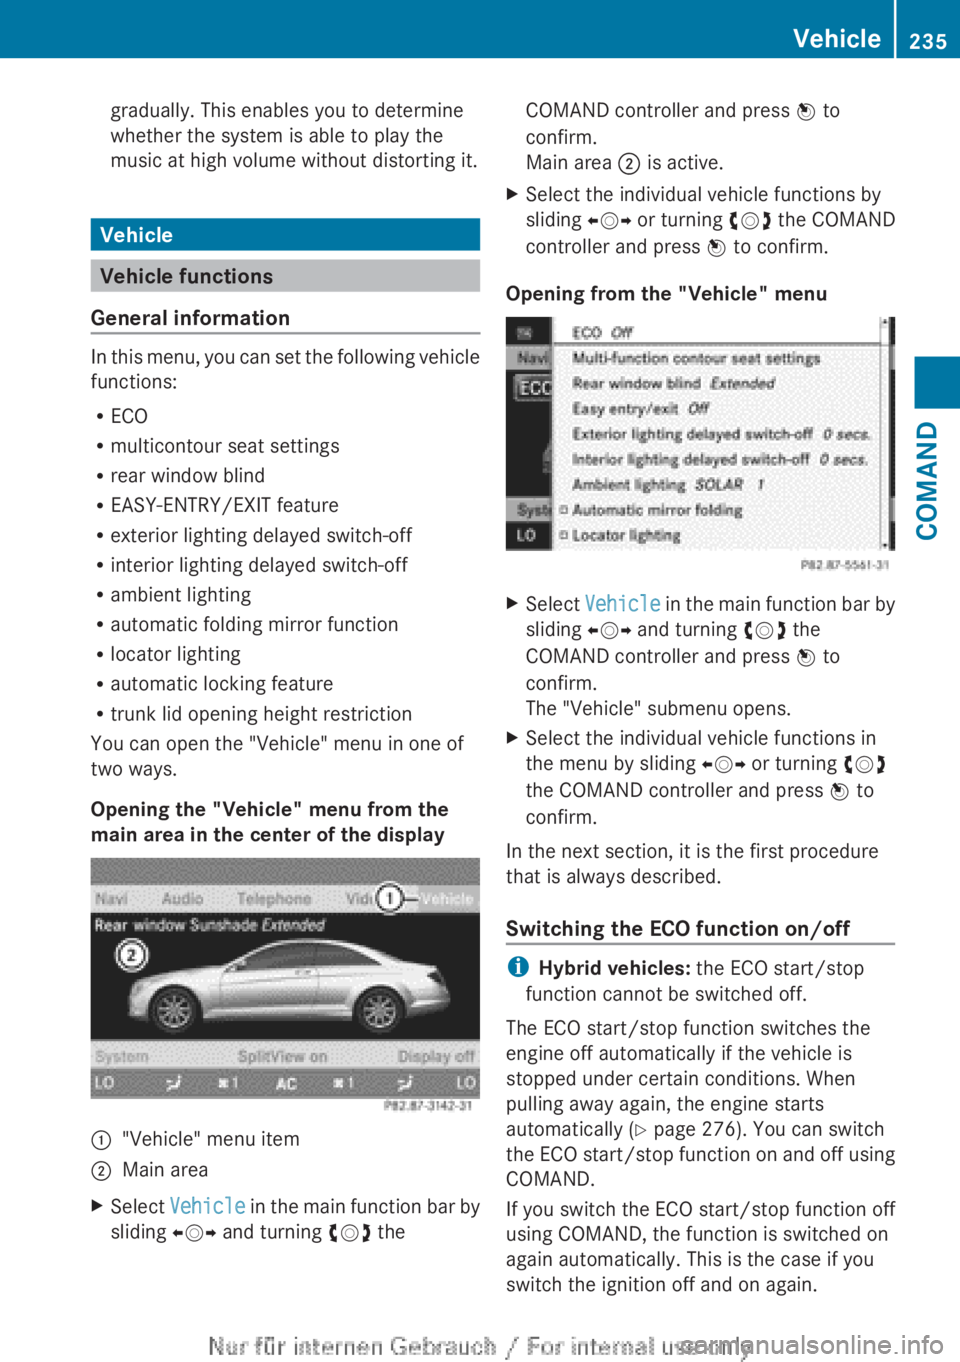
Opening the "Vehicle" menu from the
main area in the center of the display
:"Vehicle" menu item;Main areaXSelect Vehicle in the main function bar by
sliding XVY and turning cVd theCOMAND controller and press W to
confirm.
Main area ; is active.XSelect the individual vehicle functions by
sliding XVY or turning cVd the COMAND
controller and press W to confirm.
Opening from the "Vehicle" menu
XSelect Vehicle in the main function bar by
sliding XVY and turning cVd the
COMAND controller and press W to
confirm.
The "Vehicle" submenu opens.XSelect the individual vehicle functions in
the menu by sliding XVY or turning cVd
the COMAND controller and press W to
confirm.
In the next section, it is the first procedure
that is always described.
Switching the ECO function on/off
i Hybrid vehicles: the ECO start/stop
function cannot be switched off.
The ECO start/stop function switches the
engine off automatically if the vehicle is
stopped under certain conditions. When
pulling away again, the engine starts
automatically ( Y page 276). You can switch
the ECO start/stop function on and off using
COMAND.
If you switch the ECO start/stop function off
using COMAND, the function is switched on
again automatically. This is the case if you
switch the ignition off and on again.
Vehicle235COMANDZ
Page 238 of 496
XTo switch the ECO start/stop function
on/off: select Vehicle in the main
function bar by sliding XVY and turning
cVd the COMAND controller and press
W to confirm.
The main area is active.XSelect the ECO function by sliding XVY or
turning cVd the COMAND controller and
press W to confirm.
The ECO start/stop function is switched on
and off alternately.
Extending/retracting the rear window
blind
! Make sure that the rear window blind can
move freely. Otherwise, the blind or other
objects could be damaged.
i The rear window blind is deactivated at
temperatures below -20 †.
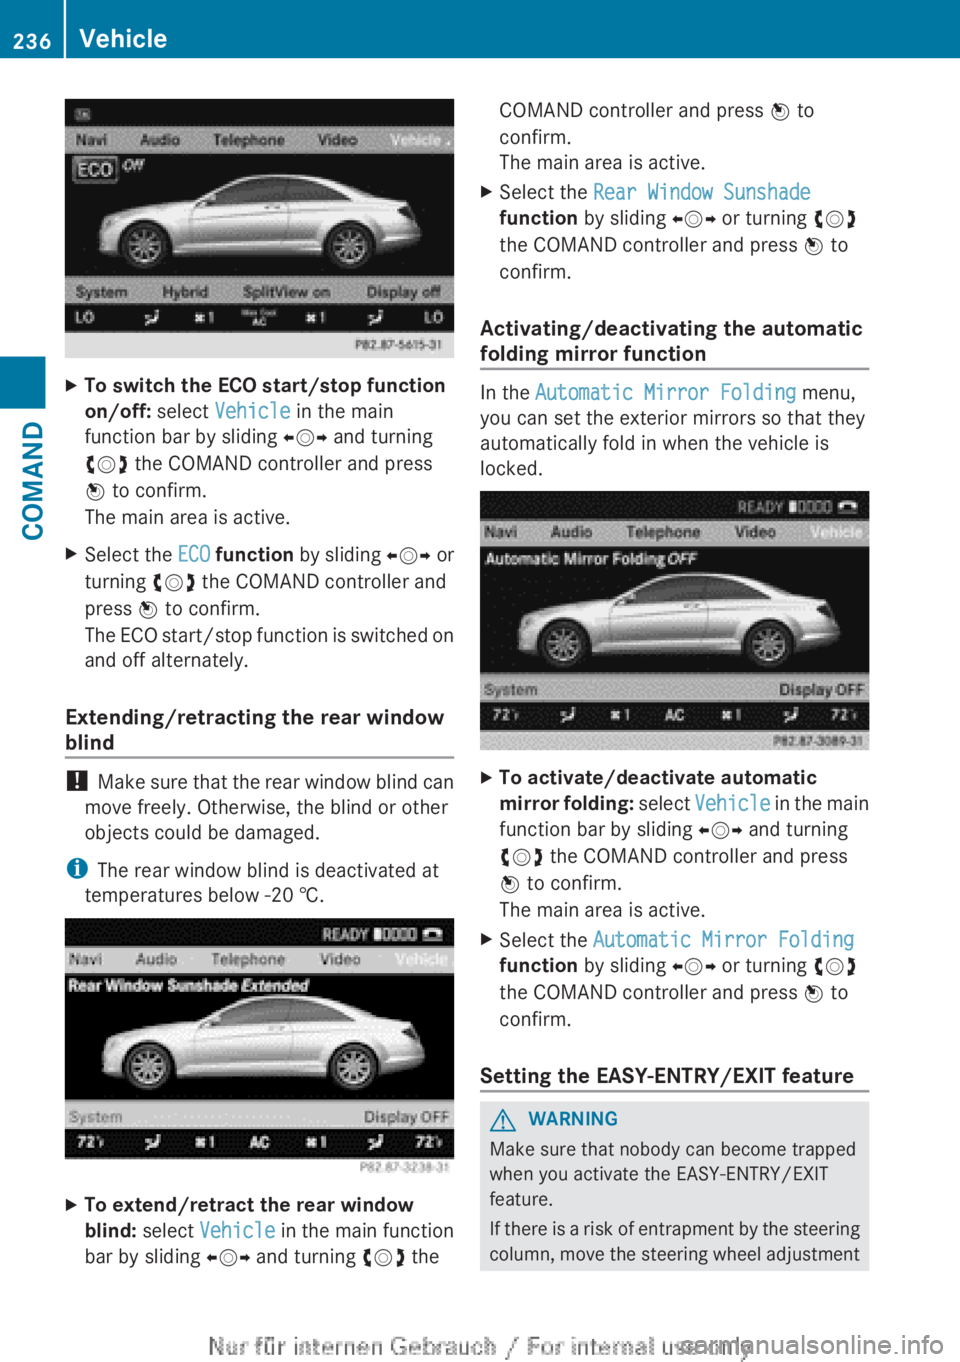
XTo extend/retract the rear window
blind: select Vehicle in the main function
bar by sliding XVY and turning cVd theCOMAND controller and press W to
confirm.
The main area is active.XSelect the Rear Window Sunshade
function by sliding XVY or turning cVd
the COMAND controller and press W to
confirm.
Activating/deactivating the automatic
folding mirror function
In the Automatic Mirror Folding menu,
you can set the exterior mirrors so that they
automatically fold in when the vehicle is
locked.
XTo activate/deactivate automatic
mirror folding: select Vehicle in the main
function bar by sliding XVY and turning
cVd the COMAND controller and press
W to confirm.
The main area is active.XSelect the Automatic Mirror Folding
function by sliding XVY or turning cVd
the COMAND controller and press W to
confirm.
Setting the EASY-ENTRY/EXIT feature
GWARNING
Make sure that nobody can become trapped
when you activate the EASY-ENTRY/EXIT
feature.
If there is a risk of entrapment by the steering
column, move the steering wheel adjustment
236VehicleCOMAND
Page 239 of 496
lever or press the position button of the
memory function.
If there is a risk of entrapment by the seat, you
can also cancel the adjustment procedure by
moving the switch for seat adjustment. The
steering column and driver's seat stop moving
immediately.
Never leave children unsupervised in the
vehicle. They could open the driver's door and
thereby unintentionally activate the EASY-
ENTRY/EXIT feature and become trapped.
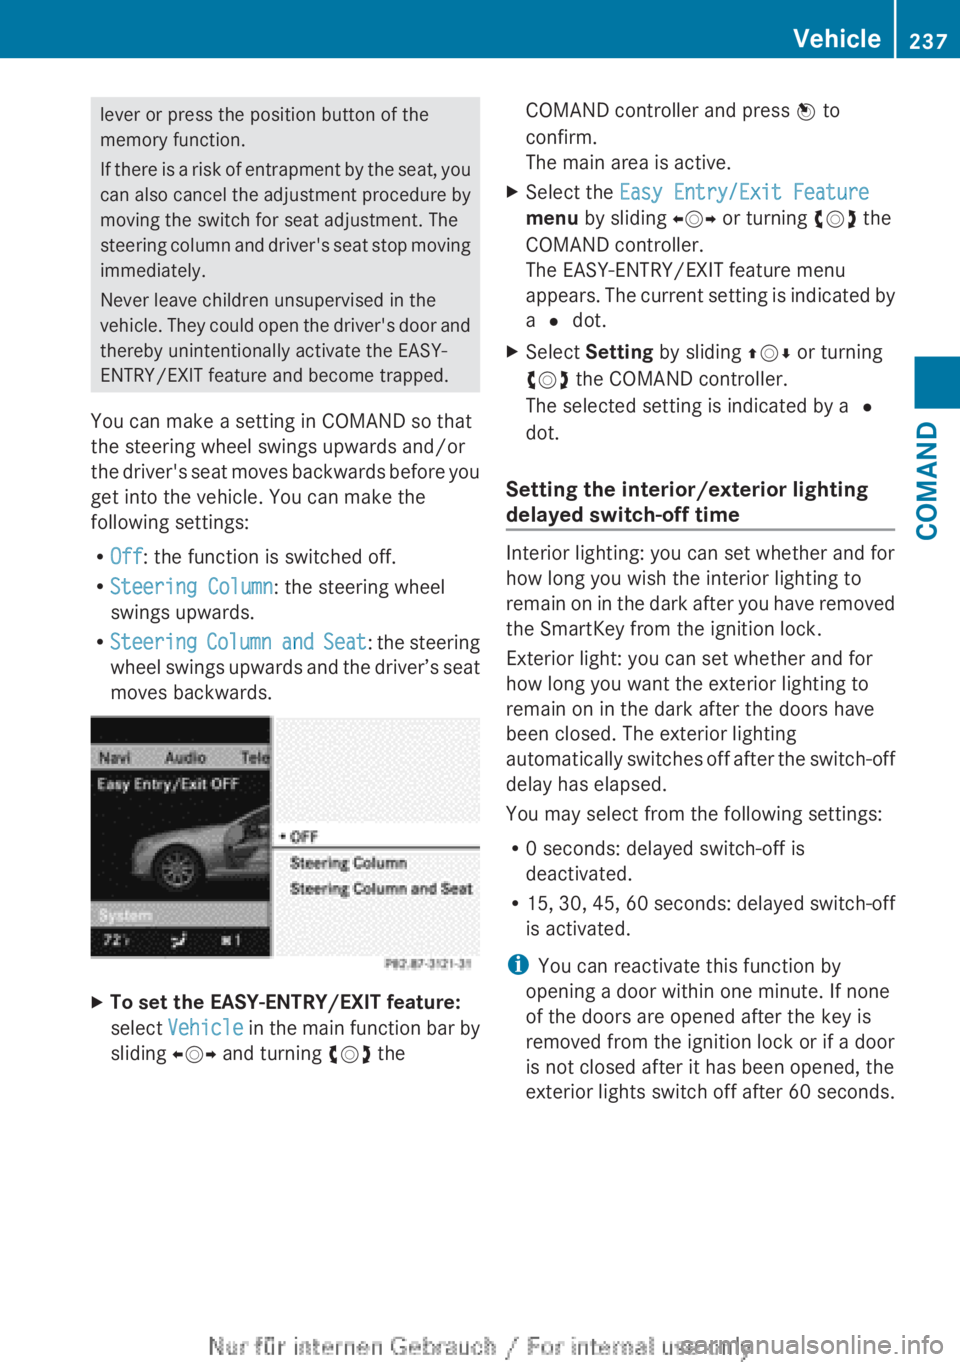
You can make a setting in COMAND so that
the steering wheel swings upwards and/or
the driver's seat moves backwards before you
get into the vehicle. You can make the
following settings:
R Off : the function is switched off.
R Steering Column : the steering wheel
swings upwards.
R Steering Column and Seat : the steering
wheel swings upwards and the driver’s seat
moves backwards.XTo set the EASY-ENTRY/EXIT feature:
select Vehicle in the main function bar by
sliding XVY and turning cVd theCOMAND controller and press W to
confirm.
The main area is active.XSelect the Easy Entry/Exit Feature
menu by sliding XVY or turning cVd the
COMAND controller.
The EASY-ENTRY/EXIT feature menu
appears. The current setting is indicated by
a # dot.XSelect Setting by sliding ZVÆ or turning
cVd the COMAND controller.
The selected setting is indicated by a #
dot.
Setting the interior/exterior lighting
delayed switch-off time
Interior lighting: you can set whether and for
how long you wish the interior lighting to
remain on in the dark after you have removed
the SmartKey from the ignition lock.
Exterior light: you can set whether and for
how long you want the exterior lighting to
remain on in the dark after the doors have
been closed. The exterior lighting
automatically switches off after the switch-off
delay has elapsed.
You may select from the following settings:
R 0 seconds: delayed switch-off is
deactivated.
R 15, 30, 45, 60 seconds: delayed switch-off
is activated.
i You can reactivate this function by
opening a door within one minute. If none
of the doors are opened after the key is
removed from the ignition lock or if a door
is not closed after it has been opened, the
exterior lights switch off after 60 seconds.
Vehicle237COMANDZ
Page 240 of 496
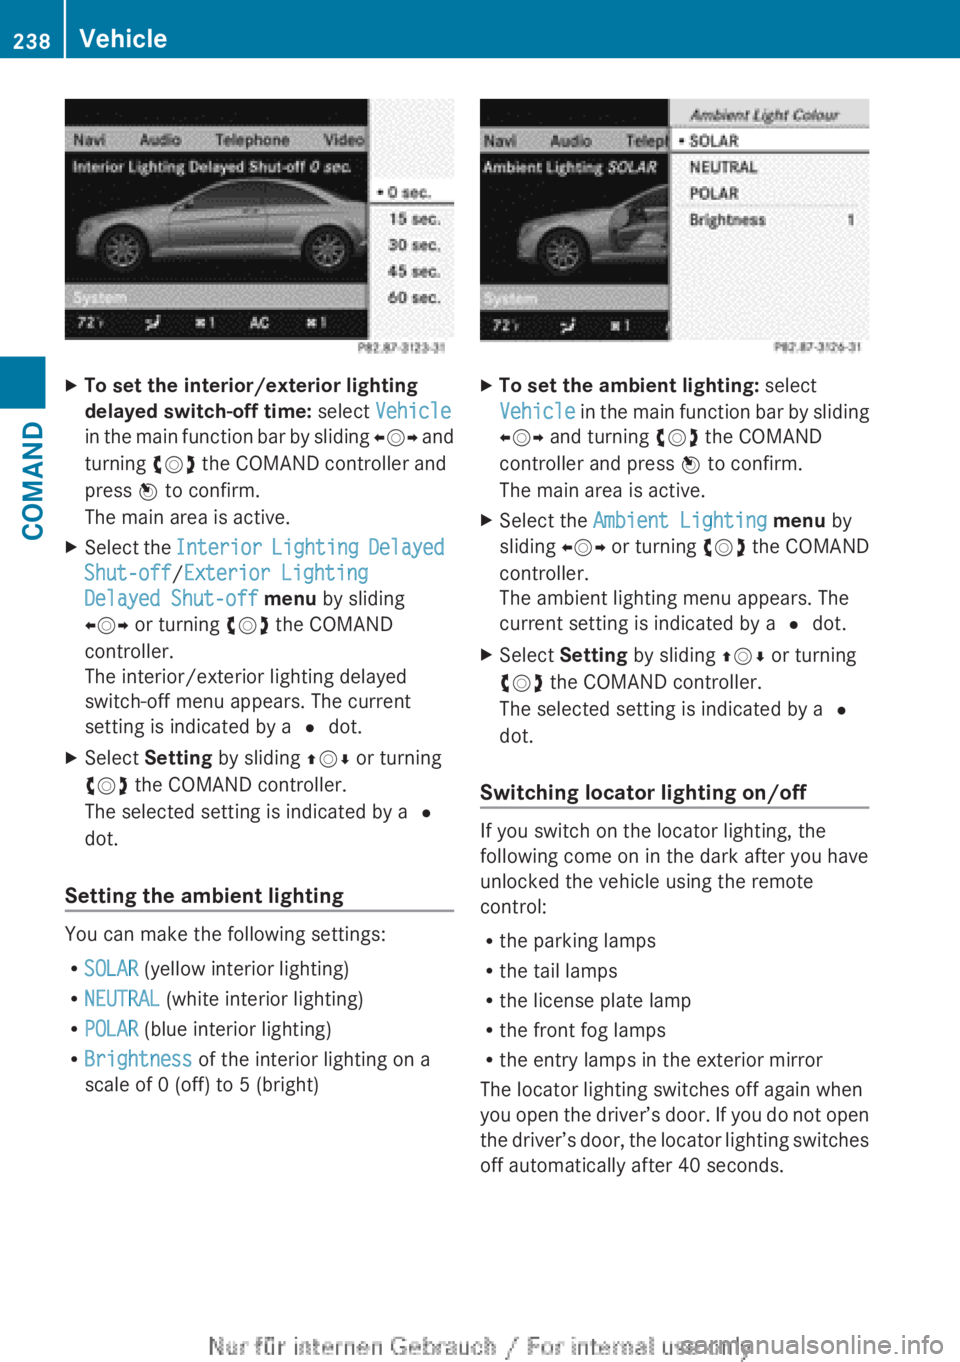
XTo set the interior/exterior lighting
delayed switch-off time: select Vehicle
in the main function bar by sliding XVY and
turning cVd the COMAND controller and
press W to confirm.
The main area is active.XSelect the Interior Lighting Delayed
Shut-off /Exterior Lighting
Delayed Shut-off menu by sliding
XVY or turning cVd the COMAND
controller.
The interior/exterior lighting delayed
switch-off menu appears. The current
setting is indicated by a # dot.XSelect Setting by sliding ZVÆ or turning
cVd the COMAND controller.
The selected setting is indicated by a #
dot.
Setting the ambient lighting
You can make the following settings:
R SOLAR (yellow interior lighting)
R NEUTRAL (white interior lighting)
R POLAR (blue interior lighting)
R Brightness of the interior lighting on a
scale of 0 (off) to 5 (bright)
XTo set the ambient lighting: select
Vehicle in the main function bar by sliding
XVY and turning cVd the COMAND
controller and press W to confirm.
The main area is active.XSelect the Ambient Lighting menu by
sliding XVY or turning cVd the COMAND
controller.
The ambient lighting menu appears. The
current setting is indicated by a # dot.XSelect Setting by sliding ZVÆ or turning
cVd the COMAND controller.
The selected setting is indicated by a #
dot.
Switching locator lighting on/off
If you switch on the locator lighting, the
following come on in the dark after you have
unlocked the vehicle using the remote
control:
R the parking lamps
R the tail lamps
R the license plate lamp
R the front fog lamps
R the entry lamps in the exterior mirror
The locator lighting switches off again when
you open the driver’s door. If you do not open
the driver’s door, the locator lighting switches
off automatically after 40 seconds.
238VehicleCOMAND
Page 241 of 496
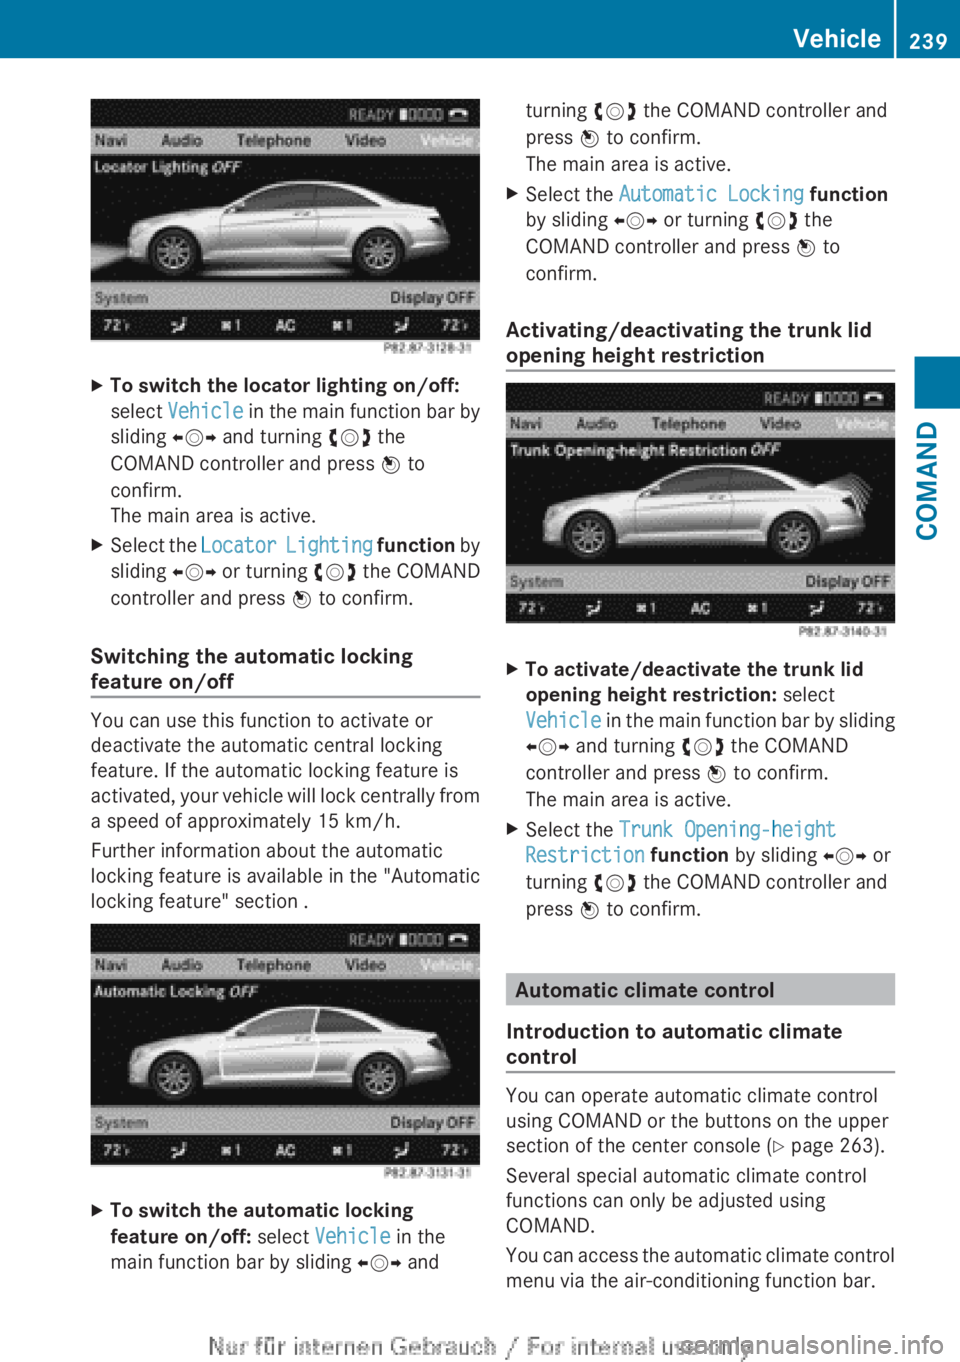
XTo switch the locator lighting on/off:
select Vehicle in the main function bar by
sliding XVY and turning cVd the
COMAND controller and press W to
confirm.
The main area is active.XSelect the Locator Lighting function by
sliding XVY or turning cVd the COMAND
controller and press W to confirm.
Switching the automatic locking
feature on/off
You can use this function to activate or
deactivate the automatic central locking
feature. If the automatic locking feature is
activated, your vehicle will lock centrally from
a speed of approximately 15 km/h.
Further information about the automatic
locking feature is available in the "Automatic
locking feature" section .
XTo switch the automatic locking
feature on/off: select Vehicle in the
main function bar by sliding XVY andturning cVd the COMAND controller and
press W to confirm.
The main area is active.XSelect the Automatic Locking function
by sliding XVY or turning cVd the
COMAND controller and press W to
confirm.
Activating/deactivating the trunk lid
opening height restriction
XTo activate/deactivate the trunk lid
opening height restriction: select
Vehicle in the main function bar by sliding
XVY and turning cVd the COMAND
controller and press W to confirm.
The main area is active.XSelect the Trunk Opening-height
Restriction function by sliding XVY or
turning cVd the COMAND controller and
press W to confirm.
Automatic climate control
Introduction to automatic climate
control
You can operate automatic climate control
using COMAND or the buttons on the upper
section of the center console ( Y page 263).
Several special automatic climate control
functions can only be adjusted using
COMAND.
You can access the automatic climate control
menu via the air-conditioning function bar.
Vehicle239COMANDZ
Page 242 of 496
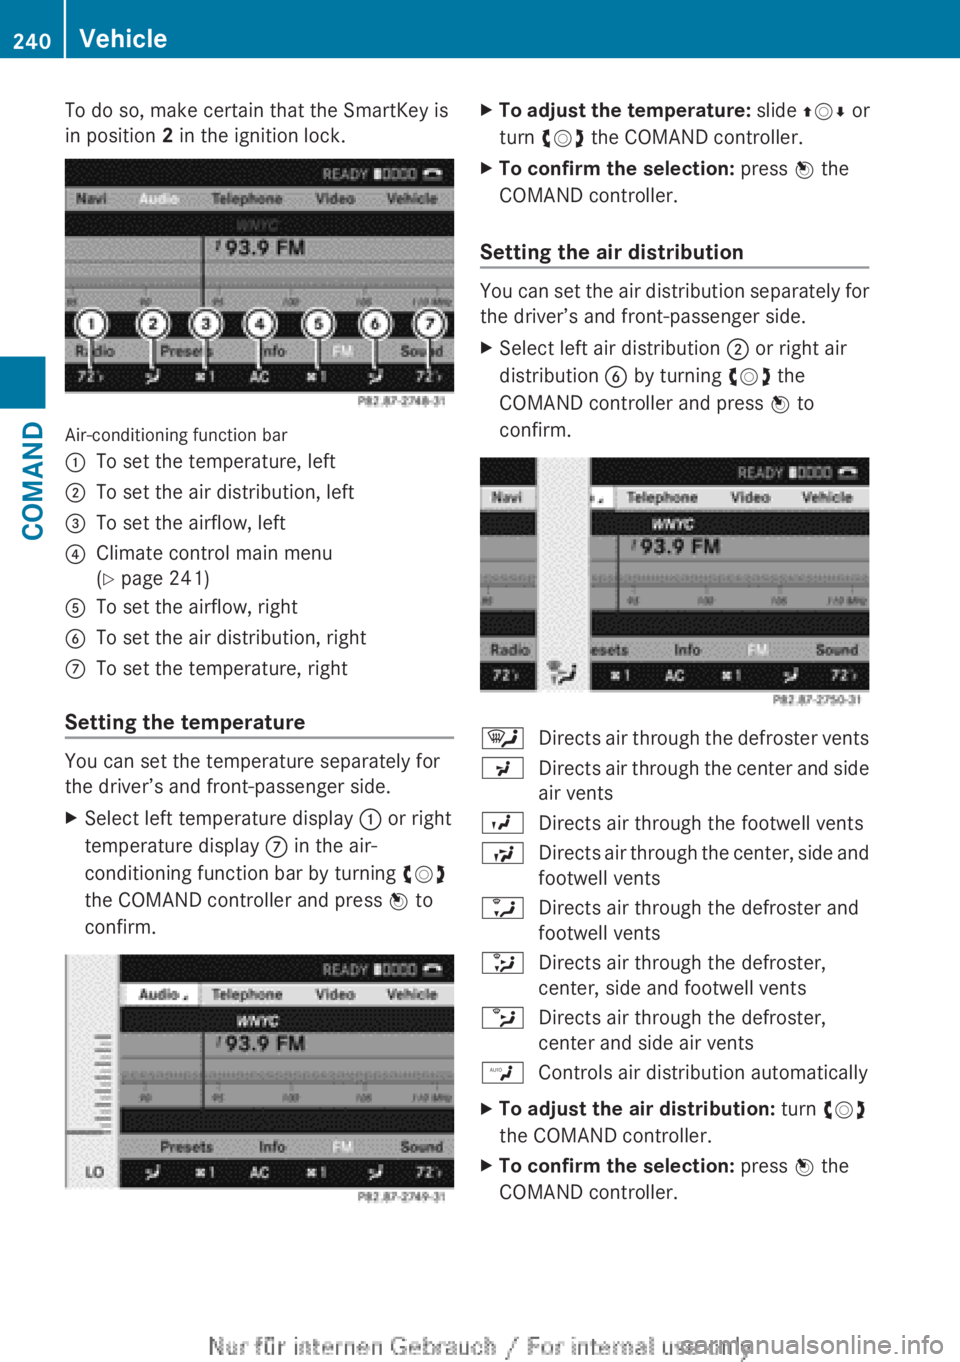
To do so, make certain that the SmartKey is
in position 2 in the ignition lock.
Air-conditioning function bar
:To set the temperature, left;To set the air distribution, left=To set the airflow, left?Climate control main menu
( Y page 241)ATo set the airflow, rightBTo set the air distribution, rightCTo set the temperature, right
Setting the temperature
You can set the temperature separately for
the driver’s and front-passenger side.
XSelect left temperature display : or right
temperature display C in the air-
conditioning function bar by turning cVd
the COMAND controller and press W to
confirm.XTo adjust the temperature: slide ZVÆ or
turn cVd the COMAND controller.XTo confirm the selection: press W the
COMAND controller.
Setting the air distribution
You can set the air distribution separately for
the driver’s and front-passenger side.
XSelect left air distribution ; or right air
distribution B by turning cVd the
COMAND controller and press W to
confirm.¯Directs air through the defroster ventsPDirects air through the center and side
air ventsODirects air through the footwell ventsSDirects air through the center, side and
footwell ventsaDirects air through the defroster and
footwell vents_Directs air through the defroster,
center, side and footwell ventsbDirects air through the defroster,
center and side air ventsWControls air distribution automaticallyXTo adjust the air distribution: turn cVd
the COMAND controller.XTo confirm the selection: press W the
COMAND controller.240VehicleCOMAND
Page 246 of 496
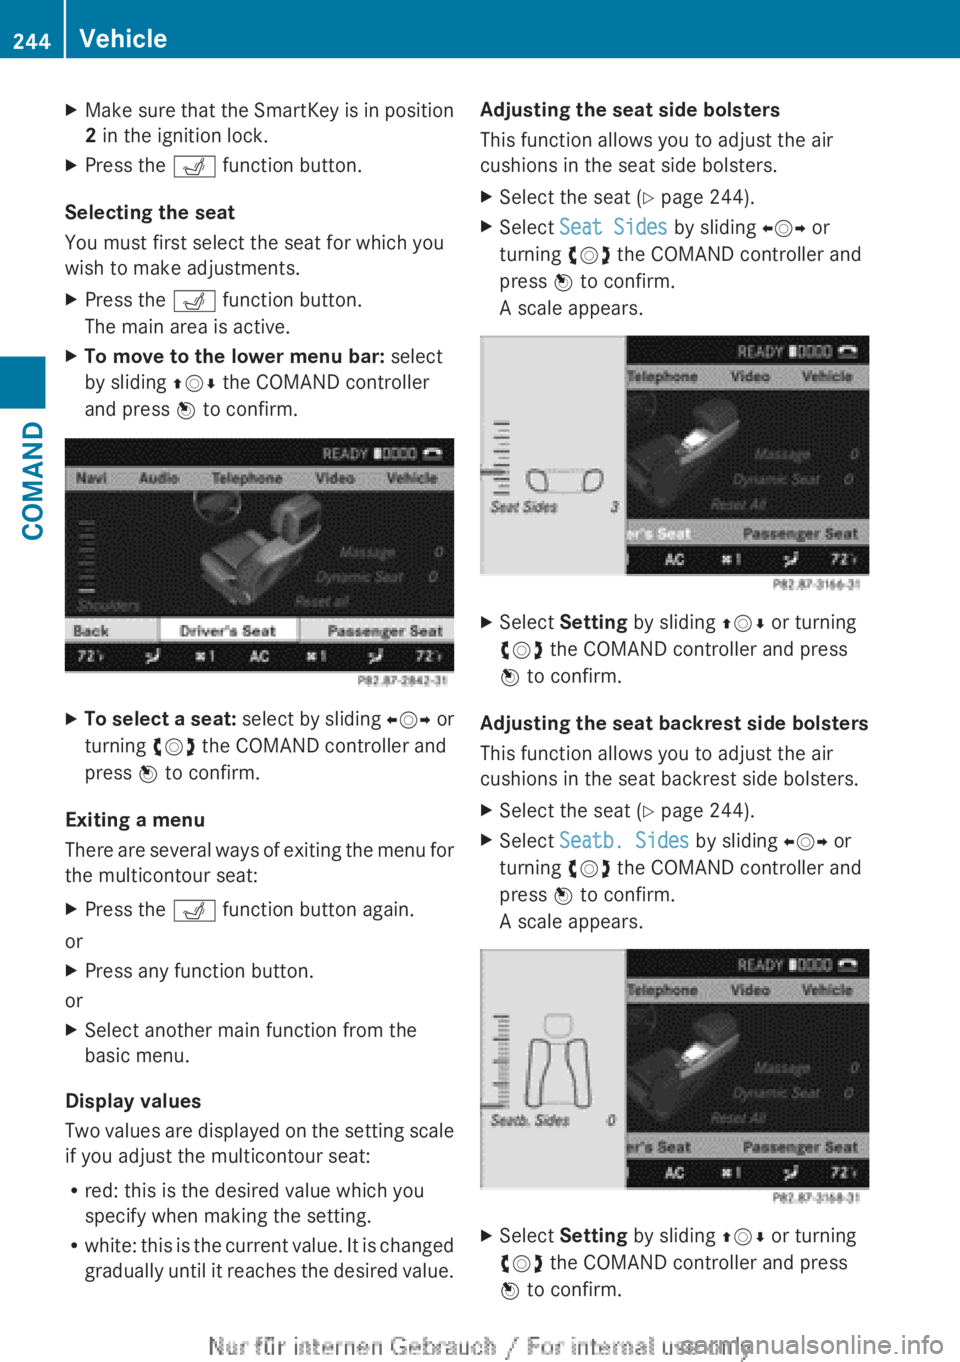
XMake sure that the SmartKey is in position
2 in the ignition lock.XPress the T function button.
Selecting the seat
You must first select the seat for which you
wish to make adjustments.
XPress the T function button.
The main area is active.XTo move to the lower menu bar: select
by sliding ZVÆ the COMAND controller
and press W to confirm.XTo select a seat: select by sliding XVY or
turning cVd the COMAND controller and
press W to confirm.
Exiting a menu
There are several ways of exiting the menu for
the multicontour seat:
XPress the T function button again.
or
XPress any function button.
or
XSelect another main function from the
basic menu.
Display values
Two values are displayed on the setting scale
if you adjust the multicontour seat:
R red: this is the desired value which you
specify when making the setting.
R white: this is the current value. It is changed
gradually until it reaches the desired value.
Adjusting the seat side bolsters
This function allows you to adjust the air
cushions in the seat side bolsters.XSelect the seat ( Y page 244).XSelect Seat Sides by sliding XVY or
turning cVd the COMAND controller and
press W to confirm.
A scale appears.XSelect Setting by sliding ZVÆ or turning
cVd the COMAND controller and press
W to confirm.
Adjusting the seat backrest side bolsters
This function allows you to adjust the air
cushions in the seat backrest side bolsters.
XSelect the seat ( Y page 244).XSelect Seatb. Sides by sliding XVY or
turning cVd the COMAND controller and
press W to confirm.
A scale appears.XSelect Setting by sliding ZVÆ or turning
cVd the COMAND controller and press
W to confirm.244VehicleCOMAND
Page 252 of 496
Useful information
i This Operator's Manual describes all
models and all standard and optional
equipment of your vehicle available at the
time of publication of the Operator's
Manual. Country-specific differences are
possible. Please note that your vehicle may
not be equipped with all features
described. This also applies to safety-
related systems and functions.
i Please read the information on qualified
specialist workshops ( Y page 29).
Exterior lighting
Important safety notes
For reasons of safety, Mercedes-Benz
recommends that you drive with the lights
switched on even during the daytime. In some
countries, operation of the headlamps varies
due to legal requirements and self-imposed
obligations.
Notes on driving abroad
To convert to symmetrical low beam
when driving abroad: switch the headlamps
to symmetrical low beam in countries in
which traffic drives on the opposite side of the
road from the country where the vehicle is
registered. This prevents glare to oncoming
traffic. Symmetrical lights do not illuminate
as large an area of the edge of the road.
Have the headlamps converted at a qualified
specialist workshop as close to the border as
possible before driving in these countries.
To convert to asymmetrical low beam
after returning: have the headlamps
converted back to asymmetrical low beam at
a qualified specialist workshop as soon as
possible after crossing the border and
returning to the original country.
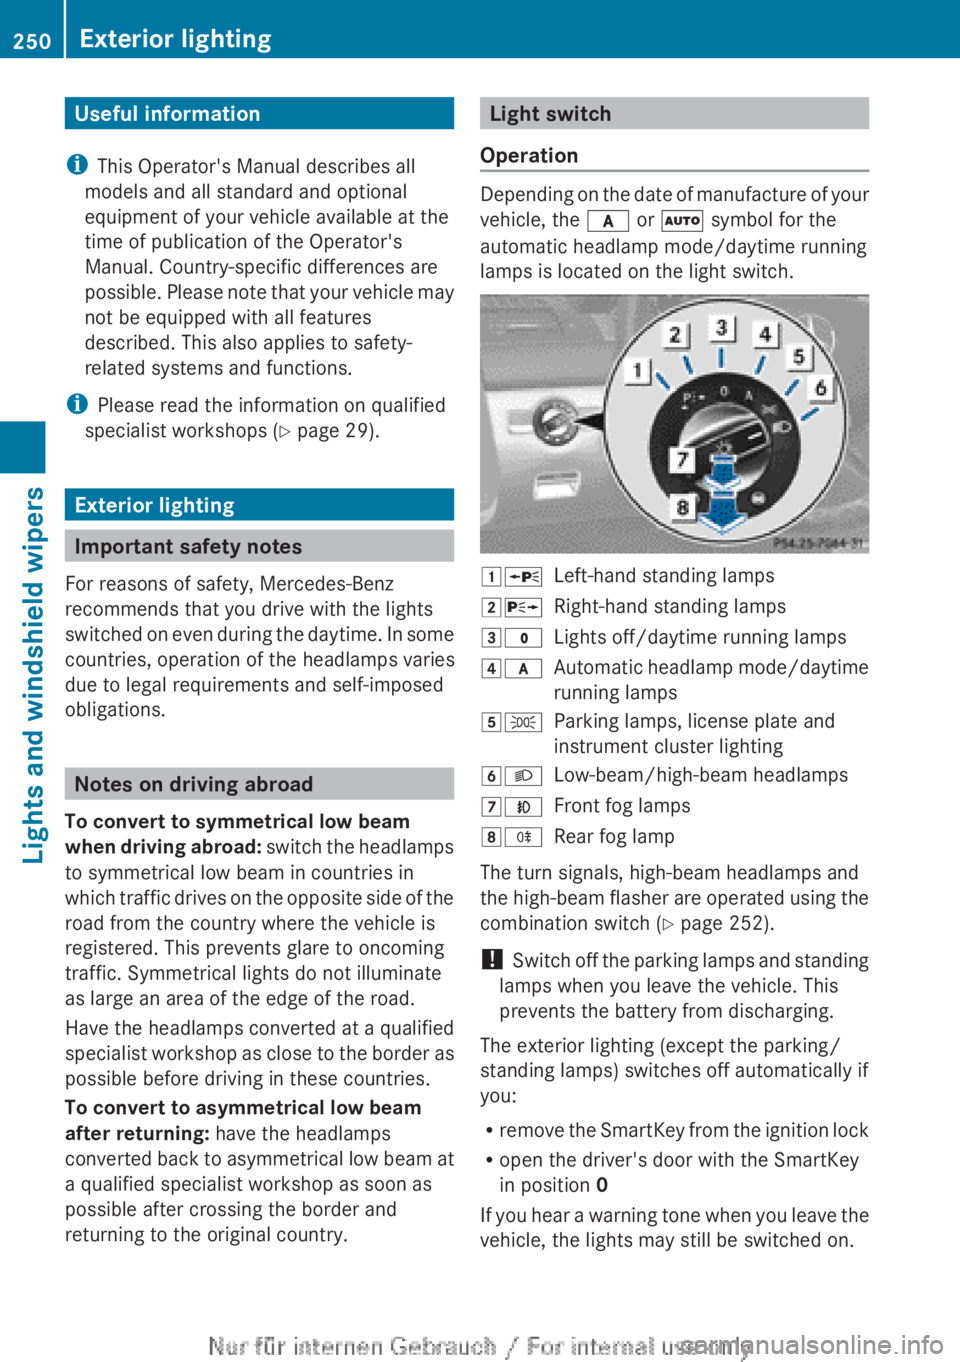
Light switch
Operation
Depending on the date of manufacture of your
vehicle, the c or à symbol for the
automatic headlamp mode/daytime running
lamps is located on the light switch.
1 WLeft-hand standing lamps2XRight-hand standing lamps3$Lights off/daytime running lamps4cAutomatic headlamp mode/daytime
running lamps5 TParking lamps, license plate and
instrument cluster lighting6 LLow-beam/high-beam headlamps7NFront fog lamps8RRear fog lamp
The turn signals, high-beam headlamps and
the high-beam flasher are operated using the
combination switch ( Y page 252).
! Switch off the parking lamps and standing
lamps when you leave the vehicle. This
prevents the battery from discharging.
The exterior lighting (except the parking/
standing lamps) switches off automatically if
you:
R remove the SmartKey from the ignition lock
R open the driver's door with the SmartKey
in position 0
If you hear a warning tone when you leave the
vehicle, the lights may still be switched on.
250Exterior lightingLights and windshield wipers