ECO mode MERCEDES-BENZ CL-Class 2014 C217 Owner's Guide
[x] Cancel search | Manufacturer: MERCEDES-BENZ, Model Year: 2014, Model line: CL-Class, Model: MERCEDES-BENZ CL-Class 2014 C217Pages: 494, PDF Size: 13.55 MB
Page 178 of 494
X
Select Navi in the main function bar by
sliding ZVand turning cVdthe COMAND
controlle rand press Wto confirm.
X Select Highway information and press
W to confirm.
Depending on the previous state, switch
the optio nonOor offª.
SIRIUS XM service Displaying SIRIUS XM service information
You can display the SIRIUS XM service
information.
X
To show the menu: pressWthe COMAND
controller.
X Select Navi in the main function bar by
sliding ZVand turning cVdthe COMAND
controller and press Wto confirm.
X Select SIRIUS Service and press
Wto
confirm.
Registering for the SIRIUS XM traffic
report service
X Call the traffic report provider's phone
number shown on the screen.
i You can also have the satellite service
activated online. To do so, visit the SIRIUS
XM Radio website at
http://www.sirius.com (USA) or
http://www.siriuscanada.com
(Canada).
Once the connection has been established:
X Follow the instructions of the operator.
The activation process may take up to ten
minutes.
If registration is not included when
purchasing the system, your credit card
details will be required to activate your
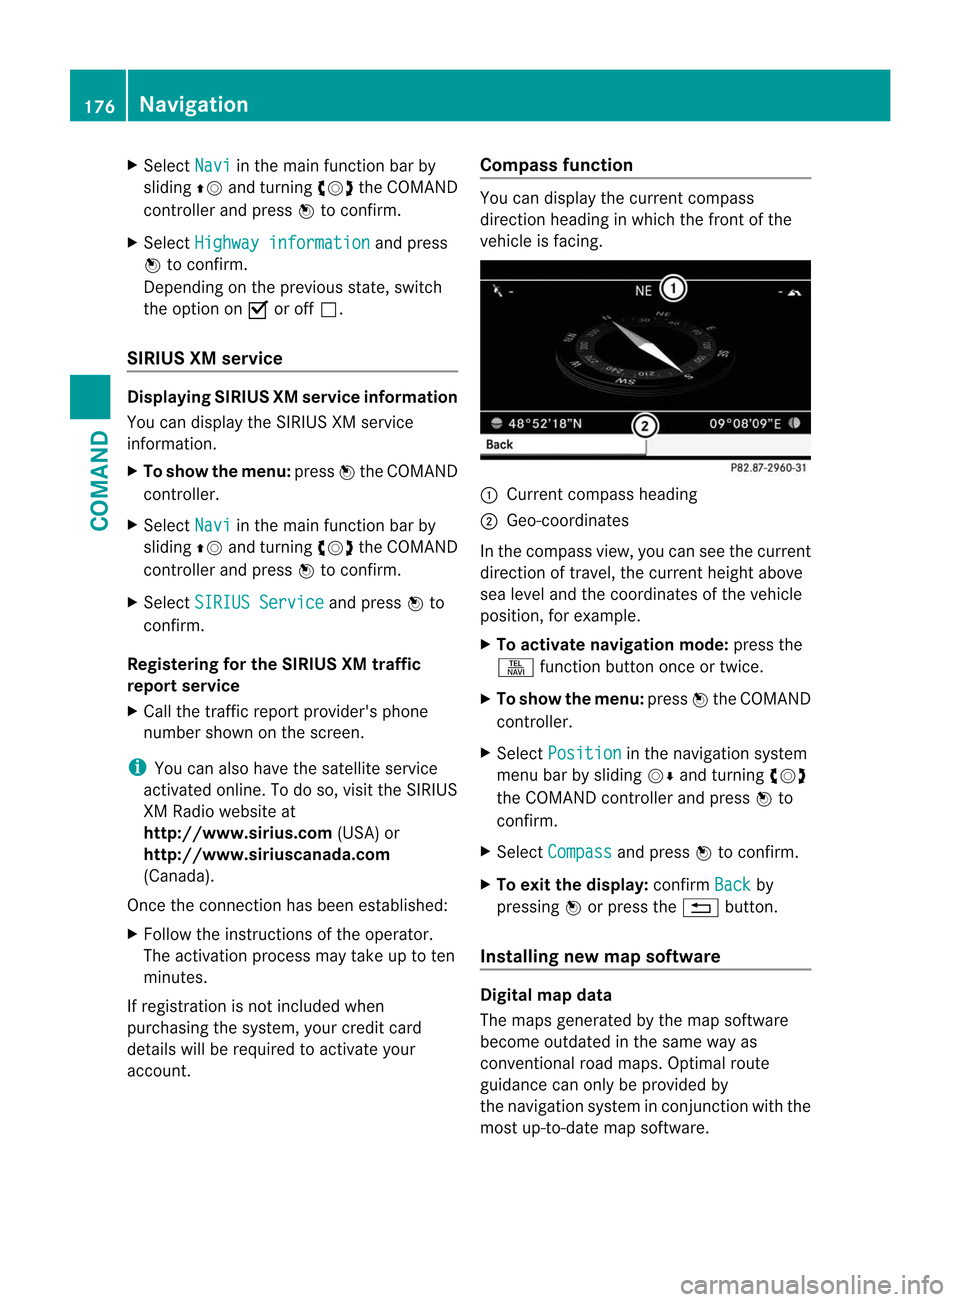
account. Compass function You can display the current compass
direction heading in which the front of the
vehicle is facing.
:
Current compass heading
; Geo-coordinates
In the compass view, you can see the current
direction of travel, the current height above
sea level and the coordinates of the vehicle
position, for example.
X To activate navigation mode: press the
S function button once or twice.
X To show the menu: pressWthe COMAND
controller.
X Select Position in the navigation system
menu bar by sliding VÆand turning cVd
the COMAND controller and press Wto
confirm.
X Select Compass and press
Wto confirm.
X To exit the display: confirmBack by
pressing Wor press the %button.
Installing new map software Digital map data
The maps generated by the map software
become outdated in the same way as
conventional road maps. Optimal route
guidance can only be provided by
the navigation system in conjunction with the
most up-to-date map software.176
NavigationCOMAND
Page 184 of 494
Call disconnection while the vehicle is
in motion
Ac
all may be disconnected if:
R there is insufficient network coverage in
certain areas.
R you move from one transmitter/receiver
area (cell) into another and no channels are
free.
R you use a SIM card which is no tcompatible
with the network available.
R you are using a mobile phone with
"Twincard" and the mobile phone with the
second SIM card is already logged into the
network.
Operating options You can operate the telephone by:
R
using the COMAND controller:
turn cVd.
slide XVY orZVÆ.
press W.
R the 6 or~ button on the telephone
keypad on the center console
R the 6 or~ button on the
multifunction steering wheel
R using the Voice Control System (see the
separate Voice Control System operating
instructions)
Unless otherwise indicated, the descriptions
and illustrations in this section refer to
COMAND and the telephone keypad. This
also means that to carry out the functions
described here, you must always be in the
Telephone menu. The fastest way to access
the Telephone menu is to press the S
function button. Function restrictions You will not be able to use the telephone, will
no longer be able to use the telephone, or you
may have to wait before using it, in the
following situations:
R
when the mobile phone is switched off
R when the "Bluetooth ®
" function is switched
off in COMAND
R when the "Bluetooth ®
" function is switched
off on the mobile phone
R if the mobile phone is not logged into a
mobile phone network
i The telephone automatically tries to log
on to a network .Ifno network is available,
you will not be able to make a " 911"
emergency call. If you attempt to make an
outgoing call, the NO SERVICE message will
appear for a short while.
R if you remove the SmartKey from the
ignition lock during an active conversation
in hands-free mode, the conversation may
be continued for up to 30 minutes. After
that time, it will be interrupted.
You can prevent this interruption by switching
to "private call" ("private mode") on the
mobile phone before deactivating COMAND
(see mobile phone operating instructions).
If you wish to switch off COMAND during an
active conversation in hands-free mode, the
following message will appear: You cannot
shut off COMAND until you have
finished your telephone call
911 emergency call
G
WARNING
The 911 emergency call system is a public
service. Using it without due cause is a
criminal offense.
The following requirements must be fulfilled
for a 911emergency call:
R the mobile phone must be switched on.
R a network must be available. 182
TelephoneCOMAND
Page 190 of 494
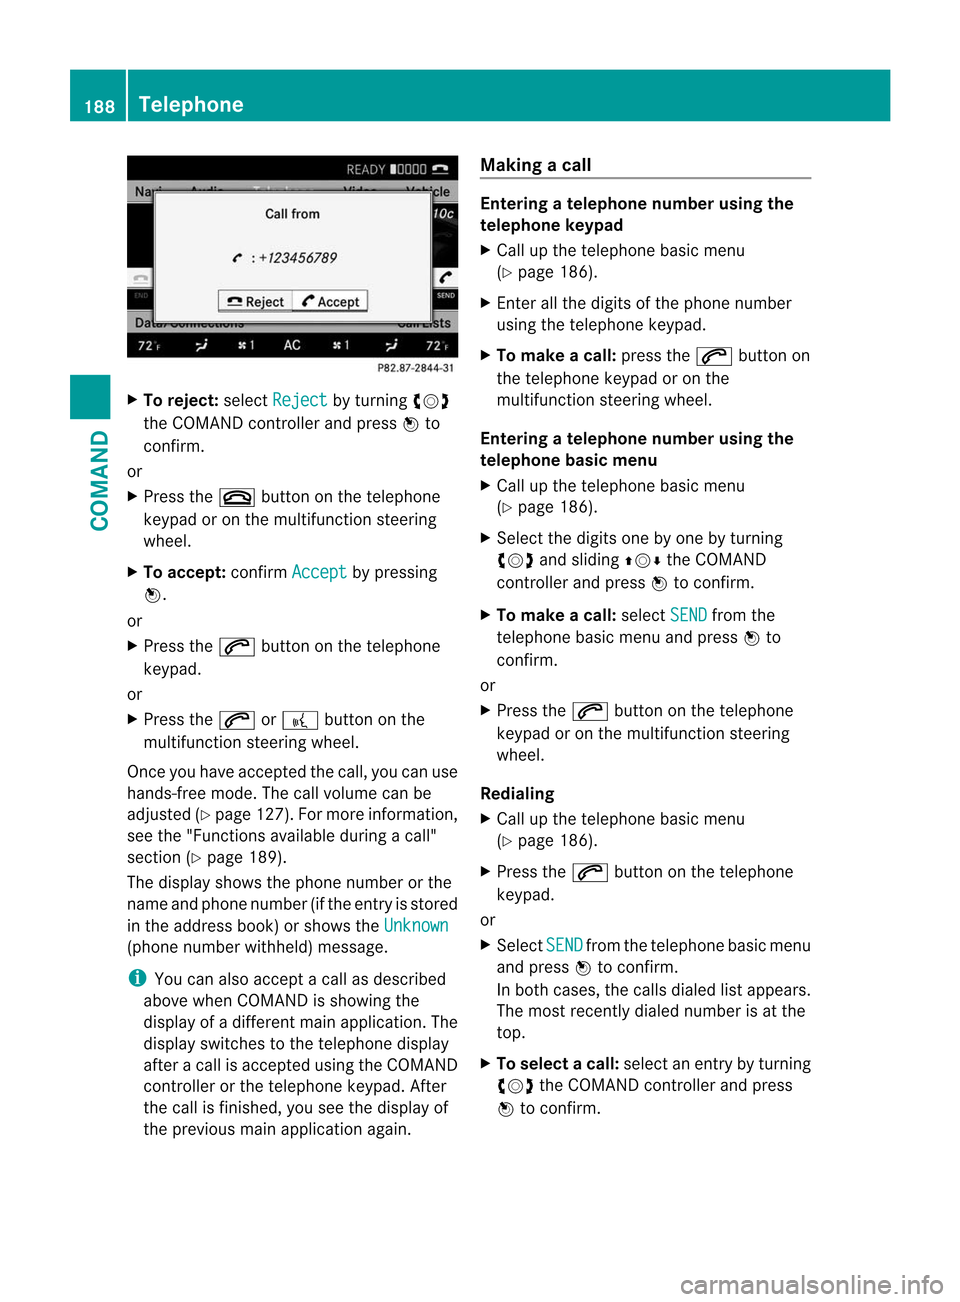
X
To reject: selectReject by turning
cVd
the COMAND controller and press Wto
confirm.
or
X Press the ~button on the telephone
keypad or on the multifunctio nsteering
wheel.
X To accept: confirmAccept by pressing
W.
or
X Press the 6button on the telephone
keypad.
or
X Press the 6or? button on the
multifunctio nsteering wheel.
Once you have accepted the call, you can use
hands-free mode. The call volume can be
adjusted (Y page 127).For more information,
see the "Functions available during a call"
section (Y page 189).
The display shows the phone number or the
name and phone number (if the entry is stored
in the address book) or shows the Unknown(phone number withheld) message.
i
You can also accept a call as described
above when COMAND is showing the
display of a different main application. The
display switches to the telephone display
after a call is accepted using the COMAND
controller or the telephone keypad. After
the call is finished, you see the display of
the previous main application again. Making a call Entering
atelephone number using the
telephone keypad
X Call up the telephone basic menu
(Y page 186).
X Enter all the digits of the phone number
using the telephone keypad.
X To make a call: press the6button on
the telephone keypad or on the
multifunction steering wheel.
Entering atelephone number using the
telephone basic menu
X Call up the telephone basic menu
(Y page 186).
X Select the digits one by one by turning
cVd and sliding ZVÆthe COMAND
controller and press Wto confirm.
X To make a call: selectSEND from the
telephone basic menu and press Wto
confirm.
or
X Press the 6button on the telephone
keypad or on the multifunction steering
wheel.
Redialing
X Call up the telephone basic menu
(Y page 186).
X Press the 6button on the telephone
keypad.
or
X Select SEND fro
mt he telephone basic menu
and press Wto confirm.
In both cases, the calls dialed list appears.
The most recently dialed number is at the
top.
X To selectac all:select an entry by turning
cVd the COMAND controller and press
W to confirm. 188
TelephoneCOMAND
Page 206 of 494
Switching on HD Radio
i
As HD Radio stations are broadcast in the
AM/FM wavebands, operating HD Radio is
very similar to operating analog AM/FM
radio. This section describes only those
functions that differ from standard FM
radio functions.
Operating analog FM/AM radio is described
in the "Radio" section (Y page 199).
You can deactivate HD Radio for the selected
frequency in the radio submenu. X
Select Audio in the main function bar by
sliding ZVand turning cVdthe COMAND
controller and press Wto confirm.
X Select FM/AM Radio by sliding
ZVthe
COMAND controller and press Wto
confirm.
The audio menu appears.
X Select Radio by sliding
ZVthe COMAND
controller and press Wto confirm.
HD Radio is deactivated if the ccheck
box is empty.
You hear the analog program of this
frequency.
As soon as you change to another HD Radio
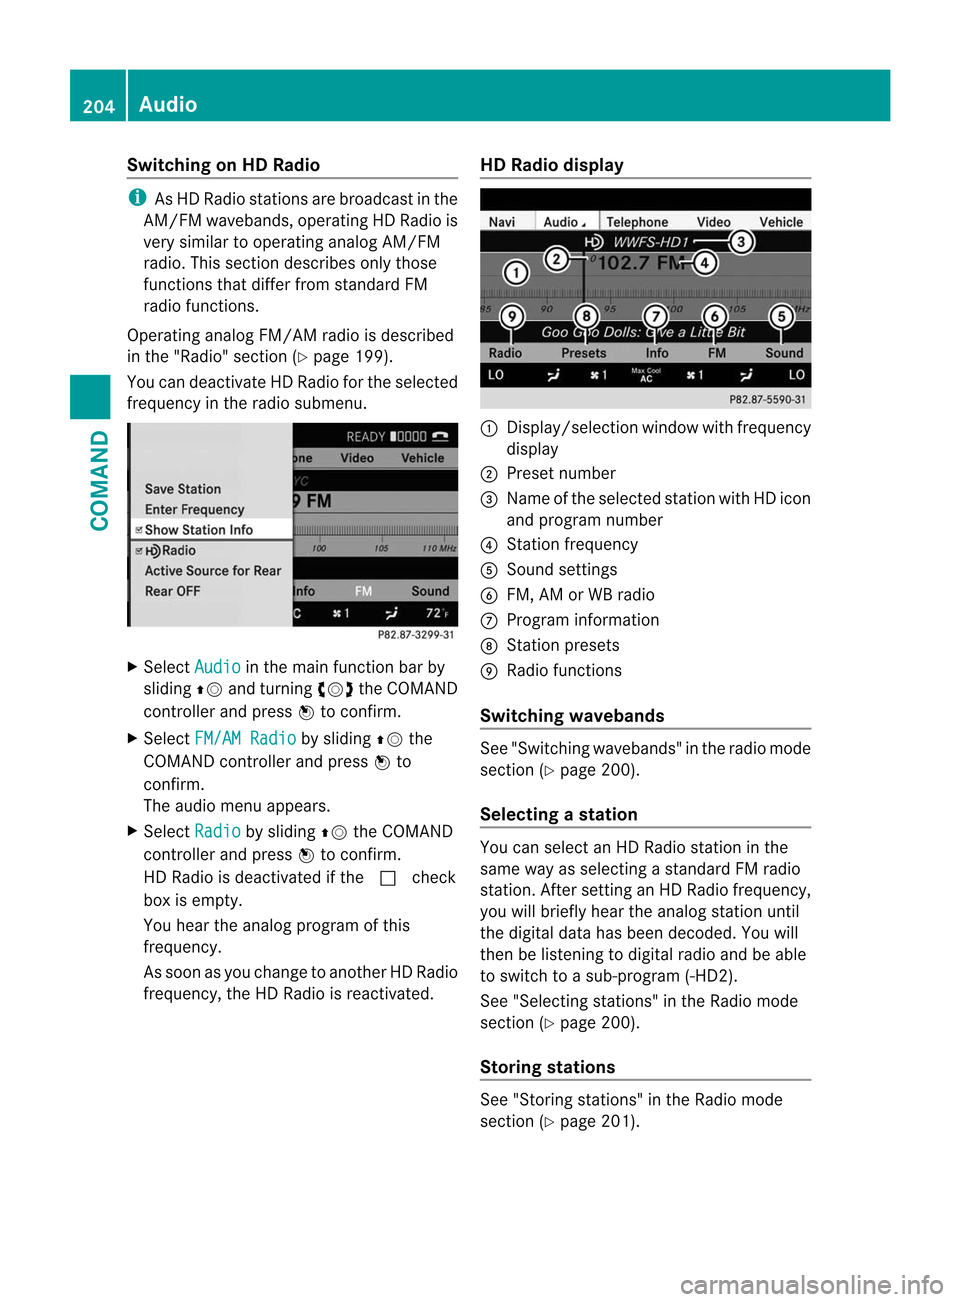
frequency, the HD Radio is reactivated. HD Radio display 1
Display/selection window with frequency
display
2 Preset number
3 Name of the selected station with HD icon
and program number
4 Station frequency
5 Sound settings
6 FM, AM or WB radio
7 Program information
8 Station presets
9 Radio functions
Switching wavebands See "Switching wavebands" in the radio mode
section (Y
page 200).
Selecting astation You can select an HD Radio statio
ninthe
same way as selecting a standard FM radio
station. After settinganHDR adio frequency,
you will briefly hear the analog statio nuntil
the digital data has been decoded .You will
then be listening to digital radio and be able
to switch to a sub-program (-HD2).
See "Selecting stations" in the Radio mode
section (Y page 200).
Storing stations See "Storing stations" in the Radio mode
section (Y
page 201). 204
AudioCOMAND
Page 213 of 494
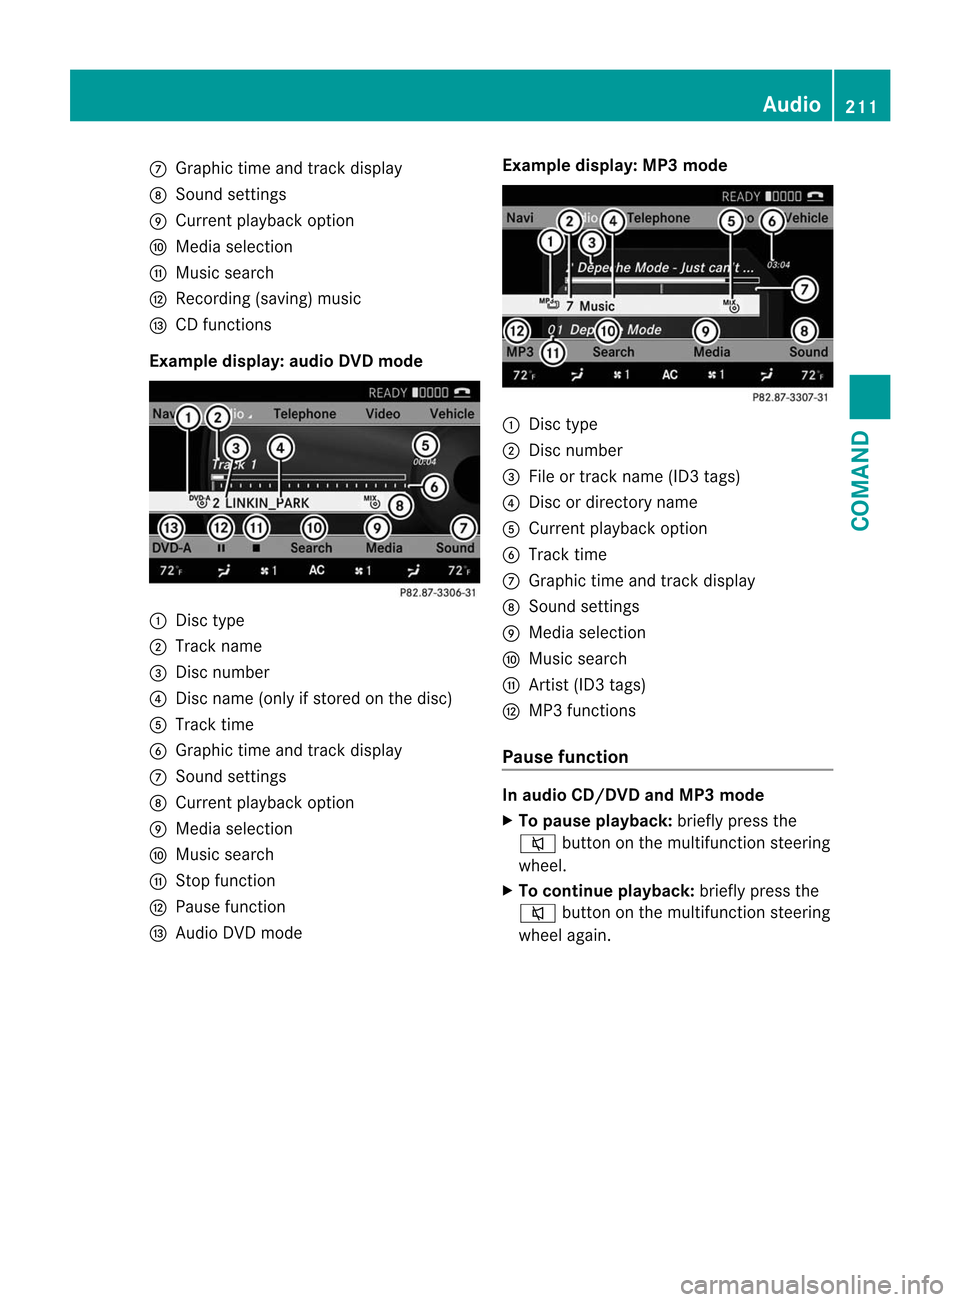
C
Graphic time and track display
D Sound settings
E Curren tplayback option
F Media selection
G Music search
H Recording (saving) music
I CD functions
Example display: audio DVD mode :
Disc type
; Track name
= Disc number
? Disc name (only if stored on the disc)
A Track time
B Graphic time and track display
C Sound settings
D Curren tplayback option
E Media selection
F Music search
G Stop function
H Pause function
I Audio DVD mode Example display: MP3 mode :
Disc type
; Disc number
= File or track name (ID3 tags)
? Disc or directory name
A Curren tplayback option
B Track time
C Graphic time and track display
D Sound settings
E Media selection
F Music search
G Artist (ID3 tags)
H MP3 functions
Pause function In audio CD/DVD and MP3 mode
X
To pause playback: briefly press the
8 button on the multifunction steering
wheel.
X To continue playback: briefly press the
8 button on the multifunction steering
wheel again. Audio
211COMAND Z
Page 215 of 494
MUSIC REGISTER, position 3
Media Interface, position 4
USB, position 5
X
Select the data medium by turning cVd
the COMAND controller and press Wto
confirm.
i If you select a video DVD, the system
switches to video DVD mode
(Y page 229).
Selecting atrac kusing the number
keypad
X Press a number button, e.g. n, when the
display/selection window is active.
The medium at the corresponding position
in the media list is loaded and then played.
Selects atrack Selecting by skipping to
atrack
X To skip forwards or back to a track: slide
XVY or turn cVdthe COMAND controller
when the display/selectio nwindow is
active.
The skip forward function skips to the next
track.
Skipping backwards restarts the current
track (if it has been playing for more than
8s econds) or starts the previous trac k(if
the current track has only been playing for
a shorter time).
If you activate the Medium Mix or
Track List Mix playback option (MP3 mode
only), the track order is random.
X On the multifunction steering wheel:
switch COMAND to audio CD, audio DV Dor
MP3 mode (Y page 210).
X Press =or; to select the Audio menu.
X Press the 9or: button on the
multifunction steering wheel. Selecting by track list
X
In audio mode, select Search by sliding
VÆ or turning cVdthe COMAND
controller and press Wto confirm.
X Select Current Track List .
or
X Press Wthe COMAND controller in audio
mode when the display/selection window
is active.
X Select Current Track List by turning
cVd the COMAND controller and press
W to confirm.
X Select the track by turning cVdand press
W to confirm.
i In MP3 mode, the list shows all the tracks
in alphabetical order.
X On the multifunction steering wheel:
switch COMAND to audio CD, audio DVD or
MP3 mode (Y page 210).
X Press =or; to select the Audio menu.
X Press and hold the 9or: button
until the desired track has been reached.
If you hold down 9or:, the system
runs through the list more quickly. Not all
audio drives or data carriers support this
function.
If track information is stored on the audio
drive or data storage device, the
multifunction display shows the number and
name of the track.
Selecting atrac kusing the number
keypad
X Press the Äbutton on the number
keypad.
An umerical entry field appears. The
number of positions offere dcorresponds to
the number of trackso n the CD/DVD. Only
numbers that correspond to a track
number on the CD/DVD can be entered.
X Enter the desired track number using the
numbe rkeys. Audio
213COMAND Z
Page 217 of 494
?
Title selection
A To start the copying process
B Name of the copied data
C Cancel procedure without copying files
D Media position in the media list
X Select START by sliding
VÆand turning
cVd and confirm with W.
All music tracks from the audio CD are
copied to COMAND's MUSIC REGISTER as
MP3 files.
X To copy individual music tracks: select
Track Select. by sliding
VÆand turning
cVd and confirm with W.
The track list appears.
X Select individual tracks by turning cVd
and confirm with W.
X Select START by turning
cVdand confirm
with W.
The selected music tracks from the audio
CD are copied to COMAND's MUSIC
REGISTER as MP3 files.
If the audio CD contains CD text or
Gracenote ®
data, this will be used for naming
when the tracks are copied. The data is then
copied to the MUSIC REGISTER in the
following structure: artist/album/track. The
copied titles can then be selected and played
using the music search in the MUSIC
REGISTER.
X To delete music files: (Ypage 221).
Gracenote Media Database Introduction
This function is only available in audio CD
mode.
There is a version of the music recognition
software from Gracenote ®
, Emeryville,
California, USA on the hard disk. You will
recognize this by the logo which can be seen
in the bottom right-hand corner of certain
audio displays. Many audio CDs contain CD text. COMAND
uses the information contained therein to
display the artist, album and track name.
If the audio CD does not contain any CD text
information, COMAND can use the Gracenote
Media Database to identify unknown audio
tracks when running in audio CD mode. This
is only possible if the relevant information is
saved in the Gracenote Media Database and
if the "Gracenote Media Database" function
is activated.
If this is the case, COMAND will display the
corresponding data such as artist, album and
track name in the relevant displays and lists.
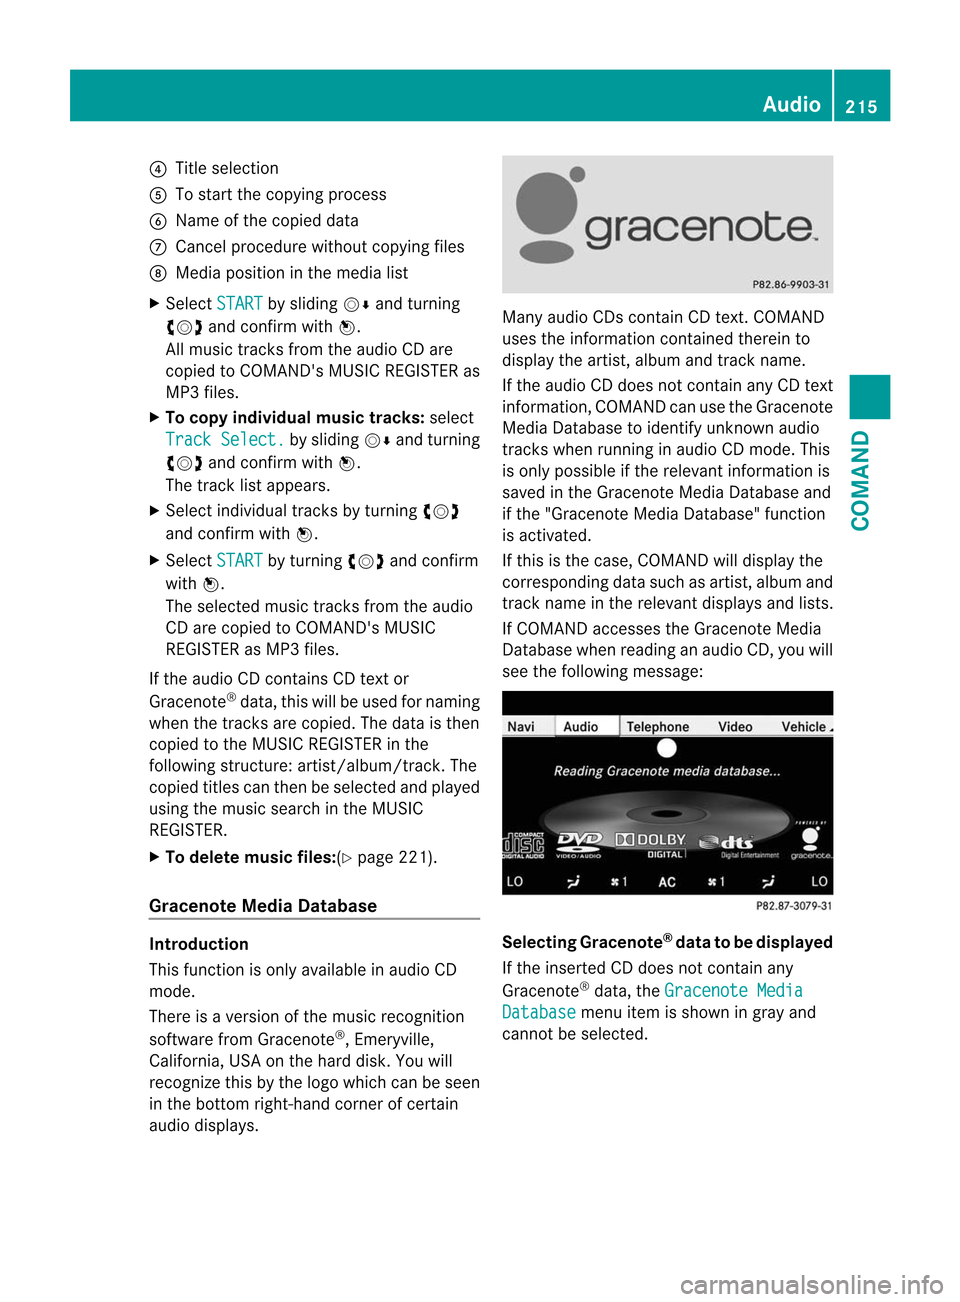
If COMAND accesses the Gracenote Media
Database when reading an audio CD, you will
see the following message:
Selecting Gracenote
®
data to be displayed
If the inserted CD does not contain any
Gracenote ®
data, the Gracenote Media Database menu item is shown in gray and
cannot be selected. Audio
215COMAND Z
Page 218 of 494
X
Switch on audio CD mode (Y page 210).
X Select CD by sliding
VÆand turning cVd
the COMAND controlle rand press Wto
confirm.
X Select Gracenote Media Database by
turning cVdthe COMAND controller and
press Wto confirm.
Switch the function on Oor off ª.
Updating Gracenote ®
music recognition
technology and the Gracenote Media
Database
The digital data on the Gracenote Media
Database becomes obsolete due to the
release of new CDs .Optimum functionality
can only be attained with up-to-date
Gracenote ®
music recognition technology.
Information about new versions can be
obtained from an authorized Mercedes-Benz
Center.
You can have your music recognition
software updated there with aDVD, or you
can update it yourself.
i The Gracenote Media Database is
updated in conjunction with the navigation
system's digital map (Y page 176).
Setting the audio format You can only set the audio format in audio
DVD mode. The number of audio formats
available depends on the DVD. The contentof
an audio DV Dis called an "album", and this
can be divided into up to nine groups. Agroup
can contain musi cindifferen tsound qualities
(stereo and multichannel formats, for
example), or bonus tracks. Each group can
contain up to 99 tracks. If an audio DVD only
contains one audio format, the "Group" menu
item(s) cannot be selected.
X Switch on audio DVD mode (Y page 210).
X Select DVD-A by sliding
VÆand turning
cVd the COMAND controller and press
W to confirm. X
Select Group by turning
cVdand press
W to confirm.
The list of available groups appears. The
# dot indicates the group currently
selected.
X To exit the menu: slideXVY the COMAND
controller or press the %button.
Playback options The following options are available to you:
R
Normal Track Sequence The tracks are played in the normal order
(e.g. track 1, 2, 3, etc.).
In MP3 mode, the track order is determined
by the order in which the tracks are written
to the MP3 data carrier when it is created.
Alphabetical order is the most common.
Once all the tracks in a folder have been
played, the tracks in the next folder are
played.
R Medium Mix All the tracks on the medium are played in
random order (e.g. track 3, 8, 5 etc.).
R Track List Mix (MP3 mode only)
All the tracks that are listed in the current
track list are played in random order.
X To select options: switch on audio CD/
DVD or MP3 mode (Y page 210).
X Select CD ,
DVD-A or
MP3 by sliding
VÆand
turning cVdthe COMAND controller and
press Wto confirm.
The options list appears. The #dot
indicates the option selected.
X Select an option by turning cVdand press
W to confirm.
The option is switched on. For all options
except "Normal track sequence", you will
see a corresponding display in the display/
selection window. See the example of the
display in audio CD mode (Y page 210).
i The "Normal track sequence" option is
automatically selected when you change
the medium you are currently listening to 216
AudioCOMAND
Page 219 of 494
or when you select a different medium. If
an option is selected, it remains selected
after COMAND is switched on or off.
Notes on MP3 mode Permissible discs
R
CD-R and CD-RW
R DVD+R and DVD+RW
R DVD-R and DVD-RW
R SD memory card:
R USB stick
R iPod ®
R MP3 player
Permissible file systems
R ISO 9660/Joliet standard for CDs
R UDF for audio and video DVDs
R FAT16 or FAT32 for storage media
Multisession CDs
For multisession CDs, the content of the first
session determines how COMAND will
process the CD. COMAND plays only one
session and gives priority to the audio CD
session.
If possible, use COMAND to play only CDs
which have been written in one session.
File structure of a data carrier
When you create a disc with compressed
music files, the tracks can be organized in
folders. Afolder may also contain subfolders.
A disc can contain amaximum of 255 folders.
Each folder can contain a maximum of
255 tracks and 255 subfolders.
The disc may contain no more than eight
directory levels. Files beyond the eighth level
will no tbe recognized by the system.
Track and file names
When you create a disc with compressed
music files, you can assign names to the
tracks and folders.
COMAND uses these names accordingly for
the display. Folders which contain data other than MP3 or WMA tracks are not displayed by
COMAND.
If MP3 or WMA files are stored in the root
directory itself, the root directory will also be
treated as a folder. COMAND will then show
the name of the root directory as the folder
name.
You must observe the following when
assigning trac knames:
R track names must have at least 1
character.
R track names must have the extension
"mp3" or "wma".
R there must be a full stop between the track
name and the extension.
Example of a correct track name:
"Track1.mp3".
i COMAND does no tsuppor tID3 tags.
Permissible formats
COMAND supports the following formats:
R Microsoft Windows Media Audio V2, V7, V8
and V9 (WMA)
Permissible bi tand sampling rates
COMAND supports MP3files of the following
types:
R fixed and variable bit rates from 32 kbit/s
to 320 kbit/s
R sampling rates of 8 kHz to 48 kHz
COMAND supports WMAfiles of the
following types:
R fixed bit rates from 5 kbit/s to 384 kbit/s
R sampling rates of 8 kHz to 48 kHz
COMAND does notsupport WMAfiles of the
following types:
R DRM (Digital Rights Management)
encrypted files
i Only use tracks with a bit rate of at least
128 kbit/s and a sampling rate of at least
44.1 kHz. Lower rates can cause a
noticeable deterioration in quality. This is
especially the case if you have activated a
surround sound function. Audio
217COMAND Z
Page 220 of 494
Notes on copyright
MP3 or WMA tracks that you create or play
back are generally subject to copyright
protection in accordance with the applicable
international and national regulations.
In many countries, reproductions, even for
private use, are not permitted withou tthe
prior consentoft he copyright holder.
Make sure that you know about the applicable
copyright regulations and that you comply
with these.
If you own these rights yourself, e.g. for your
own compositions and recordings, or if the
copyright holder has granted you permission,
these restrictions do not apply.
Notes on CDs/DVDs
Discs with copy protection are not
compatible with the audio CD standard and
therefore may not be able to be played by
COMAND.
There may be playback problems when
playing copied discs. There is a wide range of
data carriers, disc-writing software and
writers available. This variety means that
there is no guarantee that the system will be
able to play discs that you have copied
yourself.
There may be playback problems if you play
CDs that you have copied yourself with a
storage capacity of more than 700 MB. CDs
of this type do not conform to the currently
applicable standards.
i On many DVD audio discs, the last track
does not contain any music and COMAND
then switches to the next disc. This is
normal system behavior and does not mean
that there is a malfunction.
! Do not affix stickers or labels to the discs.
They could peel off and damage the drive.
The drive is designed to hold discs which
comply with the EN 60908 standard.
Therefore, you can only use discs with a
maximum thickness of 1.3 mm. If you insert thicker discs, e.g. those that
contain data on both sides (DVD on one
side and audio data on the other), they
cannot be ejected and can damage the
drive.
Do not use discs with a diameter of 8 cm,
even with an adapter. Only use round discs
with a diameter of 12 cm.
i COMAND is able to play back audio CDs
in multichannel audio format. MUSIC REGISTER
General notes You can store music files in MP3 or WMA
format in the MUSIC REGISTER. The memory
has a capacity of approximately
7GB.
! Retai nthe original music files in a secure
location. An error in COMAND might result
in the loss of the music files stored in the
MUSIC REGISTER. Mercedes-Benz is not
liable for any loss of data.
Switching to MUSIC REGISTER X
Select Audio in the main function bar by
sliding ZVand turning cVdthe COMAND
controller and press Wto confirm.
If MUSIC REGISTER was the last mode
selected, it is now switched on.
If another audio source is switched on, you
can now switch on the MUSIC REGISTER in
the audio menu.
X Select Music Register and press
Wto
confirm. 218
AudioCOMAND