AUX MERCEDES-BENZ CL-Class 2014 C217 Owner's Manual
[x] Cancel search | Manufacturer: MERCEDES-BENZ, Model Year: 2014, Model line: CL-Class, Model: MERCEDES-BENZ CL-Class 2014 C217Pages: 494, PDF Size: 13.55 MB
Page 7 of 494
Rear
............................................... 269
Setting ........................................... 268
Setting the center air vents ...........268
Setting the side air vents ...............268
Stowag ecompartmen t.................. 268
Alarm system
see ATA (Anti-Theft Alarm system)
Alertness Assistant
see ATTENTION ASSIST
Alternative route ............................... 159
Ambient light setting (COMAND) .....238
AMG menu (on-board computer) .....343
Anticipatory occupant protection
see PRE-SAFE ®
(anticipatory
occupant protection)
Anti-loc kBraking System
see ABS (Anti-lock Braking System)
Anti-Theft Alarm system
see ATA (Anti-Theft Alarm system)
Ashtray ............................................... 405
Assistance menu (on-board
computer) .......................................... 347
ATA (Anti-Theft Alarm system) Activating/deactivating ...................70
Function .......................................... .70
Switching off the alarm ....................70
ATTENTIO NASSIST
Activating/deactivating .................348
Display message ............................ 375
Function/notes ............................. 321
Audio
Radio mode ................................... 199
Audio database
see MUSIC REGISTER
Audio DVD
Mode ,switchin gto........................ 210
Pause function ............................... 211
Playback options ........................... 216
Safety notes .................................. 209
Setting the audio forma t................ 216
Stop function ................................. 212
Audio format, setting
Audi oDVD ..................................... 216
Video DVD ..................................... 233
Audio menu (on-board computer) ....342
Authorized Mercedes-Benz Center see Qualified specialist workshop Authorized workshop
see Qualified specialist workshop
AUTO lights
Display message ............................ 370
see Lights
Automatic engine start (ECO start/
stop function) .................................... 277
Automatic engine switch-off (ECO
start/stop function) ..........................276
Automatic headlamp mode ..............251
Automatic transmission Automatic drive program ...............283
Changing gea r............................... 282
DIRECT SELECT leve r..................... 279
Display message ............................ 385
Drive position (ECO start/stop
function) ........................................ 280
Driving tips .................................... 282
Emergency running mode ..............286
Engaging drive position .................. 280
Engaging neutra l............................ 280
Engaging revers egear ................... 279
Engaging the par kposition ............ 279
Kickdow n....................................... 282
Manual drive program ....................284
Neutral (ECO start/stop function) .280
Problem (malfunction) ...................286
Progra mselector button ................282
Pulling away ................................... 275
Shift range s................................... 283
Starting the engine ........................274
Steering wheel paddle shifters ......283
Transmission position displa y........ 280
Transmissio npositions .................. 281
Automatic transmission
emergency mode ............................... 286
Autostore ........................................... 201
see Station memory (radio)
AUX (audio)
Notes/socket ................................ 227
Switching to ................................... 228
AUX (video)
Setting the picture .........................228
Setting the volume and sound .......234
Showing/hiding the menu .............234
Switching to ................................... 234 Index
5
Page 22 of 494
Setting the volume
Telephone calls .............................. 127
Video AUX ..................................... 234
Side impact air bag .............................49
Side marker lamp (display
message) ............................................ 369
Side windows Cleaning ......................................... 430
Convenience closing feature ............89
Convenience opening feature ..........89
Important safety information ...........88
Opening/closing .............................. 89
Resetting ......................................... 90
Troubleshooting ............................... 91
Sliding sunroof
Important safety notes ....................91
Opening/closing .............................. 92
Resetting ......................................... 93
Troubleshooting ............................... 93
SmartKey
Changing the battery .......................78
Changing the programming .............77
Checking the battery .......................78
Convenience closing feature ............89
Convenience opening feature ..........89
Display message ............................ 387
Important safety notes ....................74
Malfunction ...................................... 80
Positions (ignition lock) .................273
Starting the engine ........................274
SMS message
see Text message
Snow chains ...................................... 457
Socket Glove box ...................................... .407
Sockets
Points to observe before use .........406
Trunk ............................................. 407
Soun dmenu ....................................... 128
Sounds see Soun dsettings
Sound settings
Balance and fader ..........................128
Calling up the sound menu ............128
Surround sound ............................. 129
Treble and bas s............................. 128Spare wheel
Notes/data .................................... 479
Storage location ............................ 436
see Emergency spare wheel
Specialist workshop ............................ 29
Speech control see Voice Control System
Speed, controlling
see Cruise control
Speedometer
Activating/deactivating the
additional speedometer .................350
Digita l............................................ 340
In the Instrument cluster .................35
Selecting the unit of measurement 350
see Instrument cluster
SPLITVIEW ......................................... 116
Spotlight function ............................. 322
SRS (Supplemental Restraint
System)
Display message ............................ 362
Introduction ..................................... 44
Warning lamp ................................. 395
Warning lamp (function) ................... 44
Standing lamps
Display message ............................ 369
Switching on/off ........................... 250
Starting (engine) ................................ 274
Station memory ................................. 201
Steering (display message) ..............387
Steering wheel Adjusting (electrically). ..................103
Button overview ............................... 37
Buttons (on-board computer) ......... 337
Cleaning ......................................... 433
Important safety notes ..................102
Paddle shifters ............................... 283
Steering wheel heating ..................103
Storing settings (memory function) 106
Steering wheel heating
Switching on/off ........................... 103
Steering wheel paddle shifters ........283
Stop function Audi oDVD ..................................... 212
Video DVD ..................................... 231
Stopwatch (RACETIMER) ................... 34420
Index
Page 26 of 494
Locking separately
...........................86
Opening automatically from insid e..86
Trunk lid
Display message ............................ 386
Power closing feature ......................83
Trunk lid opening height restriction 239
Turn signals Display message ............................ 367
Switching on/off ........................... 252
TV
Automatic picture shutoff ..............228
Picture settings .............................. 228
Type identification plate
see Vehicle identification plate U
Unlocking Emergency unlocking .......................83
From inside the vehicle (central
unlocking button) ............................. 82
USB
see Medi aInterface V
Vanity mirror (in the sun visor) ........ 404
Vehicle Correct us e...................................... 29
Data acquisition ............................... 30
Display message ............................ 385
Emergency locking ........................... 83
Emergency unlocking .......................83
Equipment ....................................... 26
Individua lsettings .......................... 349
Limited Warranty ............................. 30
Loading .......................................... 464
Lowering ........................................ 441
Maintenance .................................... 27
Parking for a long period ................ 291
Pulling away ................................... 275
Raising ........................................... 438
Reporting problems .........................30
Towing away .................................. 446
Transporting .................................. 448
Vehicle data ................................... 490
Vehicle battery
see Battery (vehicle) Vehicle data
....................................... 490
Vehicle dimensions ...........................490
Vehicle identification number see VIN
Vehicle identification plate ..............482
Vehicle level Active Body Control (ABC) .............310
AIRMATIC ...................................... 309
Display message ............................ 377
Vehicle level (display message) .......376
Vehicle tool kit .................................. 436
Video see Video DVD
Video AUX
Setting the picture .........................228
Video DVD
Automatic picture shutoff ..............228
DVD menu ..................................... 232
Fast forward/rewind ..................... .231
Function restrictions ......................230
Interactive content ........................234
Notes on discs ............................... 229
Operation ....................................... 229
Pause function ............................... 231
Playing conditions .......................... 229
Safety notes .................................. 229
Selecting ........................................ 231
Selecting a film/title ..................... .232
Selecting a scene/chapter ............231
Setting the audio forma t................ 233
Setting the language ......................233
Setting the picture .........................228
Showing/hiding the control menu .230
Showing/hiding the menu .............230
Stop function ................................. 231
Subtitles ........................................ 233
Switching to ................................... 230
VIN ...................................................... 482
Voice Control System Settings ......................................... 132
Volume, adjusting
COMAND ....................................... 127
Navigation messages .....................12724
Index
Page 114 of 494
At
ag lance COMAND operating system
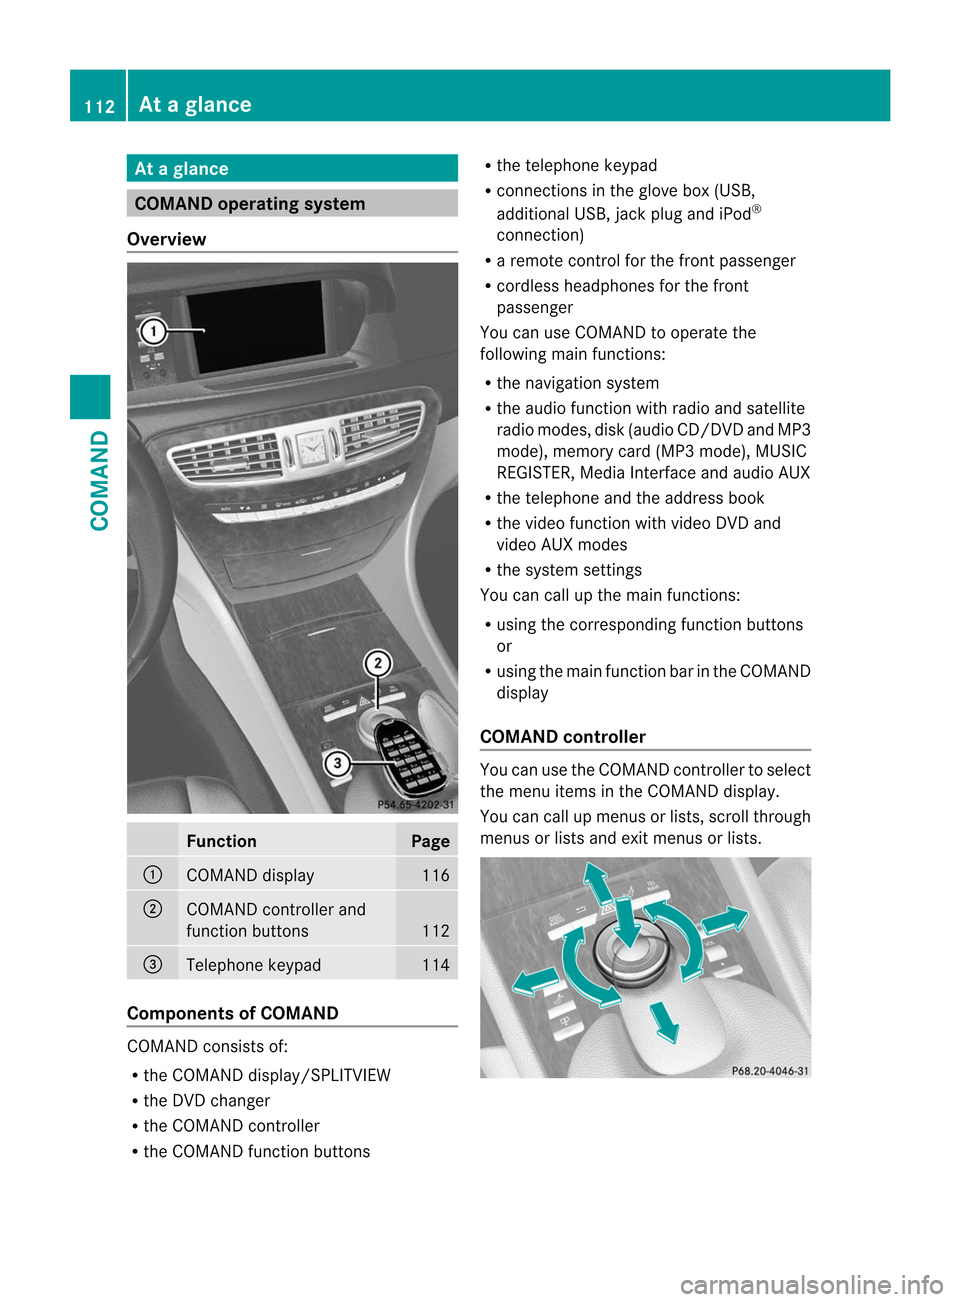
Overview Function Page
:
COMAN
Ddisplay 116
;
COMAND controller and
function buttons
112
=
Telephone keypad 114
Components of COMAND
COMAND consists of:
R
the COMAND display/SPLITVIEW
R the DVD changer
R the COMAND controller
R the COMAND function buttons R
the telephone keypad
R connections in the glove box (USB,
additional USB, jac kplug and iPod ®
connection)
R a remote control for the front passenger
R cordless headphones for the front
passenger
You can use COMAND to operate the
following main functions:
R the navigation system
R the audio function with radio and satellite
radio modes, disk (audio CD/DV Dand MP3
mode), memory card (MP3 mode), MUSIC
REGISTER, Media Interface and audio AUX
R the telephone and the address book
R the video function with video DVD and
video AUX modes
R the system settings
You can call up the main functions:
R using the corresponding functio nbuttons
or
R using the main function bar in the COMAND
display
COMAND controller You can use the COMAND controller to select
the menu items in the COMAND display.
You can call up menus or lists, scroll through
menus or lists and exit menus or lists.112
At
ag lanceCOMAND
Page 118 of 494
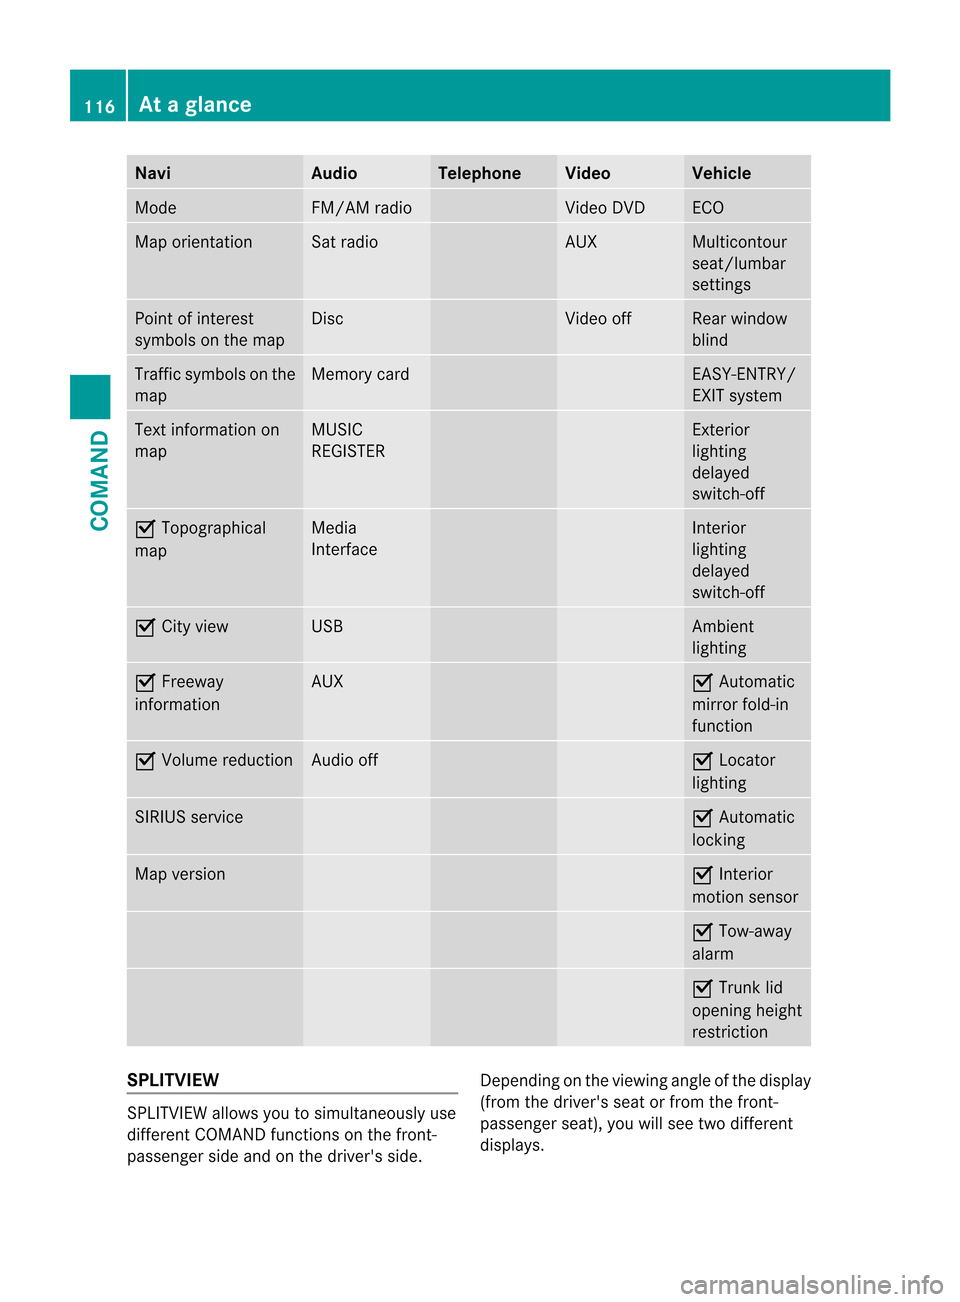
Navi Audio Telephone Video Vehicle
Mode FM/AM radio Video DVD ECO
Map orientation Sat radio AUX Multicontour
seat/lumbar
settings
Point of interest
symbols on the map Disc Video off Rear window
blind
Traffi
csymbols on the
map Memory card EASY-ENTRY/
EXIT system
Text information on
map MUSIC
REGISTER Exterior
lighting
delayed
switch-off
O
Topographical
map Media
Interface Interior
lighting
delayed
switch-off
O
City view USB Ambient
lighting
O
Freeway
information AUX O
Automatic
mirror fold-in
function O
Volume reduction Audio off O
Locator
lighting SIRIUS service O
Automatic
locking Map version O
Interior
motion sensor O
Tow-away
alarm O
Trunk lid
opening height
restriction SPLITVIEW
SPLITVIEW allows you to simultaneously use
different COMAND functions on the front-
passenger side and on the driver's side.
Depending on the viewing angle of the display
(from the driver's seat or from the front-
passenger seat), you will see two different
displays.116
At
ag lanceCOMAND
Page 119 of 494
For example, the "Navi" function can be used
from the driver's side while the "Video"
function is used on the front-passenger side.
Use the remote control to operate COMAND
from the front-passenger side with
SPLITVIEW.
Please bear the following in mind
R You rvehicle may be equipped with
SPLITVIEW, depending on its date of
production. The use of SPLITVIEW is
currently not permitted in the following
states: AL, AZ, CO, IL, LA, MA, MD, NH, PA,
VA, VT, WA, WI, and WV or in the Canadian
provinces of Manitoba, Newfoundland,
New Brunswick, and Prince Edward Island.
It is the driver's responsibility to observe
ALL regional legally prescribed regulations.
If your vehicle is registered in a state or
province in which SPLITVIEW is not
approved, this function must be
deactivated. Please contact an authorized
specialist dealer to chec kwhether
SPLITVIEW is approved in your state or
province.
R Volume adjustment for the cordless
headphones can be carried out on the
headphones. Before putting on the
headphones, make sure that the volume
has not been set too high.
R The remote control can be used for the
volume adjustment of corded headphones.
R You can only use media from the driver's
and front-passenger sides separately if the
media are from different sources. Example:
on the driver's side, an audio CD is being
played by the DVD changer. This means
that on the front-passenger side, the DVD
changer cannot be used to play a different
disc type, for instance a video DVD.
However, other media can be used at the
same time on the front-passenger side,
including radio, memory card, MUSIC
REGISTER, Media Interface, USB or AUX.
R If you use the same medium on both sides,
settings for this medium can be carried out
from either side. R
There must be intervisibility between the
headphones and the display so that
COMAND can optimally transmit music and
speech via the infrared signal on the front-
passenger's headphones. For this reason,
please also observe that the headphones
have left and right sides, and use them
correctly.
R Only entertainment functions, i.e. audio
and video, can be used separately via
SPLITVIEW.
R The multifunction steering wheel can only
be used for functions which relate to the
driver's side.
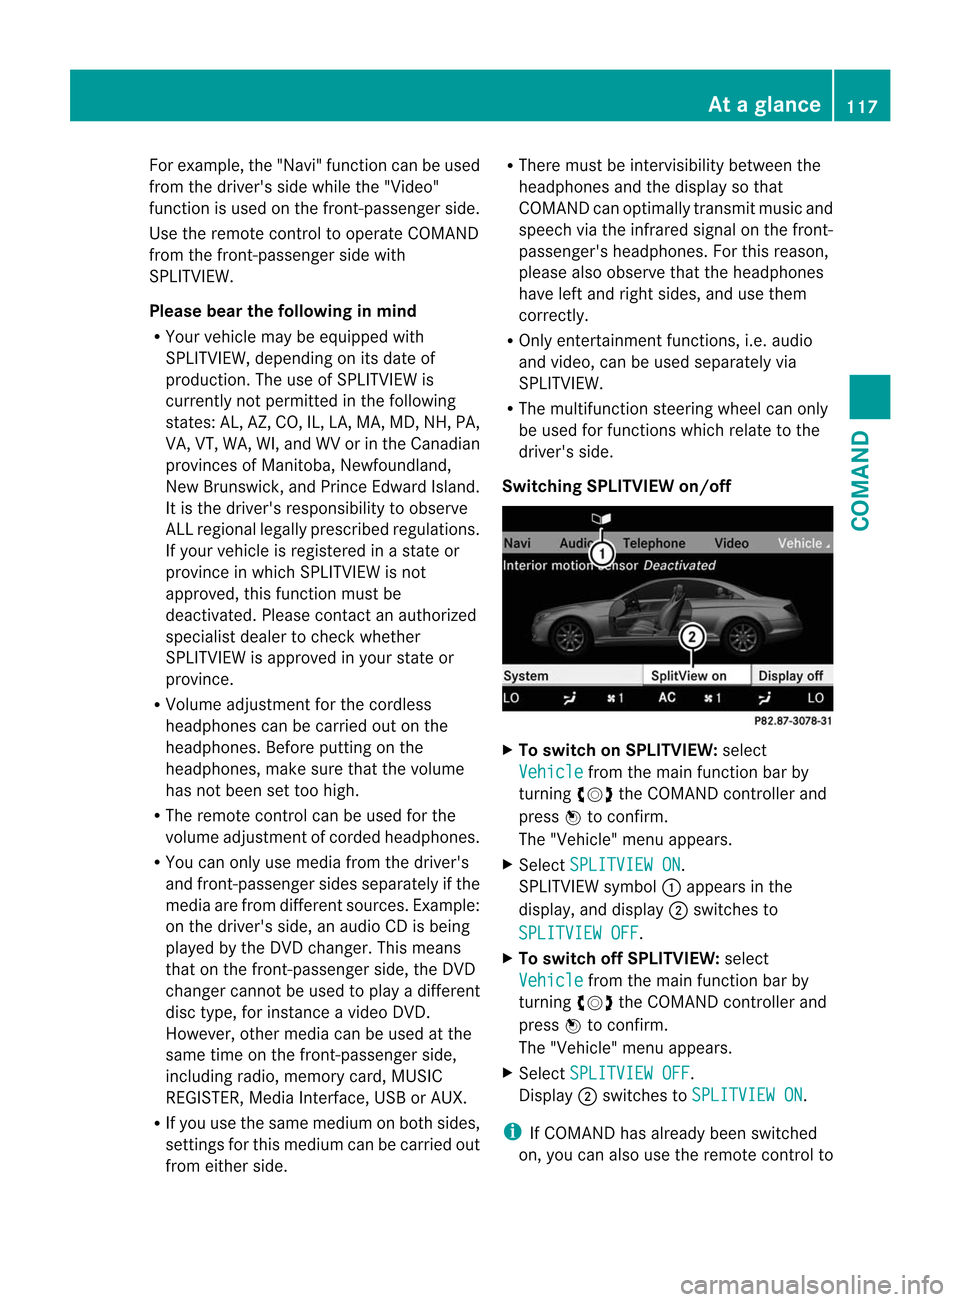
Switching SPLITVIEW on/off X
To switch on SPLITVIEW: select
Vehicle from the main function bar by
turning cVdthe COMAND controller and
press Wto confirm.
The "Vehicle" menu appears.
X Select SPLITVIEW ON .
SPLITVIEW symbol :appears in the
display, and display ;switches to
SPLITVIEW OFF .
X To switch off SPLITVIEW: select
Vehicle from the main function bar by
turning cVdthe COMAND controller and
press Wto confirm.
The "Vehicle" menu appears.
X Select SPLITVIEW OFF .
Display ;switches to SPLITVIEW ON .
i If COMAND has already been switched
on, you can also use the remote control to At
ag lance
117COMAND Z
Page 131 of 494
Surround sound
General information
If your vehicle is equipped with the harman/
kardon
®
Logic 7 ®
surround sound system,
you can provide the optimum sound
experience for every passenger.
The harman/kardon ®
Logic7 ®
surround
sound system is available for the following
operating modes:
R radio (FM only)
R satellite radio
R audio CD
R audio DVD (MLP™, dts™, PCM and
Dolby ®
Digital audio formats)
R MP3
R Media Interface
R video DVD (PCM, dts™ and Dolby ®
Digital
audio formats)
R AUX
Because some DVDs contain both stereo and
multichannel audio formats, it may be
necessary to set the audio format
(Y page 216).
i The Logic7 ®
ON function enables
playback of stereo recordings, for instance,
with a surround sound experience for every
passenger. It enables optimum playback of
music and films on CDs, audio DVDs or
video DVDs with multichannel audio
formats, such as MLP™, dts™ or Dolby ®
Digital. This results in sound
characteristics like those intended by the
sound engineer when the original was
recorded.
i If you select Logic7 ®
OFF , the sound
system plays all playable formats as stored
on the medium. Due to the design of the
passenger compartment, an optimum
audio experience cannot be guaranteed for
all passengers.
i Discs which support the audio formats
mentioned have the following logos: Dolby
®
Digital dts™
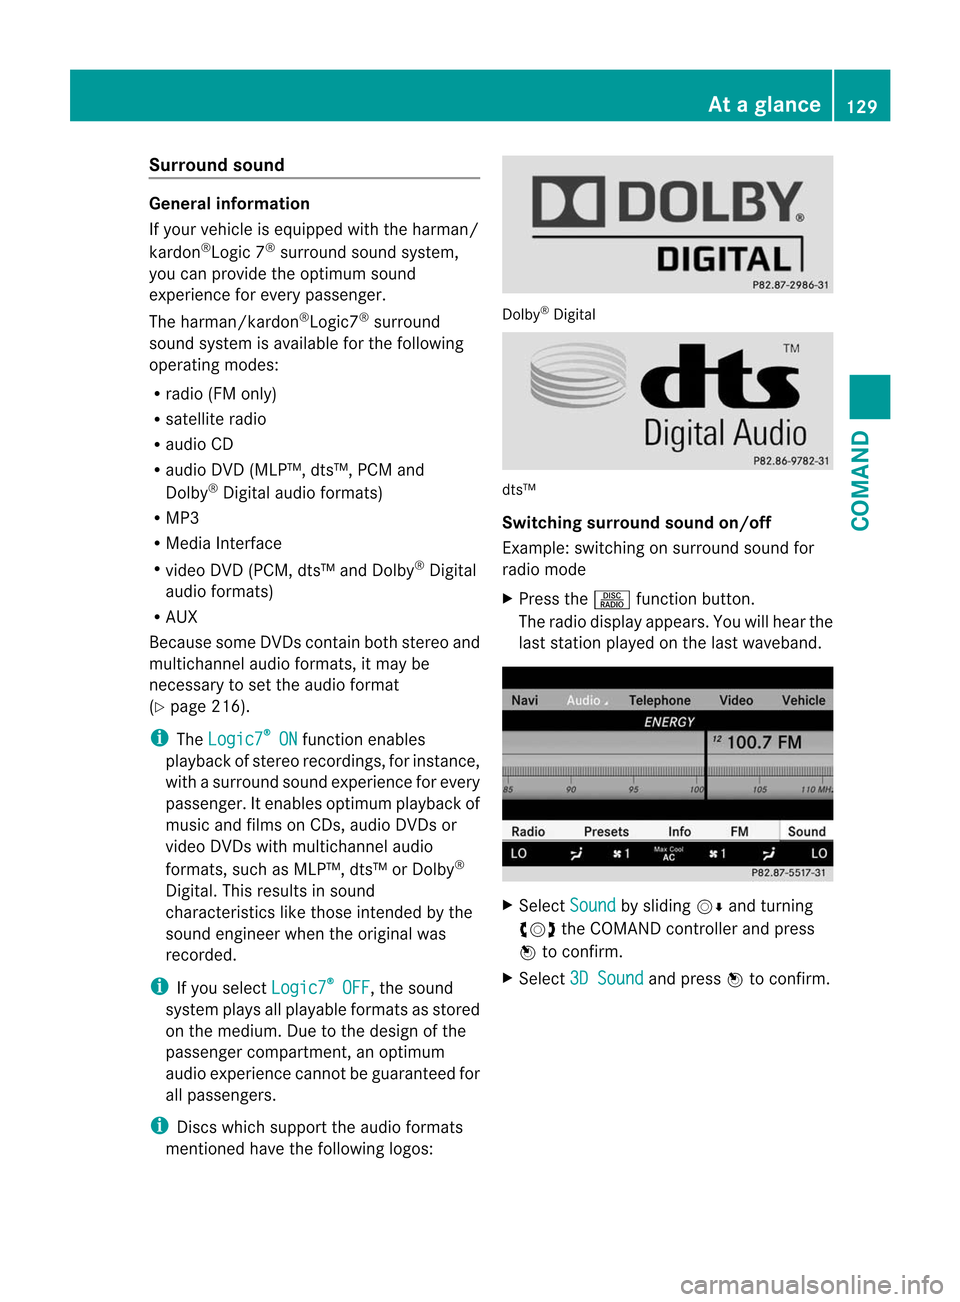
Switching surround sound on/off
Example: switching on surround sound for
radio mode
X
Press the Rfunction button.
The radio display appears. You will hear the
last station played on the last waveband. X
Select Sound by sliding
VÆand turning
cVd the COMAND controller and press
W to confirm.
X Select 3D Sound and press
Wto confirm. At
ag lance
129COMAND Z
Page 229 of 494
The tracks in the currently active category
or folder, including any subfolders, are
played in random order.
i For USB devices, the random playlists
offer a maximum of 300 tracks chosen at
random.
X To select a playback option: select
Media Interface in the basic display by
sliding VÆand turning cVdthe COMAND
controller and press Wto confirm.
The options list appears. The #dot
indicates the option selected.
X Select an option and press Wto confirm.
Separate USB connection In addition to the USB connection on the
Media Interface, there is another USB
connection in the glove box. This connection
can also be used to play audio files.
Electrical consumption at this connection
must not exceed a continuous current of
500 mA. If the electrical consumption is
higher, use a separate source to provide
power for the USB device (e.g.
12 Vp ower supply). X
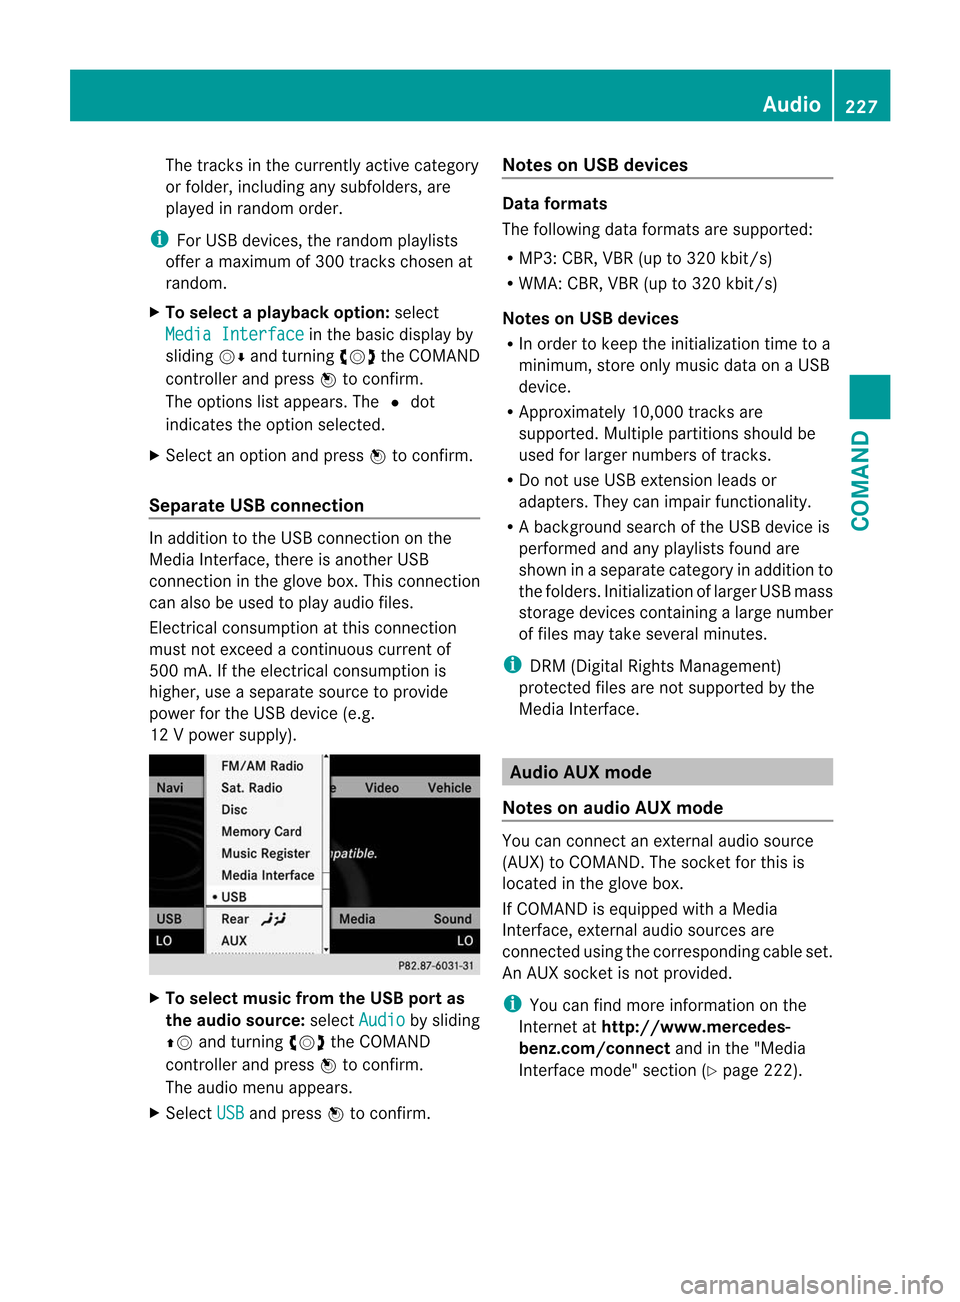
To select music from the USB port as
the audio source: selectAudio by sliding
ZV and turning cVdthe COMAND
controller and press Wto confirm.
The audio menu appears.
X Select USB and press
Wto confirm. Notes on USB devices Data formats
The following data formats are supported:
R
MP3: CBR, VBR (up to 320 kbit/s)
R WMA: CBR, VBR (up to 320 kbit/s)
Notes on USB devices
R In order to keep the initialization time to a
minimum, store only music data on a USB
device.
R Approximately 10,000 tracks are
supported. Multiple partitions should be
used for larger numbers of tracks.
R Do not use USB extension leads or
adapters. They can impair functionality.
R A background search of the USB device is
performed and any playlists found are
shown in a separate category in addition to
the folders. Initialization of larger USB mass
storage devices containing a large number
of files may take several minutes.
i DRM (Digital Rights Management)
protected files are not supported by the
Media Interface. Audio AUX mode
Notes on audio AUX mode You can connect an external audio source
(AUX) to COMAND. The socket for this is
located in the glove box.
If COMAND is equipped with a Media
Interface, external audio sources are
connected using the corresponding cable set.
An AUX socket is not provided.
i
You can find more information on the
Internet at http://www.mercedes-
benz.com/connect and in the "Media
Interface mode" section (Y page 222). Audio
227COMAND Z
Page 230 of 494
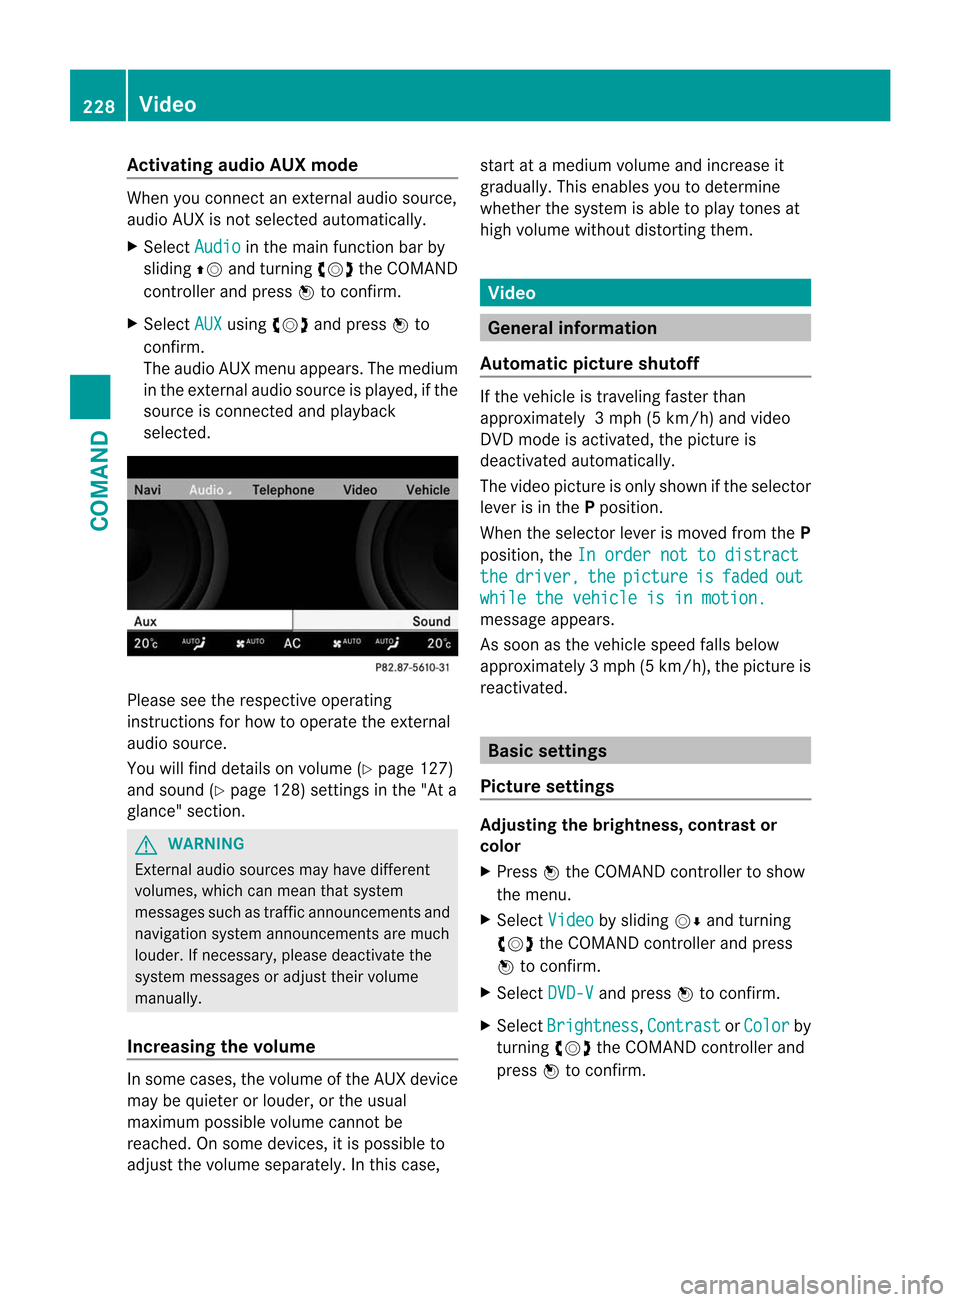
Activating audio AUX mode
When you connec
tanexternal audio source,
audio AUX is not selected automatically.
X Select Audio in the main function bar by
sliding ZVand turning cVdthe COMAND
controller and press Wto confirm.
X Select AUX using
cVdand press Wto
confirm.
The audio AUX menu appears. The medium
in the external audio source is played, if the
source is connected and playback
selected. Please see the respective operating
instructions for how to operate the external
audio source.
You will find details on volume (Y
page 127)
and sound (Y page 128) settings in the "At a
glance" section. G
WARNING
External audio sources ma yhave different
volumes, which can mean that system
messages such as traffic announcements and
navigation system announcements are much
louder .Ifnecessary, please deactivate the
system messages or adjust their volume
manually.
Increasing the volume In some cases, the volume of the AUX device
may be quieter or louder, or the usual
maximum possible volume cannot be
reached. On some devices, it is possible to
adjust the volume separately. In this case, start at a medium volume and increase it
gradually
.This enables you to determine
whether the system is able to play tones at
high volume without distortingt hem. Video
General information
Automatic picture shutoff If the vehicle is traveling faster than
approximately
3mph (5 km/h) and video
DVD mode is activated, the picture is
deactivated automatically.
The video picture is only shown if the selector
lever is in the Pposition.
When the selector lever is moved from the P
position, the In order not to distract the driver, the picture is faded out
while the vehicle is in motion.
message appears.
As soon as the vehicle speed falls below
approximately
3mph (5 km/h), the picture is
reactivated. Basic settings
Picture settings Adjusting the brightness, contrast or
color
X
Press Wthe COMAND controller to show
the menu.
X Select Video by sliding
VÆand turning
cVd the COMAND controller and press
W to confirm.
X Select DVD-V and press
Wto confirm.
X Select Brightness ,
Contrast or
Color by
turning cVdthe COMAND controller and
press Wto confirm. 228
VideoCOMAND
Page 236 of 494
X
Select DVD Functions and press
Wto
confirm.
X Select Subtitles or
Camera angle and
press Wto confirm.
In both cases, a menu appears .The # dot
in front of an entry indicates the current
setting.
X Select a setting by turning cVdthe
COMAND controller and press Wto
confirm.
X To exit the menu: slideXVY the COMAND
controller.
Interactive content DVDs can contain interactive content (e.g. a
video game). In a video game, for example,
you may be able to influence events by
selecting and triggering actions. The type and
number of actions depend on the DVD.
X
Select an action by sliding ZVÆorXVY the
COMAND controller and press Wto
execute it.
A menu appears and the first entry,
Select , is highlighted.
X Press Wthe COMAND controller. AUX video mode
AUX jacks An external video source (video AUX) can be
connected to COMAND via the media
interface( Ypage 222 )using the AUX jacks in
the glove box.
i In vehicles with a rear view camera, the
video AUX jack cannot be used for external
video sources. Switching to video AUX mode X
Select Video in the main function bar by
sliding ZVand turning cVdthe COMAND
controller and press Wto confirm.
If video AUX mode was the last mode
selected, it will now be active.
If another video source is switched on, you
can now switch to video AUX mode in the
video menu.
X Select Video and press
Wto confirm.
X Select AUX and press
Wto confirm.
The video AUX menu appears. You will hear
and see the content of the external video
source if it is connected and switched to
playback.
For details on how to operate the external
video source, see the respective device's
operating instructions.
Showing/hiding the menu X
To show: pressWthe COMAND
controller.
X To hide: slideZVthe COMAND controller
and confirm Full screen by pressing
W.
Volume and sound settings You will find details on volume (Y
page 127)
and sound (Y page 128) settings in the "At a
glance" section. G
WARNING
External video sources may have different
volumes, which can mean that system
messages such as traffic announcements and
navigation system announcements are much
louder. If necessary, please deactivate the
system messages or adjust their volume
manually.
i In some cases, the volume of the AUX
device may be quieter or louder, or the
usual maximum possible volume cannot be
reached. On some devices, it is possible to
adjust the volume separately.Int his case,
start at a medium volume and increase it 234
VideoCOMAND