four wheel drive MERCEDES-BENZ CL-Class 2014 C217 Owner's Manual
[x] Cancel search | Manufacturer: MERCEDES-BENZ, Model Year: 2014, Model line: CL-Class, Model: MERCEDES-BENZ CL-Class 2014 C217Pages: 494, PDF Size: 13.55 MB
Page 6 of 494
1, 2, 3 ...
12 Vsocket
see Sockets
4ETS
see ETS/4ETS (Electronic
Tractio nSystem)
4MATIC (permanent four-wheel
drive) .................................................. 311A
ABC see Active Body Control (ABC)
ABS (Anti-lock Braking System)
Display message ............................ 353
Function/notes ................................ 65
Important safety notes ....................65
Warning lamp ................................. 391
Activating/deactivating cooling
with air dehumidification .................264
Activating/deactivating Night
View Assist Plus
Without spotlight function .............325
With spotlight function ................... 323
Active Blin dSpot Assist
Activating/deactivating (on-
board computer) ............................ 348
Display message ............................ 379
Function/informatio n.................... 327
Active Body Control (ABC)
Display message ............................ 377
Function/notes ............................. 310
Active Driving Assistance package .327
Active Lane Keeping Assist Activating/deactivating (on-
board computer) ............................ 349
Display message ............................ 378
Function/informatio n.................... 330
Active multicontour seat ..........101, 245
Active service syste mPLUS
see ASSYS TPLUS service interval
display
ADAPTIVE BRAKE .................................68
Adaptive Damping System (ADS) .....3 09 Adaptive Highbeam Assist
Display message ............................ 370
Function/notes ............................. 254
Switching on/off (on-board
computer) ...................................... 350
Additional speedometer ...................350
Additives (engine oil) ........................487
Address Entering (example )......................... 141
see Addres sbook
Address book
Calling up ....................................... 193
Connecting acall........................... 196
Creating an entry ........................... 194
Deleting an entry ........................... 195
Entering characters .......................125
Entry as ahome address ...............166
Importing contacts ........................192
Introduction ................................... 191
Starting route guidance .................196
Voice tag ....................................... 197
Airb ags
Display message ............................ 364
Front air bag (driver, front
passenger )....................................... 48
Important safety notes ....................46
Knee bag .......................................... 48
PASSENGER AIR BAG OFF
indicator lamp .................................. 50
Safety guidelines ............................. 45
Side impact airb ag.......................... 49
Windo wcurtain air bag .................... 50
Air-conditioning system
see Climate control
Aird istribution
Settin g........................................... 265
Setting (COMAND) .........................240
Airflow
Setting ........................................... 265
Setting (COMAND) .........................241
AIRMATIC
Display message ............................ 376
Function/notes ............................. 309
Air pressure
see Tire pressure
Airv ents
Glove box ....................................... 269
Important safet ynotes .................. 2684
Index
Page 19 of 494
Operating system
see On-board computer
Outside lighting
Delayed switch-off (COMAND) .......237
Outside temperature display ...........337
Overhead control panel ......................40
Override feature Rea rside windows ........................... 64
Own address (navigation)
see Home address P
Pain tcode number ............................ 482
Paintwork (cleaning instructions) ...429
Panic alarm .......................................... 64
Parcel net ........................................... 402
Parking ............................................... 289
Important safety notes ..................289
Parking brake ................................ 290
Position of exterior mirror, front-
passenger side ............................... 105
Rea rview camera .......................... 319
see PARKTRONIC
Parking aid
Parking Guidance ........................... 315
see Exterior mirrors
see PARKTRONIC
Parking brake
Display message ............................ 357
Electric parking brake ....................290
Parking Guidance
Display message ............................ 379
Important safety notes ..................315
Parking position
Exterior mirrors (COMAND) ...........236
PARKTRONIC
Deactivating/activating .................314
Driving system ............................... 312
Function/notes ............................. 312
Important safety notes ..................312
Problem (malfunction) ...................315
Range of the sensors .....................312
Warning displa y............................. 313
PASSENGE RAIR BAG OFF
Problems (malfunction) .................. 364
PASSENGER AIR BAG OFF indicator
lamp ...................................................... 50 Pause function
Audio mode (CD, DVD, MP3) .........211
Video DVD ..................................... 231
Pedals ................................................ .292
Permanent four-wheel drive see 4MATIC (permanent four-
wheel drive)
Phone book
Calling up ....................................... 193
Creating an entry ........................... 194
Deleting an entry ........................... 195
Entering characters .......................125
Introduction ................................... 191
Picture settings (TV, video) ..............228
Plastic trim (cleaning instructions) .432
Playback options Audio mode (CD, DVD, MP3) .........216
POI (navigation)
Entering ......................................... 150
Entering a point of interest using
the map ......................................... 153
List ................................................. 151
ZAGAT ®
surve yservice .................. 152
Point of interest (navigation)
Assigning a category ..................... .151
Power closing feature .........................83
Power washers .................................. 428
Power windows see Side windows
PRE-SAFE ®
(anticipatory occupant
protection) Display message ............................ 361
Operation ........................................ .55
PRE-SAFE ®
Brake
Activating/deactivating .................348
Display message ............................ 362
Function/notes ................................ 68
Warning lamp ................................. 397
Previous destinations (navigation) ..169
Product information ............................26
Programmable button ....................... 113
Program selector button ..................282
Pulling away (automatic
transmission) ..................................... 275
PULSE see Massag efunction (PULSE) Index
17
Page 313 of 494
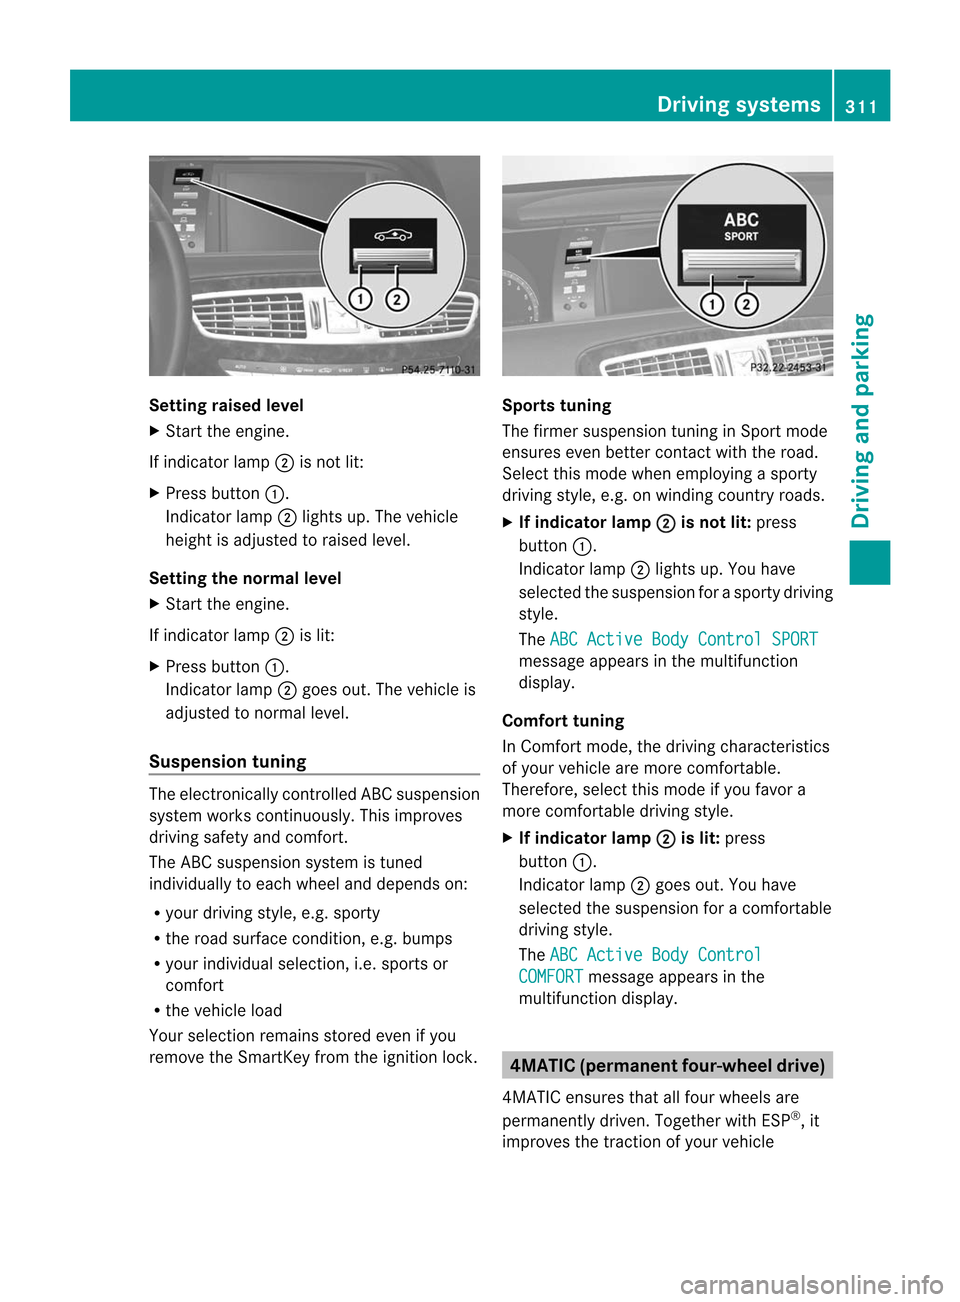
Setting raised level
X
Start the engine.
If indicator lamp ;is not lit:
X Press button :.
Indicator lamp ;lights up. The vehicle
height is adjusted to raised level.
Setting the normal level
X Start the engine.
If indicator lamp ;is lit:
X Press button :.
Indicator lamp ;goes out. The vehicle is
adjusted to normal level.
Suspension tuning The electronically controlled ABC suspension
system works continuously.T
his improves
driving safety and comfort.
The ABC suspension system is tuned
individually to each wheel and depends on:
R your driving style, e.g. sporty
R the road surface condition,e .g. bumps
R your individual selection, i.e .sports or
comfort
R the vehicle load
Your selection remains stored even if you
remove the SmartKey from the ignition lock. Sports tuning
The firmer suspension tunin
ginSport mode
ensures even better contact with the road.
Select this mode when employing a sporty
driving style, e.g. on winding country roads.
X If indicator lamp ; is not lit:
press
button :.
Indicator lamp ;lights up. You have
selected the suspension for a sporty driving
style.
The ABC Active Body Control SPORT message appears in the multifunction
display.
Comfort tuning
In Comfort mode, the driving characteristics
of your vehicle are more comfortable.
Therefore, select this mode if you favor a
more comfortable driving style.
X If indicator lamp ; is lit:
press
button :.
Indicator lamp ;goes out. You have
selected the suspension for acomfortable
driving style.
The ABC Active Body Control COMFORT message appears in the
multifunction display. 4MATIC (permanent four-wheel drive)
4MATIC ensures that all four wheels are
permanently driven. Together with ESP ®
, it
improves the traction of your vehicle Driving systems
311Driving and parking Z
Page 314 of 494
whenever a drive wheel spins due to
insufficient grip.
G
WARNING
If a drive wheel is spinning due to insufficient
traction:
R While driving off, apply as little throttle as
possible.
R While driving, ease up on the accelerator
pedal.
R Adap tyour speed and driving style to the
prevailing road conditions.
Failure to observe these guidelines could
cause the vehicle to skid.
4MATIC cannot prevent accidents resulting
from excessive speed.
! Never tow the vehicle with one axle
raised. This may damage the transfer case.
Damage of this sort is not covered by the
Mercedes-Benz Limited Warranty. All
wheels must remain either on the ground
or be fully raised. Observe the instructions
for towing the vehicle with all wheels in full
contact with the ground.
i In wintry driving conditions, the maximum
effect of 4MATIC can only be achieved if
you use winter tires (M+S tires), with snow
chains if necessary. PARKTRONIC
Important safety notes G
WARNING
The PARKTRONIC is a supplemental system.
It is not intended to, nor does it replace, the
need for extreme care. The responsibility
during parking and other critical maneuvers
always remains with the driver. G
WARNING
Make sure no persons or animals are in or
near the area in which you are parking/
maneuvering .Otherwise, they could be
injured. PARKTRONIC is an electronic parking aid with
ultrasoni
csensors. It indicates visually and
audibly the distance between your vehicle
and an object.
PARKTRONIC is activated automatically when
you:
R switch on the ignition
R shift the transmission to position D,Ror N
R release the electric parkin gbrake
PARKTRONIC is deactivated at speeds above
11 mph (18km/h). It is reactivated at lower
speeds.
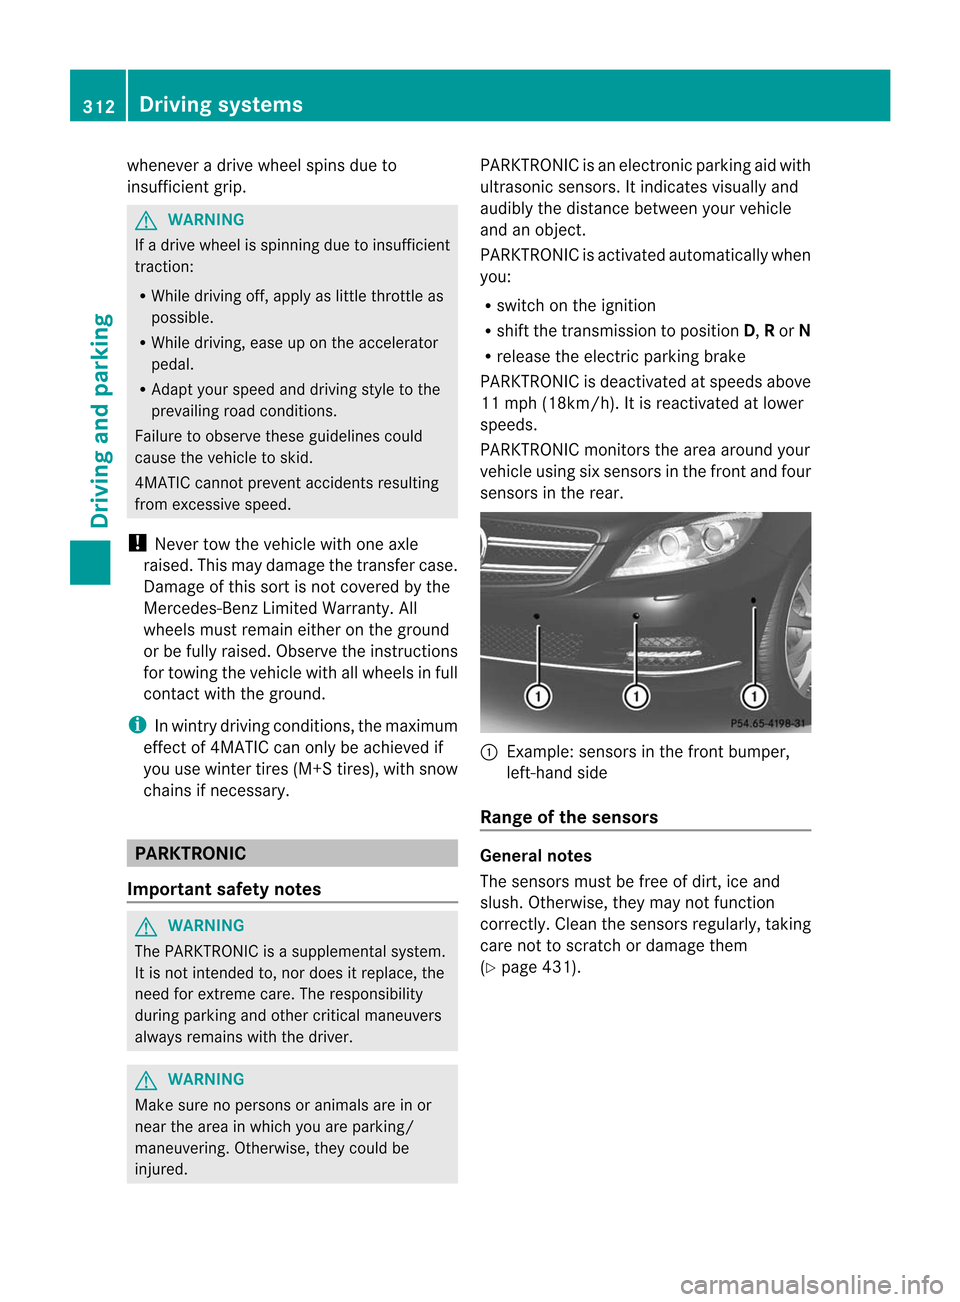
PARKTRONIC monitors the area around your
vehicle using six sensors in the front and four
sensors in the rear. :
Example: sensors in the front bumper,
left-hand side
Range of the sensors General notes
The sensors must be free of dirt, ice and
slush. Otherwise, they may not function
correctly. Clean the sensors regularly, taking
care not to scratch or damage them
(Y
page 431). 312
Driving systemsDriving and parking
Page 463 of 494
severely impair the braking properties and the
driving characteristics. There is a risk of an
accident.
Avoid tire pressures that are too high in all the
tires, including the spare wheel.
Overinflated tires may:
R have an adverse effect on handling
characteristics
R wear quickly and unevenly
R be more susceptible to damage
R have an adverse effect on ride comfort
R increase the braking distance
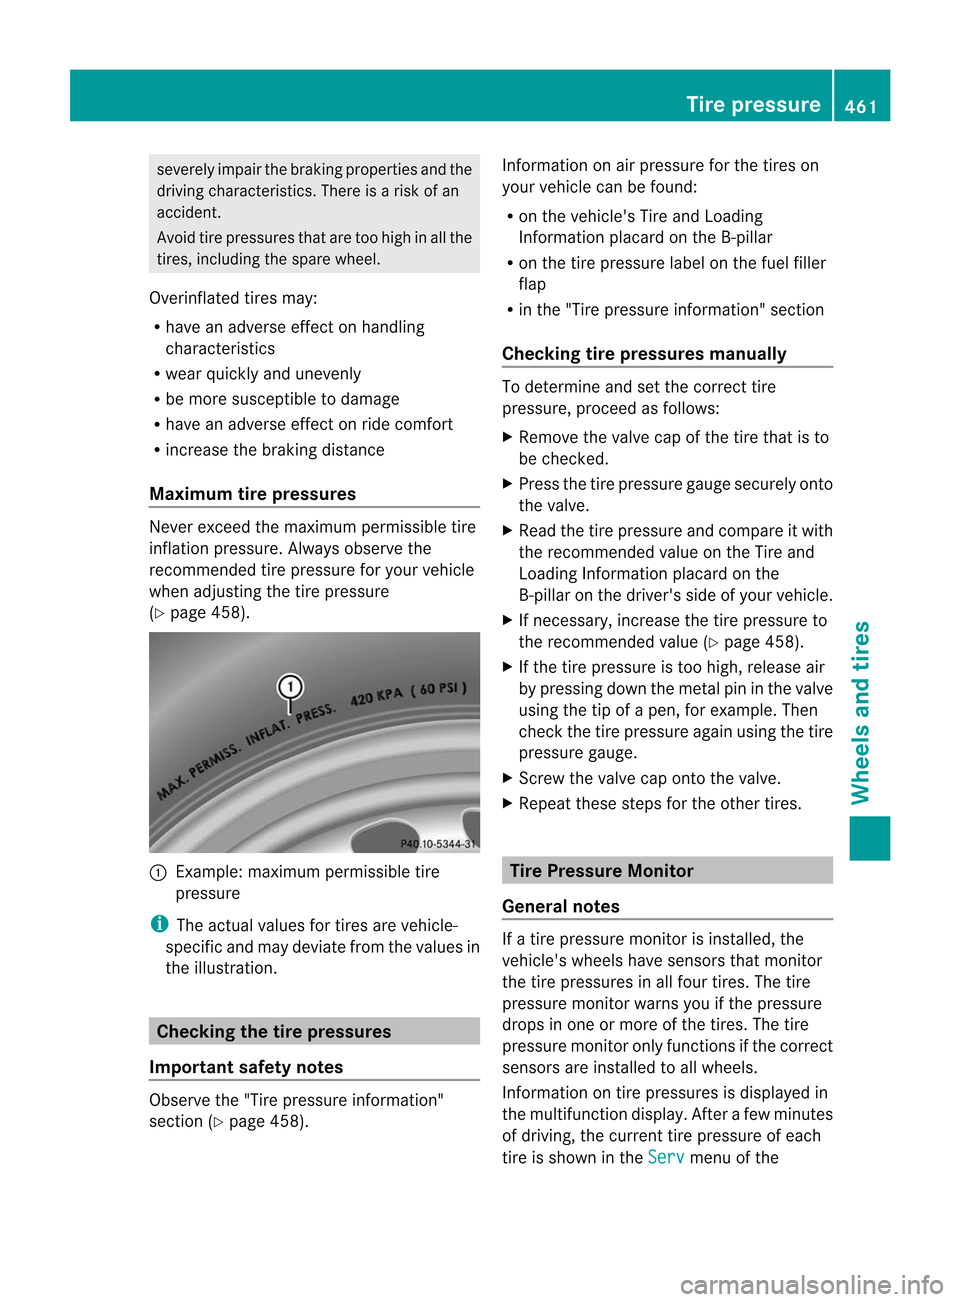
Maximum tire pressures Never exceed the maximum permissible tire
inflation pressure. Always observe the
recommended tire pressure for your vehicle
when adjusting the tire pressure
(Y page 458). :
Example: maximum permissible tire
pressure
i The actual values for tires are vehicle-
specific and may deviate from the values in
the illustration. Checking the tire pressures
Important safety notes Observe the "Tire pressure information"
section (Y
page 458). Information on air pressure for the tires on
your vehicle can be found:
R
on the vehicle's Tire and Loading
Information placard on the B-pillar
R on the tire pressure label on the fuel filler
flap
R in the "Tire pressure information" section
Checking tire pressures manually To determine and set the correct tire
pressure, proceed as follows:
X
Remove the valve cap of the tire that is to
be checked.
X Press the tire pressure gauge securely onto
the valve.
X Read the tire pressure and compare it with
the recommended value on the Tire and
Loading Information placard on the
B-pillar on the driver's side of your vehicle.
X If necessary, increase the tire pressure to
the recommended value (Y page 458).
X If the tire pressure is too high, release air
by pressing down the metal pin in the valve
using the tip of a pen, for example. Then
check the tire pressure againu sing the tire
pressure gauge.
X Screw the valve cap onto the valve.
X Repeatt hese steps for the other tires. Tire Pressure Monitor
General notes If a tire pressure monitor is installed, the
vehicle's wheels have sensors that monitor
the tire pressures in all four tires. The tire
pressure monitor warns you if the pressure
drops in one or more of the tires. The tire
pressure monitor only functions if the correct
sensors are installed to all wheels.
Information on tire pressures is displayed in
the multifunction display. After a few minutes
of driving, the current tire pressure of each
tire is shown in the Serv menu of theTire pressure
461Wheels and tires Z
Page 466 of 494
If the
Tire Pressure(s) Please Correct message appears in the multifunction
display:
X
Check the tire pressure on all four wheels
and correct it if necessary.
i If the wheel positions on the vehicle are
rotated, the tire pressures may be
displayed for the wrong positions for a
short time. This is rectified after a few
minutes of driving, and the tire pressures
are displayed for the correct positions.
Restarting the tire pressure monitor When you restart the tire pressure monitor,
all existing warning messages are deleted and
the warning lamps go out. The monitor uses
the currently set tire pressures as the
reference values for monitoring.
The tire pressure monitor must be restarted
when you set the tire pressure to a new value
(as a resultofc hanged drive or load
characteristics, for example). The tire
pressure monitor then monitors the new tire
pressure values.
i Canada only: in most cases, the tire
pressure monitor recognizes the new
reference values automatically .However,
you can also define reference values
manually as described here.
Restart the tire pressure monitor after you
have set the tire pressure to the value
recommended for the desired driving
situation (Y page 458). Only correct tire
pressures on cold tires. Comply with the
recommended tire pressures on the Tire and
Loading Information placard the B-pillar on
the driver's side. Additional tire pressure
values for driving at high speeds or with heavy
loads can be found in the tire pressure table
on the inside of the fuel filler flap.
X Make sure that the tire pressure is correct
on all four wheels.
X Make sure that the SmartKey is in position
2in the ignition lock. X
Press the =or; button on the
steering wheel to select the Service menu.
X Press the 9or: button to select
Tire Pressure .
X Press the abutton.
The multifunction display shows the
current tire pressure of the individual tires
or the Tire pressure displayed after driving a few minutes
message.
X Press the :button.
The Use Current Pressures as New Reference Values message appears in
the multifunction display.
If you wish to confirm the restart:
X Press the abutton.
The Tire Pressure Monitor Restarted message appears in the
multifunction display.
After driving for a few minutes, the system
checks whether the current tire pressures
are within the specified range. The new tire
pressures are then accepted as reference
values and monitored.
If you wish to cancel the restart:
X Press the %button.
The tire pressure values stored at the last
restart will continue to be monitored. Loading the vehicle
Instruction labels for tires and loads
G
WARNING
Overloaded tires can overheat, causing a
blowout. Overloaded tires can also impair the
steering and driving characteristics and lead
to brake failure. There is a risk of accident.
Observe the load rating of the tires. The load
rating must be at least half of the GAWR of
your vehicle. Never overload the tires by
exceeding the maximum load. 464
Loading the vehicleWheels and tires
Page 472 of 494
specified government test surfaces of asphalt
and concrete.
Atire marked C may have poor
traction performance.
The safe speed on a wet, snow covered or icy
road is always lower than on dry road
surfaces.
You should pay special attention to road
conditions when temperatures are around
the freezing point.
Mercedes-Benz recommends a minimum
tread depth of ãin(4 mm) for all four winter
tires (Y page 456) to maintai nnormal driving
characteristics in winter. Winter tires can
reduce the braking distance on snow-covered
surfaces in comparison with summer tires.
Stopping distance, however, is still
considerably greater than when the road is
not covered with ice or snow. Take
appropriate care when driving.
! Avoid wheelspin. This can lead to damage
to the drive train. Temperature
G
WARNING
The temperature grade for this tire is
established for a tire that is properly inflated
and not overloaded. Excessive speed,
underinflation, or excessive loading, either
separately or in combination, can cause
excessive heat build-up and possible tire
failure.
The temperature grades are A(the highest),
B, and C. These represent the tire's
resistance to the generatio nofheat and its
ability to dissipate heat when tested under
controlled conditions on a specified indoor
laboratory test wheel. Sustained high
temperature can cause the material of the tire
to degenerate and reduce tire life, and
excessive temperature can lead to sudden
tire failure. The grade Ccorresponds to a level
of performance which all passenger car tires
must meet under the Federal Motor Vehicle
Safety Standard No. 109. Grades B and A represent higher levels of performance on the
laboratory test wheel than the minimum
required by law. Tire labeling
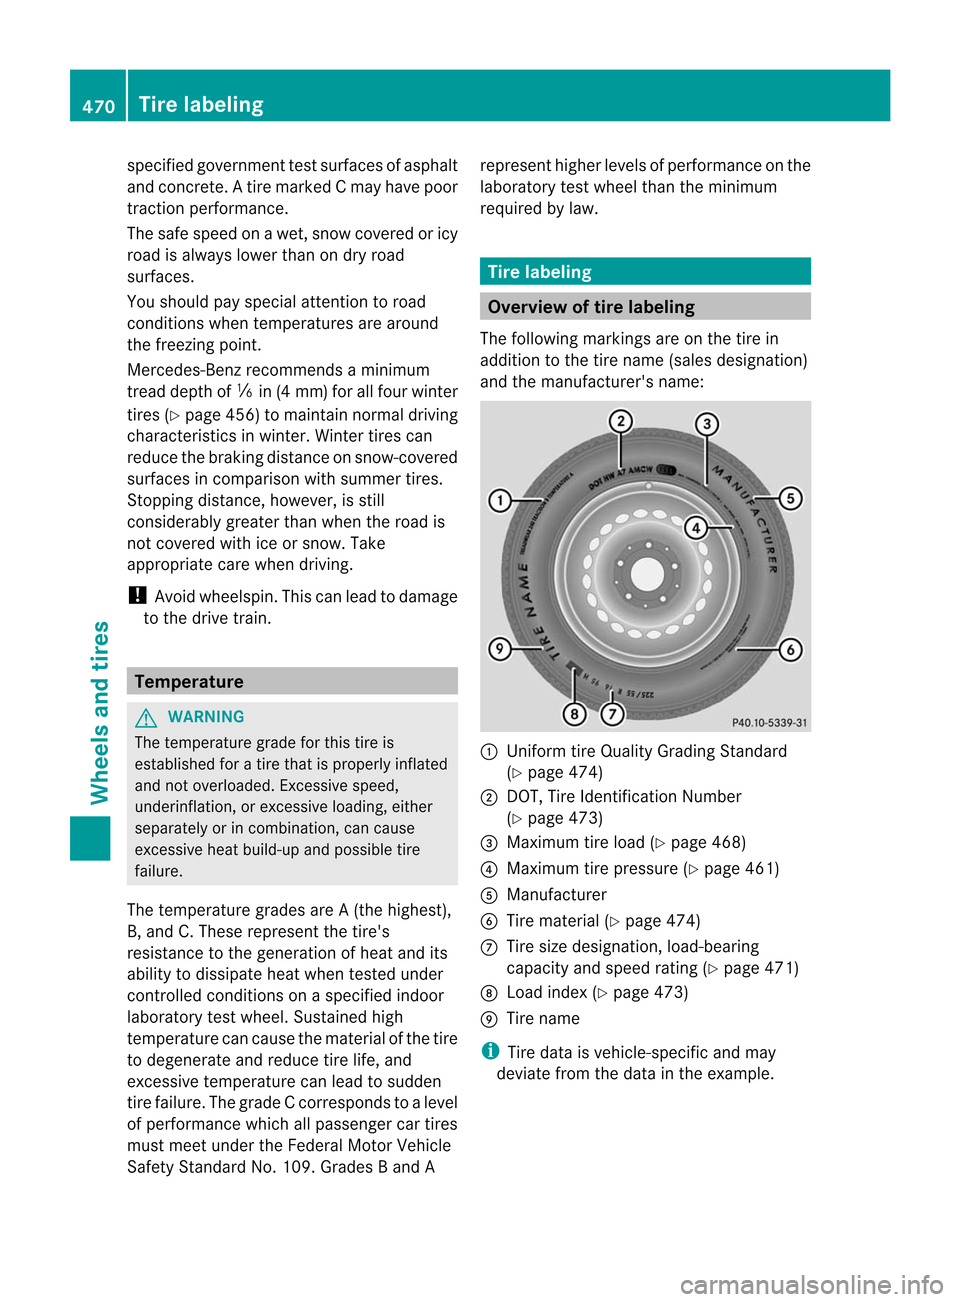
Overview of tire labeling
The following markings are on the tire in
addition to the tire name (sales designation)
and the manufacturer's name: :
Uniform tire Quality Grading Standard
(Ypage 474)
; DOT, Tire Identification Number
(Ypage 473)
= Maximum tire load (Y page 468)
? Maximum tire pressure (Y page 461)
A Manufacturer
B Tire material (Y page 474)
C Tire size designation, load-bearing
capacity and speed rating (Y page 471)
D Load index (Y page 473)
E Tire name
i Tire data is vehicle-specific and may
deviate from the data in the example. 470
Tire labelingWheels and tires