MERCEDES-BENZ CLA 2013 Manual PDF
Manufacturer: MERCEDES-BENZ, Model Year: 2013, Model line: CLA, Model: MERCEDES-BENZ CLA 2013Pages: 352, PDF Size: 5.37 MB
Page 71 of 352
Observe the information on warning lamps
( Y page 258) and display messages which
may be shown in the instrument cluster
( Y page 227).
i Only use wheels with the recommended
tyre sizes. Only then will ESP ®
function
properly.
Characteristics of ESP ®
General notes
If the ÷ ESP warning lamp goes out before
beginning the journey, ESP ®
is automatically
active.
If ESP ®
intervenes, the ÷ ESP®
warning
lamp flashes in the instrument cluster.
If ESP ®
intervenes:
XDo not deactivate ESP ®
under any circum-
stances.XWhen pulling away, only depress the accel-
erator pedal as far as is necessary.XAdapt your driving style to suit the prevail-
ing road and weather conditions.
ECO start/stop function
The ECO start/stop function switches the
engine off automatically if the vehicle stops
moving. When pulling away again, the engine
starts automatically. ESP ®
remains in its pre-
viously selected status. Example: if ESP®
was deactivated before the engine was
switched off, ESP ®
remains deactivated when
the engine is switched on again.
Deactivating/activating ESP ®
Important safety notes
i Observe the "Important safety notes" sec-
tion ( Y page 64).
You can select between the following states
of ESP ®
:
R ESP ®
is activated.
R ESP ®
is deactivated.
GWARNING
If you deactivate ESP ®
, ESP ®
no longer sta-
bilises the vehicle. There is an increased risk
of skidding and an accident.
Only deactivate ESP ®
in the situations descri-
bed in the following.
It may be best to deactivate ESP ®
in the fol-
lowing situations:
R when using snow chains
R in deep snow
R on sand or gravel
i Activate ESP ®
as soon as the situations
described above no longer apply. ESP ®
will
otherwise not be able to stabilise the vehi-
cle if the vehicle starts to skid or a wheel
starts to spin.
Deactivating/activating ESP ®
You can deactivate or activate ESP ®
via the
on-board computer.
XTo deactivate: (Y page 218).
The å ESP®
OFF warning lamp in the
instrument cluster lights up.XTo activate: (Y page 218).
The å ESP®
OFF warning lamp in the
instrument cluster goes out.
Characteristics when ESP ®
is deactivated
If ESP ®
is deactivated and one or more wheels
start to spin, the ÷ ESP®
warning lamp in
the instrument cluster flashes. In such situa-
tions, ESP ®
will not stabilise the vehicle.
If you deactivate ESP ®
:
R ESP ®
no longer improves driving stability.
R engine torque is no longer limited and the
drive wheels are able to spin.
The spinning of the wheels results in a cut-
ting action for better traction on loose sur-
faces.
R ETS is still active.
R ESP ®
still provides support when you
brake.
Driving safety systems69SafetyZ
Page 72 of 352
ESP®
trailer stabilisation
General notes
If your vehicle/trailer combination begins to
swerve, ESP ®
assists you in this situation.
ESP ®
slows the vehicle down by braking and
limiting the engine output until the vehicle/
trailer combination has stabilised.
Important safety notes
GWARNING
If road and weather conditions are poor,
trailer stabilisation will not be able to prevent
the vehicle/trailer combination from swerv-
ing. Trailers with a high centre of gravity can
tip over before ESP ®
can detect this. There is
a risk of an accident.
Always adapt your driving style to the prevail-
ing road and weather conditions.
If your vehicle/trailer combination begins to
lurch, you can only stabilise the vehicle/
trailer combination by depressing the brake
firmly.
ESP ®
trailer stabilisation is active above
speeds of about 65 km/h.
ESP ®
trailer stabilisation does not work if
ESP ®
is deactivated or disabled because of a
malfunction.
EBD (electronic brake force distribu-
tion)
General notes
EBD monitors and controls the brake pres-
sure on the rear wheels to improve driving
stability while braking.
Important safety notes
i Observe the "Important safety notes" sec-
tion for driving safety systems
( Y page 64).
GWARNING
If EBD has malfunctioned, the rear wheels can
still lock, e.g. under full braking. This increa-
ses the risk of skidding and an accident.
You should therefore adapt your driving style
to the different handling characteristics. Have
the brake system checked at a qualified spe-
cialist workshop.
Observe information regarding indicator and
warning lamps ( Y page 256) as well as dis-
play messages ( Y page 229).
ADAPTIVE BRAKE
ADAPTIVE BRAKE enhances braking safety
and offers increased braking comfort. In addi-
tion to the braking function, ADAPTIVE BRAKE
also has the HOLD function (Y page 181) and
hill start assist ( Y page 147). For further
information, see Driving tips ( Y page 166).
STEER CONTROL
General notes
STEER CONTROL helps you by transmitting a
noticeable steering force to the steering
wheel in the direction required for vehicle
stabilisation.
This steering support is provided in particular
if:
R both right wheels or both left wheels are on
a wet or slippery road surface when you
brake.
R the vehicle starts to skid.
Important safety notes
If there is an ESP ®
malfunction, you will not
receive any steering support from STEER
CONTROL. Power steering will, however, con-
tinue to function.
70Driving safety systemsSafety
Page 73 of 352
Anti-theft systems
Immobiliser
The immobiliser prevents your vehicle from
being started without the correct key.
XTo activate: remove the key from the igni-
tion lock.XTo deactivate: switch on the ignition.
When leaving the vehicle, always take the key
with you and lock the vehicle. The engine can
be started by anyone with a valid key that is
left inside the vehicle.
i The immobiliser is always deactivated
when you start the engine.
ATA (Anti-Theft Alarm system)
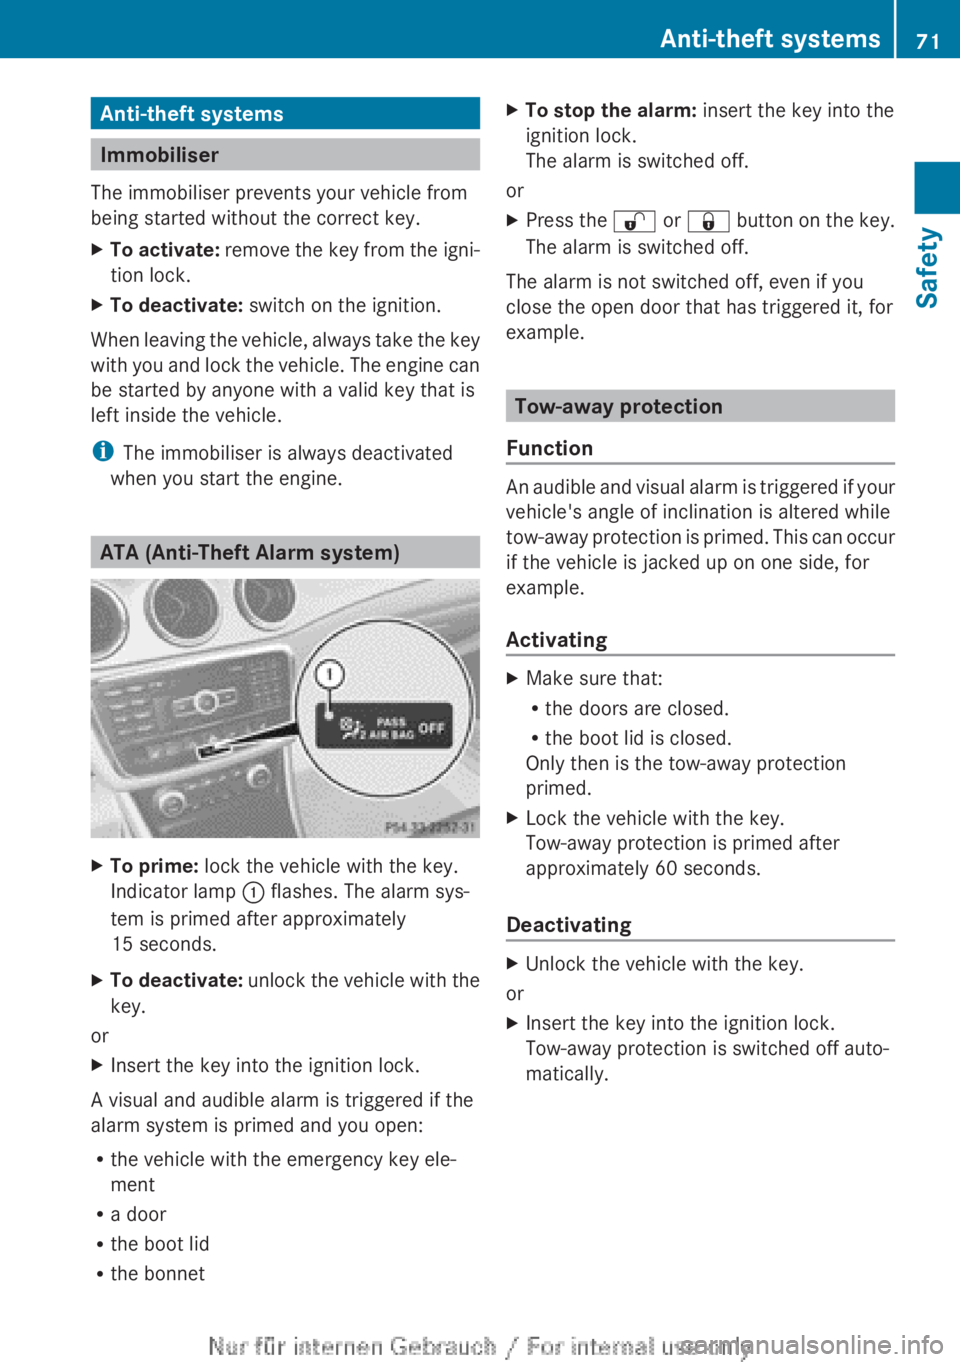
XTo prime: lock the vehicle with the key.
Indicator lamp : flashes. The alarm sys-
tem is primed after approximately
15 seconds.XTo deactivate: unlock the vehicle with the
key.
or
XInsert the key into the ignition lock.
A visual and audible alarm is triggered if the
alarm system is primed and you open:
R the vehicle with the emergency key ele-
ment
R a door
R the boot lid
R the bonnet
XTo stop the alarm: insert the key into the
ignition lock.
The alarm is switched off.
or
XPress the % or & button on the key.
The alarm is switched off.
The alarm is not switched off, even if you
close the open door that has triggered it, for
example.
Tow-away protection
Function
An audible and visual alarm is triggered if your
vehicle's angle of inclination is altered while
tow-away protection is primed. This can occur
if the vehicle is jacked up on one side, for
example.
Activating
XMake sure that:
R the doors are closed.
R the boot lid is closed.
Only then is the tow-away protection
primed.XLock the vehicle with the key.
Tow-away protection is primed after
approximately 60 seconds.
Deactivating
XUnlock the vehicle with the key.
or
XInsert the key into the ignition lock.
Tow-away protection is switched off auto-
matically.Anti-theft systems71SafetyZ
Page 74 of 352
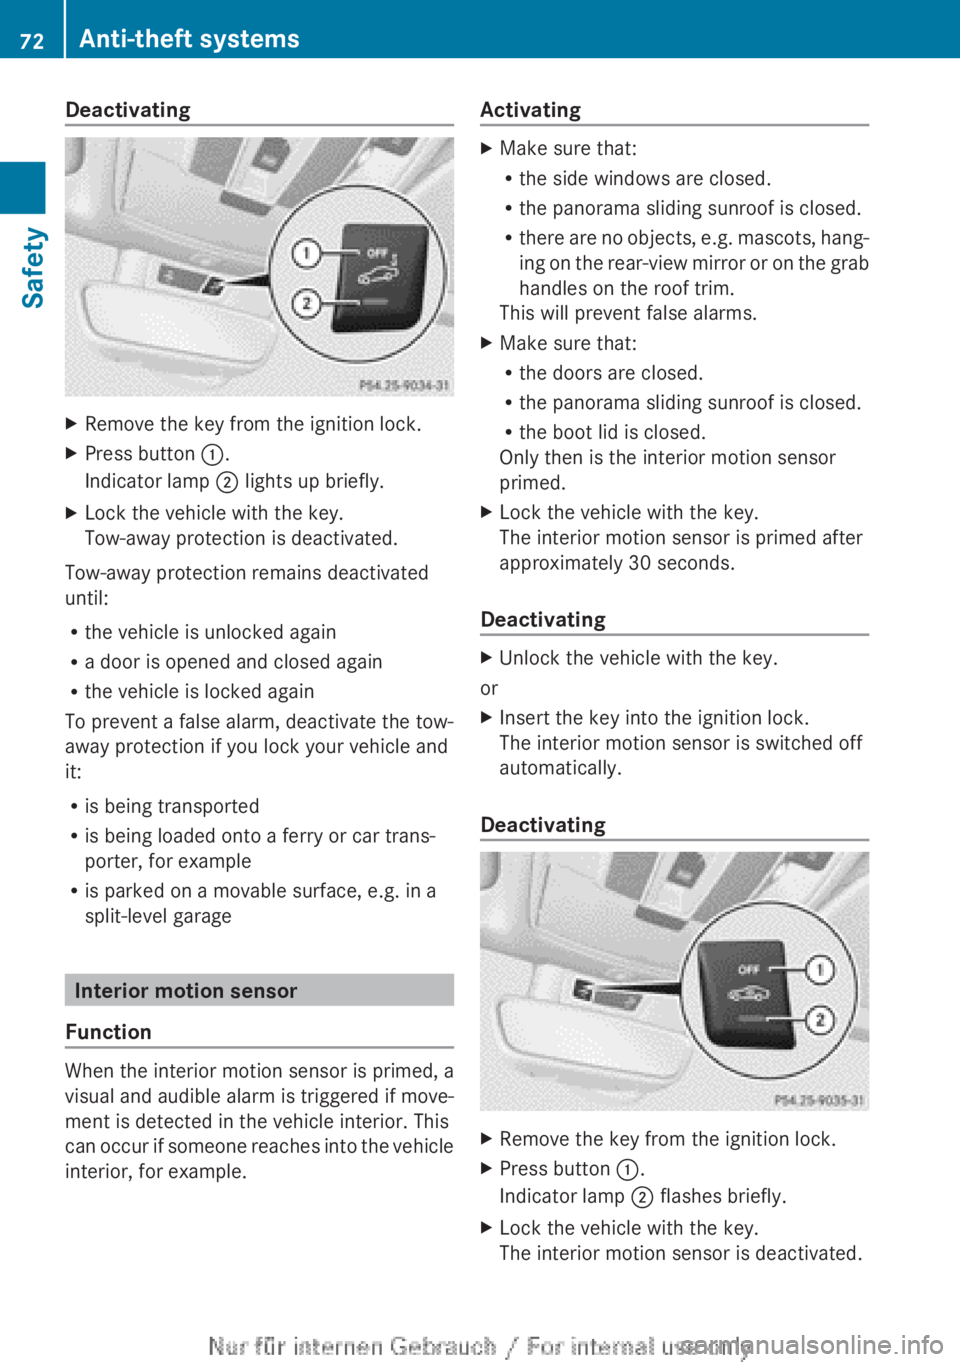
DeactivatingXRemove the key from the ignition lock.XPress button :.
Indicator lamp ; lights up briefly.XLock the vehicle with the key.
Tow-away protection is deactivated.
Tow-away protection remains deactivated
until:
R the vehicle is unlocked again
R a door is opened and closed again
R the vehicle is locked again
To prevent a false alarm, deactivate the tow-
away protection if you lock your vehicle and
it:
R is being transported
R is being loaded onto a ferry or car trans-
porter, for example
R is parked on a movable surface, e.g. in a
split-level garage
Interior motion sensor
Function
When the interior motion sensor is primed, a
visual and audible alarm is triggered if move-
ment is detected in the vehicle interior. This
can occur if someone reaches into the vehicle
interior, for example.
ActivatingXMake sure that:
R the side windows are closed.
R the panorama sliding sunroof is closed.
R there are no objects, e.g. mascots, hang-
ing on the rear-view mirror or on the grab
handles on the roof trim.
This will prevent false alarms.XMake sure that:
R the doors are closed.
R the panorama sliding sunroof is closed.
R the boot lid is closed.
Only then is the interior motion sensor
primed.XLock the vehicle with the key.
The interior motion sensor is primed after
approximately 30 seconds.
Deactivating
XUnlock the vehicle with the key.
or
XInsert the key into the ignition lock.
The interior motion sensor is switched off
automatically.
Deactivating
XRemove the key from the ignition lock.XPress button :.
Indicator lamp ; flashes briefly.XLock the vehicle with the key.
The interior motion sensor is deactivated.72Anti-theft systemsSafety
Page 75 of 352
The interior motion sensor remains deactiva-
ted until:
R the vehicle is unlocked again
R a door is opened and closed again
R the vehicle is locked again
To prevent a false alarm, deactivate the inte-
rior motion sensor if you lock your vehicle
and:
R people or animals remain in the vehicle.
R the panorama sliding sunroof remains
open.
R the side windows remain open.
i UK only: your vehicle is equipped with a
double lock function. The doors cannot be
opened from the inside if the vehicle has
been locked with the key ( Y page 82).
Deactivate the interior motion sensor
before you lock the vehicle with the key.
The doors can then be opened from the
inside after the vehicle has been locked
from the outside with the key. Observe the
"Important safety notes" ( Y page 81).Anti-theft systems73SafetyZ
Page 76 of 352

74
Page 77 of 352

Useful information ..............................76
Key ....................................................... 76
Doors .................................................... 81
Boot ...................................................... 84
Side windows ...................................... 86
Panorama sliding sunroof ..................8975Opening and closing
Page 78 of 352
Useful information
i This Owner's Manual describes all mod-
els, series and optional equipment for your
vehicle that were available at the time of
going to press. National variations are pos-
sible. Note that your vehicle may not be
equipped with all of the functions descri-
bed. This is also the case for systems and
functions relevant to safety.
i Read the information on qualified special-
ist workshops: ( Y page 24).
Key
Important safety notes
GWARNING
If children are left unsupervised in the vehicle,
they could:
R open the doors, thus endangering other
people or road users.
R get out and disrupt traffic.
R operate the vehicle's equipment.
Additionally, children could set the vehicle in
motion if, for example, they:
R release the parking brake.
R shift the automatic transmission out of
parking position P.
R shift the manual transmission into neutral.
R start the engine.
There is a risk of an accident and injury.
When leaving the vehicle, always take the key
with you and lock the vehicle. Never leave
children or animals unattended in the vehicle.
Always keep the key out of reach of children.
GWARNING
If persons (particularly children) are exposed
to heat or cold for a prolonged period, there
is a risk of serious or even fatal injuries. Never
leave persons (particularly children) unatten-
ded in the vehicle.
GWARNING
If you attach heavy or large objects to the key,
the key could be unintentionally turned in the
ignition lock. This could cause the engine to
be switched off. There is a risk of an accident.
Do not attach any heavy or large objects to
the key. Remove any bulky keyrings before
inserting the key into the ignition lock.
! Keep the key away from strong magnetic
fields. Otherwise, the remote control func-
tion could be affected.
Strong magnetic fields can occur in the
vicinity of powerful electrical installations.
Do not keep the key:
R with electronic devices, e.g. a mobile
phone or another key
R with metallic objects, e.g. coins or metal
film
R inside metallic objects, e.g. a metal case
United Kingdom only:
GWARNING
When the double locks are activated, the
doors can no longer be opened from the
inside. People in the vehicle can no longer get
out, e.g. in hazardous situations. There is a
risk of injury.
Therefore, do not leave any people unsuper-
vised in the vehicle, particularly children, eld-
erly people or people in need of special assis-
tance. Do not activate the double lock when
people are in the vehicle.
If the vehicle has been locked with the key,
then the double lock function is activated as
standard. It is then not possible to open the
doors from inside the vehicle. You can deac-
tivate the double lock function by deactivat-
ing the interior motion sensor ( Y page 72).
The doors can then be opened from the inside
after the vehicle has been locked from the
outside. You can open the rear doors from
inside the vehicle if they are not secured by
the child-proof locks ( Y page 63). The anti-
theft alarm system is triggered if the door is
76KeyOpening and closing
Page 79 of 352
opened from the inside. Switch off the alarm
( Y page 71).
Key functions
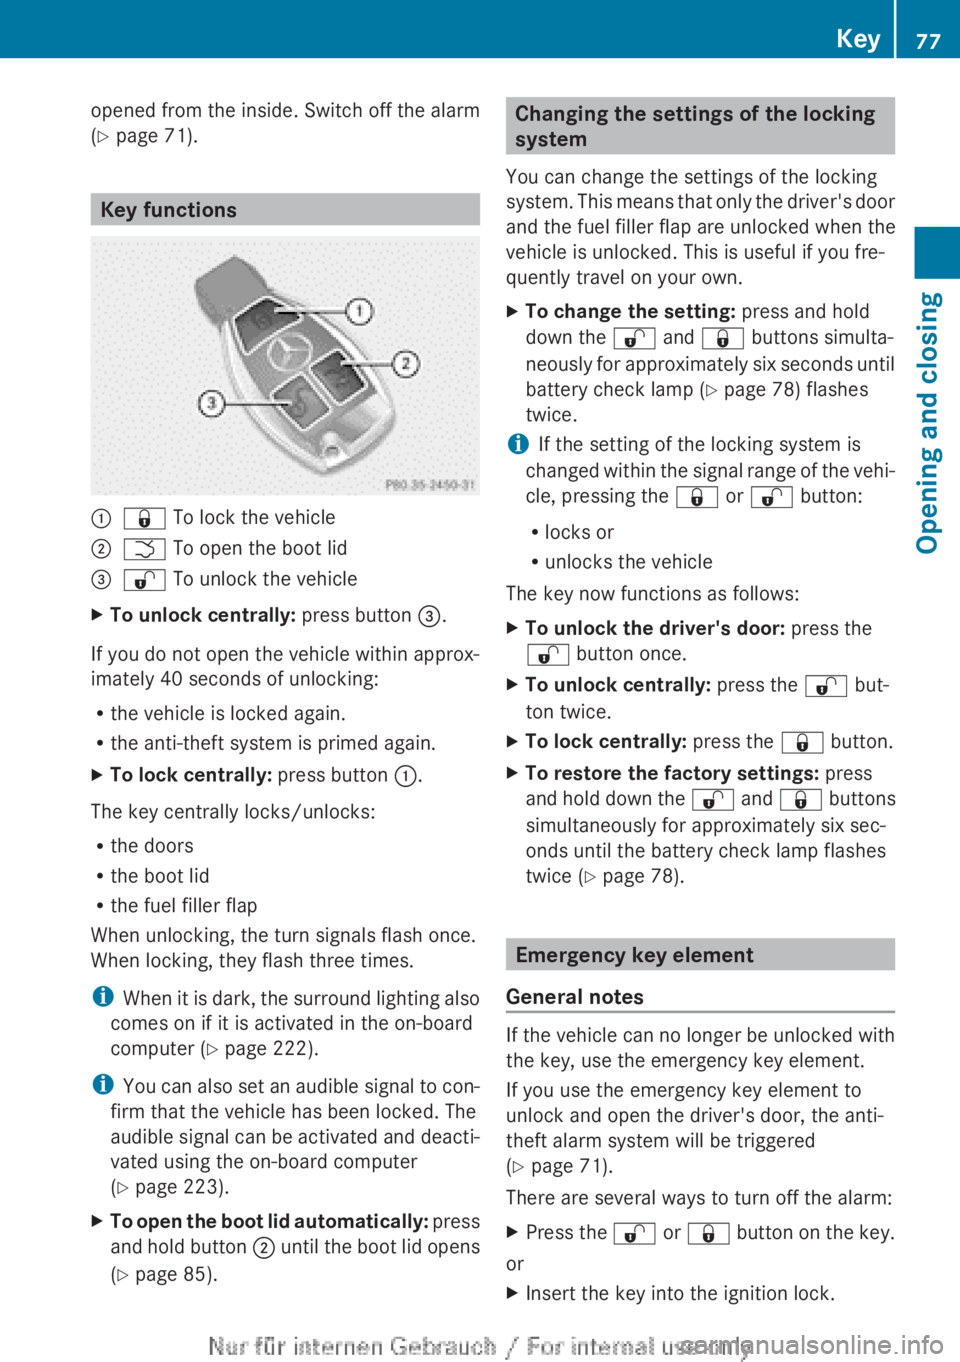
:& To lock the vehicle;F To open the boot lid=% To unlock the vehicleXTo unlock centrally: press button =.
If you do not open the vehicle within approx-
imately 40 seconds of unlocking:
R the vehicle is locked again.
R the anti-theft system is primed again.
XTo lock centrally: press button :.
The key centrally locks/unlocks:
R the doors
R the boot lid
R the fuel filler flap
When unlocking, the turn signals flash once.
When locking, they flash three times.
i When it is dark, the surround lighting also
comes on if it is activated in the on-board
computer ( Y page 222).
i You can also set an audible signal to con-
firm that the vehicle has been locked. The
audible signal can be activated and deacti-
vated using the on-board computer
( Y page 223).
XTo open the boot lid automatically: press
and hold button ; until the boot lid opens
( Y page 85).Changing the settings of the locking
system
You can change the settings of the locking
system. This means that only the driver's door
and the fuel filler flap are unlocked when the
vehicle is unlocked. This is useful if you fre-
quently travel on your own.XTo change the setting: press and hold
down the % and & buttons simulta-
neously for approximately six seconds until
battery check lamp ( Y page 78) flashes
twice.
i If the setting of the locking system is
changed within the signal range of the vehi-
cle, pressing the & or % button:
R locks or
R unlocks the vehicle
The key now functions as follows:
XTo unlock the driver's door: press the
% button once.XTo unlock centrally: press the % but-
ton twice.XTo lock centrally: press the & button.XTo restore the factory settings: press
and hold down the % and & buttons
simultaneously for approximately six sec-
onds until the battery check lamp flashes
twice ( Y page 78).
Emergency key element
General notes
If the vehicle can no longer be unlocked with
the key, use the emergency key element.
If you use the emergency key element to
unlock and open the driver's door, the anti-
theft alarm system will be triggered
( Y page 71).
There are several ways to turn off the alarm:
XPress the % or & button on the key.
or
XInsert the key into the ignition lock.Key77Opening and closingZ
Page 80 of 352
If you unlock the vehicle using the emergency
key element, the fuel filler flap will not be
unlocked automatically.XTo unlock the fuel filler flap: insert the
key into the ignition lock.
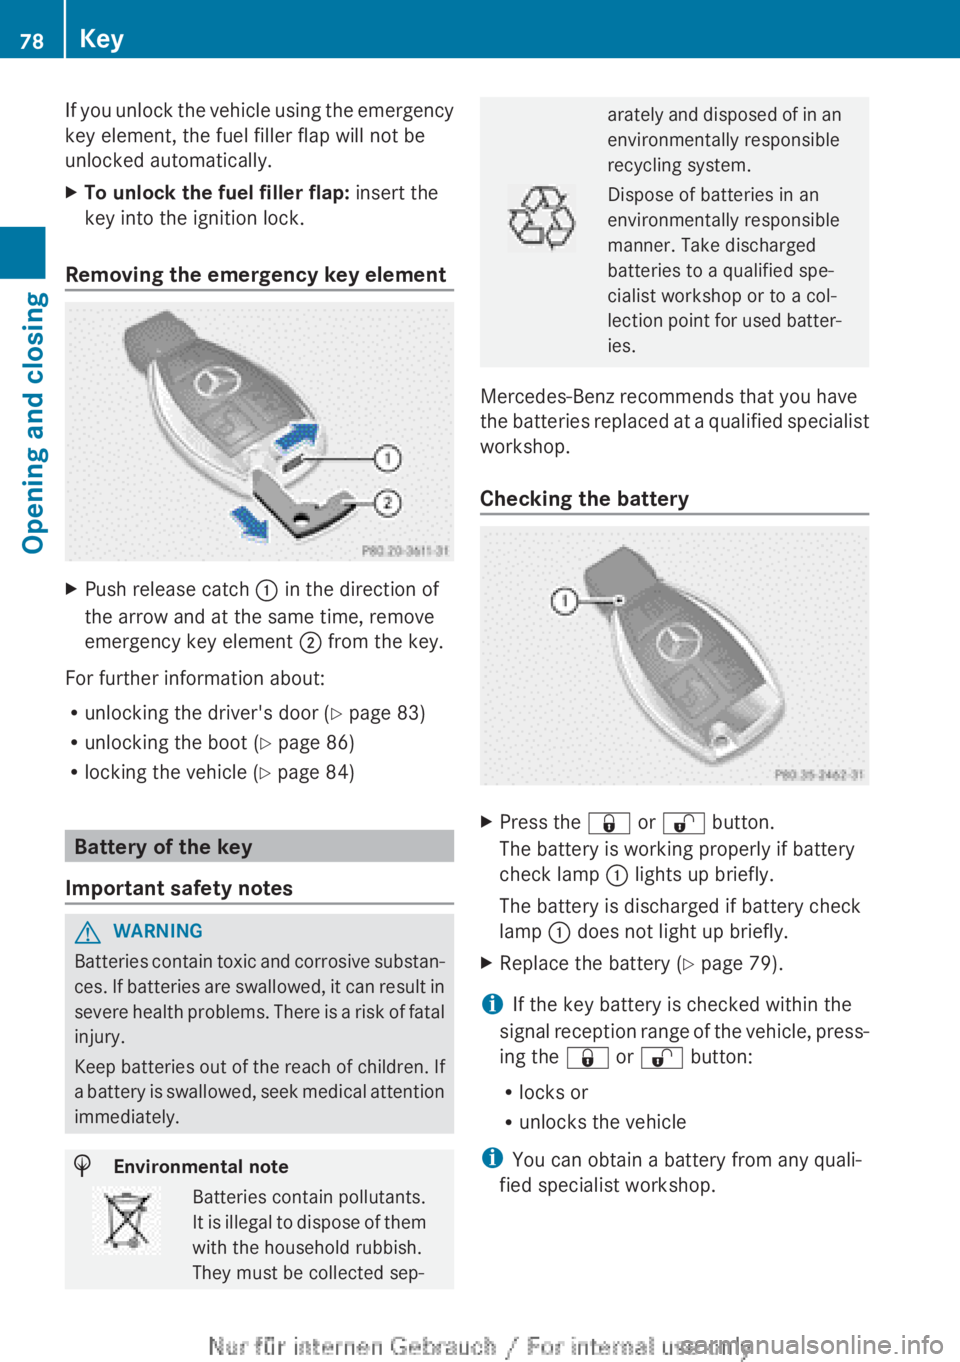
Removing the emergency key element
XPush release catch : in the direction of
the arrow and at the same time, remove
emergency key element ; from the key.
For further information about:
R unlocking the driver's door ( Y page 83)
R unlocking the boot ( Y page 86)
R locking the vehicle ( Y page 84)
Battery of the key
Important safety notes
GWARNING
Batteries contain toxic and corrosive substan-
ces. If batteries are swallowed, it can result in
severe health problems. There is a risk of fatal
injury.
Keep batteries out of the reach of children. If
a battery is swallowed, seek medical attention
immediately.
HEnvironmental noteBatteries contain pollutants.
It is illegal to dispose of them
with the household rubbish.
They must be collected sep-arately and disposed of in an
environmentally responsible
recycling system.Dispose of batteries in an
environmentally responsible
manner. Take discharged
batteries to a qualified spe-
cialist workshop or to a col-
lection point for used batter-
ies.
Mercedes-Benz recommends that you have
the batteries replaced at a qualified specialist
workshop.
Checking the battery
XPress the & or % button.
The battery is working properly if battery
check lamp : lights up briefly.
The battery is discharged if battery check
lamp : does not light up briefly.XReplace the battery ( Y page 79).
i If the key battery is checked within the
signal reception range of the vehicle, press-
ing the & or % button:
R locks or
R unlocks the vehicle
i You can obtain a battery from any quali-
fied specialist workshop.
78KeyOpening and closing