ignition MERCEDES-BENZ CLA 2016 Owners Manual
[x] Cancel search | Manufacturer: MERCEDES-BENZ, Model Year: 2016, Model line: CLA, Model: MERCEDES-BENZ CLA 2016Pages: 374, PDF Size: 9.97 MB
Page 13 of 374
Important safety notes .................. 290
Opening/closing the garage door .. 292
Programming (button in the rear-
view mirror) ................................... 290
Synchronizing the rolling code ....... 291
Gasoline ............................................ .3 66
Gear indicator (on-board com-
puter, Mercedes-AMG vehicles) ....... 223
Genuine parts ...................................... 21
Glove box .......................................... .2 73
H Handbrake
see Parking brake
Hazard warning lamps
Display message ............................ 256
Switching on/off ........................... 117
Head restraints
Adjusting ....................................... 103
Adjusting (manually) ..................... .1 03
Adjusting (rear) .............................. 104
Headlamps
Fogging up ..................................... 119
see Automatic headlamp mode
Heating
see Climate control
High beam flasher ............................ .1 17
High-beam headlamps
Adaptive Highbeam Assist ............. 118
Changing bulbs .............................. 122
Display message ............................ 241
Switching on/off ........................... 116
Hill start assist .................................. 151
HOLD function
Activating ....................................... 188
Deactivating ................................... 188
Display message ............................ 246
Function/notes ............................ .1 87
Hood
Closing .......................................... .2 97
Display message ............................ 255
Important safety notes .................. 296
Opening ......................................... 296
Horn ...................................................... 30
Hydroplaning ..................................... 177 I Ignition lock
see Key positions
Immobilizer .......................................... 73
Indicator and warning lamps
COLLISION PREVENTION ASSIST
PLUS .............................................. 269
Indicator lamps
see Warning and indicator lamps
Indicators
see Turn signals
Instrument cluster
Overview .......................................... 31
Settings ......................................... 221
Warning and indicator lamps ........... 32
Instrument cluster lighting .............. 210
Interior lighting
Control .......................................... .1 20
Emergency lighting ........................ 120
Overview ........................................ 119
Reading lamp ................................. 119
J Jack
Storage location ............................ 310
Using ............................................. 352
Jump starting (engine) ..................... .3 19
K
Key positions
Start/Stop button .......................... 147
KEYLESS-GO
Convenience closing feature ............ 90
Deactivation ..................................... 77
Locking ............................................ 77
Unlocking ......................................... 77
Kickdown
Driving tips ................................... .1 61
Manual gearshifting ....................... 166
Knee bag .............................................. 50
L
Lamps
see Warning and indicator lamps Index 11
Page 18 of 374
Seat heating problem .................... 106
Storing settings (memory func-
tion) ............................................... 110
Switching seat heating on/off ....... 105
Securing cargo .................................. 276
Selector lever
Cleaning ......................................... 307
Sensors (cleaning instructions) ....... 305
Service menu (on-board com-
puter) .................................................. 221
Service message
see ASSYST PLUS
Service products
Brake fluid ..................................... 369
Coolant (engine) ............................ 369
Engine oil ....................................... 368
Fuel ................................................ 365
Important safety notes .................. 365
Refrigerant (air-conditioning sys-
tem) ............................................... 371
Washer fluid ................................... 370
Setting the air distribution ............... 138
Setting the airflow ............................ 138
Settings
Factory (on-board computer) ......... 223
On-board computer ....................... 221
SETUP (on-board computer) ............. 224
Side impact air bag ............................. 50
Side marker lamp (display mes-
sage) ................................................... 242
Side windows
Cleaning ......................................... 304
Convenience closing feature ............ 90
Convenience opening feature .......... 89
Important safety information ........... 88
Opening/closing .............................. 89
Problem (malfunction) ..................... 92
Resetting ......................................... 91
Reversing feature ............................. 88
Sliding sunroof
see Panorama roof with power
tilt/sliding panel
SmartKey
Changing the battery ....................... 80
Changing the programming ............. 78
Checking the battery ....................... 79
Convenience closing feature ............ 90 Convenience opening feature .......... 89
Display message ............................ 257
Door central locking/unlocking ....... 76
Important safety notes .................... 76
KEYLESS-GO start function .............. 78
Loss ................................................. 81
Mechanical key ................................ 78
Positions (ignition lock) ................. 147
Problem (malfunction) ..................... 81
Sta rti
ng the engine ........................ 149
SmartKey positions (ignition lock) .. 147
Snow chains ...................................... 331
Sockets
Center console .............................. 281
General notes ................................ 281
Rear compartment ......................... 281
Trunk ............................................. 281
Special seat belt retractor .................. 59
Specialist workshop ............................ 25
Speed, controlling
see Cruise control
Speedometer
Activating/deactivating the addi-
tional speedometer ........................ 221
Digital ............................................ 215
In the Instrument cluster ................. 31
Segments ...................................... 210
Selecting the display unit ............... 221
SPORT handling mode
Deactivating/activating
(Mercedes-AMG vehicles) ................ 70
Warning lamp ................................. 264
Standing lamps
Display message ............................ 241
Switching on/off ........................... 116
Start-off assist
Activating ....................................... 189
Important safety notes .................. 189
Start/Stop button
Removing ....................................... 148
Starting the engine ........................ 150
Start/stop function
see ECO start/stop function
Starting (engine) ................................ 149
STEER CONTROL .................................. 72
Steering
Display message ............................ 25616
Index
Page 44 of 374
Useful information
i This Operator's Manual describes all
models and all standard and optional equip-
ment of your vehicle available at the time of
publication of the Operator's Manual.
Country-specific differences are possible.
Please note that your vehicle may not be
equipped with all features described. This
also applies to safety-related systems and
functions.
i Read the information on qualified special-
ist workshops ( Y
page 25).
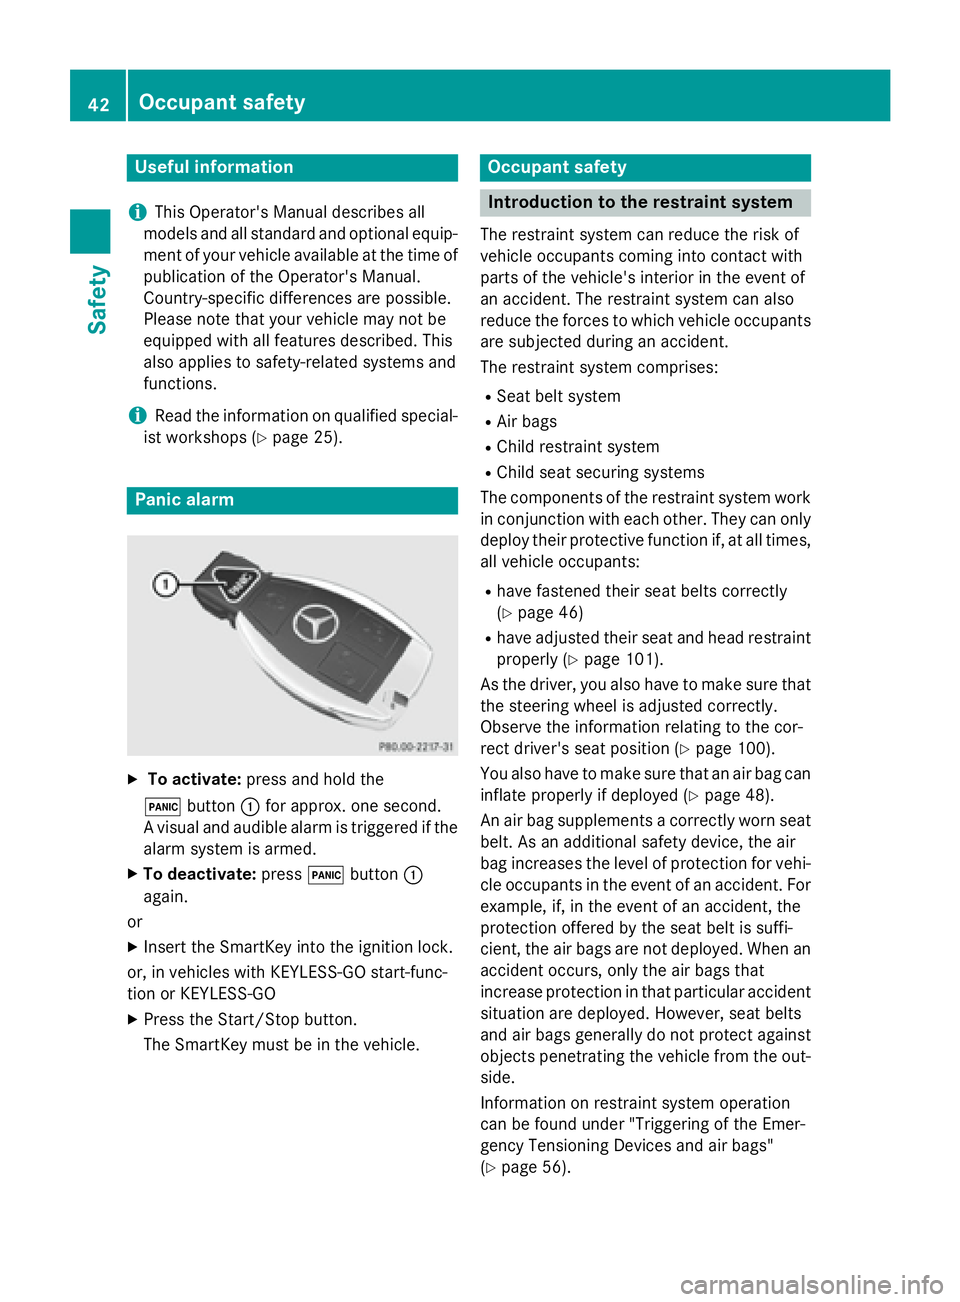
Panic alarm
X
To activate: press and hold the
�3 button �C for approx. one second.
A visual and audible alarm is triggered if the
alarm system is armed. X
To deactivate: press �3 button �C
again.
or X
Insert the SmartKey into the ignition lock.
or, in vehicles with KEYLESS-GO start-func-
tion or KEYLESS ‑ GOX
Press the Start/Stop button.
The SmartKey must be in the vehicle. Occupant safety
Introduction to the restraint system The restraint system can reduce the risk of
vehicle occupants coming into contact with
parts of the vehicle's interior in the event of
an accident. The restraint system can also
reduce the forces to which vehicle occupants
are subjected during an accident.
The restraint system comprises: R
Seat belt system R
Air bags R
Child restraint system R
Child seat securing systems
The components of the restraint system work
in conjunction with each other. They can only
deploy their protective function if, at all times,
all vehicle occupants: R
have fastened their seat belts correctly
( Y
page 46) R
have adjusted their seat and head restraint
properly ( Y
page 101).
As the driver, you also have to make sure that
the steering wheel is adjusted correctly.
Observe the information relating to the cor-
rect driver's seat position ( Y
page 100).
You also have to make sure that an air bag can
inflate properly if deployed ( Y
page 48).
An air bag supplements a correctly worn seat
belt. As an additional safety device, the air
bag increases the level of protection for vehi-
cle occupants in the event of an accident. For
example, if, in the event of an accident, the
protection offered by the seat belt is suffi-
cient, the air bags are not deployed. When an
accident occurs, only the air bags that
increase protection in that particular accident
situation are deployed. However, seat belts
and air bags generally do not protect against
objects penetrating the vehicle from the out-
side.
Information on restraint system operation
can be found under "Triggering of the Emer-
gency Tensioning Devices and air bags"
( Y
page 56).42
Occupant safety
Safety
Page 45 of 374
See "Children in the vehicle" for information
on infants and children traveling with you in
the vehicle restraint systems for infants and
children ( Y
page 58).
Important safety notes
G WARNING
Modifications to the restraint system may
cause it to no longer work as intended. The
restraint system may then not perform its
intended protective function and may fail in an
accident or trigger unexpectedly, for example.
This poses an increased risk of injury or even
fatal injury.
Never modify parts of the restraint system.
Never tamper with the wiring, the electronic
components or their software.
If it is necessary to modify an air bag system to
accommodate a person with disabilities, con-
tact an authorized Mercedes-Benz Center for
details. USA only: for further information con-
tact our Customer Assistance Center at
1-800-FOR-MERCedes (1 ‑ 800 ‑ 367 ‑ 6372).
Restraint system warning lamp
The functions of the restraint system are
checked after the ignition is switched on and
at regular intervals while the engine is run-
ning. Therefore, malfunctions can be detec-
ted in good time.
The �u restraint system warning lamp in
the instrument cluster lights up when the igni-
tion is switched on. It goes out no later than a
few seconds after the vehicle is started. The
components of the restraint system are in
operational readiness.
A malfunction has occurred if the �u
restraint system warning lamp: R
does not light up after the ignition is
switched on R
does not go out after a few seconds with
the engine running R
lights up again while the engine is running G WARNING
If restraint system is malfunctioning, restraint
system components may be triggered unin-
tentionally or might not be triggered at all in
the event of an accident with a high rate of
vehicle deceleration. This can affect the Emer-
gency Tensioning Device or air bag, for exam-
ple. This poses an increased risk of injury or
even fatal injury.
Have the restraint system checked and
repaired in a qualified specialist workshop as
soon as possible.
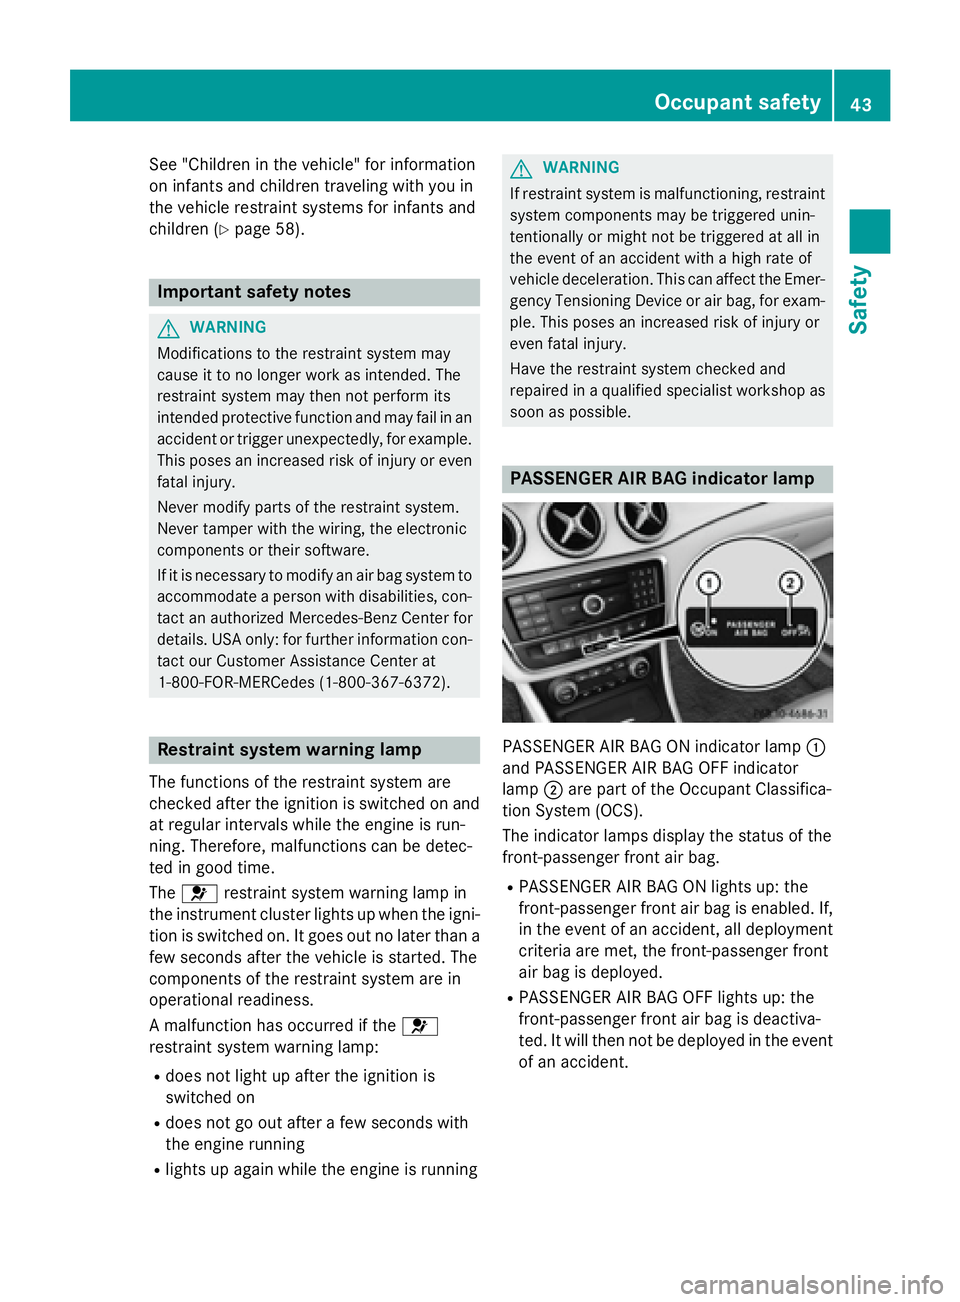
PASSENGER AIR BAG indicator lamp
PASSENGER AIR BAG ON indicator lamp �C
and PASSENGER AIR BAG OFF indicator
lamp �D are part of the Occupant Classifica-
tion System (OCS).
The indicator lamps display the status of the
front-passenger front air bag. R
PASSENGER AIR BAG ON lights up: the
front-passenger front air bag is enabled. If,
in the event of an accident, all deployment
criteria are met, the front-passenger front
air bag is deployed. R
PASSENGER AIR BAG OFF lights up: the
front-passenger front air bag is deactiva-
ted. It will then not be deployed in the event
of an accident.Occupant safety 43
Safety Z
Page 53 of 374
However, it does not protect the chest or
arms.
In the event of a side impact, the window cur-
tain air bag is deployed on the side on which
the impact occurs.
If the system determines that they can offer
additional protection to that provided by the
seat belt, a window curtain air bag may be
deployed in other accident situations
( Y
page 56).
Occupant Classification System
(OCS)
Introduction The Occupant Classification System (OCS)
categorizes the person in the front-passenger
seat. Depending on that result, the front-
passenger front air bag and front-passenger
knee bag are either enabled or deactivated.
The system does not disable: R
the side impact air bag R
the window curtain air bag R
the Emergency Tensioning Devices
Prerequisites
To be classified correctly, the front passenger
must sit: R
with the seat belt fastened correctly R
in an almost upright position with their
back against the seat backrest R
with their feet resting on the floor, if possi-
ble
If the front passenger does not observe these
conditions, OCS may produce a false classi-
fication, e.g. because the front passenger: R
transfers their weight by supporting them-
selves on a vehicle armrest R
sits in such a way that their weight is raised
from the seat cushion
If it is absolutely necessary to install a child
restraint system on the front-passenger seat,
be sure to observe the correct positioning of the child restraint system. Never place
objects under or behind the child restraint
system, e.g. cushions. The entire base of the
child restraint system must always rest on the
seat cushion of the front-passenger seat. The
backrest of the forward-facing child restraint
system must lie as flat as possible against the
backrest of the front-passenger seat.
The child restraint system must not touch the
roof or be subjected to a load by the head
restraint. Adjust the angle of the seat back-
rest and the head restraint position accord-
ingly.
Only then can OCS be guaranteed to function
correctly. Always observe the child restraint
system manufacturer's installation instruc-
tions.
Operation of Occupant Classification
System (OCS)
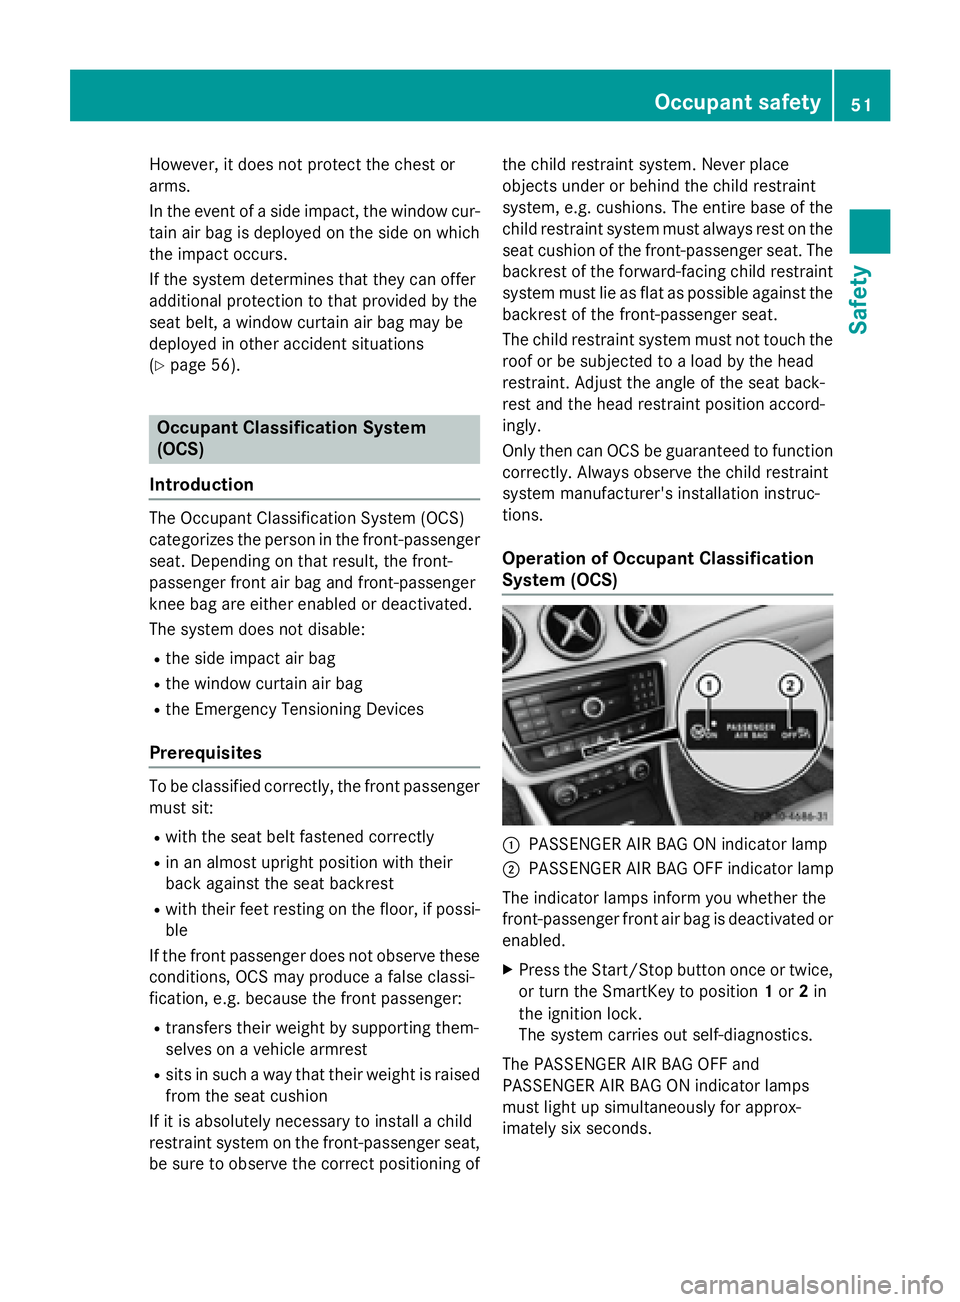
�C
PASSENGER AIR BAG ON indicator lamp �D
PASSENGER AIR BAG OFF indicator lamp
The indicator lamps inform you whether the
front-passenger front air bag is deactivated or
enabled. X
Press the Start/Stop button once or twice,
or turn the SmartKey to position 1 or 2 in
the ignition lock.
The system carries out self-diagnostics.
The PASSENGER AIR BAG OFF and
PASSENGER AIR BAG ON indicator lamps
must light up simultaneously for approx-
imately six second s.Occu pant safety 51
Safety Z
Page 58 of 374
Deployment of Emergency Tensioning
Device s an d air bags
Important safet y notes
G WARNING
The air bag parts are hot after an air bag has
bee n deployed . There is a ris k of injury.
Do no t touch th e air bag parts . Hav e a
deployed air bag replaced at a qualified spe -
cialis t workshop as soo n as possible.
G WARNING
A deployed air bag no longer offers any pro -
tection and canno t provid e th e intended pro -
tection in an accident. There is an increase d
ris k of injury.
Hav e th e vehicle towed to a qualified special-
ist workshop in order to hav e a deployed air
bag replaced.
It is important fo r your safet y and that of your
passenger to hav e deployed air bags replaced
and to hav e any malfunctionin g air bags
repaired. Thi s will hel p to mak e sur e th e air
bags continue to perform their protective
function fo r th e vehicle occupant s in th e
event of a crash .
G WARNING
Pyrotechnic Emergency Tensioning Devices
that hav e bee n deployed are no longer opera-
tional and are unable to perform their inten-
ded protective function . Thi s poses an
increase d ris k of injury or eve n fatal injury.
Therefore, hav e pyrotechni c Emergency Ten -
sioning Devices whic h hav e bee n triggere d
immediately replaced at a qualified specialis t
workshop .
If Emergency Tensioning Devices are trig-
gered or air bags are deployed , you will hear a
bang, and a small amount of powder may also
be released. The �u restrain t system warn -
in g lamp lights up.
Only in rar e cases will th e ban g affec t your
hearing. The powder that is release d gener-
ally doe s no t constitute a health hazard , but it may caus e short-term breathin g difficulties in
people wit h asthm a or other respirator y prob-
lems. Provided it is saf e to do so, you should
leav e th e vehicle immediately or ope n th e
window in order to preven t breathin g difficul-
ties.
Ai r bags and pyrotechni c Emergency Tension-
in g Devices (ETDs) contain perchlorat e mate-
rial , whic h may require special handlin g and
regard fo r th e environment. National guide-
lines mus t be observed durin g dis posa l. In
C alifornia, see www.dtsc.ca.gov/
HazardousWaste/Perchlorate/
index.cfm .
Method of operation Durin g th e first stage of a collision , th e
restrain t system contro l uni t evaluates impor -
tant physical dat a relatin g to vehicle deceler -
ation or acceleration , suc h as:R
duration R
direction R
intensit y
Based on th e evaluation of this data, th e
restrain t system contro l uni t triggers th e
Emergency Tensioning Devices durin g a fron -
ta l or rea r collision .
An Emergency Tensioning Devic e can only be
triggered, if: R
th e ignition is switched on R
th e component s of th e restrain t system are
operational. You can fin d further informa-
tion under: "Restrain t system warnin g
lamp " ( Y
page 43) R
th e belt tongue is engage d in th e buckl e on
th e respective front-passenger seat
The Emergency Tensioning Devices in th e
rea r compartmen t are triggere d independ -
entl y of th e loc k status of th e seat belts.
If th e restrain t system contro l uni t detects a
more severe accident, further component s of
th e restrain t system are activated independ -
entl y of eac h other in certain fronta l collision
situations:56
Occupant safety
Safety
Page 67 of 374
Drivin g safet y systems
Overview of drivin g safet y systemsIn this section , you will fin d information about
th e following drivin g safet y systems :R
AB S ( A nti-loc k B rakin g S ystem)
( Y
page 65) R
BA S ( B rake A ssist S ystem) ( Y
page 66 )R
COLLISION PREVENTION ASSIST PLU S
( Y
page 66 )R
ES P ®
( E lectronic S t ability P rogram)
( Y
page 69 )R
EB D ( E lectroni c B r ak e forc e D i stribution )
( Y
page 72) R
ADAPTIV E BRAKE ( Y
page 72 )R
STEE R CONTROL ( Y
page 72 )
Important safet y notesIf you fail to adapt your drivin g style or if you
are inattentive , th e drivin g safet y systems can
neither reduce th e ris k of an acciden t no r
override th e laws of physics. Driving safet y
systems are merely aids designed to assist
driving. You are responsible fo r maintainin g
th e distanc e to th e vehicle in front, fo r vehicle
speed, fo r braking in goo d time, and fo r stay-
in g in lane. Always adapt your drivin g style to
suit th e prevailin g road and weather condi-
tion s and maintain a saf e distanc e from th e
vehicle in front. Drive carefully.
The drivin g safet y systems described only
wor k as effectively as possible when there is
adequat e contact between th e tires and th e
road surface. Please pay special attention to
th e note s on tires , recommended minimum
tire tread depths, etc. ( Y
page 328).
In wintr y drivin g conditions, always use winte r
tires (M+ S tires ) and if necessary, snow
chains. Only in this way will th e drivin g safet y
systems described in this section wor k as
effectively as possible. ABS (Anti-lock Braking System)
General information AB S regulates brake pressure in suc h a way
that th e wheels do no t loc k when you brake .
Thi s allow s you to continue steerin g th e vehi-
cl e when braking .
The �% AB S warnin g lamp in th e instrumen t
cluster lights up when th e ignition is switched
on . It goe s out when th e engin e is running .
AB S works from a speed of about 5 mph
(8 km/h), regardles s of road-surfac e condi-
tions. AB S works on slipper y surfaces, eve n
when you only brake gently.
Important safet y notes
i Observ e th e "Important safet y notes" sec -
tion ( Y
page 65).
G WARNING
If AB S is faulty, th e wheels could loc k when
braking . The steerability and braking charac -
teristics may be severely impaired. Addition -
ally, further drivin g safet y systems are deac -
tivated. There is an increase d danger of skid-
din g and accidents .
Drive on carefully. Hav e AB S checke d imme-
diately at a qualified specialis t workshop .
Whe n AB S is malfunctioning, other systems ,
includin g drivin g safet y systems , will also
becom e inoperative . Observ e th e information
on th e AB S warnin g lamp ( Y
page 261) and
display message s whic h may be shown in th e
instrumen t cluster ( Y
page 228).
Braking X
If ABS intervenes: continue to depress th e
brake peda l vigorousl y until th e braking sit -
uation is over. X
To make a full brak e application:
depress th e brake peda l wit h full force.
If AB S intervenes when braking , you will feel a
pulsin g in th e brake pedal.Driving safety systems 65
Safety Z
Page 68 of 374
The pulsating brake pedal can be an indica-
tion of hazardous road conditions, and func-
tions as a reminder to take extra care while
driving.
BAS (Brake Assist System)
General information BAS operates in emergency braking situa-
tions. If you depress the brake pedal quickly,
BAS automatically boosts the braking force,
thus shortening the stopping distance.
Important safety notes
i Observe the "Important safety notes" sec-
tion ( Y
page 65).
G WARNING
If BAS is malfunctioning, the braking distance
in an emergency braking situation is
increased. There is a risk of an accident.
In an emergency braking situation, depress
the brake pedal with full force. ABS prevents
the wheels from locking.
Braking X
Keep the brake pedal firmly depressed until
the emergency braking situation is over.
ABS prevents the wheels from locking.
The brakes will function as usual once you
release the brake pedal. BAS is deactivated.
COLLISION PREVENTION ASSIST
PLUS
General information
i Observe the "Important safety notes" sec-
tion ( Y
page 65).
COLLISION PREVENTION ASSIST PLUS con-
sists of a distance warning function with an
autonomous braking function and adaptive
Brake Assist. COLLISION PREVENTION ASSIST PLUS can
help you to minimize the risk of a front-end
collision with a vehicle ahead or reduce the
effects of such a collision.
If COLLISION PREVENTION ASSIST PLUS
detects that there is a risk of a collision, you
will be warned visually and acoustically. If you
do not react to the visual and audible collision
warning, autonomous braking can be initiated
in critical situations. If you apply the brake
yourself in a critical situation, the COLLISION
PREVENTION ASSIST PLUS adaptive Brake
Assist assists you.
Important safety notes Detection of hazardous situations can be par-
ticularly impaired by: R
there is dirt on the sensors or anything else
covering the sensors R
there is snow or heavy rain R
there is interference by other radar sources R
there are strong radar reflections, for
example in parking garages R
a narrow vehicle traveling in front, e.g. a
motorbike R
a vehicle traveling in front on a different line R
new vehicles or after a service on the COL-
LISION PREVENTION ASSIST PLUS system
Observe the important safety notes in the
"Breaking-in notes" section ( Y
page 146).
Following damage to the front end of the vehi-
cle, have the configuration and operation of
the radar sensor checked at a qualified spe-
cialist workshop. This also applies to colli-
sions at low speeds where there is no visible
damage to the front of the vehicle.
Switching on/off
The COLLISION PREVENTION ASSIST PLUS is
automatically active after switching on the
ignition.
You can activate or deactivate COLLISION
PREVENTION ASSIST PLUS in the on-board
computer ( Y
page 220). When deactivated,66
Driving safety systems
Safety
Page 75 of 374
No steering assistance is provided from
STEER CONTROL, if: R
ESP ®
is malfunctioning.R
the lighting is faulty.
If ESP ®
is malfunctioning, you will be assisted
further by the electrical power steering.
Protection against theft
Immobilizer The immobilizer prevents your vehicle from
being started without the correct SmartKey. X
To activate with the SmartKey: remove
the SmartKey from the ignition lock. X
To activate with KEYLESS-GO start-
function or KEYLESS-GO: switch the igni-
tion off and open the driver's door. X
To deactivate: switch on the ignition.
When leaving the vehicle, always take the
SmartKey with you and lock the vehicle. Any-
one can start the engine if a valid SmartKey
has been left inside the vehicle.
i The immobilizer is always deactivated
when you start the engine.
In the event that the engine cannot be star-
ted (yet the vehicle's battery is charged),
the system is not operational. Contact an
authorized Mercedes-Benz Center or call
1-800-FOR-MERCedes (in the USA) or
1-800-387-0100 (in Canada).
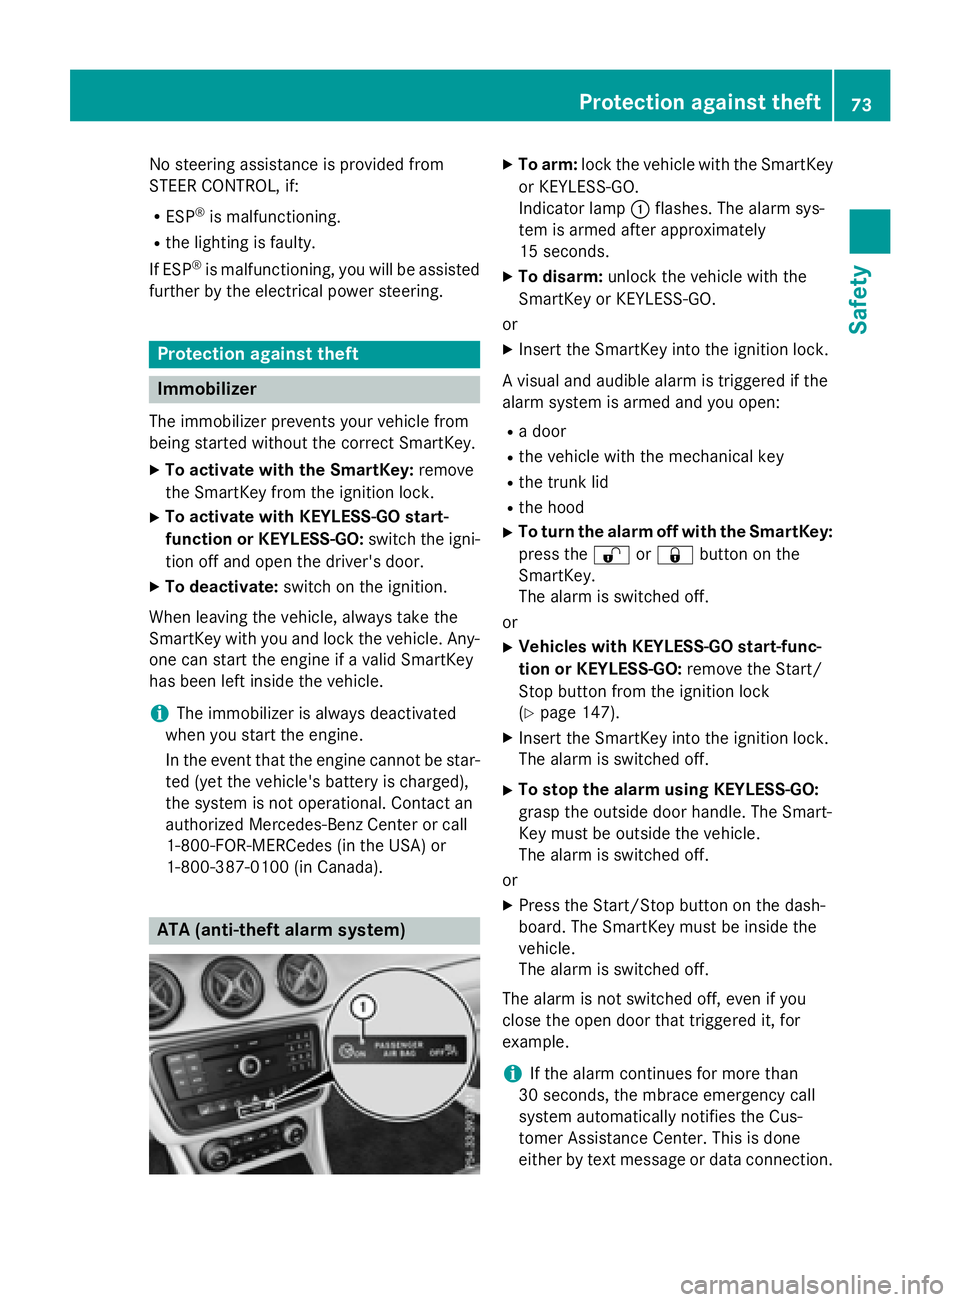
ATA (anti-theft alarm system) X
To arm: lock the vehicle with the SmartKey
or KEYLESS-GO.
Indicator lamp �C flashes. The alarm sys-
tem is armed after approximately
15 seconds. X
To disarm: unlock the vehicle with the
SmartKey or KEYLESS-GO.
or X
Insert the SmartKey into the ignition lock.
A visual and audible alarm is triggered if the
alarm system is armed and you open: R
a door R
the vehicle with the mechanical key R
the trunk lid R
the hood X
To turn the alarm off with the SmartKey:
press the �6 or �7 button on the
SmartKey.
The alarm is switched off.
or X
Vehicles with KEYLESS-GO start-func-
tion or KEYLESS-GO: remove the Start/
Stop button from the ignition lock
( Y
page 147). X
Insert the SmartKey into the ignition lock.
The alarm is switched off. X
To stop the alarm using KEYLESS-GO:
grasp the outside door handle. The Smart-
Key must be outside the vehicle.
The alarm is switched off.
or X
Press the Start/Stop button on the dash-
board. The SmartKey must be inside the
vehicle.
The alarm is switched off.
The alarm is not switched off, even if you
close the open door that triggered it, for
example.
i If the alarm continues for more than
30 seconds, the mbrace emergency call
system automatically notifies the Cus-
tomer Assistance Center. This is done
either by text message or data connection.Protection against theft 73
Safety Z
Page 78 of 374
Useful information
i This Operator's Manual describes all
models and all standard and optional equip-
ment of your vehicle available at the time of
publication of the Operator's Manual.
Country-specific differences are possible.
Please note that your vehicle may not be
equipped with all features described. This
also applies to safety-related systems and
functions.
i Read the information on qualified special-
ist workshops ( Y
page 25).
SmartKey
Important safety notes
G WARNING
If children are left unsupervised in the vehicle,
they could: R
open the doors, thus endangering other
people or road users. R
get out and disrupt traffic. R
operate the vehicle's equipment.
Additionally, children could set the vehicle in
motion if, for example, they: R
release the parking brake. R
shifting the automatic transmission out of
park position PR
Start the engine.
There is a risk of an accident and injury.
When leaving the vehicle, always take the
SmartKey with you and lock the vehicle. Never
leave children or animals unattended in the
vehicle. Always keep the SmartKey out of
reach of children.
G WARNING
If you attach heavy or large objects to the
SmartKey, the SmartKey could be uninten-
tionally turned in the ignition lock. This could
cause the engine to be switched off. There is a
risk of an accident. Do not attach any heavy or large objects to the
SmartKey. Remove any bulky key rings before
inserting the SmartKey into the ignition lock.
! Keep the SmartKey away from strong
magnetic fields. Otherwise, the remote
control function could be affected.
Strong magnetic fields can occur in the
vicinity of powerful electrical installations.
Do not keep the SmartKey: R
with electronic devices, e.g. a mobile
phone or another SmartKey. R
with metallic objects, e.g. coins or metal
foil. R
inside metallic objects, e.g. a metal case.
Vehicles with KEYLESS-GO start function:
do not keep the SmartKey in the cargo com-
partment. Otherwise, the SmartKey may not
be detected, e.g. when starting the engine
using the Start/Stop button.
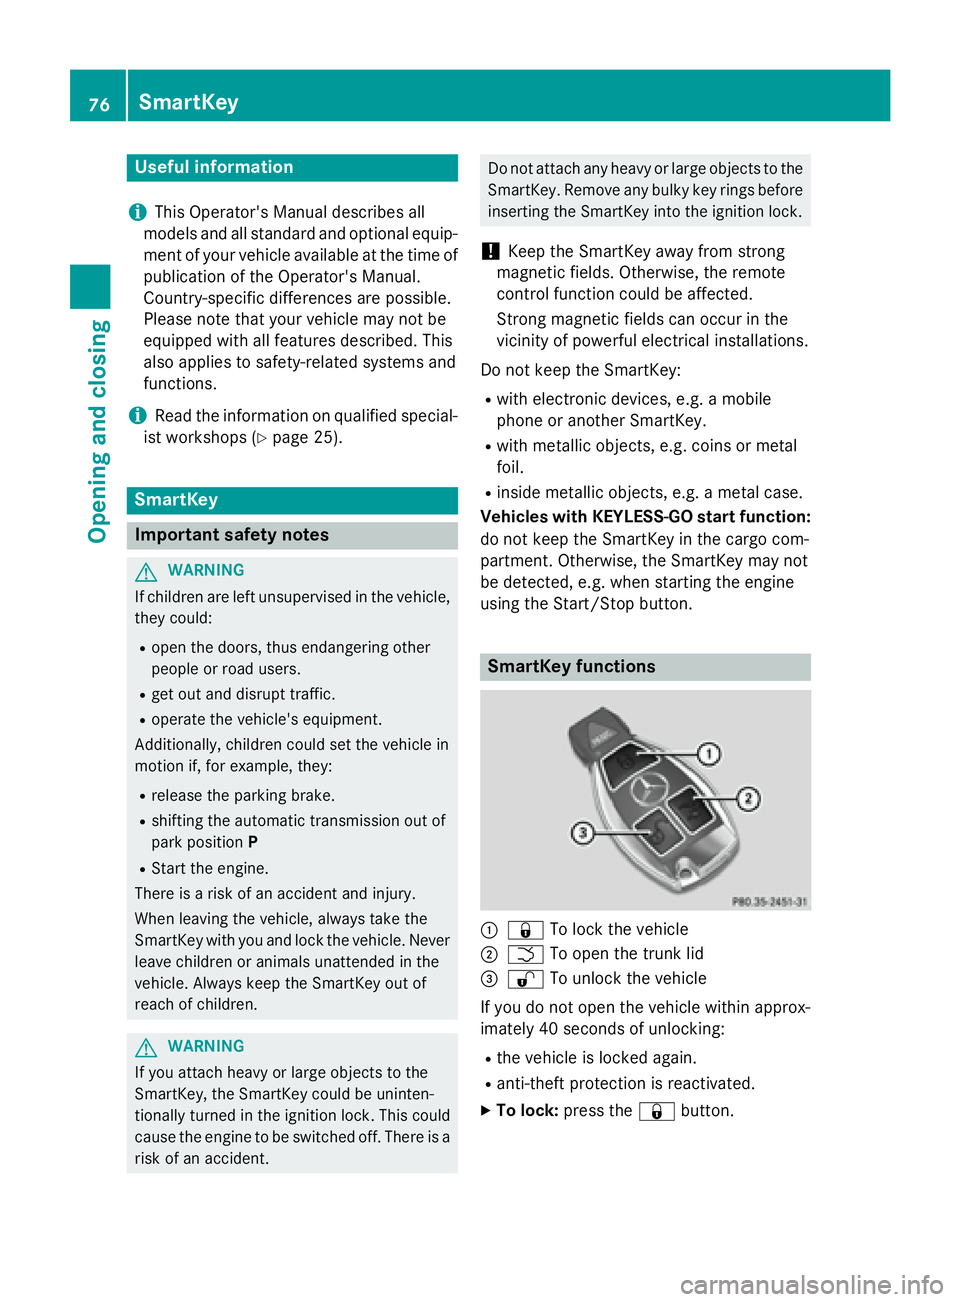
SmartKey functions
�C
�7 To lock the vehicle�D
�T To open the trunk lid�