snow chains MERCEDES-BENZ CLA 2017 Owners Manual
[x] Cancel search | Manufacturer: MERCEDES-BENZ, Model Year: 2017, Model line: CLA, Model: MERCEDES-BENZ CLA 2017Pages: 318, PDF Size: 9.9 MB
Page 11 of 318
ESP ®
(Electronic Stability Pro-
gram) ............................................... 63
Important safety information ........... 60
Overview .......................................... 60
STEER CONTROL ............................. 66
Driving system
Distance Pilot DISTRONIC ............. 150
Parking assist PARKTRONIC .......... 160
Parking Pilot .................................. 162
RACE START (Mercedes-AMG
vehicles) ........................................ 157
Start-off assist ............................... 157
Driving systems
AMG adaptive sport suspension
system ........................................... 158
ATTENTION ASSIST ........................ 169
Blind Spot Assist ............................ 171
Cruise control ................................ 148
Display message ............................ 205
HOLD function ............................... 156
Lane Keeping Assist ...................... 172
Lane Tracking package .................. 171
Rear view camera .......................... 166
Driving tips
Automatic transmission ................. 132
Brakes ........................................... 145
Break-in period .............................. 120
Checking brake lining thickness .... 146
Distance Pilot DISTRONIC ............. 155
Downhill gradient ........................... 145
Drinking and driving ....................... 143
Driving in winter ............................. 147
Driving on flooded roads ................ 147
Driving on wet roads ...................... 147
Exhaust check ............................... 143
Fuel ................................................ 143
General .......................................... 143
Hydroplaning ................................. 147
Icy road surfaces ........................... 147
Limited braking efficiency on sal-
ted roads ....................................... 146
Snow chains .................................. 285
The first 1000 miles (1500 km) ..... 120
Wet road surface ........................... 145
DVD video
Operating (on-board computer) ..... 180
see also Digital Operator's Man-
ual .................................................. 227 DYNAMIC SELECT button
Climate control (3-zone automatic
climate control) ............................. 114
Climate control (air-conditioning
system) .......................................... 111
DYNAMIC SELECT button (al l ve hi-
c les except Mercedes-AMG vehi-
cles) .................................................... 127
DYNAMIC SELECT controller
(Mercedes-AMG vehicles) ................. 128
E EBD (electronic brake force distri-
bution)
Display message ............................ 191
Function/notes ................................ 66
ECO display
Function/notes ............................. 144
On-board computer ....................... 177
ECO start/stop function
Automatic engine start .................. 125
Automatic engine switch-off .......... 125
Deactivating/activating ................. 126
General information ....................... 125
Important safety notes .................. 125
Introduction ................................... 124
Electronic Stability Program
see ESP ®
(Electronic Stability Program)
Emergency
Automatic measures after an acci-
dent ................................................. 53
Emergency release
Driver's door .................................... 76
Trunk ............................................... 80
Vehicle ............................................. 76
Emergency Tensioning Devices
Activation ......................................... 51
Emissions control
Service and warranty information .... 24
Engine
Check Engine warning lamp ........... 222
Display message ............................ 202
ECO start/stop function ................ 124
Engine number ............................... 309
Irregular running ............................ 126
Jump-starting ................................. 273
Starting problems .......................... 126 Index 9
Page 19 of 318
Setting the airflow ........................... .1 16
Setting the date/time format
see also Digital Operator's Man-
ual ................................................. .2 27
Setting the language
see also Digital Operator's Man-
ual ................................................. .2 27
Setting the time
see also Digital Operator's Man-
ual ................................................. .2 27
Settings
Factory (on-board computer) ......... 185
On-board computer ....................... 183
SETUP (on-board computer) ............. 186
Side impact air bag ............................ .4 5
Side marker lamp (display mes-
sage) ................................................... 201
Side windows
Cleaning ......................................... 261
Convenience closing feature ............ 82
Convenience opening feature ......... .8 2
Important safety information ........... 80
Opening/closing .............................. 81
Problem (malfunction) .................... .8 3
Resettin g ........................................ .8 3
Reversin g feature ............................ .8 1
SIRIUS services
see also Digital Operator's Man-
ual .................................................. 227
Sliding sunroof
see Panorama roof with power
tilt/sliding panel
SmartKey
Changing the battery ....................... 72
Changing the programming ............ .7 1
Checking the battery ...................... .7 2
Convenience closing feature ............ 82
Convenience opening feature .......... 82
Dis play message ............................ 214
Door central locking/unlo ckin g ...... .6 9
Importa nt safety notes .................... 69
KEYLESS-GO start function .............. 70
Loss ................................................ .7 3
Mechanical key ................................ 71
Positions (ignition lock) ................. 121
Problem (malfunction) ..................... 73
Starting the engine ........................ 123 SmartKey positions (ignition lock) .. 121
SMS
see also Digital Operator's Man-
ual .................................................. 227
Snow chains ...................................... 285
Sockets
Center console .............................. 241
General notes ................................ 241
Rear compartment ........................ .2 42
Trunk ............................................. 242
Sound
Switching on/off ........................... 228
Special seat belt retractor .................. 54
Specialist workshop ............................ 27
Speed, controlling
see Cruise control
Speedometer
Activating/deactivating the addi-
tional speedometer ........................ 184
Digital ............................................ 178
In the Instrument cluster ................. 32
Segments ...................................... 174
Selecting the display unit .............. .1 83
SPORT handling mode
Deactivating/activating
(Mercedes-AMG vehicles) ................ 65
Warning lamp ................................. 220
Standing lamps
Display message ............................ 200
Switching on/off ........................... 100
Start-off assist
Activating ....................................... 157
Important safety notes .................. 157
Start/Stop button
Removing ....................................... 122
Starting the engine ........................ 123
Start/stop function
see ECO start/stop function
Starting (engine) ................................ 122
STEER CONTROL .................................. 66
Steering
Display message ............................ 214
Ste e
ring assistant STEER CON-
TROL
see STEER CONTROL
Steering wheel
Adjusting (manually) ........................ 94 Index 17
Page 23 of 318
Vehicle dimensions ........................... 314
Vehicle emergency locking ................ 76
Vehicle identification number
see VIN
Vehicle identification plate .............. 308
Vehicle tool kit .................................. 266
Ventilation
Setting the vents ........................... 119
Video
Operating the DVD ......................... 180
see also Digital Operator's Man-
ual .................................................. 227
VIN
Seat ............................................... 309
Type plate ...................................... 308
W Warning and indicator lamps
ABS ................................................ 218
Active Brake Assist ........................ 225
Brakes ........................................... 217
Check Engine ................................. 222
Coolant .......................................... 223
Distance warning ........................... 225
ESP ®
.............................................. 219
ESP ®
OFF ....................................... 220
Fuel tank ........................................ 222
Overview .......................................... 32
PASSENGER AIR BAG ...................... 40
Reserve fuel ................................... 222
Restraint system ............................ 222
Seat belt ........................................ 216
SPORT handling mode ................... 220
Tire pressure monitor .................... 226
Warranty .............................................. 24
Washer fluid
Display message ............................ 214
Weather display (COMAND)
see also Digital Operator's Man-
ual .................................................. 227
Wheel and tire combinations
Tires ............................................... 306
Wheel bolt tightening torque ........... 305
Wheel chock ...................................... 302
Wheels
Changing a wheel .......................... 301
Checking ........................................ 282 Cleaning ......................................... 261
Important safety notes .................. 282
Information on driving .................... 282
Interchanging/changing ................ 301
Mounting a new wheel ................... 304
Removing a wheel .......................... 304
Storing ........................................... 302
Tightening torque ........................... 305
Wheel size/tire size ....................... 306
Window curtain air bag
Display message ............................ 196
Operation ......................................... 46
Windows
see Side windows
Windshield
Defrosting ...................................... 116
Windshield washer system
Adding washer fluid ....................... 257
Important safety notes .................. 313
Windshield wipers
Display message ............................ 214
Problem (malfunction) ................... 108
Replacing the wiper blades ............ 107
Switching on/off ........................... 106
Winter driving
Slippery road surfaces ................... 147
Snow chains .................................. 285
Winter operation
General notes ................................ 284
Winter tires
M+S tires ....................................... 284
Wiper blades
Cleaning ......................................... 262
Imp o
rtant safety notes .................. 107
Wooden trim (cleaning instruc-
tions) .................................................. 264
Workshop
see Qualified specialist workshop
Z
ZONE function
Switching on/off ........................... 116 Index 21
Page 62 of 318
Drivin g safet y systems
Overview of drivin g safet y systemsIn this section , you will fin d information about
th e followin g drivin g safet y systems :R
AB S ( A n ti-loc k B rakin g S ystem)
( Y
page 60)R
BA S ( B rak e A ssist S ystem) ( Y
page 60)R
Active Brak e Assis t ( Y
page 61 )R
ES P ®
( E lectronic S t ability P r ogram)
( Y
page 63)R
EB D ( E lectroni c B rak e forc e D istribution )
( Y
page 66 )R
ADAPTIV E BRAKE ( Y
page 66 )R
STEE R CONTROL ( Y
page 66)
Important safet y notesIf you fail to adapt your drivin g style or if you are
inattentive , th e drivin g safet y systems can nei-
ther reduce th e ris k of an acciden t no r override
th e laws of physics. Driving safet y systems are
merely aids designed to assist driving. You are
responsible fo r maintainin g th e distanc e to th e
vehicle in front, fo r vehicle speed, fo r braking in
goo d time, and fo r stayin g in lane. Always adapt
your drivin g style to suit th e prevailin g road and
weather condition s and maintain a saf e distanc e
from th e vehicle in front. Drive carefully.
The drivin g safet y systems described only wor k
as effectively as possible when there is ade-
quat e contact between th e tires and th e road
surface. Please pay special attention to th e
note s on tires , recommended minimum tire
tread depths, etc. ( Y
page 282).
In wintr y drivin g conditions, always use winte r
tires (M+ S tires )a nd if necessary, snow chains.
Only in this way will the driving safety systems
described in this section work as effectively as
possible.
ABS (Anti-lock Braking System)
General information
ABS regulates brake pressure in such a way that
the wheels do not lock when you brake. This
allows you to continue steering the vehicle when
braking. The �% ABS warning lamp in the instrument
cluster lights up when the ignition is switched
on. It goes out when the engine is running.
ABS works from a speed of about 5 mph
(8 km/h), regardless of road-surface conditions.
ABS works on slippery surfaces, even when you
only brake gently.
Important safety notes
i Observe the "Important safety notes" sec-
tion ( Y
page 60).
G WARNING
If ABS is faulty, the wheels could lock when
braking. The steerability and braking charac-
teristics may be severely impaired. Addition-
ally, further driving safety systems are deac-
tivated. There is an increased danger of skid-
ding and accidents.
Drive on carefully. Have ABS checked imme-
diately at a qualified specialist workshop.
When ABS is malfunctioning, other systems,
including driving safety systems, will also
become inoperative. Observe the information
on the ABS warning lamp ( Y
page 218) and dis-
play messages which may be shown in the
instrument cluster ( Y
page 189).
Braking X
If ABS intervenes: continue to depress the
brake pedal vigorously until the braking sit-
uation is over. X
To make a full brake application: depress
the brake pedal with full force.
If ABS intervenes when braking, you will feel a
pulsing in the brake pedal.
The pulsating brake pedal can be an indication
of hazardous road conditions, and functions as a
reminder to take extra care while driving.
BAS (Brake Assist System)
General information
BAS operates in emergency braking situations.
If you depress the brake pedal quickly, BAS
automatically boosts the braking force, thus
shortening the stopping distance.60
Driving safety systems
Safety
Page 67 of 318
R
Traction control is still activated. R
STEER CONTROL is no longer active R
ESP ®
still provides support when you brake
firmly.
Deactivating/activating ESP ®
(Mercedes ‑ AMG vehicles)Important safety notes
i Observe the "Important safety notes" sec-
tion ( Y
page 60).
You can select between the following states of
ESP ®
: R
ESP ®
is activated.R
SPORT handling mode is activated. R
ESP ®
is deactivated.
G WARNING
When SPORT handling mode is activated,
there is a greater risk of skidding and acci-
dents.
Only activate SPORT handling mode in the sit-
uations described in the following.
G WARNING
If you deactivate ESP ®
, ESP ®
no longer sta-
bilizes the vehicle. There is an increased risk
of skidding and an accident.
Only deactivate ESP ®
in the situations descri-
bed in the following.
In the following situations, it may be better to
activate SPORT handling mode or deactivate
ESP ®
: R
when using snow chains R
in deep snow R
on sand or gravel R
on specially designated roads when the vehi-
cle's own oversteering and understeering
characteristics are desired
Driving in SPORT handling mode or without
ESP ®
requires an extremely qualified and expe-
rienced driver.
i Activate ESP ®
as soon as the situations
described above no longer apply. ESP ®
will
otherwise not be able to stabilize the vehicle if the vehicle starts to skid or a wheel starts to
spin.
! Avoid spinning the driven wheels for an
extended period with ESP ®
deactivated. You
could otherwise damage the drivetrain.
Deactivating/activating ESP ®
X
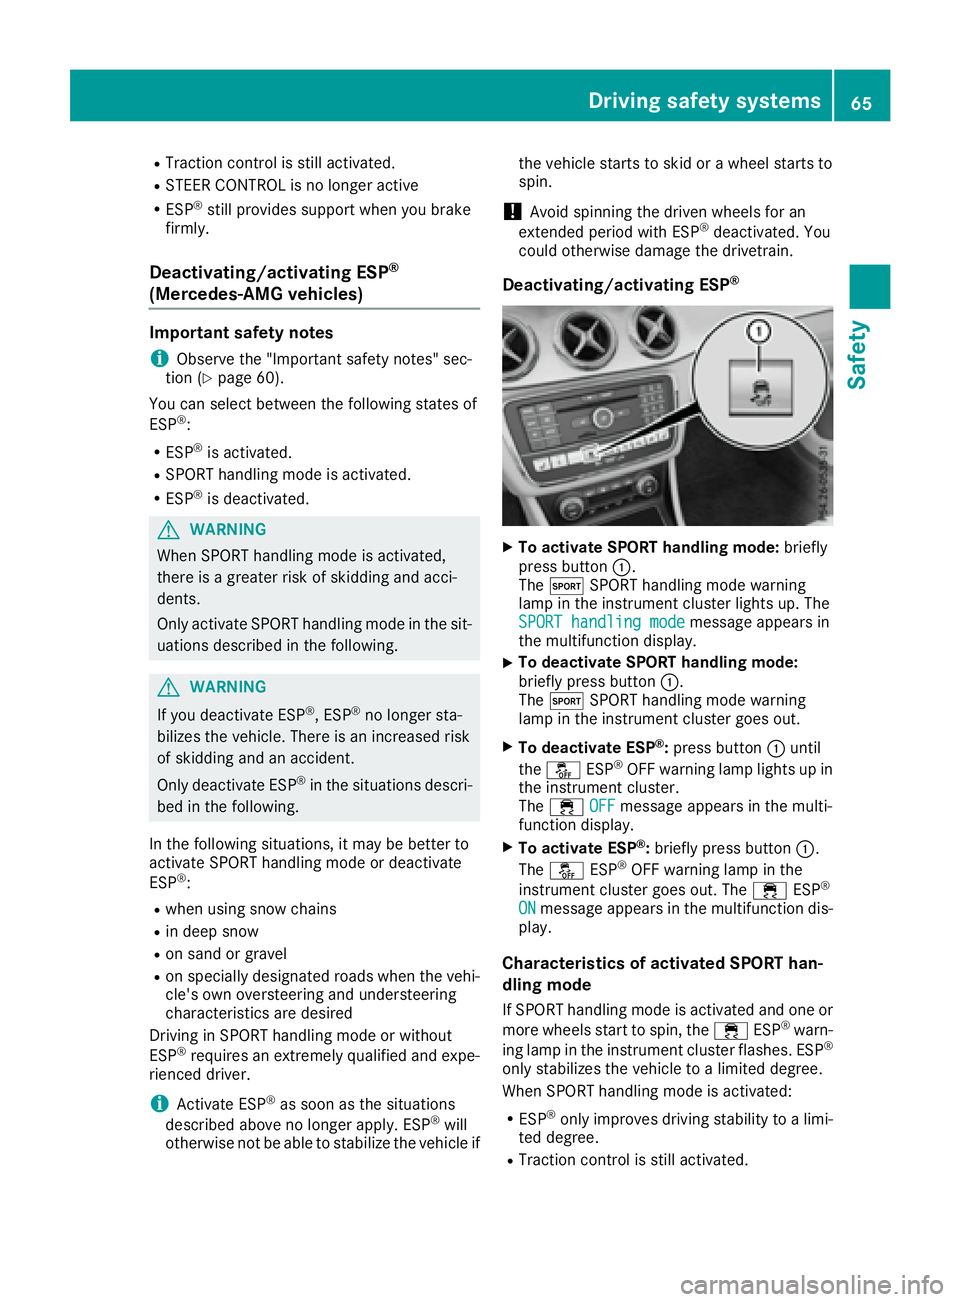
To activate SPORT handling mode: briefly
press button �C .
The �t SPORT handling mode warning
lamp in the instrument cluster lights up. The
SPORT handling mode
message appears in
the multifunction display. X
To deactivate SPORT handling mode:
briefly press button �C .
The �t SPORT handling mode warning
lamp in the instrument cluster goes out. X
To deactivate ESP ®
: press button �C until
the �
Page 150 of 318
If you leave the engine or the auxiliary heating
running, make sure the exhaust pipe and area
around the vehicle are clear of snow. To
ensure an adequate supply of fresh air, open a
window on the side of the vehicle that is not
facing into the wind.
Have your vehicle winter-proofed at a qualified
specialist workshop at the onset of winter.
Drive particularly carefully on slippery road sur-
faces. Avoid sudden acceleration, steering and
braking maneuvers. Do not use cruise control or
Distance Pilot DISTRONIC.
If the vehicle threatens to skid or cannot be
stopped when moving at low speed: X
Shift the transmission to position N .X
Try to bring the vehicle under control using
corrective steering.
The outside temperature indicator is not
designed to serve as an ice-warning device and
is therefore unsuitable for that purpose.
Changes in the outside temperature are dis-
played after a short delay.
Indicated temperatures just above the freezing
point do not guarantee that the road surface is
free of ice. The road may still be icy, especially in
wooded areas or on bridges.
You should pay special attention to road condi-
tions when temperatures are around freezing
point.
For more information on driving with snow
chains, see ( Y
page 285).
For more information on driving with summer
tires, see ( Y
page 284).
Observe the notes in the "Winter operation" sec-
tion ( Y
page 284).
Driving systems
Cruise control
General notes
Cruise control maintains a constant road speed
for you. It brakes automatically in order to avoid
exceeding the set speed. On long and steep
downhill gradients, especially if the vehicle is
laden, you must select a low gear in good time.
You need to have selected manual drive pro-
gram M ( Y
page 135). By doing so, you will make
use of the braking effect of the engine. This relieves the load on the brake system and pre-
vents the brakes from overheating and wearing
too quickly.
When the engine is running, you can use the
cruise control lever to limit the speed to any
speed between 20 mph (30 km/h) and the tech-
nically permitted maximum speed of the vehicle.
Use cruise control only if road and traffic con-
ditions make it appropriate to maintain a steady
speed for a prolonged period.
The speed indicated in the speedometer may
differ slightly from the speed stored.
Important safety notes If you fail to adapt your driving style, cruise con-
trol can neither reduce the risk of an accident
nor override the laws of physics. Cruise control
cannot take into account the road, traffic and
weather conditions. Cruise control is only an
aid. You are responsible for the distance to the
vehicle in front, for vehicle speed, for braking in
good time and for staying in your lane.
Do not use cruise control: R
in road and traffic conditions which do not
allow you to maintain a constant speed e.g. in
heavy traffic or on winding roads R
on slippery road surfaces. Braking or accel-
erating could cause the drive wheels to lose
traction and the vehicle could then skid R
in poor visibility, e.g. due to fog, heavy rain or
snow
If there is a change of drivers, advise the new
driver of the speed stored.
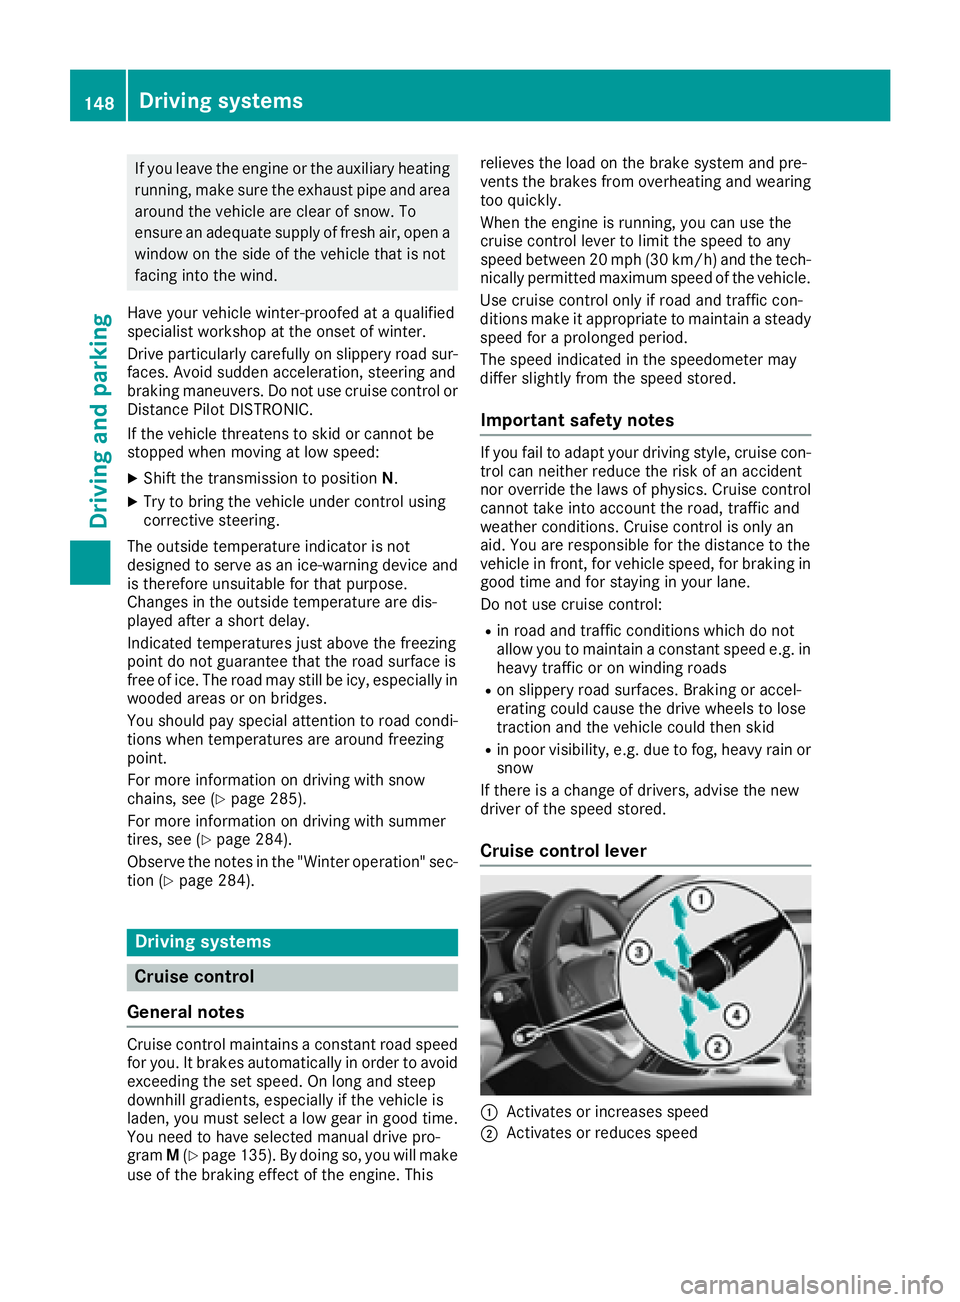
Cruise control lever
�C
Activates or increases speed
�D
Activates or reduces speed148
Driving systems
Driving and parking
Page 161 of 318
The firmer setting of the suspension tuning in
Sport mode ensures even better contact with
the road. Select this mode when employing a
sporty driving style, e.g. on winding country
roads. X
Press button �C .
Indicator lamp �D lights up. You have selected
Sport mode.
The AMG Suspension System SPORT
mes-
sage appears in the multifunction display.
Comfort mode In Comfort mode, the driving characteristics of
your vehicle are more comfortable. Select this
mode if you favor a more comfortable driving
style, but also when driving fast on straight
roads, e.g. highways. X
Press button �C again so that indicator
lamp �D goes out.
You have selected Comfort mode.
The AMG
Suspension System COMFORT mes-
sage appears in the multifunction display.
4MATIC
! Never tow the vehicle with one axle raised.
This may damage the differential. Damage of
this sort is not covered by the Mercedes-Benz
Limited Warranty. All wheels must remain
either on the ground or be fully raised.
Observe the instructions for towing the vehi-
cle with all wheels in full contact with the
ground.
4MATIC, together with ESP ®
, improves the trac-
tion of your vehicle whenever a drive wheel
spins due to insufficient grip.
If you fail to adapt your driving style, 4MATIC can
neither reduce the risk of accident nor override
the laws of physics. 4MATIC cannot take
account of road, weather and traffic conditions.
4MATIC is only an aid. You are responsible for
the distance to the vehicle in front, for vehicle
speed, for braking in good time and for staying in
your lane.
If a drive wheel spins due to insufficient grip: R
Only depress the accelerator pedal as far as
necessary when pulling away. R
Accelerate less when driving. i In wintry driving conditions, the maximum
effect of 4MATIC can only be achieved if you
use winter tires (M+S tires), with snow chains
if necessary.
Suspension with Adaptive Damping
System
General notes A suspension with the Adaptive Damping Sys-
tem provides improved driving comfort and con-
tinuously controls the calibration of the damp-
ers. The damping characteristics adapt to the
current operating and driving situation.
The damping is tuned individually to each wheel
and depends on: R
your driving style, e.g. sporty R
the road surface conditions R
the drive program selected
The drive program can be set using the
DYNAMIC SELECT button ( Y
page 127).
Selecting Comfort mode In the Comfort drive program, the driving char-
acteristics of your vehicle are more comforta-
ble. Therefore, select this drive program if you
prefer a more comfortable driving style. Also
select the Comfort drive program when driving
fast on straight roads, e.g. on straight stretches
of highway. X
Press DYNAMIC SELECT button ( Y
page 127)
as many times as necessary until the Com-
fort drive program is selected.
Selecting Sport mode The firmer setting of the suspension tuning in
the Sport drive program ensures even better
contact with the road. Select this drive program
when employing a sporty driving style, e.g. on
winding country roads. X
Press DYNAMIC SELECT button ( Y
page 127)
as many times as necessary until the Sport
drive program is selected.Driving systems 159
Driving and parking Z
Page 165 of 318
Parking Pilot may also display spaces not suita-
ble for parking, e.g.: R
where parking or stopping is prohibited R
in front of driveways or entrances and exits R
on unsuitable surfaces
Parking tips: R
On narrow roads, drive as close to the parking
space as possible. R
Parking spaces that are littered or overgrown
might be identified or measured incorrectly. R
Parking spaces that are partially occupied by
trailer drawbars might not be identified as
such or be measured incorrectly. R
Snowfall or heavy rain may lead to a parking
space being measured inaccurately. R
Pay attention to the warning messages of
Parking Pilot PARKTRONIC during the parking
procedure ( Y
page 161).R
You can intervene to correct the steering pro-
cedure at any time. Parking Pilot will then be
canceled. R
When transporting a load that protrudes from
your vehicle, you must not use Parking Pilot. R
Never use Parking Pilot when snow chains are
mounted. R
Make sure that the tire pressures are always
correct. This has a direct influence on the
parking characteristics of the vehicle.
Use Parking Pilot for parking spaces that are: R
that are parallel or at right-angles to the direc-
tion of travel R
on straight roads, not bends R
on the same level as the road, e.g. not on the
pavement
Detecting parking spaces Objects located above the detection range of
Parking Pilot will not be detected when the park-
ing space is measured. These are not taken into
account when the parking procedure is calcula-
ted, e.g. overhanging loads, truck overhangs or
loading ramps.
G WARNING
If there are objects above the detection range: R
Parking Pilot may steer in too early R
the vehicle may not stop in front of these
objects You may cause a collision as a result. There is
a risk of an accident.
If objects are located above the detection
range, stop and deactivate Parking Pilot.
For further information on the detection range
( Y
page 160).
Parking Pilot does not assist you parking in
spaces perpendicular to the direction of travel if: R
two parking spaces are located directly next
to one another R
the parking space is directly next to a low
obstacle such as a low curb R
you forward-park
Parking Pilot does not assist you parking in
spaces parallel or perpendicular to the direction
of travel if: R
the parking space is on a curb R
the system reads the parking space as being
blocked, for example by foliage or grass pav-
ing blocks R
the area is too small for the vehicle to maneu-
ver into R
the parking space is bordered by an obstacle,
e.g. a tree, a post or a trailer
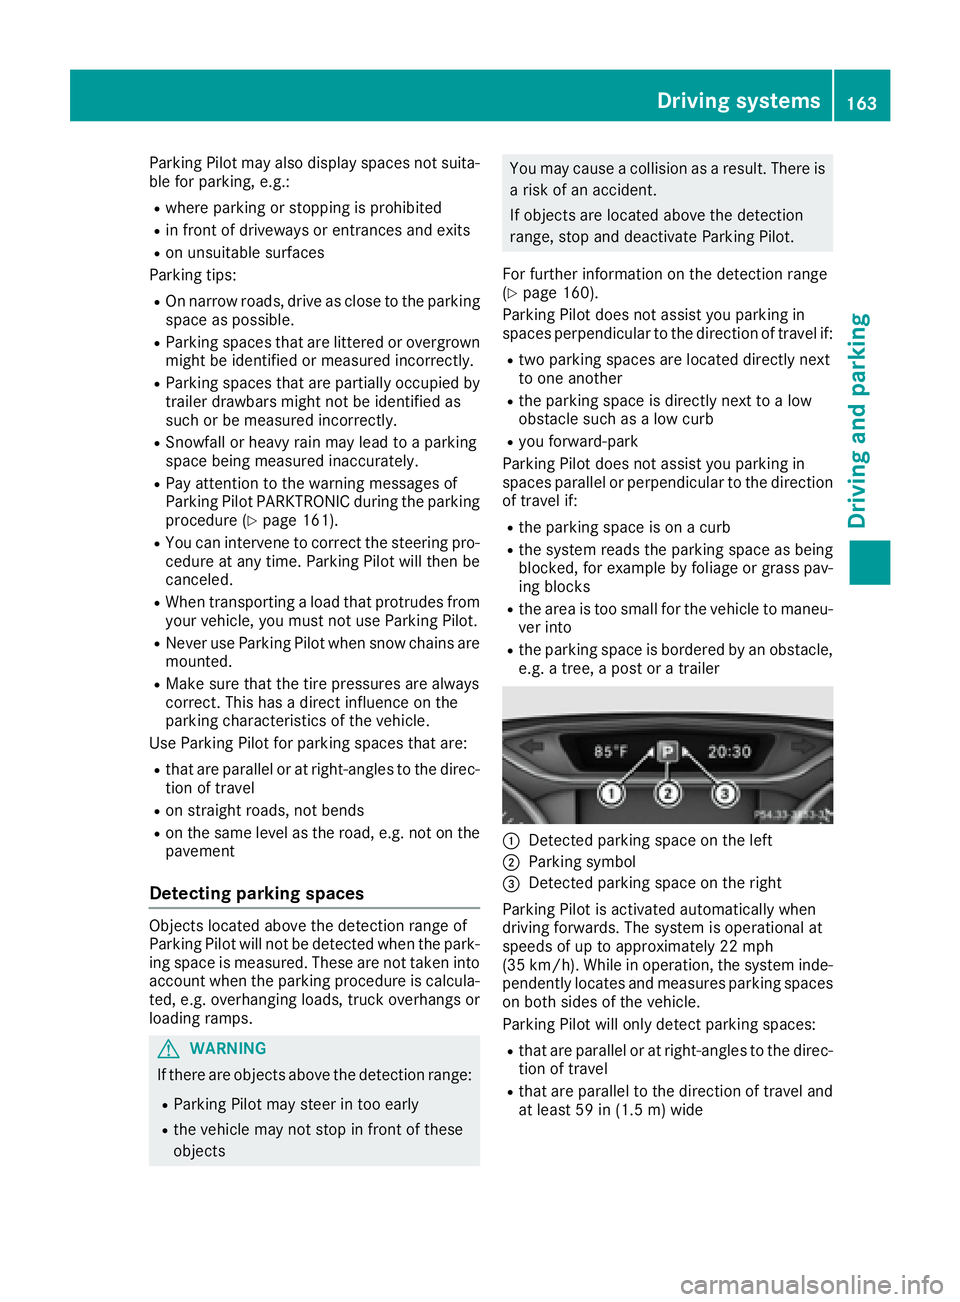
�C
Detected parking space on the left �D
Parking symbol �
Page 287 of 318
Snow chains
G WARNING
If snow chains are mounted on the rear
wheels, the snow chains could cause abrasion
to the vehicle body or to chassis components.
This could cause damage to the vehicle or the
tires. There is a risk of an accident.
To avoid hazardous situations: R
never mount snow chains on the rear
wheels R
only mount snow chains in pairs on the
front wheels.
! On some tire sizes there is not enough space
for snow chains. To avoid damage to the vehi-
cle or tires, observe the "Wheel and tire com-
binations" section under "Tires and wheels".
For safety reasons, Mercedes-Benz recom-
mends that you only use snow chains that have
been specially approved for your vehicle by
Mercedes-Benz, or are of a corresponding
standard of quality. For more information,
please contact a qualified specialist workshop.
If you intend to mount snow chains, please bear
the following points in mind: R
Snow chains may not be mounted on all
wheel/tire combinations. Permissible wheel-
tire combinations ( Y
page 306).R
Only use snow chains when driving on roads
completely covered by snow. Remove the
snow chains as soon as possible when you
come to a road that is not snow-covered. R
Local regulations may restrict the use of snow
chains. Observe the appropriate regulations if
you wish to mount snow chains. R
Do not exceed the maximum permissible
speed of 30 mph (50 km/h). R
Do not use Parking Pilot when snow chains
are installed ( Y
page 162).
You may wish to deactivate ESP ®
( Y
page 63)
when pulling away with snow chains installed .
You can thereby allow the wheels to spin in a
controlled manner, achieving an increased driv-
ing force (cutting action). Tire pressure
Tire pressure specifications
Important safety notes
G WARNING
Underinflated or overinflated tires pose the
following risks: R
the tires may burst, especially as the load
and vehicle speed increase. R
the tires may wear excessively and/or
unevenly, which may greatly impair tire
traction. R
the driving characteristics, as well as steer-
ing and braking, may be greatly impaired.
There is a risk of an accident.
Follow recommended tire inflation pressures
and check the pressure of all the tires includ-
ing the spare wheel: R
monthly, at least R
if the load changes R
before beginning a long journey R
under different operating conditions, e.g.
off-road driving
If necessary, correct the tire pressure.
i The data on the Tire and Loading Informa-
tion placard and tire pressure table shown
here are examples. Tire pressure specifica-
tions are vehicle-specific and may deviate
from the data shown here. The tire pressure
specifications that are valid for your vehicle
can be found on the Tire and Loading Infor-
mation placard and tire pressure table on the
vehicle.
General notes The recommended tire pressures for the tires
mounted at the factory can be found on the
labels described here.
Further information on tire pressures can be
obtained at a qualified specialist workshop. Tire pressure 285
Wheels and tires Z
Page 291 of 318
same time cannot be detected by the tire pres-
sure loss warning system.
The tire pressure monitor is not able to warn you
of a sudden loss of pressure, e.g. if the tire is
penetrated by a foreign object. In the event of a
sudden loss of pressure, bring the vehicle to a
halt by braking carefully. Avoid abrupt steering
movements.
The function of the tire pressure loss warning
system is limited or delayed if: R
snow chains are mounted on your vehicle's
tires. R
road conditions are wintry. R
you are driving on sand or gravel. R
you adopt a very sporty driving style (corner-
ing at high speeds or driving with high rates of
acceleration). R
you are driving with a heavy load (in the vehi-
cle or on the roof)
Restarting the tire pressure loss warn-
ing system Restart the tire pressure loss warning system if
you have: R
changed the tire pressure R
changed the wheels or tires R
mounted new wheels or tires X
Before restarting, make sure that the tire
pressures are set properly on all four tires for
the respective operating conditions.
The recommended tire pressure can be found
on the Tire and Loading Information placard
on the B-pillar. Additionally, a tire pressure
table is attached to the fuel filler flap. The tire
pressure loss warning system can only give
reliable warnings if you have set the correct
tire pressure. If an incorrect tire pressure is
set, these incorrect values will be monitored. X
Also observe the notes in the section on tire
pressures ( Y
page 285).X
Make sure that the SmartKey is in position 2
in the ignition lock ( Y
page 121).X
Press �Y or �e on the steering wheel to
select the Serv. menu.X
Press the �c or �d button to select
Tire Pressure .X
Press the �v button.
The Run Flat Indicator Active Press
'OK' to Restart message appears in the
multifunction display. If you wish to confirm the restart: X
Press the �v button.
The Tire Pressure Now OK? message
appears in the multifunction display. X
Press the �c or �d button to select Yes .X
Press the �v button.
The Run Flat Indicator Restarted mes-
sage appears in the multifunction display.
After a teach-in period, the tire pressure loss
warning system will monitor the set tire pres-
sures of all four tires.
If you wish to cancel the restart: X
Press the �8 button.
or X
If the Tire Pressure Now OK? message
appears, press the �c or �d button to
select Cancel . X
Press the �v button.
The tire pressure values stored at the last
restart will continue to be monitored.
Tire pressure monitor
General notes If a tire pressure monitor is installed, the vehi-
cle's wheels have sensors that monitor the tire
pressures in all four tires. The tire pressure mon-
itor warns you if the pressure drops in one or
more of the tires. The tire pressure monitor only
functions if the corresponding sensors are
installed in all wheels.
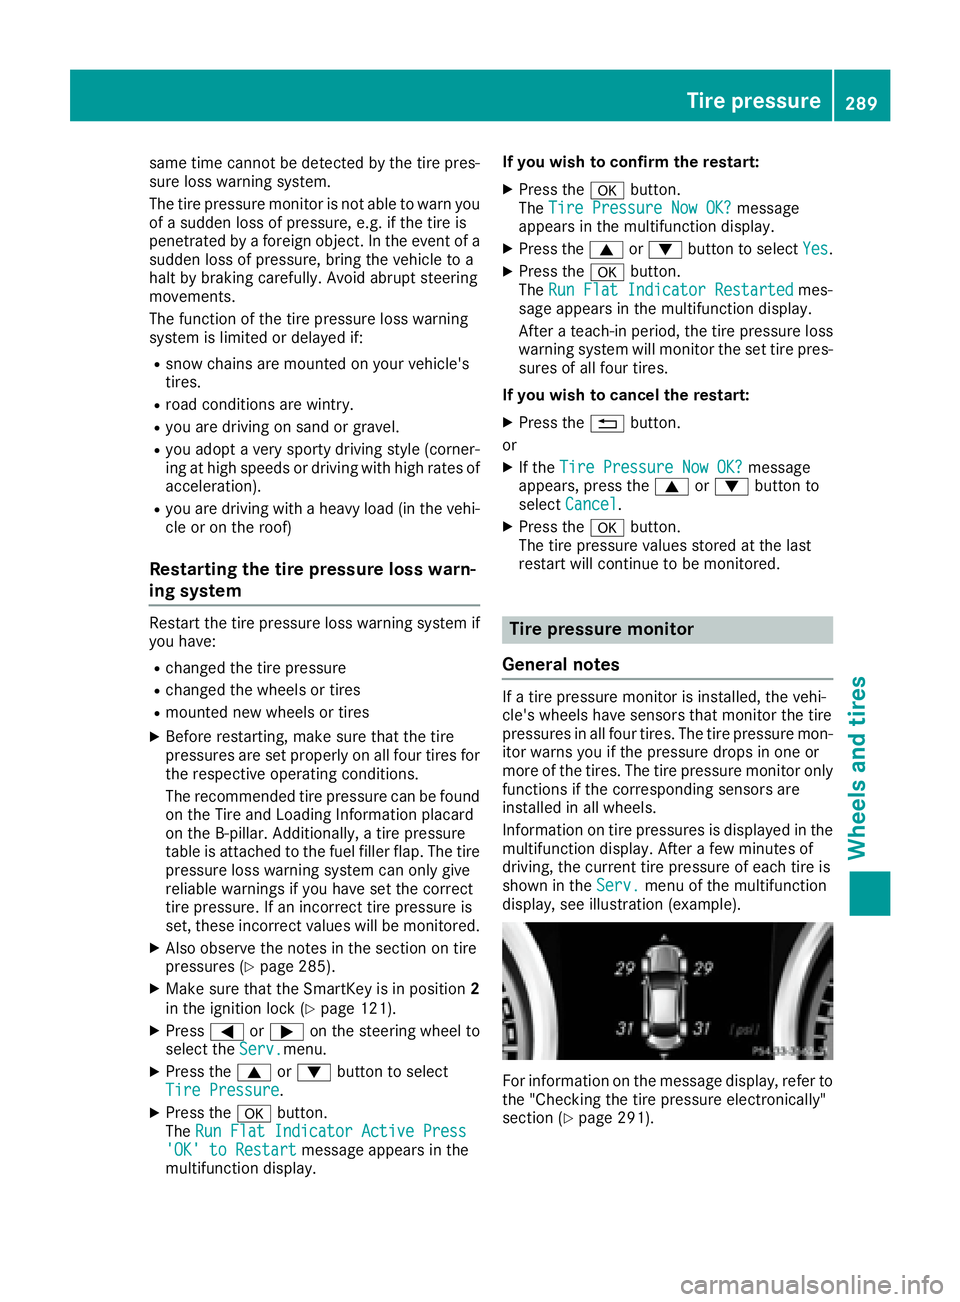
Information on tire pressures is displayed in the
multifunction display. After a few minutes of
driving, the current tire pressure of each tire is
shown in the Serv. menu of the multifunction
display, see illustration (example).
For information on the message display, refer to
the "Checking the tire pressure electronically"
section ( Y
page 291).Tire pressure 289
Wheels and tires Z