MERCEDES-BENZ CLA-Class 2014 C117 Comand Manual
Manufacturer: MERCEDES-BENZ, Model Year: 2014, Model line: CLA-Class, Model: MERCEDES-BENZ CLA-Class 2014 C117Pages: 270, PDF Size: 5.76 MB
Page 31 of 270
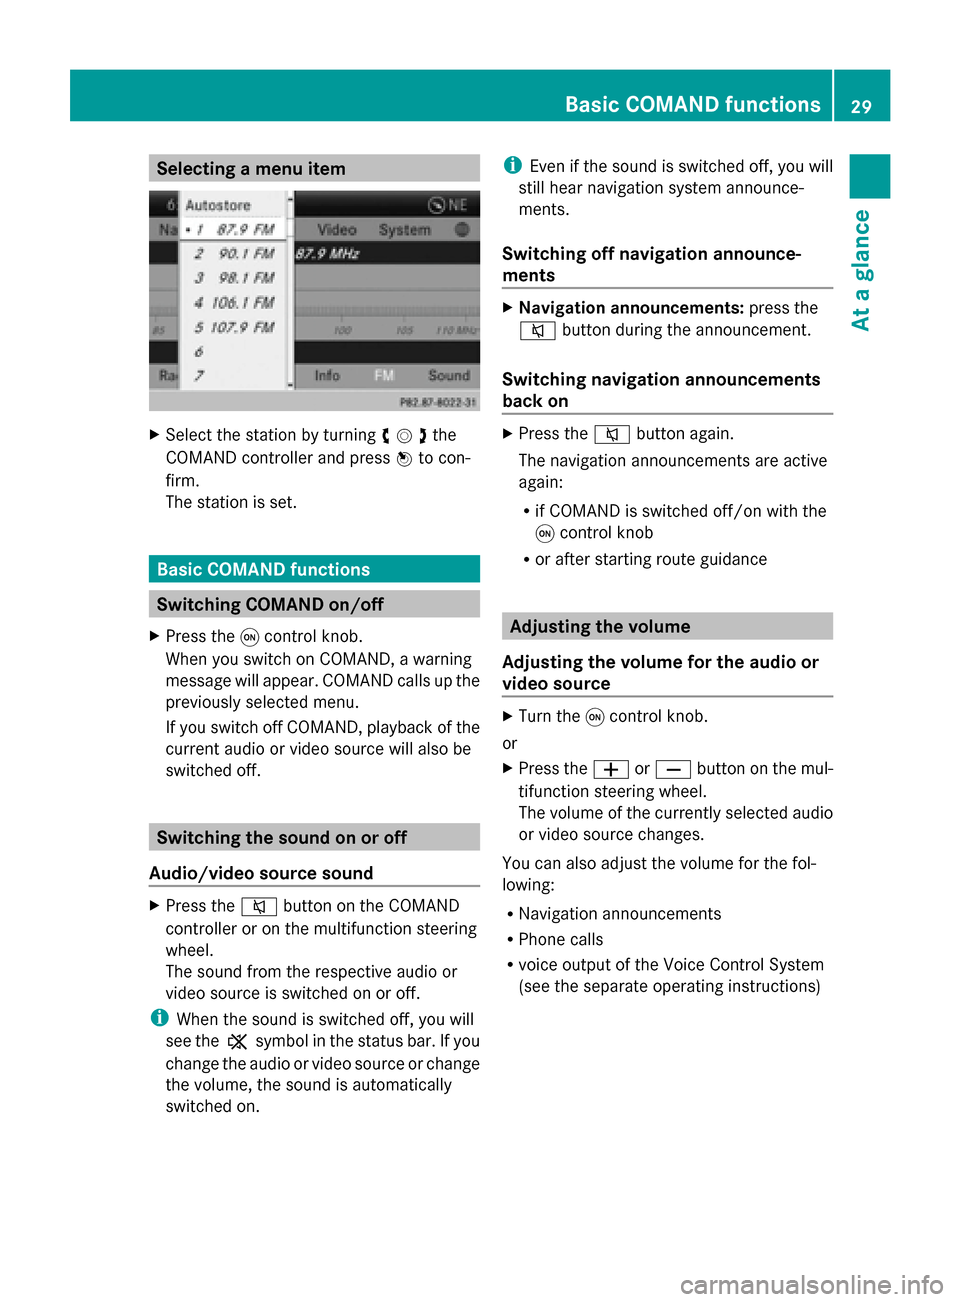
Selecting a menu item
X
Select the station by turning 00790052007Athe
COMAND controller and press 0098to con-
firm.
The station is set. Basic COMAND functions
Switching COMAND on/off
X Press the 0043control knob.
When you switch on COMAND, a warning
message will appear. COMAND calls up the
previously selected menu.
If you switch off COMAND, playback of the
current audio or video source will also be
switched off. Switching the sound on or off
Audio/video source sound X
Press the 0063button on the COMAND
controller or on the multifunction steering
wheel.
The sound from the respective audio or
video source is switched on or off.
i When the sound is switched off, you will
see the 006Bsymbol in the status bar. If you
change the audio or video source or change
the volume, the sound is automatically
switched on. i
Even if the sound is switched off, you will
still hear navigation system announce-
ments.
Switching off navigation announce-
ments X
Navigation announcements: press the
0063 button during the announcement.
Switching navigation announcements
back on X
Press the 0063button again.
The navigation announcements are active
again:
R if COMAND is switched off/on with the
0043 control knob
R or after starting route guidance Adjusting the volume
Adjusting the volume for the audio or
video source X
Turn the 0043control knob.
or
X Press the 0081or0082 button on the mul-
tifunction steering wheel.
The volume of the currently selected audio
or video source changes.
You can also adjust the volume for the fol-
lowing:
R Navigation announcements
R Phone calls
R voice output of the Voice Control System
(see the separate operating instructions) Basic COMAND functions
29At a glance
Page 32 of 270
Adjusting the volume for navigation
announcements During a navigation announcement:
X Turn the 0043control knob.
or
X Press the 0081or0082 button on the mul-
tifunction steering wheel.
Adjusting the volume for phone calls You can adjust the volume for hands-free
mode during a telephone call.
X Turn the 0043control knob.
or
X Press the 0081or0082 button on the mul-
tifunction steering wheel. Adjusting the sound settings
Calling up the sound menu You can make various sound settings for the
different audio and video sources. This means
that it is possible to set more bass for radio
mode than for audio CD mode, for example.
You can call up the respective sound menu
from the menu of the desired mode.
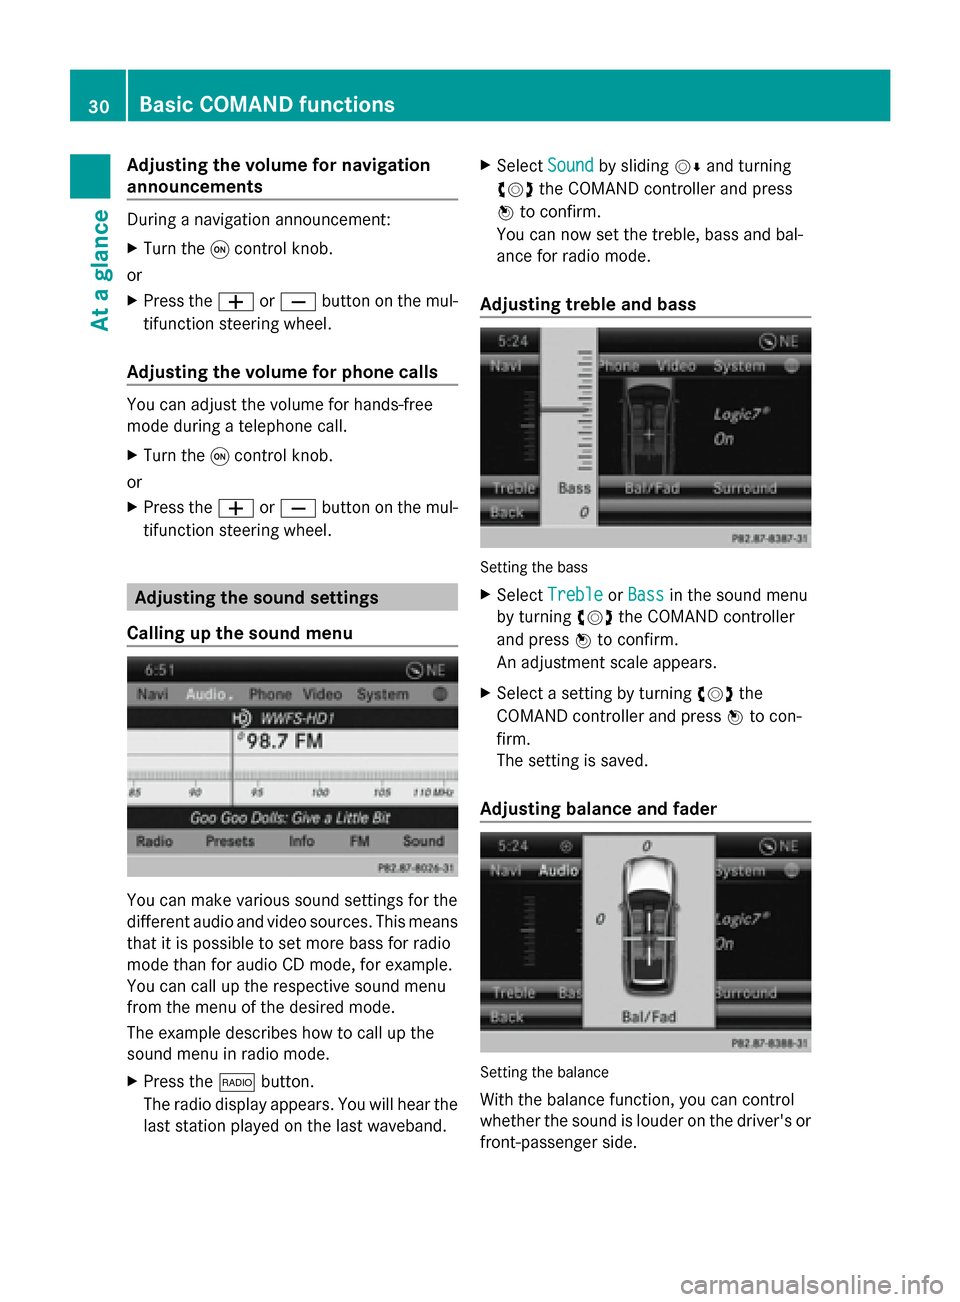
The example describes how to call up the
sound menu in radio mode.
X Press the 002Abutton.
The radio display appears. You will hear the
last station played on the last waveband. X
Select Sound
Sound by sliding 00520064and turning
00790052007A the COMAND controller and press
0098 to confirm.
You can now set the treble, bass and bal-
ance for radio mode.
Adjusting treble and bass Setting the bass
X Select Treble Treble orBass
Bass in the sound menu
by turning 00790052007Athe COMAND controller
and press 0098to confirm.
An adjustment scale appears.
X Select a setting by turning 00790052007Athe
COMAND controller and press 0098to con-
firm.
The setting is saved.
Adjusting balance and fader Setting the balance
With the balance function, you can control
whether the sound is louder on the driver's or
front-passenger side. 30
Basic COMAND functionsAt a glance
Page 33 of 270
The fader function is used to control whether
the sound is louder in the front or the rear of
the vehicle.
You can adjust the fader depending on the
vehicle model.
Equipped with Bang & Olufsen sound sys-
tem: for the best sound focus, choose the
setting 0 0.
X Select Bal/Fad
Bal/Fad (balance/fader) in the
sound menu by turning 00790052007Athe COMAND
controller and press 0098to confirm.
X Select a balance setting by sliding 009500520096the
COMAND controller and press 0098to con-
firm. Surround
General notes If your vehicle is equipped with surround
sound, you can use one of two sound sys-
tems:
R harman/kardon ®
Logic 7 ®
Surround
Sound system
The harman/kardon ®
Logic 7 ®
Surround
Sound system allows you to set the opti-
mum surround sound in the vehicle interior
(Y page 32).
R Bang & Olufsen sound system
(Y page 33)
Both sound systems are available for the fol-
lowing operating modes:
R radio (FM only)
R satellite radio
R audio CD
R audio DVD (MLP, dts, PCM and Dolby Digi-
tal audio formats)
R MP3 (including SD memory card and USB
storage device)
R Media Interface
R Bluetooth ®
audio mode R
video DVD (PCM, dts and Dolby Digital
audio formats)
R AUX
Because some DVDs contain both stereo and
multichannel audio formats, it may be neces-
sary to set the audio format (Y page 229).
Discs which support the audio formats men-
tioned have the following logos: Basic COMAND functions
31At a glance
Page 34 of 270
harman/kardon
®
Logic 7 ®
Surround
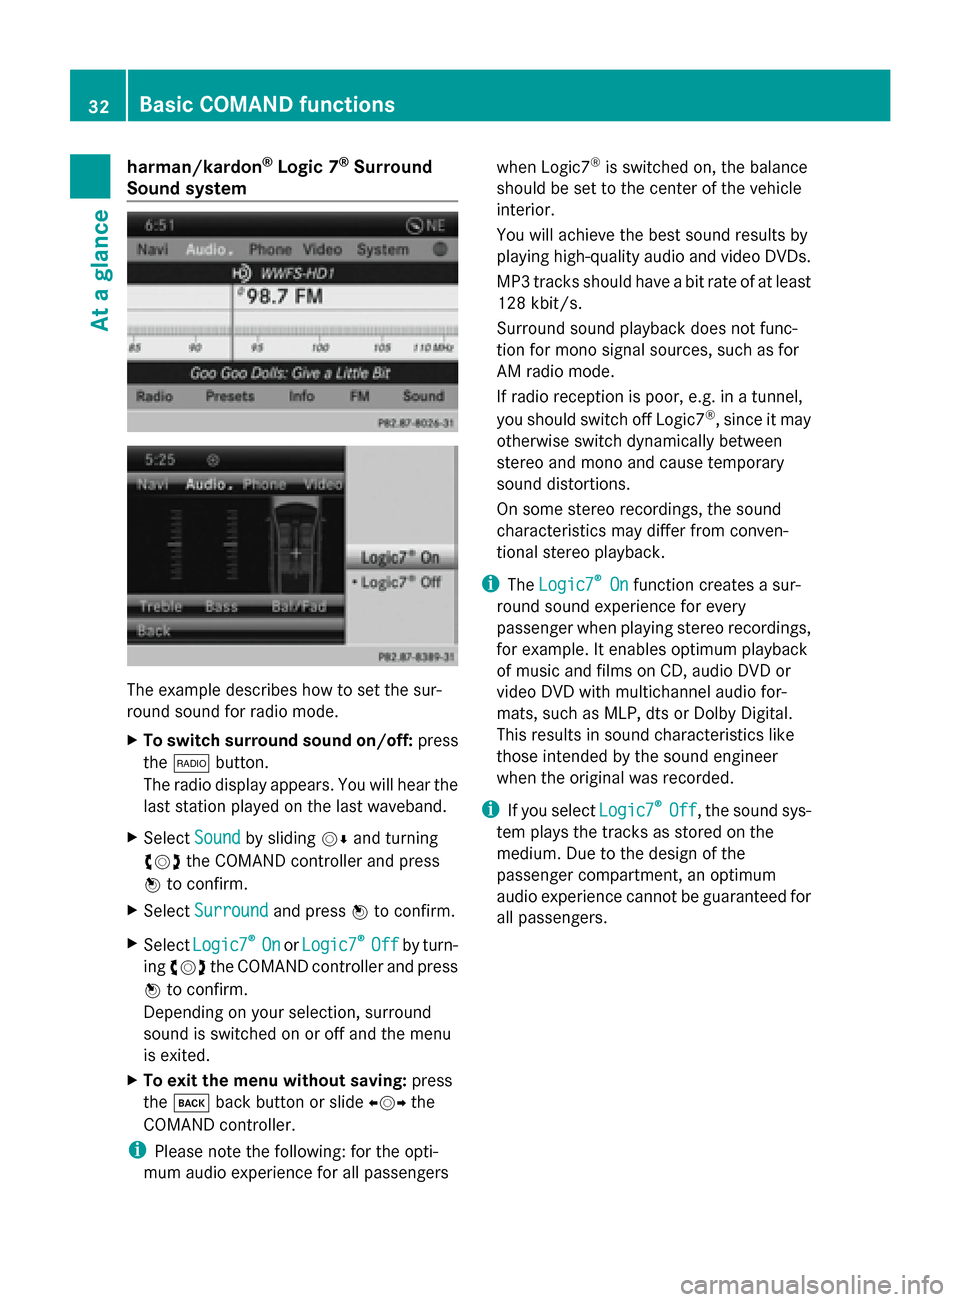
Sound system The example describes how to set the sur-
round sound for radio mode.
X To switch surround sound on/off: press
the 002A button.
The radio display appears. You will hear the
last station played on the last waveband.
X Select Sound
Sound by sliding 00520064and turning
00790052007A the COMAND controller and press
0098 to confirm.
X Select Surround Surround and press0098to confirm.
X Select Logic7
Logic7 ®
®
On
On orLogic7
Logic7 ®
®
Off
Off by turn-
ing 00790052007A the COMAND controller and press
0098 to confirm.
Depending on your selection, surround
sound is switched on or off and the menu
is exited.
X To exit the menu without saving: press
the 003D back button or slide 009500520096the
COMAND controller.
i Please note the following: for the opti-
mum audio experience for all passengers when Logic7
®
is switched on, the balance
should be set to the center of the vehicle
interior.
You will achieve the best sound results by
playing high-quality audio and video DVDs.
MP3 tracks should have a bit rate of at least
128 kbit/s.
Surround sound playback does not func-
tion for mono signal sources, such as for
AM radio mode.
If radio reception is poor, e.g. in a tunnel,
you should switch off Logic7 ®
, since it may
otherwise switch dynamically between
stereo and mono and cause temporary
sound distortions.
On some stereo recordings, the sound
characteristics may differ from conven-
tional stereo playback.
i The Logic7
Logic7 ® ®
On
On function creates a sur-
round sound experience for every
passenger when playing stereo recordings,
for example. It enables optimum playback
of music and films on CD, audio DVD or
video DVD with multichannel audio for-
mats, such as MLP, dts or Dolby Digital.
This results in sound characteristics like
those intended by the sound engineer
when the original was recorded.
i If you select Logic7
Logic7 ® ®
Off
Off, the sound sys-
tem plays the tracks as stored on the
medium. Due to the design of the
passenger compartment, an optimum
audio experience cannot be guaranteed for
all passengers. 32
Basic COMAND functionsAt a glance
Page 35 of 270
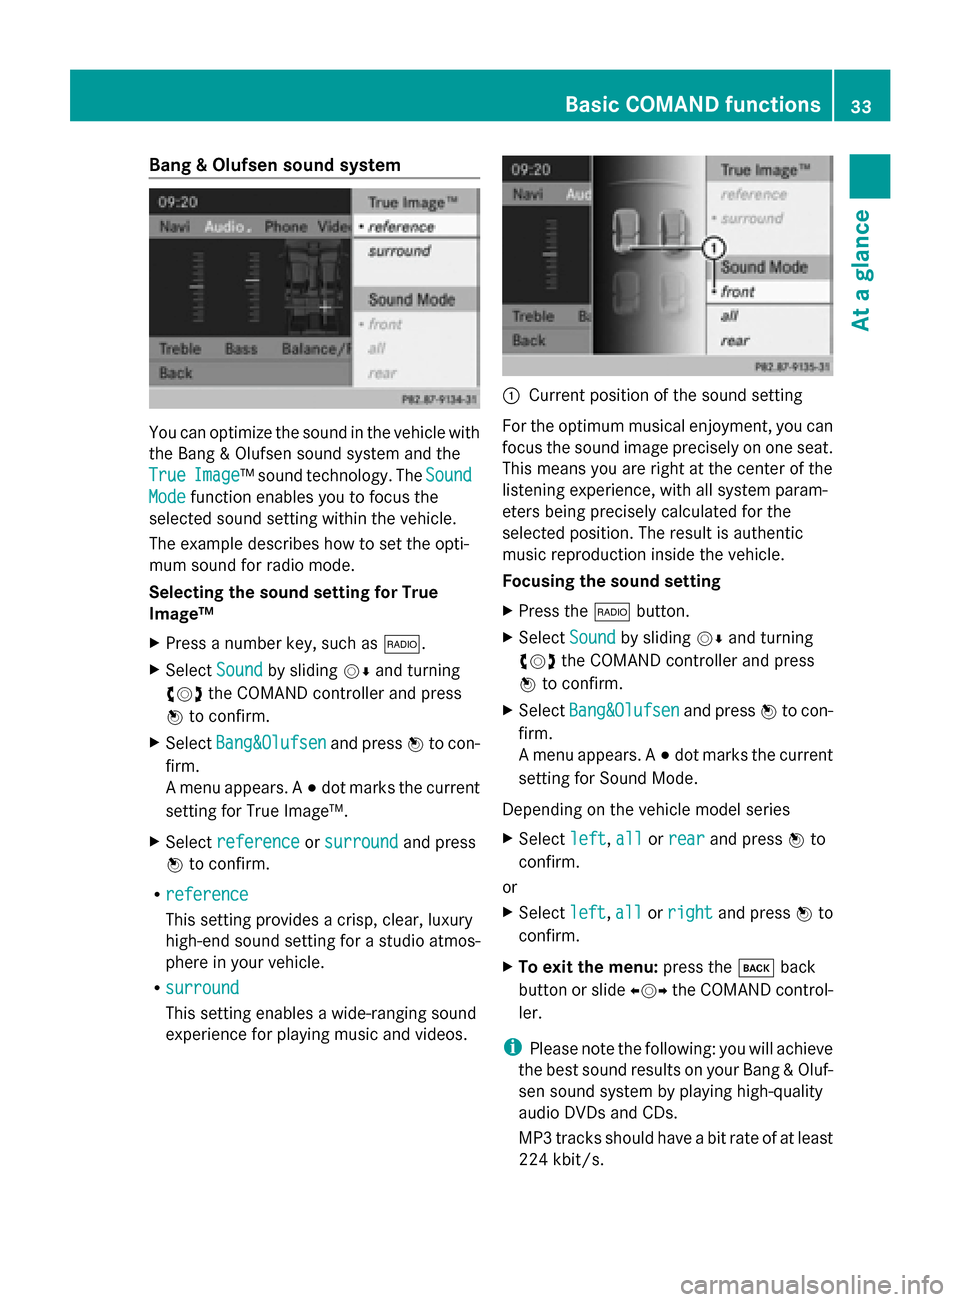
Bang & Olufsen sound system
You can optimize the sound in the vehicle with
the Bang & Olufsen sound system and the
True
True Image
Image™s ound technology. The Sound
Sound
Mode
Mode function enables you to focus the
selected sound setting within the vehicle.
The example describes how to set the opti-
mum sound for radio mode.
Selecting the sound setting for True
Image™
X Press a number key, such as 002A.
X Select Sound Soundby sliding 00520064and turning
00790052007A the COMAND controller and press
0098 to confirm.
X Select Bang&Olufsen
Bang&Olufsen and press0098to con-
firm.
A menu appears. A 003Bdot marks the current
setting for True Image™.
X Select reference
reference orsurround surround and press
0098 to confirm.
R reference
reference
This setting provides a crisp, clear, luxury
high-end sound setting for a studio atmos-
phere in your vehicle.
R surround
surround
This setting enables a wide-ranging sound
experience for playing music and videos. 0043
Current position of the sound setting
For the optimum musical enjoyment, you can
focus the sound image precisely on one seat.
This means you are right at the center of the
listening experience, with all system param-
eters being precisely calculated for the
selected position. The result is authentic
music reproduction inside the vehicle.
Focusing the sound setting
X Press the 002Abutton.
X Select Sound Soundby sliding 00520064and turning
00790052007A the COMAND controller and press
0098 to confirm.
X Select Bang&Olufsen
Bang&Olufsen and press0098to con-
firm.
A menu appears. A 003Bdot marks the current
setting for Sound Mode.
Depending on the vehicle model series
X Select left left,all
allorrear
rear and press 0098to
confirm.
or
X Select left left,all
allorright
right and press 0098to
confirm.
X To exit the menu: press the003Dback
button or slide 009500520096the COMAND control-
ler.
i Please note the following: you will achieve
the best sound results on your Bang & Oluf-
sen sound system by playing high-quality
audio DVDs and CDs.
MP3 tracks should have a bit rate of at least
224 kbit/s. Basic COMAND functions
33At a glance
Page 36 of 270
When playing using an iPod
®
, the bit rate
should also be at least 224 kbit/s.
For optimum playback quality:
XDeactivate the “EQ” setting on the
iPod ®
.
Surround-sound playback does not func-
tion for mono signal sources, such as the
medium wave range (MW) in radio mode.
On some stereo recordings, the sound
characteristics may differ from conven-
tional stereo playback. Character entry (telephony)
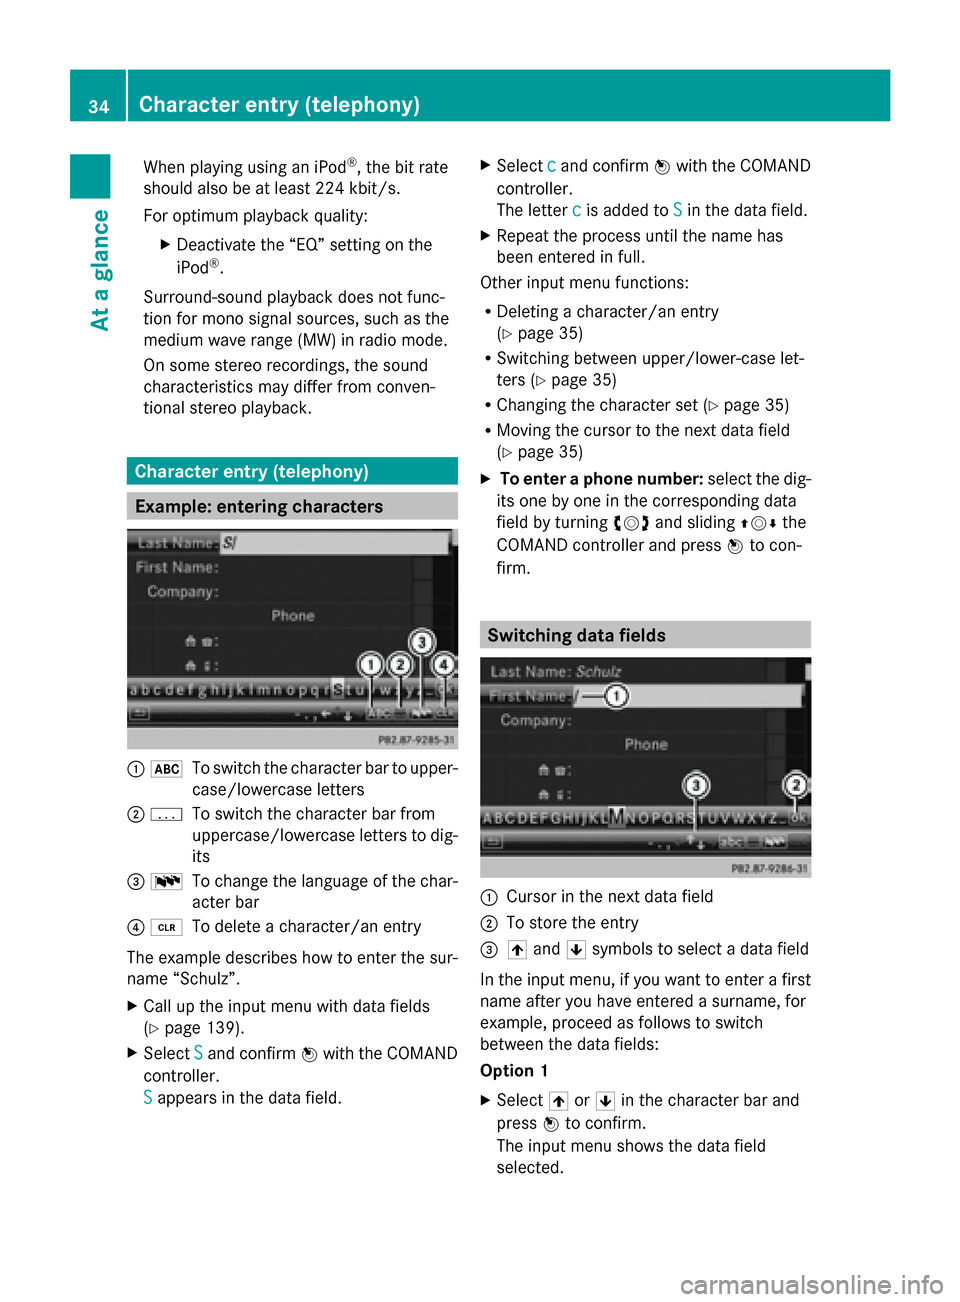
Example: entering characters
0043
0069
To switch the character bar to upper-
case/lowercase letters
0044 0042
To switch the character bar from
uppercase/lowercase letters to dig-
its
0087 0054
To change the language of the char-
acter bar
0085 0084
To delete a character/an entry
The example describes how to enter the sur-
name “Schulz”.
X Call up the input menu with data fields
(Y page 139).
X Select S Sand confirm 0098with the COMAND
controller.
S S appears in the data field. X
Select c cand confirm 0098with the COMAND
controller.
The letter c cis added to S
Sin the data field.
X Repeat the process until the name has
been entered in full.
Other input menu functions:
R Deleting a character/an entry
(Y page 35)
R Switching between upper/lower-case let-
ters (Y page 35)
R Changing the character set (Y page 35)
R Moving the cursor to the next data field
(Y page 35)
X To enter a phone number: select the dig-
its one by one in the corresponding data
field by turning 00790052007Aand sliding 009700520064the
COMAND controller and press 0098to con-
firm. Switching data fields
0043
Cursor in the next data field
0044 To store the entry
0087 005F and 0060symbols to select a data field
In the input menu, if you want to enter a first
name after you have entered a surname, for
example, proceed as follows to switch
between the data fields:
Option 1
X Select 005For0060 in the character bar and
press 0098to confirm.
The input menu shows the data field
selected. 34
Character entry (telephony)At a glance
Page 37 of 270
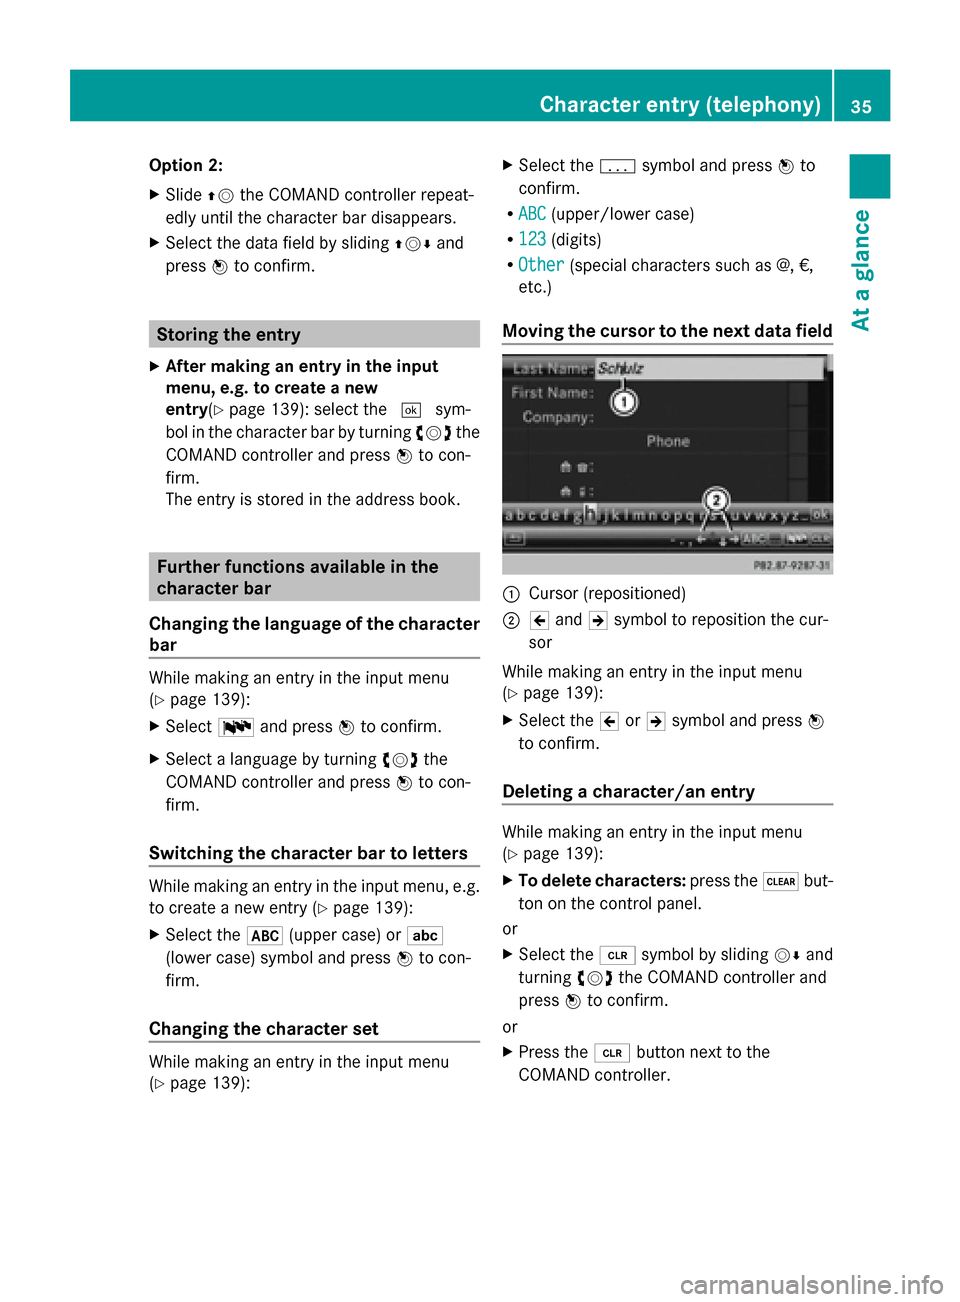
Option 2:
X
Slide 00970052the COMAND controller repeat-
edly until the character bar disappears.
X Select the data field by sliding 009700520064and
press 0098to confirm. Storing the entry
X After making an entry in the input
menu, e.g. to create a new
entry(Y page 139): select the 0054sym-
bol in the character bar by turning 00790052007Athe
COMAND controller and press 0098to con-
firm.
The entry is stored in the address book. Further functions available in the
character bar
Changing the language of the character
bar While making an entry in the input menu
(Y page 139):
X Select 0054and press 0098to confirm.
X Select a language by turning 00790052007Athe
COMAND controller and press 0098to con-
firm.
Switching the character bar to letters While making an entry in the input menu, e.g.
to create a new entry (Y page 139):
X Select the 0069(upper case) or 0041
(lower case) symbol and press 0098to con-
firm.
Changing the character set While making an entry in the input menu
(Y page 139): X
Select the 0042symbol and press 0098to
confirm.
R ABC
ABC (upper/lower case)
R 123 123 (digits)
R Other
Other (special characters such as @, €,
etc.)
Moving the cursor to the next data field 0043
Cursor (repositioned)
0044 005D and 005Esymbol to reposition the cur-
sor
While making an entry in the input menu
(Y page 139):
X Select the 005Dor005E symbol and press 0098
to confirm.
Deleting a character/an entry While making an entry in the input menu
(Y
page 139):
X To delete characters: press the0037but-
ton on the control panel.
or
X Select the 0084symbol by sliding 00520064and
turning 00790052007Athe COMAND controller and
press 0098to confirm.
or
X Press the 0084button next to the
COMAND controller. Character entry (telephony)
35At a glance
Page 38 of 270
X
To delete an entry: press and hold the
0037 button on the control panel until the
entire entry has been deleted.
or
X Select the 0084symbol and press and hold
0098 the COMAND controller until the entire
entry has been deleted.
or
X Press and hold the 0084button next to the
COMAND controller until the entire entry is
deleted. Character entry (navigation)
General information
The following paragraphs describe how to
enter characters using city input for NEW
NEW
YORK
YORK as an example.
If you want to use the address entry menu to
enter a city, a street or a house number, for
example, COMAND offers you:
R a list with a character bar (option 1)
R a selection list (option 2)
You can enter the characters using either the
character bar or the number keypad. In the
selection list, you select an entry to copy it to
the address entry menu. Option 1: city list/street list with
character bar
X Call up the city list with character bar
(Y page 64).
The alphabetically sorted city list shows the
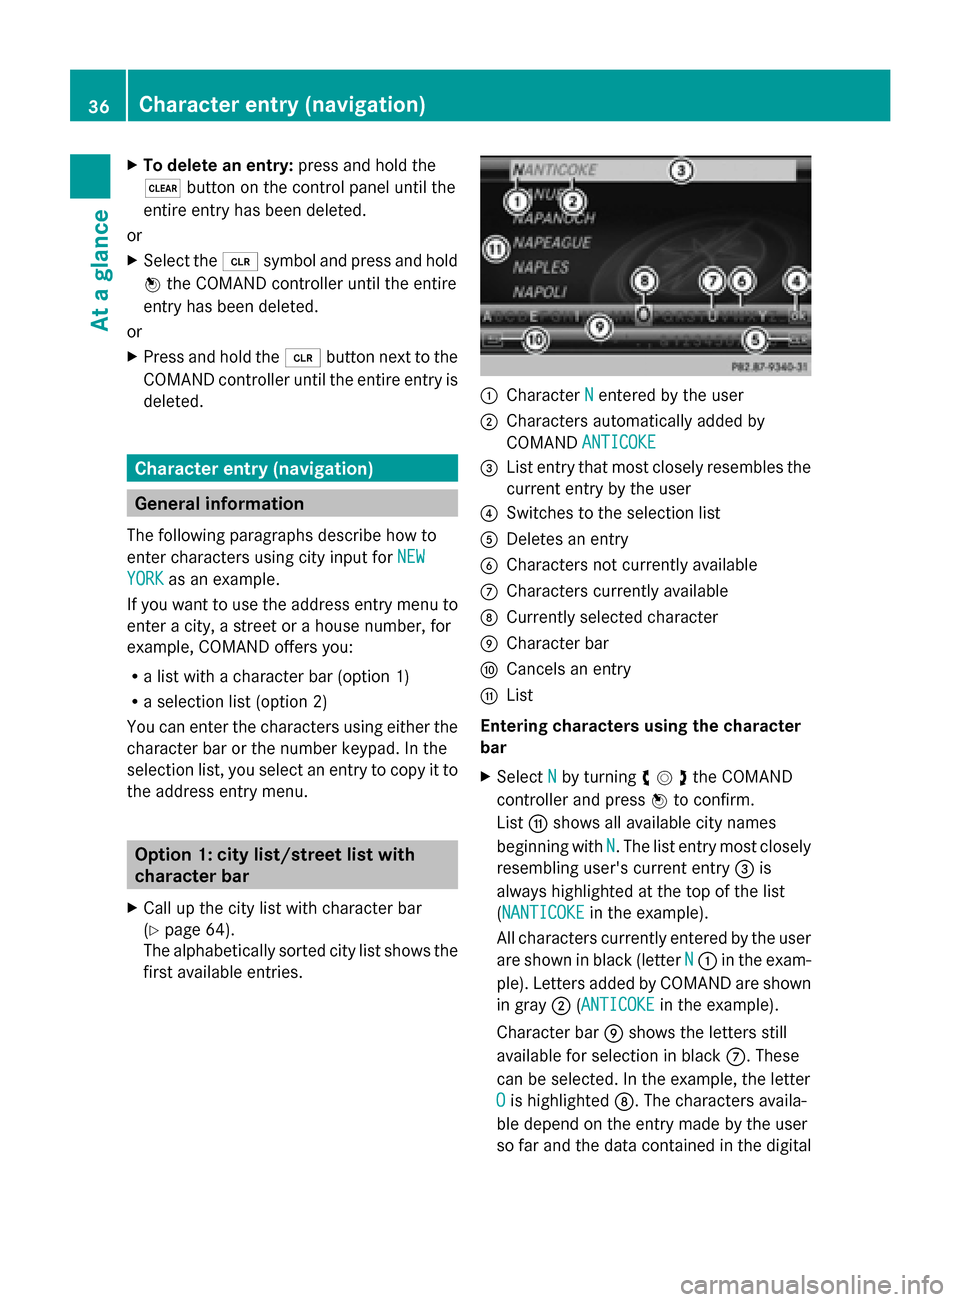
first available entries. 0043
Character N Nentered by the user
0044 Characters automatically added by
COMAND ANTICOKE
ANTICOKE
0087 List entry that most closely resembles the
current entry by the user
0085 Switches to the selection list
0083 Deletes an entry
0084 Characters not currently available
006B Characters currently available
006C Currently selected character
006D Character bar
006E Cancels an entry
006F List
Entering characters using the character
bar
X Select N
N by turning 00790052007Athe COMAND
controller and press 0098to confirm.
List 006Fshows all available city names
beginning with N N. The list entry most closely
resembling user's current entry 0087is
always highlighted at the top of the list
(NANTICOKE NANTICOKE in the example).
All characters currently entered by the user
are shown in black (letter N N0043 in the exam-
ple). Letters added by COMAND are shown
in gray 0044(ANTICOKEANTICOKE in the example).
Character bar 006Dshows the letters still
available for selection in black 006B. These
can be selected. In the example, the letter
O O is highlighted 006C. The characters availa-
ble depend on the entry made by the user
so far and the data contained in the digital 36
Character entry (navigation)At a glance
Page 39 of 270
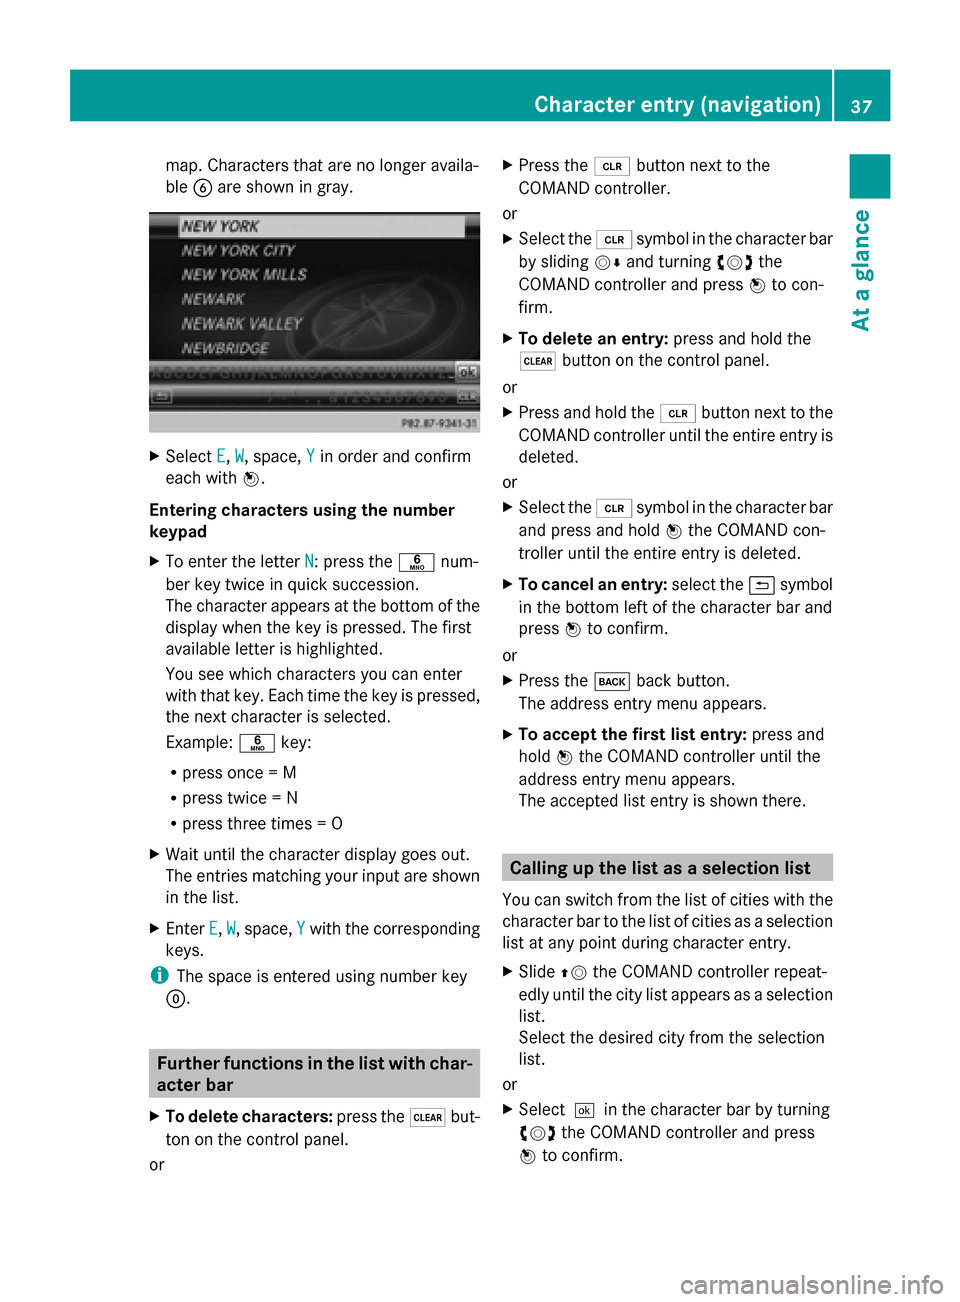
map. Characters that are no longer availa-
ble
0084are shown in gray. X
Select E E,W
W, space, Y
Yin order and confirm
each with 0098.
Entering characters using the number
keypad
X To enter the letter N N: press the0086num-
ber key twice in quick succession.
The character appears at the bottom of the
display when the key is pressed. The first
available letter is highlighted.
You see which characters you can enter
with that key. Each time the key is pressed,
the next character is selected.
Example: 0086key:
R press once = M
R press twice = N
R press three times = O
X Wait until the character display goes out.
The entries matching your input are shown
in the list.
X Enter E
E, W W, space, Y
Ywith the corresponding
keys.
i The space is entered using number key
0045. Further functions in the list with char-
acter bar
X To delete characters: press the0037but-
ton on the control panel.
or X
Press the 0084button next to the
COMAND controller.
or
X Select the 0084symbol in the character bar
by sliding 00520064and turning 00790052007Athe
COMAND controller and press 0098to con-
firm.
X To delete an entry: press and hold the
0037 button on the control panel.
or
X Press and hold the 0084button next to the
COMAND controller until the entire entry is
deleted.
or
X Select the 0084symbol in the character bar
and press and hold 0098the COMAND con-
troller until the entire entry is deleted.
X To cancel an entry: select the0039symbol
in the bottom left of the character bar and
press 0098to confirm.
or
X Press the 003Dback button.
The address entry menu appears.
X To accept the first list entry: press and
hold 0098the COMAND controller until the
address entry menu appears.
The accepted list entry is shown there. Calling up the list as a selection list
You can switch from the list of cities with the
character bar to the list of cities as a selection
list at any point during character entry.
X Slide 00970052the COMAND controller repeat-
edly until the city list appears as a selection
list.
Select the desired city from the selection
list.
or
X Select0054in the character bar by turning
00790052007A the COMAND controller and press
0098 to confirm. Character entry (navigation)
37At a glance
Page 40 of 270
If there are several entries for a city or if sev-
eral cities of the same name are stored, then
0054 is highlighted in the character bar.
X Press 0098the COMAND controller. Option 2: city list as selection list
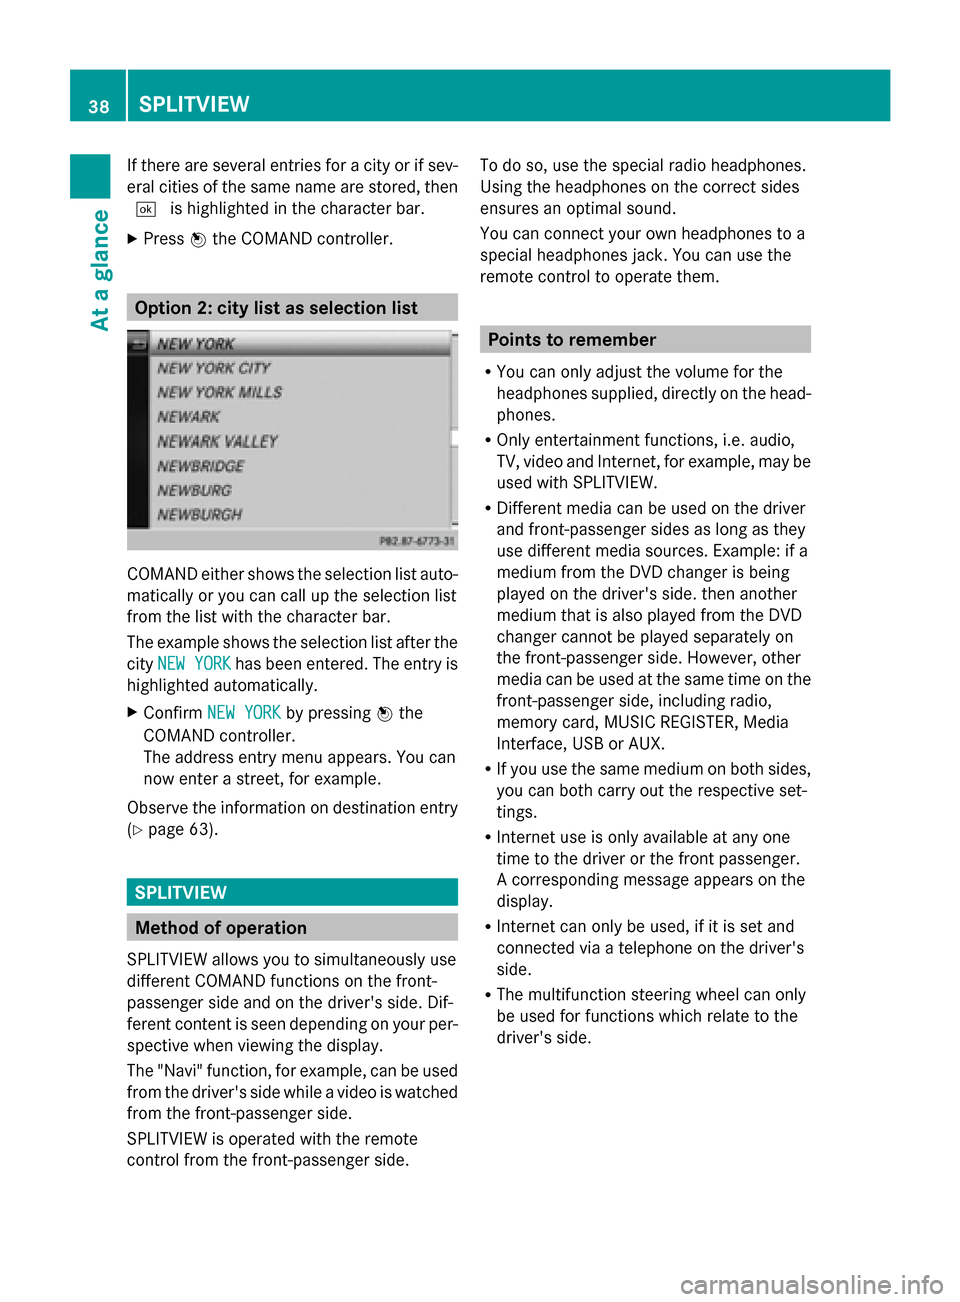
COMAND either shows the selection list auto-
matically or you can call up the selection list
from the list with the character bar.
The example shows the selection list after the
city NEW YORK
NEW YORK has been entered. The entry is
highlighted automatically.
X Confirm NEW YORK NEW YORK by pressing 0098the
COMAND controller.
The address entry menu appears. You can
now enter a street, for example.
Observe the information on destination entry
(Y page 63). SPLITVIEW
Method of operation
SPLITVIEW allows you to simultaneously use
different COMAND functions on the front-
passenger side and on the driver's side. Dif-
ferent content is seen depending on your per-
spective when viewing the display.
The "Navi" function, for example, can be used
from the driver's side while a video is watched
from the front-passenger side.
SPLITVIEW is operated with the remote
control from the front-passenger side. To do so, use the special radio headphones.
Using the headphones on the correct sides
ensures an optimal sound.
You can connect your own headphones to a
special headphones jack. You can use the
remote control to operate them. Points to remember
R You can only adjust the volume for the
headphones supplied, directly on the head-
phones.
R Only entertainment functions, i.e. audio,
TV, video and Internet, for example, may be
used with SPLITVIEW.
R Different media can be used on the driver
and front-passenger sides as long as they
use different media sources. Example: if a
medium from the DVD changer is being
played on the driver's side. then another
medium that is also played from the DVD
changer cannot be played separately on
the front-passenger side. However, other
media can be used at the same time on the
front-passenger side, including radio,
memory card, MUSIC REGISTER, Media
Interface, USB or AUX.
R If you use the same medium on both sides,
you can both carry out the respective set-
tings.
R Internet use is only available at any one
time to the driver or the front passenger.
A corresponding message appears on the
display.
R Internet can only be used, if it is set and
connected via a telephone on the driver's
side.
R The multifunction steering wheel can only
be used for functions which relate to the
driver's side. 38
SPLITVIEWAt a glance