MERCEDES-BENZ CLA-Class 2014 C117 Comand Manual
Manufacturer: MERCEDES-BENZ, Model Year: 2014, Model line: CLA-Class, Model: MERCEDES-BENZ CLA-Class 2014 C117Pages: 270, PDF Size: 5.76 MB
Page 71 of 270
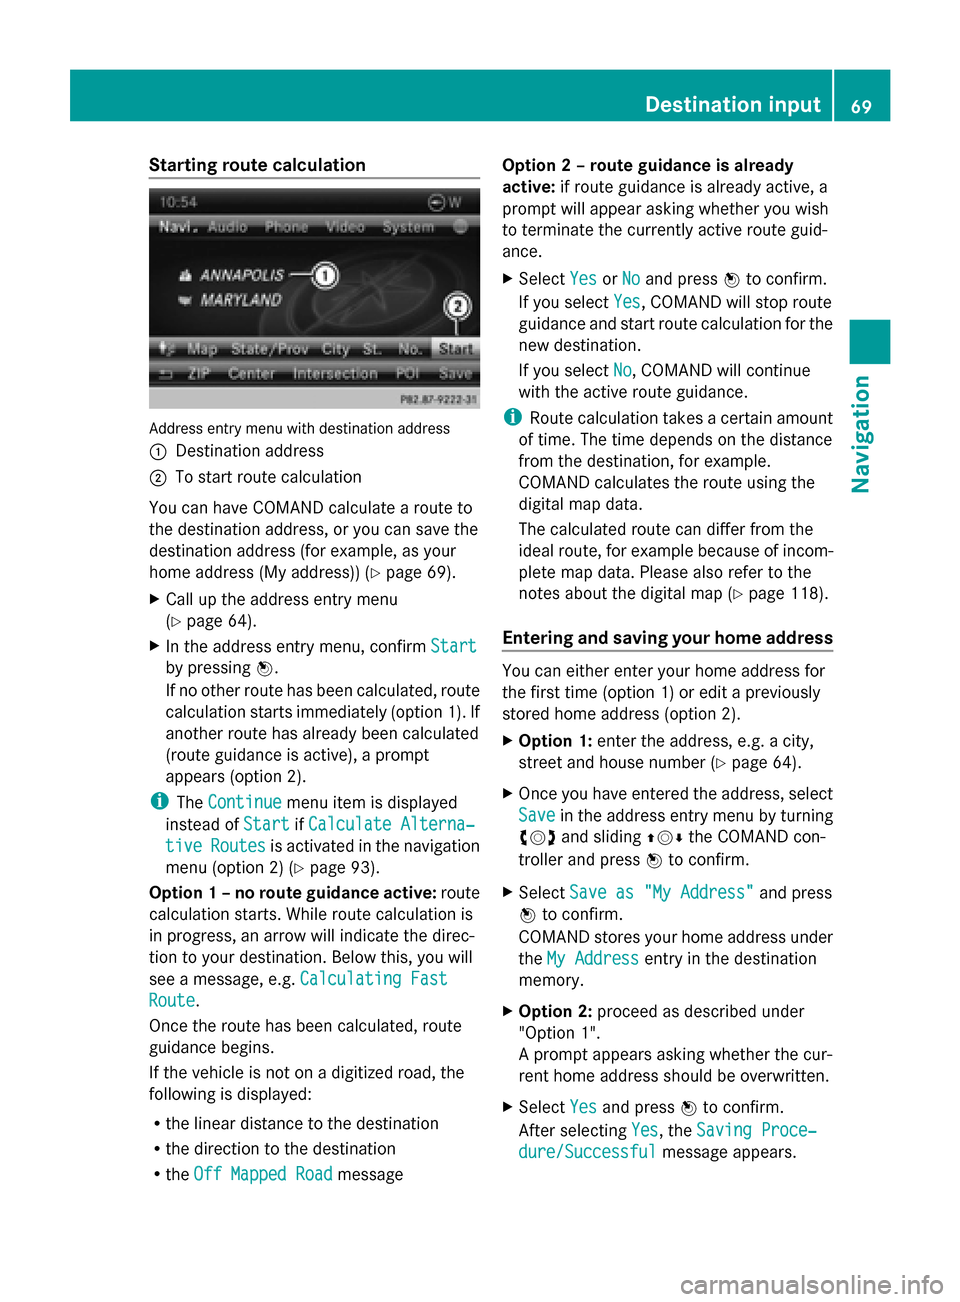
Starting route calculation
Address entry menu with destination address
0043
Destination address
0044 To start route calculation
You can have COMAND calculate a route to
the destination address, or you can save the
destination address (for example, as your
home address (My address)) (Y page 69).
X Call up the address entry menu
(Y page 64).
X In the address entry menu, confirm Start Start
by pressing 0098.
If no other route has been calculated, route
calculation starts immediately (option 1). If
another route has already been calculated
(route guidance is active), a prompt
appears (option 2).
i The Continue Continue menu item is displayed
instead of Start
StartifCalculate Alterna‐
Calculate Alterna‐
tive
tive Routes
Routes is activated in the navigation
menu (option 2) (Y page 93).
Option 1 – no route guidance active: route
calculation starts. While route calculation is
in progress, an arrow will indicate the direc-
tion to your destination. Below this, you will
see a message, e.g. Calculating Fast Calculating Fast
Route
Route.
Once the route has been calculated, route
guidance begins.
If the vehicle is not on a digitized road, the
following is displayed:
R the linear distance to the destination
R the direction to the destination
R the Off Mapped Road Off Mapped Road message Option 2 – route guidance is already
active:
if route guidance is already active, a
prompt will appear asking whether you wish
to terminate the currently active route guid-
ance.
X Select Yes YesorNo
No and press 0098to confirm.
If you select Yes
Yes, COMAND will stop route
guidance and start route calculation for the
new destination.
If you select No No, COMAND will continue
with the active route guidance.
i Route calculation takes a certain amount
of time. The time depends on the distance
from the destination, for example.
COMAND calculates the route using the
digital map data.
The calculated route can differ from the
ideal route, for example because of incom-
plete map data. Please also refer to the
notes about the digital map (Y page 118).
Entering and saving your home address You can either enter your home address for
the first time (option 1) or edit a previously
stored home address (option 2).
X
Option 1: enter the address, e.g. a city,
street and house number (Y page 64).
X Once you have entered the address, select
Save Save in the address entry menu by turning
00790052007A and sliding 009700520064the COMAND con-
troller and press 0098to confirm.
X Select Save as "My Address"
Save as "My Address" and press
0098 to confirm.
COMAND stores your home address under
the My Address
My Address entry in the destination
memory.
X Option 2: proceed as described under
"Option 1".
A prompt appears asking whether the cur-
rent home address should be overwritten.
X Select Yes Yesand press 0098to confirm.
After selecting Yes
Yes, the Saving Proce‐
Saving Proce‐
dure/Successful
dure/Successful message appears. Destination input
69Navigation Z
Page 72 of 270
Selecting a destination from the des-
tination memory (e.g. My address)
Introduction The destination memory always contains an
entry named "My Address". You may wish to
assign your home address to this entry, for
example (Y page 69), and select it for route
guidance. This entry is always located at the
top of the list in the destination memory.
X To switch to navigation mode: press the
00BE button.
X To show the menu: press0098the COMAND
controller.
X Select Destination
Destination in the navigation sys-
tem menu bar by turning 00790052007Athe
COMAND controller and pressing 0098to
confirm.
X Select From Memory
From Memory and press0098to con-
firm.
You will see the destination memory list
either with the character bar (option 1) or
as a selection list (option 2).
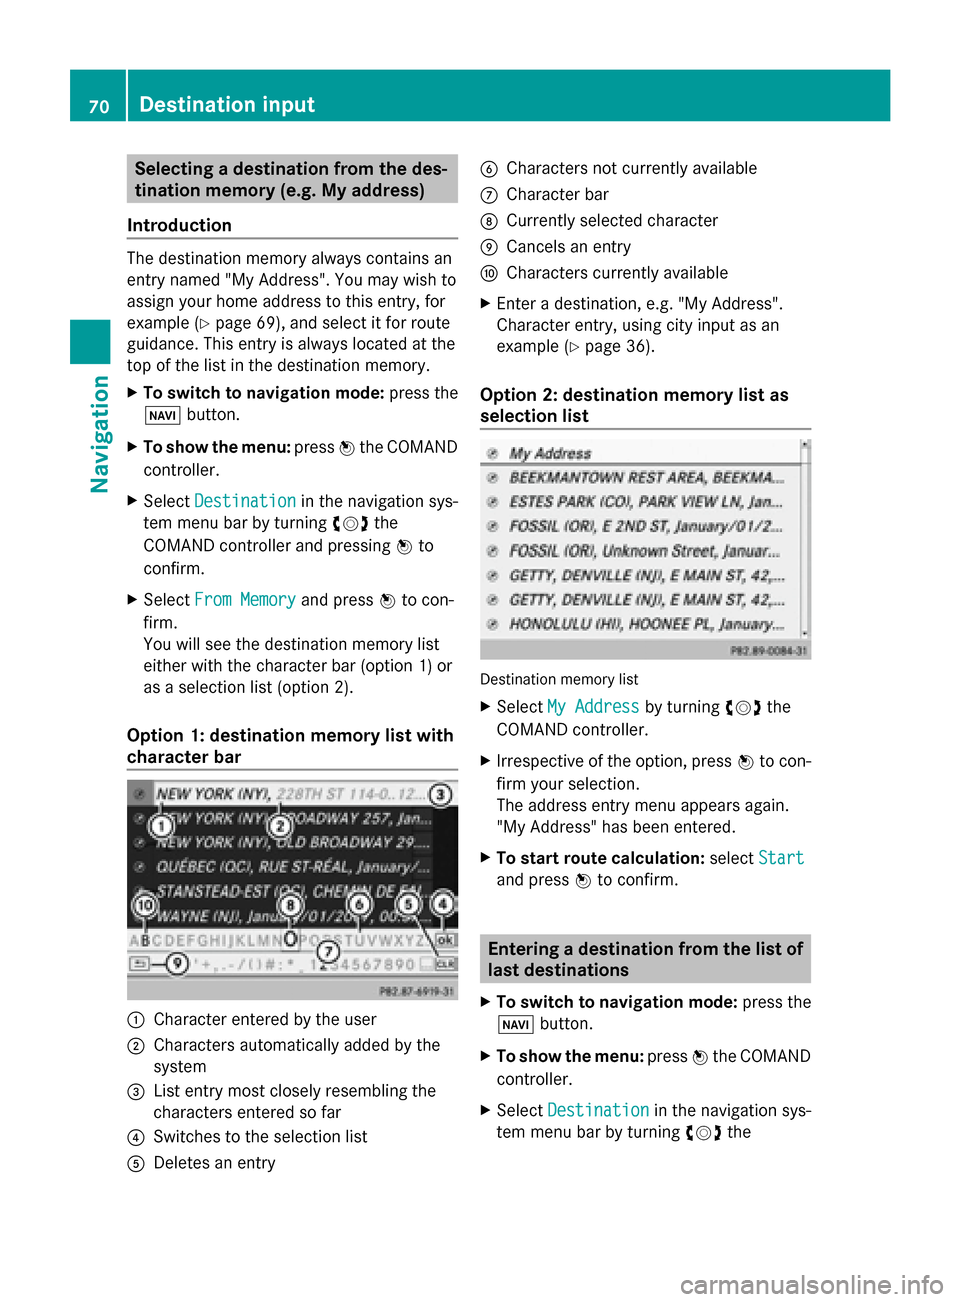
Option 1: destination memory list with
character bar 0043
Character entered by the user
0044 Characters automatically added by the
system
0087 List entry most closely resembling the
characters entered so far
0085 Switches to the selection list
0083 Deletes an entry 0084
Characters not currently available
006B Character bar
006C Currently selected character
006D Cancels an entry
006E Characters currently available
X Enter a destination, e.g. "My Address".
Character entry, using city input as an
example (Y page 36).
Option 2: destination memory list as
selection list Destination memory list
X
Select My Address My Address by turning00790052007Athe
COMAND controller.
X Irrespective of the option, press 0098to con-
firm your selection.
The address entry menu appears again.
"My Address" has been entered.
X To start route calculation: selectStart
Start
and press 0098to confirm. Entering a destination from the list of
last destinations
X To switch to navigation mode: press the
00BE button.
X To show the menu: press0098the COMAND
controller.
X Select Destination Destination in the navigation sys-
tem menu bar by turning 00790052007Athe 70
Destination inputNavigation
Page 73 of 270
COMAND controller and pressing
0098to
confirm. X
Select From Last Destinations
From Last Destinations and
press 0098to confirm.
X Select the desired destination by turning
00790052007A the COMAND controller and press
0098 to confirm.
The address entry menu appears again. The
destination address selected has been
entered.
X To start route calculation: selectStart
Start
and press 0098to confirm.
Once the route has been calculated, route
guidance begins (Y page 69).
i “Last destinations” memory
(Y page 107). Entering a destination using the map
Calling up the map X
To switch to navigation mode: press the
00BE button.
X To show the menu: press0098the COMAND
controller.
X Select Destination Destination in the navigation sys-
tem menu bar by turning 00790052007Athe
COMAND controller and pressing 0098to
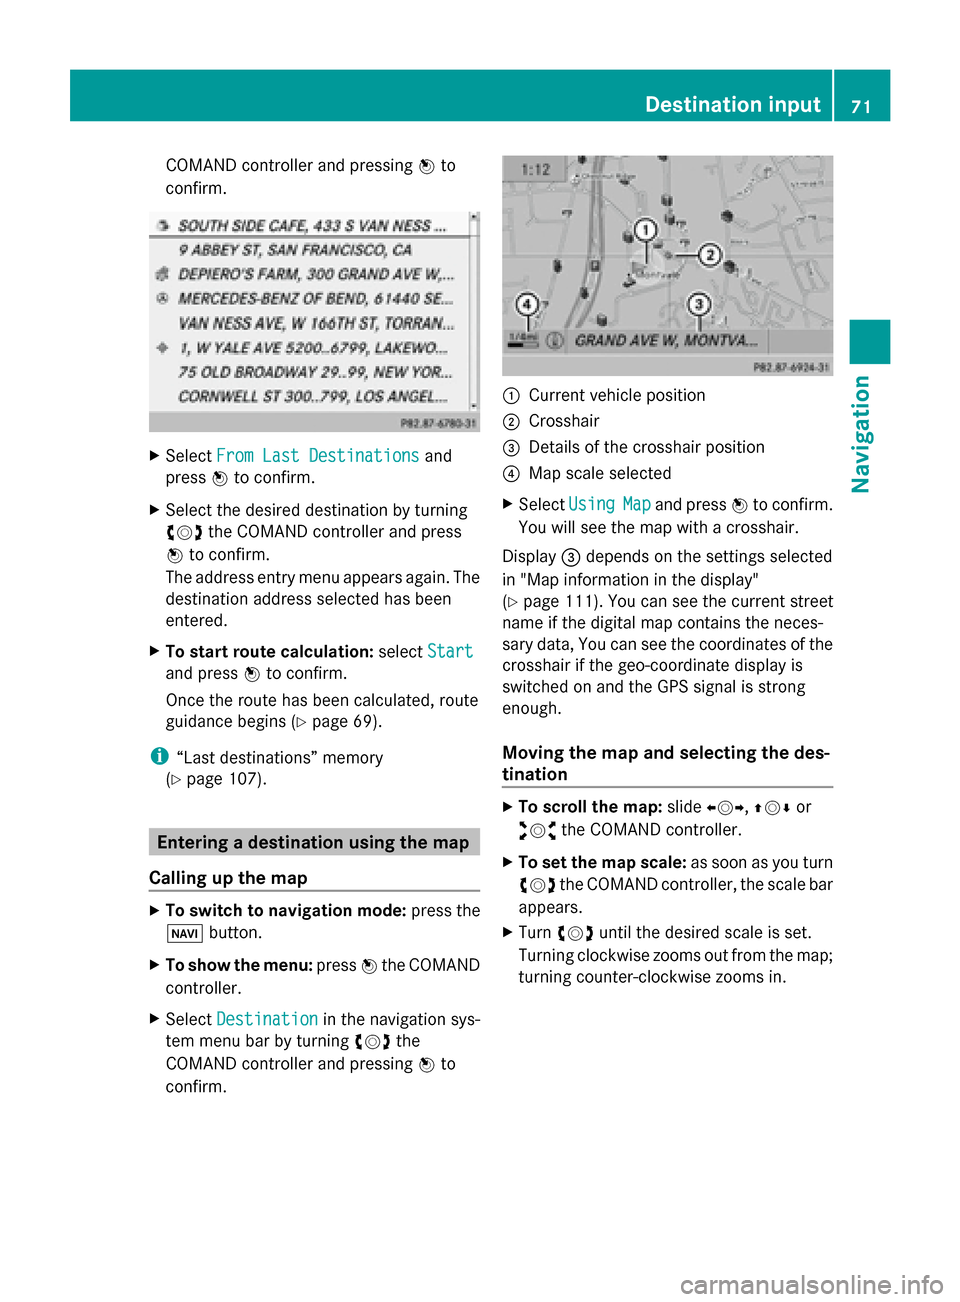
confirm. 0043
Current vehicle position
0044 Crosshair
0087 Details of the crosshair position
0085 Map scale selected
X Select Using
Using Map
Mapand press 0098to confirm.
You will see the map with a crosshair.
Display 0087depends on the settings selected
in "Map information in the display"
(Y page 111). You can see the current street
name if the digital map contains the neces-
sary data, You can see the coordinates of the
crosshair if the geo-coordinate display is
switched on and the GPS signal is strong
enough.
Moving the map and selecting the des-
tination X
To scroll the map: slide009500520096,009700520064 or
009100520078 the COMAND controller.
X To set the map scale: as soon as you turn
00790052007A the COMAND controller, the scale bar
appears.
X Turn 00790052007A until the desired scale is set.
Turning clockwise zooms out from the map;
turning counter-clockwise zooms in. Destination input
71Navigation Z
Page 74 of 270
X
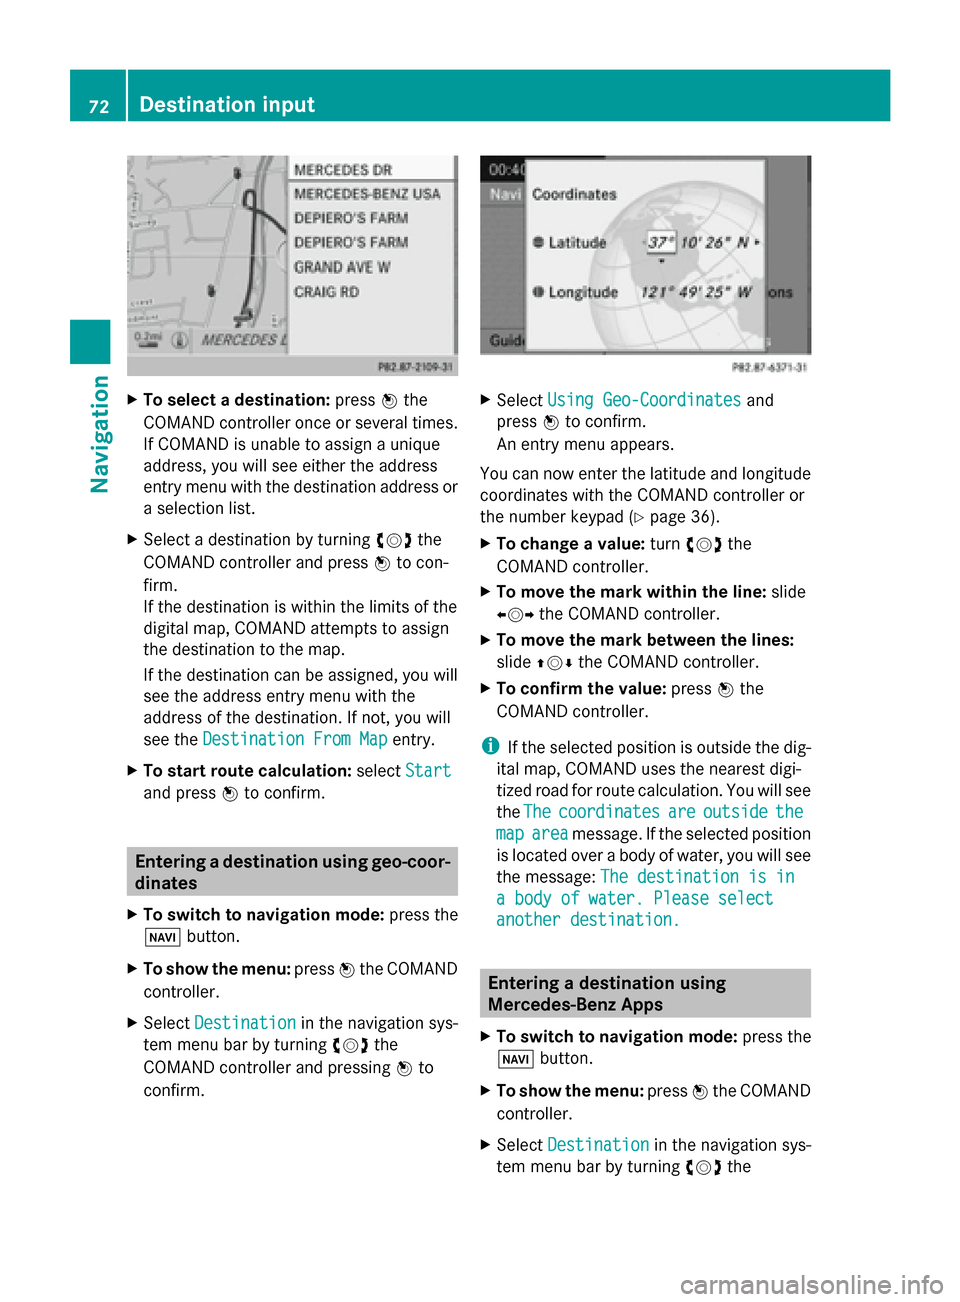
To select a destination: press0098the
COMAND controller once or several times.
If COMAND is unable to assign a unique
address, you will see either the address
entry menu with the destination address or
a selection list.
X Select a destination by turning 00790052007Athe
COMAND controller and press 0098to con-
firm.
If the destination is within the limits of the
digital map, COMAND attempts to assign
the destination to the map.
If the destination can be assigned, you will
see the address entry menu with the
address of the destination. If not, you will
see the Destination From Map
Destination From Map entry.
X To start route calculation: selectStart Start
and press 0098to confirm. Entering a destination using geo-coor-
dinates
X To switch to navigation mode: press the
00BE button.
X To show the menu: press0098the COMAND
controller.
X Select Destination
Destination in the navigation sys-
tem menu bar by turning 00790052007Athe
COMAND controller and pressing 0098to
confirm. X
Select Using Geo-Coordinates
Using Geo-Coordinates and
press 0098to confirm.
An entry menu appears.
You can now enter the latitude and longitude
coordinates with the COMAND controller or
the number keypad (Y page 36).
X To change a value: turn00790052007A the
COMAND controller.
X To move the mark within the line: slide
009500520096 the COMAND controller.
X To move the mark between the lines:
slide 009700520064 the COMAND controller.
X To confirm the value: press0098the
COMAND controller.
i If the selected position is outside the dig-
ital map, COMAND uses the nearest digi-
tized road for route calculation. You will see
the The The coordinates
coordinates are
areoutside
outside the
the
map
map area
area message. If the selected position
is located over a body of water, you will see
the message: The destination is in
The destination is in
a body of water. Please select a body of water. Please select
another destination. another destination. Entering a destination using
Mercedes-Benz Apps
X To switch to navigation mode: press the
00BE button.
X To show the menu: press0098the COMAND
controller.
X Select Destination Destination in the navigation sys-
tem menu bar by turning 00790052007Athe 72
Destination inputNavigation
Page 75 of 270
COMAND controller and pressing
0098to
confirm.
X Select Mercedes-Benz Apps
Mercedes-Benz Apps and press
0098 to confirm.
If an Internet connection is established, you
will see the message Do you want to Do you want to
accept the navigation data sent
accept the navigation data sent
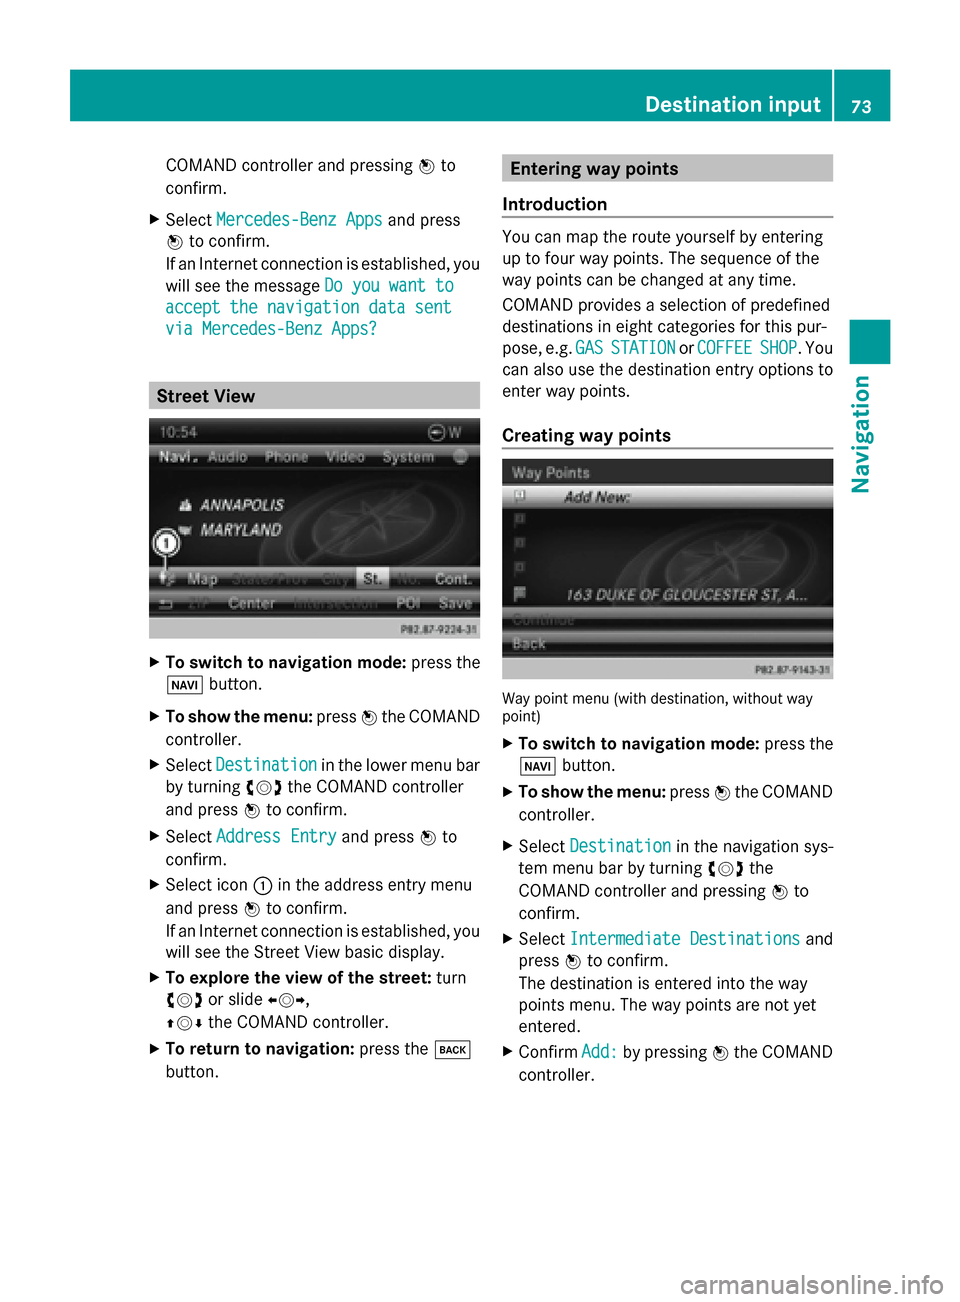
via Mercedes-Benz Apps? via Mercedes-Benz Apps? Street View
X
To switch to navigation mode: press the
00BE button.
X To show the menu: press0098the COMAND
controller.
X Select Destination Destination in the lower menu bar
by turning 00790052007Athe COMAND controller
and press 0098to confirm.
X Select Address Entry Address Entry and press0098to
confirm.
X Select icon 0043in the address entry menu
and press 0098to confirm.
If an Internet connection is established, you
will see the Street View basic display.
X To explore the view of the street: turn
00790052007A or slide 009500520096,
009700520064 the COMAND controller.
X To return to navigation: press the003D
button. Entering way points
Introduction You can map the route yourself by entering
up to four way points. The sequence of the
way points can be changed at any time.
COMAND provides a selection of predefined
destinations in eight categories for this pur-
pose, e.g.
GAS GASSTATION
STATION orCOFFEE
COFFEE SHOP
SHOP. You
can also use the destination entry options to
enter way points.
Creating way points Way point menu (with destination, without way
point)
X
To switch to navigation mode: press the
00BE button.
X To show the menu: press0098the COMAND
controller.
X Select Destination Destination in the navigation sys-
tem menu bar by turning 00790052007Athe
COMAND controller and pressing 0098to
confirm.
X Select Intermediate Destinations
Intermediate Destinations and
press 0098to confirm.
The destination is entered into the way
points menu. The way points are not yet
entered.
X Confirm Add: Add:by pressing 0098the COMAND
controller. Destination input
73Navigation Z
Page 76 of 270
X
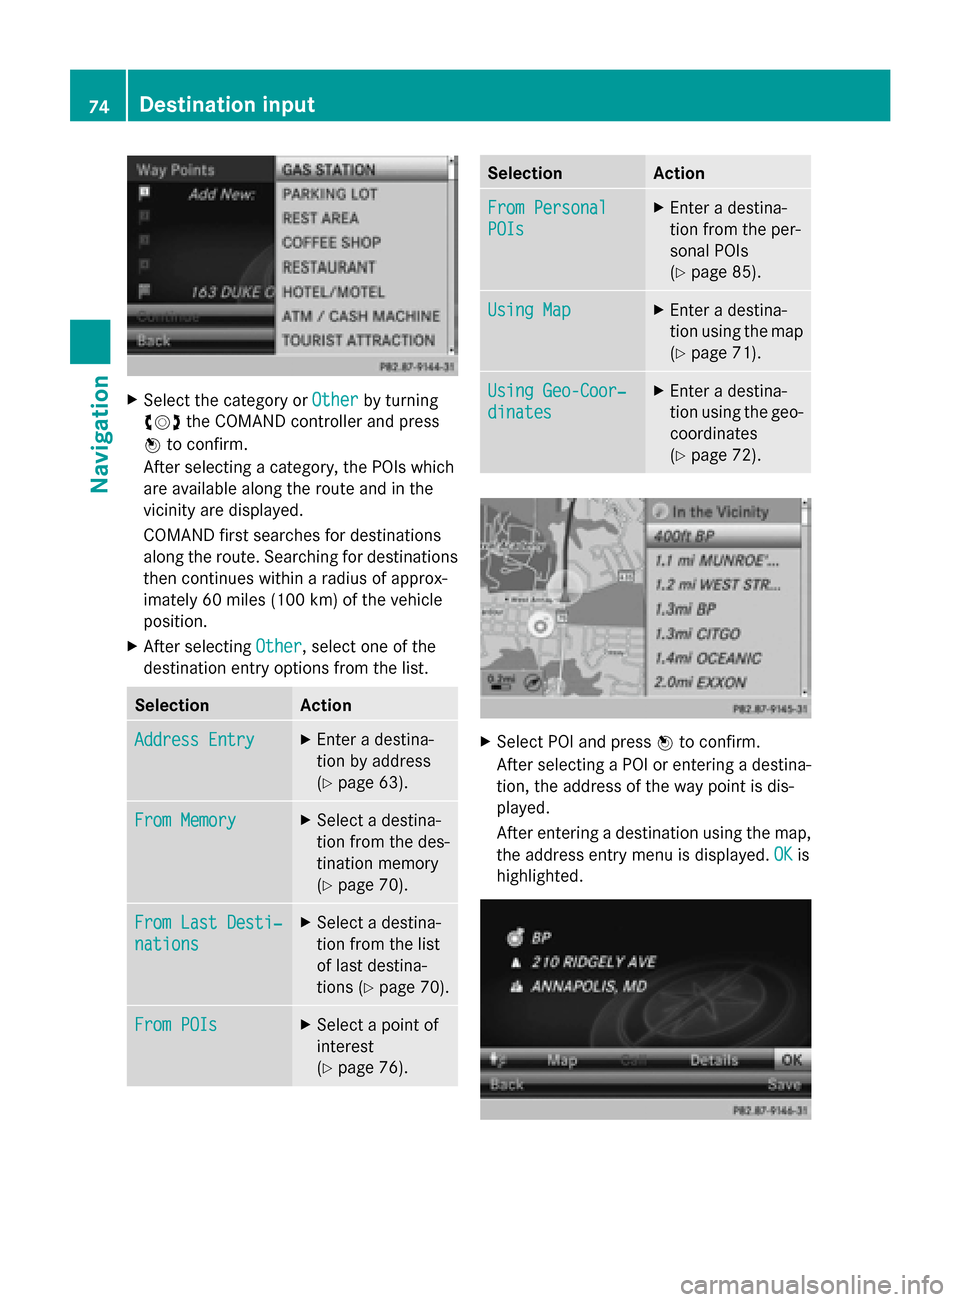
Select the category or Other
Otherby turning
00790052007A the COMAND controller and press
0098 to confirm.
After selecting a category, the POIs which
are available along the route and in the
vicinity are displayed.
COMAND first searches for destinations
along the route. Searching for destinations
then continues within a radius of approx-
imately 60 miles (100 km) of the vehicle
position.
X After selecting Other Other, select one of the
destination entry options from the list. Selection Action
Address Entry
Address Entry X
Enter a destina-
tion by address
(Y page 63). From Memory From Memory X
Select a destina-
tion from the des-
tination memory
(Y page 70). From Last Desti‐ From Last Desti‐
nations nations X
Select a destina-
tion from the list
of last destina-
tions (Y page 70). From POIs From POIs X
Select a point of
interest
(Y page 76). Selection Action
From Personal From Personal
POIs POIs X
Enter a destina-
tion from the per-
sonal POIs
(Y page 85). Using Map Using Map X
Enter a destina-
tion using the map
(Y page 71). Using Geo-Coor‐ Using Geo-Coor‐
dinates dinates X
Enter a destina-
tion using the geo-
coordinates
(Y page 72). X
Select POI and press 0098to confirm.
After selecting a POI or entering a destina-
tion, the address of the way point is dis-
played.
After entering a destination using the map,
the address entry menu is displayed. OK OKis
highlighted. 74
Destination inputNavigation
Page 77 of 270
X
To accept the way point: confirmOK
OKby
pressing 0098.
Once you have accepted the way point, it
is entered in the way point menu.
X To display the details: selectDetails
Details by
turning 00790052007Athe COMAND controller and
press 0098to confirm.
X To make a call: selectCall Callwith the
COMAND controller and press 0098to con-
firm. COMAND switches to telephone
mode (Y page 132).
i This menu item is available if the way
point has a telephone number and if a
mobile phone is connected to COMAND
(Y page 126).
X To call up the map: selectMap
Map with the
COMAND controller and press 0098to con-
firm.
X You can move the map and select the des-
tination.
X To store the way point in the destina-
tion memory: selectPresets
Presets with the
COMAND controller and press 0098to con-
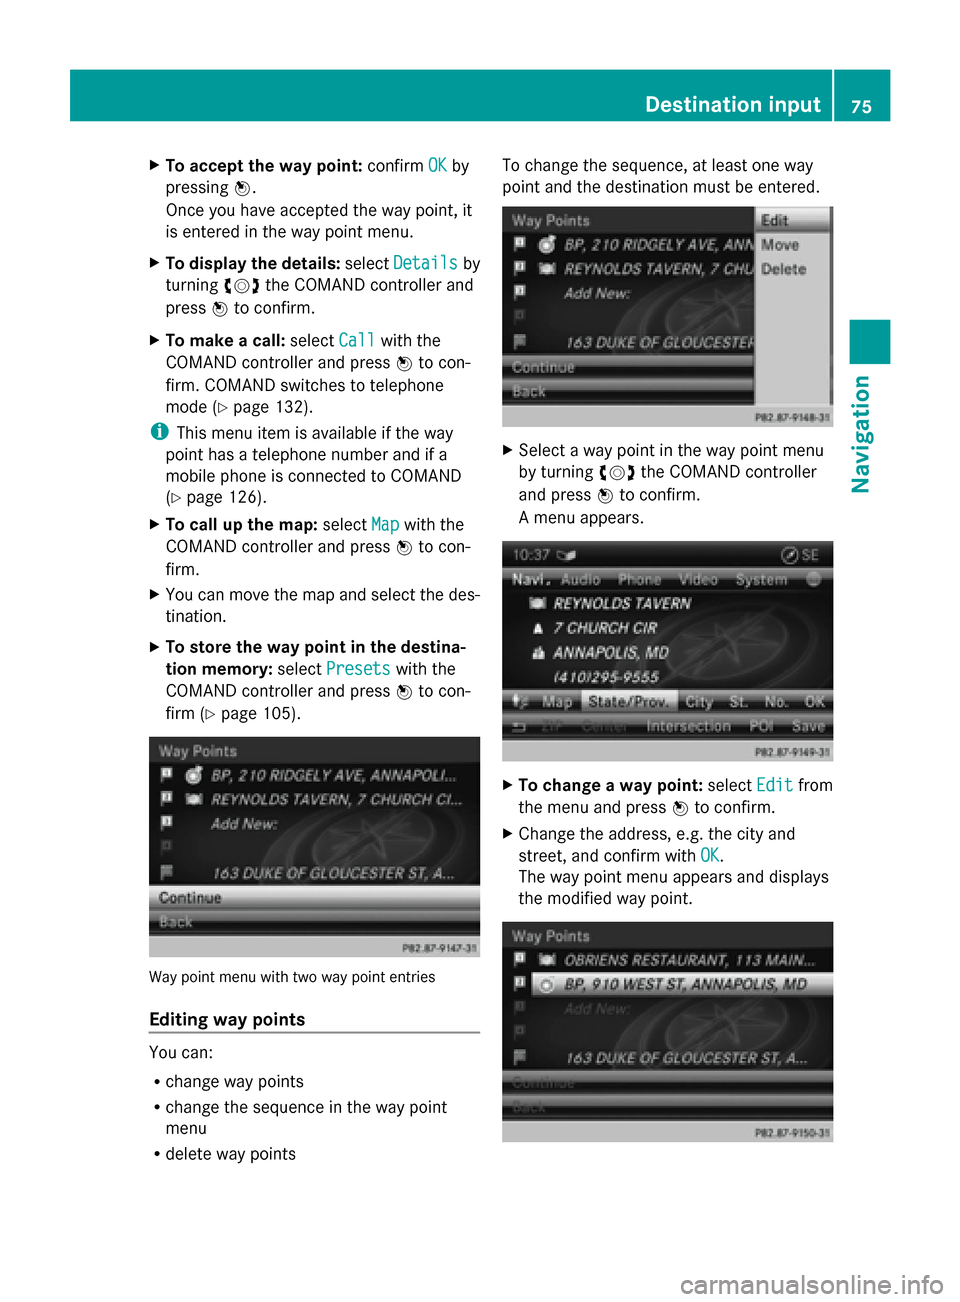
firm (Y page 105). Way point menu with two way point entries
Editing way points You can:
R
change way points
R change the sequence in the way point
menu
R delete way points To change the sequence, at least one way
point and the destination must be entered.
X
Select a way point in the way point menu
by turning 00790052007Athe COMAND controller
and press 0098to confirm.
A menu appears. X
To change a way point: selectEdit Editfrom
the menu and press 0098to confirm.
X Change the address, e.g. the city and
street, and confirm with OK OK.
The way point menu appears and displays
the modified way point. Destination input
75Navigation Z
Page 78 of 270
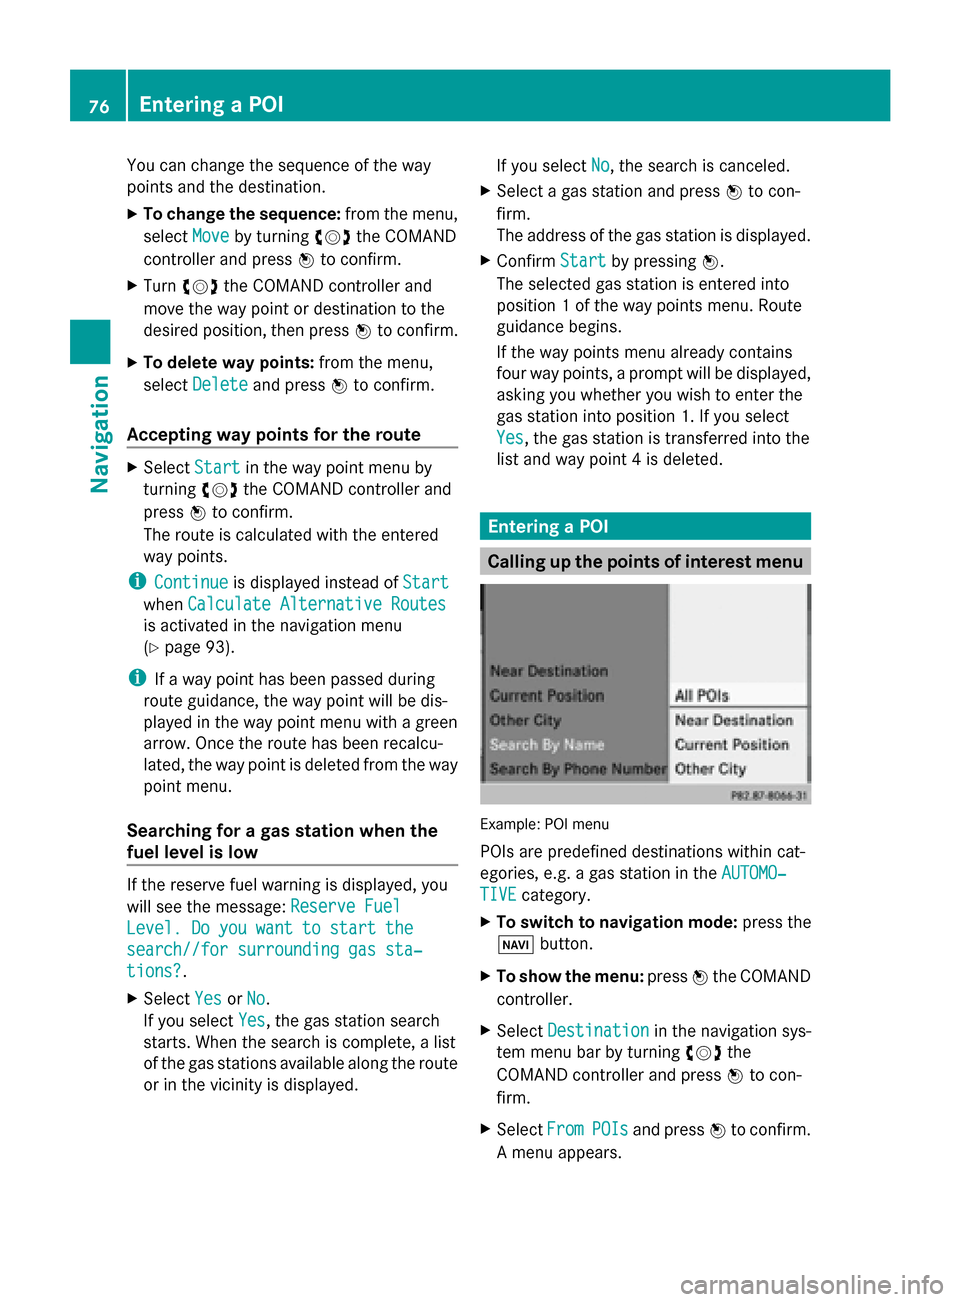
You can change the sequence of the way
points and the destination.
X To change the sequence: from the menu,
select Move
Move by turning 00790052007Athe COMAND
controller and press 0098to confirm.
X Turn 00790052007A the COMAND controller and
move the way point or destination to the
desired position, then press 0098to confirm.
X To delete way points: from the menu,
select Delete
Delete and press 0098to confirm.
Accepting way points for the route X
Select Start Startin the way point menu by
turning 00790052007Athe COMAND controller and
press 0098to confirm.
The route is calculated with the entered
way points.
i Continue
Continue is displayed instead of Start
Start
when Calculate Alternative Routes
Calculate Alternative Routes
is activated in the navigation menu
(Y page 93).
i If a way point has been passed during
route guidance, the way point will be dis-
played in the way point menu with a green
arrow. Once the route has been recalcu-
lated, the way point is deleted from the way
point menu.
Searching for a gas station when the
fuel level is low If the reserve fuel warning is displayed, you
will see the message: Reserve Fuel
Reserve Fuel
Level. Do you want to start the Level. Do you want to start the
search//for surrounding gas sta‐
search//for surrounding gas sta‐
tions?
tions?.
X
Select Yes YesorNo
No.
If you select Yes
Yes, the gas station search
starts. When the search is complete, a list
of the gas stations available along the route
or in the vicinity is displayed. If you select
No
No, the search is canceled.
X Select a gas station and press 0098to con-
firm.
The address of the gas station is displayed.
X Confirm Start Startby pressing 0098.
The selected gas station is entered into
position 1 of the way points menu. Route
guidance begins.
If the way points menu already contains
four way points, a prompt will be displayed,
asking you whether you wish to enter the
gas station into position 1. If you select
Yes
Yes, the gas station is transferred into the
list and way point 4 is deleted. Entering a POI
Calling up the points of interest menu
Example: POI menu
POIs are predefined destinations within cat-
egories, e.g. a gas station in the
AUTOMO‐ AUTOMO‐
TIVE
TIVE category.
X To switch to navigation mode: press the
00BE button.
X To show the menu: press0098the COMAND
controller.
X Select Destination
Destination in the navigation sys-
tem menu bar by turning 00790052007Athe
COMAND controller and press 0098to con-
firm.
X Select From
FromPOIs
POIsand press 0098to confirm.
A menu appears. 76
Entering a POINavigation
Page 79 of 270
X
Choose one of the options and press 0098to
confirm.
Further steps are arranged in a table
according to the option selected
(Y page 78). Entering a POI
77Navigation Z
Page 80 of 270
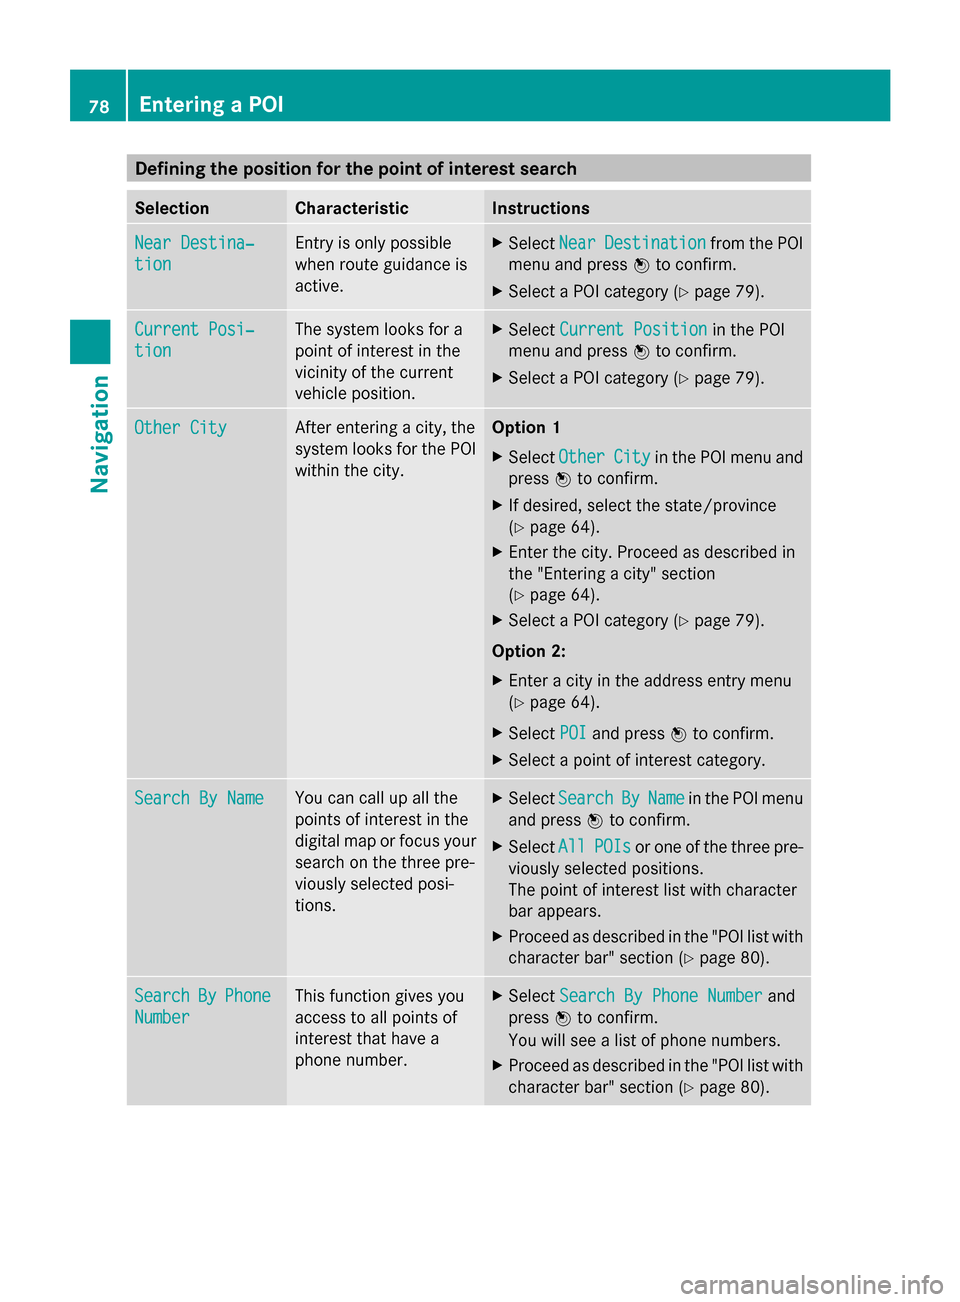
Defining the position for the point of interest search
Selection Characteristic Instructions
Near Destina‐
Near Destina‐
tion tion Entry is only possible
when route guidance is
active. X
Select Near NearDestination
Destination from the POI
menu and press 0098to confirm.
X Select a POI category (Y page 79).Current Posi‐
Current Posi‐
tion tion The system looks for a
point of interest in the
vicinity of the current
vehicle position. X
Select Current Position Current Position in the POI
menu and press 0098to confirm.
X Select a POI category (Y page 79).Other City
Other City After entering a city, the
system looks for the POI
within the city. Option 1
X Select Other Other City
Cityin the POI menu and
press 0098to confirm.
X If desired, select the state/province
(Y page 64).
X Enter the city. Proceed as described in
the "Entering a city" section
(Y page 64).
X Select a POI category (Y page 79).
Option 2:
X Enter a city in the address entry menu
(Y page 64).
X Select POI
POI and press 0098to confirm.
X Select a point of interest category. Search By Name Search By Name You can call up all the
points of interest in the
digital map or focus your
search on the three pre-
viously selected posi-
tions. X
Select Search Search By
ByName
Name in the POI menu
and press 0098to confirm.
X Select All
AllPOIs
POIs or one of the three pre-
viously selected positions.
The point of interest list with character
bar appears.
X Proceed as described in the "POI list with
character bar" section (Y page 80).Search Search
By
ByPhone
Phone
Number
Number This function gives you
access to all points of
interest that have a
phone number. X
Select Search By Phone Number Search By Phone Number and
press 0098to confirm.
You will see a list of phone numbers.
X Proceed as described in the "POI list with
character bar" section (Y page 80).78
Entering a POINavigation