transmission MERCEDES-BENZ CLA-Class 2015 C117 Repair Manual
[x] Cancel search | Manufacturer: MERCEDES-BENZ, Model Year: 2015, Model line: CLA-Class, Model: MERCEDES-BENZ CLA-Class 2015 C117Pages: 362, PDF Size: 6.93 MB
Page 315 of 362
X
Remove the towing eye from the stowage
space.
The towing eye is located with the vehicle
tool kit under the luggage compartment
floor (Y page 300).
Vehicles with the TIREFIT kit: the towing
eye is beneath the tire inflation compres-
sor.
X Press the mark on cover :inwards in the
direction of the arrow.
X Take cover :off the opening.
X Screw in the towing eye clockwise to the
stop.
Removing the towing eye X
Unscrew and remove the towing eye.
X Attach cover :to the bumper and press
until it engages.
X Place the towing eye in the stowage well
(Y page 300) beneath the cargo compart-
ment floor in the cargo compartment.
X Vehicles with the TIREFIT kit: put back the
tire inflation compressor. Towing the vehicle with the front axle
raised
When towing your vehicle with the rear axle
raised, it is important that you observe the
safety instructions (Y page 311).
Only vehicles without 4MATIC can be
towed with the front axle raised.
! Vehicles with 4MATIC must not be towed
with either the front or the rear axle raised, as doing so will damage the transmission.
Vehicles with 4MATIC may either be towed
away with both axles on the ground or be loa-
ded up and transported.
! The ignition must be switched off if the
vehicle is being towed with the front axle
raised. Otherwise, ESP ®
may intervene and
damage the brake system. X
On vehicles with KEYLESS-GO or the
KEYLESS-GO start function: you must
use the SmartKey instead of the Start/Stop
button (Y page 143).
X Make sure that the vehicle is stationary.
X Turn the SmartKey to position 2in the igni-
tion lock.
X When the vehicle is stationary, depress the
brake pedal and keep it depressed.
X Shift the automatic transmission to posi-
tion P.
X Release the brake pedal.
X Release the electric parking brake.
X Switch off the automatic locking
(Y page 212).
X Switch on the hazard warning lamps
(Y page 113).
X Turn the SmartKey in the ignition lock to
position 0and leave the SmartKey in the
ignition lock. Towing a vehicle with both axles on
the ground
It is important that you observe the safety
instructions when towing away your vehicle
(Y page 311).
X On vehicles with KEYLESS-GO or the
KEYLESS-GO start function: you must
use the SmartKey instead of the Start/Stop
button (Y page 143).
The automatic transmission automatically
shifts to position Pwhen you open the driver's
or front-passenger door or when you remove
the SmartKey from the ignition lock. In order to ensure that the automatic transmission
stays in position Nwhen towing the vehicle,
you must observe the following points:
X Make sure that the vehicle is stationary.
X Turn the SmartKey to position 2in the igni-
tion lock. Towing and tow-starting
313Roadside Assistance Z
Page 316 of 362
X
Depress and hold the brake pedal.
X Shift the automatic transmission to posi-
tion N.
X Leave the SmartKey in position 2in the
ignition lock.
X Release the brake pedal.
X Release the electric parking brake.
X Switch on the hazard warning lamps
(Y page 113).
i In order to signal a change of direction
when towing the vehicle with the hazard
warning lamps switched on, use the com-
bination switch as usual. In this case, only
the indicator lamps for the direction of
travel flash. After resetting the combina-
tion switch, the hazard warning lamp starts
flashing again. Transporting the vehicle
! You may only secure the vehicle by the
wheels, not by parts of the vehicle such as
axle or steering components. Otherwise,
the vehicle could be damaged.
X Turn the SmartKey to position 2in the igni-
tion lock (Y page 141).
X Shift the transmission to position N.
As soon as the vehicle has been loaded:
X Prevent the vehicle from rolling away by
applying the electric parking brake.
X Shift the transmission to position P.
X Turn the SmartKey to position 0in the igni-
tion lock and remove it.
X Secure the vehicle.
The towing eye can be used to pull the vehicle
onto a trailer or transporter for transporting
purposes. Notes on 4MATIC vehicles
! Vehicles with 4MATIC must not be towed
with either the front or the rear axle raised,
as doing so will damage the transmission.
Vehicles with 4MATIC may only either be
towed away with both axles on the ground or be loaded up and transported.
If the vehicle's transmission, front, or rear
axle is damaged, have the vehicle transported on a truck or trailer.
In the event of damage to the electrical
system:
If the battery is defective, the automatic
transmission will be locked in position P. To
shift the automatic transmission to position
N, you must provide power to the vehicle's
electrical system in the same way as when
jump-starting (Y page 309).
Have the vehicle transported on a transporter
or trailer. Tow-starting (emergency engine
starting)
! Vehicles with automatic transmission
must not be tow-started. You could other-
wise damage the automatic transmission.
i You can find information on "Jump-start-
ing" under (Y page 309). Fuses
Important safety notes
G
WARNING
If you manipulate or bridge a faulty fuse or if
you replace it with a fuse with a higher amper- age, the electric cables could be overloaded.
This could result in a fire. There is a risk of an
accident and injury.
Always replace faulty fuses with the specified
new fuses having the correct amperage. 314
FusesRoadside
Assistance
Page 343 of 362
Occupant distribution
The distribution of occupants in a vehicle at
their designated seating positions.
Total load limit
Nominal load and luggage load plus 68 kg
(150 lbs) multiplied by the number of seats in the vehicle. Changing a wheel
Flat tire
The "Breakdown assistance" section
(Y page 300) contains information and notes
on how to deal with a flat tire. Information on driving with MOExtended tires in the event of
a flat tire can be found under "MOExtended
tires (tires with run-flat characteristics"
(Y page 301). Rotating the wheels
G
WARNING
Interchanging the front and rear wheels may
severely impair the driving characteristics if
the wheels or tires have different dimensions. The wheel brakes or suspension components
may also be damaged. There is a risk of acci-
dent.
Rotate front and rear wheels only if the wheels and tires are of the same dimensions.
! On vehicles equipped with a tire pressure
monitor, electronic components are loca-
ted in the wheel.
Tire-mounting tools should not be used
near the valve. This could damage the elec- tronic components.
Only have tires changed at a qualified spe-cialist workshop.
Observe the instructions and safety notes in
the "Changing a wheel" section (Y page 341).
The wear patterns on the front and rear tires
differ, depending on the operating conditions. Rotate the wheels before a clear wear pattern has formed on the tires. Front tires typically
wear more on the shoulders and the rear tires
in the center.
If your vehicle's tire configuration allows, you can rotate the wheels according to the inter-
vals in the tire manufacturer's warranty book
in your vehicle documents. If no warranty
book is available, the tires should be rotated
every 3,000 to 6,000 miles (5,000 to
10,000 km), or earlier if tire wear requires.
Ensure the direction of rotation is maintained.
Clean the contact surfaces of the wheel and
the brake disc thoroughly every time a wheel
is rotated. Check the tire pressure and, if nec- essary, restart the tire pressure loss warning
system or the tire pressure monitor. Direction of rotation
Tires with a specified direction of rotation
have additional benefits, e.g. if there is a risk
of hydroplaning. These advantages can only
be gained if the tires are installed correspond- ing to the direction of rotation.
An arrow on the sidewall of the tire indicates
its correct direction of rotation. Storing wheels
Store wheels that are not being used in a cool,
dry and preferably dark place. Protect the
tires from oil, grease, gasoline and diesel. Mounting a wheel
Preparing the vehicle X
Stop the vehicle on solid, non-slippery and
level ground.
X Apply the electric parking brake manually.
X Bring the front wheels into the straight-
ahead position.
X Shift the transmission to position P.
X Switch off the engine. Changing a wheel
341Wheels and tires Z
Page 355 of 362
Vehicle identification number (VIN)
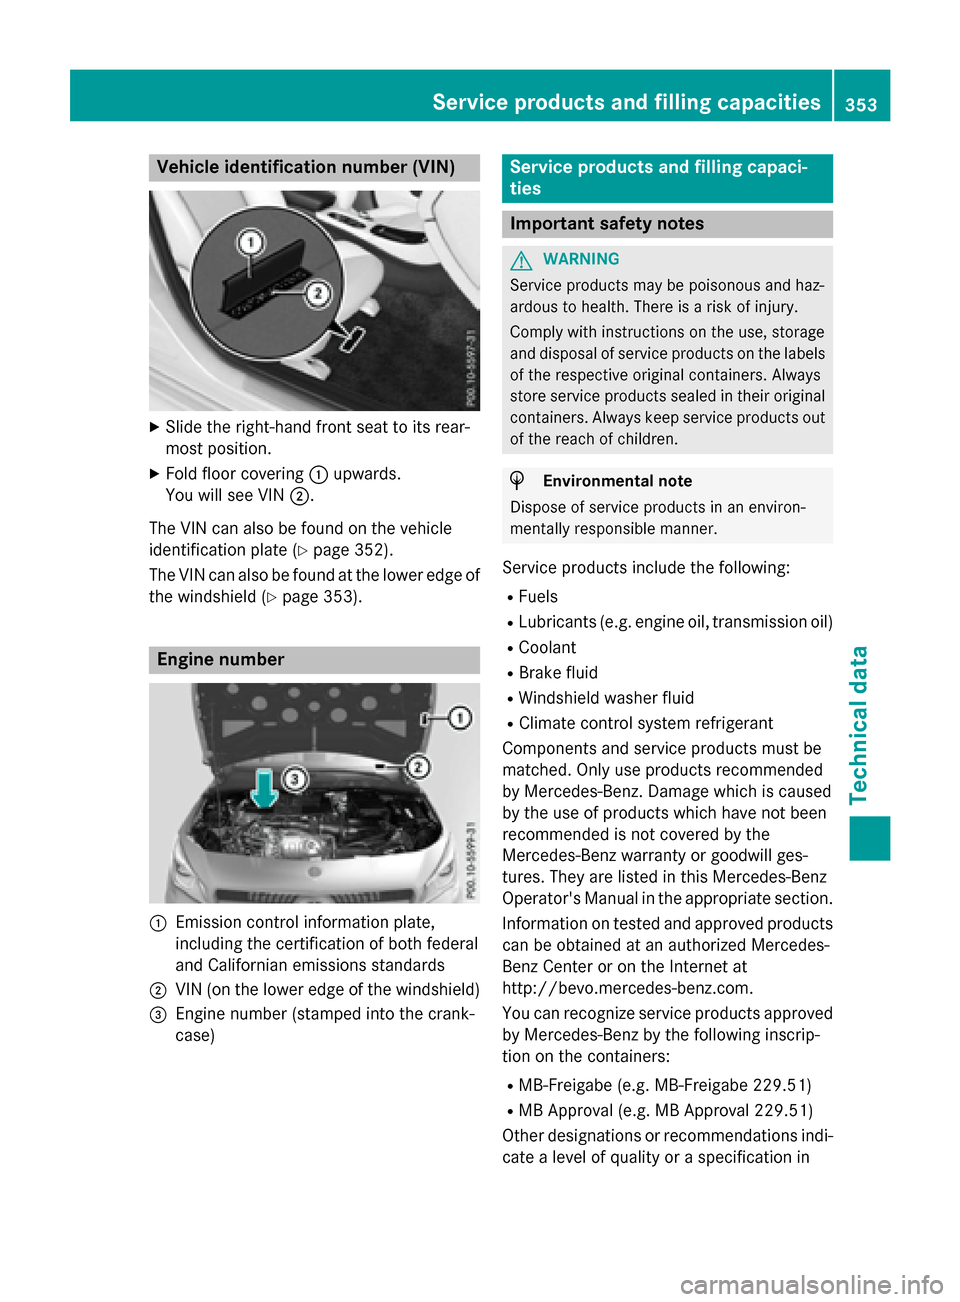
X
Slide the right-hand front seat to its rear-
most position.
X Fold floor covering :upwards.
You will see VIN ;.
The VIN can also be found on the vehicle
identification plate (Y page 352).
The VIN can also be found at the lower edge of
the windshield (Y page 353). Engine number
:
Emission control information plate,
including the certification of both federal
and Californian emissions standards
; VIN (on the lower edge of the windshield)
= Engine number (stamped into the crank-
case) Service products and filling capaci-
ties
Important safety notes
G
WARNING
Service products may be poisonous and haz-
ardous to health. There is a risk of injury.
Comply with instructions on the use, storage
and disposal of service products on the labels of the respective original containers. Always
store service products sealed in their original containers. Always keep service products out
of the reach of children. H
Environmental note
Dispose of service products in an environ-
mentally responsible manner.
Service products include the following:
R Fuels
R Lubricants (e.g. engine oil, transmission oil)
R Coolant
R Brake fluid
R Windshield washer fluid
R Climate control system refrigerant
Components and service products must be
matched. Only use products recommended
by Mercedes-Benz. Damage which is caused
by the use of products which have not been
recommended is not covered by the
Mercedes-Benz warranty or goodwill ges-
tures. They are listed in this Mercedes-Benz
Operator's Manual in the appropriate section.
Information on tested and approved products can be obtained at an authorized Mercedes-
Benz Center or on the Internet at
http://bevo.mercedes-benz.com.
You can recognize service products approved
by Mercedes-Benz by the following inscrip-
tion on the containers:
R MB-Freigabe (e.g. MB-Freigabe 229.51)
R MB Approval (e.g. MB Approval 229.51)
Other designations or recommendations indi- cate a level of quality or a specification in Service products and filling capacities
353Technical data Z