instrument cluster MERCEDES-BENZ CLA-Class 2016 C117 User Guide
[x] Cancel search | Manufacturer: MERCEDES-BENZ, Model Year: 2016, Model line: CLA-Class, Model: MERCEDES-BENZ CLA-Class 2016 C117Pages: 374, PDF Size: 8.19 MB
Page 45 of 374
See "Children in the vehicle" for information
on infants and children traveling with you in
the vehicle restraint systems for infants and
children (
Ypage 58).
Important safety notes
GWARNING
Modifications to the restraint system may
cause it to no longer work as intended. The
restraint system may then not perform its
intended protective function and may fail in an
accident or trigger unexpectedly, for example.
This poses an increased risk of injury or even fatal injury.
Never modify parts of the restraint system.
Never tamper with the wiring, the electronic
components or their software.
If it is necessary to modify an air bag system to
accommodate a person with disabilities, con-
tact an authorized Mercedes-Benz Center for
details. USA only: for further information con-
tact our Customer Assistance Center at
1-800-FOR-MERCedes (1‑800‑ 367‑6372).
Restraint system warning lamp
The functions of the restraint system are
checked after the ignition is switched on and
at regular intervals while the engine is run-
ning. Therefore, malfunctions can be detec-
ted in good time.
The 6 restraint system warning lamp in
the instrument cluster lights up when the igni-
tion is switched on. It goes out no later than a
few seconds after the vehicle is started. The
components of the restraint system are in
operational readiness.
A malfunction has occurred if the 6
restraint system warning lamp:
Rdoes not light up after the ignition is
switched on
Rdoes not go out after a few seconds with
the engine running
Rlights up again while the engine is running
GWARNING
If restraint system is malfunctioning, restraint
system components may be triggered unin-
tentionally or might not be triggered at all in
the event of an accident with a high rate of
vehicle deceleration. This can affect the Emer- gency Tensioning Device or air bag, for exam-
ple. This poses an increased risk of injury or
even fatal injury.
Have the restraint system checked and
repaired in a qualified specialist workshop as
soon as possible.
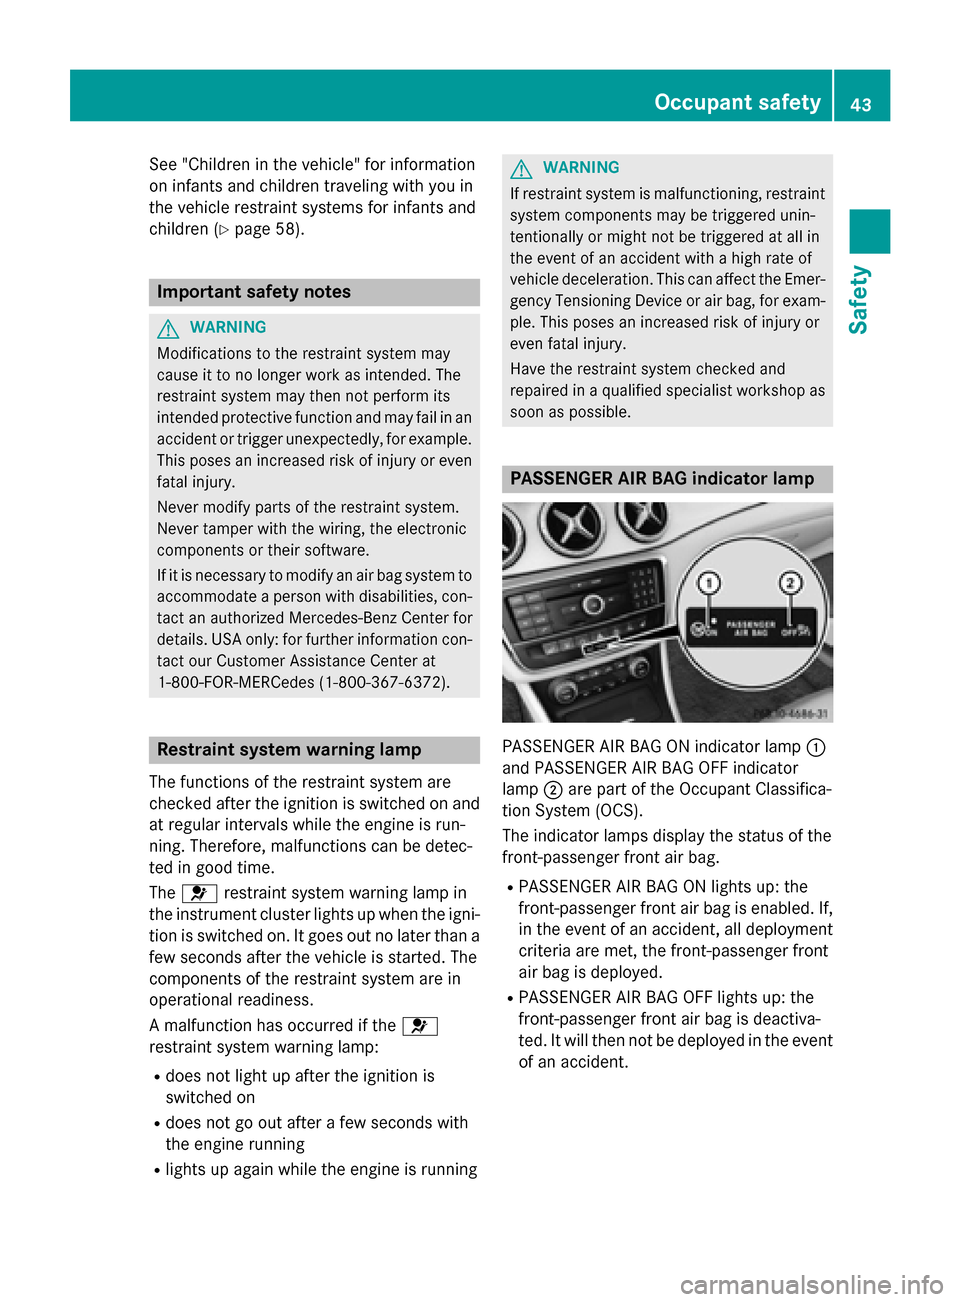
PASSENGER AIR BAG indicator lamp
PASSENGER AIR BAG ON indicator lamp :
and PASSENGER AIR BAG OFF indicator
lamp ;are part of the Occupant Classifica-
tion System (OCS).
The indicator lamps display the status of the
front-passenger front air bag.
RPASSENGER AIR BAG ON lights up: the
front-passenger front air bag is enabled. If,
in the event of an accident, all deployment
criteria are met, the front-passenger front
air bag is deployed.
RPASSENGER AIR BAG OFF lights up: the
front-passenger front air bag is deactiva-
ted. It will then not be deployed in the event of an accident.
Occupant safety43
Safety
Z
Page 50 of 374
passenger seat belts are not fastened, a
warning tone sounds. A warning tone also
sounds with increasing intensity for
60 seconds or until the driver or front
passenger have fastened their seat belts.
If the driver or front passenger unfasten their
seat belts during the journey, the seat belt
warning is activated again.
iFor more information on the7seat
belt warning lamp, see "Warning and indi-
cator lamps in the instrument cluster, seat
belts" (
Ypage 258).
Air bags
Introduction
The installation point of an air bag can be rec-
ognized by the AIR BAG symbol.
An air bag complements the correctly fas-
tened seat belt. It is no substitute for the seat
belt. The air bag provides additional protec-
tion in applicable accident situations.
Not all air bags are deployed in an accident.
The different air bag systems function inde-
pendently from one another (
Ypage 56).
However, no system available today can com-
pletely eliminate injuries and fatalities.
It is also not possible to rule out a risk of injury
caused by an air bag due to the high speed at
which the air bag must be deployed.
Important safety notes
GWARNING
If you do not sit in the correct seat position,
the air bag cannot protect as intended and
could even cause additional injury when
deployed. This poses an increased risk of
injury or even fatal injury.
To avoid hazardous situations, always make
sure that all of the vehicle's occupants:
Rhave fastened their seat belts correctly,
including pregnant women
Rare sitting correctly and maintain the great-
est possible distance to the air bags
Rfollow the following instructions
Always make sure that there are no objects
between the air bag and the vehicle's occu-
pants.
RAdjust the seats properly before beginning
your journey. Always make sure that the
seat is in an almost upright position. The
center of the head restraint must support
the head at about eye level.
RMove the driver's and front-passenger
seats as far back as possible. The driver's
seat position must allow the vehicle to be
driven safely.
ROnly hold the steering wheel on the out-
side. This allows the air bag to be fully
deployed.
RAlways lean against the backrest while driv-
ing. Do not lean forwards or lean against
the door or side window. You may other-
wise be in the deployment area of the air
bags.
RAlways keep your feet in the footwell in
front of the seat. Do not put your feet on the
dashboard, for example. Your feet may oth- erwise be in the deployment area of the air
bag.
RFor this reason, always secure persons less
than 5 ft (1.50 m) tall in suitable restraint
systems. Up to this height, the seat belt
cannot be worn correctly.
If a child is traveling in your vehicle, also
observe the following notes:
RAlways secure children under twelve years
of age and less than 5 ft (1.50 m)tall in
suitable child restraint systems.
RChild restraint systems should be installed on the rear seats.
48Occupant safety
Safety
Page 69 of 374
the distance warning function and the auton-
omous braking function are also deactivated.
If COLLISION PREVENTION ASSIST PLUS is
deactivated, theæsymbol appears in the
assistance graphics display.
Distance warning function
General information
The distance warning function can help you to
minimize the risk of a front-end collision with a vehicle ahead or reduce the effects of such
a collision. If the distance warning function
detects that there is a risk of a collision, you
will be warned visually and acoustically.
Important safety notes
iObserve the "Important safety notes" sec-
tion for driving safety systems (
Ypage 65).
GWARNING
The distance warning function does not react:
Rto people or animals
Rto oncoming vehicles
Rto crossing traffic
Rwhen cornering
Thus, the distance warning function cannot
provide a warning in all critical situations.
There is a risk of an accident.
Always pay careful attention to the traffic sit-
uation and be ready to brake.
GWARNING
The distance warning function cannot always
clearly identify objects and complex traffic
situations.
In such cases, the distance warning function
may:
Rgive an unnecessary warning
Rnot give a warning
There is a risk of an accident.
Always pay careful attention to the traffic sit-
uation and do not rely solely on the distance
warning function.
Function
Starting at a speed of approximately 4 mph
(7 km/h), the distance warning function
warns you if you rapidly approach a vehicle in
front. An intermittent warning tone will then
sound, and the ·distance warning lamp
will light up in the instrument cluster.
XBrake immediately in order to increase the distance from the vehicle in front.
or
XTake evasive action, provided it is safe to do
so.
Due to the nature of the system, particularly
complicated but non-critical driving condi-
tions may also cause the system to display a warning.
With the help of the radar sensor system, the
distance warning function can detect obsta-
cles that are in the path of your vehicle for an
extended period of time.
Up to a speed of approximately 44 mph
(70 km/h), the distance warni
ng function can
also react to stationary obstacles, such as
stopped or parked vehicles.
Autonomous braking function
If the driver does not react to the distance
warning signal in a critical situation, COLLI-
SION PREVENTION ASSIST PLUS can assist
with the autonomous braking function.
The autonomous braking function:
Rgives the driver more time to react to criti-
cal driving situations
Rcan help the driver to avoid an accident or
Rreduces the effects of an accident
Vehicles without DISTRONIC PLUS: the
autonomous braking function is available in
the following speed ranges:
R4 - 65 mph (7 - 105 km/h) for moving
objects
R4 - 31 mph (7 - 50 km/h) for stationary
objects
Driving safet ysystem s67
Safety
Z
Page 71 of 374
ESP®(Electronic Stability Program)
General notes
iObserve the "Important safety notes" sec-
tion (
Ypage 65).
ESP
®monitors driving stability and traction,
i.e. power transmission between the tires and the road surface.
If ESP
®detects that the vehicle is deviating
from the direction desired by the driver, one
or more wheels are braked to stabilize the
vehicle. The engine output is also modified to
keep the vehicle on the desired course within
physical limits. ESP
®assists the driver when
pulling away on wet or slippery roads. ESP®
can also stabilize the vehicle during braking.
ETS/4ETS (Electronic Traction System)
iObserve the "Important safety notes" sec-
tion (
Ypage 65).
ETS traction control is part of ESP
®. On vehi-
cles with 4MATIC, 4ETS is part of ESP®.
Traction control brakes the drive wheels indi-
vidually if they spin. This enables you to pull
away and accelerate on slippery surfaces, for example if the road surface is slippery on one
side. In addition, more drive torque is trans-
ferred to the wheel or wheels with traction.
Traction control remains active, even if you
deactivate ESP
®.
Important safety notes
iObserve the "Important safety notes" sec-
tion (
Ypage 65).
GWARNING
If ESP
®is malfunctioning, ESP®is unable to
stabilize the vehicle. Additionally, further driv-
ing safety systems are deactivated. This
increases the risk of skidding and an accident.
Drive on carefully. Have ESP
®checked at a
qualified specialist workshop.
Vehicles without 4MATIC: when towing
your vehicle with the front axle raised, it is
important that you observe the notes on ESP
®
(Ypage 323).
If the å ESP
®OFF warning lamp lights up
continuously, ESP®is deactivated.
If the ÷ ESP
®warning lamp and the å
warning lamp are lit continuously, ESP®is not
available due to a malfunction.
Observe the information on warning lamps
(
Ypage 263) and display messages which
may be shown in the instrument cluster
(
Ypage 228).
Only use wheels with the recommended tire
sizes. Only then will ESP
®function properly.
Characteristics of ESP®
General information
If the ÷ ESP
®warning lamp goes out
before beginning the journey, ESP®is auto-
matically active.
If ESP
®intervenes, the ÷ESP®warning
lamp flashes in the instrument cluster.
If ESP
®intervenes:
XDo not deactivate ESP®under any circum-
stances.
XOnly depress the accelerator pedal as far as
necessary when pulling away.
XAdapt your driving style to suit the prevail-
ing road and weather conditions.
ECO start/stop function
The ECO start/stop function switches the
engine off automatically when the vehicle
stops moving. The engine starts automati-
cally when the driver wants to pull away again.
ESP
®remains in its previously selected sta-
tus. Example: if ESP®was deactivated before
the engine was switched off, ESP®remains
deactivated when the engine is switched on
again.
Driving safety systems69
Safety
Z
Page 73 of 374
In the following situations, it may be better to
activate SPORT handling mode or deactivate
ESP
®:
Rwhen using snow chains
Rin deep snow
Ron sand or gravel
Ron specially designated roads when the
vehicle's own oversteering and understeer- ing characteristics are desired
Driving in SPORT handling mode or without
ESP
®requires an extremely qualified and
experienced driver.
iActivate ESP®as soon as the situations
described above no longer apply. ESP®will
otherwise not be able to stabilize the vehi-
cle if the vehicle starts to skid or a wheel
starts to spin.
!Avoid spinning the driven wheels for an
extended period with ESP®deactivated.
You could otherwise damage the drivetrain.
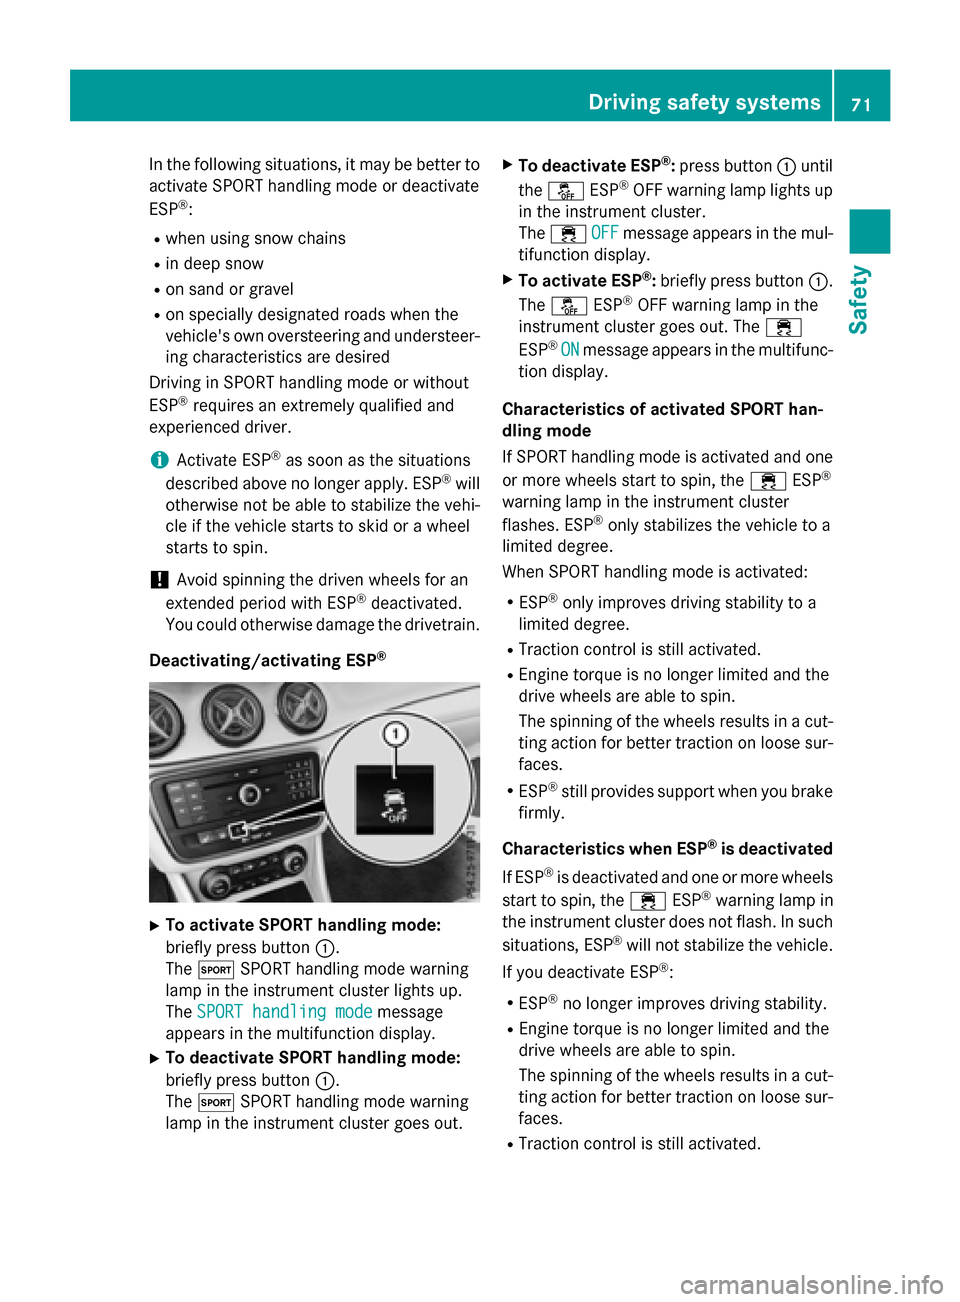
Deactivating/activating ESP
®
XTo activate SPORT handling mode:
briefly press button :.
The M SPORT handling mode warning
lamp in the instrument cluster lights up.
The SPORT handling mode
message
appears in the multifunction display.
XTo deactivate SPORT handling mode:
briefly press button :.
The M SPORT handling mode warning
lamp in the instrument cluster goes out.
XTo deactivate ESP®: press button :until
the å ESP®OFF warning lamp lights up
in the instrument cluster.
The ÷ OFF
message appears in the mul-
tifunction display.
XTo activate ESP®: briefly press button :.
The å ESP®OFF warning lamp in the
instrument cluster goes out. The ÷
ESP
®ONmessage appears in the multifunc-
tion display.
Characteristics of activated SPORT han-
dling mode
If SPORT handling mode is activated and one
or more wheels start to spin, the ÷ESP
®
warning lamp in the instrument cluster
flashes. ESP®only stabilizes the vehicle to a
limited degree.
When SPORT handling mode is activated:
RESP®only improves driving stability to a
limited degree.
RTraction control is still activated.
REngine torque is no longer limited and the
drive wheels are able to spin.
The spinning of the wheels results in a cut-
ting action for better traction on loose sur-
faces.
RESP®still provides support when you brake
firmly.
Characteristics when ESP
®is deactivated
If ESP
®is deactivated and one or more wheels
start to spin, the ÷ESP®warning lamp in
the instrument cluster does not flash. In such
situations, ESP
®will not stabilize the vehicle.
If you deactivate ESP
®:
RESP®no longer improves driving stability.
REngine torque is no longer limited and the
drive wheels are able to spin.
The spinning of the wheels results in a cut-
ting action for better traction on loose sur-
faces.
RTraction control is still activated.
Driving safety systems71
Safety
Z
Page 116 of 374
Useful information
i
This Operator's Manual describes all
models and all standard and optional equip-
ment of your vehicle available at the time of
publication of the Operator's Manual.
Country-specific differences are possible.
Please note that your vehicle may not be
equipped with all features described. This
also applies to safety-related systems and
functions.
iRead the information on qualified special-
ist workshops (
Ypage 25).
Exterior lighting
General notes
For reasons of safety, Mercedes-Benz recom-
mends that you drive with the lights switched
on even during the daytime. In some coun-
tries, operation of the headlamps varies due
to legal requirements and self-imposed obli-
gations.
Setting the exterior lighting
Setting options
Exterior lighting can be set using the:
Rlight switch
Rcombination switch (Ypage 116)
Ron-board computer (Ypage 222)
Light switch
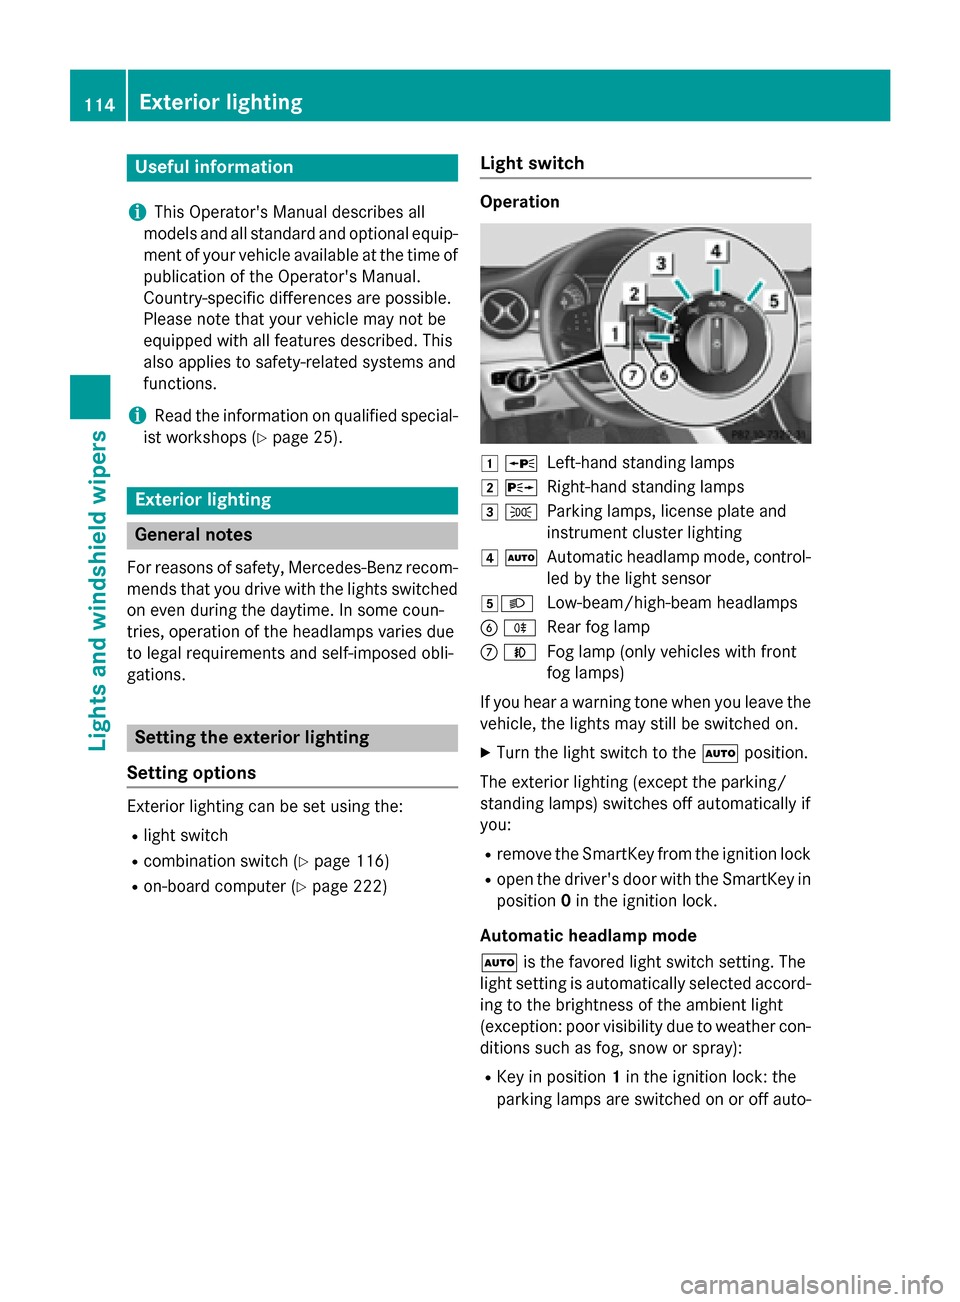
Operation
1 WLeft-hand standing lamps
2XRight-hand standing lamps
3TParking lamps, license plate and
instrument cluster lighting
4ÃAutomatic headlamp mode, control-
led by the light sensor
5LLow-beam/high-beam headlamps
BRRear fog lamp
CNFog lamp (only vehicles with front
fog lamps)
If you hear a warning tone when you leave the
vehicle, the lights may still be switched on.
XTurn the light switch to the Ãposition.
The exterior lighting (except the parking/
standing lamps) switches off automatically if
you:
Rremove the SmartKey from the ignition lock
Ropen the driver's door with the SmartKey in position 0in the ignition lock.
Automatic headlamp mode
à is the favored light switch setting. The
light setting is automatically selected accord-
ing to the brightness of the ambient light
(exception: poor visibility due to weather con-
ditions such as fog, snow or spray):
RKey in position 1in the ignition lock: the
parking lamps are switched on or off auto-
114Exterior lighting
Lights and windshield wipers
Page 118 of 374
Rear fog lamp
The rear fog lamp improves visibility of your
vehicle for the traffic behind in the event of
thick fog. Please take note of the country-
specific regulations for the use of rear fog
lamps.
XTo switch on the rear fog lamp:turn the
SmartKey in the ignition lock to position 2
or start the engine.
XTurn the light switch to LorÃ.
XPress the Rbutton.
The yellow Rindicator lamp in the
instrument cluster lights up.
XTo switch off the rear fog lamp: press the
R button.
The yellow Rindicator lamp in the
instrument cluster goes out.
iWhen the rear fog lamp is switched on,
the center brake lamp in the tail lamp
switches off due to a legal requirement.
Parking lamps
!If the battery has been excessively dis-
charged, the parking lamps or standing
lamps are automatically switched off to
enable the next engine start. Always park
your vehicle safely and sufficiently lit
according to legal standards. Avoid the
continuous use of the Tparking lamps
for several hours. If possible, switch on the
X right or the Wleft standing lamp.
XTo switch on: turn the light switch to T.
The green Tindicator lamp in the instru-
ment cluster lights up.
Standing lamps
Switching on the standing lamps ensures the
corresponding side of the vehicle is illumina-
ted.
XTo switch on the standing lamps: the
SmartKey should not be in the ignition lock
or it should be in position 0.
XTurn the light switch to W(left-hand side
of the vehicle) or X(right-hand side of
the vehicle).
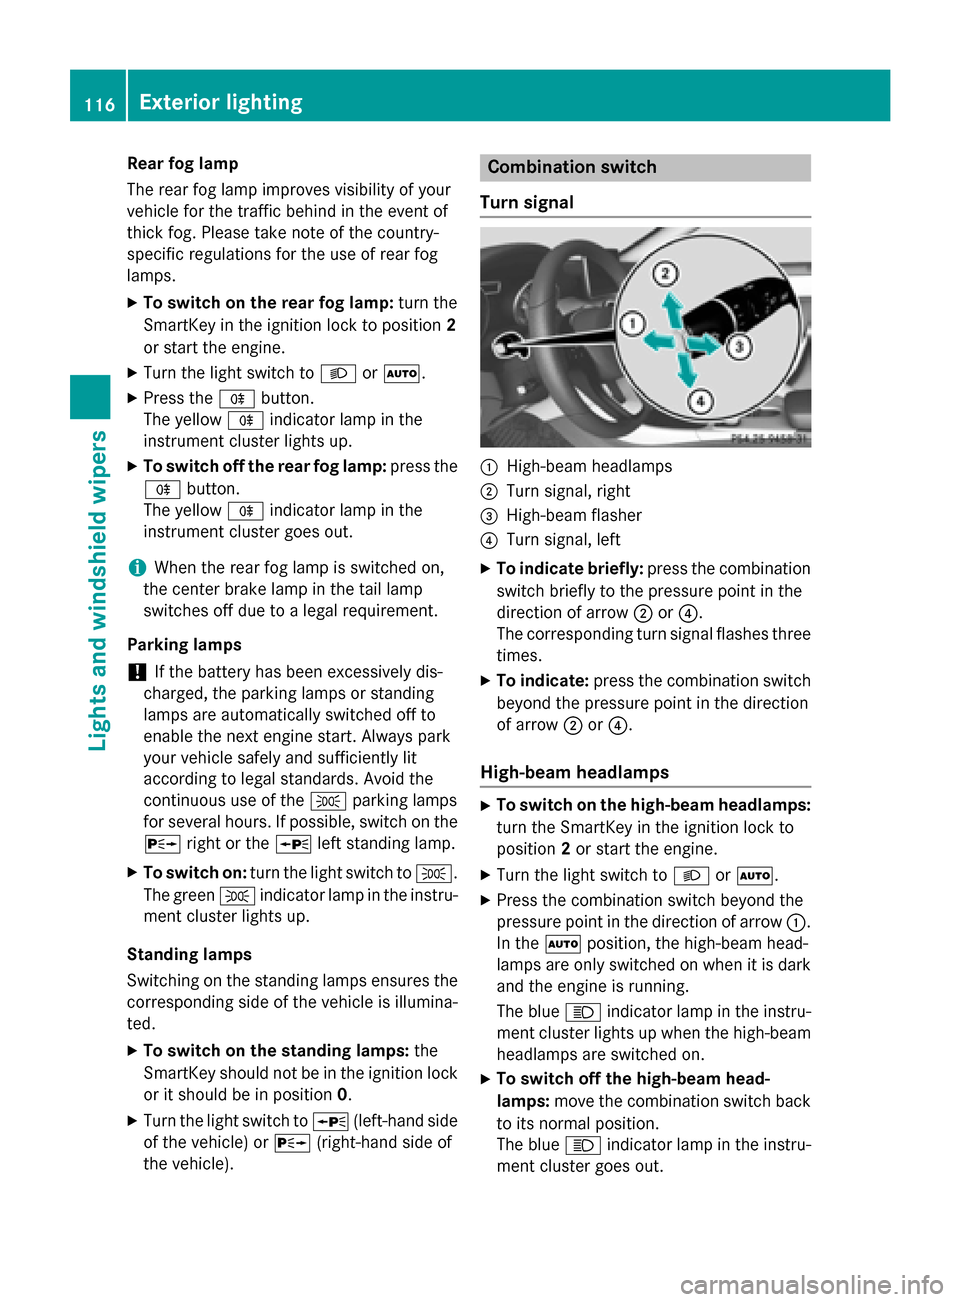
Combination switch
Turn signal
:High-beam headlamps
;Turn signal, right
=High-beam flasher
?Turn signal, left
XTo indicate briefly: press the combination
switch briefly to the pressure point in the
direction of arrow ;or?.
The corresponding turn signal flashes three
times.
XTo indicate: press the combination switch
beyond the pressure point in the direction
of arrow ;or?.
High-beam headlamps
XTo switch on the high-beam headlamps:
turn the SmartKey in the ignition lock to
position 2or start the engine.
XTurn the light switch to LorÃ.
XPress the combination switch beyond the
pressure point in the direction of arrow :.
In the Ãposition, the high-beam head-
lamps are only switched on when it is dark
and the engine is running.
The blue Kindicator lamp in the instru-
ment cluster lights up when the high-beam
headlamps are switched on.
XTo switch off the high-beam head-
lamps: move the combination switch back
to its normal position.
The blue Kindicator lamp in the instru-
ment cluster goes out.
116Exterior lighting
Lights and windshield wipers
Page 121 of 374
The headlamp range is set automatically
depending on the distance between the
vehicle and other road users.
If you are driving at speeds above approx-
imately 35 mph (55 km/h) and no other
road users have been detected:
The high-beam headlamps are switched on
automatically. TheKindicator lamp in
the instrument cluster also lights up.
If you are driving at speeds below approx-
imately 30 mph (45 km/h) or other road
users have been detected or the roads are
adequately lit:
The high-beam headlamps are switched off
automatically. The Kindicator lamp in
the instrument cluster goes out. The _
indicator lamp in the multifunction display
remains lit.
XTo deactivate: move the combination
switch back to its normal position.
The _ indicator lamp in the multifunc-
tion display goes out.
Headlamps fogged up on the inside
Certain climatic and physical conditions may
cause moisture to form in the headlamp. This
moisture does not affect the functionality of
the headlamp.
Interior lighting
Overview of interior lighting
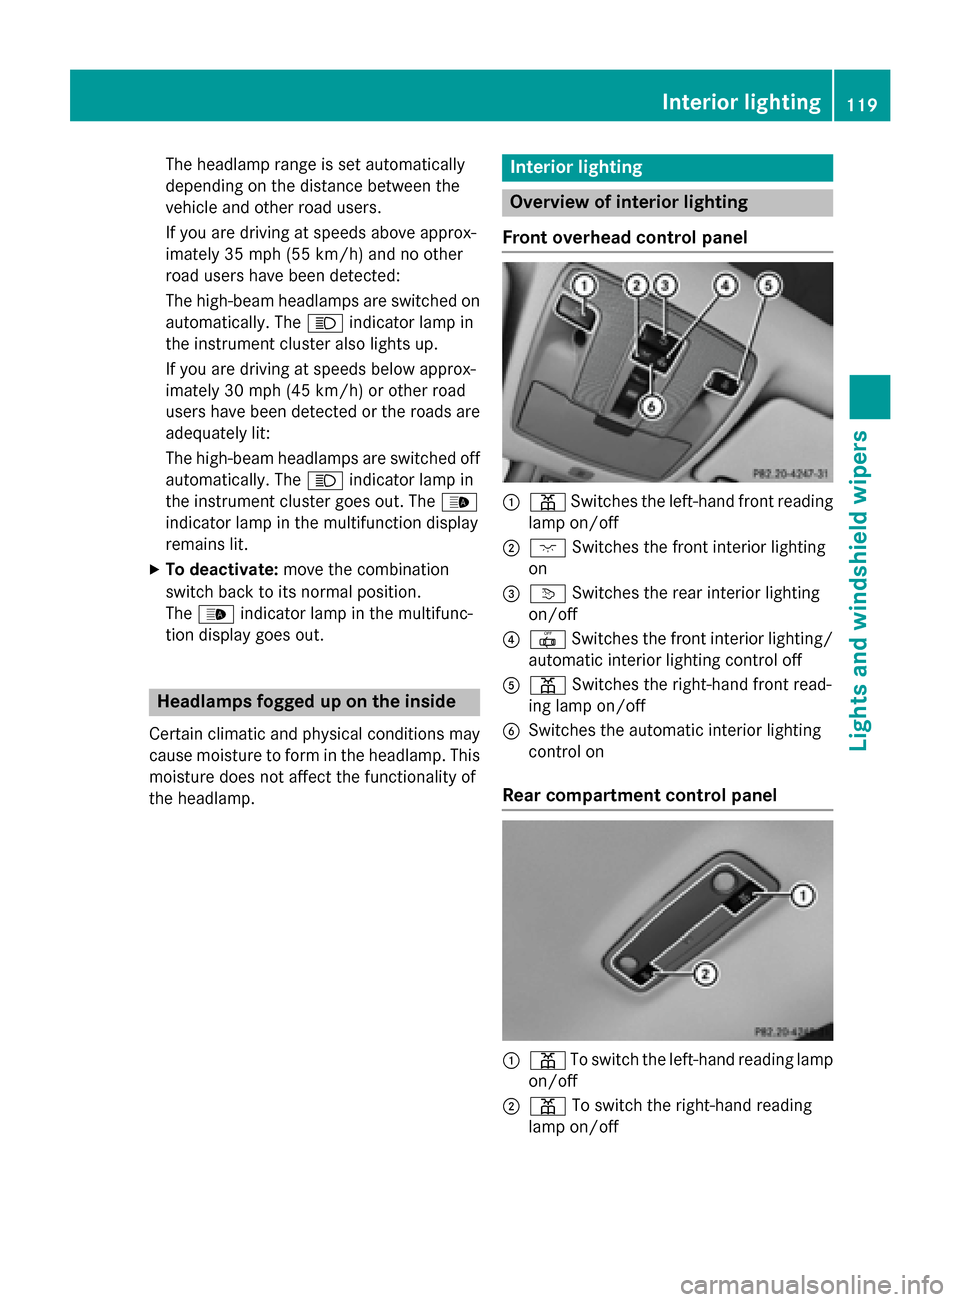
Front overhead control panel
:p Switches the left-hand front reading
lamp on/off
;c Switches the front interior lighting
on
=v Switches the rear interior lighting
on/off
?| Switches the front interior lighting/
automatic interior lighting control off
Ap Switches the right-hand front read-
ing lamp on/off
BSwitches the automatic interior lighting
control on
Rear compartment control panel
:p To switch the left-hand reading lamp
on/off
;p To switch the right-hand reading
lamp on/off
Interior lighting119
Lights and windshield wipers
Z
Page 150 of 374
Pressing the Start/Stop button several times
in succession corresponds to the different
key positions in the ignition lock. This is only
the case if you are not depressing the brake
pedal.
If you depress the brake pedal and press the
Start/Stop button, the engine starts immedi-
ately.
To start the vehicle without actively using the
SmartKey:
Rthe Start/Stop button must be inserted in
the ignition lock.
Rthe SmartKey must be in the vehicle.
Rthe vehicle must not be locked with the
SmartKey or KEYLESS-GO (
Ypage 77).
Do not keep the KEYLESS-GO key:
Rwith electronic devices, e.g. a mobile
phone or another SmartKey.
Rwith metallic objects, e.g. coins or metal
foil.
Rinside metallic objects, e.g. a metal case.
This can affect the functionality of KEYLESS-
GO.
If you lock the vehicle with the SmartKey's
remote control or with KEYLESS-GO, after a
short time:
Ryou will not be able to switch on the ignition
with the Start/Stop button.
Ryou will not be able to start the engine with the Start/Stop button until the vehicle is
unlocked again.
If you lock the vehicle centrally using the but- ton on the front door (
Ypage 84), you can
continue to start the engine with the Start/
Stop button.
The engine can be switched off while the vehi-
cle is in motion by pressing and holding the
Start/Stop button for three seconds. This
function operates independently of the ECO
start/stop automatic engine switch-off func-
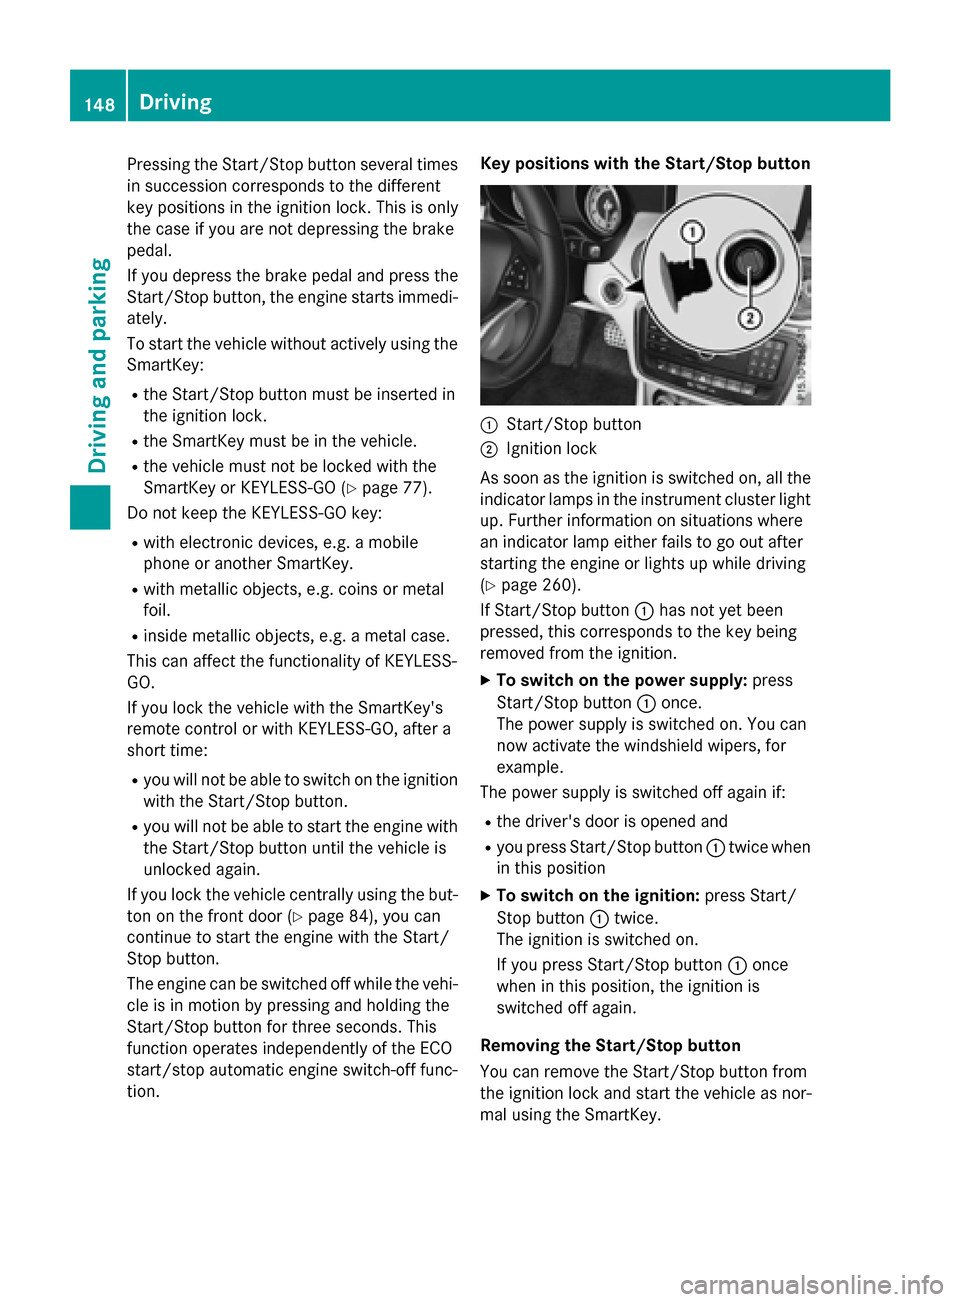
tion. Key positions with the Start/Stop button
:Start/Stop button
;Ignition lock
As soon as the ignition is switched on, all the
indicator lamps in the instrument cluster light
up. Further information on situations where
an indicator lamp either fails to go out after
starting the engine or lights up while driving
(
Ypage 260).
If Start/Stop button :has not yet been
pressed, this corresponds to the key being
removed from the ignition.
XTo switch on the power supply: press
Start/Stop button :once.
The power supply is switched on. You can
now activate the windshield wipers, for
example.
The power supply is switched off again if:
Rthe driver's door is opened and
Ryou press Start/Stop button :twice when
in this position
XTo switch on the ignition: press Start/
Stop button :twice.
The ignition is switched on.
If you press Start/Stop button :once
when in this position, the ignition is
switched off again.
Removing the Start/Stop button
You can remove the Start/Stop button from
the ignition lock and start the vehicle as nor-
mal using the SmartKey.
148Driving
Driving and parking
Page 156 of 374
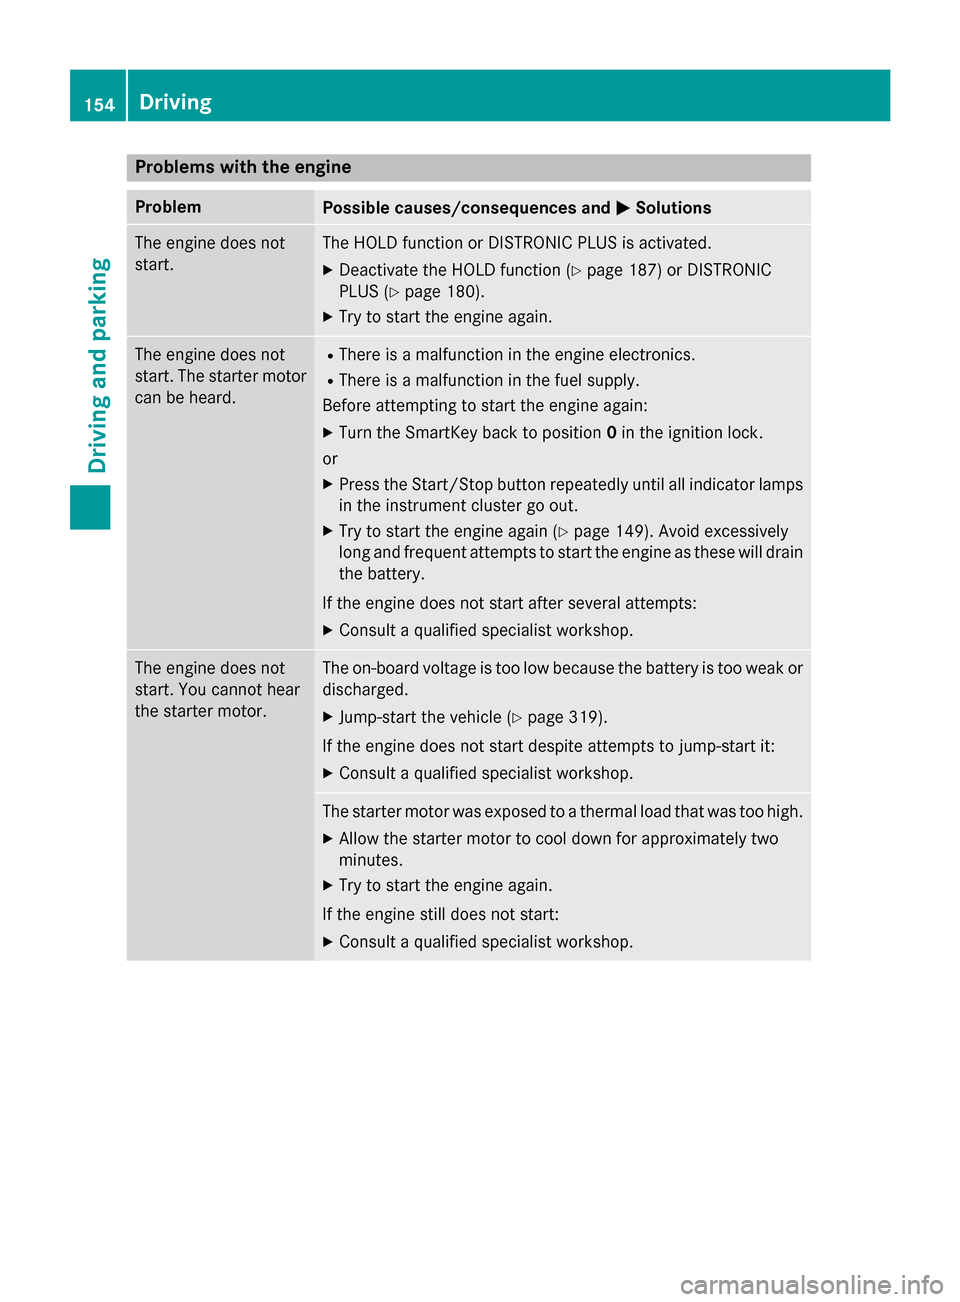
Problems with the engine
ProblemPossible causes/consequences andMSolutions
The engine does not
start.The HOLD function or DISTRONIC PLUS is activated.
XDeactivate the HOLD function (Ypage 187) or DISTRONIC
PLUS (
Ypage 180).
XTry to start the engine again.
The engine does not
start. The starter motor
can be heard.RThere is a malfunction in the engine electronics.
RThere is a malfunction in the fuel supply.
Before attempting to start the engine again:
XTurn the SmartKey back to position 0in the ignition lock.
or
XPress the Start/Stop button repeatedly until all indicator lamps in the instrument cluster go out.
XTry to start the engine again (Ypage 149). Avoid excessively
long and frequent attempts to start the engine as these will drain
the battery.
If the engine does not start after several attempts:
XConsult a qualified specialist workshop.
The engine does not
start. You cannot hear
the starter motor.The on-board voltage is too low because the battery is too weak or
discharged.
XJump-start the vehicle (Ypage 319).
If the engine does not start despite attempts to jump-start it:
XConsult a qualified specialist workshop.
The starter motor was exposed to a thermal load that was too high.
XAllow the starter motor to cool down for approximately two
minutes.
XTry to start the engine again.
If the engine still does not start:
XConsult a qualified specialist workshop.
154Driving
Driving and parking