instrument cluster MERCEDES-BENZ CLA-Class 2016 C117 Owner's Guide
[x] Cancel search | Manufacturer: MERCEDES-BENZ, Model Year: 2016, Model line: CLA-Class, Model: MERCEDES-BENZ CLA-Class 2016 C117Pages: 374, PDF Size: 8.19 MB
Page 170 of 374
!Overfilling the fuel tank could damage the
fuel system.
!Take care not to spill any fuel on painted
surfaces. You could otherwise damage the
paintwork.
!Use a filter when refueling from a fuel can.
Otherwise, the fuel lines and/or injection
system could be blocked by particles from
the fuel can.
Do not get into the vehicle again during the
refueling process. Otherwise, electrostatic
charge could build up again.
If you overfill the fuel tank, fuel could spray
out when the fuel pump nozzle is removed.
For further information on fuel and fuel quality (
Ypage 365).
Refueling
General information
The fuel filler flap is unlocked/locked auto-
matically when you unlock/lock the vehicle
with the SmartKey.
The position of the fuel filler cap is displayed
æ in the instrument cluster. The arrow on
the filling pump indicates the side of the vehi-
cle.
Opening the fuel filler flap
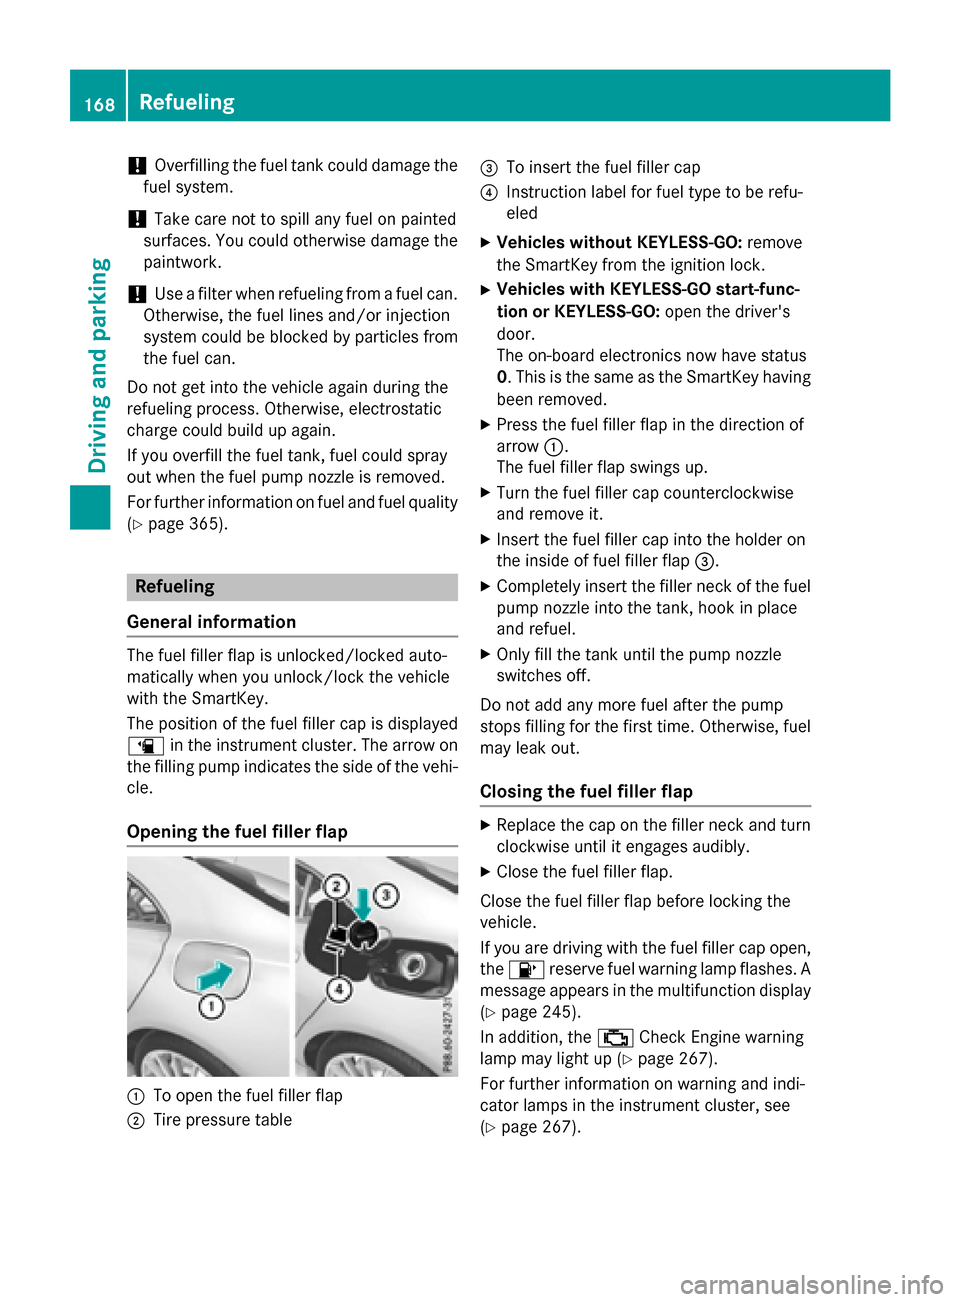
:To open the fuel filler flap
;Tire pressure table
=To insert the fuel filler cap
?Instruction label for fuel type to be refu-
eled
XVehicles without KEYLESS-GO: remove
the SmartKey from the ignition lock.
XVehicles with KEYLESS-GO start-func-
tion or KEYLESS-GO: open the driver's
door.
The on-board electronics now have status
0. This is the same as the SmartKey having
been removed.
XPress the fuel filler flap in the direction of
arrow :.
The fuel filler flap swings up.
XTurn the fuel filler cap counterclockwise
and remove it.
XInsert the fuel filler cap into the holder on
the inside of fuel filler flap =.
XCompletely insert the filler neck of the fuel
pump nozzle into the tank, hook in place
and refuel.
XOnly fill the tank until the pump nozzle
switches off.
Do not add any more fuel after the pump
stops filling for the first time. Otherwise, fuel
may leak out.
Closing the fuel filler flap
XReplace the cap on the filler neck and turn
clockwise until it engages audibly.
XClose the fuel filler flap.
Close the fuel filler flap before locking the
vehicle.
If you are driving with the fuel filler cap open,
the 8 reserve fuel warning lamp flashes. A
message appears in the multifunction display
(
Ypage 245).
In addition, the ;Check Engine warning
lamp may light up (
Ypage 267).
For further information on warning and indi-
cator lamps in the instrument cluster, see
(
Ypage 267).
168Refueling
Driving and parking
Page 172 of 374
Switching off the engine
Important safety notes
GWARNING
The automatic transmission switches to neu-
tral position Nwhen you switch off the engine.
The vehicle may roll away. There is a risk of an
accident.
After switching off the engine, always switch
to parking position P. Prevent the parked vehi-
cle from rolling away by applying the parking
brake.
Vehicles with automatic transmission
XApply the electric parking brake.
XAll vehicles (except Mercedes-AMG
vehicles): shift the transmission to posi-
tion P.
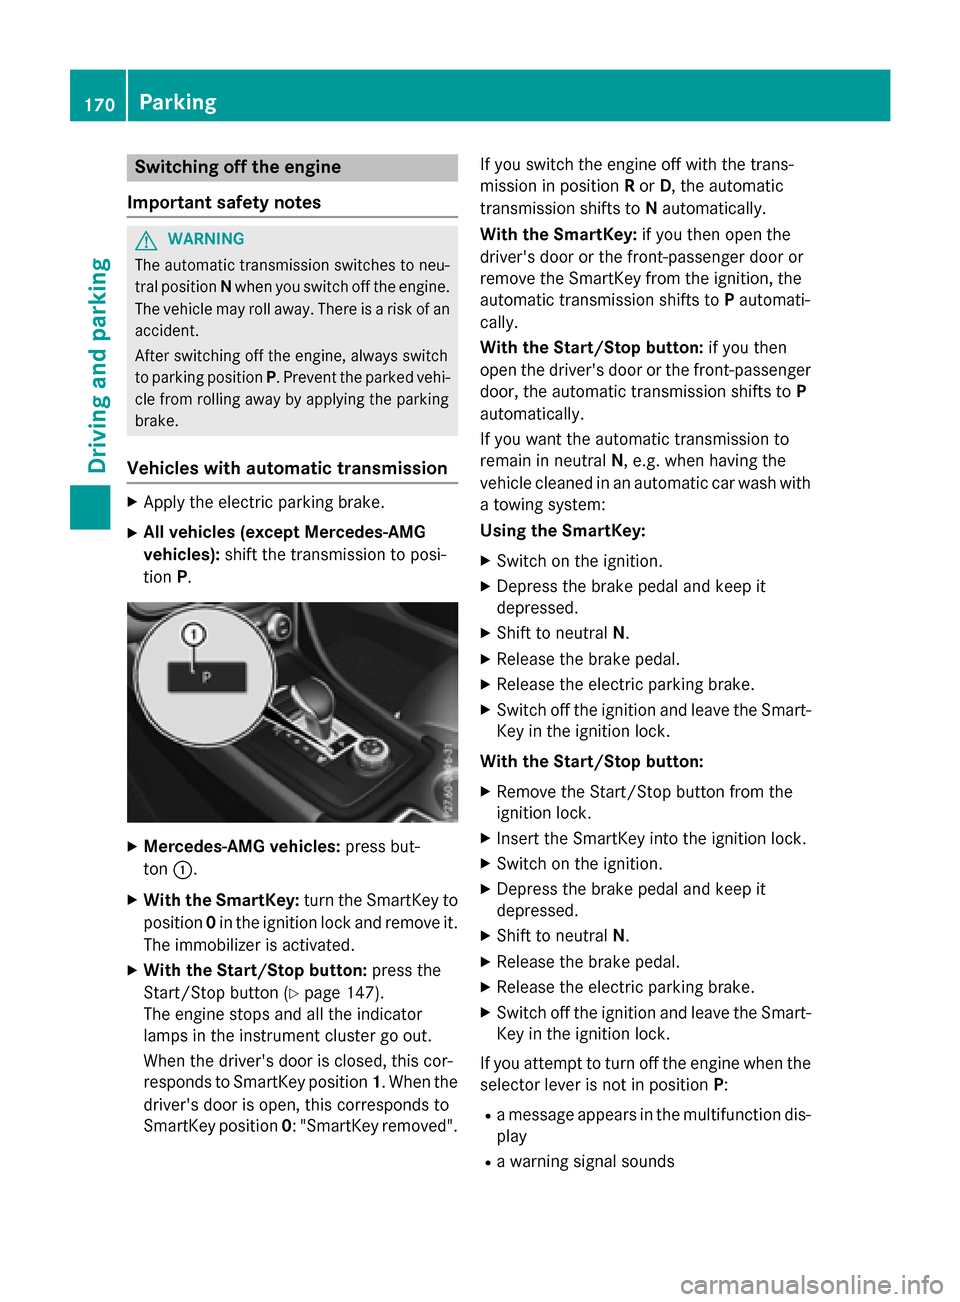
XMercedes-AMG vehicles: press but-
ton :.
XWith the SmartKey: turn the SmartKey to
position 0in the ignition lock and remove it.
The immobilizer is activated.
XWith the Start/Stop button: press the
Start/Stop button (
Ypage 147).
The engine stops and all the indicator
lamps in the instrument cluster go out.
When the driver's door is closed, this cor-
responds to SmartKey position 1. When the
driver's door is open, this corresponds to
SmartKey position 0: "SmartKey removed". If you switch the engine off with the trans-
mission in position
Ror D, the automatic
transmission shifts to Nautomatically.
With the SmartKey: if you then open the
driver's door or the front-passenger door or
remove the SmartKey from the ignition, the
automatic transmission shifts to Pautomati-
cally.
With the Start/Stop button: if you then
open the driver's door or the front-passenger door, the automatic transmission shifts to P
automatically.
If you want the automatic transmission to
remain in neutral N, e.g. when having the
vehicle cleaned in an automatic car wash with
a towing system:
Using the SmartKey:
XSwitch on the ignition.
XDepress the brake pedal and keep it
depressed.
XShift to neutral N.
XRelease the brake pedal.
XRelease the electric parking brake.
XSwitch off the ignition and leave the Smart-
Key in the ignition lock.
With the Start/Stop button:
XRemove the Start/Stop button from the
ignition lock.
XInsert the SmartKey into the ignition lock.
XSwitch on the ignition.
XDepress the brake pedal and keep it
depressed.
XShift to neutral N.
XRelease the brake pedal.
XRelease the electric parking brake.
XSwitch off the ignition and leave the Smart-
Key in the ignition lock.
If you attempt to turn off the engine when the
selector lever is not in position P:
Ra message appears in the multifunction dis-
play
Ra warning signal sounds
170Parking
Driving and parking
Page 173 of 374
Electric parking brake
General notes
GWARNING
If you leave children unsupervised in the vehi-
cle, they could set it in motion by, for example:
Rrelease the parking brake.
Rshift the automatic transmission out of the
parking position P.
Rstart the engine.
In addition, they may operate vehicle equip-
ment and become trapped. There is a risk of
an accident and injury.
When leaving the vehicle, always take the
SmartKey with you and lock the vehicle. Never
leave children unsupervised in the vehicle.
The function of the electric parking brake is
dependent on the on-board voltage. If the on-
board voltage is low or there is a malfunction
in the system, it may not be possible to apply
the released parking brake.
XIf this is the case, only park the vehicle on
level ground and secure it to prevent it roll-
ing away.
XShift the automatic transmission to posi-
tion P.
It may not be possible to release an applied
parking brake if the on-board voltage is low or
there is a malfunction in the system. Contact a qualified specialist workshop.
The electric parking brake performs a func-
tion test at regular intervals while the engine
is switched off. The sounds that can be heard
while this is occurring are normal.
Applying or releasing manually
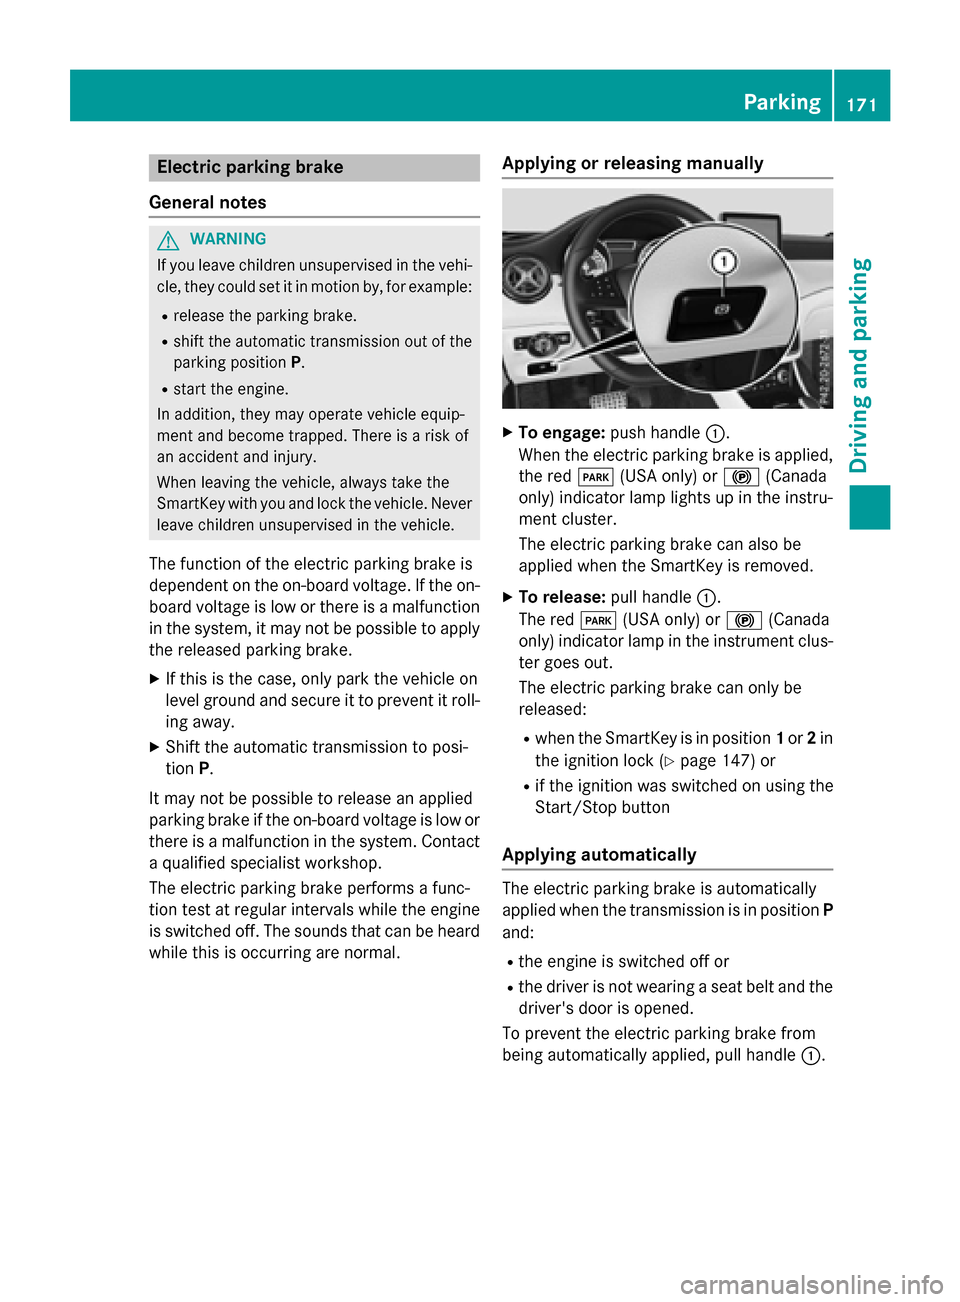
XTo engage: push handle :.
When the electric parking brake is applied, the red F(USA only) or !(Canada
only) indicator lamp lights up in the instru-
ment cluster.
The electric parking brake can also be
applied when the SmartKey is removed.
XTo release: pull handle:.
The red F(USA only) or !(Canada
only) indicator lamp in the instrument clus-
ter goes out.
The electric parking brake can only be
released:
Rwhen the SmartKey is in position 1or 2in
the ignition lock (
Ypage 147) or
Rif the ignition was switched on using the
Start/Stop button
Applying automatically
The electric parking brake is automatically
applied when the transmission is in position P
and:
Rthe engine is switched off or
Rthe driver is not wearing a seat belt and the
driver's door is opened.
To prevent the electric parking brake from
being automatically applied, pull handle :.
Parking171
Driving and parking
Z
Page 174 of 374
The electric parking brake is also engaged
automatically if:
RDISTRONIC PLUS brings the vehicle to a
standstill or
Rthe HOLD function is keeping the vehicle
stationary
RActive Parking Assist is keeping the vehicle
stationary
In addition, at least one of the following con-
ditions must be fulfilled:
Rthere is a system malfunction.
Rthe power supply is insufficient.
Rthe vehicle is stationary for a lengthy
period.
The red F(USA only) or !(Canada
only) indicator lamp in the instrument cluster goes out.
The electric parking brake is not automati-
cally engaged if the engine is switched off by
the ECO start/stop function.
Releasing automatically
Your vehicle's electric parking brake is auto-
matically released if all of the following con-
ditions are met:
Rthe engine is running.
Rthe transmission is in position Dor R.
Rthe seat belt has been fastened.
Ryou depress the accelerator pedal.
If the transmission is in position R, the trunk
lid must be closed.
If your seat belt is not fastened, the following
conditions must be fulfilled to automatically
release the electric parking brake:
Rthe driver's door is closed.
Ryou have shifted out of transmission posi-
tion Por you have previously driven faster
than 2 mph (3 km/h).
Ensure that you do not depress the acceler-
ator pedal unintentionally. Otherwise the
parking brake will be released and the vehicle
will start to move.
Emergency braking
The vehicle can also be braked during an
emergency by using the electric parking
brake.
XWhile driving, push handle :of the electric
parking brake (
Ypage 171).
The vehicle is braked as long as you keep
handle :of the electric parking brake
pressed. The longer the electric parking
brake handle :is depressed, the greater
the braking force.
During braking:
Ra warning tone sounds
Rthe Release Parking Brakemessage
appears
Rthe red F(USA only) or !(Canada
only) indicator lamp in the instrument clus- ter flashes
When the vehicle has been braked to a stand-
still, the electric parking brake is engaged.
Parking the vehicle for a long period
If you leave the vehicle parked for longer than
four weeks, the battery may be damaged by
exhaustive discharging.
If you leave the vehicle parked for longer than
six weeks, the vehicle may suffer damage as a
result of lack of use.
XVisit a qualified specialist workshop and
seek advice.
iYou can obtain information about trickle
chargers from a qualified specialist work-
shop.
Driving tips
General notes
Important safety notes
GWARNING
If you switch off the ignition while driving,
safety-relevant functions are only available
172Driving tips
Driving and parking
Page 178 of 374
Servicing the brakes
!The brake fluid level may be too low, if:
Rif the red brake warning lamp lights up inthe instrument cluster and
Ryou hear a warning tone while the engineis running
Observe additional warning messages in
the multifunction display.
The brake fluid level may be too low due to
brake pad wear or leaking brake lines.
Have the brake system checked immedi-
ately. Consult a qualified specialist work-
shop to arrange this.
!A function or performance test should
only be carried out on a 2-axle dynamom-
eter. If you wish to operate the vehicle on
such a dynamometer, please consult a
qualified specialist workshop in advance.
You could otherwise damage the drive train
or the brake system.
!As the ESP®system operates automati-
cally, the engine and the ignition must be
switched off (the SmartKey must be in posi-
tion 0or 1in the ignition lock) if:
Rthe electric parking brake is tested on a
brake dynamometer (for a maximum of
ten seconds)
Rthe vehicle is towed with the front axle
raised.
Braking triggered automatically by ESP
®
may seriously damage the brake system.
All checks and maintenance work on the
brake system must be carried out at a quali-
fied specialist workshop.
Have brake pads installed and brake fluid
replaced at a qualified specialist workshop.
If the brake system has only been subject to
moderate loads, you should test the function-
ality of your brakes at regular intervals.
You can find a description of Brake Assist
(BAS) on (
Ypage 66).
Mercedes-Benz recommends that you only
have brake pads/linings installed on your vehicle which have been approved for
Mercedes-Benz vehicles or which correspond
to an equivalent quality standard. Brake
pads/linings which have not been approved
for Mercedes-Benz vehicles or which are not
of an equivalent quality could affect your vehi-
cle's operating safety.
Mercedes-Benz recommends that you only
use brake fluid that has been specially
approved for your vehicle by Mercedes-Benz,
or which corresponds to an equivalent quality
standard. Brake fluid which has not been
approved for Mercedes-Benz vehicles or
which is not of an equivalent quality could
affect your vehicle's operating safety.
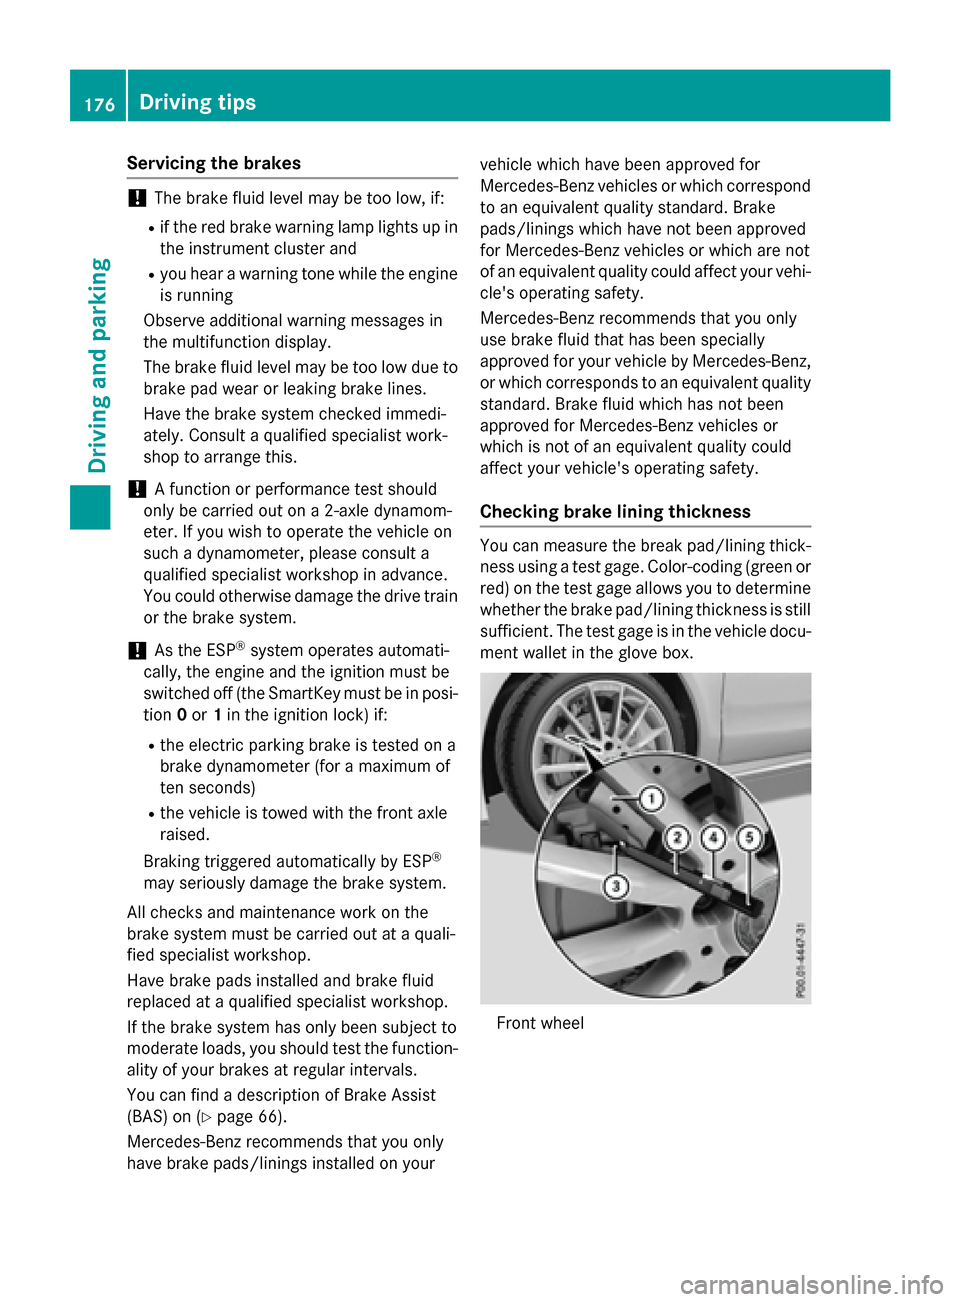
Checking brake lining thickness
You can measure the break pad/lining thick- ness using a test gage. Color-coding (green or
red) on the test gage allows you to determine
whether the brake pad/lining thickness is still
sufficient. The test gage is in the vehicle docu-
ment wallet in the glove box.
Front wheel
176Driving tips
Driving and parking
Page 182 of 374
press the cruise control lever up:or
down ?to the pressure point.
The last stored speed increases or decrea-
ses in 5 mph (10 km/h) increments.
iCruise control is not deactivated if you
depress the accelerator pedal. For exam-
ple, if you accelerate briefly to overtake,
cruise control adjusts the vehicle's speed
to the last speed stored after you have fin- ished overtaking.
Deactivating cruise control
There are several ways to deactivate cruise
control:
XBriefly press the cruise control lever for-
wards =.
or
XBrake.
Cruise control is automatically deactivated if:
Rthe vehicle is secured with the electric
parking brake
Ryou are driving at less than 20 mph
(30 km/h)
RESP®intervenes or you deactivate ESP®
Ryou shift the transmission to position N
while driving
If cruise control is deactivated, you will hear a
warning tone. You will see the Cruise con‐
trol Offmessage in the multifunction dis-
play for approximately five seconds.
iWhen you switch off the engine, the last
speed stored is cleared.
DISTRONIC PLUS
General notes
DISTRONIC PLUS regulates the speed and
automatically helps you maintain the dis-
tance to the vehicle detected in front. Vehi-
cles are detected with the aid of the radar
sensor system. DISTRONIC PLUS brakes
automatically to avoid exceeding the set speed or to maintain the designated distance
from the vehicle in front.
Change into a lower gear in good time on long
and steep downhill gradients. This is espe-
cially important if the vehicle is laden. By
doing so, you will make use of the braking
effect of the engine. This relieves the load on
the brake system and prevents the brakes
from overheating and wearing too quickly.
If DISTRONIC PLUS detects that there is a risk
of a collision, you will be warned visually and
acoustically. DISTRONIC PLUS cannot pre-
vent a collision without your intervention. An
intermittent warning tone will then sound and
the distance warning lamp will light up in the
instrument cluster. Brake immediately in
order to increase the distance to the vehicle
in front or take evasive action provided it is
safe to do so.
DISTRONIC PLUS operates in range between
0 mph (0 km/h) and 120 mph (200 km/h).
Do not use DISTRONIC PLUS while driving on
roads with steep gradients.
Important safety notes
GWARNING
DISTRONIC PLUS does not react to:
Rpeople or animals
Rstationary obstacles on the road, e.g. stop- ped or parked vehicles
Roncoming and crossing traffic
As a result, DISTRONIC PLUS may neither give
warnings nor intervene in such situations.
There is a risk of an accident.
Always pay careful attention to the traffic sit- uation and be ready to brake.
GWARNING
DISTRONIC PLUS cannot always clearly iden-
tify other road users and complex traffic sit-
uations.
180Driving systems
Driving and parking
Page 199 of 374
Active Parking Assist is switched on automat-
ically when driving forwards. The system is
operational at speeds of up to approximately
22 mph (35 km/h). While in operation, the
system independently locates and measures
parking spaces on both sides of the vehicle.
Active Parking Assist will only detect parking
spaces:
Rthat are parallel or at right-angles to the
direction of travel
Rthat are parallel to the direction of travel
and at least 59 in (1.5m) wide
Rthat are parallel to the direction of travel
and at least 39.5 in (1.0 m) longer than your
vehicle
Rthat are at right angles to the direction of
travel and at least 39.5 in (1.0 m) wider
than your vehicle
iNote that Active Parking Assist cannot
measure the length of a parking space if it
is at right angles to the direction of travel.
You will need to judge whether your vehicle
will fit into the parking space.
When driving at speeds below 19 mph
(30 km/h), you will see parking symbol ;as
a status indicator in the instrument cluster.
When a parking space has been detected, an
arrow towards the right or the left also
appears. By default, Active Parking Assist
onl y d
isplays parking spaces on the front-
passenger side. Parking spaces on the driv-
er's side are displayed as soon as the turn
signal on the driver's side is activated. When
parking on the driver's side, this must remain
activated until you confirm the use of Active
Parking Assist by pressing the abutton on
the multifunction steering wheel. The system
automatically determines whether the park-
ing space is parallel or at right-angles to the
direction of travel.
A parking space is displayed while you are
driving past it, and until you are approx-
imately 50 ft (15 m) away from it.
Parking
GWARNING
If you leave the vehicle when it is only being
braked by Active Parking Assist it could roll
away if:
Rthere is a malfunction in the system or in
the voltage supply.
Rthe electrical system in the engine com-
partment, the battery or the fuses have
been tampered with.
Rthe battery is disconnected.
Rthe accelerator pedal has been depressed,
e.g. by a vehicle occupant.
There is a risk of an accident.
Before leaving the vehicle, always secure it
against rolling away.
iWhen PARKTRONIC detects obstacles,
Active Parking Assist brakes automatically
during the parking process. You are respon-
sible for braking in good time.
XStop the vehicle when the parking space
symbol shows the desired parking space in
the instrument cluster.
XShift the transmission to position R.
The Start Park Assist?
Yes: OKNo:
% message appears in the multifunction
display.
XTo cancel the procedure: press the%
button on the multifunction steering wheel or pull away.
or
XTo park using Active Parking Assist:
press the abutton on the multifunction
steering wheel.
The Park Assist Active Accelerate
and BrakeObserve Surroundingsmes-
sage appears in the multifunction display.
XLet go of the multifunction steering wheel.
XBack up the vehicle, being ready to brake at
all times. When backing up, drive at a speed
below approximately 6 mph (10 km/h).
Driving system s197
Driving an d parking
Z
Page 211 of 374
Useful information............................210
Important safety notes .....................210
Displays and operation .....................210
Menus and submenus ......................213
Display messages ............................. 227
Warning and indicator lamps in the
instrument cluster ............................258
209
On-board computer and displays
Page 212 of 374
Useful information
i
This Operator's Manual describes all
models and all standard and optional equip-
ment of your vehicle available at the time of
publication of the Operator's Manual.
Country-specific differences are possible.
Please note that your vehicle may not be
equipped with all features described. This
also applies to safety-related systems and
functions.
iRead the information on qualified special-
ist workshops (
Ypage 25).
Important safety notes
GWARNING
If you operate information systems and com-
munication equipment integrated in the vehi-
cle while driving, you will be distracted from
traffic conditions. You could also lose control
of the vehicle. There is a risk of an accident.
Only operate the equipment when the traffic
situation permits. If you are not sure that this
is possible, park the vehicle paying attention
to traffic conditions and operate the equip-
ment when the vehicle is stationary.
You must observe the legal requirements for
the country in which you are currently driving
when operating the on-board computer.
GWARNING
If the instrument cluster has failed or mal-
functioned, you may not recognize function
restrictions in systems relevant to safety. The
operating safety of your vehicle may be
impaired. There is a risk of an accident.
Drive on carefully. Have the vehicle checked
at a qualified specialist workshop immedi-
ately.
The on-board computer only shows messages
or warnings from certain systems in the mul-
tifunction display. You should therefore make sure your vehicle is operating safely at all
times.
If the operating safety of your vehicle is
impaired, pull over as soon as it is safe to do
so. Contact a qualified specialist workshop.
For an overview, see the instrument panel
illustration (
Ypage 31).
Displays and operation
Instrument cluster lighting
The light sensor in the instrument cluster
automatically controls the brightness of the
multifunction display. In daylight, the displays
in the instrument cluster are not illuminated.
The lighting in the instrument cluster, in the
displays and the controls in the vehicle inte-
rior can be adjusted using the brightness con-
trol knob.
The brightness control knob is located on the
bottom left of the instrument cluster
(
Ypage 31).
XTurn the brightness control knob clockwise
or counter-clockwise.
If the light switch is set to the
Ã,Tor
L position, the brightness is dependent
upon the brightness of the ambient light.
Speedometer with segments
The speedometer is divided into segments
only on vehicles with DISTRONIC PLUS.
The segments in the speedometer indicate
which speed range is available.
RDISTRONIC PLUS activated (Ypage 180):
One or two segments in the set speed
range light up.
RDISTRONIC PLUS detects a vehicle in front
that is driving at a slower speed than the
stored speed:
The segments between the speed of the
vehicle in front and the stored speed light
up.
210Displays and operation
On-board computer and displays
Page 222 of 374
Deactivating/activating ESP®in Mercedes-
AMG vehicles (
Ypage 70).
For further information about ESP
®, see
(
Ypage 69).
XStart the engine.
XPress the =or; button on the steer-
ing wheel to select the DriveAssist
menu.
XPress9or: to select ESP.
XPressato confirm.
The current selection appears.
XTo activate/deactivate: press thea
button again.
ESP
®is deactivated if the åwarning
lamp in the instrument cluster lights up
continuously when the engine is running.
If the ÷ andå warning lamps light up
continuously, ESP
®is not available due to a
malfunction.
Observe the information on warning lamps
(
Ypage 263).
Observe the information on display messages
(
Ypage 228).
Activating/deactivating COLLISION
PREVENTION ASSIST PLUS
XPress the =or; button on the steer-
ing wheel to select the DriveAssist
menu.
XPress the9or: button to select
Collision Prevent. Assist
.
XPress ato confirm.
The current selection appears.
XTo activate/deactivate: press thea
button again.
When COLLISION PREVENTION ASSIST
PLUS is deactivated, the æsymbol
appears in the multifunction display in the
assistance graphic display.
For further information about COLLISION
PREVENTION ASSIST PLUS, see (
Ypage 66).
Activating/deactivating ATTENTION
ASSIST
XPress the =or; button on the steer-
ing wheel to select the DriveAssist
menu.
XPress the9or: button to select
Attention Assist
.
XPress ato confirm.
The current selection appears.
XPress ato confirm.
XPress the :or9 button to set Off,
Standard
or Sensitive.
XPress the abutton to save the setting.
When ATTENTION ASSIST is deactivated,
the é symbol appears in the multifunc-
tion display in the assistance graphics dis-
play.
For further information about ATTENTION
ASSIST, see (
Ypage 203).
Activating/deactivating Blind Spot
Assist
XPress the =or; button on the steer-
ing wheel to select the DriveAssist
menu.
XPress the9or: button to select
Blind Spot Assist
.
XPress ato confirm.
The current selection appears.
XTo activate/deactivate: press thea
button again.
For further information about Blind Spot
Assist, see (
Ypage 205).
Activating/deactivating Lane Keeping
Assist
XPress the =or; button on the steer-
ing wheel to select the DriveAssist
menu.
XPress the9or: button to select
Lane Keeping Assist
.
XPress ato confirm.
The current selection appears.
XPress aagain to confirm.
220Menus and submenus
On-board computer and displays