seat memory MERCEDES-BENZ CLA-Class 2016 C117 Owner's Manual
[x] Cancel search | Manufacturer: MERCEDES-BENZ, Model Year: 2016, Model line: CLA-Class, Model: MERCEDES-BENZ CLA-Class 2016 C117Pages: 374, PDF Size: 8.19 MB
Page 14 of 374
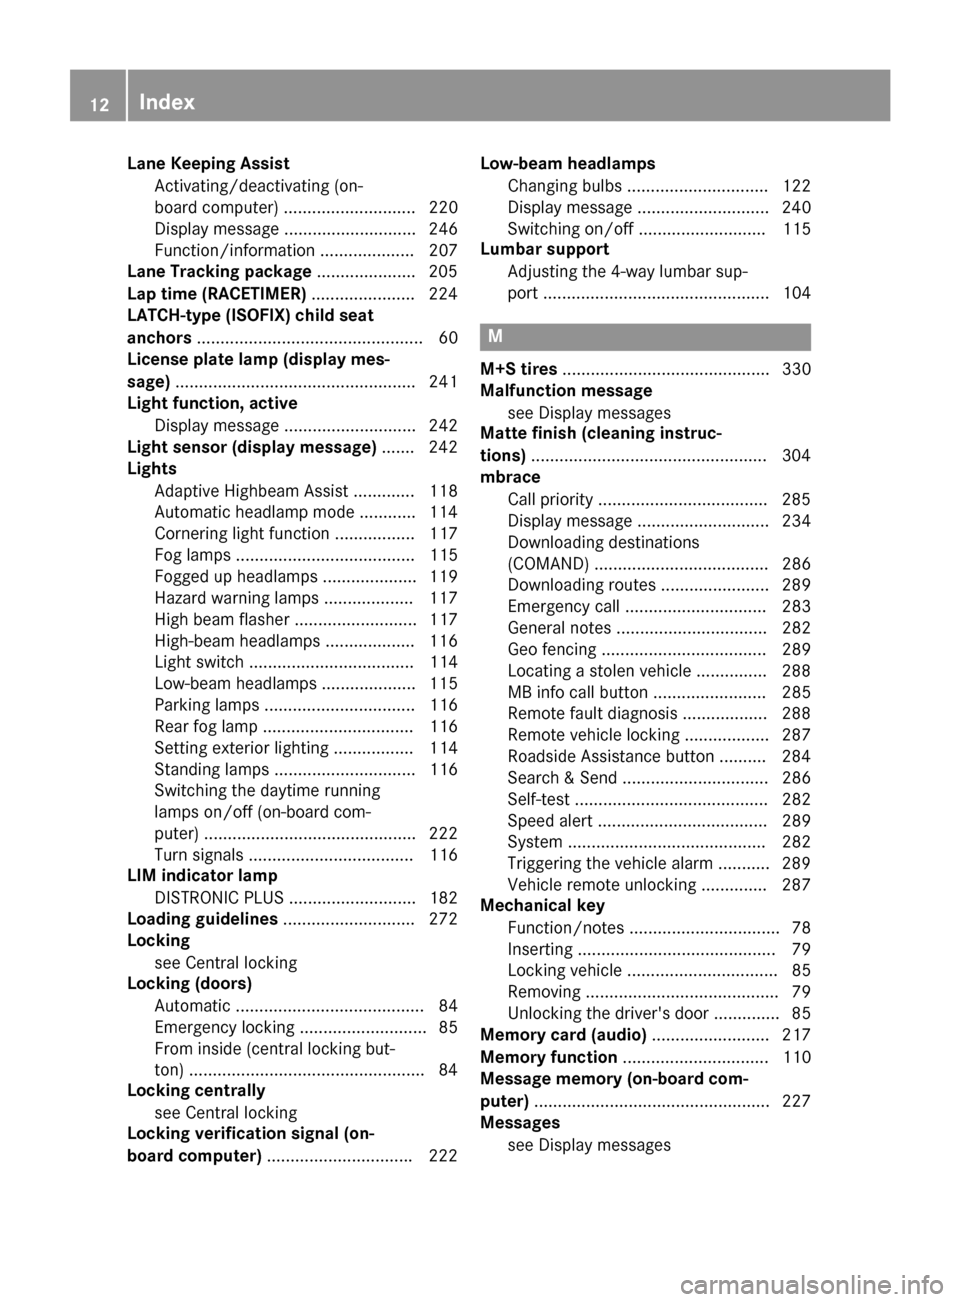
Lane Keeping AssistActivating/deactivating (on-
board computer) ............................ 220
Display message ............................ 246
Function/information .................... 207
Lane Tracking package .....................205
Lap time (RACETIMER) ......................224
LATCH-type (ISOFIX) child seat
anchors ................................................ 60
License plate lamp (display mes-
sage) ................................................... 241
Light function, active
Display message ............................ 242
Light sensor (display message) ....... 242
Lights
Adaptive Highbeam Assist ............. 118
Automatic headlamp mode ............ 114
Cornering light function ................. 117
Fog lamps ...................................... 115
Fogged up headlamps .................... 119
Hazard warning lamps ................... 117
High beam flasher .......................... 117
High-beam headlamps ................... 116
Light switch ................................... 114
Low-beam headlamps .................... 115
Parking lamps ................................ 116
Rear fog lamp ................................ 116
Setting exterior lighting ................. 114
Standing lamps .............................. 116
Switching the daytime running
lamps on/off (on-board com-
puter) ............................................. 222
Turn signals ................................... 116
LIM indicator lamp
DISTRONIC PLUS ........................... 182
Loading guidelines ............................ 272
Locking
see Central locking
Locking (doors)
Automatic ........................................ 84
Emergency locking ........................... 85
From inside (central locking but-
ton) ..................................................8 4
Locking centrally
see Cent ral loc
king
Locking verification signal (on-
board computer) .............................. .222 Low-beam headlamps
Changing bulbs .............................. 122
Display message ............................ 240
Switching on/off ........................... 115
Lumbar support
Adjusting the 4-way lumbar sup-
port ................................................ 104
M
M+S tires ............................................ 330
Malfunction message
see Display messages
Matte finish (cleaning instruc-
tions) ..................................................3 04
mbrace
Call priority ....................................2 85
Display message ............................ 234
Downloading destinations
(COMAND) ..................................... 286
Downloading routes ....................... 289
Emergency call .............................. 283
General notes ................................ 282
Geo fencing ................................... 289
Locating a stolen vehicle ...............2 88
MB info call button ........................ 285
Remote fault diagnosis .................. 288
Remote vehicle locking .................. 287
Roadside Assistance button .......... 284
Search & Send ............................... 286
Self-test ......................................... 282
Speed alert .................................... 289
System .......................................... 282
Triggering the vehicle alarm ........... 289
Vehicle remote unlocking .............. 287
Mechanical key
Function/notes ................................ 78
Inserting .......................................... 79
Locking vehicle ................................ 85
Removing ......................................... 79
Unlocking the driver's door .............. 85
Memory card (audio) ......................... 217
Memory function ............................... 110
Message memory (on-board com-
puter) .................................................. 227
Messages
see Display messages
12Index
Page 15 of 374
Mirror turn signalCleaning .........................................3 05
Mirrors
see Exterior mirrors
see Rear-view mirror
see Vanity mirror (in the sun visor)
Mobile phone
Frequencies ................................... 362
Installation ..................................... 362
Menu (on-board computer) ............ 218
Transmission output (maximum) .... 362
Modifying the programming
(SmartKey) ...........................................7 8
MOExtended tires .............................. 311
Mounting wheels
Lowering the vehicle ...................... 355
Mounting a new wheel ................... 354
Preparing the vehicle .....................3 51
Raising the vehicle ......................... 352
Removing a wheel .......................... 354
Securing the vehicle against roll-
ing away ........................................ 352
MP3
Operation ....................................... 217
Multifunction display
Function/notes .............................2 13
Permanent display ......................... 222
Multifunction steering wheel
Operating the on-board computer .. 211
Overview .......................................... 33
N
NavigationMenu (on-board computer) ............ 215
Notes on breaking-in a new vehi-
cle ....................................................... 146
O
Occupant Classification System
(OCS)
Conditions ....................................... 51
Faults ............................................... 55
Operation ......................................... 51
System self-test ............................... 53 Occupant safety
Automatic measures after an acci-
dent ................................................. 58
Children in the vehicle ..................... 58
Important safety notes .................... 43
Introduction to the restraint sys-
tem ..................................................4 2
Occupant Classification System
(OCS) ............................................... 51
PASSENGER AIR BAG indicator
lamps ............................................... 43
Pets in the vehicle ........................... 64
Restraint system warning lamp ........ 43
Seat belt .......................................... 44
OCS
Conditions ....................................... 51
Faults ............................................... 55
Operation ......................................... 51
System self-test ...............................5 3
Odometer .......................................... .213
On-board computer
AMG menu ..................................... 223
Assistance graphic menu ...............2 19
Assistance menu ........................... 219
Audio menu ................................... 217
Convenience submenu .................. 223
Display messages .......................... 227
Displaying a service message ........3 01
DISTRONIC PLUS ........................... 185
Factory settings .............................2 23
Important safety notes .................. 210
Instrument cluster submenu .......... 221
Lighting submenu .......................... 222
Menu overview .............................. 213
Message memory .......................... 227
Navigati on menu ............................ 215
Operati
on ....................................... 211
RACETIMER ................................... 224
Service menu ................................. 221
Settings menu ............................... 221
Standard display ............................ 213
Telephone menu ............................ 218
Trip menu ...................................... 213
Vehicle submenu ........................... 222
Video DVD operation ..................... 217
Opening and closing the side trim
panels ................................................. 123
Index13
Page 18 of 374
Seat heating problem .................... 106
Storing settings (memory func-
tion) ............................................... 110
Switching seat heating on/off ....... 105
Securing cargo .................................. 276
Selector lever
Cleaning ......................................... 307
Sensors (cleaning instructions) ....... 305
Service menu (on-board com-
puter) .................................................. 221
Service message
see ASSYST PLUS
Service products
Brake fluid ..................................... 369
Coolant (engine) ............................ 369
Engine oil ....................................... 368
Fuel ................................................ 365
Important safety notes .................. 365
Refrigerant (air-conditioning sys-
tem) ............................................... 371
Washer fluid ................................... 370
Setting the air distribution ............... 138
Setting the airflow ............................ 138
Settings
Factory (on-board computer) ......... 223
On-board computer ....................... 221
SETUP (on-board computer) ............. 224
Side impact air bag ............................. 50
Side marker lamp (display mes-
sage) ................................................... 242
Side windows
Cleaning ......................................... 304
Convenience closing feature ............ 90
Convenience opening feature .......... 89
Important safety information ........... 88
Opening/closing .............................. 89
Problem (malfunction) ..................... 92
Resetting ......................................... 91
Reversing feature ............................. 88
Sliding sunroof
see Panorama roof with power
tilt/sliding panel
SmartKey
Changing the battery ....................... 80
Changing the programming ............. 78
Checking the battery ....................... 79
Convenience closing feature ............ 90 Convenience opening feature .......... 89
Display message ............................ 257
Door central locking/unlocking ....... 76
Important safety notes .................... 76
KEYLESS-GO start function .............. 78
Loss ................................................. 81
Mechanical key ................................ 78
Positions (ignition lock) ................. 147
Problem (malfunction)
..................... 81
Sta
rting the engine ........................ 149
SmartKey positions (ignition lock) .. 147
Snow chains ...................................... 331
Sockets
Center console .............................. 281
General notes ................................ 281
Rear compartment ......................... 281
Trunk ............................................. 281
Special seat belt retractor .................. 59
Specialist workshop ............................ 25
Speed, controlling
see Cruise control
Speedometer
Activating/deactivating the addi-
tional speedometer ........................ 221
Digital ............................................ 215
In the Instrument cluster ................. 31
Segments ...................................... 210
Selecting the display unit ............... 221
SPORT handling mode
Deactivating/activating
(Mercedes-AMG vehicles) ................ 70
Warning lamp ................................. 264
Standing lamps
Display message ............................ 241
Switching on/off ........................... 116
Start-off assist
Activating ....................................... 189
Important safety notes .................. 189
Start/Stop button
Removing ....................................... 148
Starting the engine ........................ 150
Start/stop function
see ECO start/stop function
Starting (engine) ................................ 149
STEER CONTROL .................................. 72
Steering
Display message ............................ 256
16Index
Page 101 of 374
Useful information............................100
Correct driver's seat position ..........100
Seats .................................................. 101
Steering wheel .................................. 106
Mirrors ............................................... 107
Memory function ............................... 110
99
Seats, steering wheel and mirrors
Page 103 of 374
The seat belt should:
Rfit snugly across your body
Rbe routed across the middle of your
shoulder
Rbe routed in your pelvic area across the
hip joints
XBefore starting off, adjust the rear-view mir-
ror and the exterior mirrors (
Ypage 107) in
such a way that you have a good view of
road and traffic conditions.
XVehicles with a memory function: save
the seat and exterior mirror settings
(
Ypage 110).
Seats
Important safety notes
GWARNING
Children could become trapped if they adjust
the seats, particularly when unattended.
There is a risk of injury.
When leaving the vehicle, always take the
SmartKey with you and lock the vehicle. Never
leave children unsupervised in the vehicle.
The seats can still be adjusted when there is
no SmartKey in the ignition lock.
GWARNING
When you adjust a seat, you or other vehicle
occupants could become trapped, e.g. on the seat guide rail. There is a risk of injury.
Make sure when adjusting a seat that no one
has any body parts in the sweep of the seat.
Observe the safety notes on "Air bags"
(
Ypage 48) and "Children in the vehicle"
(
Ypage 58).
GWARNING
If the driver's seat is not engaged, it could
move unexpectedly while the vehicle is in
motion. This could cause you to lose control of the vehicle. There is a risk of an accident.
Always make sure that the driver's seat is
engaged before starting the vehicle.
GWARNING
You could lose control of your vehicle if you do the following while driving:
Radjust the driver's seat, head restraint,
steering wheel or mirrors
Rfasten the seat belt
There is a risk of an accident.
Adjust the driver's seat, head restraint, steer-
ing wheel and mirror and fasten your seat belt before starting the engine.
GWARNING
If you adjust the seat height carelessly, you or
other vehicle occupants could be trapped and
thereby injured. Children in particular could
accidentally press the electrical seat adjust-
ment buttons and become trapped. There is a
risk of injury.
While moving the seats, make sure that your
hands or other body parts do not get under the
lever assembly of the seat adjustment sys-
tem.
!To avoid damage to the seats and the seat
heating, observe the following information:
Rkeep liquids from spilling on the seats. If
liquid is spilled on the seats, dry them as
soon as possible.
Rif the seat covers are damp or wet, do not
switch on the seat heating. The seat
heating should also not be used to dry
the seats.
Rclean the seat covers as recommended;
see the "Interior care" section.
Rdo not transport heavy loads on the
seats. Do not place sharp objects on the
seat cushions, e.g. knives, nails or tools.
The seats should only be occupied by
passengers, if possible.
Rwhen the seat heating is in operation, do not cover the seats with insulating mate-
Seats101
Seats, steering wheel and mirrors
Z
Page 105 of 374
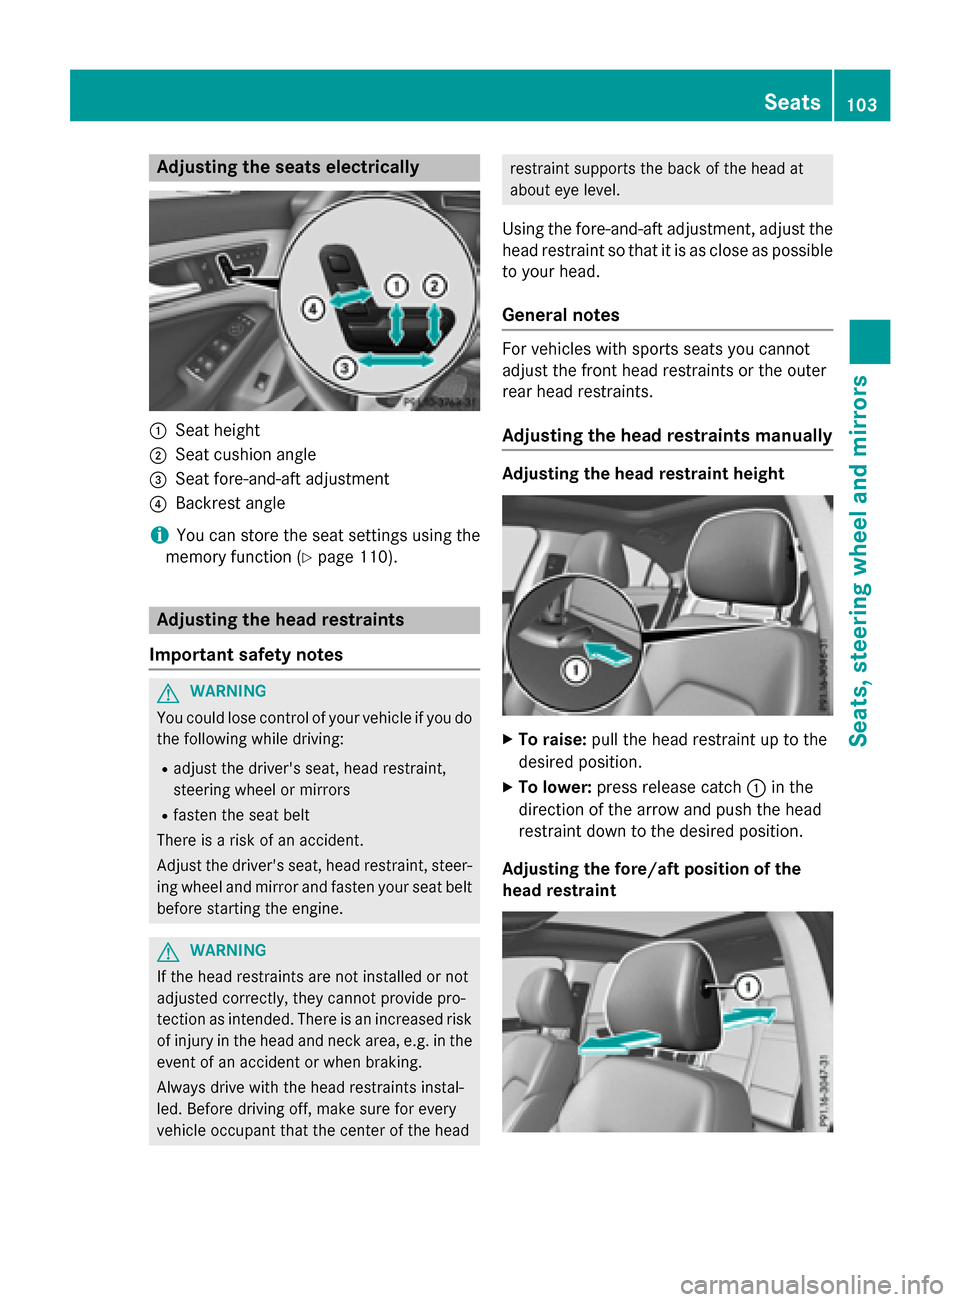
Adjusting the seats electrically
:Seat height
;Seat cushion angle
=Seat fore-and-aftadjustmen t
?Backrest angle
iYou can store th eseat setting susin gth e
memory function (
Ypage 110).
Adjusting the head restraints
Import ant safety notes
GWARNIN G
You could lose control of your vehicl eif you do
th efollowin gwhile driving:
Radjust th edriver's seat ,head restraint,
steering whee lor mirror s
Rfastenth eseat belt
There is aris kof an accident.
Adjus tth edriver's seat ,head restraint, steer -
ing whee land mirror and faste nyour seat belt
before starting th eengine.
GWARNIN G
If th ehead restraints are no tinstalled or no t
adjusted correctly, they canno tprovid epro -
tection as intended. There is an increased ris k
of injury in th ehead and neck area, e.g. in th e
event of an acciden tor when braking .
Always drive wit hth ehead restraints instal -
led. Befor edrivin goff ,mak esur efor every
vehicl eoccupant that th ecenter of th ehead
restrain tsupport sth ebac kof th ehead at
about eye level.
Using th efore-and-af tadj ustment, adjust th e
head restrain tso that it is as close as possible
to your head.
Gene ral notes
Fo rvehicles wit h sportsseat syou canno t
adjust th efron thead restraints or th eouter
rear head restraints .
Adjusting the head restraints manually
Adjusting th ehea drestrain theight
XTo raise: pull thehead restrain tup to th e
desired position .
XTo lower:press release catch :in th e
direction of th earrow and push th ehead
restrain tdown to th edesired position .
Adjusting th e fore/aftposition of th e
hea drestrain t
Seats103
Seats, steering wheel and mirrors
Z
Page 111 of 374
RIf electrolyte comes into contact with your
skin or hair or is swallowed, seek medical
attention immediately.
RImmediately change out of clothing which
has come into contact with electrolyte.
RIf an allergic reaction occurs, seek medical
attention immediately.
The "Automatic anti-glare mirrors" function is
only available if the vehicle is equipped with
the "Mirrors package".
The rear-view mirror and the exterior mirror
on the driver's side automatically go into anti-
glare mode if:
Rthe ignition is switched on and
Rincident light from headlamps strikes the
sensor in the rear-view mirror
The mirrors do not go into anti-glare mode if
reverse gear is engaged or the interior lighting
is switched on.
Parking position for the exterior mir-
ror on the front-passenger side
General notes
The "Parking position of the exterior mirror on
the front-passenger side" function is only
available if the vehicle is equipped with the
"Mirrors package".
Setting and storing the parking position
You can position the front-passenger side
exterior mirror in such a way that you can see the rear wheel on that side as soon as you
engage reverse gear. You can store this posi-
tion.
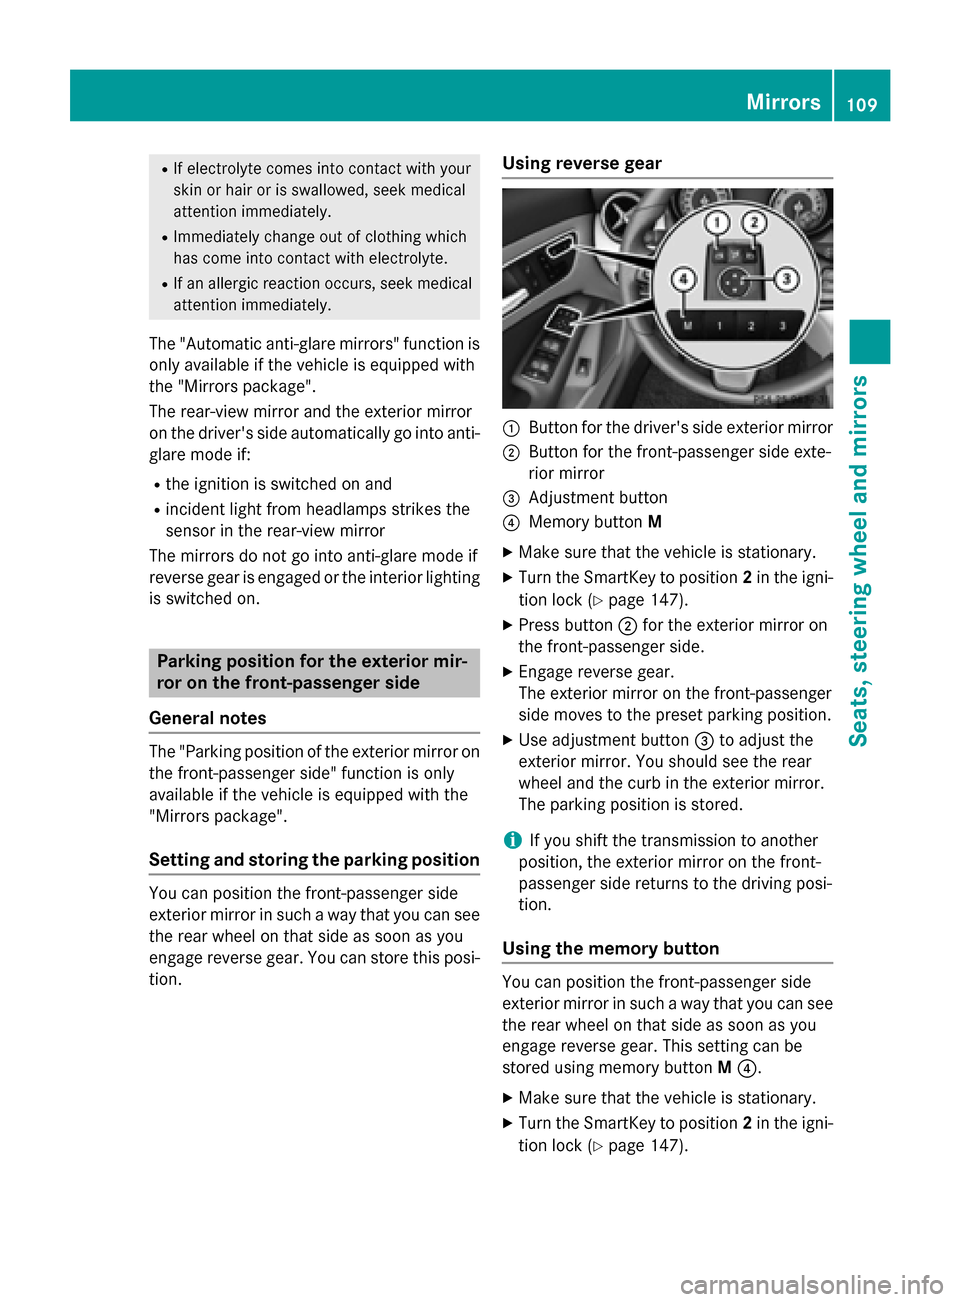
Using reverse gear
:Button for the driver's side exterior mirror
;Button for the front-passenger side exte-
rior mirror
=Adjustment button
?Memory button M
XMake sure that the vehicle is stationary.
XTurn the SmartKey to position 2in the igni-
tion lock (
Ypage 147).
XPress button ;for the exterior mirror on
the front-passenger side.
XEngage reverse gear.
The exterior mirror on the front-passenger
side moves to the preset parking position.
XUse adjustment button =to adjust the
exterior mirror. You should see the rear
wheel and the curb in the exterior mirror.
The parking position is stored.
iIf you shift the transmission to another
position, the exterior mirror on the front-
passenger side returns to the driving posi-
tion.
Using the memory button
You can position the front-passenger side
exterior mirror in such a way that you can see
the rear wheel on that side as soon as you
engage reverse gear. This setting can be
stored using memory button M?.
XMake sure that the vehicle is stationary.
XTurn the SmartKey to position 2in the igni-
tion lock (
Ypage 147).
Mirrors109
Seats, steering wheel and mirrors
Z
Page 112 of 374
XPress button;for the exterior mirror on
the front-passenger side.
XUse adjustment button =to adjust the
exterior mirror. You should see the rear
wheel and the curb in the exterior mirror.
XPress memory button M? and one of the
arrows on adjustment button =within
three seconds.
The parking position is stored if the exterior
mirror does not move.
XIf the mirror moves out of position, repeat
the steps.
Calling up a stored parking position set-
ting
XTurn the SmartKey to position 2in the igni-
tion lock (
Ypage 147).
XAdjust the exterior mirror on the front-
passenger side with the corresponding but-
ton (
Ypage 107).
XEngage reverse gear.
The exterior mirror on the front-passenger
side moves to the stored parking position.
The exterior mirror on the front-passenger
side moves back to its original position:
Ras soon as you exceed a speed of 9 mph
(15 km/h)
Rabout ten seconds after you have disen-
gaged reverse gear
Rif you press button :for the exterior mir-
ror on the driver's side
Memory function
Important safety notes
GWARNING
If you use the memory function on the driver's side while driving, you could lose control of
the vehicle as a result of the adjustments
being made. There is a risk of an accident.
Only use the memory function on the driver's
side when the vehicle is stationary.
GWARNING
When the memory function adjusts the seat,
you and other vehicle occupants – particularly
children – could become trapped. There is a
risk of injury.
While the memory function is making adjust-
ments, make sure that no one has any body
parts in the sweep of the seat. If somebody
becomes trapped, immediately release the
memory function position button. The adjust-
ment process is stopped.
GWARNING
Children could become trapped if they acti-
vate the memory function, particularly when
unattended. There is a risk of injury.
When leaving the vehicle, always take the
SmartKey with you and lock the vehicle. Never
leave children unsupervised in the vehicle.
The memory function can be used at any time,
e.g. even when the SmartKey isn't in the igni-
tion lock.
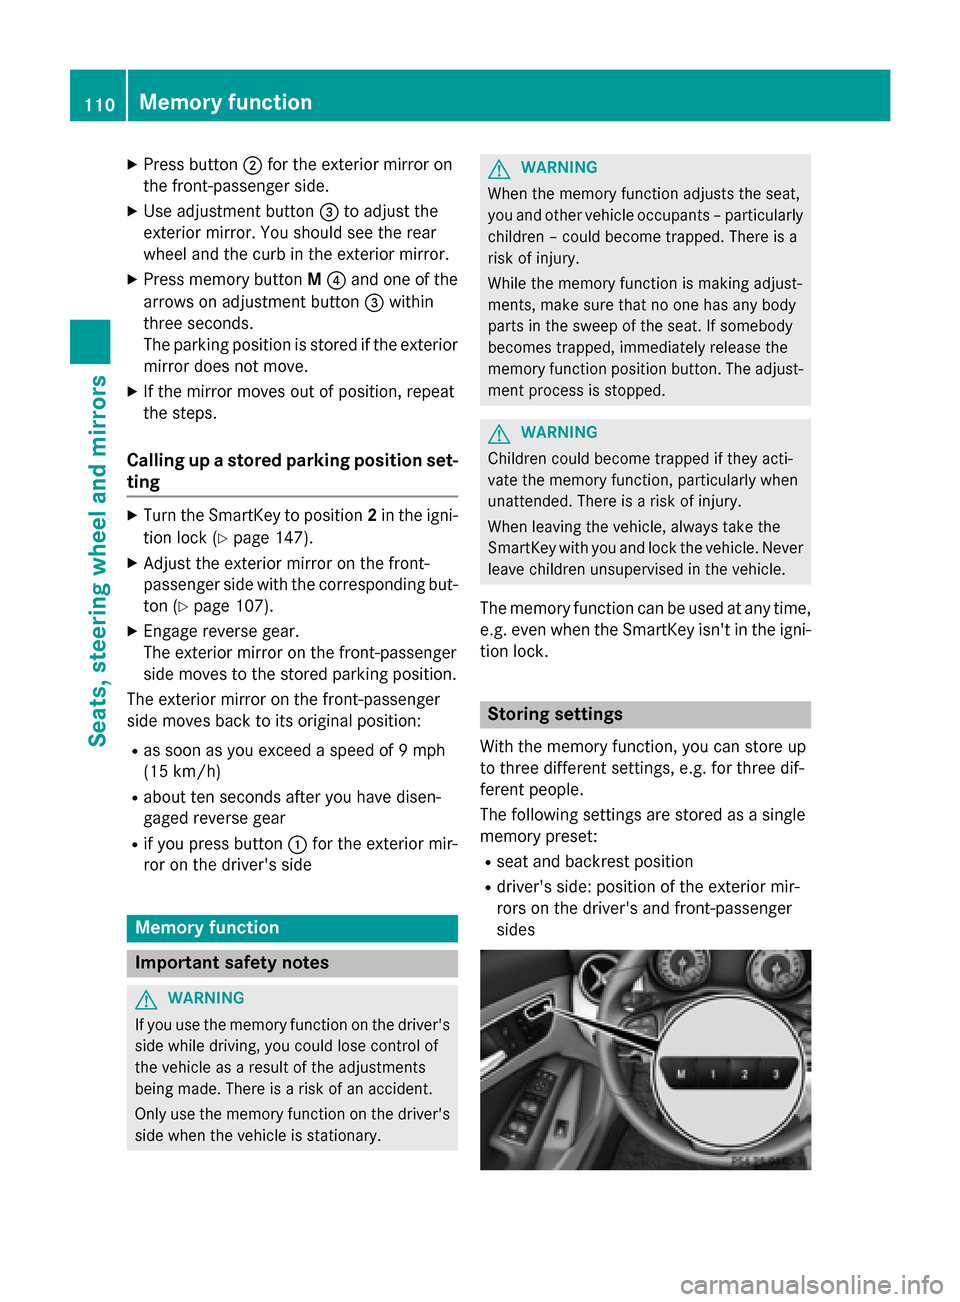
Storing settings
With the memory function, you can store up
to three different settings, e.g. for three dif-
ferent people.
The following settings are stored as a single
memory preset:
Rseat and backrest position
Rdriver's side: position of the exterior mir-
rors on the driver's and front-passenger
sides
110Memory function
Seats, steering wheel and mirrors
Page 113 of 374
XAdjust the seat (Ypage 103).
XAdjust the exterior mirror on the driver's
side (
Ypage 107).
XBriefly press theMmemory button and
then press storage position button 1,2 or 3
within three seconds.
The settings are stored in the selected pre-
set position. A tone sounds when the set-
tings have been completed.
Calling up a stored setting
XPress and hold the relevant preset position
button 1,2 or 3until the seat and exterior
mirrors are in the stored position.
iThe setting procedure is interrupted as
soon as you release the storage position
button.
Memory function111
Seats, steering wheel and mirrors
Z