Screen MERCEDES-BENZ CLA-Class 2017 C117 Owner's Manual
[x] Cancel search | Manufacturer: MERCEDES-BENZ, Model Year: 2017, Model line: CLA-Class, Model: MERCEDES-BENZ CLA-Class 2017 C117Pages: 318, PDF Size: 8.02 MB
Page 24 of 318

Introduction
The printedOperator's Manual provide sinfor-
mation about th esaf eoperation of your vehicle.
The Digital Operator's Manual provide scompre-
hensiv eand specifically adapted information on
your vehicle's equipmen tand multimedia sys-
tem. You can call up th eDigital Operator's Man -
ual via th emultimedia system.
iYou will no tincur any cost swhen calling up
th eDigital Operator's Manual. The Digital
Operator's Manual works without connecting
to th eInternet .
Ther eare three ways to access th etopic sof th e
Digital Operator's Manual:
RVisua lsearch
The visual search allows you to explor eyour
vehicl e"virtually". Starting from either th e
vehicl eexterio rvie wor interio rview, you can
access man yof th edifferen ttopic scovered
by th eDigital Operator's Manual. To access
th evehicl einterio rsection ,select th e"Vehi-
cle interior" view.
RKeywor dsearch
The keyword search allows you to search for a
keyword by enterin gcharacters.
RContent s
You can select individual section sin th econ-
tents.
iThe Digital Operator's Manual is deactiva-
te dfor safet yreason swhile driving .
Operation
Calling up the Digital Operator's Man-
ual
XPress theØ buttonin th ecenter console.
The overview relating to th evehicl eappears.
XSelec tth e"Operator's Manual" men uitem by
turnin g3 or pressin g7 thecontroller.
XConfir m7 themessage about th ewarning
and safet ynotes.
The basic men ufor th eDigital Operator's
Manual appears.
Operating the Digital Operator's Man-
ual
General notes
Pleas eobserv eth einformation about th eoper -
ation of th econtroller (Ypage 228).
Content pages
The conten tpages can be accessed by mean sof
a visual search , akeyword search or usin gth e
contents .
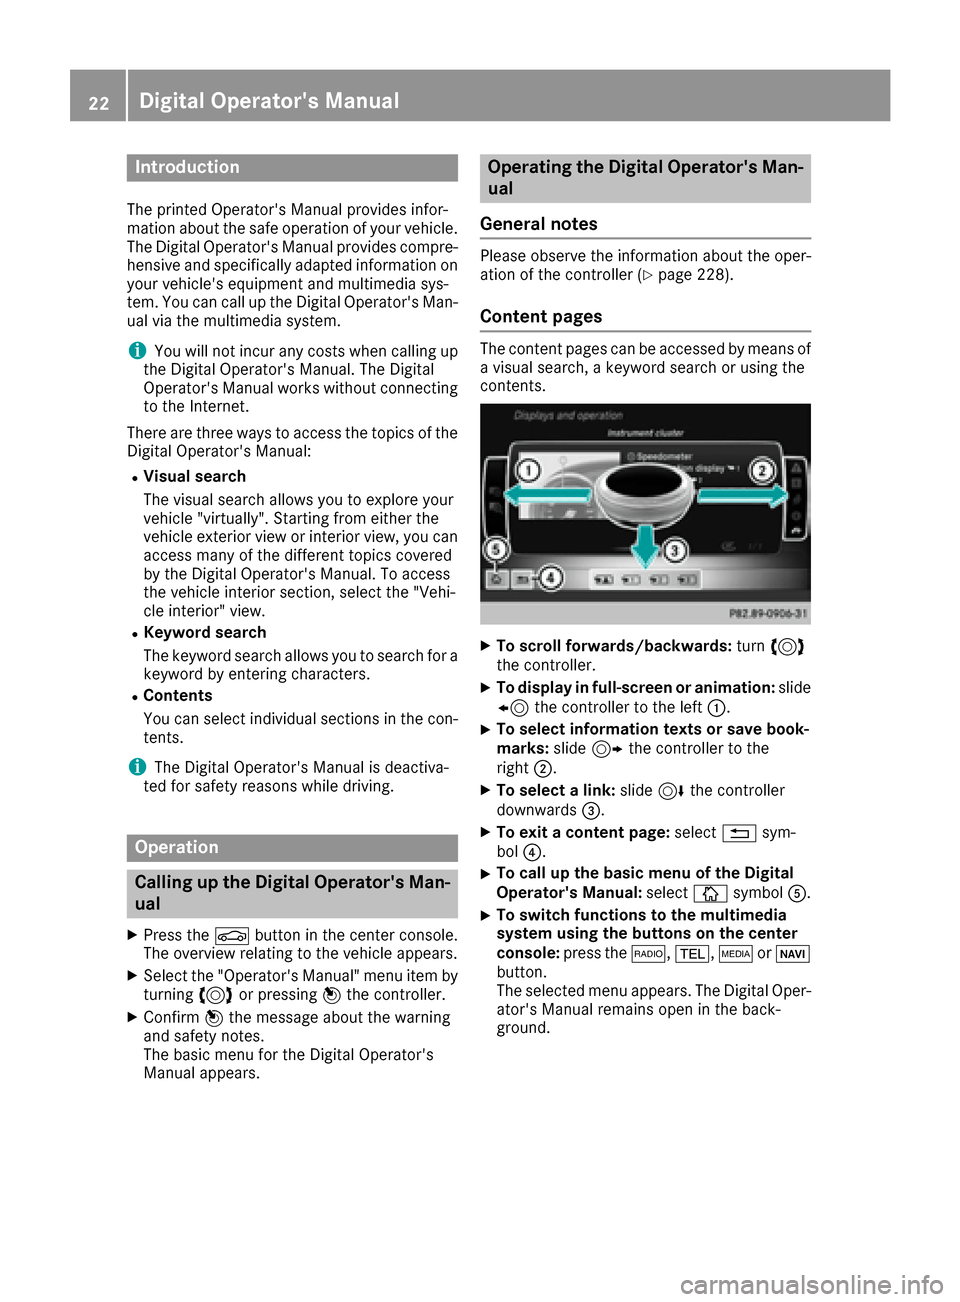
XTo scroll forwards/backwards: turn3
th econtroller .
XTo displayin full-screen or animation: slide
8 thecontroller to th elef t:.
XTo select information texts or sav ebook -
marks: slide9 thecontroller to th e
right ;.
XTo select alink :slide 6thecontroller
downwards =.
XTo exitacontent page: select%sym-
bol ?.
XTo call up th ebasic men uof th eDigital
Operator's Manual: selectÞsymbol A.
XTo switch functions to th emultimedi a
system using th ebutton son th ecenter
console: press the$, %,ÕorØ
button.
The selected men uappears. The Digital Oper -
ator's Manual remain sopen in th eback-
ground .
22Digital Operator's Manual
Page 113 of 318

BSwitches cooling with air dehumidification on/off (Ypage 114)
CSwitches the rear window defroster on/off (Ypage 117)
Notes on using the air-conditioning
system
Air-conditioning system
Below, you can find a number of notes and rec-
ommendations to help you use the air-condi-
tioning system optimally.
RSwitch on the air-conditioning system by turn- ing control knob Aclockwise to the desired
position (except position 0).
RSet the temperature to 72 ‡ (22 †).
RRecommendation for avoiding misted
windows at low exterior temperatures or
in rain: switch on the ¿cooling with dehu-
midification function (
Ypage 114).
Set air distribution to ¯and if possible
switch off PandO (
Ypage 115).
Deactivate air-recirculation mode e
(
Ypage 118).
Set airflow control Ato a setting between 3
and 6(
Ypage 116).
RRecommendation for rapid cooling or
heating of the vehicle interior: briefly set
airflow control Ato a setting between 3and
6 (
Ypage 116).
RRecommendation for a constant vehicle
interior temperature: set airflow controlA
to a setting between 1and 3(
Ypage 116).
RRecommendation for air distribution in
winter: select the Oand¯ settings
(
Ypage 115).
Recommendation for air distribution in
summer: select the PorP and¯
settings (
Ypage 115).
ROnly use the "Windshield defrosting" function
briefly until the windshield is clear again.
ROnly use air-recirculation mode briefly, e.g. if
there are unpleasant outside odors or when in
a tu
nnel. The windows could otherwise fog up,
since no fresh air is drawn into the vehicle in
air-recirculation mode.
RIf you change the settings of the climate con-
trol system, the climate status display
appears for approximately three seconds at
the bottom of the screen in the multimedia
system display; see separate operating
instructions. You will see the current settings
of the various climate control functions.
DYNAMIC SELECT button (except
Mercedes-AMG vehicles)
You can choose between various drive programs
with the DYNAMIC SELECT button
(
Ypage 127).
If you have selected drive program E:
Rwhen heating, the electrical heater booster is
deactivated and in the warming-up phase
heat output is reduced
Rthe rear window defroster running time is
reduced
Depending on the configuration, climate set-
tings may also be influenced in the drive pro-
gram I.
If you have selected drive program Cor S, cli-
mate settings are not influenced.
ECO start/stop function
During automatic engine switch-off, the climate
control system only operates at a reduced capa-
city. If you require the full climate control output,
you can switch off the ECO start/stop function
by pressing the ECO button (
Ypage 126).
Overview of climate control systems111
Climate control
Page 230 of 318

Operating system
Overview
General notes
!Do not use the space in front of the display
for storage. Objects placed here could dam-
age the display or impair its function. Avoid
any direct contact with the display surface.
Pressure on the display surface may result in
impairments to the display, which could be
irreversible.
Wearing polarized sunglasses may impair your
ability to read the display.
The display has an automatic temperature-con-
trolled switch-off feature. The brightness is
automatically reduced if the temperature is too
high. The display may temporarily switch off
completely.
Cleaning instructions
!Do not touch the display. The display has a
very sensitive high-gloss surface; there is a
risk of scratching. If you have to clean the
screen, however, use a mild cleaning agent
and a soft, lint-free cloth.
The display must be switched off and have
cooled down before you start cleaning. Do not
apply pressure to the display surface when
cleaning it, as this could cause irreversible dam-
age to the display.
Switching the multimedia system
on/off
XPress the qcontrol knob.
Adjusting the volume
XTurn the qcontrol knob.
The volume is adjusted:
Rfor the currently selected media source
Rduring traffic or navigation announcements
Rin hands-free mode during a phone call
Switching the sound on or off
XPress the 8button on the control panel.
If the audio output is switched off, the status
line will show the 8symbol. If you switch the media source or set the volume, the sound
is automatically switched on.
iNavigation announcements will be heard
even if the sound is muted.
Functions
The multimedia system has the following func-
tions:
RRadio mode
RMedia mode with media search
RSound systems
RNavigation system
COMAND: navigation via the hard drive
Audio 20: navigation via SD card
RCommunication functions
RSIRIUS Weather (COMAND)
RVehicle functions with system settings
RFavorites functions
Controller
The controller in the center console lets you:
Rselect menu items on the display
Renter characters
Rselect a destination on the map
Rsave entries
The controller can be:
Rturned 3
Rslid left or right 1
Rslid forwards or back 4
Rslid diagonally2
Rpressed briefly or pressed and held 7
Back button
You can use the%button to exit a menu or to
call up the basic display of the current operating
mode.
XTo exit the menu: briefly press the%
button.
The multimedia system changes to the next
higher menu level in the current operating
mode.
XTo call up the basic display: press the%
button for longer than two seconds.
The multimedia system changes to the basic
display of the current operating mode.
228Operating system
Multimedia system
Page 265 of 318

XMake sure that the vehicle is stationary and
that the SmartKey is in position2in the igni-
tion lock.
XOpen the camera cover for cleaning via the
multimedia system (see the separate operat-
ing instructions).
XTo clean the rear view camera: use clear
water and a soft cloth to clean camera
lens :.
Cleaning the exhaust pipes
GWARNING
The exhaust tail pipe and tail pipe trim can
become very hot. If you come into contact
with these parts of the vehicle, you could burn
yourself. There is a risk of injury.
Always be particularly careful around the
exhaust tail pipe and the tail pipe trim. Allow
these components to cool down before touch-
ing them.
!Do not clean the exhaust pipe with acid-
based cleaning agents, such as bathroom
cleaner or wheel cleaner.
!Mercedes-AMG vehicles with black exhaust
pipes: the black-chrome tailpipe finishers
should not be polished with a chrome polish.
They will otherwise lose their black sheen. For
optimal care, the faceplates should be rubbed with a lightly oiled cloth after every car wash.
Commercially available engine and care oils
are suitable for this.
For heavier soiling, you can apply a fine paint-
work polish with a microfiber cloth. Remove
the excess polish residue after polishing.
Impurities combined with the effects of road grit
and corrosive environmental factors may cause
flash rust to form on the surface. You can restore the original shine of the exhaust pipe by
cleaning it regularly, especially in winter and
after washing.
XClean the exhaust pipe with a care product
tested and approved by Mercedes-Benz.
Interior care
Cleaning the display
!For cleaning, do not use any of the following:
Ralcohol-based thinner or gasoline
Rabrasive cleaning agents
Rcommercially-available household cleaning
agents
These may damage the display surface. Do
not put pressure on the display surface when cleaning. This could lead to irreparable dam-
age to the display.
XBefore cleaning the display, make sure that it
is switched off and has cooled down.
XClean the display surface using a commer-
cially available microfiber cloth and TFT/LCD
display cleaner.
XDry the display surface using a dry microfiber
cloth.
Cleaning the plastic trim
GWARNING
Care products and cleaning agents containing solvents cause surfaces in the cockpit to
become porous. As a result, plastic parts may
come loose in the event of air bag deploy-
ment. There is a risk of injury.
Do not use any care products and cleaning
agents to clean the cockpit.
!Do not affix the following to plastic surfaces:
Rstickers
Rfilms
Rscented oil bottles or similar items
You can otherwise damage the plastic.
!Do not allow cosmetics, insect repellent or
sunscreen to come into contact with the plas-
tic trim. This maintains the high-quality look of
the surfaces.
Care263
Maintenance and care
Z