MERCEDES-BENZ CLS-Class 2014 W218 Owner's Manual
Manufacturer: MERCEDES-BENZ, Model Year: 2014, Model line: CLS-Class, Model: MERCEDES-BENZ CLS-Class 2014 W218Pages: 382, PDF Size: 5.36 MB
Page 101 of 382
The seat belt should:
R
fit snugly across your body
R be routed across the middle of your
shoulder
R be routed in your pelvic area across the hip
joints
X Before starting off, adjust the rear-view
mirror and the exterior mirrors in such a
way that you have agood view of road and
traffic conditions (Y page 109).
X Vehicles with amemor yfunction: save
the seat, steerin gwheel and exterior mirror
settings with the memory function
(Y page 112). Seats
Important safety notes
G
WARNING
Children could become trapped if they adjust
the seats, particularly when unattended.
There is arisk of injury.
When leaving the vehicle, alway stake the
SmartKey with you and lock the vehicle. Never
leave children unsupervised in the vehicle. G
WARNING
You could lose control of your vehicle if you
do the following while driving:
R adjust the driver's seat, head restraint,
steerin gwheel or mirrors
R fasten the seat belt
There is arisk of an accident.
Adjust the driver's seat, head restraint,
steerin gwheel and mirror and fasten your
seat belt before starting the engine. G
WARNING
If you adjust the seat height carelessly, you or
other vehicle occupant scould be trapped and
thereby injured. Children in particular could
accidentally press the electrical seat adjustmen
tbutton sand become trapped.
Ther eisar iskofi njury.
While moving the seats, make sure tha tyour
hands or other body parts do not get under
the lever assembly of the seat adjustment
system. G
WARNING
When you adjust aseat, you or other vehicle
occupant scould become trapped, e.g. on the
seat guide rail. There is arisk of injury.
Make sure when adjusting aseat that no one
has any body parts in the sweep of the seat. G
WARNING
If head restraints are not installed and
adjusted correctly, they cannot provide
protection as intended. There is an increased
risk of injury in the head and neck area, e.g.
in the event of an accident or when braking.
Always drive with the head restraints
installed. Befor edriving off, make sure for
every vehicle occupant that the center of the
head restraint supports the back of the head
at about eye level. G
WARNING
The seat belt does not offer the intended level
of protection if the backrest is not in the
upright position .When braking or in the event
of an accident, you could slide underneath the
seat belt and sustain abdomen or neck
injuries, for example. This poses an increased
risk of injury or even fatal injury.
Adjust the seat properly before beginning
your journey. Always make sure that the seat
is in the upright position. G
WARNING
According to accident statistics, children are
safer when properly restrained on the rear
seats than on the front-passenger seat. Thus,
we strongly recommendt hat children be
placed in the rear seat whenever possible.
Regardless of seating position, children 12
years old and under must be seated and Seats
99Seats, steering wheela nd mirrors
Z
Page 102 of 382

properly secured in an appropriately sized
child restraint system or booster seat
recommended for the size and weight of the
child. For additional information ,see the
"Children in the vehicle" section.
Ac hild's risk of serious or fatal injuries is
significantly increased if the child restraints
are not properly secured in the vehicle and/
or the child is not properly secured in the child
restraint.
! To avoid damage to the seats and the seat
heating, observe the following information:
R keep liquids from spilling on the seats. If
liquidiss pilled on the seats, dry them as
soon as possible.
R if the seat covers are damp or wet, do not
switch on the seat heating. The seat
heating should also not be used to dry
the seats.
R clean the seat covers as recommended;
see "Interior care".
R do not transport heavy loads on the
seats. Do not place sharp objectsont he
seat cushions, e.g. knives, nails or tools.
The seats should only be occupied by
passengers, if possible.
R when the seat heating is in operation, do
not cover the seats with insulating
materials, e.g. blankets, coats, bags,
seat covers, child seats or booster seats.
! Make sure that there are no objectsint he
footwell or behind the seats when resetting
the seats. There is arisk that the seats
and/or the objectsc ould be damaged.
i The head restraintsint he front seats are
installed with the NECK-PRO system
(Y page 53). For this reason, it is not
possible to remove the head restraints
from the front seats.
For more information ,contact aqualified
specialist workshop.
i Further related subjects: Adjusting the seats
001A
Head restraint height
0010 Seat cushion angle
0024 Seat height
0021 Seat fore-and-aft adjustment
001E Backrest angle
i If PRE-SAFE ®
is triggered, the front-
passenger seat will be moved to abetter
position if it was previously in an
unfavorable position.
i You can store the seat settings using the
memory function (Y page 112).
i Vehicles with the through-loading
feature: if you fold down arear seat
backrest, the respective front seat is
moved forwards slightly in order to avoid
contact. Adjusting the head restraints
Important safety notes G
WARNING
You could lose control of your vehicle if you
do the following while driving:
R adjust the driver's seat, head restraint,
steering wheel or mirrors
R fasten the seat belt
There is arisk of an accident.
Adjust the driver's seat, head restraint,
steering wheel and mirror and fasten your
seat belt before startingt he engine.100
SeatsSeats, steering wheela
nd mirrors
Page 103 of 382

G
WARNING
If headr estraints are not installed and
adjusted correctly, they cannot provide
protection as intended. There is an increased
risk of injury in the heada nd neck area,e.g.
in the event of an accident or when braking.
Always drive with the headr estraints
installed. Before driving off, make sure for
every vehicl eoccupant that the center of the
head restraint supports the back of the head
at about eye level.
General notes Observe the important safety guidelines for
seats (Y page99).
Do not rotate the headr estraints of the front
and rear seats. Otherwise, you cannot adjust
the height and angle of the headr estraints to
the correct position.
Adjusting the height of the head
restraints electrically X
To adjust the head restraint height: slide
switch for headr estraint adjustment 001Aup
or downint he direction of the arrow. Adjusting the luxury head restraints X
To adjust the side bolsters of the head
restraint: pushorpullr ight or left-hand
side bolster 001Ainto the desired position.
X To adjust the angle of the head
restraint: pushorpullt he headr estraint in
the direction of arrow 0010.
i Adjust the headr estraint so that the back
of yourh ead is as close to the head
restraint as possible.
Rear seat head restraints Important safet
ynotes G
WARNING
For your protection ,drive only with properly
positioned head restraints.
Adjust the head restraint ssothat they are as
close as possible to your head. This will
reduce the potential for injury to the head and
neck in the event of an accident or similar
situation.
Whenever the rear seats are occupied, only
drive the vehicle with the head restraints
installed and engaged. Head restraint sare
intended to help reduce injuries during an
accident. Seats
101Seats, steering wheel and mirrors Z
Page 104 of 382

Adjusting th
erears eat hea drestraint
angle X
Pull or push th etop of th ehead restraint
until it is in th edesired position.
Removing and installing th erears eat
hea drestraints G
WARNING
If head restraints are not installe dand
adjusted correctly, they cannot provide
protection as intended. Ther eisanincreased
risk of injury in th ehead and nec karea, e.g.
in th eeven tofana ccidentorwhen braking.
Always driv ewith th ehead restraints
installed. Before driving off ,makes ure for
ever yvehicle occupant that th ecenter of the
head restrain tsupports th eback of th ehead
at about eye level.
! Mak esure that th erear window roller
sunblin dhas been retracte dbefore the rear
head restraint sare removed. You could
otherwise damage the roller sunblind. X
To remove: pull the head restraint up to
the stop.
X Press release catch 001Aand pull the head
restraint out of the guides.
X To re-install: insert the head restraint so
that the notches on the bar are on the left
when viewed in the direction of travel.
X Push the head restraint down until you hear
it engage in position. Adjusting the multicontour seat
The multicontour seat function is only
available for vehicles in Canada. 001A
To adjust the thigh cushion
0010 To adjust the backrest contour in the
lumbar region
0024 To adjust the backrest contour in the
upper back region
0021 To adjust the side bolsters of the seat
backrest
You can adjust the contour of the fron tseats
individually so as to provide optimum support
for your back and sides.
X Turn the SmartKey to position 2in the
ignition lock (Y page 147).102
SeatsSeats, steering wheel and mirrors
Page 105 of 382
Adjusting th
eactive multicontour
seat
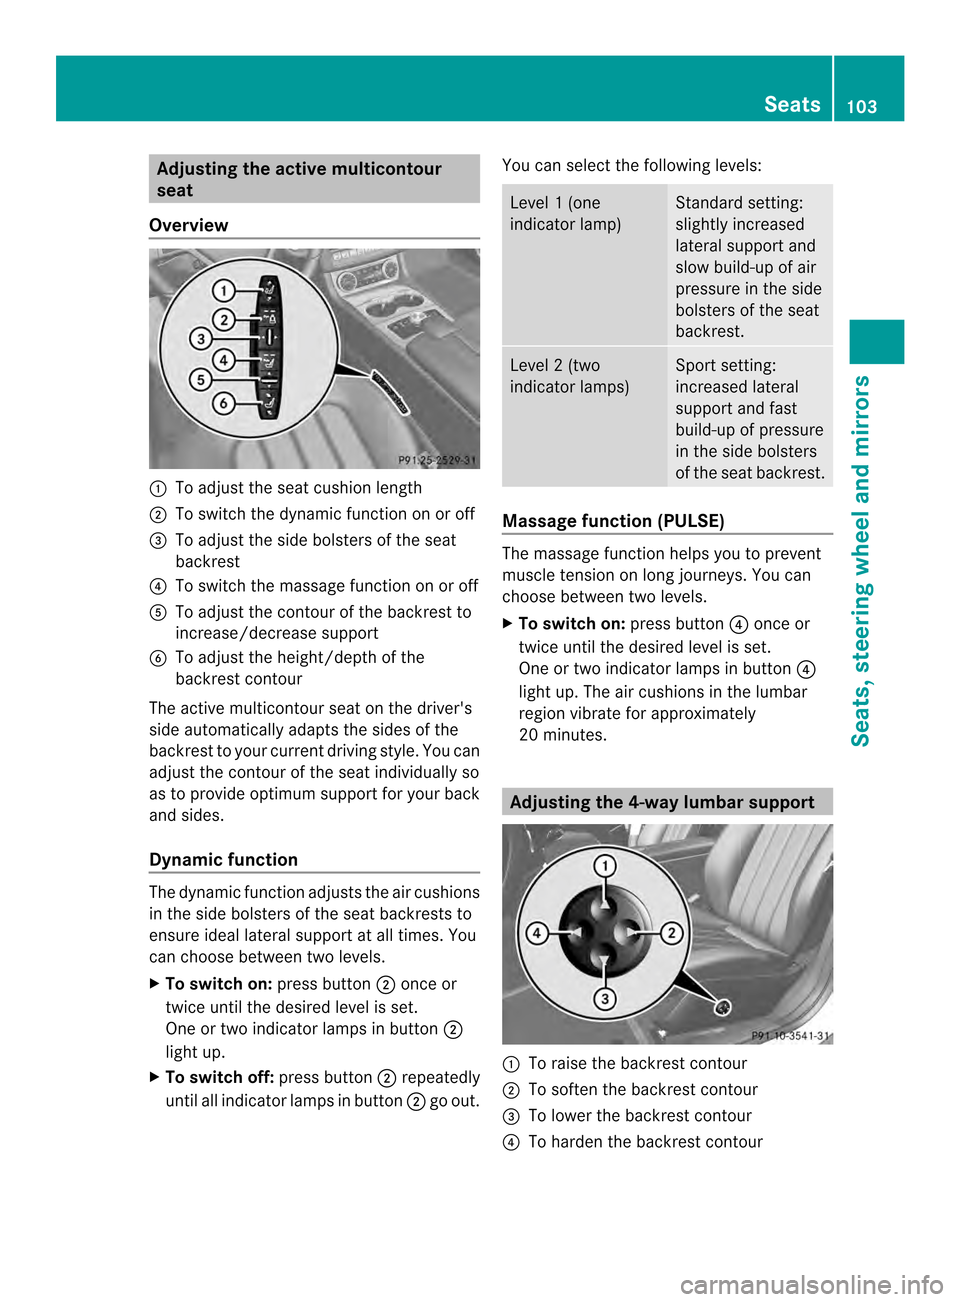
Overview 001A
To adjust th eseat cushion length
0010 To switch th edynamic function on or off
0024 To adjust th eside bolsters of th eseat
backrest
0021 To switch th emassage function on or off
001E To adjust th econtou rofthebackrest to
increase/decreas esupport
0025 To adjust th eheight/dept hofthe
backrest contour
The active multicontour seat on th edriver's
side automatically adapt sthe side soft he
backrest to your curren tdriving style .You can
adjust the contour of the seat individuall yso
as to provide optimum support for your back
and sides.
Dynamic function The dynamic function adjusts the air cushions
in the side bolsters of the seat backrest sto
ensure ideal lateral support at all times. You
can choose between two levels.
X To switch on: press button0010once or
twice until the desired level is set.
One or two indicator lamps in button 0010
light up.
X To switch off: press button0010repeatedly
until all indicator lamps in button 0010go out. You can select the following levels: Level
1(one
indicator lamp) Standard setting:
slightly increased
lateral support and
slow build-up of air
pressure in the side
bolsters of the seat
backrest.
Level
2(two
indicator lamps) Sport setting:
increased lateral
support and fast
build-up of pressure
in the side bolsters
of the seat backrest.
Massage function (PULSE)
The massage function helps you to prevent
muscle tension on long journeys. You can
choose between two levels.
X To switch on: press button0021once or
twice until the desired level is set.
One or two indicator lamps in button 0021
light up. The air cushions in the lumbar
region vibrate for approximately
20 minutes. Adjusting the 4-way lumbar support
001A
To raise the backrest contour
0010 To soften the backrest contour
0024 To lower the backrest contour
0021 To harden the backrest contour Seats
103Seats, steering wheel and mirrors Z
Page 106 of 382
You can adjust the contour of the front seat
backrest sindividually to provide optimum
support for your back. Switchin
gthe seat heating on/off
Activating/deactivating G
WARNING
Repeatedly switching on the seat heatin gcan
cause the seat cushio nand backres tpads to
become ver yhot.T he health of persons with
limited temperature sensitivity or alimited
ability to react to excessively high
temperatures may be affected or they may
even suffer burn-like injuries. There is arisk
of injury.
Therefore, do not switch the seat heating on
repeatedly. Driver's and front-passenger seat
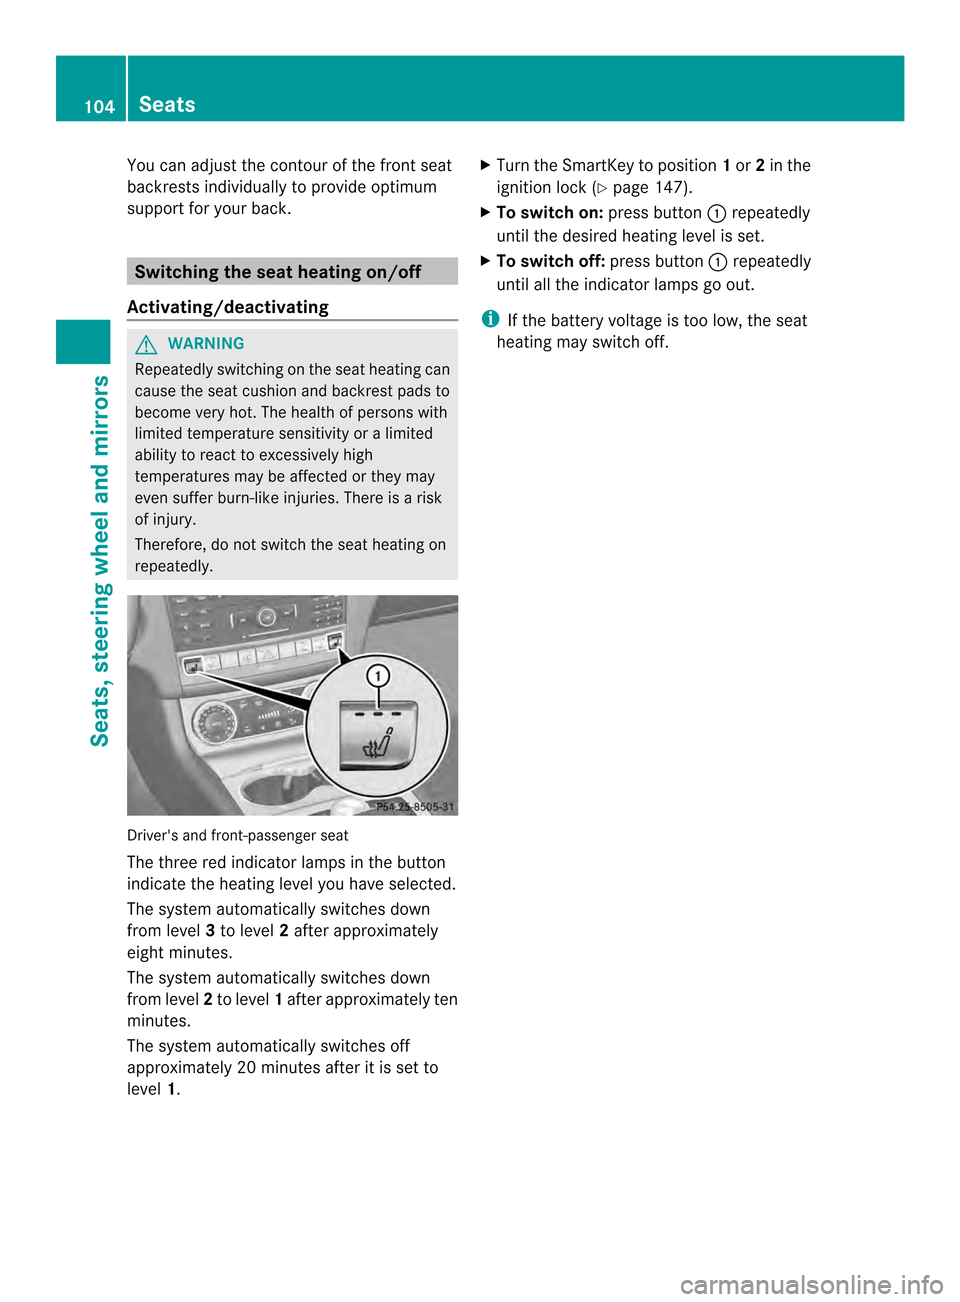
The three red indicator lamps in the button
indicate the heating level you have selected.
The system automatically switches down
from level
3to level 2after approximately
eight minutes.
The system automatically switches down
from level 2to level 1after approximately ten
minutes.
The system automatically switches off
approximately 20 minutes after it is set to
level 1. X
Turn the SmartKey to position 1or 2in the
ignition lock (Y page 147).
X To switch on: press button001Arepeatedly
until the desired heating level is set.
X To switch off: press button001Arepeatedly
until all the indicator lamps go out.
i If the battery voltage is too low, the seat
heating may switch off. 104
SeatsSeats, steering wheela
nd mirrors
Page 107 of 382
Problems with the seat heating
Problem Possible causes/consequences and
000B Solutions
The seat heating has
switched off
prematurely or cannot
be switched on. The on-board voltage is too low because too many electrical
consumers are switched on.
X
Switch off electrical consumers that you do not need, such as
the rear window defroster or interior lighting.
Once the battery is sufficiently charged, the seat heating will
switch back on automatically. Switching the seat ventilation on/off
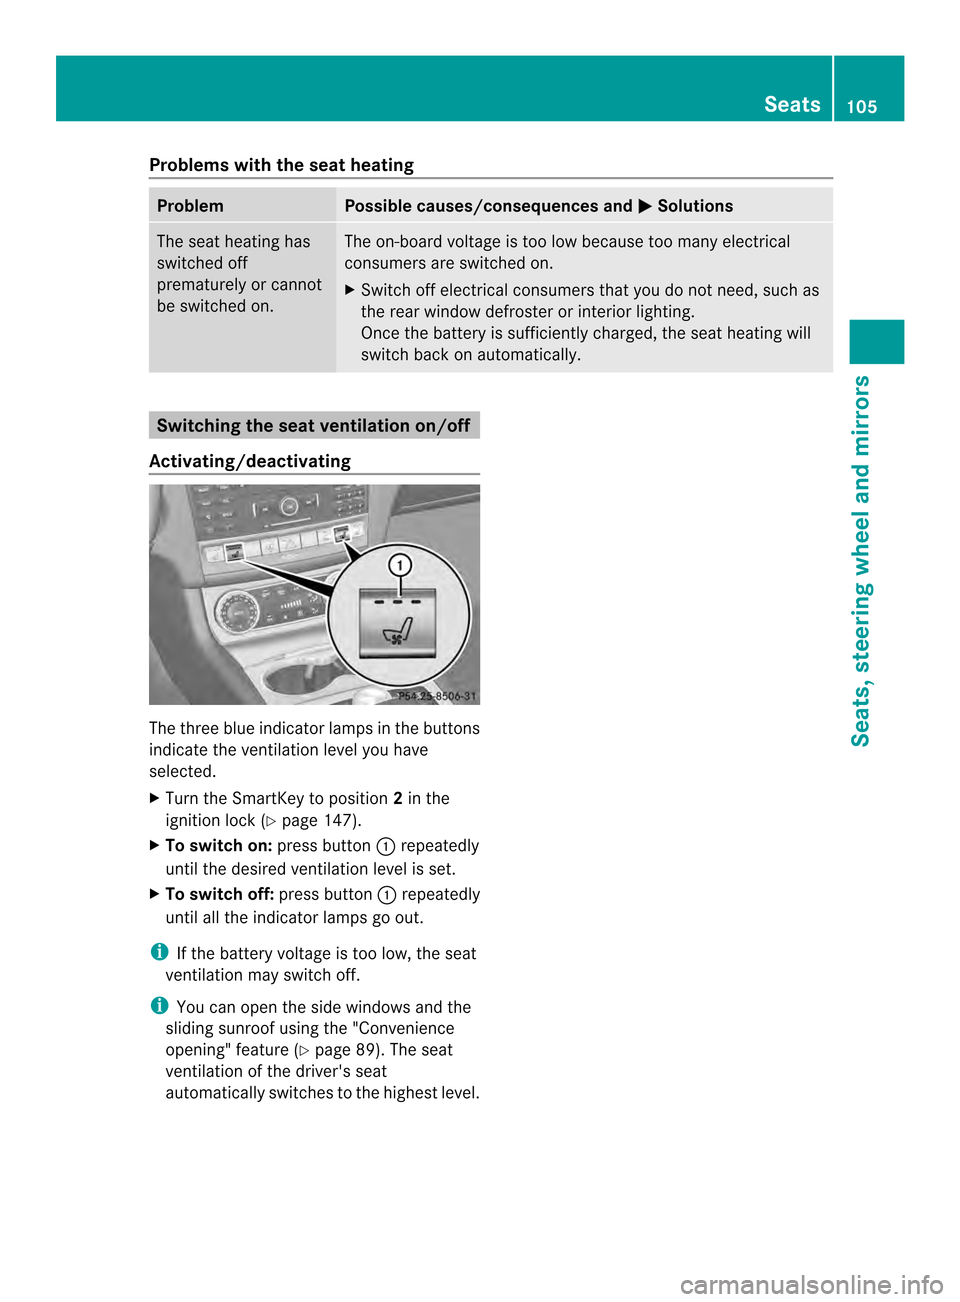
Activating/deactivating The three blue indicator lamps in the buttons
indicate the ventilation level you have
selected.
X Turn the SmartKey to position 2in the
ignition lock (Y page 147).
X To switch on: press button001Arepeatedly
until the desired ventilation level is set.
X To switch off: press button001Arepeatedly
until all the indicator lamps go out.
i If the battery voltage is too low, the seat
ventilation may switch off.
i You can open the side windows and the
sliding sunroof using the "Convenience
opening" feature (Y page 89). The seat
ventilation of the driver's seat
automatically switches to the highest level. Seats
105Seats, steering wheela nd mirrors Z
Page 108 of 382

Problems with the seat ventilation
Problem Possible causes/consequences and
000B Solutions
The seat ventilation has
switched off
prematurely or cannot
be switched on. The on-board voltage is too low because too many electrical
consumers are switched on.
X
Switch off electrical consumers that you do not need, such as
the rear window defroster or interior lighting.
Once the battery is sufficiently charged, the seat ventilation will
switch back on automatically. Steering wheel
Important safety notes
G
WARNING
You could lose control of your vehicle if you
do the following while driving:
R adjust the driver's seat, head restraint,
steering wheel or mirrors
R fasten the seat belt
There is arisk of an accident.
Adjust the driver's seat, head restraint,
steering wheel and mirror and fasten your
seat belt before startingt he engine.G
WARNING
Children could injure themselves if they
adjust the steering wheel. There is arisk of
injury.
When leaving the vehicle, always take the
SmartKey with you and lock the vehicle. Never
leave children unsupervised in the vehicle. Adjusting the steering wheel
electrically
001A
To adjust the steering wheel height
0010 To adjust the steering wheel position
(fore-and-aft adjustment)
i Further related subjects:
R EASY-ENTRY/EXIT feature
(Y page 108)
R Storing settings (Y page 112)106
Steering wheelSeats, steering wheela
nd mirrors
Page 109 of 382

Steering wheel heating
Activating/deactivating X
Turn the SmartKey to position 2in the
ignition lock (Y page 147).
X To switch on/off: turn the lever in the
direction of arrow 001Aor0010.
Indicator lamp 0024lights up or goes out.
Vehicles without KEYLESS-GO: when you
remove the SmartKey from the ignition lock,
the steering wheel heating is deactivated.
Vehicles with KEYLESS-GO: when you switch
off the ignition and open the driver's door, the
steering wheel heating is deactivated.
i The steering wheel heating may switch off
temporarily if:
R the temperature in the vehicle interior is
above 86 ‡(30 †).
R the temperature of the steering wheel is
above 95 ‡(35 †).
Indicator lamp 0024remains on. Steering wheel
107Seats, steering wheela nd mirrors Z
Page 110 of 382
Problems with the steering wheel heating
Problem Possible causes/consequences and
000B Solutions
If the steering wheel
heating indicator lamp
is flashing, the steering
wheel heating has
switched off
automatically. The on-board voltage is too low because too many electrical
consumers are switched on.
X
Switch off electrical consumers that you do not need, such as
the rear window defroster or interior lighting.
Once the battery is sufficiently charged, the steering wheel
heating will switch back on automatically. EASY-ENTRY/EXIT feature
Important safety notes G
WARNING
When the EASY-ENTRY/EXIT feature adjusts
the steering wheel, you and other vehicle
occupants –particularly childre n–could
become trapped. There is arisk of injury.
While the EASY-ENTRY/EXIT feature is
making adjustments, make sure that no one
has any body parts in the sweep of the
steering wheel.
If somebody becomes trapped:
R press one of the memory function position
buttons, or
R move the switch for steering wheel
adjustmen tinthe opposite direction to that
in which the steering wheel is moving.
The adjustment process is stopped. G
WARNING
If children activate the EASY-ENTRY/EXIT
feature, they can become trapped,
particularly when unattended. There is arisk
of injury.
When leaving the vehicle, always take the
SmartKey with you and lock the vehicle. Never
leave children unsupervised in the vehicle. G
WARNING
If you drive off while the EASY-ENTRY/EXIT
feature is making adjustments, you could lose control of the vehicle. There is
arisk of an
accident.
Always wait until the adjustment process is
complete before driving off.
The EASY-ENTRY/EXITf eature makes getting
in and out of your vehicle easier.
You can activate and deactivate the EASY-
ENTRY/EXIT feature in the on-board
computer (Y page 233).
Position of the steering wheel when the
EASY-ENTRY/EXIT featureisa ctive The steerin
gwheel swings upwards when
you:
R remove the SmartKey from the ignition lock
R with KEYLESS-GO: open the driver's door;
KEYLESS-GO must be in position 1in the
ignition lock
R with the SmartKey: open the driver's
door; the SmartKey must be in position 0
or 1in the ignition lock (Y page 147)
i The steerin gwheel only moves upwards if
it has not already reached the upper end
stop. 108
Steering wheelSeats, steering wheel and mirrors