MERCEDES-BENZ CLS-Class 2014 W218 Owner's Manual
Manufacturer: MERCEDES-BENZ, Model Year: 2014, Model line: CLS-Class, Model: MERCEDES-BENZ CLS-Class 2014 W218Pages: 382, PDF Size: 5.36 MB
Page 141 of 382
Setting the airflow
X Turn the SmartKey to position 2in the
ignition lock (Y page 147).
X To increase: press the000Bbutton.
X To reduce: press the0004button.
i You can use 3-zone automatic climate
control to set the airflow in the rear
compartmen tseparately.
If the batter yisnot sufficiently charged,
blower output may be reduced. As soon as
the batter yissufficiently charged, full blower
output will be available. Switching the ZONE function on/off
X To activate: press the0010button.
The indicator lamp above the 0010button
lights up.
Dual-zone automatic climate control: the
temperature setting for the driver's side is
not adopted for the front-passenger side.
3-zone automatic climate control: the
temperature setting for the driver's side is
not adopted for the front-passenger side
and the rear compartment.
X To deactivate: press the0010button.
The indicator lamp above the 0010button
goes out.
Dual-zone automatic climate control: the
temperature setting for the driver's side is
adopted for the front-passenger side.
3-zone automatic climate control: the
temperature setting for the driver's side is
adopted for the front-passenger side and
the rear compartment. Defrosting the windshield
You can use this function to defrost the
windshield or to defrost the inside of the
windshield and the side windows. Switc
hoff the "Windshield defrosting"
function as soon as the windshield is clear
again.
X Turn the SmartKey to position 2in the
ignition lock (Y page 147).
X To activate: press the0013button.
The indicator lamp in the 0013button lights
up.
The climate control system switches to the
following functions:
R high airflow
R high temperature
R air distribution to the windshield and
fron tside windows
R air-recirculation mode off
If the battery is not sufficiently charged,
blower output may be reduced. Onc ethe
battery is sufficiently charged again, full
blower output will be available again.
X To deactivate: press the0013button.
The indicator lamp in the 0013button goes
out. The previously selected settings are
restored. Air-recirculation mode remains
deactivated.
or
X Press the 000Dbutton.
The indicator lamp in the 0013button goes
out. Airflow and air distribution are set to
automatic mode.
or
X Dual-zon eautomatic climate control: turn
temperature controls 001Aor0025 clockwise
or counter-clockwise (Y page 131).
3-zon eautomatic climate control: turn
temperature controls 001Aor0025 clockwise
or counter-clockwise (Y page 134).
or
X Press the 000Bor0004 button. MAX COOL maximum cooling
The MAX COOL function is only available in
vehicles for the USA. Operating thec
limate control systems
139Climate control
Page 142 of 382
MAX COOL is only operational when the
engine is running.
X
To activate: press the0019button.
The indicator lamp in the button lights up.
X To activate: press off-road button 0019
again.
The indicator lamp goes out. The previously
selected settings are restored.
When you activate MAX COOL, climate
control switches to the following functions:
R maximum cooling
R maximum airflow
R air-recirculation mode on Defrosting the windows
Windows fogged up on the inside X
Activate the 000Ccooling with air
dehumidification function.
X Activate automatic mode 000D.
X Adjust the side air ventssot hat the warmed
air is directed to the side windows.
X If the windows continue to fog up, activate
the "windshieldd efrosting" function
(Y page 139).
i You should only select this settingu ntil
the windshield is clear again.
Windows fogged up on the outside X
Press the 000Fbutton repeatedly until the
000E or001A symbol appears in the
display.
X Adjust the side air ventssot hat no air is
directed to the side windows. Rear window defroster
Activating/deactivating The rear window defroster has
ahigh current
draw. You should therefor eswitch it off as
soon as the rear window is clear. Otherwise, the rear window defroster switches off
automatically after several minutes.
If the battery voltage is too low, the rear
window defroster may switch off.
X
Turn the SmartKey to position 2in the
ignition lock (Y page 147).
X Press the 0005button.
The indicator lamp in the 0005button lights
up or goes out. 140
Operating the climate control systemsClimate control
Page 143 of 382
Problems with the rear window defroster
Problem Possible causes/consequences and
000B Solutions
The rear window
defroster has
deactivated
prematurely or cannot
be activated. The battery has not been sufficiently charged.
X
Switch off any consumers that are not required, e.g. reading
lamps, interior lighting or the seat heating.
When the battery is sufficiently charged, the rear window
defroster can be activated again. Activating/deactivating air-
recirculation mode
Points to observe before use You can deactivate the flow of fresh air if
unpleasant odors are enteringt he vehicle
from outside. The air already inside the
vehicle will then be recirculated.
If you switch on air-recirculation mode, the
windows can fog up more quickly, in
particular at low temperatures. Only use air-
recirculation mode briefly to prevent the
windows from fogging up.
The operation of air-recirculation mode is the
same for all control panels.
Activating/deactivating X
Turn the SmartKey to position 2in the
ignition lock (Y page 147).
X To activate: press the0008button.
The indicator lamp in the 0008button lights
up.
i Dual-zone automatic climate control: air-
recirculation mode is automatically
activated at high outside temperatures.
3-zone automatic climate control: air-
recirculation mode is automatically
activated at high levels of pollution or at
high outside temperatures.
When air-recirculation mode is activated
automatically ,the indicator lamp above the 0008
button does not light up. Outside air
is added after about 30 minutes.
X To deactivate: press the0008button.
The indicator lamp in the 0008button goes
out.
i Air-recirculation mode deactivates
automatically:
R after approximately five minutes at
outside temperatures below
approximately 41 ‡(5†)
R after approximately five minutes if
cooling with air dehumidification is
deactivated
R after approximately 30 minutes at
outside temperatures above
approximately 41 ‡(5 †)if the "Cooling
with air dehumidification" function is
activated Activating/deactivating th
eresidual
heat function
The residual heat function is only available in
vehicles for Canada with 3-zon eautomatic
climate control.
It is possible to mak euse of the residual heat
of the engine to continue heatin gthe vehicle
for approximately 30 minutes after the engine
has been switched off .The heating time
depends on the temperature that has been
set. Operating the climate control systems
141Climatecontrol
Page 144 of 382

X
Turn the SmartKey to position 0in the
ignition lock or remove it (Y page 147).
X To activate: press the0018button.
The indicator lamp in the 0018button lights
up.
i If the residual heat function is activated,
the windows may fog up on the inside.
i The blower will run at alow speed
regardless of the airflow setting.
i If you activat ethe residual heat function
at high temperatures, only the ventilation
will be activated. The blower runs at
medium speed.
X To deactivate: press the0018button.
The indicator lamp in the 0018button goes
out.
Residua lheat is deactivated automatically:
R after approximately 30 minutes
R when the ignition is switched on
R if the battery voltage drops Setting the air vents
Important safety notes
G
WARNING
Very hot or very cold air can flow from the air
vents. This could result in burns or frostbite in
the immediate vicinit yofthe air vents. There
is ar isk of injury.
Make sure that all vehicle occupant salways
maintain asufficient distanc etothe air
outlets. If necessary, redirect the airflow to
another area of the vehicle interior.
In order to ensure the direct flow of fresh air
through the air ventsi nto the vehicle interior,
please observe the following notes:
R keep the air inlet between the windshield
and the hood free of blockages, such as ice,
snow or leaves.
R never cover the air ventsora ir intakegrilles
in the vehicle interior. Setting the center air vents
001A
Center air vent,l eft
0010 Center air vent,r ight
0024 Center vent thumbwheel, right
0021 Center vent thumbwheel, left
X To open/close: turn thumbwheels 0024
and 0021up or down. Setting the side air vents
001A
Defroster vent
0010 Side air vent
0024 Control for side air vent
X To open/close: turn thumbwheel 0024up or
down. Setting the glove box air vent
! Close the air vent when heating the
vehicle.
At high outside temperatures, open the air
vent and activat ethe "cooling with air 142
Setting the air ventsClimate control
Page 145 of 382

dehumidification" function
.Otherwise,
temperature-sensitive items stored in the
glove bo xcould be damaged. 001A
Air vent thumbwheel
0010 Air vent
When automatic climate control is activated,
the glove box can be ventilated, for instance
to cool its contents.T he level of airflow
depends on the airflow and air distribution
settings.
X To open/close: turn thumbwheel 001A
clockwise or counter-clockwise. Setting the rear-compartment air
vents
Setting the center vents in the rear
compartment 001A
Rear-compartment air vent thumbwheel
0010 Rear-compartment air vent,r ight0024
Rear control panel, only for Canada with
3-zone automatic climate control
0021 Rear-compartment air vent,l eft
X To open/close: turn thumbwheel 001Aup or
down. Setting the air vents
143Climatecontrol Z
Page 146 of 382

144
Page 147 of 382
Useful information
............................146
Notes on breaking-in anew vehicle 146
Driving ............................................... 146
Automatic transmission ...................155
Refueling ............................................ 164
Parking ............................................... 167
Driving tips ........................................ 169
Driving systems ................................ 175 145Driving and parking
Page 148 of 382
Useful information
i This Operator's Manual describes all
models and all standard and optional
equipment of your vehicle available at the
time of publication of the Operator's
Manual. Country-specific differences are
possible. Please not ethat your vehicle may
not be equipped with all features
described. This also applies to safety-
related system sand functions.
i Read the information on qualified
specialist workshops: (Y page 26).Notes on breaking-in
anew vehicle Important safety notes
New and replaced brak epads and disc sonly
reac htheir optimum braking effect after
several hundred kilometers of driving.
Compensate for this by applyin ggreater force
to th ebrak epedal. Th
ef irst 1000miles (1500 km)
The mor eyou look after th eengine when it is
new, th emores atisfied you will be with its
performanc einthefuture.
R You should therefore driv eatvarying
vehicle and engine speed sfor th efirst
1000 miles (1500 km).
R Avoid heavy loads, e.g .driving at full
throttle, during this period.
R Change gearing ood time, before the
tachometer needle is 001Bof the way to the
red area of the tachometer.
R Do not manually shift to alower gear to
brake the vehicle.
R If possible, do not depress the accelerator
pedal past the point of resistance
(kickdown).
R Only select shift ranges 3,2or 1when
driving slowly, e.g. in mountainous terrain. After 1000 miles (1500 km), you can increase
the engine speed graduall
yand accelerate
the vehicle to full speed.
Additional breaking-in notes for AMG
vehicles:
R Do not drive faster than 85 mph
(140 km/h) for the first 1000 miles
(1500 km).
R Only allow the engine to reach amaximum
engine speed of 4500 rpm briefly.
R Change gear in good time.
i You should also observe these notes on
breaking in if the engine or parts of the drive
train on your vehicle have been replaced.
i Always observe the respective speed
limits. AMG vehicles with self-locking rear
axle differential
Your vehicle is equipped with aself-locking
differential on the rear axle. To protec tthe
differential on the rear axle, carry out an oil
change after abreaking-in phase of
2000m iles (3000 km). This oil change
prolongs the servic elife of the differential.
Have the oil change carried out at aqualified
specialist workshop. Driving
Important safet
ynotes G
WARNING
Objects in the driver's footwell can restrict the
pedal travel or obstruct adepressed pedal.
The operatin gand road safety of the vehicle
is jeopardized. There is arisk of an accident.
Make sure that all objects in the vehicle are
stowed correctly, and that they cannot enter
the driver's footwell. Install the floormats
securely and as specified in order to ensure
sufficien tclearanc efor the pedals. Do not use
loose floormats. 146
DrivingDriving and parking
Page 149 of 382

G
WARNING
Unsuitable footwea rcan hinder correc tusage
of the pedals, e.g.:
R shoes with thick soles
R shoes with high heels
R slippers
There is arisk of an accident.
Wear suitable footwear to ensure correct
usage of the pedals. G
WARNING
If you switch off the ignition while driving,
safety-relevant functions are only available
with limitations, or not at all. This could affect,
for example, the power steering and the brake
boosting effect. You will require considerably
more effort to steer and brake. There is arisk
of an accident.
Do not switch off the ignition while driving. G
WARNING
If the parking brake has not been fully
released when driving, the parking brake can:
R overheat and cause afire
R lose its hold function.
There is arisk of fire and an accident. Release
the parking brake fully before driving off.
! Warm up the engine quickly. Do not use
the engine's full performance until it has
reached operating temperature.
Only shift the automatic transmission to
the desired drive position when the vehicle
is stationary.
Where possible,a void spinning the drive
wheels when pulling awayons lippery
roads. You could otherwise damage the
drive train.
! AMG vehicles: at low engine oil
temperatures below 68 ‡(+20 †), the
maximu mengine speed is restricte din
order to protect the engine .Toprotectt he
engine and maintain smooth engine operation, avoid driving at full throttle when
the engine is cold. Key positions
SmartKey 0018
To remove the SmartKey
(shift the transmission to position P)
0001 Power supply for some consumers, such
as the windshield wipers
0002 Ignition (power supply for all consumers)
and drive position
0003 To start the engine
i The SmartKey can be turned in the
ignition lock even if it is not the correct
SmartKey for the vehicle. The ignition is not
switched on. The engine cannot be started.
KEYLESS-GO General notes
R
Do not store the KEYLESS-GO key together
with:
-electronic devices, e.g. amobile phone
or another SmartKey
- metallic objects, e.g. coins or metal film
R Do not keep the KEYLESS-GO key in metal
objects, e.g. metal cases.
This can affect the functionality of
KEYLESS-GO.
Vehicles with KEYLESS-GO are equipped with
keys featuring the integrated KEYLESS-GO
function and adetachable Start/Stop button. Driving
147Driving and parking Z
Page 150 of 382
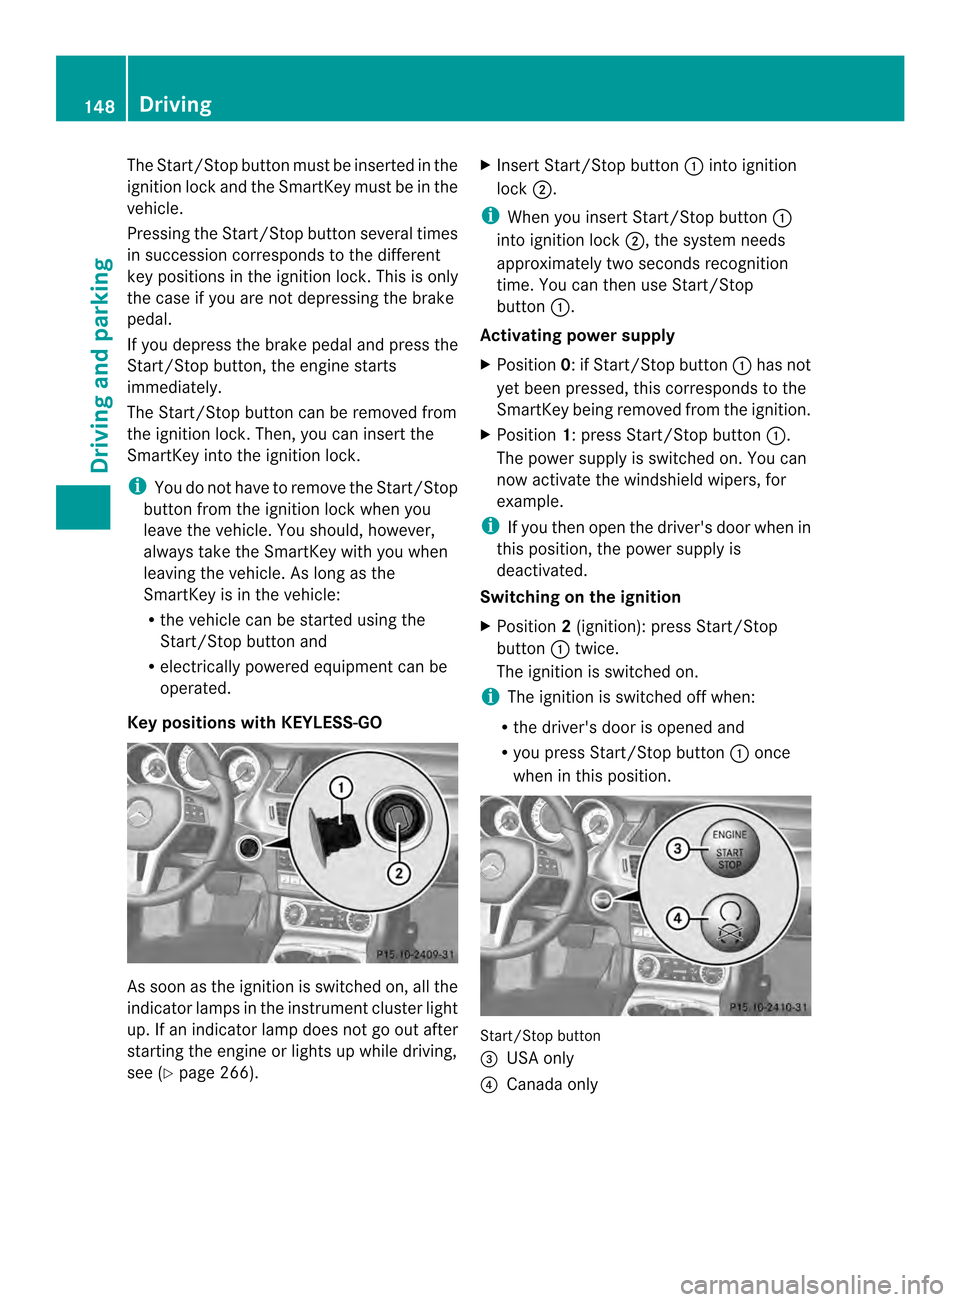
The Start/Stop button must be inserted in the
ignition lock and the SmartKey must be in the
vehicle.
Pressing the Start/Stop button several times
in succession corresponds to the different
key positions in the ignition lock. This is only
the case if you are not depressing the brake
pedal.
If you depress the brake pedal and press the
Start/Stop button ,the engine starts
immediately.
The Start/Stop button can be removed from
the ignition lock. Then, you can insert the
SmartKey into the ignition lock.
i You do not have to remove the Start/Stop
button from the ignition lock when you
leave the vehicle. You should, however,
alway stake the SmartKey with you when
leaving the vehicle. As long as the
SmartKey is in the vehicle:
R the vehicle can be started using the
Start/Stop button and
R electrically powered equipment can be
operated.
Key positions with KEYLESS-GO As soon as the ignition is switched on, all the
indicator lamps in the instrument cluster light
up. If an indicator lamp does not go out after
starting the engine or lights up while driving,
see (Y page 266). X
Insert Start/Stop button 001Ainto ignition
lock 0010.
i When you insert Start/Stop button 001A
into ignition lock 0010,the system needs
approximately two seconds recognition
time. You can then use Start/Stop
button 001A.
Activating power supply
X Position 0:ifStart/Stop button 001Ahas not
yet been pressed, this corresponds to the
SmartKey being removed from the ignition.
X Position 1:press Start/Stop button 001A.
The power supply is switched on. You can
now activat ethe windshield wipers, for
example.
i If you then open the driver's door when in
this position, the power supply is
deactivated.
Switching on the ignition
X Position 2(ignition): press Start/Stop
button 001Atwice.
The ignition is switched on.
i The ignition is switched off when:
R the driver's door is opened and
R you press Start/Stop button 001Aonce
when in this position. Start/Stop button
0024
USA only
0021 Canada only 148
DrivingDriving and parking