sensor MERCEDES-BENZ CLS-Class 2014 W218 Owner's Guide
[x] Cancel search | Manufacturer: MERCEDES-BENZ, Model Year: 2014, Model line: CLS-Class, Model: MERCEDES-BENZ CLS-Class 2014 W218Pages: 382, PDF Size: 5.36 MB
Page 119 of 382

The exterior lighting (except the parking/
standin
glamps) switches off automatically if
you:
R remove the SmartKey from the ignition lock
R open the driver's door with the SmartKey
in position 0.
Automatic headlam pmode G
WARNING
When the light switch is set to 000D,the low-
beam headlamps may not be switched on
automatically if there is fog, snow or other
causes of poor visibility due to the weather
conditions such as spray. There is arisk of an
accident.
In such situations, turn the light switch to
001D.
The automatic headlamp feature is only an
aid. The driver is responsible for the vehicle's
lighting at all times. 00010018
Left-hand standin glamps
0002000A Right-hand standin glamps
00030008 Parking lamps, license plate and
instrument cluster lighting
0005000D Automatic headlamp mode,
controlled by the light sensor
0019001D Low-beam/high-beam headlamps 000D
is the favored light switch setting. The
light setting is automatically selected
accordin gtothe brightness of the ambient
light (exception: poor visibility due to weather
conditions such as fog, snow or spray):
R SmartKey in position 1in the ignition lock:
the parking lamps are switched on or off
automatically depending on the brightness
of the ambient light.
R With the engine running: if you have
activated the daytime runnin glamps
function via the on-board computer ,the
daytime runnin glamps or the low-beam
headlamps and parking lamps are switched
on or off automatically depending on the
brightness of the ambient light.
X To switch on automatic headlamp
mode: turn the light switch to 000D.
Only for Canada:
The daytime runnin glamps improve the
visibility of your vehicle during the day. The
daytime runnin glamps function is required by
law in Canada. It cannot therefore be
deactivated.
When the engine is runnin gand the vehicle is
stationary: if you move the selector lever from
ad rive position to P,the daytime running
lamps/low-beam headlamps go out after
three minutes.
When the engine is running, the vehicle is
stationary and in high ambient light: if you
turn the light switch to 0008,the daytime
runnin glamps and parking lamps switch on.
If the engine is runnin gand you turn the light
switch to 001D,the manual settings take
precedenc eover the daytime runnin glamps.
USA only:
The daytime runnin glamps improve the
visibility of your vehicle during the day. To do
this, the daytime runnin glamps function must
be switched on using the on-board computer
(Y page 230).
If the engine is runnin gand you turn the light
switch to 0008or001D,t he manual settings Exterior lighting
117Lights and windshield wipers Z
Page 120 of 382

take precedence ove
rthe daytime running
lamps.
Low-beam headlamps G
WARNING
When the ligh tswitc hiss et to 000D,t helow-
beam headlamp smay not be switche don
automatically if there is fog, snow or other
causes of poor visibility due to th eweather
conditions such as spray. Ther eisarisk of an
accident.
In such situations, tur nthe light switch to
001D. 00010018
Left-hand standing lamps
0002000A Right-hand standing lamps
00030008 Parking lamps, license plate and
instrumentc luster lighting
0005000D Automatic headlamp mode,
controlled by the light sensor
0019001D Low-beam/high-beam headlamps
Even if the light sensor does not detect that
it is dark ,the parking lamps and low-beam
headlamps switc honwhen the ignition is
switched on and the light switc hisset to the
001D position. This is aparticularly useful
function in the even tofrain and fog.
X To switch on th elow-beam headlamps:
tur nthe SmartKey in the ignition lock to
position 2or start the engine.
X Turn the light switc hto001D.
The green 001Dindicator lamp in the
instrumen tcluster light sup. Parking lamps
!
If the battery has been excessively
discharged, the parking lamps or standing
lamps are automatically switched off to
enable the nex tengine start. Alway spark
your vehicl esafelya nd sufficiently lit
according to lega lstandards .Avoid the
continuou suse of the 0008parking lamps
for severa lhours .Ifpossible, switch on the
000A right or the 0018left standin glamp. 00010018
Left-hand standin glamps
0002000A Right-hand standin glamps
00030008 Parking lamps, license plate and
instrument cluster lighting
0005000D Automatic headlamp mode,
controlled by the light sensor
0019001D Low-beam/high-beam headlamps
X To switch on: turn the light switch to
0008.
The green 0008indicator lamp in the
instrument cluster lights up. 118
Exterior lightingLights and windshiel
dwipers
Page 121 of 382

Standing lamps
00010018
Left-hand standing lamps
0002000A Right-hand standing lamps
00030008 Parking lamps, license plate and
instrumen tcluster lighting
0005000D Automatic headlamp mode,
controlled by the light sensor
0019001D Low-beam/high-beam headlamps
Switchin gonthe standin glamps ensure sthe
corresponding side of th evehicle is
illuminated.
X To switch on th estanding lamps: the
SmartKey is no tintheignition loc koritis
in position 0.
X Turn th elight switch to 0018(left-han dside
of th evehicle )or000A (right-hand side of
th ev ehicle). Combination switch
Turn signal 001A
High-beam headlamps
0010 Turn signal, right 0024
High-beam flasher
0021 Turn signal, left
X To indicat ebriefly: pressthe combination
switch briefly to th epressure poin tinthe
direction of arrow 0010or0021.
The corresponding turn signal flashes three
times.
X To indicate: press the combination switch
beyond the pressure point in the direction
of arrow 0010or0021.
High-beam headlamps 001A
High-beam headlamps
0010 Turn signal, right
0024 High-beam flasher
0021 Turn signal, left
X To switch on the high-beam headlamps:
turn the SmartKey in the ignition lock to
position 2or start the engine.
X Turn the light switch to 001Dor000D.
X Press the combination switch beyond the
pressure point in the direction of
arrow 001A.
In the 000Dposition, the high-beam
headlamps are only switched on when it is
dark and the engine is running. Exterior lighting
119Lights and windshield wipers Z
Page 124 of 382

You can use this function to set the
headlamps to change betwee
nlow beam and
high beam automatically. The system
recognizes vehicles with their lights on, either
approaching from the opposite direction or
traveling in front of your vehicle, and
consequently switches the headlamps from
high beam to low beam.
The system automatically adapts the low-
beam headlamp range depending on the
distance to the other vehicle. Once the
system no longer detect sany other vehicles,
it reactivates the high-beam headlamps.
The system's optical sensor is located behind
the windshield near the overhead control
panel.
Switching Adaptive Highbeam Assist
on/off 001A
High-beam headlamps
0010 Turn signal, right
0024 High-beam flasher
0021 Turn signal, left
X To switch on: turn the light switch to
000D.
X Press the combination switch beyond the
pressure point in the direction of
arrow 001A.
The 0010 indicator lamp in the
multifunction display lights up if it is dark
and the light sensor activates the low-beam
headlamps.
If you are driving at speeds above
approximately 28 mph (45 km/h): The headlamp range is set automatically
depending on the distance between the
vehicle and other road users.
If you are driving at speeds above
approximately 35 mph (55 km/h) and no
other road users have been detected:
The high-beam headlamps are switched on
automatically. The
0015indicator lamp in
the instrument cluster also lights up.
If you are driving at speeds below
approximately 30 mph (45 km/h) or other
road users have been detected or the roads
are adequately lit:
The high-beam headlamps are switched off
automatically. The 0015indicator lamp in
the instrument cluster goes out. The 0010
indicator lamp in the multifunction display
remains lit.
X To switch off: move the combination
switch back to its normal position or move
the light switch to another position.
The 0010 indicator lamp in the instrument
cluster goes out. Headlamps fogged up on the inside
The headlamps may fog up on the inside if
there is high atmospheric humidity.
X Switch on the light and drive off.
The level of moisture diminishes,
depending on the length of the journey and
the weather conditions (humidity and
temperature).
If the level of moisture does not diminish:
X Have the headlamps checked at aqualified
specialist workshop. 122
Exterior lightingLights and windshield wipers
Page 128 of 382

tha
thas collecte donthewindshield can
scratch th eglass if wipin gtakes plac ewhen
th ew indshield is dry.
If it is necessary to switch on th ewindshield
wiper sindry weather conditions, always
use washe rfluid when operating the
windshield wipers.
! If the windshield wipers leave smear son
the windshield after the vehicle has been
washed in an automatic car wash, wax or
other residues may be the reason for this.
Clean the windshield using washer fluid
after washin gthe vehicle in an automatic
car wash.
! Intermitten twiping with rain sensor: due
to optical influences and the windshield
becomin gdirtyind ry weathe rconditions,
the windshield wipers may be activated
inadvertently. This could then damage the
windshield wiper blades or scratc hthe
windshield.
For this reason, you should always switch
off the windshield wipers in dry weather. Combination switch
0001
0003 Windshield wiper off
0002 0003 Intermittent wipe, low (rain sensor
set to low sensitivity)
0003 0002 Intermittent wipe, high (rain sensor
set to high sensitivity)
0005 0016 Continuous wipe, slow
0019 0017 Continuous wipe, fast
0025 000C Single wipe/0001 To wipe the
windshield using washer fluid X
Switch on the ignition.
X Turn the combination switch to the
corresponding position.
In the 0003or0002 position, the appropriate
wiping frequency is set automatically
according to the intensity of the rain. In
the 0002 position, the rain sensor is more
sensitive than in the 0003position, causing
the windshield wipers to wipe more
frequently.
If the wiper blades are worn, the windshield
will no longer be wiped properly. This could
prevent you from observing the traffic
conditions. Replace the wiper blades twice a
year, ideall yinspring and fall. Replacing the wiper blades
Important safety notes G
WARNING
If the windshield wipers begin to move while
you are changing the wiper blades, you could
be trapped by the wiper arm. There is arisk
of injury.
Always switch off the windshield wipers and
ignition before changing the wiper blades.
! To avoid damaging the wiper blades,
make sure that you touch only the wiper
arm of the wiper.
! Never open the hood if awindshield wiper
arm has been folded away from the
windshield.
Never fold awindshield wiper arm without
aw iper blade back ontot he windshield.
Hold the windshield wiper arm firmly when
you change the wiper blade. If you release
the windshield wiper arm without awiper
blade and it falls ontot he windshield, the
windshield may be damaged by the force of
the impact.
Mercedes-Benz recommends that you have
the wiper blades changed at aqualified
specialist workshop. 126
Windshiel
dwipersLight sand windshield wipers
Page 180 of 382

As
aresult, DISTRONI CPLUSm ay neither give
warning snor interv eneins uchs ituations.
There is ariskofana ccident.
Alway spaycarefu lattentio ntothe traffic
situatio nand be ready to brake. G
WARNING
DISTRONIC PLU Scanno talway sclearly
identify othe rroad users and complex traffic
situations.
In such cases, DISTRONIC PLUS may:
R give an unnecessary warning and then
brake the vehicle
R neither give awarning nor intervene
R accelerate unexpectedly
There is arisk of an accident.
Continue to drive carefully and be ready to
brake, in particular when warned to do so by
DISTRONIC PLUS. G
WARNING
DISTRONIC PLUS brakes your vehicle with up
to 40% of the maximum braking force. If this
braking force is insufficient ,DISTRONIC PLUS
warns you visually and audibly. There is arisk
of an accident.
In such cases, apply the brakes yourself and
try to take evasive action.
! If DISTRONIC PLUS or the HOLD function
is activated, the vehicle brakes
automatically in certain situations. To
prevent damage to the vehicle, deactivate
DISTRONIC PLUS and the HOLD function in
the following or other similar situations:
R when towing the vehicle
R in the car wash
If you fail to adapt your driving style,
DISTRONIC PLUS can neither reduce the risk
of accident nor override the laws of physics.
DISTRONIC PLUS cannot take into account
the road, traffic and weather conditions.
DISTRONIC PLUS is only an aid. You are
responsible for the distance to the vehicle in front,f
or vehicle speed, for braking in good
time and for staying in your lane.
Do not use DISTRONIC PLUS:
R in road and traffic conditions which do not
allow you to maintain aconstant speed e.g.
in heavy traffic or on winding roads
R on slippery road surfaces. Brakin gor
accelerating could cause the drive wheels
to lose traction and the vehicle could then
skid
R when there is poor visibility, e.g. due to fog,
heavy rain or snow
DISTRONIC PLUS may not detect narrow
vehicles driving in front,e .g. motorcycles, or
vehicles driving on adifferent line.
In particular, the detection of obstacles can
be impaired if:
R dirt on the sensors or anything else
coverin gthe sensors
R snow or heavy rain
R interference by other radar sources
R strongr adar reflections, for example, in
parking garages
If DISTRONIC PLUS no longer detect sa
vehicle in front,D ISTRONIC PLUS may
unexpectedly accelerate the vehicle to the
stored speed.
This speed may:
R be too high if you are driving in afilter lane
or an exit lane
R be so high in the right lane that you pass
vehicles driving on the left (left-han ddrive
countries)
R be so high in the left lane that you pass
vehicles driving on the right (right-hand
drive countries)
If there is achange of drivers, advise the new
driver of the speed stored.
General notes DISTRONIC PLUS regulates the speed and
automatically helps you maintain the
distance to the vehicle detected in front.
Vehicles are detected with the aid of the radar178
Driving systemsDriving and parking
Page 181 of 382

sensor system. DISTRONIC PLUS brakes
automaticallysot hat the set speed is not
exceeded.
Change into alower gear in good time on long
and steep downhill gradients. This is
especially important if the vehicle is laden. By
doing so, you will make use of the braking
effect of the engine. This relieves the load on
the brake system and prevents the brakes
from overheating and wearing too quickly.
If DISTRONIC PLUS detects that there is arisk
of ac ollision, you will be warned visually and
acoustically.D ISTRONIC PLUS cannot
prevent acollision without your intervention.
An intermittent warning tone will then sound
and the distance warning lamp will light up in
the instrument cluster. Brake immediately in
order to increase the distance to the vehicle
in front or take evasive action provided it is
safe to do so.
For DISTRONIC PLUS to assist you, the radar
sensor system must be operational.
If there is no vehicle in front,D ISTRONIC
PLUS operates in the same way as cruise
control in the speed range between 20 mph
(Canada: 30 km/h) and 120 mph (Canada:
200 km/h). If avehicle is driving in front of
you, it operates in the speed range between
0m ph (0 km/h) and 120 mph (Canada:
200 km/h).
Do not use DISTRONIC PLUS while driving on
roads with steep gradients.
As DISTRONIC PLUS transmits radar waves,
it can resemble the radar detectors of the
responsible authorities. You can refer to the
relevant chapter in the Operator's Manual if
questions are asked aboutt his.
i USA only: This device has been approved
by the FCC as a"VehicularR adar System".
The radar sensor is intended for use in an
automotive radar system only. Removal,
tampering ,oralterin gofthedevice will void
any warranties, and is no tpermitted by the
FCC. Do not tamper with, alter, or use in
any non-approved way. Anyu
nauthorized modification to this
device could void the user's authorit yto
operate the equipment.
i Canada only: This device complies with
RSS-210 of Industry Canada. Operation is
subject to the following two conditions:
1. This device may not cause harmful
interference, and
2. this device must accept any interference
received, including interference that may
cause undesired operation of the device.
Removal, tampering, or altering of the
device will void any warranties, and is not
permitted. Do not tamper with, alter, or use
in any non-approved way.
Anyu nauthorized modification to this
device could void the user's authorit yto
operate the equipment.
Cruise control lever 001A
To stor ethe curren tspeed or ahigher
speed
0010 To stor ethe curren tspeed or alower
speed
0024 To deactivate DISTRONIC PLUS
0021 To stor ethe curren tspeed or call up the
last stored speed
001E To set the specified minimum distance Driving systems
179Driving and parking Z
Page 195 of 382

Load compensation
The vehicle can compensat
edifferences in
th ev ehicle level by raisin gorlowering the
rear axle. This is the case, for example, if
people get out or if luggage is being loaded.
Load compensation takes place if:
R ad oor or the trunk lid/tailgate is opened
R the parked vehicle is unlocked
For larger level changes, the engine must be
running. 4MATIC (permanent four-wheel drive)
If you fail to adapt your driving style, 4MATIC
can neither reduce the risk of accident nor
override the laws of physics. 4MATIC cannot
take account of road, weather and traffic
conditions. 4MATIC is only an aid. You are
responsible for the distance to the vehicle in
front,f or vehicle speed, for braking in good
time and for staying in your lane.
If ad rive wheel spins due to insufficien tgrip:
R Only depress the accelerator peda lasfar
as necessary when pulling away.
R Accelerate less when driving.
! Never tow the vehicl ewith one axle
raised. This may damage the transfer case.
Damag eofthis sort is not covered by the
Mercedes-Benz Limited Warranty. All
wheels must remai neithe ront he ground
or be fully raised. Observe the instructions
for towing the vehicle with all wheels in full
contact with the ground.
i In wintry driving conditions, the maximum
effect of 4MATIC can only be achieved if
you use winter tires (M+S tires), with snow
chains if necessary.
4MATIC ensures that allf our wheels are
permanently driven. Together with ESP ®
,it
improves the traction of you rvehicle
whenever adrive wheel spins due to
insufficient grip. PARKTRONIC
Important safet ynotes PARKTRONIC is an electronic parkin
gaid with
ultrasonic sensors. It indicates visually and
audibly the distanc ebetween your vehicle
and an object.
PARKTRONIC is only an aid. It is not a
replacemen tfor your attention to your
immediate surroundings. You are always
responsible for safe maneuvering, parking
and exiting aparkin gspace. When
maneuvering, parkin gorpulling out of a
parkin gspace, make sure that ther eare no
persons, animals or objects in the area in
which you are maneuvering.
! When parking, pay particular attention to
objects above or below the sensors, such
as flower pots or trailer drawbars.
PARKTRONIC does not detec tsuch objects
when they are in th eimmediat evicinity of
th ev ehicle. You could damag ethe vehicle
or the objects.
The sensors may not detect snow and other
objectst hat absorb ultrasonic waves.
Ultrasonic sources such as an automatic
car wash, the compressed-air brakes on a
truck or apneumatic drill could cause
PARKTRONIC to malfunction.
PARKTRONIC may not function correctly on
uneven terrain.
PARKTRONIC is activated automatically when
you:
R switch on the ignition
R shift the transmission to position D,Ror N
R release the parking brake
PARKTRONIC is deactivated at speeds above
11 mph (18 km/h). It is reactivated at lower
speeds.
PARKTRONIC monitors the area around your
vehicle using six sensors in the front bumper
and four sensors in the rear bumper. Driving systems
193Driving and parking Z
Page 196 of 382

Rang
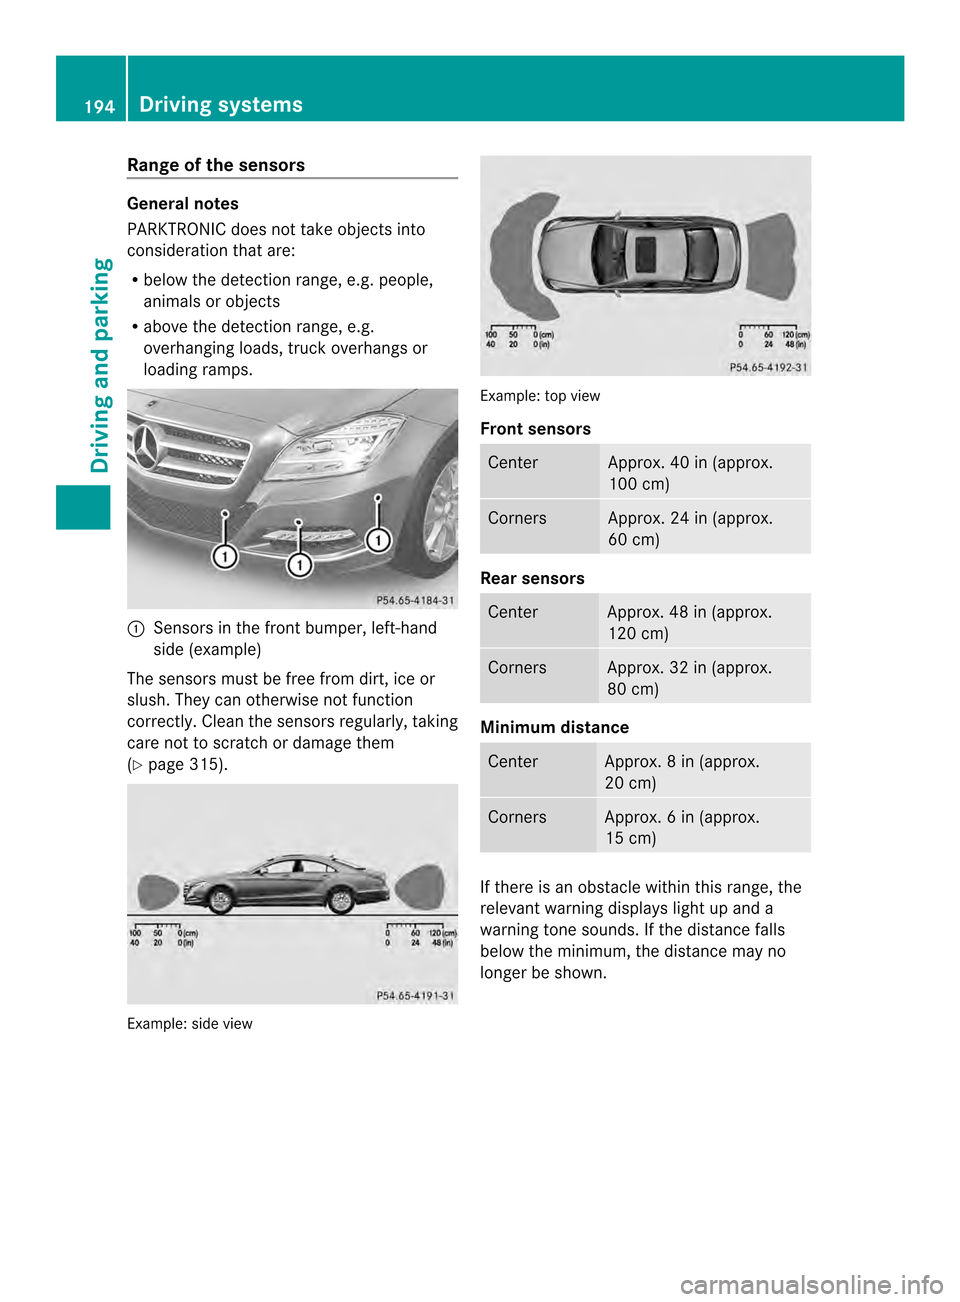
eoft he sensors General notes
PARKTRONIC doe
snot take objects into
consideration that are:
R below the detection range, e.g. people,
animal sorobjects
R above the detection range, e.g.
overhanging loads, truck overhangs or
loading ramps. 001A
Sensors in the front bumper, left-hand
sid e(example)
The sensors mus tbefree from dirt, ice or
slush. They can otherwise not function
correctly. Clean the sensor sregularly, taking
care not to scratch or damage them
(Y page 315). Example: side view Example: top view
Front sensors
Center Approx
.40in(approx.
100 cm) Corners Approx
.24in(approx.
60 cm) Rear sensors
Center Approx
.48in(approx.
120 cm) Corners Approx
.32in(approx.
80 cm) Minimu
mdistance Center Approx
.8in(approx.
20 cm) Corners Approx
.6in(approx.
15 cm) If
there is an obstacle withi nthis range, the
relevant warning displays light up and a
warning tone sounds. If the distance falls
below the minimum, the distance may no
longer be shown. 194
Driving systemsDriving and parking
Page 197 of 382

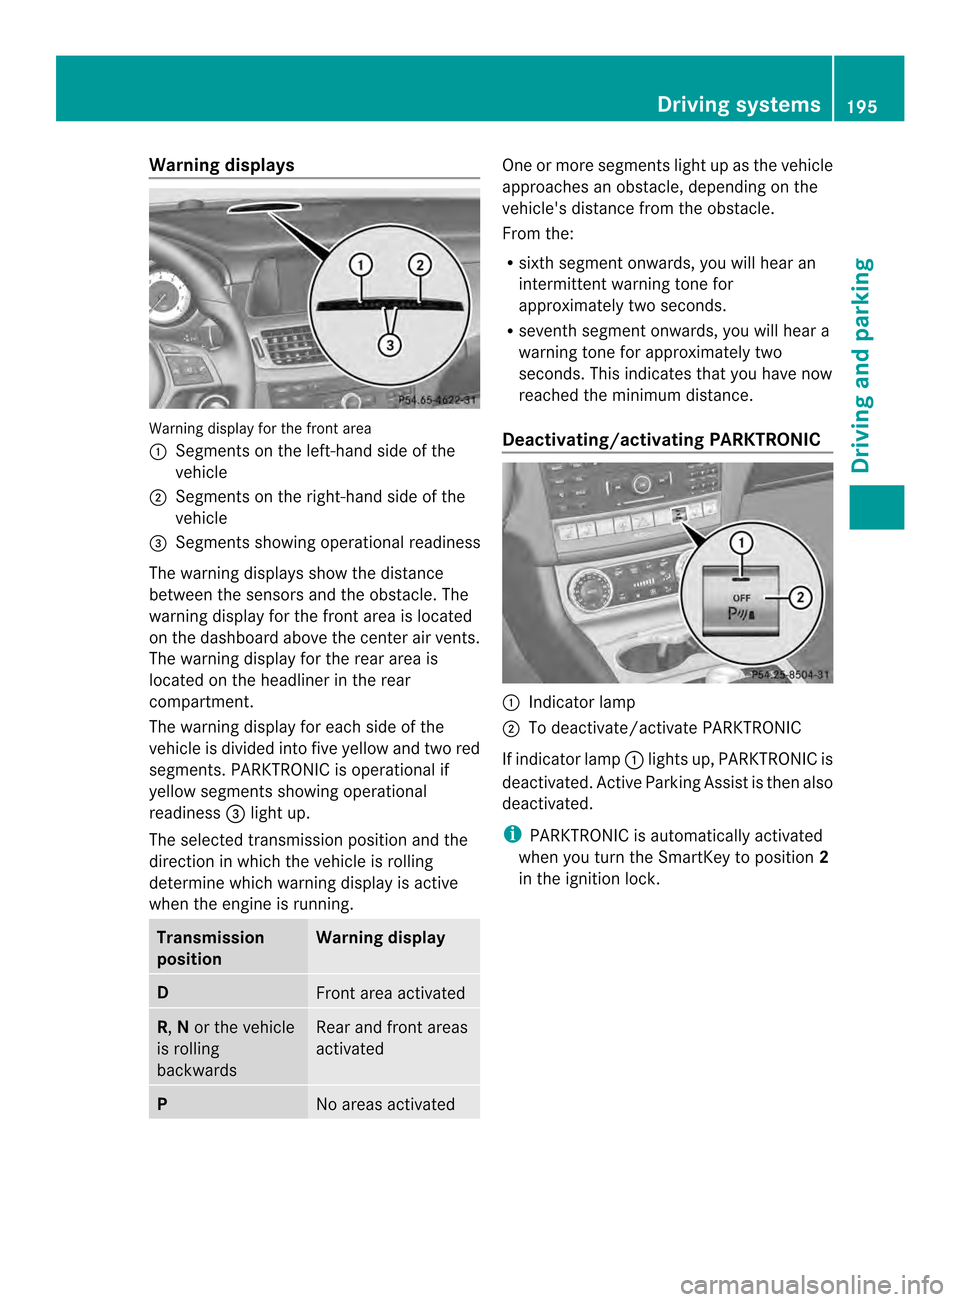
Warning displays
Warning display for the front area
001A
Segments on the left-hand side of the
vehicle
0010 Segments on the right-hand side of the
vehicle
0024 Segments showing operational readiness
The warning displays show the distance
between the sensors and the obstacle. The
warning displayf or the front area is located
on the dashboard above the center airv ents.
The warning display for the rear area is
located on the headliner in the rear
compartment.
The warning display for each side of the
vehicle is divided intof ive yellow and two red
segments. PARKTRONIC is operational if
yellow segments showing operational
readiness 0024light up.
The selected transmission position and the
direction in which the vehicle is rolling
determine which warning display is active
when the engin eisrunning. Transmission
position Warning display
D
Fron
tarea activated R,
Nor the vehicle
is rolling
backwards Rear and fron
tareas
activated P
No areas activated One or more segments light up as the vehicle
approaches an obstacle, depending on the
vehicle's distanc
efrom the obstacle.
From the:
R sixt hsegmen tonwards ,you will hea ran
intermitten twarnin gtonef or
approximately two seconds.
R sevent hsegment onwards, you will hear a
warning tonef or approximately two
seconds. This indicates that you have now
reached the minimum distance.
Deactivating/activating PARKTRONIC 001A
Indicator lamp
0010 To deactivate/activate PARKTRONIC
If indicator lamp 001Alights up, PARKTRONIC is
deactivated. Active Parking Assist is then also
deactivated.
i PARKTRONIC is automatically activated
when you turn the SmartKey to position 2
in the ignition lock. Driving systems
195Driving and parking Z