sensor MERCEDES-BENZ CLS-Class 2014 W218 User Guide
[x] Cancel search | Manufacturer: MERCEDES-BENZ, Model Year: 2014, Model line: CLS-Class, Model: MERCEDES-BENZ CLS-Class 2014 W218Pages: 382, PDF Size: 5.36 MB
Page 69 of 382
ABS works fro
maspeed of abou t5mph
(8 km/h )upwar ds,regardless of road-surface
conditions .ABS works on slippery surfaces,
eve nify ou only brake gently.
The yellow 001CABS warning lamp in the
instrument cluster lights up when the ignition
is switched on. It goes out when the engine is
running.
Braking X
If ABS intervenes: continue to depress the
brake pedal vigorously until the braking
situation is over.
X To makeaf ull brake application:
depress the brake pedal with full force.
If ABS intervenes when braking, you will feel
ap ulsing in the brake pedal.
The pulsating brake pedal can be an
indication of hazardous road conditions, and
functions as areminder to take extrac are
while driving. BAS (Brake Assist System)
i Observe the "Important safety notes"
section (Y page 66). G
WARNING
If BAS is malfunctioning, the braking distance
in an emergenc ybraking situation is
increased. There is arisk of an accident.
In an emergenc ybraking situation, depress
the brake pedal with full force. ABS prevents
the wheels from locking.
BAS operates in emergenc ybraking
situations. If you depress the brake pedal
quickly, BAS automatically boosts the braking
force, thus shortening the stopping distance.
The brakes will function as usual once you
release the brake pedal. BAS is deactivated. BAS PLUS (Brake Assist System
PLUS)
General information i
Observe the "Important safety notes"
section (Y page 66).
BAS PLUS is only available in vehicles
equipped with DISTRONIC PLUS.
For BAS PLUS to assist you when driving, the
radar sensor system must be:
R activated (Y page 232)
R operational
With the help of the radar sensor system, BAS
PLUS can detect obstacles that are in the
path of your vehicle for an extended period of
time.
If the radar sensor system is malfunctioning,
BAS PLUS will not be available. The brake
system is still available with complete brake
boosting effect and BAS.
BAS PLUS provides braking assistance in
hazardous situations at speeds greater than
4m ph (7 km/h).
At speeds of up to approximately 40 mph
(70 km/h) ,BAS PLUS can also react to
stationary objects. Examples of stationary
object sare stopped or parked vehicles.
Important safety notes G
WARNING
BAS PLUS cannot alwaysc learly identify
object sand complex traffic situations. BAS
PLUS cannot intervene in these cases. There
is ar isk of an accident.
Always pay careful attention to the traffic
situation and be ready to brake. G
WARNING
BAS PLUS does not react:
R to people or animals
R to oncoming vehicles
R to crossin gtraffic
R when cornering Driving safety systems
67Safety
Z
Page 70 of 382
As
aresult, BAS PLUS may not intervene in all
critical situations. There is arisk of an
accident.
Always pay careful attention to the traffic
situation and be ready to brake.
In particular, the detection of obstacles can
be impaired if there is:
R dirt on the sensor soranythin gelse
covering the sensors
R snow or heavy rain
R interference by other radar sources
R there are strong radar reflections, for
example in parking garages
R an arrow vehicle travelin ginfront, e.g. a
motorbike
R av ehicle travelin ginfrontonad ifferent line
relative to the center of your vehicle
Following damage to the fron tend of the
vehicle, have the configuratio nand operation
of the rada rsensor schecked at aqualified
specialist workshop. This also applies to
collisions at low speeds where ther eisno
visible damage to the fron tofthe vehicle.
Braking assistance To prevent
acollision with the vehicle in front,
BAS PLUS calculates the brake force
necessary if:
R you approach an obstacle, and
R BAS PLUS has detected arisk of collision
When driving at aspeed under 20 mph
(30 km/h):ify ou depress the brake pedal,
BAS PLUS is activated. The increase in brake
pressure will be carried out at the last
possible moment.
When driving at aspeed greater than
20 mph (30 km/h):ify ou depress the brake
pedal sharply, BAS PLUS automatically raises
the brake pressure to avalue adapted to the
traffic situation.
If BAS PLUS demands particularly high
braking force, preventative passenger protection measures (PRE-SAFE
®
)a re
activated simultaneously.
X Keep the brake pedal depressed until the
emergenc ybraking situation is over.
ABS prevent sthe wheels from locking.
BAS PLUS is deactivated and the brakes
function as usual if:
R you release the brake pedal
R there is no longer arisk of collision
R no obstacle is detected in front of your
vehicle ESP
®
(Electronic Stability Program)
Important safety notes i
Observe the "Important safety notes"
section (Y page 66). G
WARNING
If ESP ®
is malfunctioning, ESP ®
is unable to
stabilize the vehicle. Additionally, further
driving safety systems are deactivated. This
increases the risk of skidding and an accident.
Drive on carefully. Have ESP ®
checked at a
qualified specialist workshop.
! Vehicles with 4MATIC: switch off the
ignition when the parking brake is being
tested on abrake dynamometer.
Application of the brakes by ESP ®
may
otherwise destroy the brake system.
Vehicles without 4MATIC: observe the notes
on ESP ®
(Y page 330) when towing the
vehicle with araised rear axle.
ESP ®
is deactivated if the 0009warning lamp
in the instrument cluster lights up
continuously when the engine is running.
If the 0011 warning lamp and the 0009
warning lamp are lit continuously, ESP ®
is not
available due to amalfunction.
Observe the information on warning lamps
(Y page 269) and display messages which
may be shown in the instrument cluster
(Y page 238). 68
Driving safety systemsSafety
Page 74 of 382
ADAPTIVE BRAKE
ADAPTIV EBRAKE enhance sbraking safety
and offers increased braking comfort .In
addition to th ebraking function ,ADAPT IVE
BRAKE also has th eHOLDf unction
(Y page 186) and hill start assist
(Y page 150). PRE-SAFE
®
Brake
Genera linformation i
Observ ethe "Importan tsafet ynotes"
sectio n(Ypage 66).
PRE-SAFE ®
Brak eiso nly available in vehicles
with DISTRONIC PLUS.
If PRE-SAFE ®
Brak eistoa id you, the radar
senso rsystem mus tbe:
R activated (Y page 232)
R operational
With the help of the radar sensor system,
PRE-SAFE ®
Brak ecan detec tobstacles that
are in fron tofyour vehicle for an extended
period of time.
PRE-SAFE ®
Brak ecan help you to minimize
the risk of acollision with avehicle ahead or
reduce the effects of such acollision. If PRE-
SAFE ®
Brak ehas detected arisk of collision,
you will be warned visually and acoustically
as well as by automatic braking. PRE-SAFE ®
Brak ecannot preven tacollision withou tyour
intervention.
At speeds of up to approximately 40 mph
(70 km/h) PRE-SAFE®
Brake can also detect
stationary objects. Examples of stationary
object sare stopped or parked vehicles.
Important safety notes G
WARNING
PRE-SAFE ®
Brake will initially brake your
vehicle by apartial application of the brakes
if ad anger of collision is detected. There may
be acollision unless you also brake. Automatic emergenc
ybraking cannot prevent
ac ollision. There is arisk of an accident.
Always apply the brakes yourself and try to
take evasive action. G
WARNING
PRE-SAFE ®
Brake cannot alwaysc learly
identify objects and comple xtraffic
conditions.
In these cases, PRE-SAFE ®
Brake may:
R give an unnecessary warning and then
brake the vehicle
R not give awarning or intervene
There is arisk of an accident.
Always pay particular attention to the traffic
situation and be read ytobrake, especially if
PRE-SAFE ®
Brake warns you.T erminate the
intervention in anon-critical driving situation.
In particular, the detection of obstacles can
be impaired if there is:
R dirt on the sensors or anything else
covering the sensors
R snow or heavy rain
R interference by other rada rsources
R there are strongr adar reflections, for
example in parking garages
R an arrow vehicle traveling in front,e .g. a
motorbike
R av ehicle traveling in front on adifferent line
relative to the center of your vehicle G
WARNING
PRE-SAFE ®
Brake does not react:
R to people or animals
R to oncoming vehicles
R to crossin gtraffic
R when cornering
As aresult, PRE-SAFE ®
Brake may neither
give warnings nor intervene in all critical
situations. There is arisk of an accident.
Always pay careful attention to the traffic
situation and be ready to brake. 72
Driving safety systemsSafety
Page 75 of 382
In order to maintain the appropriat
edistance
to the vehicle in front and thus prevent a
collision, you must apply the brakes yourself.
Due to the nature of the system, particularly
complicated driving conditionsm ay cause
unnecessar ywarning sortheunnecessary
intervention of PRE-SAFE ®
Brake.
Followin gdamag etothe front end of the
vehicle, have the configuratio nand operation
of the rada rsensor schecked at aqualified
specialist workshop. This also applies to
collisions at low speeds where ther eisno
visible damage to the fron tofthe vehicle.
Function X
To activate/deactivate: activate or
deactivate PRE-SAFE ®
Brake in the on-
board computer (Y page 228).
If the PRE-SAFE ®
Brake is not activated, the
0001 symbol appears in the multifunction
display.
If you approach avehicle in front very quickly,
this function warns you from aspeed of
approximately 4mph (7 km/h). An
intermittent warning tone sounds and the
0008 distance warning signal lamp in the
instrumentc luster lightsup.
X Brake immediately to defuse the situation.
or
X Take evasiv eaction provided it is safe to do
so.
Fro mas peed of approximately 4mph
(7 km/h), if the driver and fron tpassenger
have fastened their seat belts, PRE-SAFE ®
Brak ecan brake the vehicle automatically at
speeds up to approximately 124 mph
(200 km/h).
You can preven tthe intervention of the PRE-
SAFE ®
Brak eata ny time by:
R depressin gthe accelerator pedal further.
R activating kickdown.
R releasing the brake pedal. The brakin
gaction of PRE-SAFE ®
Brak eis
ended automatically if:
R you maneuver to avoid the obstacle.
R ther eisnol onger any danger of arear-end
collision.
R ther eisnol onger an obstacle detected in
fron tofy our vehicle.
If you approach an obstacle and PRE-SAFE ®
Brak edetects arisk of acollision, the system
will alert you both visually and acoustically. If
you do not brake or tak eevasive action ,the
system will warn you by automatically braking
the vehicle gently. If ther eisanincreased risk
of collision, preventative passenger
protection measures (PRE-SAFE ®
)a re
activated (Y page 54). Ifarisk of collision
remains at speeds of over 20 mph
(30 km/h) and you do not brake, tak eevasive
action or significantly accelerate, automatic
brakin gmay be performed up to and including
emergency braking. Automatic emergency
brakin gisnot performed until immediately
prior to an acciden tthat can no longer be
avoided. Thef
tdeterrent locking system Immobilizer
The immobilizer prevents your vehicle from
being started without the correct SmartKey.
X To activate with the SmartKey: remove
the SmartKey from the ignition lock.
X To activate with KEYLESS-GO: switchthe
ignition off and open the driver' sdoor.
X To deactivate: switchont he ignition.
When leaving the vehicle, always tak ethe
SmartKey with you and lock the vehicle.
Anyone can start the engin eifavalid
SmartKey has been left inside the vehicle.
i The immobilizer is always deactivated
when you start the engine.
In the event that the engin ecannot be
started when the starter battery is fully
charged, the immobilizer may be faulty. Theft deterrent locking system
73Safety Z
Page 79 of 382
If you do not open the vehicle within
approximately 40 seconds of unlocking:
R
the vehicle is locked again.
R the theft deterrent locking system is
armed again.
X To lockc entrally:pressthe 000F button.
The SmartKey centrally locks/unlocks:
R thed oors
R thet runk lid
R thef uel filler flap
The tur nsignals flash onc ewhen unlocking
and three times when locking.
You can also set an audible signal to confirm
that the vehicle has been locked. The audible
signal can be activated and deactivated using
the on-board computer (Y page 232).
When it is dark, the surround lighting also
comes on if it is activated in the on-board
computer (Y page 231). KEYLESS-GO
General notes Bear in mind that the engine can be started
by any of the vehicle occupants if there is a
KEYLESS-GO key in the vehicle.
Locking/unlocking centrally You can start, lock or unlock the vehicle using
KEYLESS-GO. To do this, you only need carry
the SmartKey with you. You can combine the
functions of KEYLESS-GO with those of a
conventional SmartKey. Unlock the vehicle
by using KEYLESS-GO, for instance, and lock
it using the 000Fbutton on the SmartKey.
When locking or unlocking with KEYLESS-GO,
the distance between the SmartKey and the
corresponding door handle must not be
greater than 3ft(1m). KEYLESS-GO checksw
hetheravalid
SmartKey is in the vehicle by periodically
establishing aradio connection between the
vehicle and the SmartKey. This happens:
R when the external door handles are
touched
R when startingt he engine
R while the vehicle is in motion X
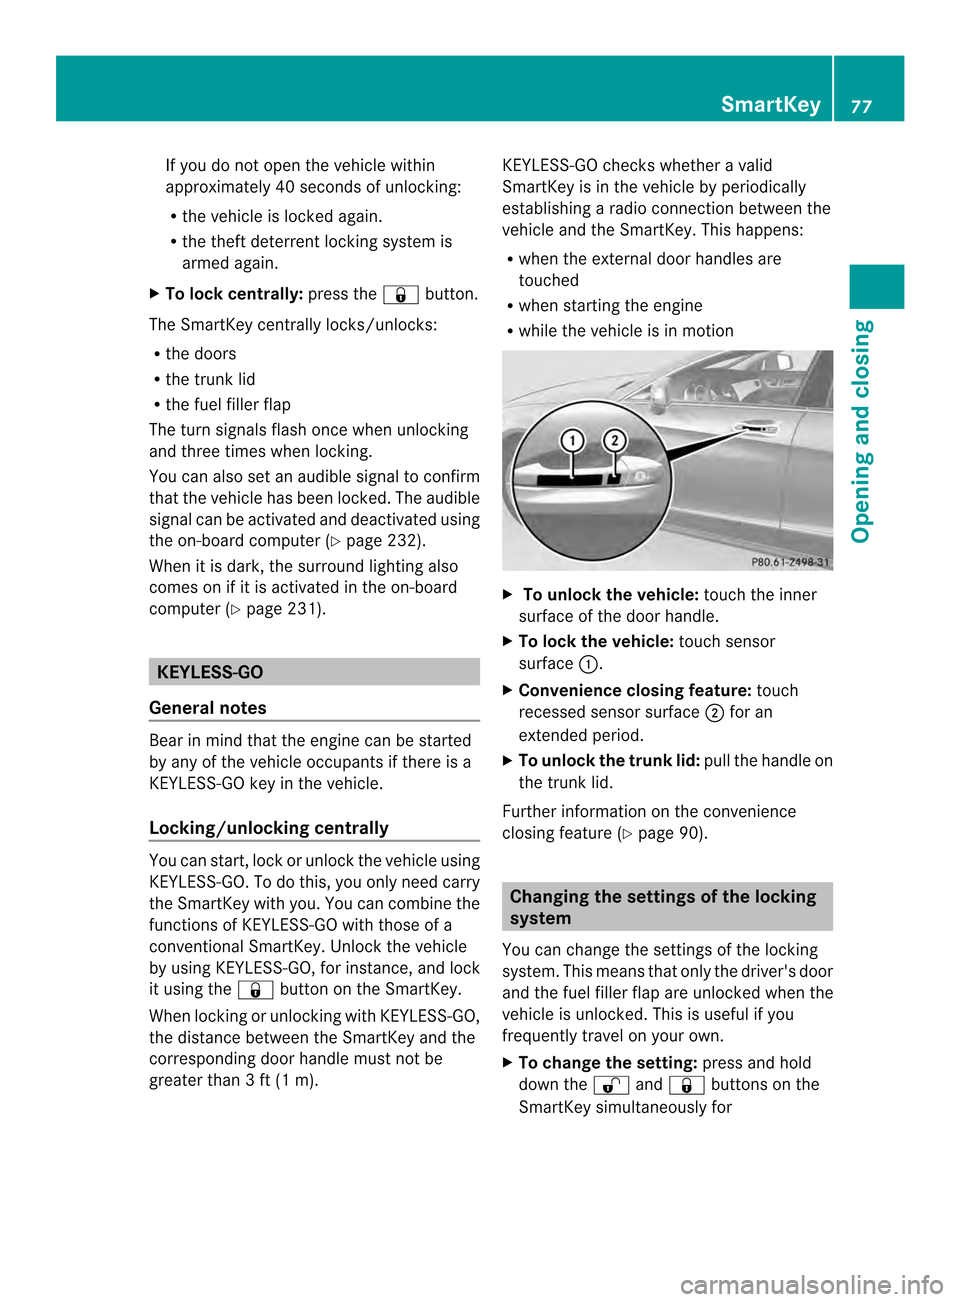
To unlock the vehicle: touch the inner
surface of the door handle.
X To lock the vehicle: touch sensor
surface 001A.
X Convenience closing feature: touch
recessed sensor surface 0010for an
extended period.
X To unlock the trunk lid: pull the handle on
the trunk lid.
Further information on the convenience
closing feature (Y page 90). Changing the settings of the locking
system
You can change the settings of the locking
system. This means that only the driver's door
and the fuel filler flap are unlocked when the
vehicle is unlocked. This is useful if you
frequently travel on your own.
X To change the setting: press and hold
down the 0014and000F buttons on the
SmartKey simultaneously for SmartKey
77Opening and closing Z
Page 80 of 382

approximately six seconds until th
ebattery
check lamp flashes twice (Y page 79).
i If th esettin goft helockin gsystem is
changed within th esignal range of the
vehicle ,pressin gthe 000F or0014 button:
R locks or
R unlock sthe vehicle
The SmartKey no wfunction sasfollows:
X To unlock th edriver's door: pressthe
0014 buttononce.
X To unlock centrally: pressthe 0014
butto ntwice.
X To lock centrally: pressthe 000F button.
The KEYLESS-GO function is changed as
follows:
X To unlock th edriver's door: touch the
inner surface of th edoor handle on the
driver' sdoor.
X To unlock centrally: touch theinner
surface of th edoor handle on th efront-
passenger door or th erear door.
X To lock centrally: touch theoute rsensor
surface on one of the door handles.
X To restor ethe factor ysettings: press
and hold down the 0014and000F buttons
simultaneously for approximately six
seconds until the batter ychec klamp
flashes twice ( Ypage 79). Mechanica
lkey
General notes If th
evehicle can no longer be locke dor
unlocked wit hthe SmartKey, use the
mechanical key.
If you use th emechanical ke ytou nlock and
open th edriver' sdoor or th etrunk lid, the
anti-thef talarm system will be triggered
(Y page 74). There are several ways to tur
noff the alarm:
X To turn the alarm off with the
SmartKey: press the0014or000F button
on the SmartKey.
or
X Insert the SmartKey into the ignition lock.
or
X To deactivate the alarm with KEYLESS-
GO: press the Start/Stop button in the
ignition lock. The SmartKey must be in the
vehicle.
or
X Lock or unlock the vehicle using KEYLESS-
GO. The SmartKey must be outside the
vehicle.
If you unlock the vehicle using the mechanical
key, the fuel filler fla pwill not be unlocked
automatically.
X To unlock th efuel filler flap: insert the
SmartKey int othe ignition lock.
Removing th emechanical key 001A
Release catch
0010 Mechanical key
X Push release catch 001Ain the direction of
the arrow and at the same tim eremove
mechanical key 0010fromt he SmartKey. 78
SmartKeyOpening and closing
Page 92 of 382

Convenience opening
X
Poin tthe tip of the SmartKey at the driver's
door handle.
X Press and hold the 0014button until the
side windows and the sliding sunroof are in
the desired position.
X To interrupt convenienceo pening:
release the 0014button. Conveniencec
losing feature
Important safety notes Information on the side window reversing
feature (Y
page 88). G
WARNING
The reversing feature does not react:
R to soft, light and thin objects, e.g. small
fingers
R over the last 4mmofthe closing movement
R during resetting
R when closing the sliding sunroof again
manually immediately after automatic
reversing
This means that the reversing feature cannot
prevent someone being trapped in these
situations. There is arisk of injury.
Make sure that no body parts are in close
proximity during the closing procedure.
If somebody becomes trapped:
R release the switch immediately, or
R during automatic operation, push the
switch briefly in any direction
The closing process is stopped. G
WARNING
When the convenience closing feature is
operating, parts of the body could become
trapped in the closing area of the side window
and the sliding sunroof. There is arisk of
injury.
Observe the complete closing procedure
when the convenience closing feature is operating. Make sure that no body parts are
in close proximity during the closing
procedure.
Proceed as follows if someone is trapped:
With the SmartKey:
R release the 000Fbutton.
R press and hold the 0014button until the
side windows and the sliding sunroof or the
panorama roof with power tilt/sliding
panel open again.
Using KEYLESS-GO:
R release the sensor surface on the door
handle.
R pull the door handle immediately and hold
it.
The side windows and the sliding sunroof
or the panorama roof with power tilt/
sliding panel open.
General notes When you lock the vehicle, you can
simultaneously:
R
close the side windows
R close the sliding sunroof
Using the SmartKey The SmartKey must be close to the driver's
door handle.
X
Point the tip of the SmartKey at the driver's
door handle.
X Press and hold the 000Fbutton until the
side windows and the sliding sunroof are
fully closed.
X Make sure that all the side windows and the
sliding sunroof are closed.
X To interrupt conveniencec losing:
release the 000Fbutton.
Using KEYLESS-GO The KEYLESS-GO key must be outside the
vehicle. All the doors must be closed.90
Side windowsOpening and closing
Page 93 of 382
X
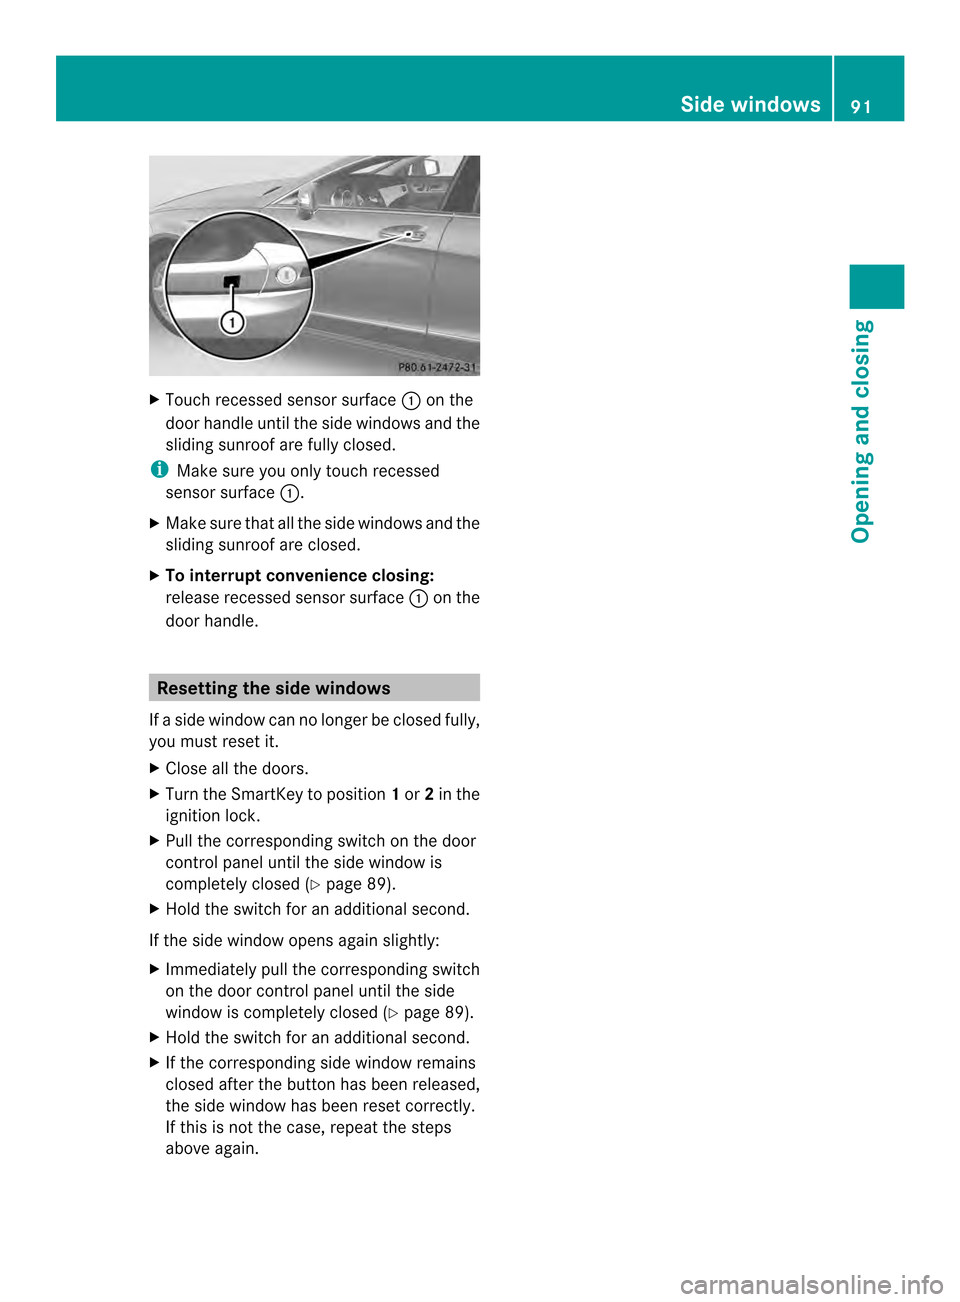
Touch recessed sensor surface 001Aon the
door handle until the side windows and the
sliding sunroof are fully closed.
i Make sure you only touch recessed
sensor surface 001A.
X Make sure that all the side windows and the
sliding sunroof are closed.
X To interrupt convenience closing:
release recessed sensor surface 001Aon the
door handle. Resetting the side windows
If as ide window can no longer be closed fully,
you must reset it.
X Close all the doors.
X Turn the SmartKey to position 1or 2in the
ignition lock.
X Pull the corresponding switch on the door
control panel until the side window is
completely closed (Y page 89).
X Hold the switch for an additional second.
If the side window opens again slightly:
X Immediately pull the corresponding switch
on the door control panel until the side
window is completely closed (Y page 89).
X Hold the switch for an additional second.
X If the corresponding side window remains
closed after the button has been released,
the side window has been reset correctly.
If this is not the case, repeat the steps
above again. Side windows
91Opening and closing Z
Page 113 of 382
Automati
canti-glar emirrors
The rear-view mirror and th eexter iorm irror
on th edriver' sside automatically go int oanti-
glar emodeift hefollowin gcondition sare met
simultaneously:
R the ignition is switched on and
R incident light from headlamps strikes the
sensor in the rear-view mirror.
The mirrors do not go into anti-glare mode if
reverse gear is engaged or if the interior
lighting is switched on. Parking position for the exterior
mirror on the front-passenger side
Setting and storing the parking position Using reverse gear
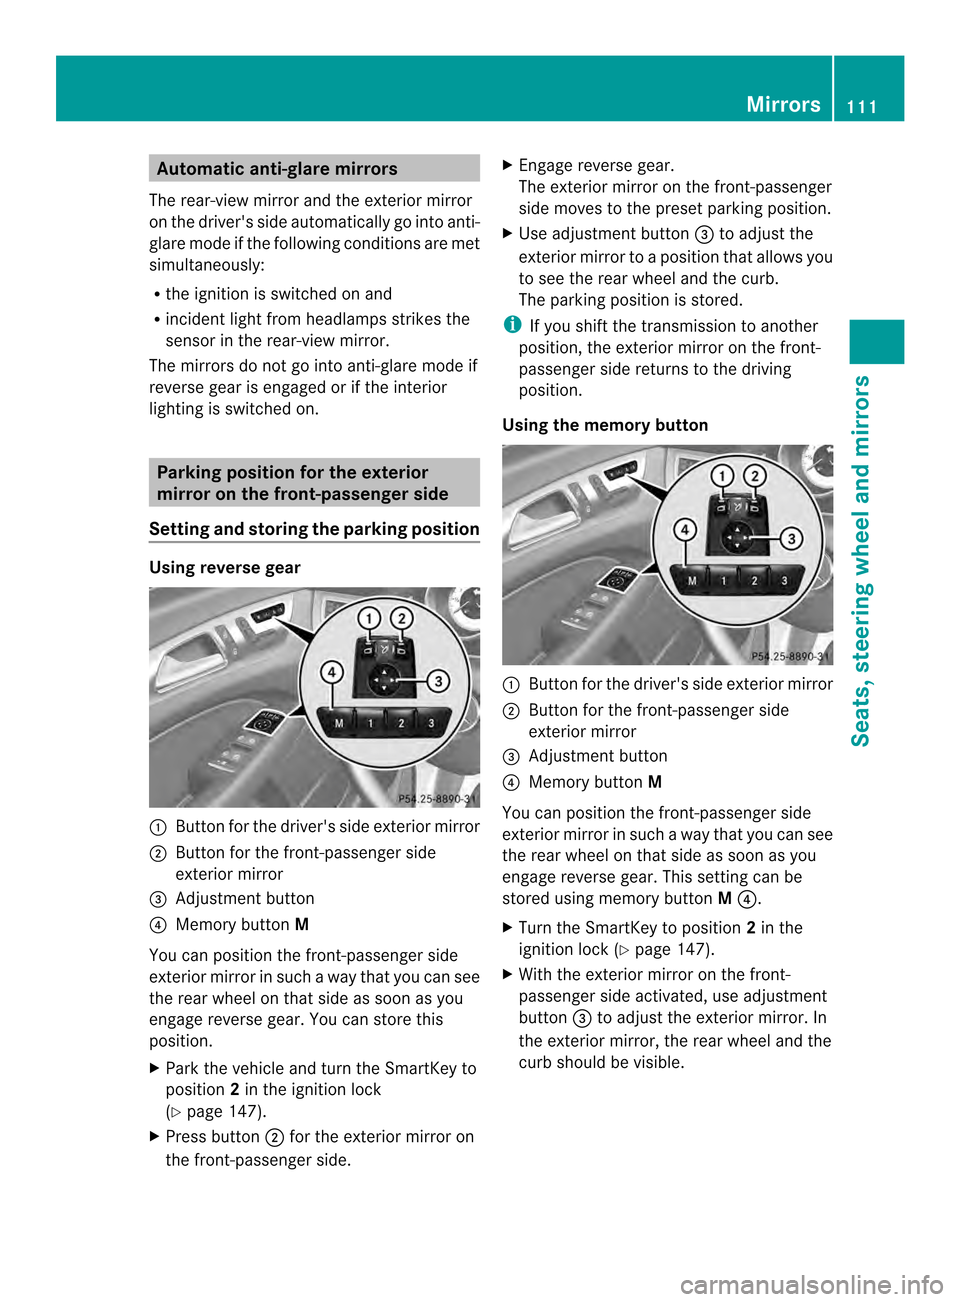
001A
Button for the driver's side exterior mirror
0010 Button for the front-passenger side
exterior mirror
0024 Adjustment button
0021 Memory button M
You can position the front-passenger side
exterior mirror in such away that you can see
the rear wheel on that side as soon as you
engage reverse gear. You can store this
position.
X Park the vehicle and turn the SmartKey to
position 2in the ignition lock
(Y page 147).
X Press button 0010for the exterior mirror on
the front-passenger side. X
Engage reverse gear.
The exterior mirror on the front-passenger
side moves to the preset parking position.
X Use adjustmen tbutton 0024to adjust the
exterior mirror to aposition that allows you
to see the rear wheel and the curb.
The parking position is stored.
i If you shift the transmission to another
position, the exterior mirror on the front-
passenger side return stothe driving
position.
Using the memoryb utton 001A
Button for the driver's side exterior mirror
0010 Button for the front-passenger side
exterior mirror
0024 Adjustment button
0021 Memory button M
You can position the front-passenger side
exterior mirror in such away that you can see
the rear wheel on that side as soon as you
engage reverse gear. This setting can be
stored using memory button M0021.
X Turn the SmartKey to position 2in the
ignition lock (Y page 147).
X With the exterior mirror on the front-
passenger side activated, use adjustment
button 0024to adjust the exterior mirror. In
the exterior mirror, the rear wheel and the
curb should be visible. Mirrors
111Seats, steering wheel and mirrors Z
Page 118 of 382

Useful information
i This Operator's Manual describes all
models and all standard and optional
equipment of your vehicle available at the
time of publication of the Operator's
Manual. Country-specific differences are
possible. Please not ethat your vehicle may
not be equipped with all features
described. This also applies to safety-
related system sand functions.
i Read the information on qualified
specialist workshops: (Y page 26).Exterior lighting
Genera
lnotes
For reason sofsafety, Mercedes-Benz
recommends that you drive with the lights
switched on even during the daytime.
Therefore, your vehicle is equipped with
special daytime running lamps. In some
countries, operation of the headlamps varies
due to legal requirements and self-imposed
obligations.
If you wish to drive during the daytime without
lights, switc hoff the daytime running lamps
function in the on-board computer
(Y page 230). Driving abroad
Symmetrical low-beam headlamps Switc
hthe headlamps to symmetrical low
beam in countries in which traffic drives on
the opposite side of the road from the country
where the vehicle is registered. This prevents
glare to oncoming traffic. When using
symmetrical lights, the edge of the road is not
lit as widely and as far ahead as normal.
Have the headlamps converted at aqualified
specialist workshop as close to the border as
possible before drivin ginthesecountries. Asymmetrical low beam Have the headlamps converted back to
asymmetrical low-beam headlamps at a
qualified specialist workshop as soon as
possible after crossing the border again.
Setting the exterior lighting
Setting options Exterior lightin
gcan be set using:
R the light switch
R the combination switc h(Ypage 119)
R the on-board computer (Y page 230)
Light switch Operation
00010018
Left-handstanding lamps
0002000A Right-hand standing lamps
00030008 Parkinglamps, licens eplate and
instrumen tcluste rlighting
0005000D Automatic headlamp mode,
controlled by the light sensor
0019001D Low-beam/high-beam headlamps
If you hear awarnin gton ew hen you leave the
vehicle, the light smay still be switched on.
X Turn the light switc hto000D. 116
Exterior lightingLight
sand windshield wipers