MERCEDES-BENZ CLS-Class 2016 W218 Owner's Manual
Manufacturer: MERCEDES-BENZ, Model Year: 2016, Model line: CLS-Class, Model: MERCEDES-BENZ CLS-Class 2016 W218Pages: 342, PDF Size: 8.28 MB
Page 111 of 342
XPress the combination switch beyond the
pressure point in the direction of arrow:.
In the Ãposition, the high-beam head-
lamps are only switched on when it is dark and the engine is running.
The blue Kindicator lamp in the instru-
ment cluster lights up when the high-beam
headlamps are switched on.
XTo switch off the high-beam headlamps:
move the combination switch back to its nor-
mal position.
The blue Kindicator lamp in the instru-
ment cluster goes out.
Vehicles with Adaptive Highbeam Assist: if
Adaptive Highbeam Assist is activated, it auto-
matically controls activation and deactivation of
the high-beam headlamps (
Ypage 109).
Hazard warning lamps
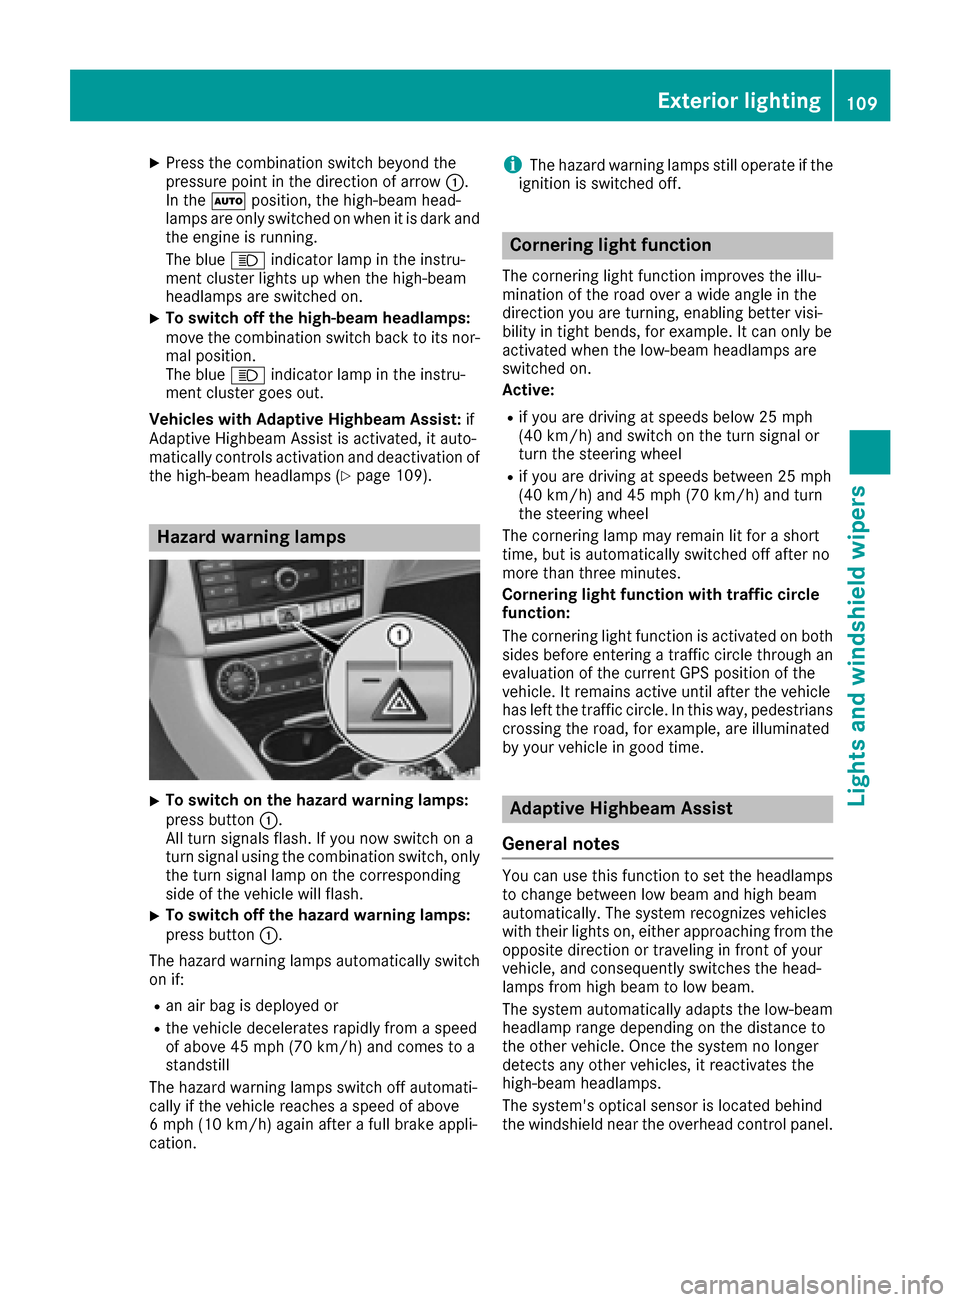
XTo switch on the hazard warning lamps:
press button :.
All turn signals flash. If you now switch on a
turn signal using the combination switch, only
the turn signal lamp on the corresponding
side of the vehicle will flash.
XTo switch off the hazard warning lamps:
press button :.
The hazard warning lamps automatically switch
on if:
Ran air bag is deployed or
Rthe vehicle decelerates rapidly from a speed
of above 45 mph (70 km/h) and comes to a
standstill
The hazard warning lamps switch off automati-
cally if the vehicle reaches a speed of above
6 mph (10 km/h) again after a full brake appli-
cation.
iThe hazard warning lamps still operate if the
ignition is switched off.
Cornering light function
The cornering light function improves the illu-
mination of the road over a wide angle in the
direction you are turning, enabling better visi-
bility in tight bends, for example. It can only be
activated when the low-beam headlamps are
switched on.
Active:
Rif you are driving at speeds below 25 mph
(40 km/h) and switch on the turn signal or
turn the steering wheel
Rif you are driving at speeds between 25 mph
(40 km/h) and 45 mph (70 km/h) and turn
the steering wheel
The cornering lamp may remain lit for a short
time, but is automatically switched off after no
more than three minutes.
Cornering light function with traffic circle
function:
The cornering light function is activated on both
sides before entering a traffic circle through an
evaluation of the current GPS position of the
vehicle. It remains active until after the vehicle
has left the traffic circle. In this way, pedestrians
crossing the road, for example, are illuminated
by your vehicle in good time.
Adaptive Highbeam Assist
General notes
You can use this function to set the headlamps
to change between low beam and high beam
automatically. The system recognizes vehicles
with their lights on, either approaching from the
opposite direction or traveling in front of your
vehicle, and consequently switches the head-
lamps from high beam to low beam.
The system automatically adapts the low-beam
headlamp range depending on the distance to
the other vehicle. Once the system no longer
detects any other vehicles, it reactivates the
high-beam headlamps.
The system's optical sensor is located behind
the windshield near the overhead control panel.
Exterior lighting109
Lights and windshield wipers
Z
Page 112 of 342
Important safety notes
GWARNING
Adaptive Highbeam Assist does no trecognize
road users:
Rwho have no lights ,e.g. pedestrian s
Rwho havepoor lighting ,e.g. cyclist s
Rwhoselighting is blocked, e.g. by abarrier
In ver yrar ecases, Adaptive Highbeam Assist
may fail to recognize other road user sthat
hav elights ,or may recognize them to olate. In
this or similar situations, th eautomatic high -
beam headlamps will no tbe deactivated or
activated regardless .Ther eis aris kof an acci-
dent.
Always carefully observ eth etraffic condition s
and switch off th ehigh-beam headlamps in
goo dtime.
Adaptive Highbeam Assist canno ttak eint o
accoun troad ,weather or traffic conditions.
Adaptive Highbeam Assist is only an aid. You are responsible for adjusting th evehicle's lighting
to th eprevailing light, visibilit yand traffic con-
ditions.
In particular, th edetection of obstacles can be
restricted if there is:
Rpoor visibility, e.g. due to fog ,heav yrain or
snow
Rdirt on th esensor sor th esensor sare
obscured
Switching Adaptive Highbeam Assist
on/off
XTo switch on: turnth eligh tswitch to Ã.
XPress thecombination switch beyon dth e
pressur epoin tin th edirection of arrow :.
The _ indicator lamp in th emultifunction
display lights up when it is dark and th eligh t
sensor activates th elow-beam headlamps .
If you are driving at speeds abov eapprox -
imately 16 mph (25 km/h):
The headlamp range is set automatically
depending on th edistanc ebetween th evehi-
cle and other road users.
If you are driving at speeds abov eapprox -
imately 19 mph (30 km/h )and no other road
user shave been detected: The high-beam headlamps are switched on
automatically. The
Kindicator lamp in th e
instrumen tcluste ralso lights up.
If you are driving at speeds belo wapprox -
imately 16 mph (25 km/h) or other road user s
hav ebeen detecte dor th eroad sare ade-
quately lit :
The high-beam headlamps are switched off
automatically. The Kindicator lamp in th e
instrumen tcluste rgoes out .The _ indi-
cator lamp in th emultifunction display
remain slit .
XTo switch off :mov eth ecombination switch
bac kto it snormal position or mov eth eligh t
switch to another position .
The _ indicator lamp in th einstrumen t
cluste rgoes out .
Headlamps fogged up on the inside
Certain climatic and physical condition smay
caus emoisture to for min th eheadlamp. This
moisture does no taffec tth efunctionalit yof th e
headlamp.
Interior lighting
Overview of interior lighting
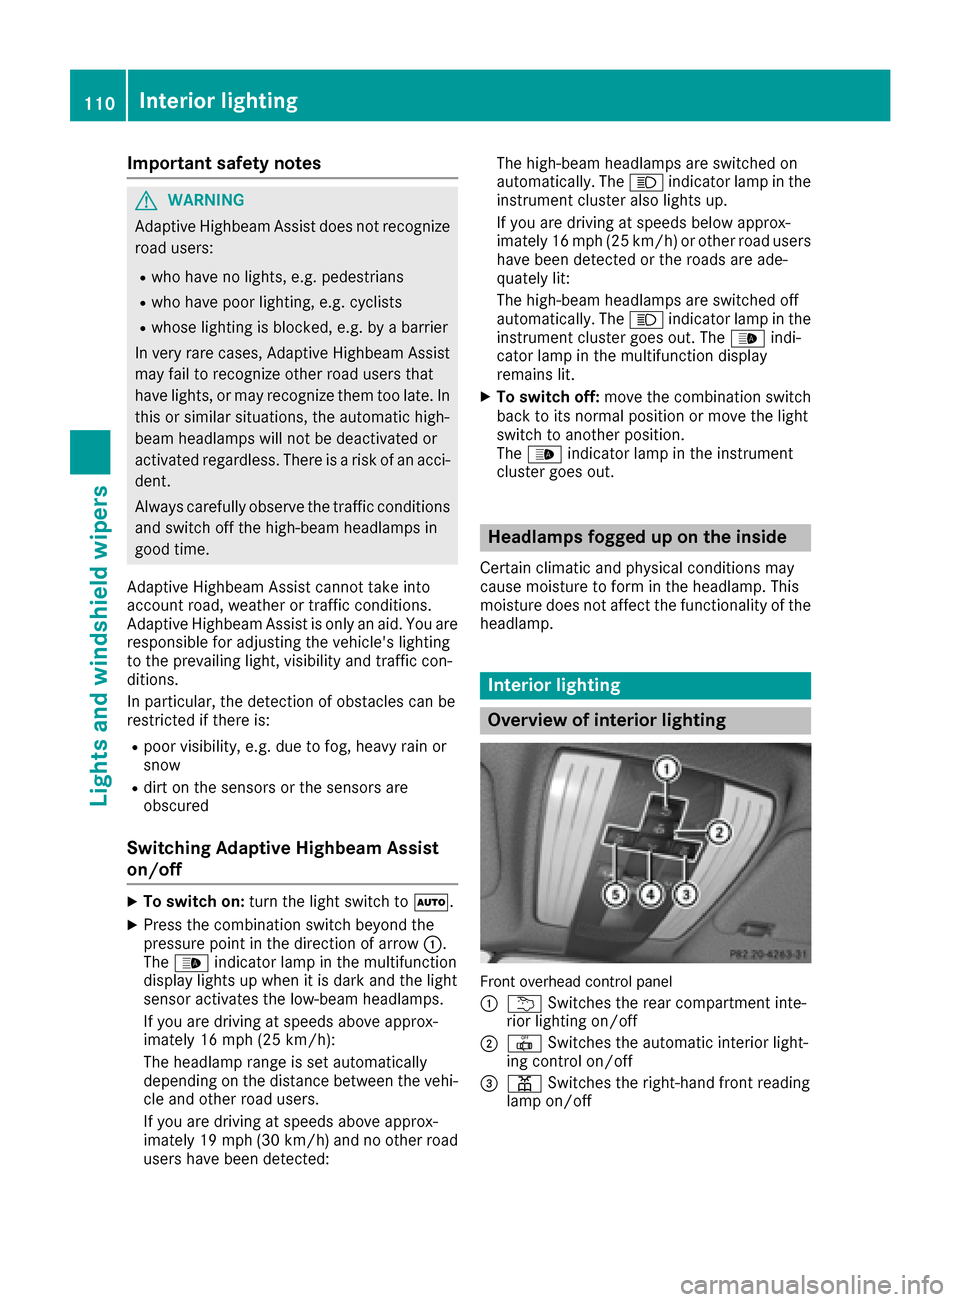
Fron toverhead control panel
:
u Switches th erear compartmen tinte-
rio rlighting on/off
;| Switches th eautomatic interior light-
ing control on/off
=p Switches th eright-hand fron treading
lamp on/off
110Interior lighting
Lights and windshield wipers
Page 113 of 342
?cSwitches the front interior lighting on/
off
Ap Switches the left-hand front reading
lamp on/off
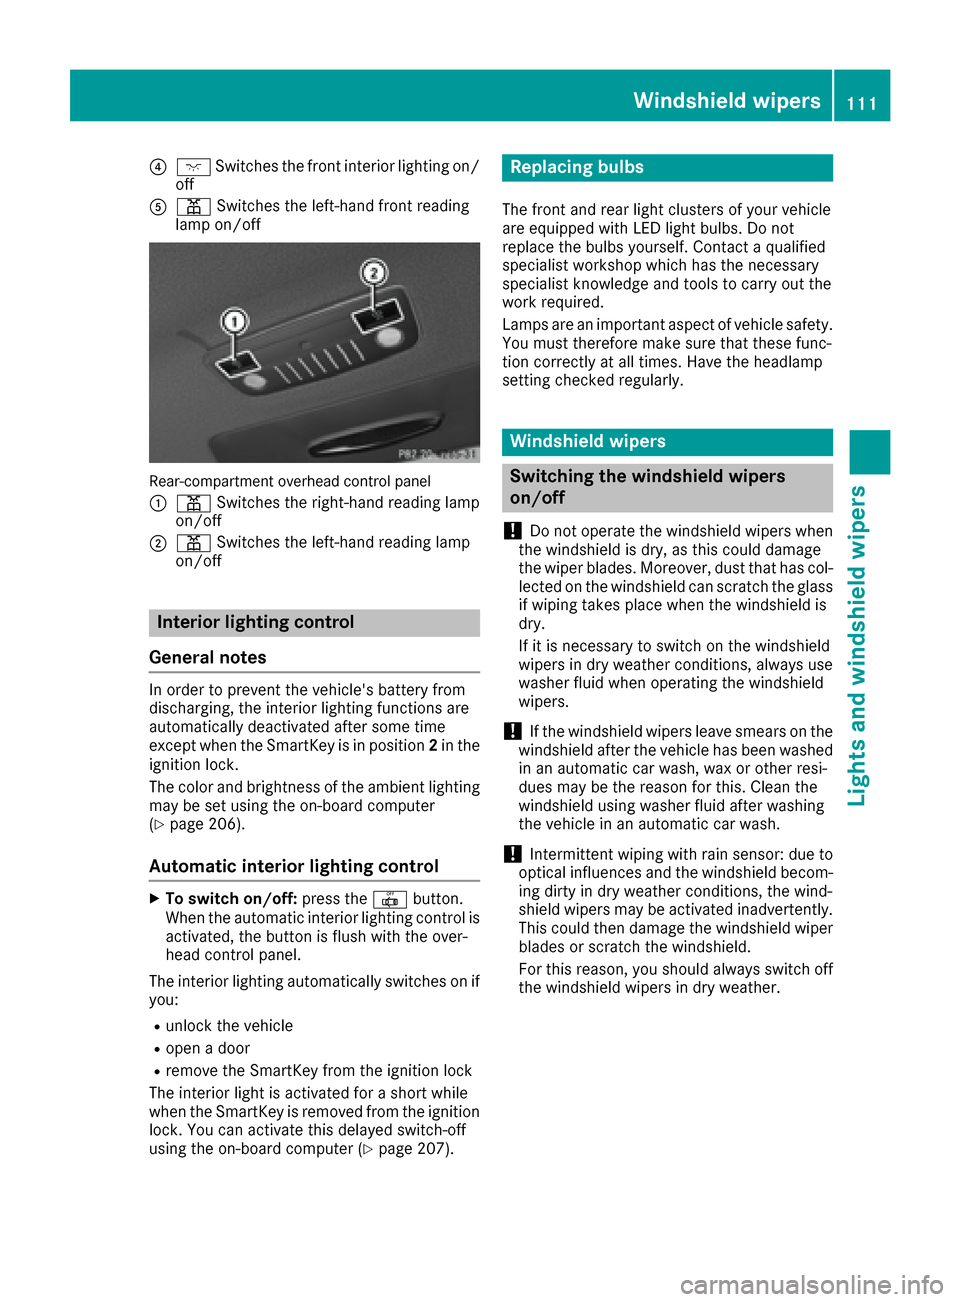
Rear-compartment overhead control panel
:
p Switches the right-hand reading lamp
on/off
;p Switches the left-hand reading lamp
on/off
Interior lighting control
General notes
In order to prevent the vehicle's battery from
discharging, the interior lighting functions are
automatically deactivated after some time
except when the SmartKey is in position 2in the
ignition lock.
The color and brightness of the ambient lighting
may be set using the on-board computer
(
Ypage 206).
Automatic interior lighting control
XTo switch on/off: press the|button.
When the automatic interior lighting control is
activated, the button is flush with the over-
head control panel.
The interior lighting automatically switches on if
you:
Runlock the vehicle
Ropen a door
Rremove the SmartKey from the ignition lock
The interior light is activated for a short while
when the SmartKey is removed from the ignition
lock. You can activate this delayed switch-off
using the on-board computer (
Ypage 207).
Replacing bulbs
The front and rear light clusters of your vehicle
are equipped with LED light bulbs. Do not
replace the bulbs yourself. Contact a qualified
specialist workshop which has the necessary
specialist knowledge and tools to carry out the
work required.
Lamps are an important aspect of vehicle safety.
You must therefore make sure that these func-
tion correctly at all times. Have the headlamp
setting checked regularly.
Windshield wipers
Switching the windshield wipers
on/off
!
Do not operate the windshield wipers when
the windshield is dry, as this could damage
the wiper blades. Moreover, dust that has col-
lected on the windshield can scratch the glass
if wiping takes place when the windshield is
dry.
If it is necessary to switch on the windshield
wipers in dry weather conditions, always use
washer fluid when operating the windshield
wipers.
!If the windshield wipers leave smears on the
windshield after the vehicle has been washed
in an automatic car wash, wax or other resi-
dues may be the reason for this. Clean the
windshield using washer fluid after washing
the vehicle in an automatic car wash.
!Intermittent wiping with rain sensor: due to
optical influences and the windshield becom-
ing dirty in dry weather conditions, the wind-
shield wipers may be activated inadvertently.
This could then damage the windshield wiper
blades or scratch the windshield.
For this reason, you should always switch off
the windshield wipers in dry weather.
Windshield wipers111
Lights and windshield wipers
Z
Page 114 of 342
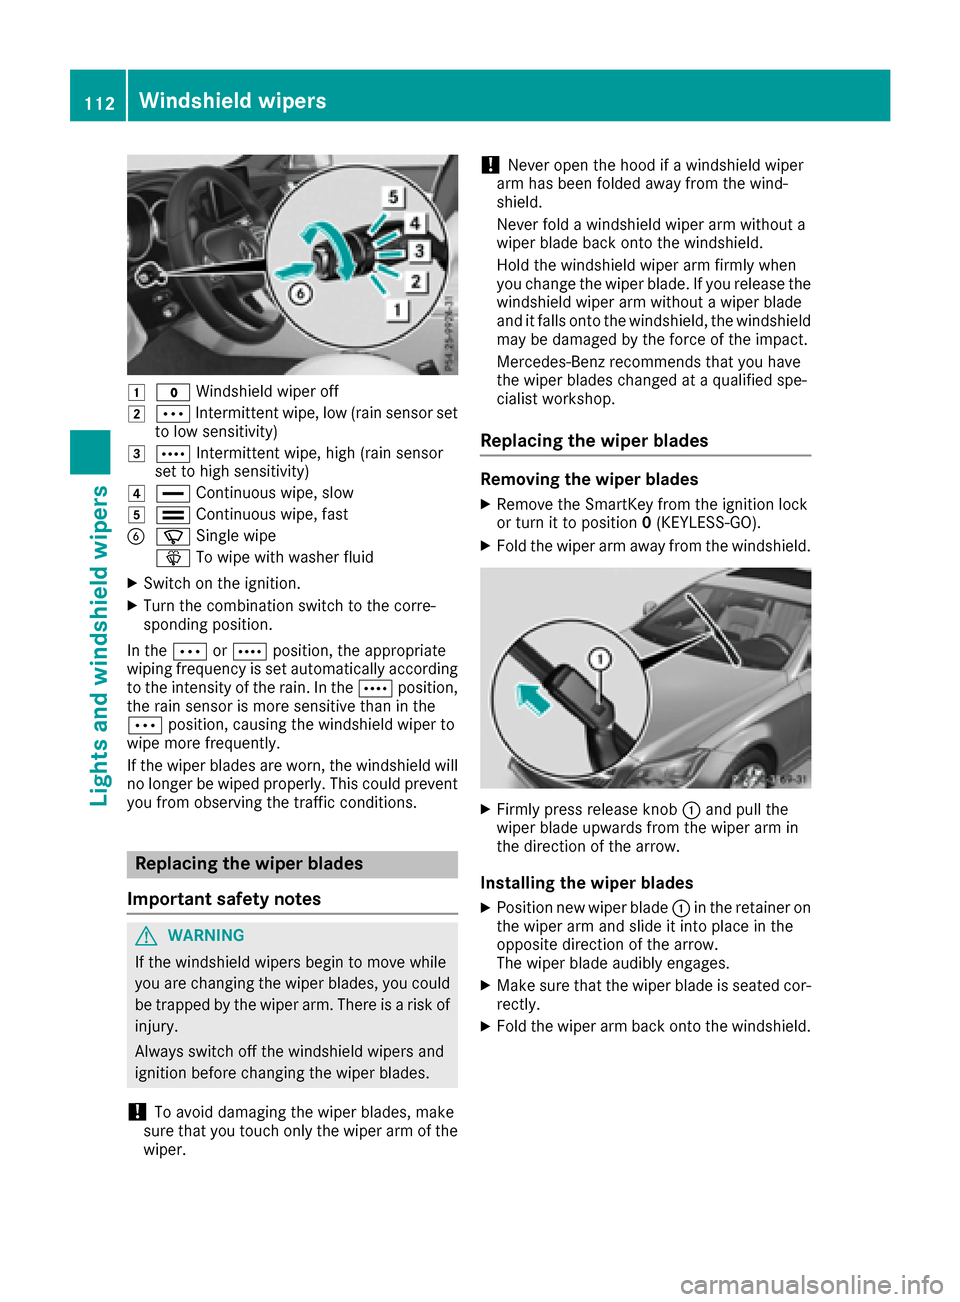
1$Windshield wiper off
2ÄIntermittent wipe, low (rain sensor set
to low sensitivity)
3Å Intermittent wipe, high (rain sensor
set to high sensitivity)
4° Continuous wipe, slow
5¯Continuous wipe, fast
BíSingle wipe
î To wipe with washer fluid
XSwitch on the ignition.
XTurn the combination switch to the corre-
sponding position.
In the ÄorÅ position, the appropriate
wiping frequency is set automatically according
to the intensity of the rain. In the Åposition,
the rain sensor is more sensitive than in the
Ä position, causing the windshield wiper to
wipe more frequently.
If the wiper blades are worn, the windshield will
no longer be wiped properly. This could prevent
you from observing the traffic conditions.
Replacing the wiper blades
Important safety notes
GWARNING
If the windshield wipers begin to move while
you are changing the wiper blades, you could be trapped by the wiper arm. There is a risk of
injury.
Always switch off the windshield wipers and
ignition before changing the wiper blades.
!To avoid damaging the wiper blades, make
sure that you touch only the wiper arm of the
wiper.
!Never open the hood if a windshield wiper
arm has been folded away from the wind-
shield.
Never fold a windshield wiper arm without a
wiper blade back onto the windshield.
Hold the windshield wiper arm firmly when
you change the wiper blade. If you release the
windshield wiper arm without a wiper blade
and it falls onto the windshield, the windshield
may be damaged by the force of the impact.
Mercedes-Benz recommends that you have
the wiper blades changed at a qualified spe-
cialist workshop.
Replacing the wiper blades
Removing the wiper blades
XRemove the SmartKey from the ignition lock
or turn it to position 0(KEYLESS-GO).
XFold the wiper arm away from the windshield.
XFirmly press release knob :and pull the
wiper blade upwards from the wiper arm in
the direction of the arrow.
Installing the wiper blades
XPosition new wiper blade :in the retainer on
the wiper arm and slide it into place in the
opposite direction of the arrow.
The wiper blade audibly engages.
XMake sure that the wiper blade is seated cor-
rectly.
XFold the wiper arm back onto the windshield.
112Windshield wipers
Lights and windshield wipers
Page 115 of 342
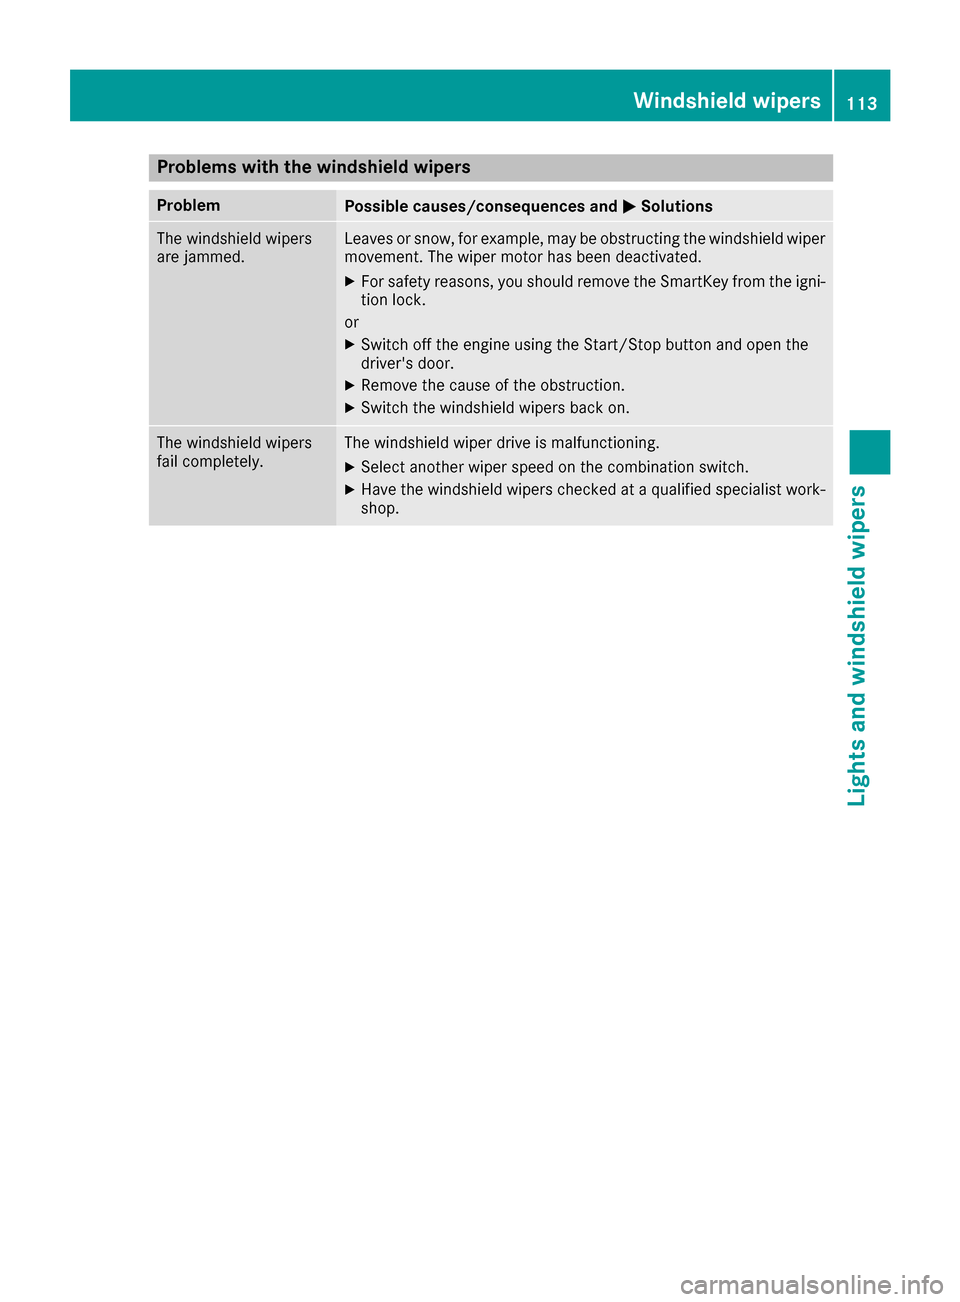
Problems with the windshield wipers
ProblemPossible causes/consequences andMSolutions
The windshield wipers
are jammed.Leaves or snow, for example, may be obstructing the windshield wiper
movement. The wiper motor has been deactivated.
XFor safety reasons, you should remove the SmartKey from the igni-
tion lock.
or
XSwitch off the engine using the Start/Stop button and open the
driver's door.
XRemove the cause of the obstruction.
XSwitch the windshield wipers back on.
The windshield wipers
fail completely.The windshield wiper drive is malfunctioning.
XSelect another wiper speed on the combination switch.
XHave the windshield wipers checked at a qualified specialist work-
shop.
Windshield wipers113
Lights and windshield wipers
Z
Page 116 of 342

Overview of climate control systems
General notes
Observe the settings recommended on the fol-
lowing pages. The windows could otherwise fog
up.
To prevent the windows from fogging up:
Rswitch off climate control only briefly
Rswitch on air-recirculation mode only briefly
Rswitch on the cooling with air dehumidifica-
tion function
Rswitch on the defrost windshield function
briefly, if required
Climate control regulates the temperature and
the humidity in the vehicle interior and filters
undesirable substances out of the air.
Climate control can only be operated when the
engine is running. Optimum operation is only
achieved with the side windows and roof closed.
The residual heat function can only be activated
or deactivated with the ignition switched off
(
Ypage 124).
iVentilate the vehicle for a brief period during
warm weather, e.g. using the convenience
opening feature (
Ypage 88). This will speed
up the cooling process and the desired inte-
rior temperature will be reached more
quickly.
iThe integrated filter filters out most parti-
cles of dust and soot and completely filters
out pollen. It also reduces gaseous pollutants
and odors. A clogged filter reduces the
amount of air supplied to the vehicle interior.
For this reason, you should always observe
the interval for replacing the filter, which is
specified in the Maintenance Booklet. As it
depends on environmental conditions, e.g.
heavy air pollution, the interval may be
shorter than stated in the Maintenance Book- let.
114Overview of climate control systems
Climate control
Page 117 of 342
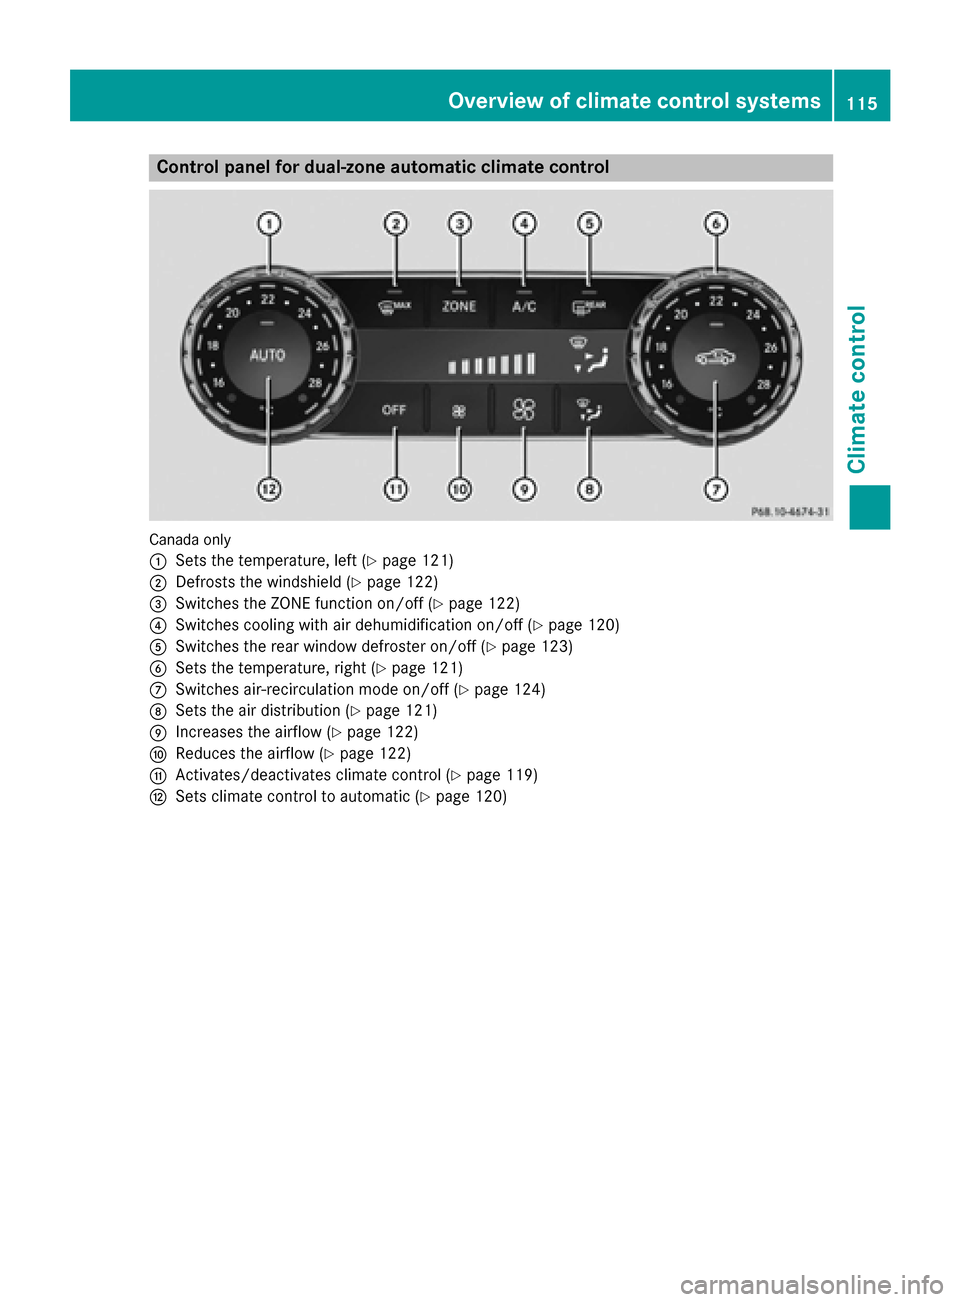
Control panel for dual-zone automatic climate control
Canadaonly
:
Sets the temperature, left (Ypage 121)
;Defrosts the windshield (Ypage 122)
=Switches the ZONE function on/off (Ypage 122)
?Switches cooling with air dehumidification on/off (Ypage 120)
ASwitches the rear window defroster on/off (Ypage 123)
BSets the temperature, right (Ypage 121)
CSwitches air-recirculation mode on/off (Ypage 124)
DSets the air distribution (Ypage 121)
EIncreases the airflow (Ypage 122)
FReduces the airflow (Ypage 122)
GActivates/deactivates climate control (Ypage 119)
HSets climate control to automatic (Ypage 120)
Overview of climate control systems115
Climate control
Page 118 of 342
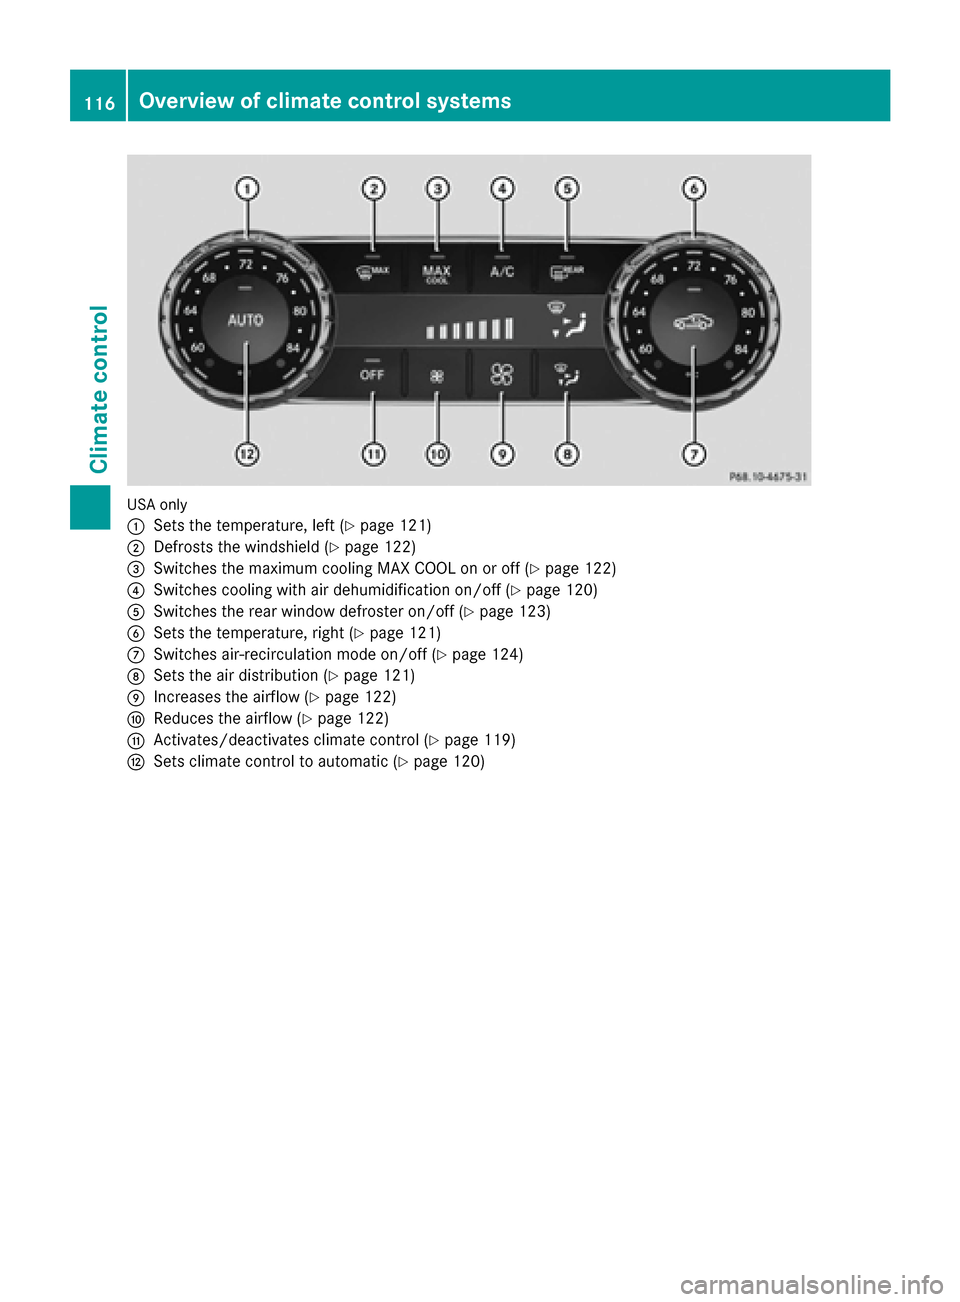
USA only
:
Sets the temperature, left (Ypage 121)
;Defrosts the windshield (Ypage 122)
=Switches the maximum cooling MAX COOL on or off (Ypage 122)
?Switches cooling with air dehumidification on/off (Ypage 120)
ASwitches the rear window defroster on/off (Ypage 123)
BSets the temperature, right (Ypage 121)
CSwitches air-recirculation mode on/off (Ypage 124)
DSets the air distribution (Ypage 121)
EIncreases the airflow (Ypage 122)
FReduces the airflow (Ypage 122)
GActivates/deactivates climate control (Ypage 119)
HSets climate control to automatic (Ypage 120)
116Overview of climate control systems
Climate control
Page 119 of 342
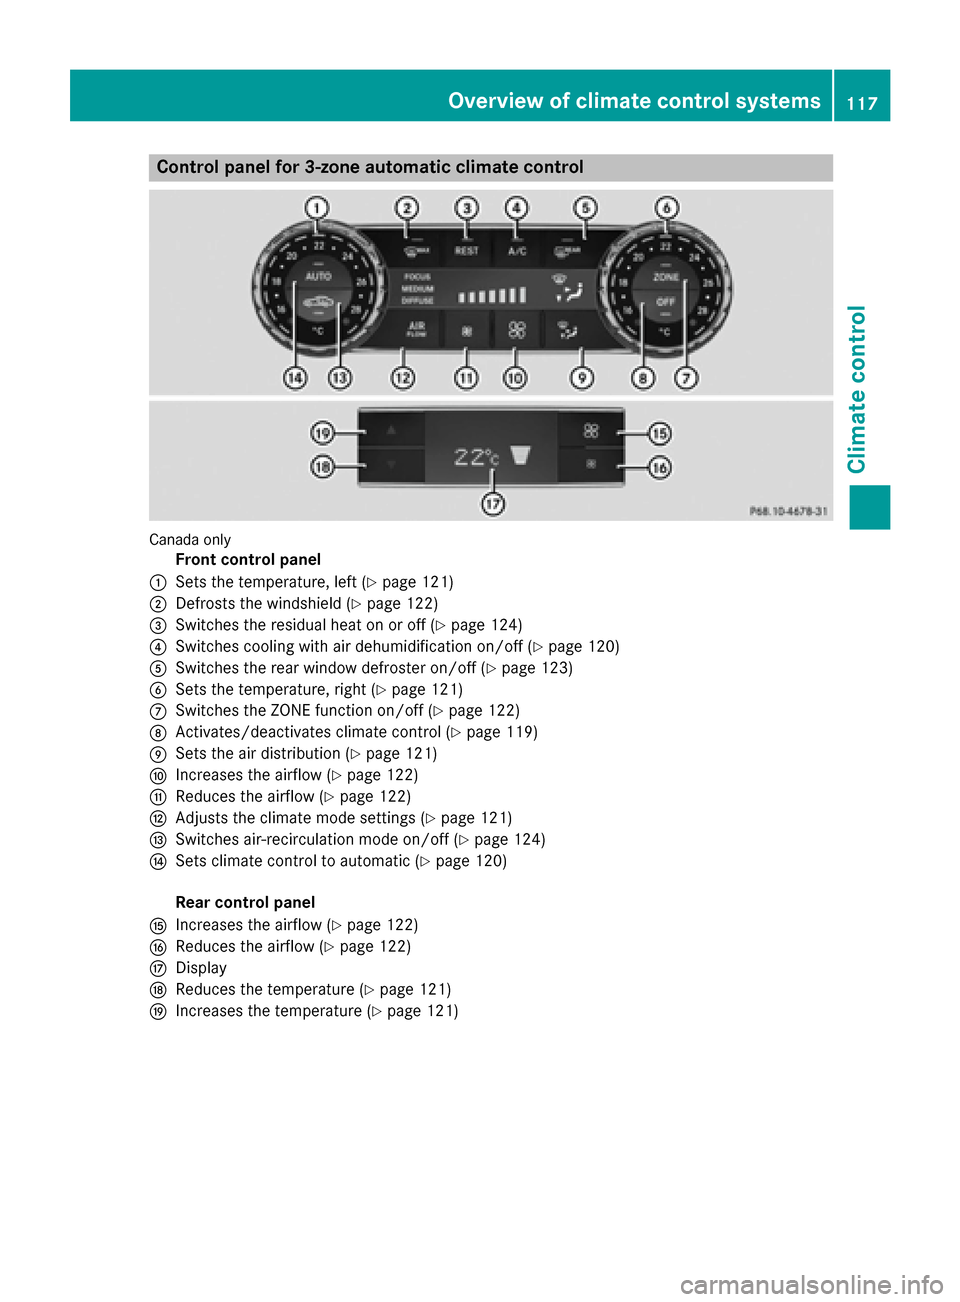
Control panel for 3-zone automatic climate control
Canadaonly
Front control panel
:Sets the temperature, left (Ypage 121)
;Defrosts the windshield (Ypage 122)
=Switches the residual heat on or off (Ypage 124)
?Switches cooling with air dehumidification on/off (Ypage 120)
ASwitches the rear window defroster on/off (Ypage 123)
BSets the temperature, right (Ypage 121)
CSwitches the ZONE function on/off (Ypage 122)
DActivates/deactivates climate control (Ypage 119)
ESets the air distribution (Ypage 121)
FIncreases the airflow (Ypage 122)
GReduces the airflow (Ypage 122)
HAdjusts the climate mode settings (Ypage 121)
ISwitches air-recirculation mode on/off (Ypage 124)
JSets climate control to automatic (Ypage 120)
Rear control panel
KIncreases the airflow (Ypage 122)
LReduces the airflow (Ypage 122)
MDisplay
NReduces the temperature (Ypage 121)
OIncreases the temperature (Ypage 121)
Overview of climate control systems117
Climate control
Page 120 of 342
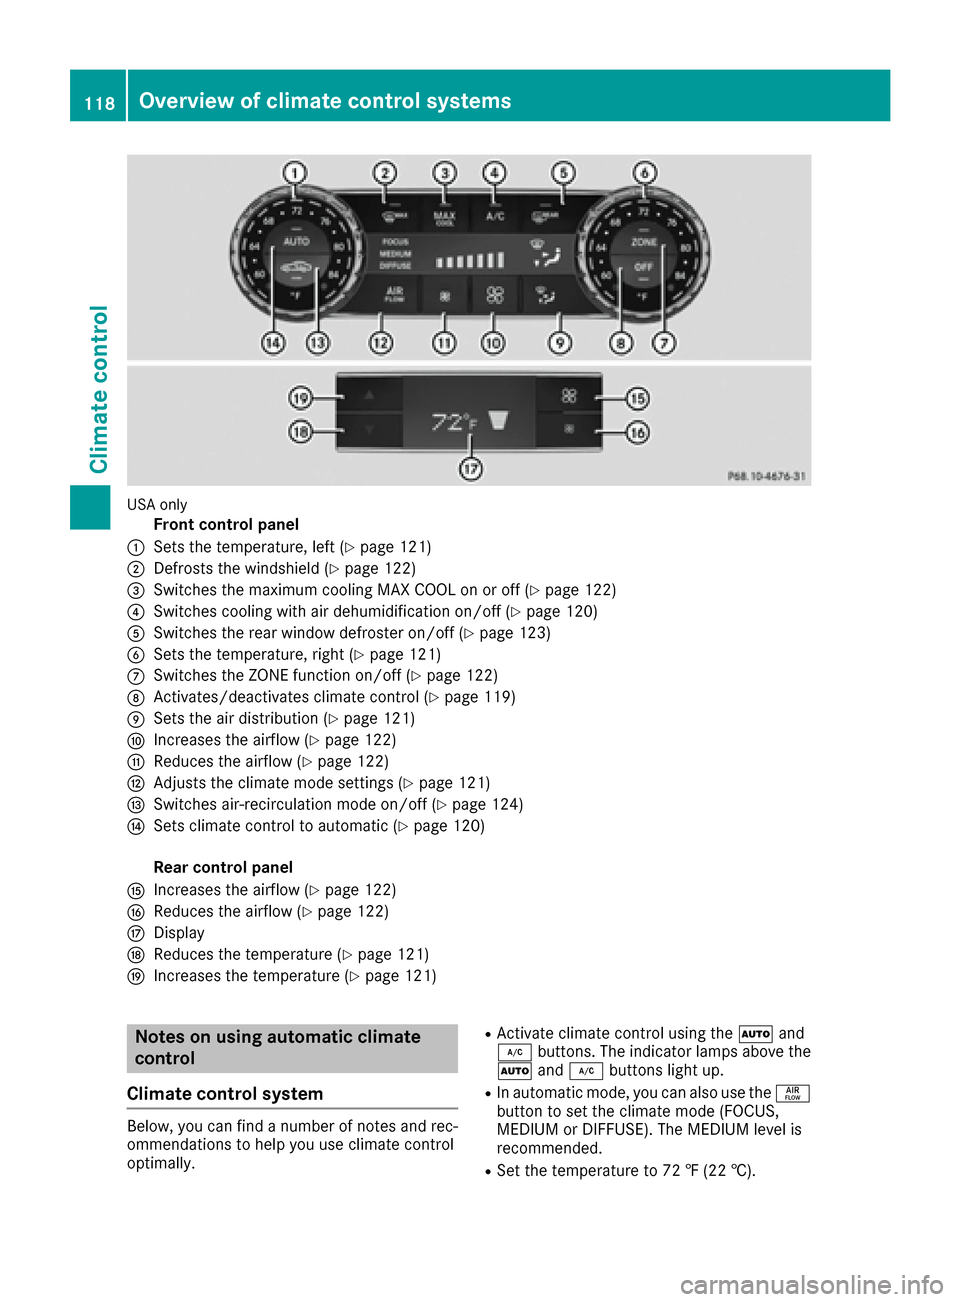
USA only
Front control panel
:Sets the temperature, left (Ypage 121)
;Defrosts the windshield (Ypage 122)
=Switches the maximum cooling MAX COOL on or off (Ypage 122)
?Switches cooling with air dehumidification on/off (Ypage 120)
ASwitches the rear window defroster on/off (Ypage 123)
BSets the temperature, right (Ypage 121)
CSwitches the ZONE function on/off (Ypage 122)
DActivates/deactivates climate control (Ypage 119)
ESets the air distribution (Ypage 121)
FIncreases the airflow (Ypage 122)
GReduces the airflow (Ypage 122)
HAdjusts the climate mode settings (Ypage 121)
ISwitches air-recirculation mode on/off (Ypage 124)
JSets climate control to automatic (Ypage 120)
Rear control panel
KIncreases the airflow (Ypage 122)
LReduces the airflow (Ypage 122)
MDisplay
NReduces the temperature (Ypage 121)
OIncreases the temperature (Ypage 121)
Notes on using automatic climate
control
Climate control system
Below, you can find a number of notes and rec-
ommendations to help you use climate control
optimally.
RActivate climate control using the Ãand
¿ buttons. The indicator lamps above the
à and¿ buttons light up.
RIn automatic mode, you can also use the ñ
button to set the climate mode (FOCUS,
MEDIUM or DIFFUSE). The MEDIUM level is
recommended.
RSet the temperature to 72 ‡ (22 †).
118Overview of climate control systems
Climate control