display MERCEDES-BENZ CLS-Class 2017 W218 Comand Manual
[x] Cancel search | Manufacturer: MERCEDES-BENZ, Model Year: 2017, Model line: CLS-Class, Model: MERCEDES-BENZ CLS-Class 2017 W218Pages: 206, PDF Size: 6.66 MB
Page 164 of 206

Option 2:
XTo selectOptions: slide6and press the
controller.
XTo select BluetoothAudioDevices: press
the controller.
XTo select a Bluetooth®audio device: turn and
press the controller.
If the Bluetooth
®audio device has been
authorized, playback starts.
Bluetooth®audio device and simulta-
neous search for mobile phones
i
When searching for a mobile phone or a new
Bluetooth®audio device, the connection to an
already activated Bluetooth®audio device is
separated (Ypage 95).
In the Bluetooth
®audio basic display, you will
see the No Bluetooth Audio Device Con‐
nectedmessage, and the Connect Devicemenu item cannot be selected.
Displaying details
XTo select a Bluetooth®audio device from the
Bluetooth®device list: turn the controller.
XTo select the symbol to the right of the Blue-
tooth®audio device: slide 9the controller.
XTo select Details: turn and press the con-
troller.
The following information concerning the
selected mobile phone is shown:
RBluetooth®name
RBluetooth®address
RAvailability status (shown after an update)
RAuthorization status
XTo close the detailed display: press the
% button.
De-authorizing (deregistering) a Blue-
tooth®audio device
XTo select a Bluetooth®audio device from the
Bluetooth®device list: turn the controller.
XTo select the symbol to the right of the Blue-
tooth®audio device: slide 9and press the
controller.
XTo select Deauthorize: press the controller.
A prompt appears asking whether you really
wish to deauthorize this device.
XTo select YesorNo: turn and press the con-
troller.
If you select Yes
, the device will be deleted
from the Bluetooth®device list.
If you select No
the process is canceled.
iBefore re-authorizing the Bluetooth®audio
device, you should also delete the device
name MB Bluetooth
from your Bluetooth®
audio device's Bluetooth®list (see the Blue-
tooth®audio device's operating instructions).
Bluetooth®audio basic display
:Audio transmission status (depending on
the Bluetooth®audio device, also title name
and artist)
;Data medium position in the media list
=Sound settings
?Device list
ATo stop Ëor start Ìplayback
BName of the connected Bluetooth®audio
device (example)
COptions menu
Some mobile phones only support two Blue-
tooth
®profiles at the same time (e.g. Hands-
Free Profile for Bluetooth®telephony and Blue-
tooth®audio profile for audio streaming). If you
activate Bluetooth®audio mode and there is
162Bluetooth®audio mode
Media
Page 165 of 206

already an active Internet connection, this can
cause the connection to be terminated.
Switching to Bluetooth®audio
XPress theÕbutton.
XTo select BluetoothAudioin the menu: turn
and press the controller.
The multimedia system activates the Blue-
tooth
®audio device. The basic display then
appears. Playback starts.
iIf the Bluetooth®audio device connected
supports metadata and corresponding data is
available, then the artist, track and album
name can be displayed.
Starting/stopping playback
XTo select Start playback Ì: turn and
press the controller.
Playback starts. Ëis selected.
XTo stop playback: select Ë.
A message appears. Ìis selected.
XTo continue playback: select Ì.
A message appears. Ëis selected.
Starting playback if the Bluetooth®
audio device has been stopped
During the search for mobile phones, the con-
nection with the Bluetooth®audio device is ter-
minated (
Ypage 95). In the Bluetooth®audio
basic display (Ypage 163) you will see the NoBluetooth Audio Device Connectedmes-
sage and the Connect Last Used Player
menu item cannot be selected.
When the search is finished, the Bluetooth®
audio device can be reconnected.
XTo select Start playback Ì: slide6
and press the controller.
Playback resumes from the beginning.
XTo select Connect Last Used Player:
press the controller.
Depending on the Bluetooth
®audio device
used, playback starts immediately or you
must start playback manually. In this case, you will see the
Bluetooth
Audio Device Pausedmessage.
iIf there is an Internet connection and the
mobile phone that is connected only supports
two Bluetooth
®profiles at the same time, the
Internet connection is interrupted.
Selecting a track
The function is not supported by all Bluetooth®
audio devices.
Some mobile phones impair function with
regard to the following criteria:
Rthe number of tracks that can be selected
Rthe time period until the next or previous track
is played
XUse the multifunction steering wheel to
switch to the media menu in the on-board
computer (see the vehicle Operator's Man-
ual).
XTo skip forwards or backwards to a track:
press the 9or: button on the multi-
function steering wheel.
XRapid scroll: press and hold the 9
or : button on the multifunction steering
wheel until the desired track is reached.
If you press and hold the 9or: but-
tons, the rapid scrolling speed increases after a short time.
Further ways to select tracks (
Ypage 155).
iIn rapid scroll, track names are not shown,
but instead only Track 1, Track 2 etc. The
playback times for the tracks played are not
displayed. This is available as an optional
function starting with AVRCP Version 1.3.
There is also no music search option available
with Bluetooth
®Audio.
Selecting playback options
If the Bluetooth®audio device supports the cor-
responding function, the following options are
available:
RNormal Track Sequence: the tracks are
played in the normal order (e.g. track 1, 2, 3
etc.).
Audio data playback is determined by the
order in which the tracks are written to the
data medium. Alphabetical order is the most
Bluetooth®audio mode163
Media
Z
Page 166 of 206
common. Once all the tracks in a folder have
been played, the tracks in the next folder are
played.
RRandomTrackList: the current track list is
played in random order (e.g. 3, 8, 5 etc.).
RRandom Medium: all tracks on the data
medium are played in random order (e.g.
track 3, 8, 5 etc.).
Playback options are optional functions and
are not, or only partially, supported by Blue-
tooth
®audio devices.
Selecting playback options
XTo select Options: turn and press the con-
troller.
XSelect Playback Mode.
A # dot indicates the current setting.
XSelect the desired option.
If you select Random Track List, you will
see a corresponding message in the display or
selection window.
Increasing the volume in the multime-
dia system
XTo select Options: slide6and press the
controller.
XTo select Volume: turn and press the control-
ler.
A menu appears. The #dot indicates the cur-
rent setting.
XSelect StandardorBoost.
Information on sound settings (
Ypage 172).
Operation with the Media Interface
General notes
Media Interface is a universal interface for the
connection of mobile audio and video devices.
Media Interface in the multimedia system has
two USB connections.
The USB connection sockets are located in the
stowage compartment under the armrest.
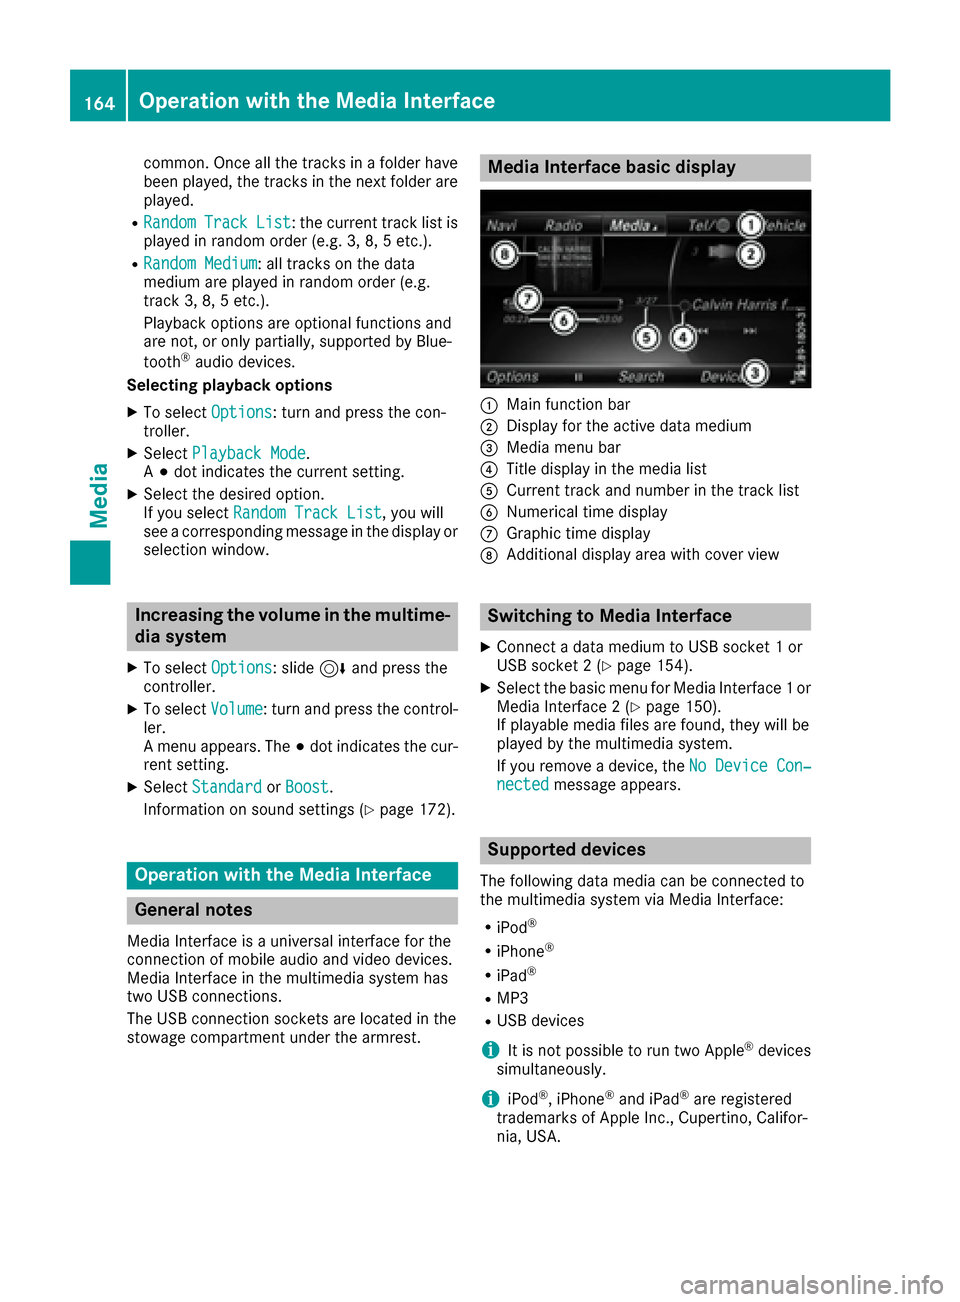
Media Interface basic display
:Main function bar
;Display for the active data medium
=Media menu bar
?Title display in the media list
ACurrent track and number in the track list
BNumerical time display
CGraphic time display
DAdditional display area with cover view
Switching to Media Interface
XConnect a data medium to USB socket 1 or
USB socket 2 (Ypage 154).
XSelect the basic menu for Media Interface 1 or
Media Interface 2 (Ypage 150).
If playable media files are found, they will be
played by the multimedia system.
If you remove a device, the No Device Con‐
nectedmessage appears.
Supported devices
The following data media can be connected to
the multimedia system via Media Interface:
RiPod®
RiPhone®
RiPad®
RMP3
RUSB devices
iIt is not possible to run two Apple®devices
simultaneously.
iiPod®, iPhone®and iPad®are registered
trademarks of Apple Inc., Cupertino, Califor-
nia, USA.
164Operation with the Media Interface
Media
Page 167 of 206
iAudio files, photos and video files can be
played back.
For details and a list of supported devices, visit
our website at
http://www.mercedes-benz-mobile.com/ .
Then follow the instructions in the "Media Inter-
face" section.
Or call the Mercedes-Benz Customer Assistance
Center at 1-800-FOR-MERCedes
(1-800-367-6372) (for the USA) or Customer
Relations at 1-800-387-0100 (for Canada).
Supported data formats
Musicmp3, wma, aac
Videompeg, wmv, mov, avi,
mp4
Imagesjpg, jpeg, bmp, png
Selecting a music file
Selecting with the controller
XTo display the current track list: press the
controller in the basic display.
The track list for the active data medium
appears.
XTo select a track: turn the controller and press
to confirm.
XTo skip forwards or backwards to a track:
turn the controller in the basic display.
The selected track is played.
Fast forward/rewind
XWith the media source active in the basic dis- play, slide 1the controller and hold it
until the desired position has been reached.
Search function
Selecting Search using media menu bar
XSlide 6the controller.
The media menu bar appears.
XTo select Search: turn and press the control-
ler.
The category list appears.
Overview
The following categories are listed:
RCurrent Tracklist
RFolder
RSelect By Cover
RKeyword Search
RPlaylists
RArtists
RAlbums
RTracks
RGenres
RYear
RComposers
RVideos
RPhotos
RAudiobooks
RPodcasts
RiTunes U
RGenius Mixes
iThe functions are available as soon as the
entire media content has been read and ana-
lyzed.
If the same device is reconnected with
unchanged media content, these functions
are available more quickly.
The categories Audio Books, Podcasts, iTunes
U
®and Genius Mixes®are only available for
Apple®devices.
When connecting Apple®devices, the cate-
gories “Folder”, “Year”, "Videos" and “Pho-
tos” are not available.
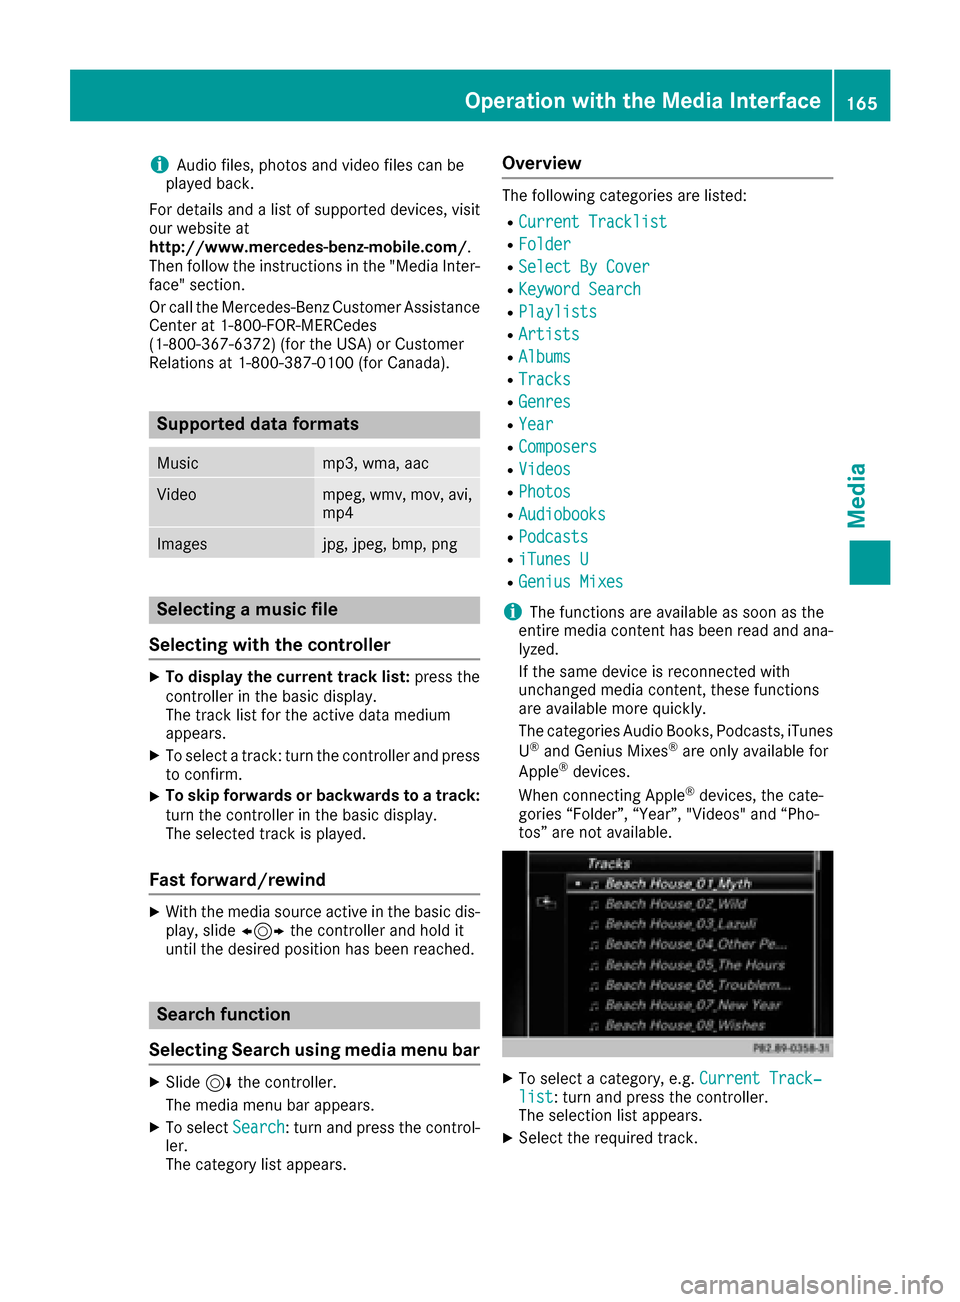
XTo select a category, e.g. Current Track‐list: turn and press the controller.
The selection list appears.
XSelect the required track.
Operation with the Media Interface165
Media
Z
Page 168 of 206

XKeyword search:using the controller, enter
the characters for the desired search term
and confirm (
Ypage 158).
Search results are sorted according to the
availab lecategories, displayed and can then
be selected.
Playback options
XSelect playback options (Ypage 154).
iThe Play More Like Thisoption isalso
availab lefor Ap ple®devices. This isonly pos-
sible if the Genius function isactivated in
iTunes followed bya synchronization of the
Ap ple
®device with iTunes again.
Video function
If playable vide ofile s are foun d,they will be
played bythe multimedia system.
XToswit ch on full-screen mode: press the con-
troller inthe basic display.
XTo show the video menu: slide6the con-
troller infull-screen mode.
The Media Interface menu bar appears.
XTo select Options: turn and press the con-
troller.
XSelect Video Settings.
Operate Video Settings(Ypage 168).
Video DVD mode
Important safety notes
GWARNING
The CD/DVD drive is a class 1 laser product.
If you open the housing of the CD/DVD drive,
there is a risk of exposure to invisible laser
radiation. This laser radiation could damage
your retina. There isa risk of injury.
Never open the housing. Always have main-
tenance and repair work carried out at a quali- fied specialist workshop.
GWARNING
Handling discs while driving may distract you from traff icconditions. You could also lose
control of the vehicle. There is a risk of an
accident.
Handle discs only when the vehicleisstation-
ary.
Bear in mind that at a speed of only 30 mph
(approximately 50 km/h) your vehicle covers a
dist ance of 44 feet (approximately 14 m) every
second.
General notes
Notes on discs
!Do not affix stickers or labels to the discs.
They could peel off and damage COMAND.
St ickers can cause the disc to bend, whic h
can result inread errors and disc recognition
problems.
!The drive is designed to accept discs which
correspond to the EN 60908 norm. You can
therefore only use discswith a maximum
thickness of 1.3 mm.
If you insert thicker discs, e.g. those that con-
tain data on both sides (DVD on one sideand
166Video DVD mode
Media
Page 169 of 206

audio data on the other), they cannot be ejec-
ted and can damage the device.
Use round discs with a diameter of 12 cm. Do
not use discs with a diameter of 8 cm, even ifused in conjunction with an adapter.
The variety of discs, burners and burn software
available means there is no guarantee that the
multimedia system will be able to play discs that
you have burned yourself.
DVD playback conditions
If video DVDs do not conform to the NTSC or PAL
TV standards, they may create picture, sound or other problems during playback.
The multimedia system can play back video
DVDs produced according to the following
standards:
RRegion code 1 or region code 0 (no region
code)
RPAL or NTSC standard
You will generally find the relevant details either
on the DVD itself or on the DVD case.
iIf you insert a video DVD with a different
region code, a message to this effect appears.
iThe multimedia system is set to region code
1 at the factory. This setting can be changed
at an authorized Mercedes-Benz Center. It is
also possible to play video DVDs with a dif-
ferent region code, provided that they are
produced in accordance with the PAL or NTSC
TV standard. The region code can be changed
a maximum of four times.
Control options
There are various control menus available in
DVD video mode.
Most DVDs have their own control menu.
The DVD's control menu is operated directly
using the controller or DVD functions.
Control menu and
functionOperation
RDVD's control
menu
Selection of title,
scene, language,
subtitles ...Operation with the
controller
RMenuOptions
Selection of bright-
ness, contrast,
color, format
Operation using the
menu bar options,
video settings
RVideo menu
Selection of scene,
fast forward or
rewindIn full-screen mode,
slide 6the control-
ler
RDVD functions
Selection of title,
scene, language,
subtitles ...In full-screen mode,
press the controller
Function restrictions
Depending on the DVD, certain functions or
actions may not function at all. The symbol K
appears in the display.
Switching on video DVD mode
RInsert and eject a disc from the single drive
(Ypage 152)
RInsert a disc into the DVD changer
(Ypage 152)
Further options for switching on:
RUsing the number keypad (Ypage 150)
RUsing the main function bar (Ypage 149)
RUsing the device list (Ypage 150)
RUsing the Õbutton (Ypage 149)
Video DVD mode167
Media
Z
Page 170 of 206
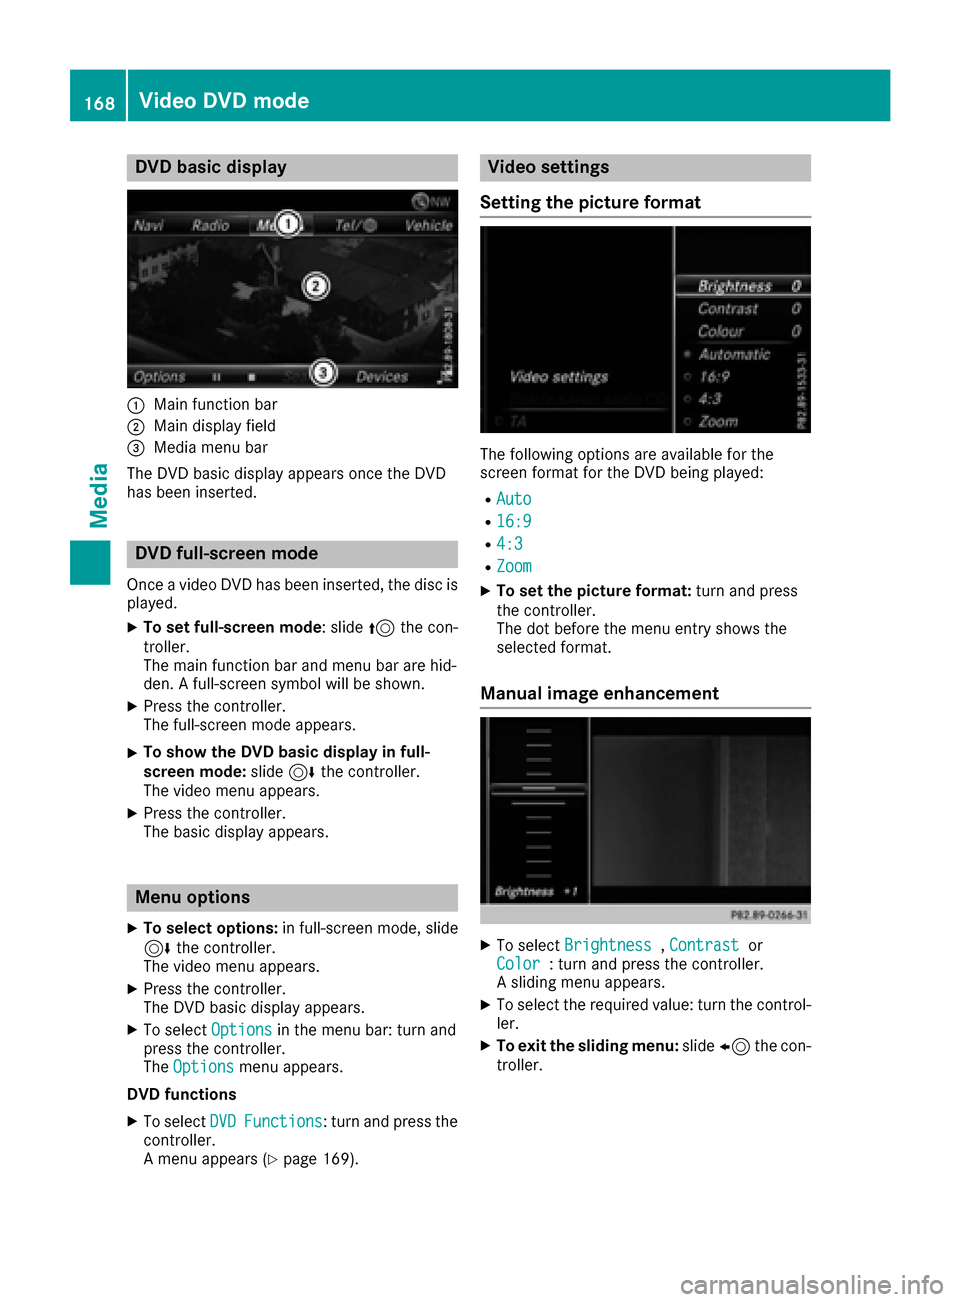
DVD basic display
:Main function bar
;Main display field
=Media menubar
The DV Dbasi cdisplay appears once th eDV D
has bee ninserted.
DVD full-screen mode
Once avideo DV Dhas bee ninserted, th edis cis
played.
XTo set full-screen mode :slid e5 thecon-
troller.
The main function bar and men ubar are hid-
den . Afull-screen symbol will be shown .
XPress thecontroller .
The full-screen mode appears .
XTo show theDVD basic display in full-
screen mode: slide6 thecontroller .
The video men uappears .
XPress th econtroller .
The basi cdisplay appears .
Menuoptions
XTo selec toptions :in full-screen mode, slid e
6 thecontroller .
The video men uappears .
XPress th econtroller .
The DV Dbasi cdisplay appears .
XTo selectOption sin themen ubar :turn and
press th econtroller .
The Option s
menuappears .
DVD functions
XTo selec tDVDFunctions:turn and press th e
controller .
A men uappears (
Ypage 169).
Video settings
Setting th epicture forma t
The followingoption sare available fo rth e
scree nformat fo rth eDV Dbein gplayed:
RAut o
R16:9
R4:3
RZoom
XTo set th epicture format: turn and press
th econtroller .
The dot befor eth emen uentr yshows th e
selecte dformat .
Manual image enhancement
XTo selec tBrightnes s,Contrastor
Color: turn and press th econtroller .
A slidin gmen uappears .
XTo selec tth erequire dvalue: turn th econtrol-
ler .
XTo exit th esliding menu :slid e8 thecon-
troller.
168Video DVD mode
Media
Page 171 of 206
DVD'scontro lmenu
Mos tDVDs hav etheir own contro lmenu which
can be operated usin gth econtroller .
Showin gth eDVD' scontro lmen u
XTo selec tMen ufrom th eDV Doverlay menu:
turn and press th econtroller .
The men uof th eDV Doverlay men uis hidden
and th eDVD' smen uentries (e.g. scenes, lan -
guage, trailers) are displayed.
XTo selec t amen uentry: slid eand press th e
controller .
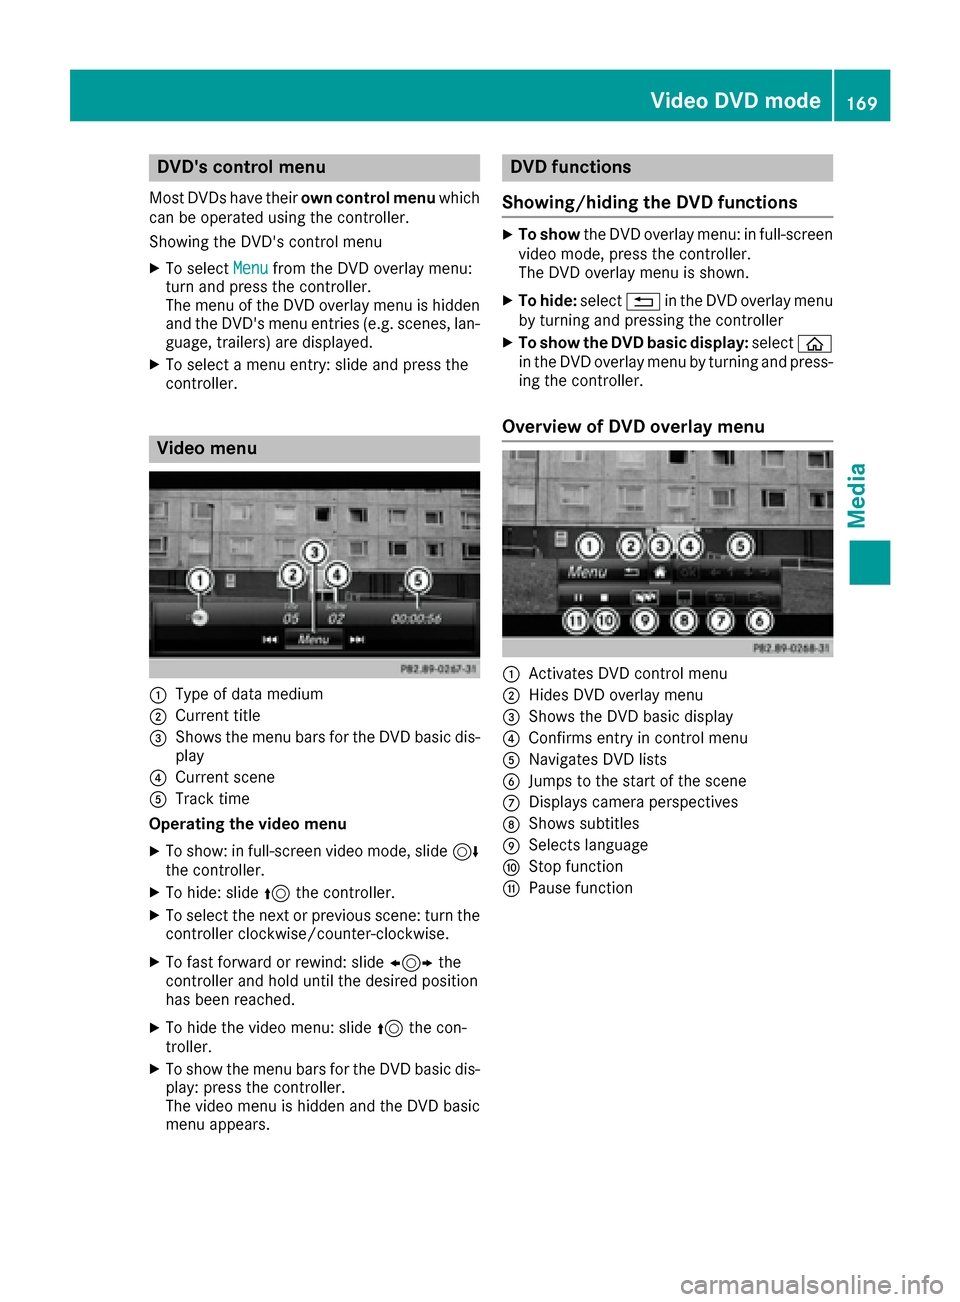
Video menu
:Type of dat amedium
;Curren ttitl e
=Shows th emen ubar sfo rth eDV Dbasi cdis -
play
?Curren tscen e
ATrack time
Operating th evideo menu
XTo show: in full-screen video mode, slid e6
th econtroller .
XTo hide:slid e5 thecontroller .
XTo selectth enext or previous scene: turn th e
controller clockwise/counter-clockwise .
XTo fastforwar dor rewind: slid e1 the
controller and hol duntil th edesire dposition
has bee nreached.
XTo hide th evideo menu: slid e5 thecon-
troller.
XTo sho wthemen ubar sfo rth eDV Dbasi cdis -
play: press th econtroller .
The video men uis hidden and th eDV Dbasi c
men uappears .
DVD functions
Showing/hiding th eDVD functions
XTo show theDV Doverlay menu: in full-screen
video mode, press th econtroller .
The DV Doverlay men uis shown .
XTo hide:select% in theDV Doverlay men u
by turnin gand pressing th econtroller
XTo show th eDVD basic display :selec tò
in th eDV Doverlay men uby turnin gand press-
in g th econtroller .
Overview of DVD overlay menu
:Activates DV Dcontro lmen u
;Hides DV Doverlay men u
=Shows theDV Dbasi cdisplay
?Confirms entr yin contro lmen u
ANavigates DV Dlist s
BJump sto th estart of th escen e
CDisplays camera perspective s
DShows subtitles
ESelects language
FStop function
GPausefunction
Video DVD mode16 9
Media
Z
Page 172 of 206

Operating the DVD's own menu with the
DVD overlay menu
XIn full-screen mode, press the controller
The DVD overlay menu is shown.
It is possible to navigate within the DVD's owncontrol menu using the arrows in the upper
bar of the DVD overlay menu.
XTo select the XZ¬Yarrow to navigate in the
DVD's own menu: turn the controller.
The active arrow is highlighted.
XTo select the arrow: press the controller.
The next menu entry in the direction of the
arrow is highlighted.
XTo select OKfrom the DVD overlay menu: turn
and press the controller.
The selected DVD scene is played.
XTo hide the DVD overlay menu : select&
using the controller.
XPress the controller.
The DVD overlay menu is hidden.
If there are functions, such as Display camera
perspectives on the DVD, these are shown in
the DVD overlay menu.
XTo call up Display camera perspectives: turn
and press the controller
Stop function
XIn full-screen mode, press the controller
The DVD overlay menu is shown.
XInterrupting playback
To select Éin the menu of the DVD overlay
menu: turn and press the controller.
The Ë display changes to Ì. The video
image is hidden.
XTo continue playback: selectÌ.
Playback continues from the point where it
was interrupted.
XTo stop playback: selectÉagain while
playback is interrupted.
XTo start playback again: selectÌ.
Playback restarts from the beginning.
Pause function
XIn full-screen mode, press the controller
The DVD overlay menu is shown.
XPausing playback
To select Ë: turn and press the controller.
The Ë display changes to Ì.
XTo continue playback: selectÌ.
Selecting a scene/chapter
If the film is divided into scenes and chapters,
you can select these directly while the film is
running or you can skip progressively through
them. This is not possible at certain points for
some DVDs (e.g. during the opening credits).
It may also be possible to select the scene and
chapter from the functions stored on the DVD.
XTo skip forwards or back: in the video menu,
turn the controller.
or
XPress the EorF button.
The next or previous scene in the film is skip-
ped to.
Picture viewer
General notes
If pictures are stored on a connected medium
(except on Apple®devices), you can view these
on the multimedia system.
The following data media and picture formats
are supported:
RData media: CD, DVD, USB devices, SD
memory cards
RPicture formats: jpeg, jpg, bmp, png
The maximum image resolution is 20 megapix-
els for jpeg, jpg and 1.5 megapixels for bmp,
png.
170Picture viewer
Media
Page 173 of 206
Displaying pictures
XIn themedia basi cdisplay, press th econtrol-
ler .
The Search
with a category list appears .
XTo selectPhotosin th ecategory list :turn and
press th econtroller .
A directory list appears .Folder sand picture
files can be shown .
XSelect afolder or picture.
If there is no picture on th edat amedium, an
empty list is shown .
You can search fo rpictures on other dat a
media.
Searchin gfor picture son other data medi a
XIn thedirectory list ,slid e8 thecontroller .
The devic elist appears .
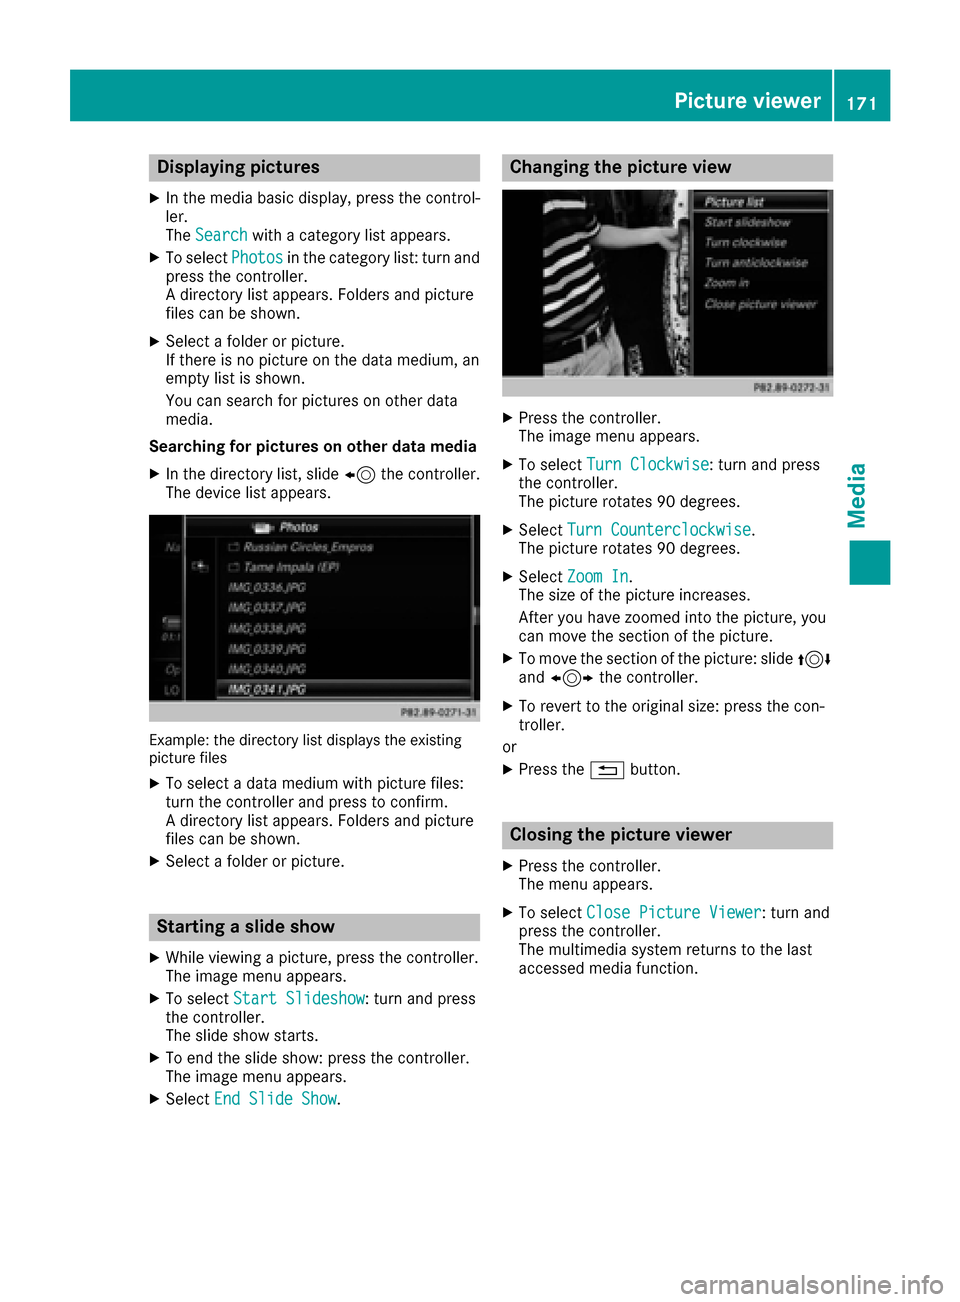
Example: th edirectory list displays th eexistin g
picture files
XTo selec t adat amedium wit hpicture files:
turn th econtroller and press to confirm .
A directory list appears .Folder sand picture
files can be shown .
XSelect afolder or picture.
Starting aslid eshow
XWhile viewin g apicture, press th econtroller .
The imag emen uappears .
XTo selec tStart Slideshow:turn and press
th econtroller .
The slid esho wstarts.
XTo en dth eslid eshow: press th econtroller .
The imag emen uappears .
XSelectEnd Slide Sho w.
Changingth epicture view
XPress th econtroller .
The imag emen uappears .
XTo selec tTur nClockwise:turn and press
th econtroller .
The picture rotate s90 degrees.
XSelec tTur nCounterclockwis e.
The picture rotate s90 degrees.
XSelec tZoo mIn.
The siz eof th epicture increases.
Afte ryou hav ezoomed into th epicture, you
can move th esection of th epicture.
XTo move th esection of th epicture: slid e4
and 1 thecontroller .
XTo revert to th eoriginal size: press th econ-
troller.
or
XPress th e% button.
Closing th epicture viewer
XPress th econtroller .
The men uappears .
XTo selec tClose Pictur eViewer:turn and
press th econtroller .
The multimedia system return sto th elast
accessed media function .
Picture viewer171
Media
Z