tow MERCEDES-BENZ CLS-Class 2017 W218 Owner's Guide
[x] Cancel search | Manufacturer: MERCEDES-BENZ, Model Year: 2017, Model line: CLS-Class, Model: MERCEDES-BENZ CLS-Class 2017 W218Pages: 334, PDF Size: 8.22 MB
Page 169 of 334
Rthe area is too small for the vehicle to maneu-
ver into
Rthe parking space is bordered by an obstacle,
e.g. a tree, a post or a trailer
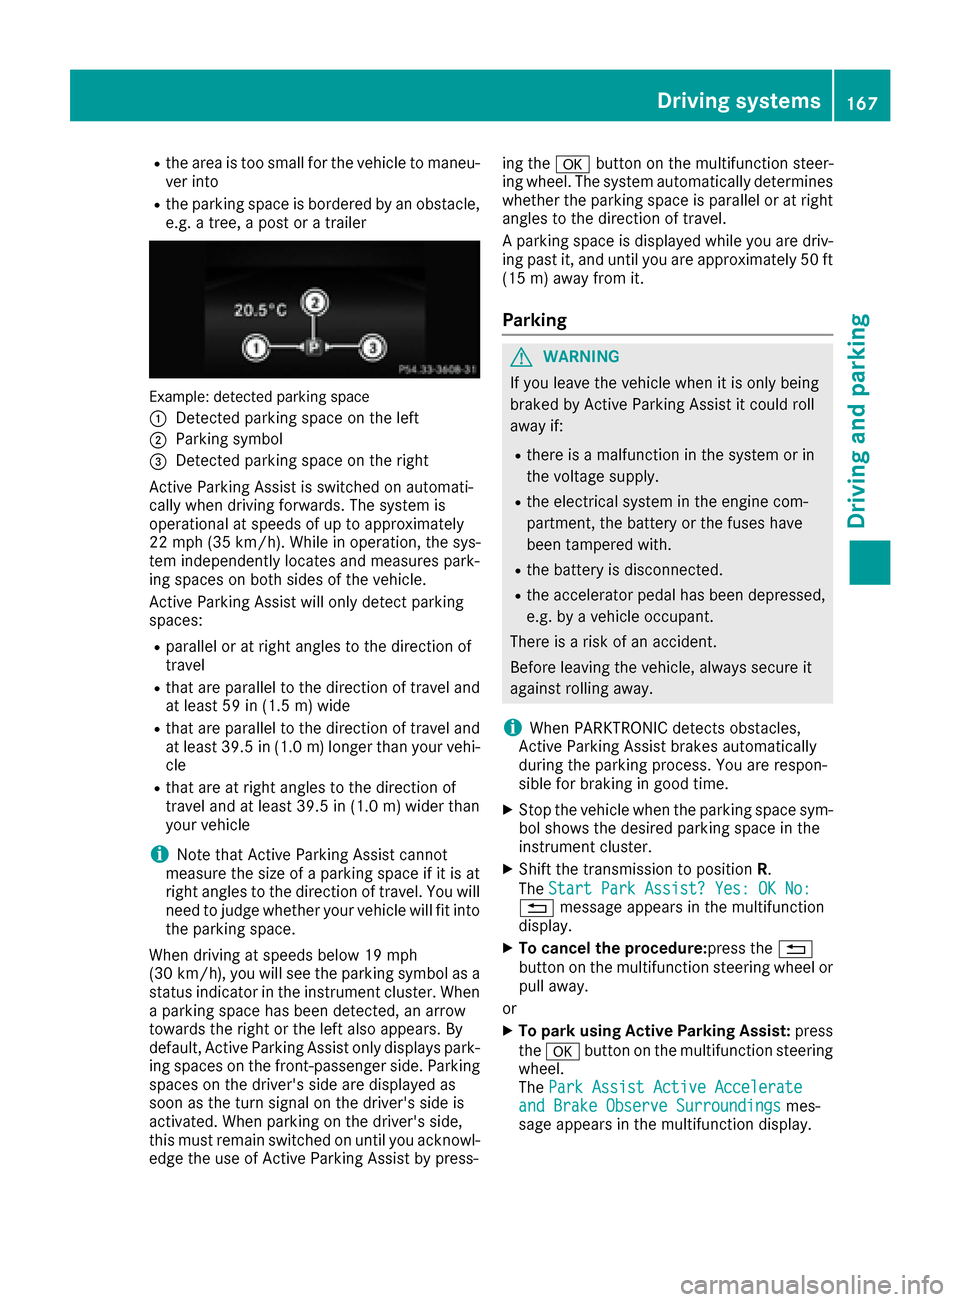
Example: detected parking space
:
Detected parking space on the left
;Parking symbol
=Detected parking space on the right
Active Parking Assist is switched on automati-
cally when driving forwards. The system is
operational at speeds of up to approximately
22 mph (35 km/h). While in operation, the sys-
tem independently locates and measures park-
ing spaces on both sides of the vehicle.
Active Parking Assist will only detect parking
spaces:
Rparallel or at right angles to the direction of
travel
Rthat are parallel to the direction of travel and
at least 59 in (1.5 m) wide
Rthat are parallel to the direction of travel and
at least 39.5 in (1.0 m)longer than your vehi-
cle
Rthat are at right angles to the direction of
travel and at least 39.5 in (1.0 m) wider than
your vehicle
iNote that Active Parking Assist cannot
measure the size of a parking space if it is at
right angles to the direction of travel. You will
need to judge whether your vehicle will fit into the parking space.
When driving at speeds below 19 mph
(30 km/h), you will see the parking symbol as a
status indicator in the instrument cluster. When
a parking space has been detected, an arrow
towards the right or the left also appears. By
default, Active Parking Assist only displays park-
ing spaces on the front-passenger side. Parking
spaces on the driver's side are displayed as
soon as t
he turn signal on the driver's side is
activated. When parking on the driver's side,
this must remain switched on until you acknowl-
edge the use of Active Parking Assist by press- ing the
abutton on the multifunction steer-
ing wheel. The system automatically determines
whether the parking space is parallel or at right
angles to the direction of travel.
A parking space is displayed while you are driv-
ing past it, and until you are approximately 50 ft (15 m) away from it.
Parking
GWARNING
If you leave the vehicle when it is only being
braked by Active Parking Assist it could roll
away if:
Rthere is a malfunction in the system or in
the voltage supply.
Rthe electrical system in the engine com-
partment, the battery or the fuses have
been tampered with.
Rthe battery is disconnected.
Rthe accelerator pedal has been depressed,
e.g. by a vehicle occupant.
There is a risk of an accident.
Before leaving the vehicle, always secure it
against rolling away.
iWhen PARKTRONIC detects obstacles,
Active Parking Assist brakes automatically
during the parking process. You are respon-
sible for braking in good time.
XStop the vehicle when the parking space sym- bol shows the desired parking space in the
instrument cluster.
XShift the transmission to position R.
The Start Park Assist? Yes: OK No:
% message appears in the multifunction
display.
XTo cancel the procedure: press the%
button on the multifunction steering wheel or
pull away.
or
XTo park using Active Parking Assist: press
the a button on the multifunction steering
wheel.
The Park Assist Active Accelerate
and Brake Observe Surroundingsmes-
sage appears in the multifunction display.
Driving systems167
Driving and parking
Z
Page 172 of 334
iThe text shown in the multimedia system
depends on the language setting. The follow-
ing are examples of rear view camera displays
in the multimedia system.
Important safety notes
The rear view camera is only an aid. It is not a
replacement for your attention to your immedi-
ate surroundings. You are always responsible
for safe maneuvering and parking. When maneu-
vering or parking, make sure that there are no
persons, animals or objects in the area in which you are maneuvering.
Under the following circumstances, the rear
view camera will not function, or will function in
a limited manner:
Rif the trunk lid is open
Rin heavy rain, snow or fog
Rat night or in very dark places
Rif the camera is exposed to very bright light
Rif the area is lit by fluorescent bulbs or LED
lighting (the display may flicker)
Rif there is a sudden change in temperature,
e.g. when driving into a heated garage in win- ter
Rif the camera lens is dirty or obstructed
Observe the notes on cleaning
(
Ypage 274)
Rif the rear of your vehicle is damaged. In this
event, have the camera position and setting
checked at a qualified specialist workshop
The field of vision and other functions of the rear
view camera may be restricted due to additional
accessories on the rear of the vehicle (e.g.
license plate holder, bicycle rack).
On vehicles with height-adjustable chassis,
leaving the standard height can result in inac-
curacies in the guide lines, depending on tech-
nical conditions.
iThe rear view camera is protected from rain-
drops and dust by means of a flap. When the
rear view camera is activated, this flap opens.
The flap closes again when:
Ryou have finished the maneuvering process
Ryou switch off the engine
Ryou open the trunk
Observe the notes on cleaning (
Ypage 274).
For technical reasons, the flap may remain
open briefly after the rear view camera has
been deactivated.
Switching the rear view camera on/off
XTo switch on: make sure that the Activa‐
tion by R gearfunction is selected in the
multimedia system (see Digital Operator's
Manual).
XEngage reverse gear.
The rear view camera flap opens. The multi-
media system shows the area behind the vehi-
cle with guide lines.
The image from the rear view camera is avail-
able throughout the maneuvering process.
XTo switch off: shift the transmission to posi-
tion P.
or
XDrive forwards a short distance.
Displays in the multimedia system
The rear view camera may show a distorted view
of obstacles, show them incorrectly or not at all.
The rear view camera does not show objects in
the following positions:
Rvery close to the rear bumper
Runder the rear bumper
Rin the area immediately above the tailgate
handle
!Objects not at ground level may appear to
be further away than they actually are, e.g.:
Rthe bumper of a parked vehicle
Rthe drawbar of a trailer
Rthe ball coupling of a trailer tow hitch
Rthe rear section of an HGV
Ra slanted post
Use the guidelines only for orientation.
Approach objects no further than the bottom-
most guideline.
170Driving systems
Driving and parking
Page 177 of 334
Selecting the split-screen view or full
screen mode
Switching between split screen views:
XTo switch to the line with the vehicle icons:
slide5the controller.
XTo select one of the vehicle icons: turn 3
the controller.
Switching to full screen mode:
XTo switch to 180° View: turn3the con-
troller to select and press 7to confirm.
iThe full screen option is only available in the
following views:
RTop view with picture from the rear view
camera
RTop view with picture from the front camera
Displays in the multimedia system
Important safety notes
The camera system may show a distorted view
of obstacles, show them incorrectly or not at all.
Obstacles are not shown by the system in the
following locations:
Runder the front and rear bumpers
Rvery close to the front and rear bumpers
Rin close range above the handle on the trunk
lid
Rvery close to the exterior mirrors
Rin the transitional areas between the various
cameras in the virtual top view
!Objects not at ground level may appear to
be further away than they actually are, e.g.:
Rthe bumper of a parked vehicle
Rthe drawbar of a trailer
Rthe ball coupling of a trailer tow hitch
Rthe rear section of an HGV
Ra slanted post
Use the guidelines only for orientation.
Approach objects no further than the bottom-
most guideline.
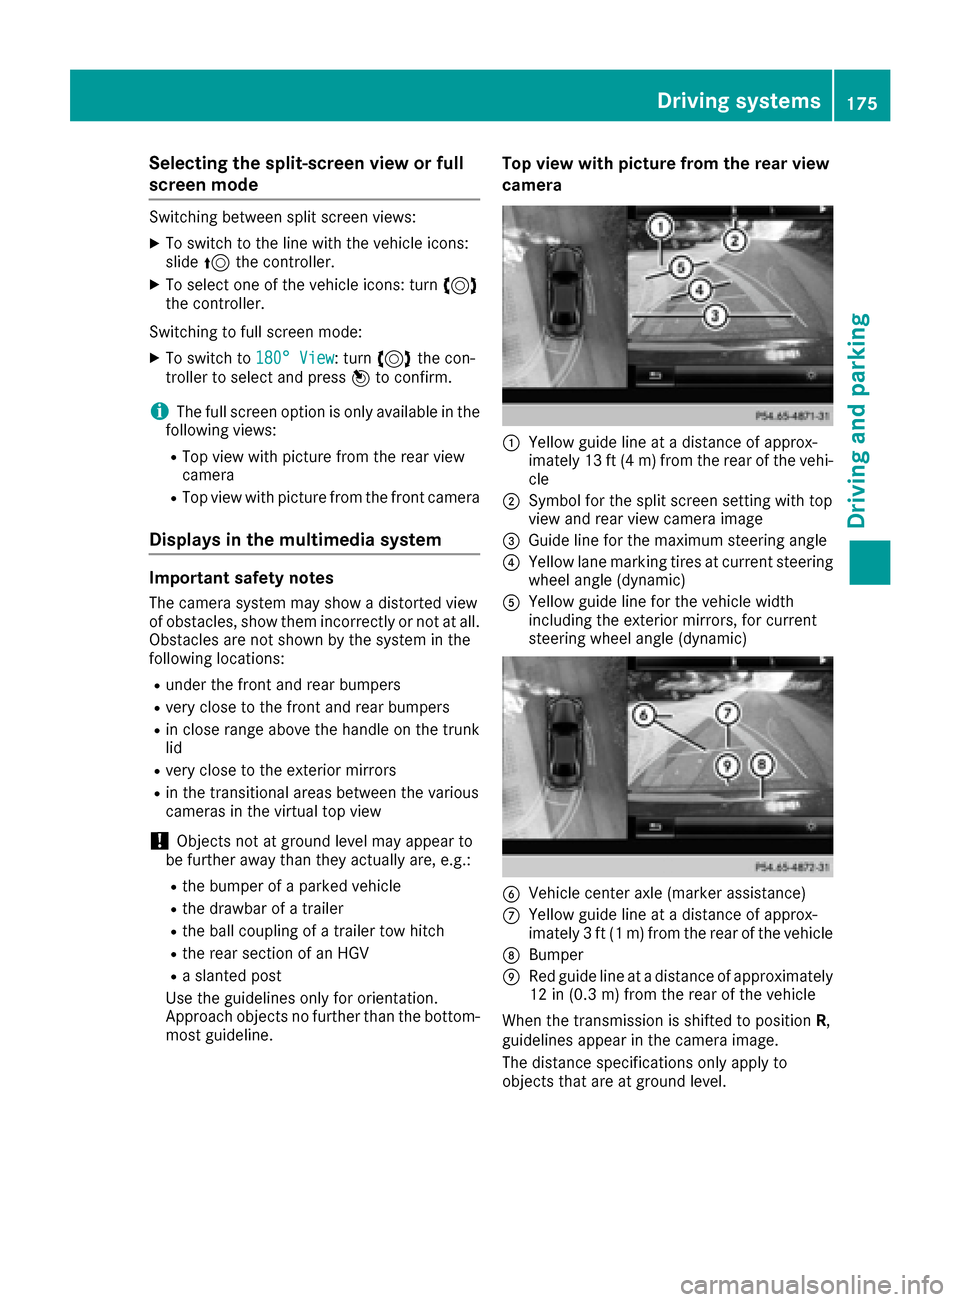
Top view with picture from the rear view
camera
:Yellow guide line at a distance of approx-
imately 13 ft (4 m) from the rear of the vehi-
cle
;Symbol for the split screen setting with top
view and rear view camera image
=Guide line for the maximum steering angle
?Yellow lane marking tires at current steering
wheel angle (dynamic)
AYellow guide line for the vehicle width
including the exterior mirrors, for current
steering wheel angle (dynamic)
BVehicle center axle (marker assistance)
CYellow guide line at a distance of approx-
imately 3 ft (1 m) from the rear of the vehicle
DBumper
ERed guide line at a distance of approximately
12 in (0.3 m) from the rear of the vehicle
When the transmission is shifted to position R,
guidelines appear in the camera image.
The distance specifications only apply to
objects that are at ground level.
Driving systems175
Driving and parking
Z
Page 184 of 334
Ryou switch on thetur nsignals. In this event ,
th ewarnings are suppressed for acertain
period of time.
Ra drivin gsafet ysystem intervenes, suc has
ABS, BA Sor ES P®.
Adaptive
WhenAdaptiveis selected, no warnin gvibra-
tion occur sif:
Ryou switch on th etur nsignals. In this event ,
th ewarnings are suppressed for acertain
period of time.
Ra drivin gsafet ysystem intervenes, e.g. ABS,
BA Sor ES P®.
Ryou accelerate hard, e.g. kickdown .
Ryou brakehard.
Ryou steer actively, e.g. swerve to avoid an
obstacle or chang elanes quickly.
Ryou cut th ecorner on ashar pbend.
In order that you are warned only when neces-
sar yand in goo dtime if you cross th elan emark-
ing, th esystem recognizes certain condition s
and warn syou accordingly.
The warnin gvibration occur searlier if:
Ryou approac hth eouter lan emarking on a
bend.
Rth eroa dhas ver ywide lanes, e.g. ahighway.
Rth esystem recognizes soli dlan emarkings.
The warnin gvibration occur slater if:
Rth eroa dhas narrow lanes.
Ryou cut th ecorner on abend.
Active Driving Assistance package
Gene ral notes
The Active Drivin gAssistance packag econsist s
of DISTRONI CPLU S (Ypage 149), Active Blind
Spot Assis t (Ypage 182) and Active Lan eKeep-
in g Assis t (Ypage 184).
Active Blind Spot Assist
Generalnotes
Active Blind Spot Assis tuses arada rsensor
system, pointe dtoward th erear of th evehicle,
to monitor th earea to th eside sof th evehicl e
whic hth edriver is unable to see . Awarnin glamp
lights up in th eexterio rmirror sand draw syour
attention to vehicles detecte din th emonitore darea
.If you then switch on th ecorrespondin g
tur nsignal to chang elane, you will also receiv e
an optica land audibl ewarning. If aris kof lateral
collision is detected, corrective brakin gmay
help you avoid acollision .Befor e acourse-cor-
recting brak eapplication ,Active Blind Spot
Assis tevaluates th espac ein th edirection of
travel and at th eside sof th evehicle. Fo rthis,
Active Blind Spot Assis tuses th eforward-facing
rada rsensors.
Active Blind Spot Assis tsupport syou from a
speed of approximately 20 mph (30 km/h).
Important safety notes
Active Blind Spot Assis tis only an aid and is no t
a substitut efor attentive driving.
GWARNIN G
Active Blind Spot Assis tdoes no treac tto :
Rvehicles overtake nto oclosely on th eside ,
placin gthem in th eblin dspo tarea
Rvehicles whic happroac hwit h a larg espeed
differential and overtake your vehicl e
As aresult ,Active Blind Spot Assis tmay nei-
ther giv ewarnings no rinterven ein suc hsit -
uations. There is aris kof an accident.
Always observ eth etraffic condition scare-
fully, and maintai n asafelateral distance.
iUS Aonly:
This device has been approve dby th eFCC as
a "Vehicular Radar System". The rada rsensor
is intended for use in an automotive rada r
system only. Removing, tamperin gwith, or
altering th edevice will voi dany warranties,
and is no tpermitte dby th eFCC. Do no ttam -
per with, alter, or use in any non-approve d
way.
An yunauthorize dmodification to this device
could voi dth euser’s authorit yto operate th e
equipment.
iCanada only: This device complies wit h
RSS-210 of Industry Canada. Operation is
subjec tto th efollowin gtw oconditions:
1. This device may no tcaus eharmful inter-
ference ,and
2. This device mus taccept any interferenc e
received, includin ginterferenc ethat may
caus eund esire
d operation of th
edevice .
Removal, tampering, or altering of th edevice
will voi dany warranties, and is no tpermitted.
182Driving systems
Driving and parking
Page 194 of 334
You can reset the values of the following func-
tions:
RTrip odometer
R"From Start" trip computer
R"From Reset" trip computer
RECO display
iIf you reset the values in the ECO display,
the values in the "From Start" trip computer
are also reset. If you reset the values in the
"From Start" trip computer, the values in the
ECO display are also reset.
Navigation system menu
Displaying navigation instructions
In the Navimenu, the multifunction display
shows navigation instructions.
Observe the additional information on naviga-
tion in the Digital Operator's Manual of the mul-
timedia system.
XSwitch on the multimedia system.
XPress the =or; button on the steering
wheel to select the Navimenu.
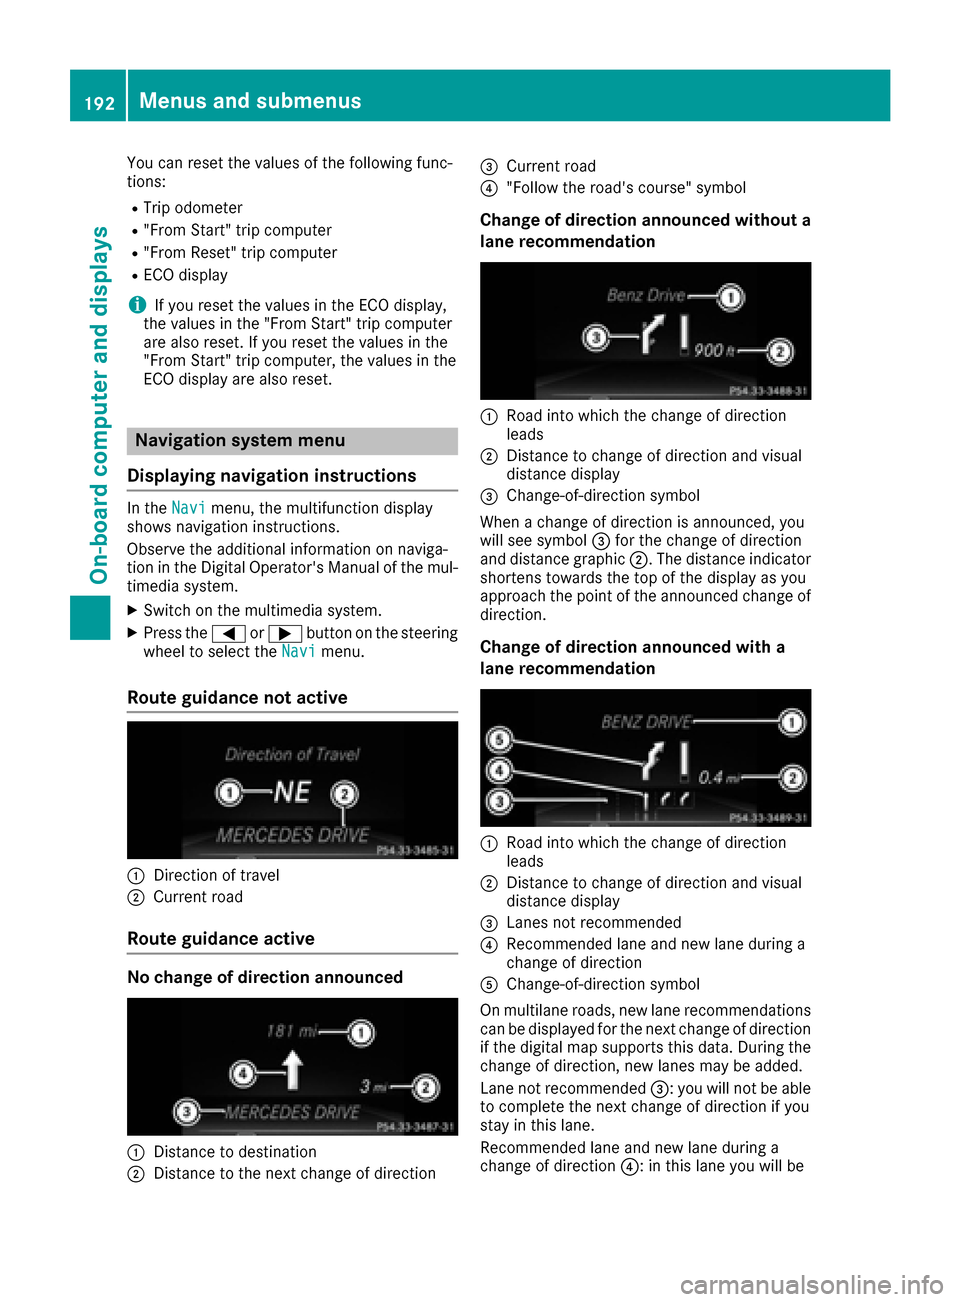
Route guidance not active
:Direction of travel
;Current road
Route guidance active
No change of direction announced
:Distance to destination
;Distance to the next change of direction
=Current road
?"Follow the road's course" symbol
Change of direction announced without a
lane recommendation
:Road into which the change of direction
leads
;Distance to change of direction and visual
distance display
=Change-of-direction symbol
When a change of direction is announced, you
will see symbol =for the change of direction
and distance graphic ;. The distance indicator
shortens towards the top of the display as you
approach the point of the announced change of
direction.
Change of direction announced with a
lane recommendation
:Road into which the change of direction
leads
;Distance to change of direction and visual
distance display
=Lanes not recommended
?Recommended lane and new lane during a
change of direction
AChange-of-direction symbol
On multilane roads, new lane recommendations can be displayed for the next change of direction
if the digital map supports this data. During the
change of direction, new lanes may be added.
Lane not recommended =: you will not be able
to complete the next change of direction if you
stay in this lane.
Recommended lane and new lane during a
change of direction ?: in this lane you will be
192Menus and submenus
On-board computer and displays
Page 229 of 334
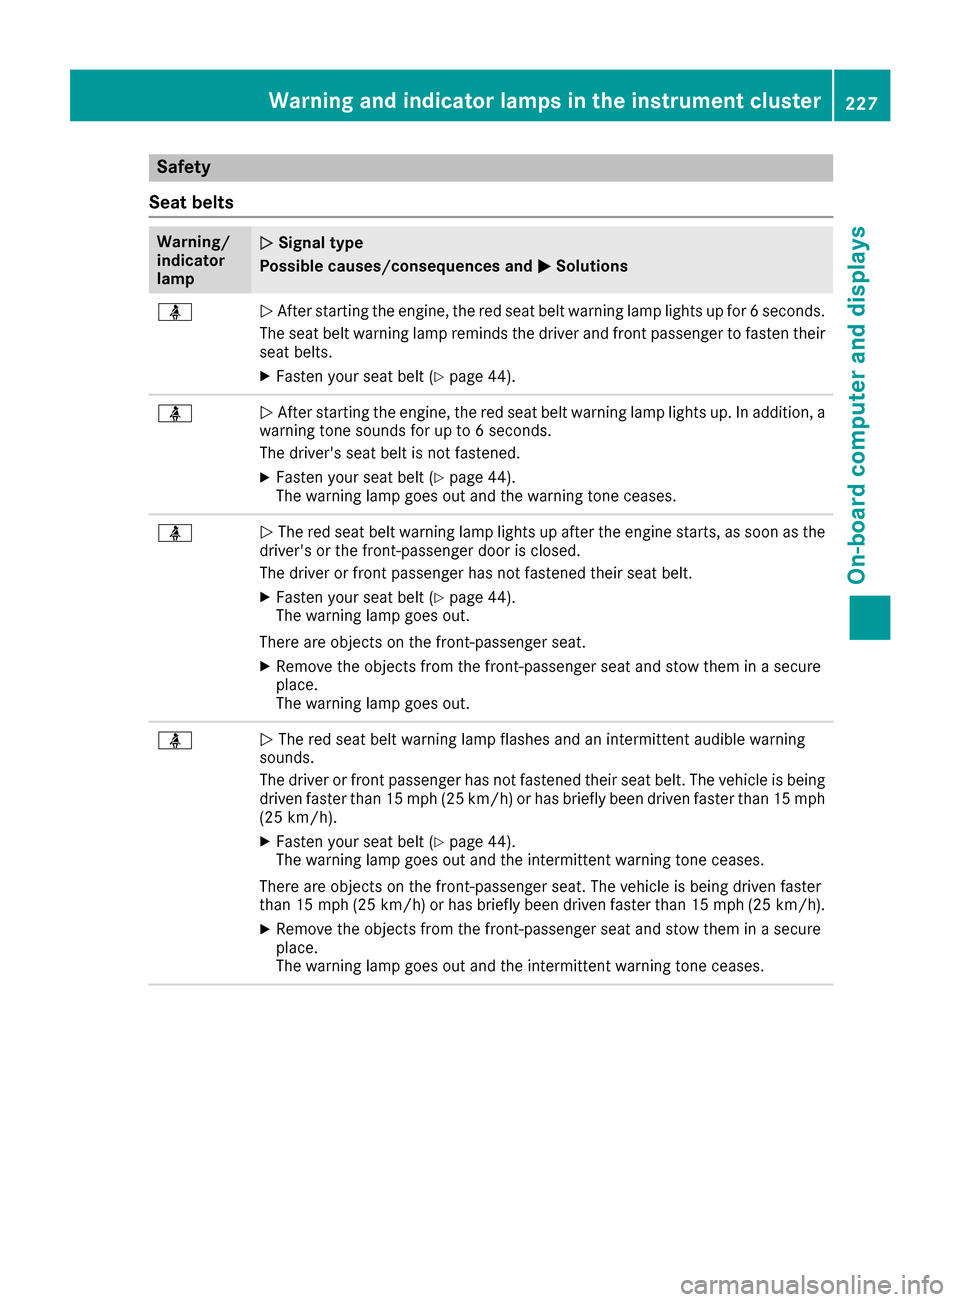
Safety
Seat belts
Warning/
indicator
lampNSignal type
Possible causes/consequences and M
Solutions
üNAfter starting the engine, the red seat belt warning lamp lights up for 6 seconds.
The seat belt warning lamp reminds the driver and front passenger to fasten their
seat belts.
XFasten your seat belt (Ypage 44).
üN After starting the engine, the red seat belt warning lamp lights up. In addition, a
warning tone sounds for up to 6 seconds.
The driver's seat belt is not fastened.
XFasten your seat belt (Ypage 44).
The warning lamp goes out and the warning tone ceases.
üN The red seat belt warning lamp lights up after the engine starts, as soon as the
driver's or the front-passenger door is closed.
The driver or front passenger has not fastened their seat belt.
XFasten your seat belt (Ypage 44).
The warning lamp goes out.
There are objects on the front-passenger seat.
XRemove the objects from the front-passenger seat and stow them in a secure
place.
The warning lamp goes out.
üN The red seat belt warning lamp flashes and an intermittent audible warning
sounds.
The driver or front passenger has not fastened their seat belt. The vehicle is being
driven faster than 15 mph (25 km/h) or has briefly been driven faster than 15 mph
(25 km/h).
XFasten your seat belt (Ypage 44).
The warning lamp goes out and the intermittent warning tone ceases.
There are objects on the front-passenger seat. The vehicle is being driven faster
than 15 mph (25 km/h) or has briefly been driven faster than 15 mph (25 km/h).
XRemove the objects from the front-passenger seat and stow them in a secure
place.
The warning lamp goes out and the intermittent warning tone ceases.
Warning and indicator lamps in the instrument cluster227
On-board computer and displays
Z
Page 243 of 334
tem and for the PBAP and MAP Bluetooth®
profiles. The prompt to confirm may take up
to two minutes to be displayed (see the man-
ufacturer's operating instructions).
Switching between mobile phones
If you have authorized more than one mobile
phone, you can switch between the individual
phones.
Multimedia system:
XSelect Connect Device.
XSelect a mobile phone from the device list.
Media mode
General notes
If you wish to play external media sources, the
default display must already be turned on. Fur-
ther information on media mode (see the Digital
Operator's Manual).
The following external media sources can be
used:
RApple®devices (e.g. iPhone®)
RUSB devices (e.g. USB stick, MP3 player)
(Ypage 241)
RCD
RDVD (COMAND)
RSD cards
Rvia devices connected by Bluetooth®
iInformation on single CD/DVD drive or DVD
changer (see the Digital Operator's Manual).
Using the device list
Multimedia system:
XSelect MediaQDevices.
The available media sources will be shown.
The #dot indicates the current setting.
XSelect the media source.
Playable files are played.
Inserting/removing an SD card
Important safety notes
GWARNING
SD cards are small parts. They can be swal-
lowed and cause choking. This poses an
increased risk of injury or even fatal injury.
Keep the SD card out of the reach of children. If a SD card is swallowed, seek medical atten-
tion immediately.
!If you are no longer using the SD card, you
should remove it and store it outside the vehi-
cle. High temperatures can damage the card.
Inserting an SD card
The SD card slot is on the control panel.
XInsert the SD card into the SD card slot until
the SD card engages. The side with the con-
tacts must face downwards.
Removing an SD card
XPress the SD card.
The SD card is ejected.
XRemove the SD card.
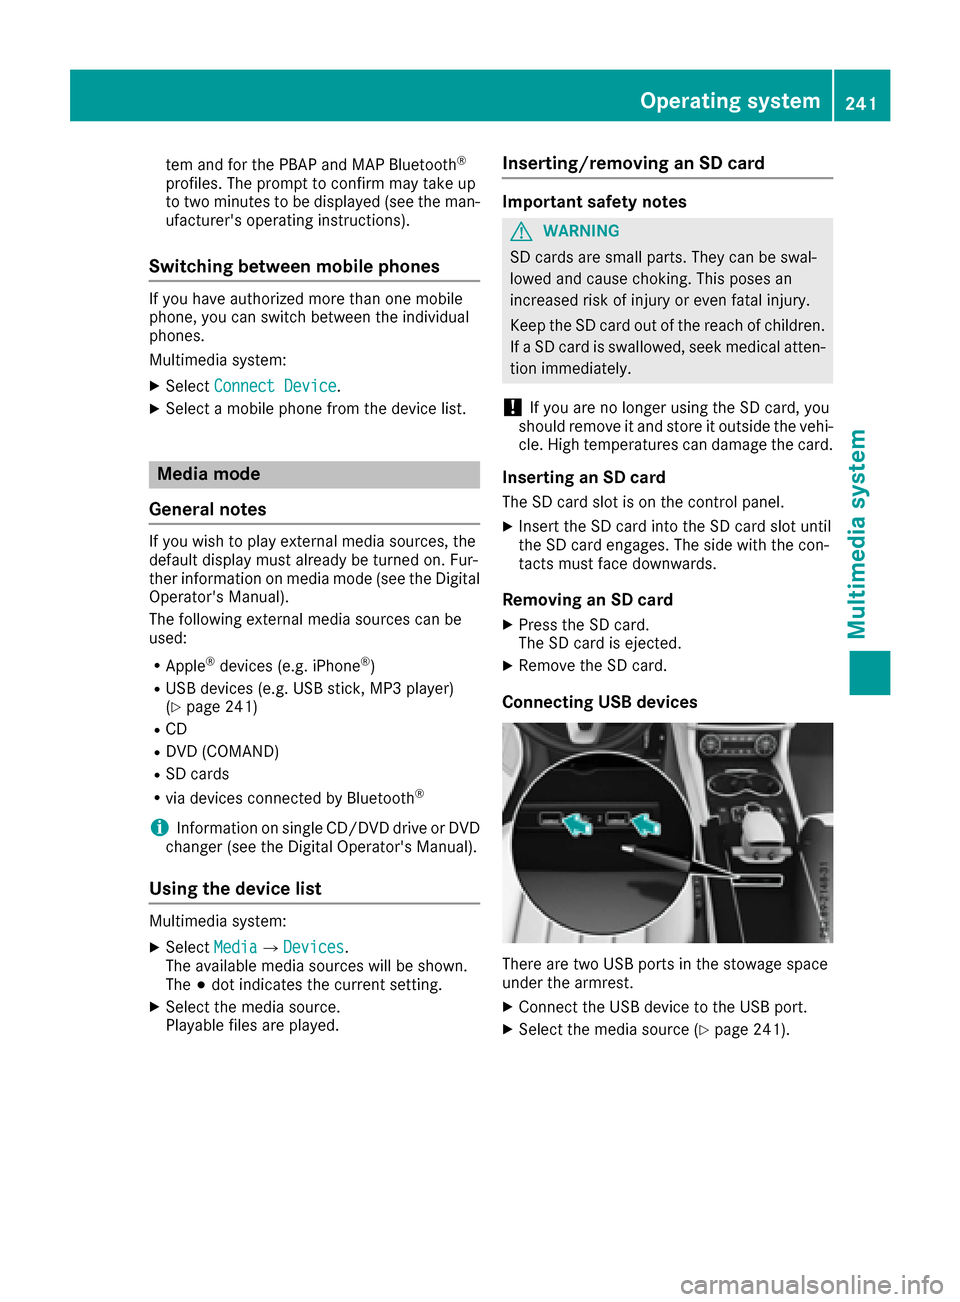
Connecting USB devices
There are two USB ports in the stowage space
under the armrest.
XConnect the USB device to the USB port.
XSelect the media source (Ypage 241).
Operating system241
Multimedia system
Z
Page 244 of 334

Stowage areas
Loading guidelines
GWARNING
If objects, luggage or loads are not secured or
not secured sufficiently, they could slip, tip
over or be flung around and thereby hit vehicle
occupants. There is a risk of injury, particu-
larly in the event of sudden braking or a sud-
den change in direction.
Always store objects so that they cannot be
flung around. Secure objects, luggage or
loads against slipping or tipping before the
journey.
GWARNING
Combustion engines emit poisonous exhaust
gases such as carbon monoxide. Exhaust
gases can enter the vehicle interior if the
trunk lid is open when the engine is running,
especially if the vehicle is in motion. There is a
risk of poisoning.
Always switch off the engine before opening
the trunk lid. Never drive with the trunk lid
open.
GWARNING
The exhaust tail pipe and tail pipe trim can
become very hot. If you come into contact
with these parts of the vehicle, you could burn
yourself. There is a risk of injury.
Always be particularly careful around the
exhaust tail pipe and the tail pipe trim. Allow
these components to cool down before touch-
ing them.
The handling characteristics of a laden vehicle
are dependent on the distribution of the load
within the vehicle. For this reason, you should
observe the following notes when transporting a
load:
RNever exceed the maximum permissible
gross vehicle mass or the gross axle weight
rating for the vehicle (including occupants).
The values are specified on the vehicle iden- tification plate on the B-pillar of the driver's
door.
RThe trunk is the preferred place to carry
objects.
RPosition heavy loads as far forwards as pos-
sible and as low down in the trunk as possible.
RThe load must not protrude above the upper
edge of the seat backrests.
RAlways place the load against the rear or front
seat backrests. Make sure that the seat
backrests are securely locked into place.
RAlways place the load behind unoccupied
seats if possible.
RUse the cargo tie-down rings and the parcel
nets to transport loads and luggage.
RUse cargo tie-down rings and fastening mate-
rials appropriate for the weight and size of the
load.
RSecure the load with sufficiently strong and
wear-resistant tie-downs. Pad sharp edges forprotection.
Stowage spaces
Important safety notes
GWARNING
If objects in the passenger compartment are
stowed incorrectly, they can slide or be
thrown around and hit vehicle occupants. In
addition, cupholders, open stowage spaces
and mobile phone brackets cannot always
retain all objects they contain. There is a risk of injury, particularly in the event of sudden
braking or a sudden change in direction.
RAlways stow objects so that they cannot be
thrown around in such situations.
RAlways make sure that objects do not pro-
trude from stowage spaces, parcel nets or
stowage nets.
RClose the lockable stowage spaces before
starting a journey.
RAlways stow and secure heavy, hard, poin-
ted, sharp-edged, fragile or bulky objects in
the trunk.
Observe the loading guidelines (
Ypage 242).
242Stowage areas
Stowage and features
Page 245 of 334
Stowage compartments in the front
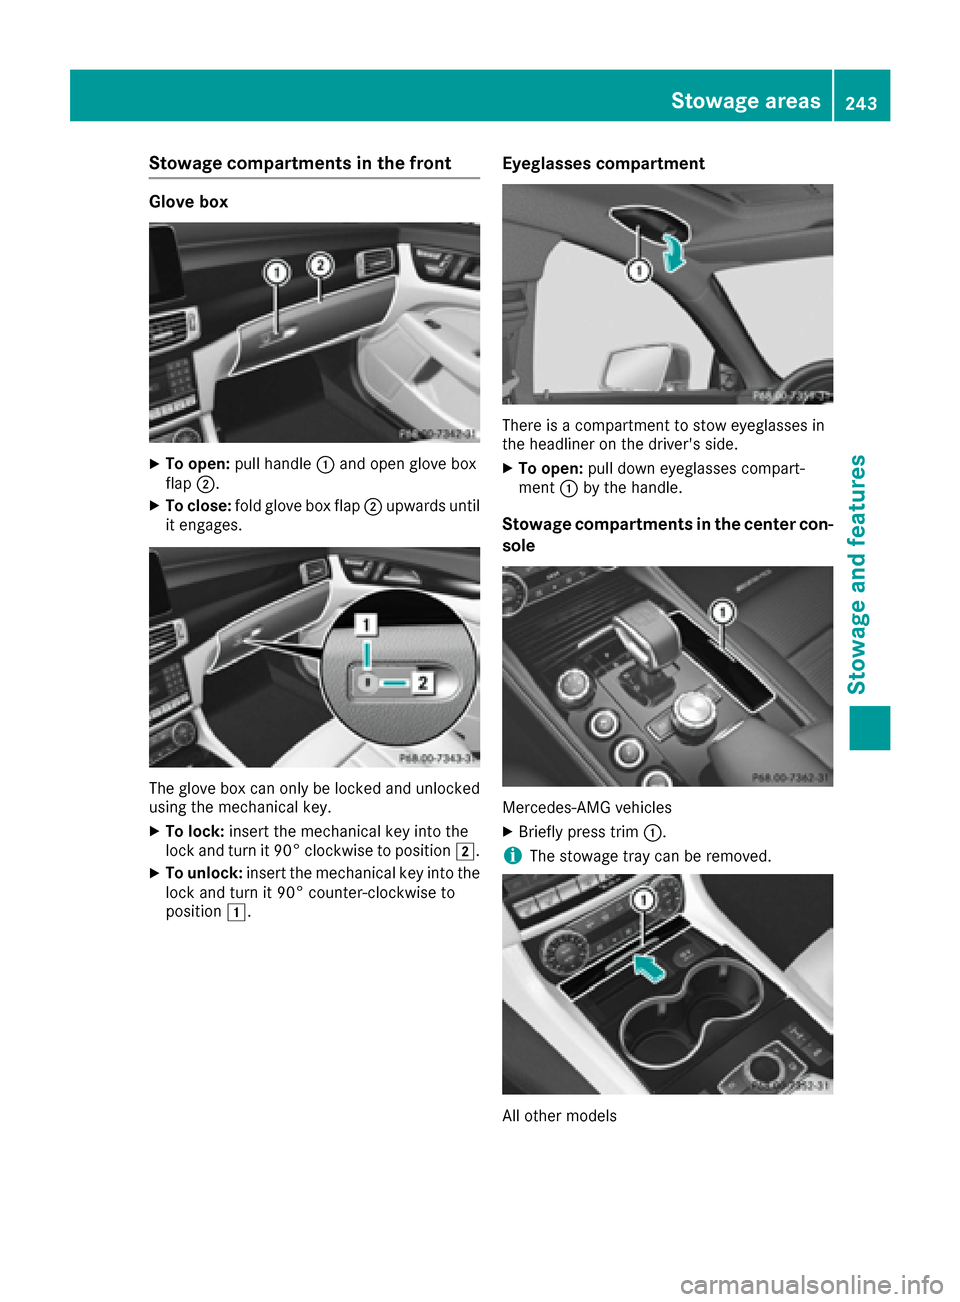
Glove box
XTo open:pull handle :and open glove box
flap ;.
XTo close: fold glove box flap ;upwards until
it engages.
The glove box can only be locked and unlocked
using the mechanical key.
XTo lock: insert the mechanical key into the
lock and turn it 90° clockwise to position 2.
XTo unlock:insert the mechanical key into the
lock and turn it 90° counter-clockwise to
position 1.
Eyeglasses compartment
There is a compartment to stow eyeglasses in
the headliner on the driver's side.
XTo open: pull down eyeglasses compart-
ment :by the handle.
Stowage compartments in the center con-
sole
Mercedes-AMG vehicles
XBriefly press trim :.
iThe stowage tray can be removed.
All other models
Stowage areas243
Stowage and features
Z
Page 246 of 334
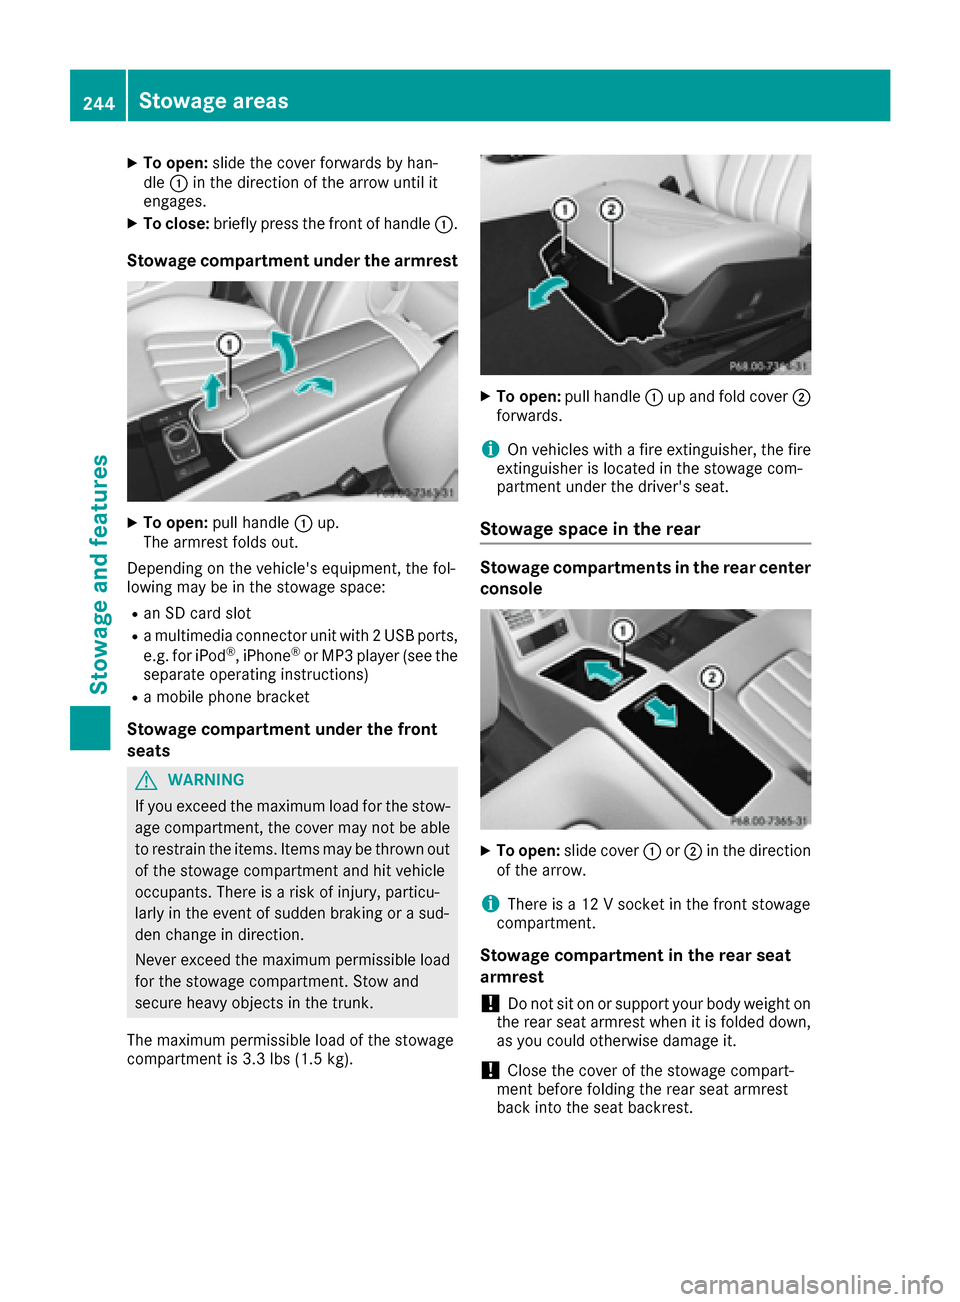
XTo open:slide the cover forwards by han-
dle :in the direction of the arrow until it
engages.
XTo close: briefly press the front of handle :.
Stowage compartment under the armrest
XTo open:pull handle :up.
The armrest folds out.
Depending on the vehicle's equipment, the fol-
lowing may be in the stowage space:
Ran SD card slot
Ra multimedia connector unit with 2 USB ports,
e.g. for iPod®, iPhone®or MP3 player (see the
separate operating instructions)
Ra mobile phone bracket
Stowage compartment under the front
seats
GWARNING
If you exceed the maximum load for the stow- age compartment, the cover may not be able
to restrain the items. Items may be thrown out
of the stowage compartment and hit vehicle
occupants. There is a risk of injury, particu-
larly in the event of sudden braking or a sud-
den change in direction.
Never exceed the maximum permissible load
for the stowage compartment. Stow and
secure heavy objects in the trunk.
The maximum permissible load of the stowage
compartment is 3.3 lbs (1.5 kg).
XTo open: pull handle :up and fold cover ;
forwards.
iOn vehicles with a fire extinguisher, the fire
extinguisher is located in the stowage com-
partment under the driver's seat.
Stowage space in the rear
Stowage compartments in the rear center
console
XTo open: slide cover :or; in the direction
of the arrow.
iThere is a 12 V socket in the front stowage
compartment.
Stowage compartment in the rear seat
armrest
!Do not sit on or support your body weight on
the rear seat armrest when it is folded down,
as you could otherwise damage it.
!Close the cover of the stowage compart-
ment before folding the rear seat armrest
back into the seat backrest.
244Stowage areas
Stowag ean d features