tow MERCEDES-BENZ CLS-Class 2017 W218 User Guide
[x] Cancel search | Manufacturer: MERCEDES-BENZ, Model Year: 2017, Model line: CLS-Class, Model: MERCEDES-BENZ CLS-Class 2017 W218Pages: 334, PDF Size: 8.22 MB
Page 40 of 334
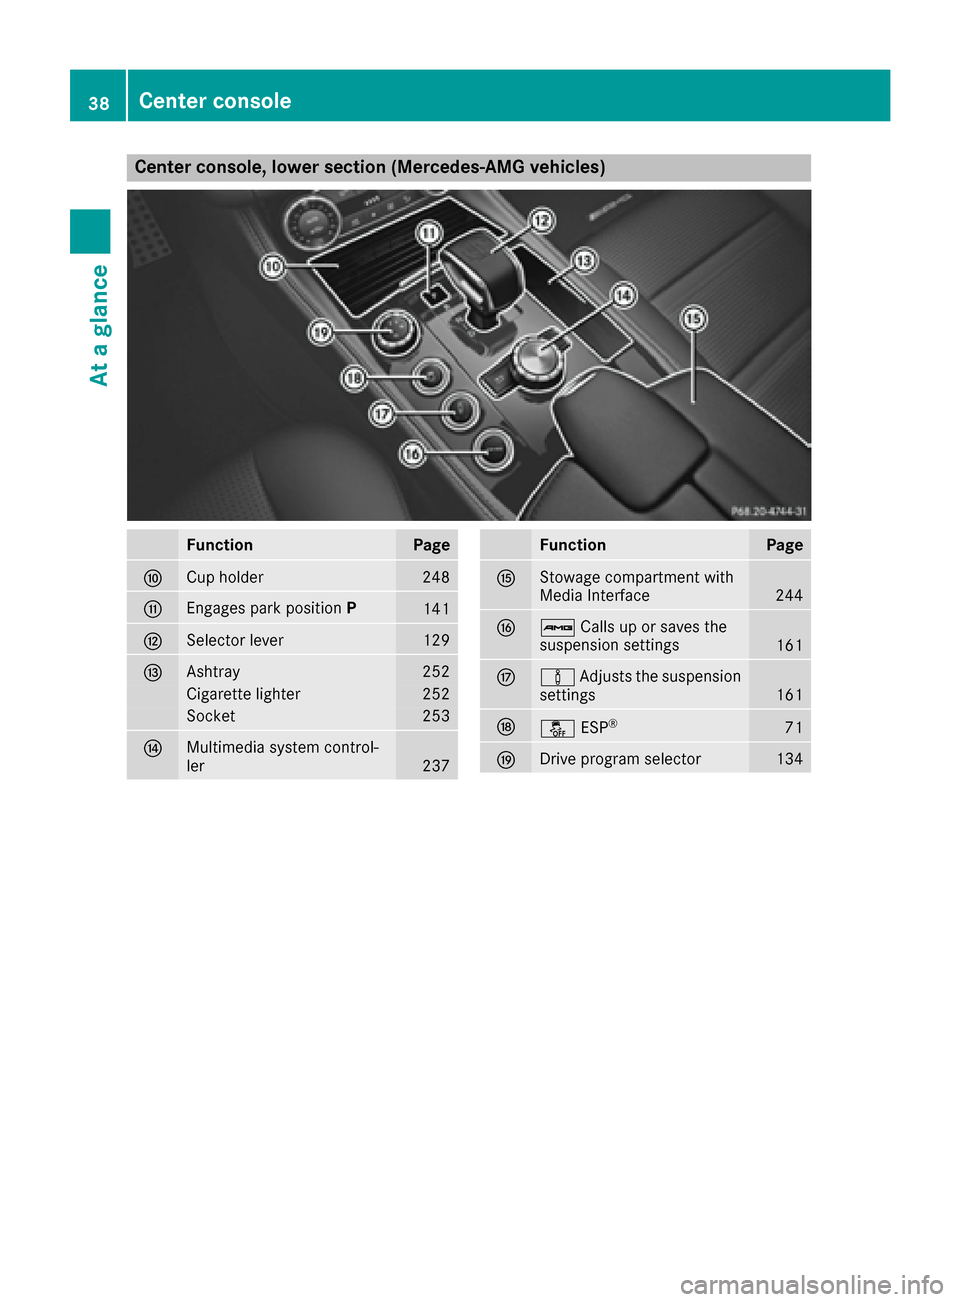
Center console, lower section (Mercedes-AMG vehicles)
FunctionPage
FCup holder248
GEngages park positionP141
HSelector lever129
IAshtray252
Cigarette lighter252
Socket253
JMultimedia system control-
ler237
FunctionPage
KStowage compartment with
Media Interface244
LßCalls up or saves the
suspension settings161
Mà Adjusts the suspension
settings161
Nå ESP®71
ODrive program selector134
38Center console
At a glance
Page 55 of 334
ProblemPossible causes/consequences andMSolutions
The PASSENGER AIR
BAG OFF indicator lamp
lights up and remains lit,
even though the front-
passenger seat is occu-
pied by an adult or a per-
son of a stature corre-
sponding to that of an
adult.The classification of the person on the front-passenger seat is incor-
rect.
XMake sure the conditions for a correct classification of the person
on the front-passenger seat are met (Ypage 49).
XIf the PASSENGER AIR BAG OFF indicator lamp remains lit, the front-
passenger seat may not be used.
XHave OCS checked as soon as possible at an authorized Mercedes- Benz Center.
The PASSENGER AIR
BAG OFF indicator lamp
does not light up and/or
does not stay on.
The front-passenger seat
is:
Runoccupied
Roccupied with the
weight of a child up to
twelve months old in a
child restraint system
OCS is malfunctioning.
XMake sure there is nothing between the seat cushion and the child
seat.
XMake sure that the entire base of the child restraint system rests on
the seat cushion of the front-passenger seat. The backrest of the
forward-facing child restraint system must lie as flat as possible
against the backrest of the front-passenger seat. If necessary,
adjust the position of the front-passenger seat.
XWhen installing the child restraint system, make sure that the seat belt is tight. Do not pull the seat belt tight using the front-passenger
seat adjustment. This could result in the seat belt and the child
restraint system being pulled too tightly.
XCheck for correct installation of the child restraint system.
Make sure that the head restraint does not apply a load to the child
restraint system. If necessary, adjust the head restraint accord-
ingly.
XMake sure that no objects are applying additional weight onto the
seat.
XIf the PASSENGER AIR BAG OFF indicator lamp remains off, do not
install a child restraint system on the front-passenger seat. It is
recommended that you install the child restraint system on a suit-
able rear seat.
XHave OCS checked as soon as possible at an authorized Mercedes-
Benz Center.
Deployment of Emergency Tensioning
Devices and air bags
Important safety notes
GWARNING
The air bag parts are hot after an air bag has
been deployed. There is a risk of injury.
Do not touch the air bag parts. Have a
deployed air bag replaced at a qualified spe-
cialist workshop as soon as possible.
GWARNING
A deployed air bag no longer offers any pro-
tection and cannot provide the intended pro-
tection in an accident. There is an increased
risk of injury.
Have the vehicle towed to a qualified special-
ist workshop in order to have a deployed air
bag replaced.
It is important for your safety and that of your
passenger to have deployed air bags replaced
and to have any malfunctioning air bags
repaired. This will help to make sure the air bags
Occupant safety53
Safety
Z
Page 61 of 334
secured properly. The special seat belt retrac-tor is disabled and the inertia real draws in a
portion of the seat belt. The seat belt cannot
be immediately refastened. There is an
increased risk of injury, possibly even fatal.
Stop the vehicle immediately, paying atten-
tion to road and traffic conditions. Reactivate
the special seat belt retractor and secure the
child restraint system properly.
All seat belts except the driver's seat belt are
equipped with a special seat belt retractor.
When activated, the special seat belt retractor
ensures that the seat belt will not slacken once
the child restraint system has been secured.
Installing a child restraint system:
XAlways comply with the child restraint system
manufacturer's installation instructions.
XPull the seat belt smoothly from the belt out-
let.
XEngage the seat belt tongue in the belt buckle.
Activating the special seat belt retractor:
XPull the seat belt out fully and let the inertia
reel retract it again.
While the seat belt is retracting, you should
hear a ratcheting sound. The special seat belt
retractor is activated.
XPush the child seat restraint system down so
that the seat belt is tight and does not loosen.
Removing a child restraint system and deacti-
vating the special seat belt retractor:
XAlways comply with the child restraint system
manufacturer's installation instructions.
XPress the release button of the belt buckle,
hold the belt tongue firmly and guide it back
towards the belt outlet.
The special seat belt retractor is deactivated.
Child restraint system
The use of seat belts and child restraint systems
is required by law in:
Rall 50 states
Rthe U.S. territories
Rthe District of Columbia
Rall Canadian provinces You can obtain further information about the
correct child restraint system from any author-
ized Mercedes-Benz Center.
GWARNING
If the child restraint system is installed incor-
rectly on a suitable seat, it cannot protect as
intended. The child cannot then be restrained
in the event of an accident, heavy braking or
sudden changes of direction. There is an
increased risk of injury, possibly even fatal.
Make sure that you observe the child restraint
system manufacturer's installation instruc-
tions and the notes on use. Please ensure,
that the base of the child restraint system is
always resting completely on the seat cush-
ion. Never place objects, e.g. cushions, under or behind the child restraint system. Only use
child restraint systems with the original cover
designed for them. Only replace damaged
covers with genuine covers.
GWARNING
If the child restraint system is installed incor-
rectly or is not secured, it can come loose in
the event of an accident, heavy braking or a
sudden change in direction. The child
restraint system could be thrown about, strik-
ing vehicle occupants. There is an increased
risk of injury, possibly even fatal.
Always install child restraint systems prop-
erly, even if they are not being used. Make
sure that you observe the child restraint sys-
tem manufacturer's installation instructions.
You will find further information on stowing
objects, luggage or loads under "Loading guide-
lines" (
Ypage 242).
GWARNING
Child restraint systems or their securing sys-
tems which have been damaged or subjected
to a load in an accident can no longer protect
as intended. The child cannot then be
restrained in the event of an accident, heavy
braking or sudden changes of direction. There is an increased risk of injury, possibly even
fatal.
Children in the vehicle59
Safety
Z
Page 71 of 334
In such cases, Adaptive Brake Assist can:
Rintervene unnecessarily
Rnot intervene
There is a risk of an accident.
Always pay careful attention to the traffic sit- uation and be ready to brake. Terminate the
intervention in a non-critical driving situation.
GWARNING
Adaptive Brake Assist does not react:
Rto people or animals
Rto oncoming vehicles
Rto crossing traffic
Rwhen cornering
As a result, the Adaptive Brake Assist may not
intervene in all critical conditions. There is a
risk of an accident.
Always pay careful attention to the traffic sit- uation and be ready to brake.
Due to the nature of the system, particularly
complicated but non-critical driving conditions
may also cause Brake Assist to intervene.
If adaptive Brake Assist is not available due to a
malfunction in the radar sensor system, the
brake system remains available with full brake
boosting effect and BAS.
ESP®(Electronic Stability Program)
General notes
iObserve the "Important safety notes" sec-
tion (Ypage 64).
ESP
®monitors driving stability and traction, i.e.
power transmission between the tires and the
road surface.
If ESP
®detects that the vehicle is deviating from
the direction desired by the driver, one or more
wheels are braked to stabilize the vehicle. The
engine output is also modified to keep the vehi-
cle on the desired course within physical limits.
ESP
®assists the driver when pulling away on
wet or slippery roads. ESP®can also stabilize
the vehicle during braking.
ETS/4ETS (Electronic Traction System)
ETS traction control is part of ESP®. On vehicles
with 4MATIC, 4ETS is part of ESP®.
Traction control brakes the drive wheels indi-
vidually if they spin. This enables you to pull
away and accelerate on slippery surfaces, for
example if the road surface is slippery on one
side. In addition, more drive torque is transfer-
red to the wheel or wheels with traction.
Traction control remains active, even if you
deactivate ESP
®.
Important safety notes
iObserve the "Important safety notes" sec-
tion (Ypage 64).
GWARNING
If ESP
®is malfunctioning, ESP®is unable to
stabilize the vehicle. Additionally, further driv-
ing safety systems are deactivated. This
increases the risk of skidding and an accident.
Drive on carefully. Have ESP
®checked at a
qualified specialist workshop.
!Vehicles with 4MATIC: function or perform-
ance tests may only be carried out on a 2-axle dynamometer. Before you operate the vehicle
on such a dynamometer, please consult a
qualified workshop. You could otherwise
damage the drive train or the brake system.
Vehicles without 4MATIC: observe the notes on
ESP
®(Ypage 289) when towing the vehicle
with a raised rear axle.
If the å ESP
®OFF warning lamp lights up
continuously, then ESP®is deactivated.
If the ÷ ESP®warning lamp and the å
ESP®OFF warning lamp are lit continuously,
ESP®is not available due to a malfunction.
Observe the information on warning lamps
(
Ypage 229) and display messages which may
be shown in the instrument cluster
(
Ypage 204).
iOnly use wheels with the recommended tire
sizes. Only then will ESP®function properly.
Driving safety systems69
Safety
Z
Page 84 of 334
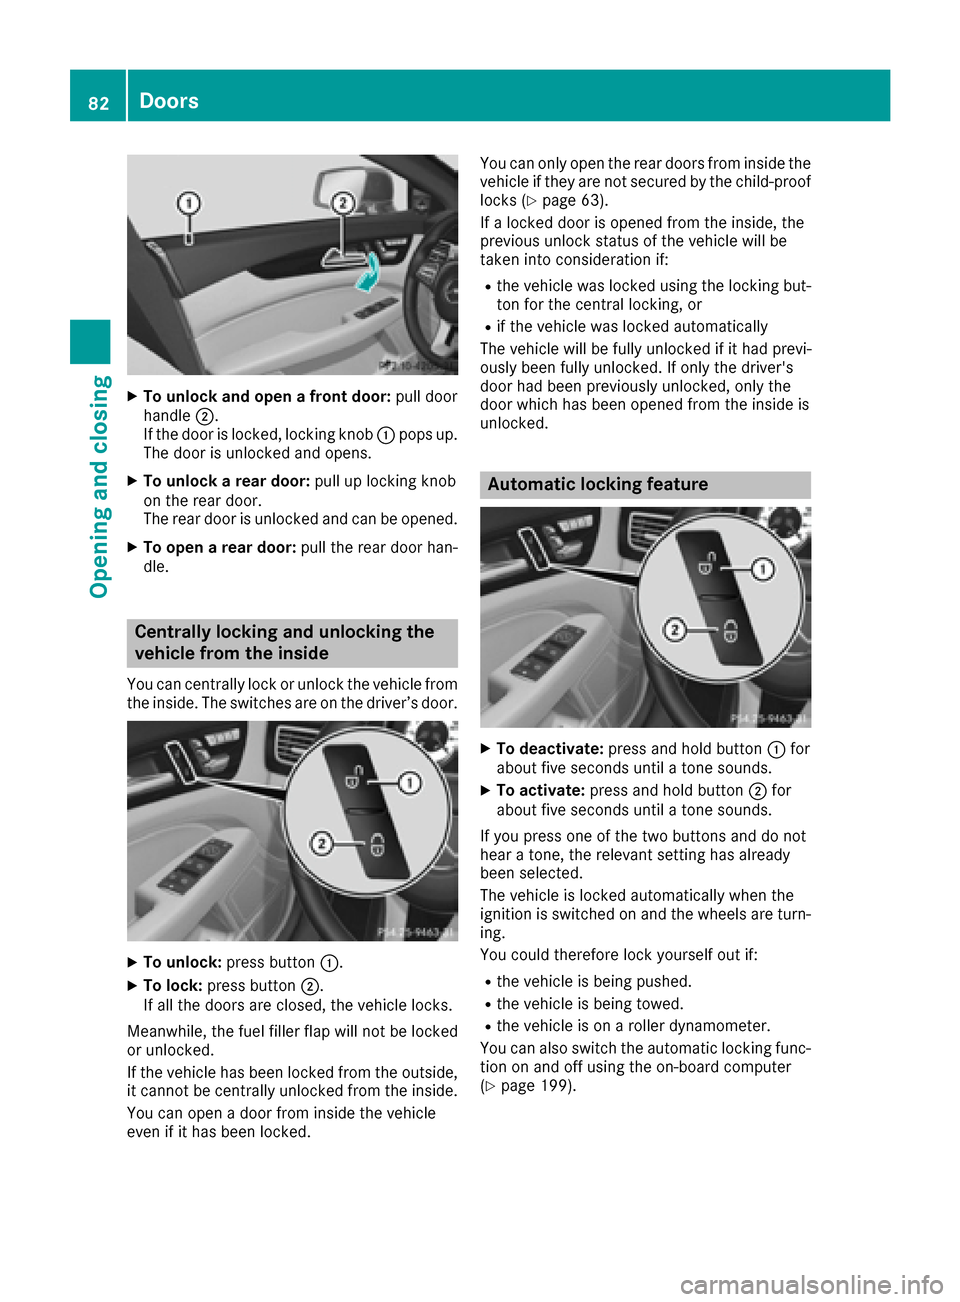
XTo unlock and open a front door:pull door
handle ;.
If the door is locked, locking knob :pops up.
The door is unlocked and opens.
XTo unlock a rear door: pull up locking knob
on the rear door.
The rear door is unlocked and can be opened.
XTo open a rear door: pull the rear door han-
dle.
Centrally locking and unlocking the
vehicle from the inside
You can centrally lock or unlock the vehicle from
the inside. The switches are on the driver’s door.
XTo unlock: press button :.
XTo lock:press button ;.
If all the doors are closed, the vehicle locks.
Meanwhile, the fuel filler flap will not be locked
or unlocked.
If the vehicle has been locked from the outside,
it cannot be centrally unlocked from the inside.
You can open a door from inside the vehicle
even if it has been locked. You can only open the rear doors from inside the
vehicle if they are not secured by the child-proof
locks (
Ypage 63).
If a locked door is opened from the inside, the
previous unlock status of the vehicle will be
taken into consideration if:
Rthe vehicle was locked using the locking but-
ton for the central locking, or
Rif the vehicle was locked automatically
The vehicle will be fully unlocked if it had previ-
ously been fully unlocked. If only the driver's
door had been previously unlocked, only the
door which has been opened from the inside is
unlocked.
Automatic locking feature
XTo deactivate: press and hold button :for
about five seconds until a tone sounds.
XTo activate: press and hold button ;for
about five seconds until a tone sounds.
If you press one of the two buttons and do not
hear a tone, the relevant setting has already
been selected.
The vehicle is locked automatically when the
ignition is switched on and the wheels are turn-
ing.
You could therefore lock yourself out if:
Rthe vehicle is being pushed.
Rthe vehicle is being towed.
Rthe vehicle is on a roller dynamometer.
You can also switch the automatic locking func-
tion on and off using the on-board computer
(
Ypage 199).
82Doors
Opening and closing
Page 124 of 334
Notes on breaking-in a new vehicle
Important safety notes
The sensor system of some driving and driving
safety systems adjusts automatically while a
certain distance is being driven after the vehiclehas been delivered or after repairs. Full system
effectiveness is not reached until the end of this
teach-in procedure.
New and replaced brake pads and discs only
reach their optimum braking effect after several hundred kilometers of driving. Compensate for
this by applying greater force to the brake pedal.
The first 1000 miles (1500 km)
The more you look after the engine when it is
new, the more satisfied you will be with its per-
formance in the future.
RYou should therefore drive at varying vehicle
and engine speeds for the first 1000 miles
(1500 km).
RAvoid heavy loads, e.g. driving at full throttle,during this period.
RChange gear in good time, before the tach-
ometer needle is Ôof the way to the red area
of the tachometer.
RDo not manually shift to a lower gear to brake
the vehicle.
RTry to avoid depressing the accelerator pedal
beyond the point of resistance (kickdown).
Additional breaking-in notes for Mercedes-AMG
vehicles:
RDo not drive faster than 85 mph (140 km/h)
for the first 1,000 miles (1,500 km).
ROnly allow the engine to reach a maximum
engine speed of 4,500 rpm briefly.
RChange gear in good time.
After 1000 miles (1500 km), you can increase
the engine speed gradually and accelerate the
vehicle to full speed.
You should also observe these notes on break-
ing in if the engine or parts of the drive train on
your vehicle have been replaced.
Always observe the respective maximu
m per-
missible speed.
Self-locking rear axle differential
(Mercedes-AMG vehicles)
Your vehicle is equipped with a self-locking dif-
ferential on the rear axle.
Change the oil to improve protection of the rear axle differential:
Rafter a breaking-in period of 1,850 miles
(3,000 km)
Revery 31,000 miles (50,000 km) or 3 years
These oil changes prolong the service life of the
differential. Have the oil change carried out at a
qualified specialist workshop.
Driving
Important safety notes
GWARNING
Objects in the driver's footwell can restrict the pedal travel or obstruct a depressed pedal.
The operating and road safety of the vehicle is
jeopardized. There is a risk of an accident.
Make sure that all objects in the vehicle are
stowed correctly, and that they cannot enter
the driver's footwell. Install the floormats
securely and as specified in order to ensure
sufficient clearance for the pedals. Do not use
loose floormats and do not place floormats on
top of one another.
GWARNING
Unsuitable footwear can hinder correct usage of the pedals, e.g.:
Rshoes with thick soles
Rshoes with high heels
Rslippers
There is a risk of an accident.
Wear suitable footwear to ensure correct
usage of the pedals.
GWARNING
If you switch off the ignition while driving,
safety-relevant functions are only available
with limitations, or not at all. This could affect, for example, the power steering and the brake
122Driving
Dr iving an d parking
Page 133 of 334
Engaging park position P
!If the engine speed is too high or the vehicle
is moving, do not shift the automatic trans-
mission directly from Dto R, from Rto Dor
directly to P. The automatic transmission
could otherwise be damaged.
XPush the DIRECT SELECT lever in the direction of arrow P.
Transmission position display Pis shown in
the multifunction display.
Depressing the brake and pushing the DIRECT
SELECT lever up or down disengages the park-
ing lock. The transmission is in Nneutral.
In order to shift from park position Pdirectly into
R or D:
Rdepress the brake pedal and
Rpush the DIRECT SELECT lever up or down
past the first point of resistance
Engaging park position P automatically
Park position Pis automatically engaged if:
Ryou switch off the engine using the Smartkey
and remove the SmartKey
Ryou switch off the engine using the Smartkey
or using the Start/Stop button and open the
driver's door or front-passenger door
Rthe driver's door is opened when the vehicle is
stationary or driving at very low speed and the
transmission is in position Dor R
Under certain conditions, the automatic trans-
mission shifts automatically to transmission
position Pif the HOLD function or DISTRONIC
PLUS is activated. Observe the information on
the HOLD function (
Ypage 158) and on
DISTRONIC PLUS (Ypage 153).
Engaging reverse gear R
!Only shift the automatic transmission to R
when the vehicle is stationary.
XIf the transmission is in position Dor N: push
the DIRECT SELECT lever up past the first
point of resistance.
XIf the transmission is in position P: depress
the brake pedal and push the DIRECT SELECT
lever up past the first point of resistance.
The ECO start/stop function is not available
when reverse gear is engaged. Further informa- tion on the ECO start/stop function
(
Ypage 126).
Shifting to neutral N
GWARNING
If children are left unsupervised in the vehicle,
they could:
Ropen the doors, thus endangering other
people or road users.
Rget out and disrupt traffic.
Roperate the vehicle's equipment.
Additionally, children could set the vehicle in
motion if, for example, they:
Rrelease the parking brake.
Rshifting the automatic transmission out of
park position P
RStart the engine.
There is a risk of an accident and injury.
When leaving the vehicle, always take the
SmartKey with you and lock the vehicle. Never
leave children or animals unattended in the
vehicle. Always keep the SmartKey out of
reach of children.
XIf the transmission is in position Dor R: push
the DIRECT SELECT lever up or down to the
first point of resistance.
XIf the transmission is in position P: depress
the brake pedal and push the DIRECT SELECT lever up or down to the first point of resist-
ance.
If you switch the engine off with the transmis-
sion in position Ror D, the automatic transmis-
sion shifts to Nautomatically.
With the Smartkey: if you then open the driv-
er's door or the front-passenger door or remove
the Smartkey from the ignition, the automatic
transmission shifts to Pautomatically.
With KEYLESS-GO: if you then open thedriver's
or f
ront-passenger door, the automatic trans-
mission shifts to P.
If you want the automatic transmission to
remain in neutral N, e.g. when having the vehicle
cleaned in an automatic car wash with a towing system:
Automatic transmission131
Driving and parking
Z
Page 135 of 334
ANeutral
Do not shift the transmission toN
while driving. Otherwise, the auto-
matic transmission could be dam-
aged.
No power is transmitted from the
engine to the drive wheels.
Releasing the brakes will allow you to
move the vehicle freely, e.g. to push
it or tow it.
If ESP
®is deactivated or faulty: shift
the transmission only to position Nif
the vehicle is in danger of skidding,
e.g. on icy roads.
If you switch the engine off with the
transmission in position Ror D, the
automatic transmission shifts to N
automatically.
!Rolling in neutral Ncan damage
the drive train.
7Drive
The automatic transmission changes
gear automatically. All forward gears
are available.
Driving tips
Changing gear
The automatic transmission shifts to the indi-
vidual gears automatically when it is in trans-
mission position D. This automatic gear shifting
behavior is determined by:
Rthe selected drive program
Rthe position of the accelerator pedal
Rthe road speed
Accelerator pedal position
Your style of driving influences how the auto-
matic transmission shifts gear:
Rlittle throttle: early upshifts
Rmore throttle: late upshifts
Mercedes-AMG vehicles
When shifting down, the double-clutch function
is active regardless of the currently selected
drive program. The double-clutch function reduces load change reactions and is conducive
to a sporty driving style. The sound generated by
the double-clutch function depends on the drive
program selected.
Kickdown
Use kickdown for maximum acceleration:
XDepress the accelerator pedal beyond the
pressure point.
The automatic transmission shifts to a lower
gear depending on the engine speed.
XEase off the accelerator pedal once the
desired speed is reached.
The automatic transmission shifts back up.
Rocking the vehicle free
Rocking the vehicle free by shifting back and
forth between transmission positions
Dand R
can help to free a vehicle that has become stuck
in mud or snow. The vehicle's engine manage-
ment restricts switching between transmission
positions Dand Rto speeds up to a maximum of
5 mph (9 km/h). To shift back and forth between
transmission positions Dand R, move the
DIRECT SELECT lever up and down past the
point of resistance.
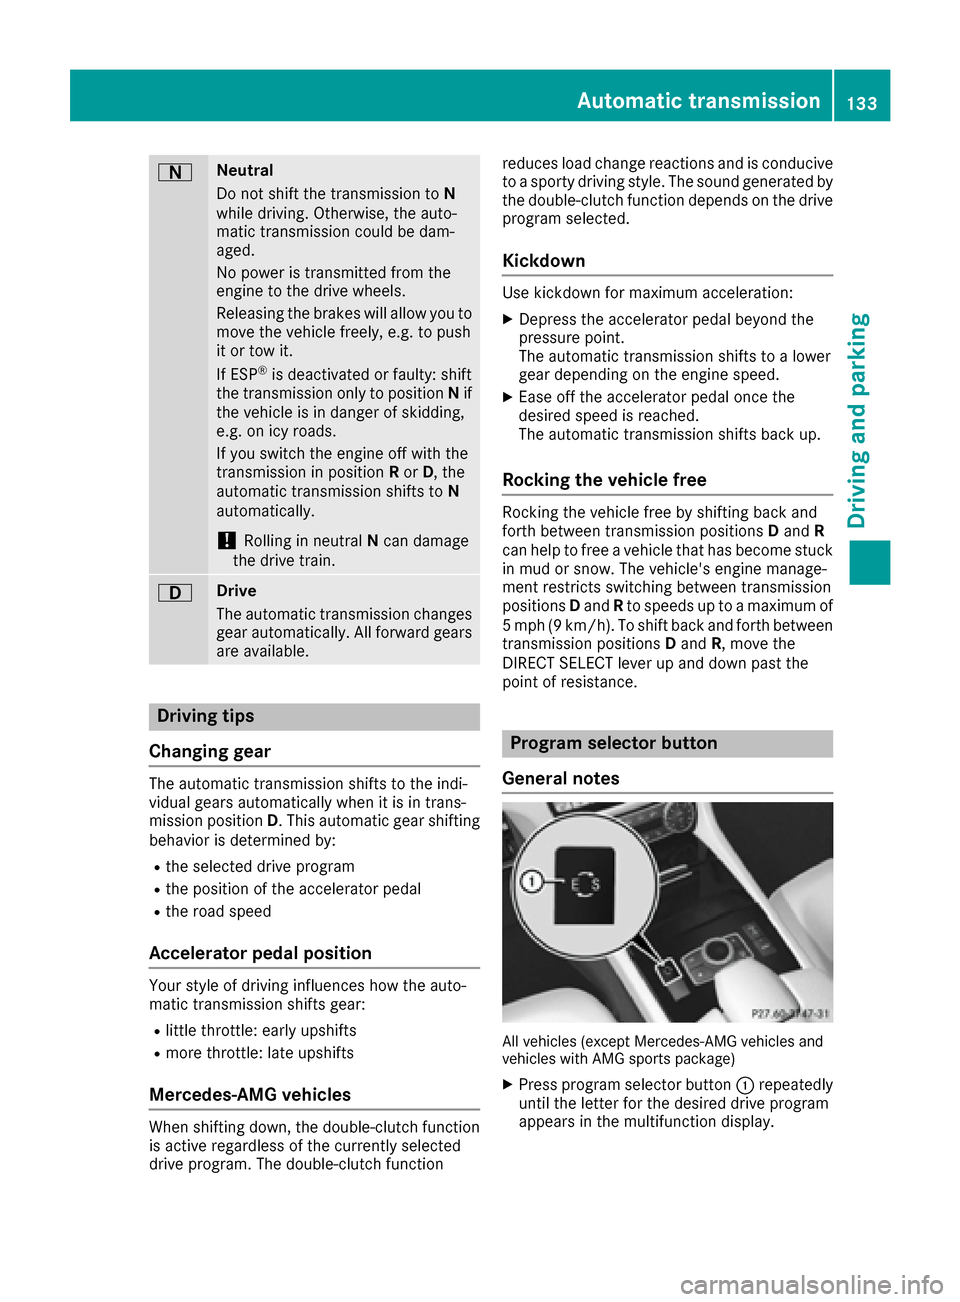
Program selector button
General notes
All vehicles (except Mercedes-AMG vehicles and
vehicles with AMG sports package)
XPress program selector button :repeatedly
until the letter for the desired drive program
appears in the multifunction display.
Automatic transmission133
Driving an d parking
Z
Page 140 of 334
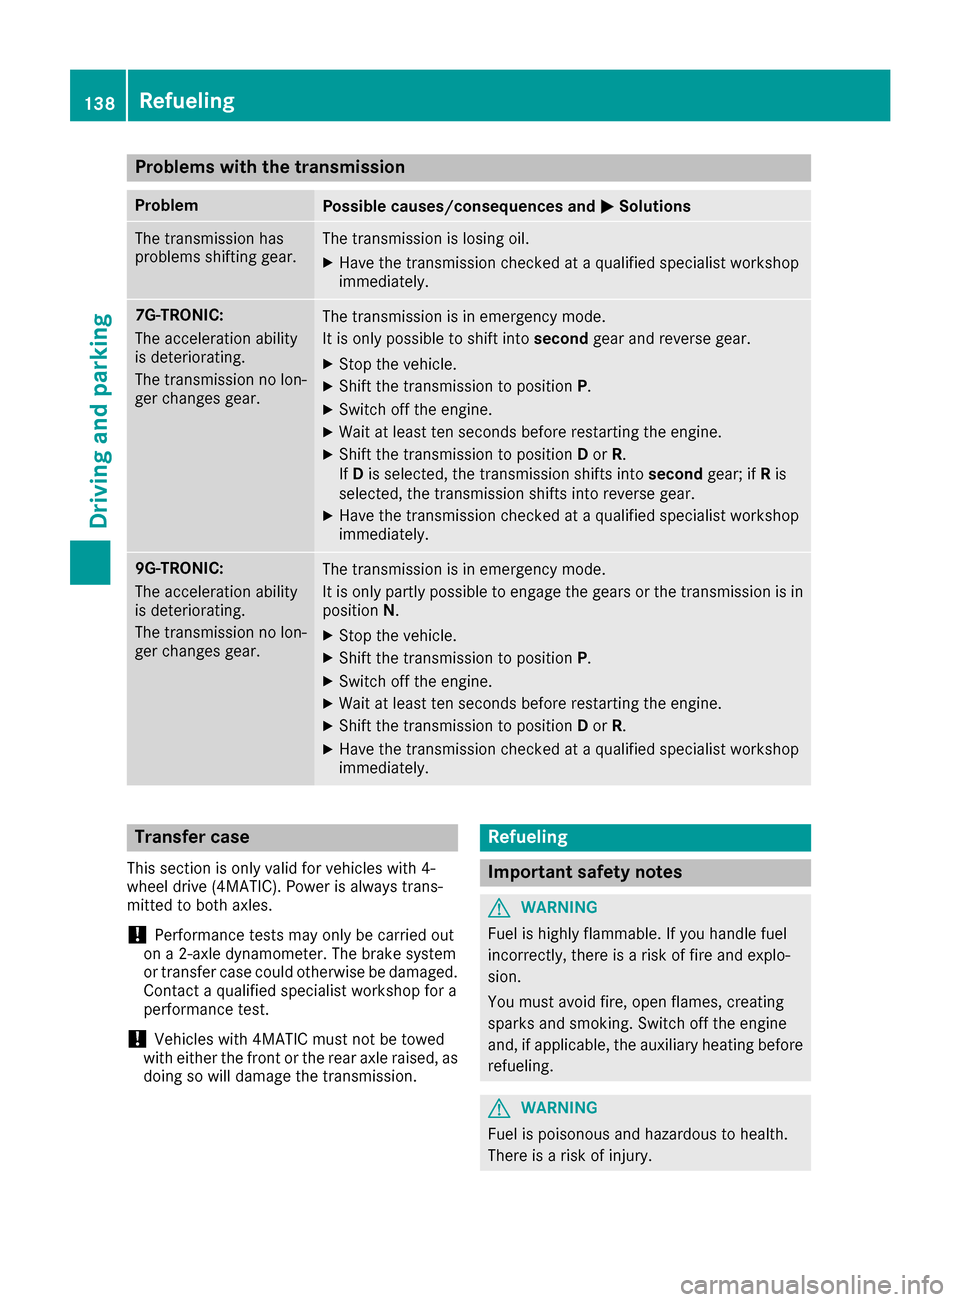
Problems with the transmission
ProblemPossible causes/consequences andMSolutions
The transmission has
problems shifting gear.The transmission is losing oil.
XHave the transmission checked at a qualified specialist workshop
immediately.
7G-TRONIC:
The acceleration ability
is deteriorating.
The transmission no lon-
ger changes gear.The transmission is in emergency mode.
It is only possible to shift intosecondgear and reverse gear.
XStop the vehicle.
XShift the transmission to position P.
XSwitch off the engine.
XWait at least ten seconds before restarting the engine.
XShift the transmission to positionDor R.
If D is selected, the transmission shifts into secondgear; ifRis
selected, the transmission shifts into reverse gear.
XHave the transmission checked at a qualified specialist workshop
immediately.
9G-TRONIC:
The acceleration ability
is deteriorating.
The transmission no lon-
ger changes gear.The transmission is in emergency mode.
It is only partly possible to engage the gears or the transmission is in
position N.
XStop the vehicle.
XShift the transmission to position P.
XSwitch off the engine.
XWait at least ten seconds before restarting the engine.
XShift the transmission to positionDor R.
XHave the transmission checked at a qualified specialist workshop
immediately.
Transfer case
This section is only valid for vehicles with 4-
wheel drive (4MATIC). Power is always trans-
mitted to both axles.
!Performance tests may only be carried out
on a 2-axle dynamometer. The brake system
or transfer case could otherwise be damaged. Contact a qualified specialist workshop for a
performance test.
!Vehicles with 4MATIC must not be towed
with either the front or the rear axle raised, as
doing so will damage the transmission.
Refueling
Important safety notes
GWARNING
Fuel is highly flammable. If you handle fuel
incorrectly, there is a risk of fire and explo-
sion.
You must avoid fire, open flames, creating
sparks and smoking. Switch off the engine
and, if applicable, the auxiliary heating before refueling.
GWARNING
Fuel is poisonous and hazardous to health.
There is a risk of injury.
138Refueling
Driving and parking
Page 143 of 334
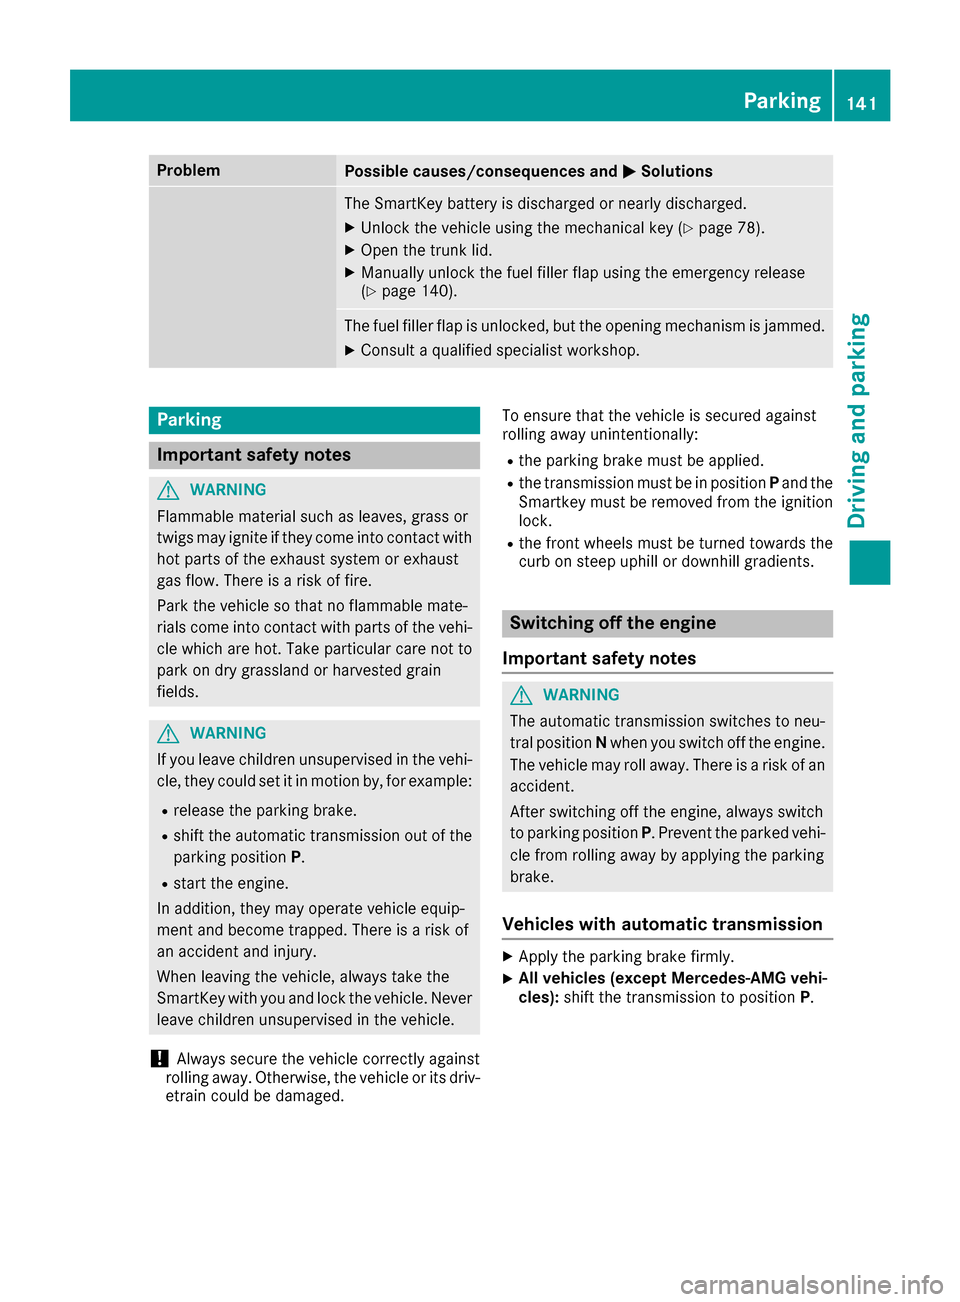
ProblemPossible causes/consequences andMSolutions
The SmartKey battery is discharged or nearly discharged.
XUnlock the vehicle using the mechanical key (Ypage 78).
XOpen the trunk lid.
XManually unlock the fuel filler flap using the emergency release
(Ypage 140).
The fuel filler flap is unlocked, but the opening mechanism is jammed.
XConsult a qualified specialist workshop.
Parking
Important safety notes
GWARNING
Flammable material such as leaves, grass or
twigs may ignite if they come into contact with
hot parts of the exhaust system or exhaust
gas flow. There is a risk of fire.
Park the vehicle so that no flammable mate-
rials come into contact with parts of the vehi-
cle which are hot. Take particular care not to
park on dry grassland or harvested grain
fields.
GWARNING
If you leave children unsupervised in the vehi-
cle, they could set it in motion by, for example:
Rrelease the parking brake.
Rshift the automatic transmission out of the
parking position P.
Rstart the engine.
In addition, they may operate vehicle equip-
ment and become trapped. There is a risk of
an accident and injury.
When leaving the vehicle, always take the
SmartKey with you and lock the vehicle. Never
leave children unsupervised in the vehicle.
!Always secure the vehicle correctly against
rolling away. Otherwise, the vehicle or its driv-
etrain could be damaged. To ensure that the vehicle is secured against
rolling away unintentionally:
Rthe parking brake must be applied.
Rthe transmission must be in position
Pand the
Smartkey must be removed from the ignition lock.
Rthe front wheels must be turned towards the
curb on steep uphill or downhill gradients.
Switching off the engine
Important safety notes
GWARNING
The automatic transmission switches to neu-
tral position Nwhen you switch off the engine.
The vehicle may roll away. There is a risk of an
accident.
After switching off the engine, always switch
to parking position P. Prevent the parked vehi-
cle from rolling away by applying the parking
brake.
Vehicles with automatic transmission
XApply the parking brake firmly.
XAll vehicles (except Mercedes-AMG vehi-
cles): shift the transmission to position P.
Parking141
Driving and parking
Z