key battery MERCEDES-BENZ CLS COUPE 2012 User Guide
[x] Cancel search | Manufacturer: MERCEDES-BENZ, Model Year: 2012, Model line: CLS COUPE, Model: MERCEDES-BENZ CLS COUPE 2012Pages: 373, PDF Size: 9.12 MB
Page 115 of 373
Even if the ligh
tsensor does not detec tthat
is dark, the side lamps and dipped-beam
headlamps switch on when the key is inserted
into the ignition lock and the light switch is
set to the Lposition. This is aparticularly
useful function in the event of rain and fog.
X To switch on the dipped-beam head-
lamps: turn the key in the ignition lock to
position 2or start the engine.
X Turn the light switch to L.
The green Lindicator lamp in the instru-
ment cluster lights up.
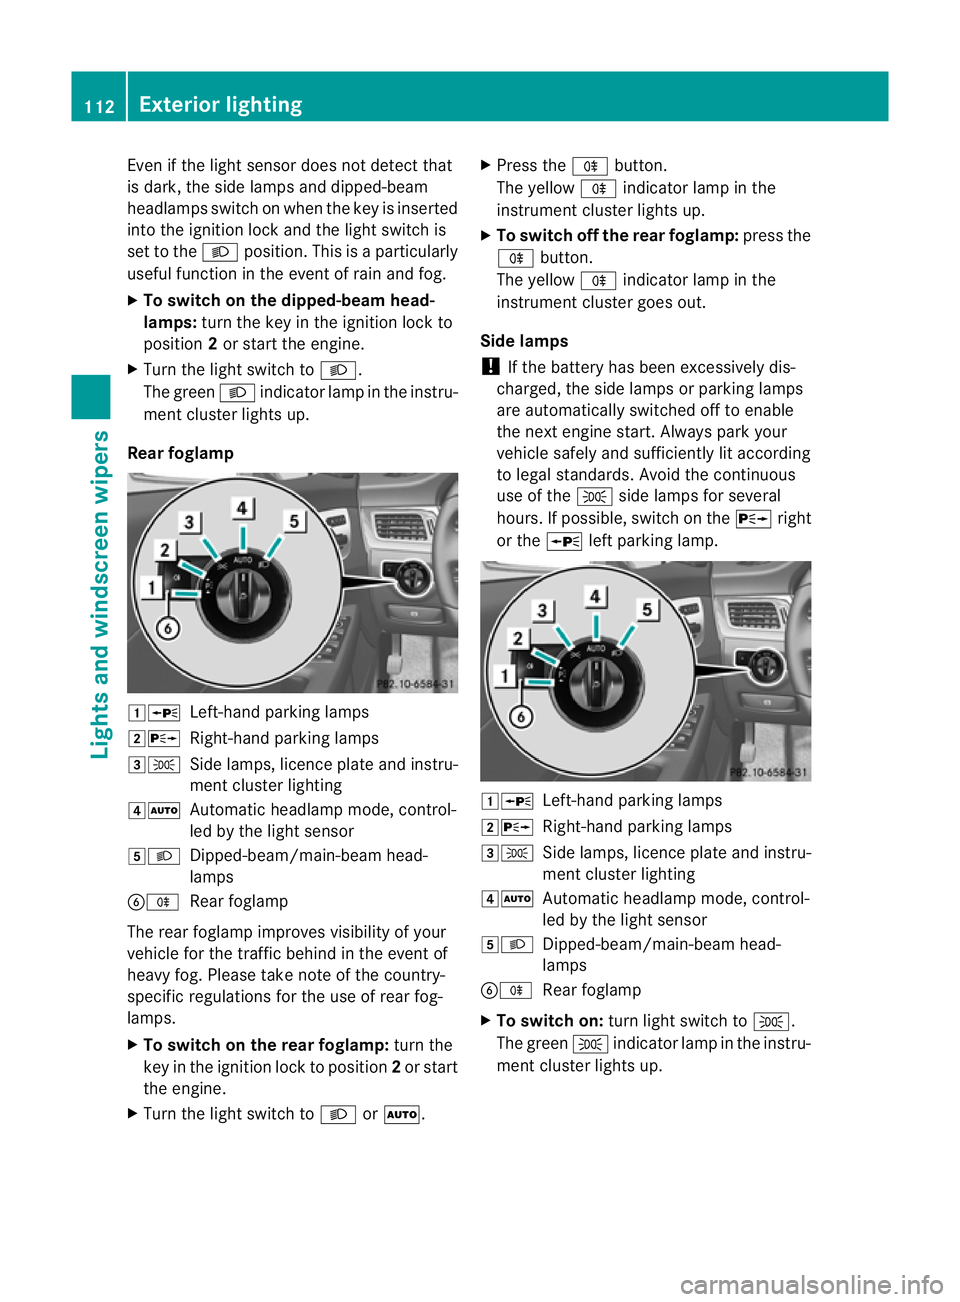
Rear foglamp 1W
Left-hand parking lamps
2X Right-hand parking lamps
3T Side lamps, licence plate and instru-
ment cluster lighting
4Ã Automatic headlamp mode, control-
led by the light sensor
5L Dipped-beam/main-beam head-
lamps
BR Rear foglamp
The rear foglamp improves visibility of your
vehicle for the traffic behind in the event of
heavy fog. Please take note of the country-
specific regulations for the use of rear fog-
lamps.
X To switch on the rear foglamp: turn the
key in the ignition lock to position 2or start
the engine.
X Turn the light switch to LorÃ. X
Press the Rbutton.
The yellow Rindicator lamp in the
instrumentc luster lightsup.
X To switch off th erear foglamp: pressthe
R button.
The yellow Rindicator lamp in the
instrumen tcluster goes out.
Side lamps
! If the battery has been excessively dis-
charged, the side lamps or parking lamps
are automatically switched off to enable
the nex tengine start. Alway sparky our
vehicl esafelya nd sufficiently li taccording
to lega lstandards. Avoi dthe continuous
us eoft heT sidelam ps for several
hours. If possible ,switch on the Xright
or the Wleft parking lamp. 1W
Left-hand parking lamps
2X Right-hand parking lamps
3T Sidelam ps,licence plate and instru-
ment cluster lighting
4Ã Automati cheadlamp mode, control-
led by the light sensor
5L Dipped-beam/main-beam head-
lamps
BR Rear foglamp
X To switch on: turn light switch to T.
The green Tindicator lamp in the instru-
ment cluster lights up. 112
Exterior lightingLights and windscreen wipers
Page 121 of 373
Interior lighting
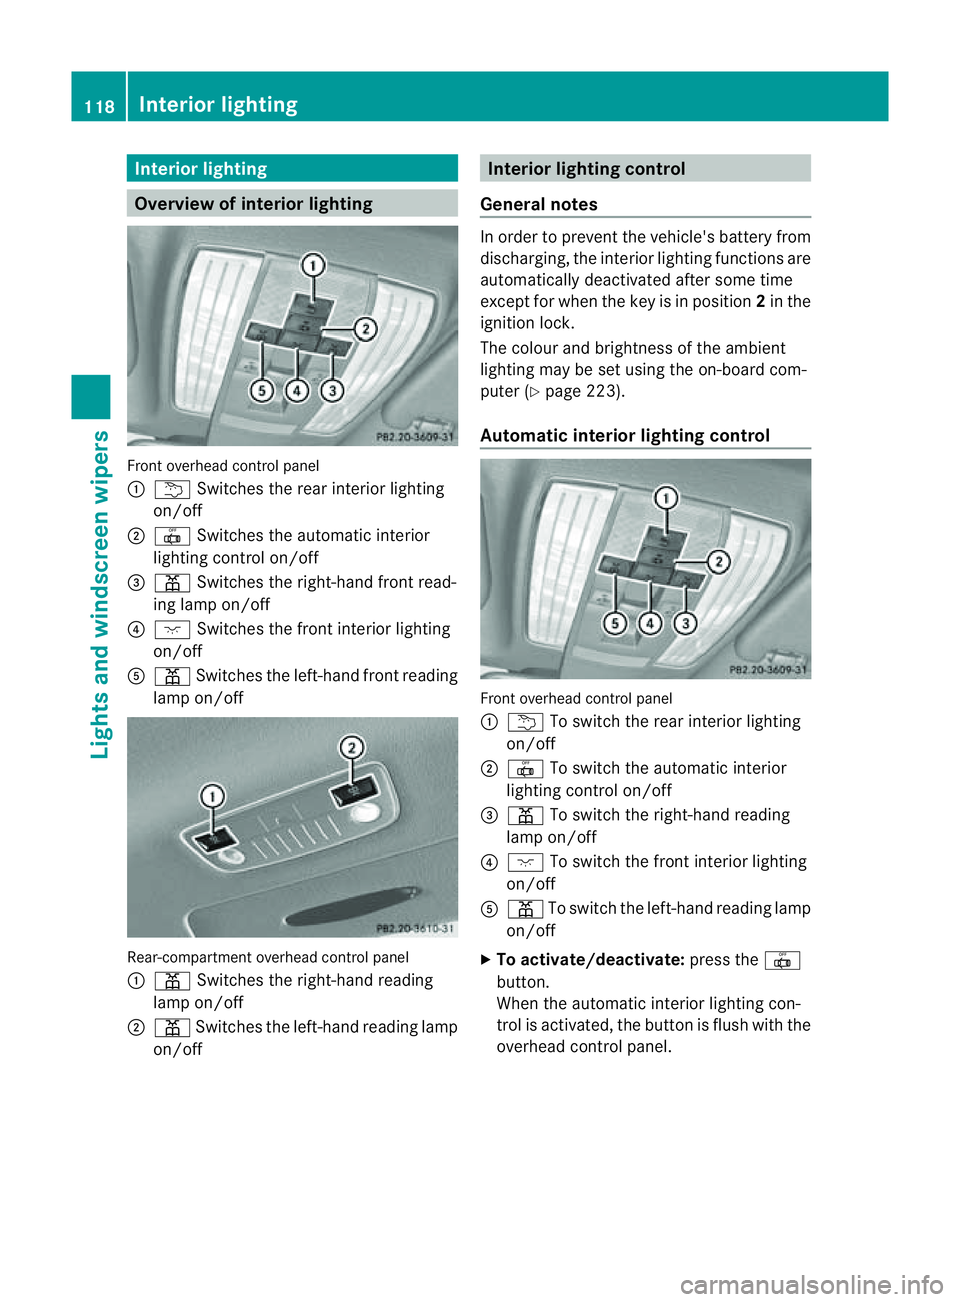
Overview of interior lighting
Fron
toverhead control panel
: u Switches th erear interio rlighting
on/off
; | Switches the automatic interior
lighting control on/off
= p Switches the right-han dfront read-
ing lamp on/off
? c Switches the front interior lighting
on/off
A p Switches the left-han dfront reading
lamp on/off Rear-compartment overhead control panel
:
p Switches the right-han dreading
lamp on/off
; p Switches the left-han dreadin glamp
on/off Interior lighting control
General notes In order to prevent the vehicle's battery from
discharging, the interior lighting function
sare
automatically deactivated after some time
except for when the key is in position 2in the
ignition lock.
The colour and brightnes softhe ambient
lighting may be set using the on-board com-
puter (Y page 223).
Automatic interior lighting control Front overhead control panel
:
u To switc hthe rear interior lighting
on/off
; | To switc hthe automatic interior
lighting control on/off
= p To switc hthe right-han dreading
lamp on/off
? c To switch the fron tinterior lighting
on/off
A p To switch the left-hand reading lamp
on/off
X To activate/deactivate: press the|
button.
When the automatic interior lighting con-
trol is activated, the button is flush with the
overhead control panel. 118
Interior lightingLights and windscreen wipers
Page 134 of 373
Rear windo
wheating
Switchin gon/off G
WARNING
Clea rall windows of ice or sno wbefor esetting
off .O therwise, impaire dvisibility could
endanger yo uand others.
Th er earw indow heatin ghasah igh current
draw. You should therefore switc hitoff as
soon as the window is clear .Itotherwise
switches off automaticall yafter several
minutes.
If the battery voltag eistoo low, the rea rwin-
dow heatin gmay switc hoff.
X Turn the key to position 2in the ignition
lock.
X Press the ¤button.
The indicator lamp in the ¤button lights
up or goes out.
Problems with th erearw indow heating The rear window heatin
ghas switched off
prematurely or cannot be activated.
X Switch off any consumers that are not
required, e.g. readin glamps or interior
lighting.
When the battery is sufficiently charged,
the rear window heatin gisactivate dagain
automatically. Activating/deactivating air-recircula-
tion mode G
WARNING
Only switc hover to air-recirculatio nmode
briefly at low outside temperatures. Other-
wise, the windows could mist up, thus impair-
ing visibility and endangering yourself and
others. This may prevent you from observing
the traffic conditions, thereby causing an
accident. You can deactivate the flow of fresh air if
unpleasant odours are entering the vehicle
from outside. The air already inside the vehi-
cle will then be recirculated.
The operation of air-recirculation mode is the
same for all control panels.
X
Turn the key to position 2in the ignition
lock.
X To activate: press thegbutton.
The indicator lamp in the gbutton lights
up.
i In the event of high pollution levels 1
or at
high outside temperatures, air-recircula-
tion mode is automatically activated. When
air-recirculation mode is activated auto-
matically, the indicator lamp above the
g button does not light up.
Outside air is added after about
30 minutes.
X To deactivate: press thegbutton.
The indicator lamp in the gbutton goes
out.
i Air-recirculation mode deactivates auto-
matically:
R after approximately five minutes at out-
side temperatures below approximately
5†
R after approximately five minutes if cool-
ing with air dehumidification is deactiva-
ted
R after approximately 30 minutes at out-
side temperatures above approximately
5† Convenience opening/closing using
the air-recirculation button
G
WARNING
Make sure that nobody can become trapped
between the side window and the door frame
as the side windows are opened and closed.
Make sure that all object sand body parts are
clear of the side windows when they are being
1 THERMOTRONIC automatic climate contro lonly. Operatin
gthe climate contro lsystem
131Climate control
Z
Page 135 of 373
opened or closed. You or the object
scould be
drawn in or become trapped between the side
window and the door frame as the window
moves. If there is arisk of entrapment, oper-
ate the Wswitchtom ove the side window
in the opposit edirection.
Make sure that nobody can becom etrapped
as the slidin gsunroof/panorama slidin gsun-
roof is opened and closed. If there is arisk of
entrapment, operat ethe 3 switchtom ove
the slidin gsunroof/panorama slidin gsunroof
in the opposit edirection.
X Convenience closing feature: press and
hold the gbutton until the side win-
dows and the sliding sunroof/panorama
sliding sunroof are closed.
The indicator lamp in the gbutton lights
up. Air-recirculation mode is activated.
X Convenience opening feature: press and
hold the gbutton until the side win-
dows and the sliding sunroof/panorama
sliding sunroof are opened. The side win-
dows and the sliding sunroof/panorama
sliding sunroof move back to their original
position.
The indicator lamp in the gbutton goes
out. Air-recirculation mode is deactivated.
i If you open the side windows or the sliding
sunroof/panorama sliding sunroof man-
ually after closing the mwith the conveni-
enc eclosing feature, the ywill remain in this
position when opened using the conveni-
enc eopening feature. Activating/deactivating th
eresidual
heat function
The residual heat function is only available
with THERMOTRONI Cautomatic climate con-
trol.
It is possible to mak euse of the residual heat
of the engine to continue heatin gthe station-
ary vehicle for up to 30 minutes after the
engine has been switched off .The heating time depends on the temperature that has
been set for the vehicle interior.
X
To activate: press theÌbutton.
The indicator lamp in the Ìbutton lights
up.
i The blower will run at alow speed regard-
less of the airflow setting.
i If you activate the residual heat function
at high temperatures, only the ventilation
will be activated. The blower runs at
medium speed.
X To deactivate: press theÌbutton.
The indicator lamp in the Ìbutton goes
out.
i It is possible that the residual heat func-
tion may be activated automatically an hour
after the key has been removed. The vehi-
cle is then ventilated for 30minutes to dry
the air-conditioning system.
Residual heat is deactivated automatically:
R after approximately 30 minutes
R when the ignition is switched on
R if the battery voltage drops Auxiliary heating
Important safety notes G
WARNING
Exhaust fumes are produced when the auxili-
ary heating is in operation. Inhaling these
exhaust fumes can be poisonous. You should
therefore switch off the auxiliary heating in
confined spaces without an extraction sys-
tem, e.g. agarage. G
WARNING
When operating the auxiliary heating parts of
the vehicle can get very hot. Make sure that
the exhaust system does not under any cir-
cumstances come into contact with easily
ignitable material such as dry grass or fuels.
The material could otherwise ignite and set 132
Operating the climate control systemClimatec
ontrol
Page 136 of 373
the vehicl
ealigh t. Choose your parking spot
accordingly.
Operating the auxiliary heating is thu spro-
hibited at filling stations or when your vehicle
is being refuelled .You must therefor eswitch
off the auxiliary heating at filling stations.
! Operating the auxiliary heating/ventila-
tion draws on the vehicle battery. After you
have heated or ventilated the vehicle a
maximum of two times, drive for alonger
distance.
i Switch the auxiliary heating on regularly
once amonthf or about ten minutes.
The auxiliary heating heats the air in the
passenger compartment to the selected tem-
perature. It does not use the heat of the run-
ning engine to do this. The auxiliary heating
is operated directly using the vehicle's fuel.
For this reason, the tank content must be at
least at reserve fuel level to ensure that the
auxiliary heating functions.
The auxiliary heating/ventilation automati-
cally adjusts to changes in temperature and
weather conditions. For this reason, the aux-
iliary heating could switch from ventilation
mode to heating mode or from heating mode
to ventilation mode.
The auxiliary heating switches off automati-
cally after 50 minutes. This time limit can be
altered. To do this, visit aqualified specialist
workshop.
You cannot use the auxiliary ventilation to
cool the vehicle interior to atemperature
lower than the outside temperature.
Before switching on X
Turn the key to position 2in the ignition
lock.
X Set the temperature.
The auxiliary heating/ventilation can be acti-
vated even when climate control is set to
manual. Optimum comfor tcan be attained
when the system is set to automatic mode.
Set the temperature to 22 †. The auxiliary heating/ventilation can be acti-
vated or deactivated using the remote control
or the button on the centre console.
The on-board computer can be used to spec-
ify up to three departure times, one of which
may be preselected (Y page 225).
Switching the auxiliary heating/venti-
lation on/off using the centre console
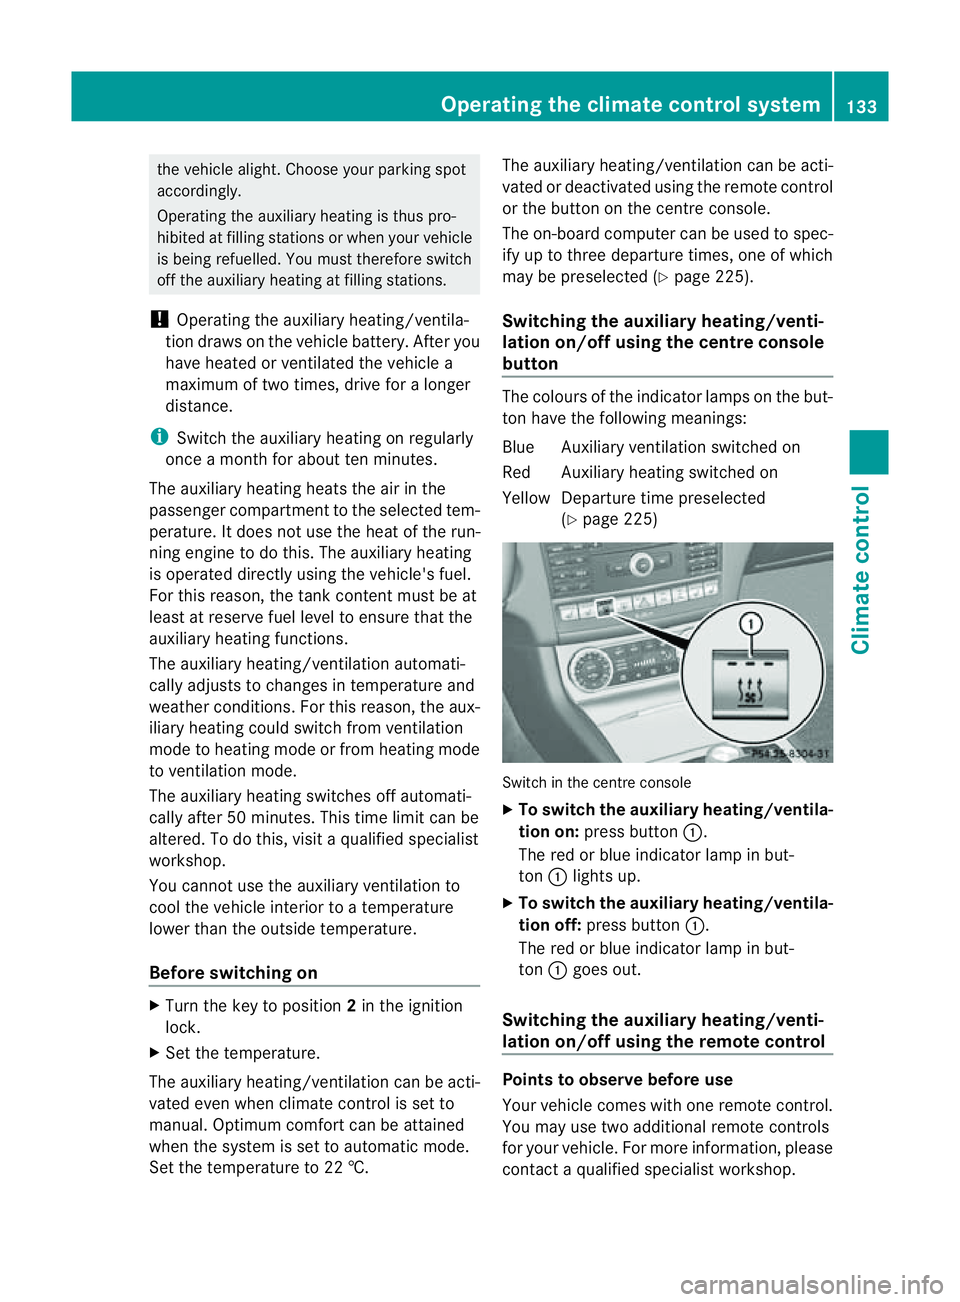
button The colours of the indicator lamps on the but-
ton have the following meanings:
Blue Auxiliary ventilation switched on
Red Auxiliary heating switched on
Yellow Departure time preselected
(Ypage 225) Switch in the centre console
X
To switch the auxiliary heating/ventila-
tion on: press button :.
The red or blue indicator lamp in but-
ton :lights up.
X To switch the auxiliary heating/ventila-
tion off: press button :.
The red or blue indicator lamp in but-
ton :goes out.
Switching the auxiliary heating/venti-
lation on/off using the remotec ontrol Points to observe before use
Your vehicle comes with one remote control.
You may use two additional remote controls
for your vehicle. For more information, please
contact
aqualified specialist workshop. Operating the climate control system
133Climate control Z
Page 150 of 373
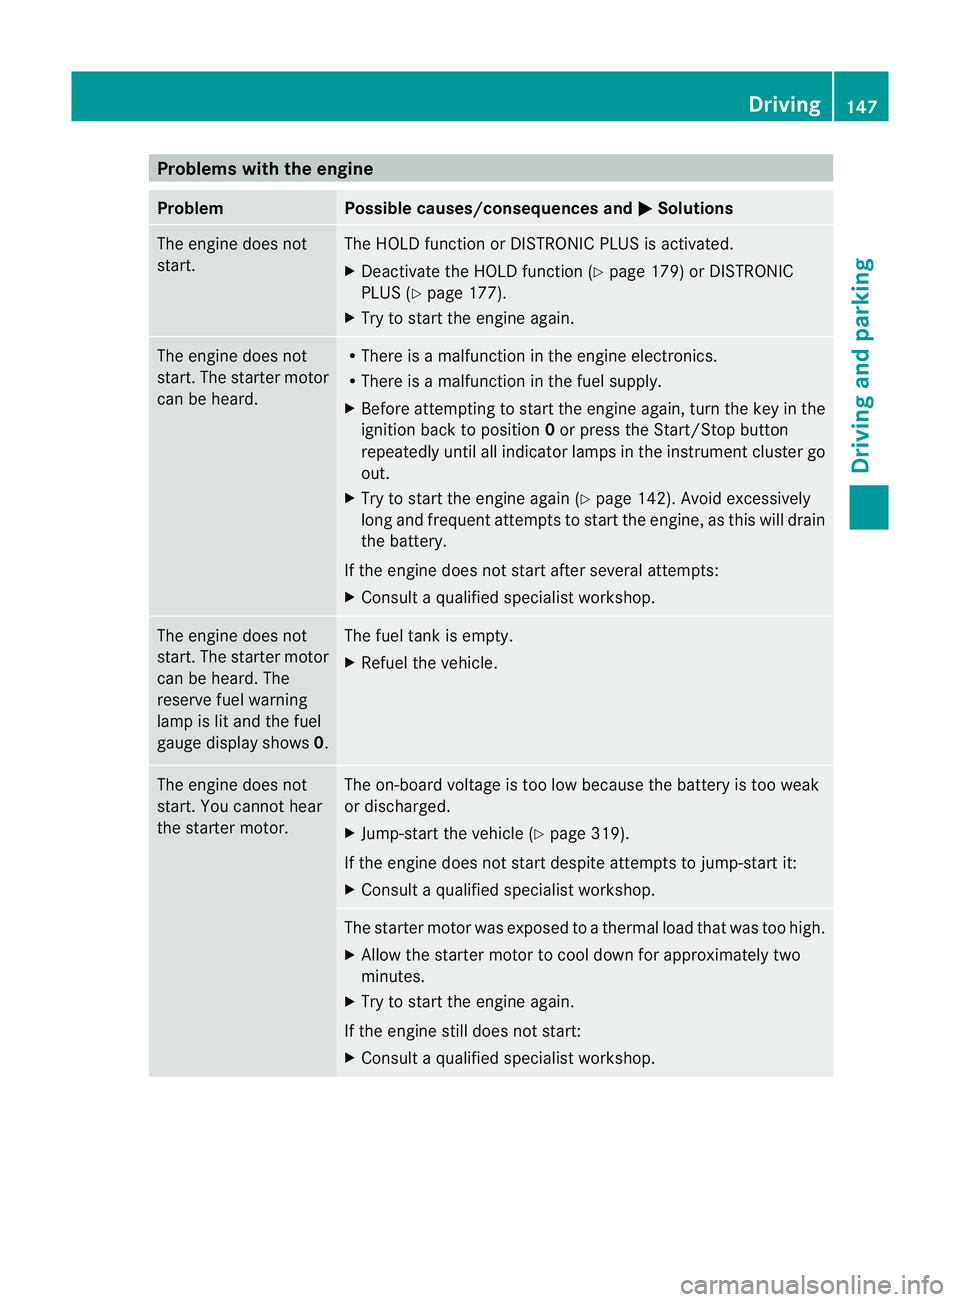
Problems with the engine
Problem Possible causes/consequences and
M Solutions
The engine does not
start. The HOLD function or DISTRONIC PLUS is activated.
X
Deactivat ethe HOLD function (Y page 179) or DISTRONIC
PLUS (Y page 177).
X Try to start the engine again. The engine does not
start. The starter motor
can be heard. R
There is amalfunction in the engine electronics.
R There is amalfunction in the fuel supply.
X Before attempting to start the engine again, turn the key in the
ignition back to position 0or press the Start/Stop button
repeatedly until all indicator lamps in the instrumen tcluster go
out.
X Try to start the engine again (Y page 142). Avoid excessively
long and frequent attempt stostart the engine, as this will drain
the battery.
If the engine does not start after several attempts:
X Consult aqualified specialist workshop. The engine does not
start
.The starter motor
can be heard. The
reserve fuel warning
lamp is lit and the fuel
gauge displays hows0. The fuel tank is empty.
X
Refuel the vehicle. The engine does not
start. You cannot hear
the starter motor. The on-board voltage is too low because the battery is too weak
or discharged.
X
Jump-start the vehicle (Y page 319).
If the engine does not start despite attemptstoj ump-start it:
X Consult aqualified specialist workshop. The starter motor was exposed to
athermal load that was too high.
X Allow the starter motor to cool down for approximately two
minutes.
X Try to start the engine again.
If the engine still does not start:
X Consult aqualified specialist workshop. Driving
147Driving and parking Z
Page 162 of 373
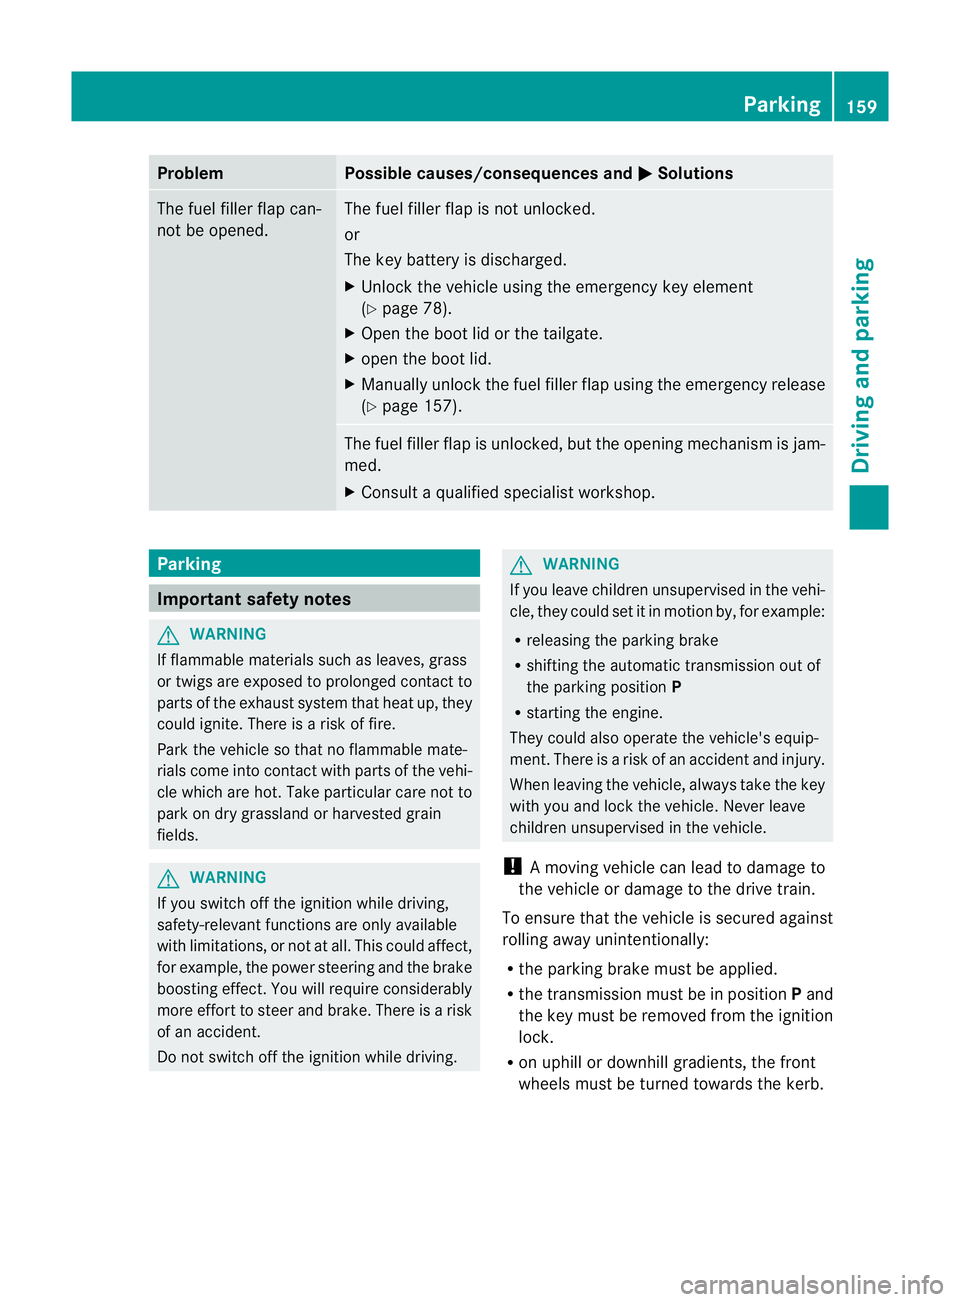
Problem Possible causes/consequences and
M Solutions
The fuel filler flap can-
not be opened. The fuel filler flap is not unlocked.
or
The key battery is discharged.
X
Unlock the vehicle using the emergency key element
(Y page 78).
X Open the boot lid or the tailgate.
X open the boot lid.
X Manuallyu nlock the fuel filler flap using the emergency release
(Y page 157). The fuel filler flap is unlocked, but the opening mechanism is jam-
med.
X
Consult aqualified specialist workshop. Parking
Important safety notes
G
WARNING
If flammable materials such as leaves, grass
or twigs are exposed to prolonged contact to
parts of the exhaust system that heat up, they
could ignite. There is arisk of fire.
Park the vehicle so that no flammable mate-
rials come into contact with parts of the vehi-
cle which are hot. Take particular care not to
park on dry grassland or harvested grain
fields. G
WARNING
If you switch off the ignition while driving,
safety-relevant functions are only available
with limitations, or not at all. This could affect,
for example, the power steering and the brake
boosting effect.Y ou will require considerably
more effort to steer and brake. There is arisk
of an accident.
Do not switch off the ignition while driving. G
WARNING
If you leave children unsupervised in the vehi-
cle, they could set it in motion by, for example:
R releasing the parking brake
R shifting the automatic transmission out of
the parking position P
R starting the engine.
They could also operate the vehicle's equip-
ment.T here isarisk of an accident and injury.
When leaving the vehicle, always take the key
with you and lock the vehicle. Never leave
children unsupervised in the vehicle.
! Am oving vehicle can lead to damage to
the vehicle or damage to the drive train.
To ensure that the vehicle is secured against
rolling away unintentionally:
R the parking brake must be applied.
R the transmission must be in position Pand
the key must be removed from the ignition
lock.
R on uphill or downhill gradients, the front
wheels must be turned towards the kerb. Parking
159Driving and parking Z
Page 286 of 373
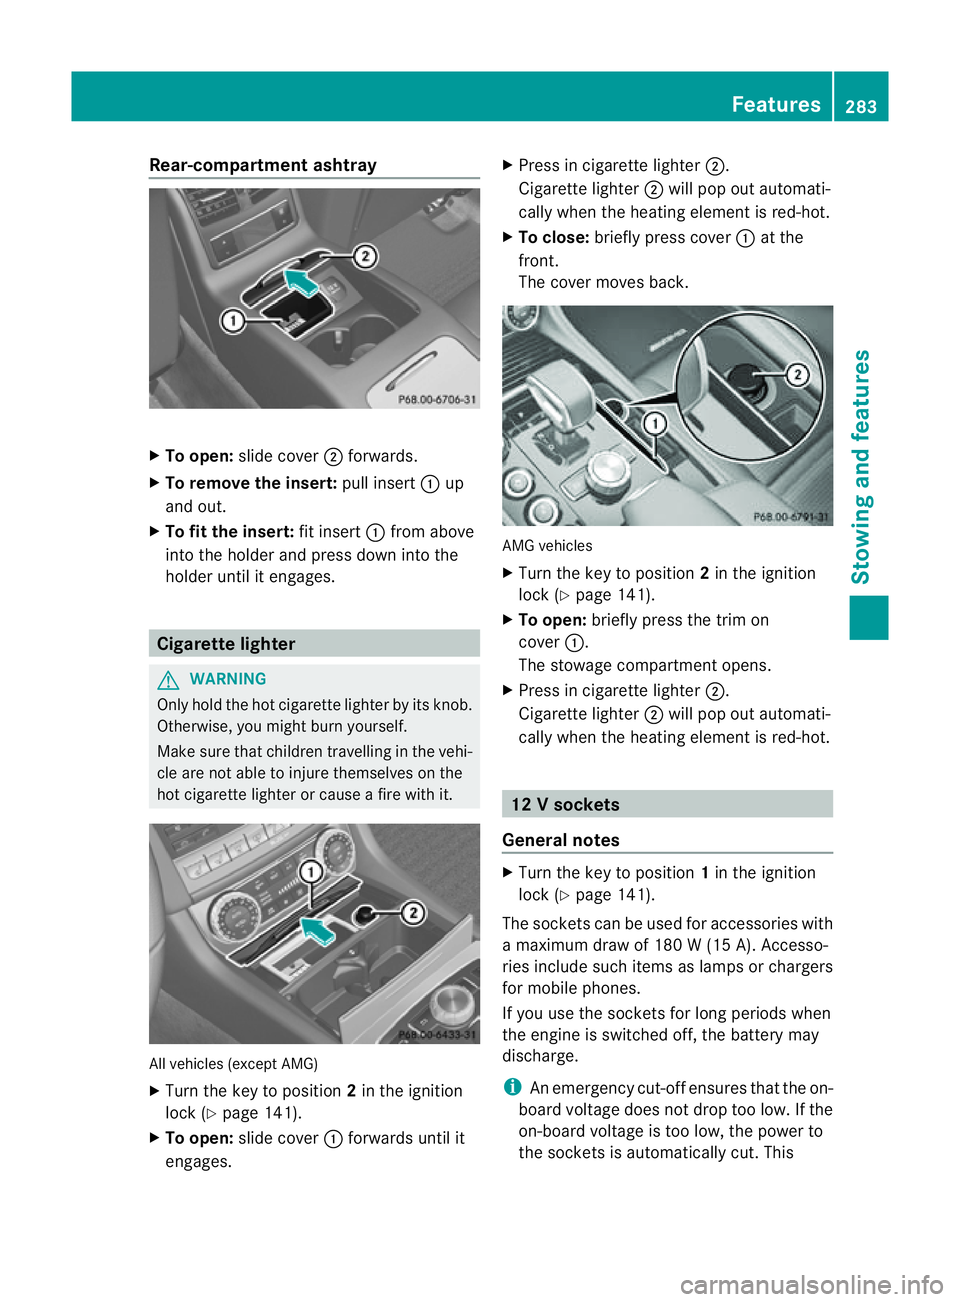
Rear-compartmen
tashtray X
To open: slide cover ;forwards.
X To remove the insert: pull insert:up
and out.
X To fit the insert: fit insert:from above
into the holder and press dow ninto the
holde runtil it engages. Cigarette lighter
G
WARNING
Onl yholdt he hot cigarette lighte rbyitsknob.
Otherwise ,you might burn yourself.
Mak esuret hatc hildren travellin ginthevehi-
cle are no table to injure themselves on the
hot cigarette lighter or cause afire with it. All vehicles (excep
tAMG)
X Turn the key to position 2in the ignition
lock (Y page 141).
X To open: slide cover :forwards until it
engages. X
Press in cigarette lighter ;.
Cigarette lighter ;will pop out automati-
cally when the heating element is red-hot.
X To close: briefly press cover :at the
front.
The cover moves back. AMG vehicles
X
Turn the key to position 2in the ignition
lock (Y page 141).
X To open: briefly press the trim on
cover :.
The stowage compartmento pens.
X Press in cigarette lighter ;.
Cigarett elighter ;will pop out automati-
cally when the heatin gelement is red-hot. 12
Vsockets
General notes X
Turn th ekey to position 1in th eignition
lock (Y page 141).
The socket scan be used for accessories with
am aximum draw of 18 0W(15 A). Accesso-
ries include such items as lamps or chargers
for mobil ephones.
If you use th esocket sfor lon gperiods when
th ee ngine is switche doff,t he battery may
discharge.
i An emergency cut-offe nsures thatthe on-
board voltage does not drop too low. If the
on-board voltage is too low, the power to
the socketsisa utomatically cut. This Features
283Stowing and features Z
Page 305 of 373
R
Vehicles with akey:
do not remove the key from the ignition
lock. Do not open the driver's door or
front-passenger door when the engine is
switched off. Otherwise, the automatic
transmission selects park position P
automatically and locks the wheels. You
can prevent this by shifting the auto-
matic transmission to Nbeforehand.
R Vehicles with KEYLESS-GO:
do not open the driver's door or front-
passenger door when the engine is
switched off. Otherwise, the automatic
transmission selects park position P
automatically and locks the wheels.
Observe the following to make sure that the
automatic transmission stays in position N:
X Make sure the vehicle is stationary and the
ignition is switched off.
X Turn the key to position 2(Ypage 141) in
the ignition lock.
Use the key instead of the Start/Stop but-
ton on vehicles with KEYLESS-GO.
X Depress and hold the brake pedal.
X Shift the automatic transmission to posi-
tion N.
X Release the brake pedal.
X Release the electric parking brake.
X Switch off the ignition and leave the key in
the ignition lock.
You can wash the vehicle in an automatic car
wash from the very start.
Wash off excess dirt before cleaning the vehi-
cle in an automatic car wash.
After using an automatic car wash, wipe off
wax from the windscreen and the wiper
blades. This will prevent smears and reduce
wiping noises caused by residueont he wind-
screen.
Washing by hand In some countries, washing by hand is only
allowed at specially equipped washing bays. Observe the legal requirements for each indi-
vidual country.
X Do not use hot water and do not wash the
vehicle in direct sunlight.
X Use asoft sponge to clean.
X Use amild cleaning agent, such as acar
shampoo approved by Mercedes-Benz.
X Thoroughly hose down the vehicle with a
gentle jet of water.
X Do not point the water jet directly towards
the air inlet.
X Use plenty of water and rinse out the
sponge frequently.
X Rinse the vehicle with clean water and dry
thoroughly with achamois.
X Do not let the cleaning agent dry on the
paintwork.
When using the vehicle in winter, remove all
traces of road salt deposits carefully and as
soon as possible.
High-pressure cleaninge quipment G
WARNING
Do not use high-pressure cleaners with circu-
lar-jet nozzles (dirt grinders) to clean your
vehicle, in particular the tyres. You could oth-
erwise damage the tyres and cause an acci-
dent.
! Always maintain adistance of at least
30 cm between the vehicle and the high-
pressure cleaner nozzle. Information about
the correct distance is available from the
equipment manufacturer.
Move the high-pressure cleaner nozzle
around when cleaning your vehicle.
Do not aim directly at any of the following:
R tyres
R door gaps, roof gaps, jointse tc.
R electrical components
R battery
R connectors
R lights 302
CareMaintenance and care
Page 320 of 373
Battery aci
discaustic.
Avoid contact with the skin,
eyes or clothing.
Wea rsuitable protective
clothing ,inparticular
gloves, an apro nand aface
mask.
Immediately rins eacid
splashes off with clean
water. Consult adoctor if
necessary. Wear ey
eprotection. Kee
pchildren away. Observ
ethisO wner'sM an-
ual. G
WARNING
For safety reasons ,Mercedes-Benz recom-
mend stha tyou only use batteries which have
been tested and approved for your vehicle by
Mercedes-Benz. These batteries provide
increased impact protection to prevent vehi-
cle occupant sfrom suffering acid burns
should the battery be damaged in the event
of an accident.
To prevent acid burns, observe the following
safety notes when handling batteries:
R do not lean over the battery.
R do not place any metal object sonabattery.
Otherwise, you could cause ashort circuit
and the battery's gas mixture could ignite.
R make sure that you do not create an elec-
trostatic charge, e.g. by wearing synthetic
clothin gorasar esult of friction on fabrics.
Therefore, you should not pull or slide the
battery over carpets or other synthetic
materials. R
never touch the battery first. To discharge
ap ossible electrostatic charge, step out of
the vehicle first and touch the bodywork.
R do not wipe the battery using acloth. The
battery may explode as aresult of electro-
static charge or due to flying sparks. H
Environmental note Batteries contain pollutants.
It is illegal to dispose of them
with the household rubbish.
They must be collected sep-
arately and disposed of in an
environmentally responsible
recycling system. Dispose of batteries in an
environmentally responsible
manner. Take discharged
batteries to
aqualified spe-
cialis tworkshop or to acol-
lection point for used batter-
ies.
! Have the battery checked regularly at a
qualified specialist workshop.
Observe the service intervals in the Service
Booklet or contact aqualified specialist
workshop for more information.
! You should have all work involving the
battery carried out at aqualified specialist
workshop. In th eexcepti onal cas ethatitis
necessar yfor you to disconnect th ebattery
yourself, mak esure that:
R you switch off th eenginea nd remove the
key. On vehicles wit hKEYLESS-GO,
ensure that th eignition is switched off.
Chec kthat all the indicator lamps in the
instrumentc luster are off. Otherwise,
electronic components, such as the
alternator, may be damaged.
R you first remove the negative terminal
clamp and then the positive terminal
clamp. Never swap the terminal clamps. Battery (vehicle)
317Breakdown assistance Z