MERCEDES-BENZ CLS COUPE 2012 Owners Manual
Manufacturer: MERCEDES-BENZ, Model Year: 2012, Model line: CLS COUPE, Model: MERCEDES-BENZ CLS COUPE 2012Pages: 373, PDF Size: 9.12 MB
Page 271 of 373
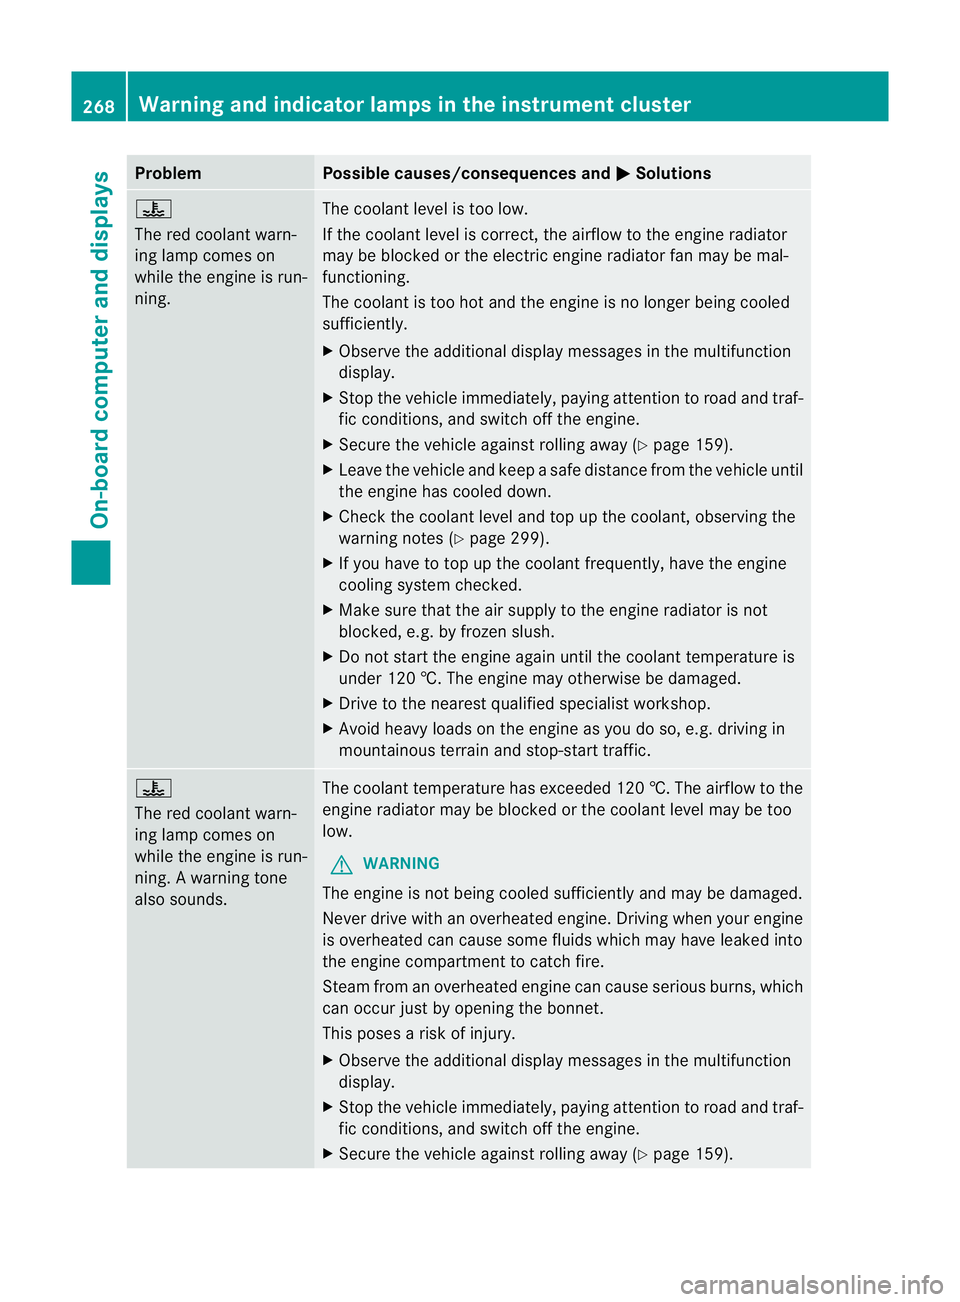
Problem Possible causes/consequences and
M Solutions
?
The red coolant warn-
ing lamp comes on
while the engine is run-
ning.
The coolant level is too low.
If the coolant level is correct, the airflow to the engine radiator
may be blocked or the electric engine radiator fan may be mal-
functioning.
The coolant is too hot and the engine is no longer being cooled
sufficiently.
X
Observe the additional display messages in the multifunction
display.
X Stop the vehicle immediately, paying attention to road and traf-
fic conditions, and switch off the engine.
X Secure the vehicle against rolling away (Y page 159).
X Leave the vehicle and keep asafe distance from the vehicle until
the engine has cooled down.
X Check the coolant level and top up the coolant, observing the
warning notes (Y page 299).
X If you have to top up the coolant frequently, have the engine
cooling system checked.
X Make sure that the air supply to the engine radiator is not
blocked, e.g. by frozen slush.
X Do not start the engine again until the coolant temperature is
under 120 †. The engine may otherwise be damaged.
X Drive to the nearest qualified specialist workshop.
X Avoid heavy loads on the engine as you do so, e.g. driving in
mountainous terrain and stop-start traffic. ?
The red coolant warn-
ing lamp comes on
while the engine is run-
ning.
Awarning tone
also sounds. The coolant temperature has exceeded 120 †. The airflow to the
engine radiator may be blocked or the coolant level may be too
low.
G WARNING
The engine is not being cooled sufficiently and may be damaged.
Never drive with an overheated engine. Driving when your engine
is overheated can cause some fluids which may have leaked into
the engine compartmen ttocatch fire.
Steam from an overheated engine can cause serious burns, which
can occur just by opening the bonnet.
This poses arisk of injury.
X Observe the additional display messages in the multifunction
display.
X Stop the vehicle immediately, paying attention to road and traf-
fic conditions, and switch off the engine.
X Secure the vehicle against rolling away (Y page 159).268
Warning and indicator lampsint
he instrument clusterOn-board computer and displays
Page 272 of 373
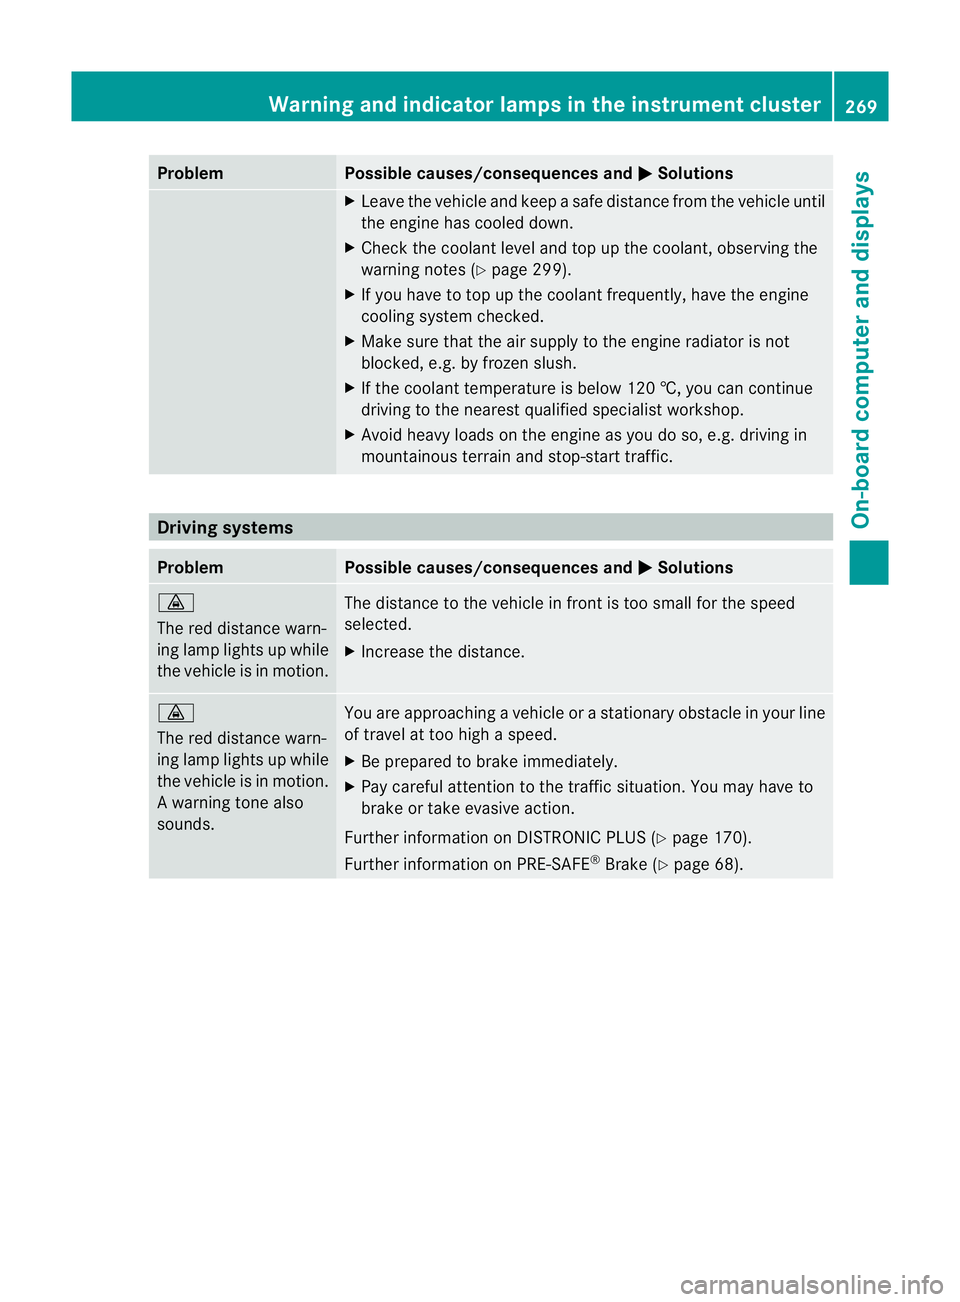
Problem Possible causes/consequences and
M Solutions
X
Leave the vehicle and keep asafe distance from the vehicle until
the engine has cooled down.
X Check the coolant level and top up the coolant, observing the
warning notes (Y page 299).
X If you have to top up the coolant frequently, have the engine
cooling system checked.
X Make sure that the air supply to the engine radiator is not
blocked, e.g. by frozen slush.
X If the coolant temperature is below 120 †, you can continue
driving to the nearest qualified specialist workshop.
X Avoid heavy loads on the engine as you do so, e.g. driving in
mountainous terrain and stop-start traffic. Driving systems
Problem Possible causes/consequences and
M Solutions
·
The red distance warn-
ing lamp lights up while
the vehicle is in motion.
The distance to the vehicle in front is too small for the speed
selected.
X
Increase the distance. ·
The red distance warn-
ing lamp lights up while
the vehicle is in motion.
Aw
arning tone also
sounds. You are approaching
avehicle or astationar yobstacle in your line
of travel at to ohigh aspeed.
X Be prepared to brak eimmediately.
X Pay careful attentio ntothetraffic situation. You may have to
brak eort akee vasive action.
Further informatio nonDISTRONICPLUS(Ypage 170).
Further informatio nonPRE-SAFE ®
Brake (Y page 68). Warning and indicator lamps in th
einstrumen tcluster
269On-boar dcomputer and displays Z
Page 273 of 373
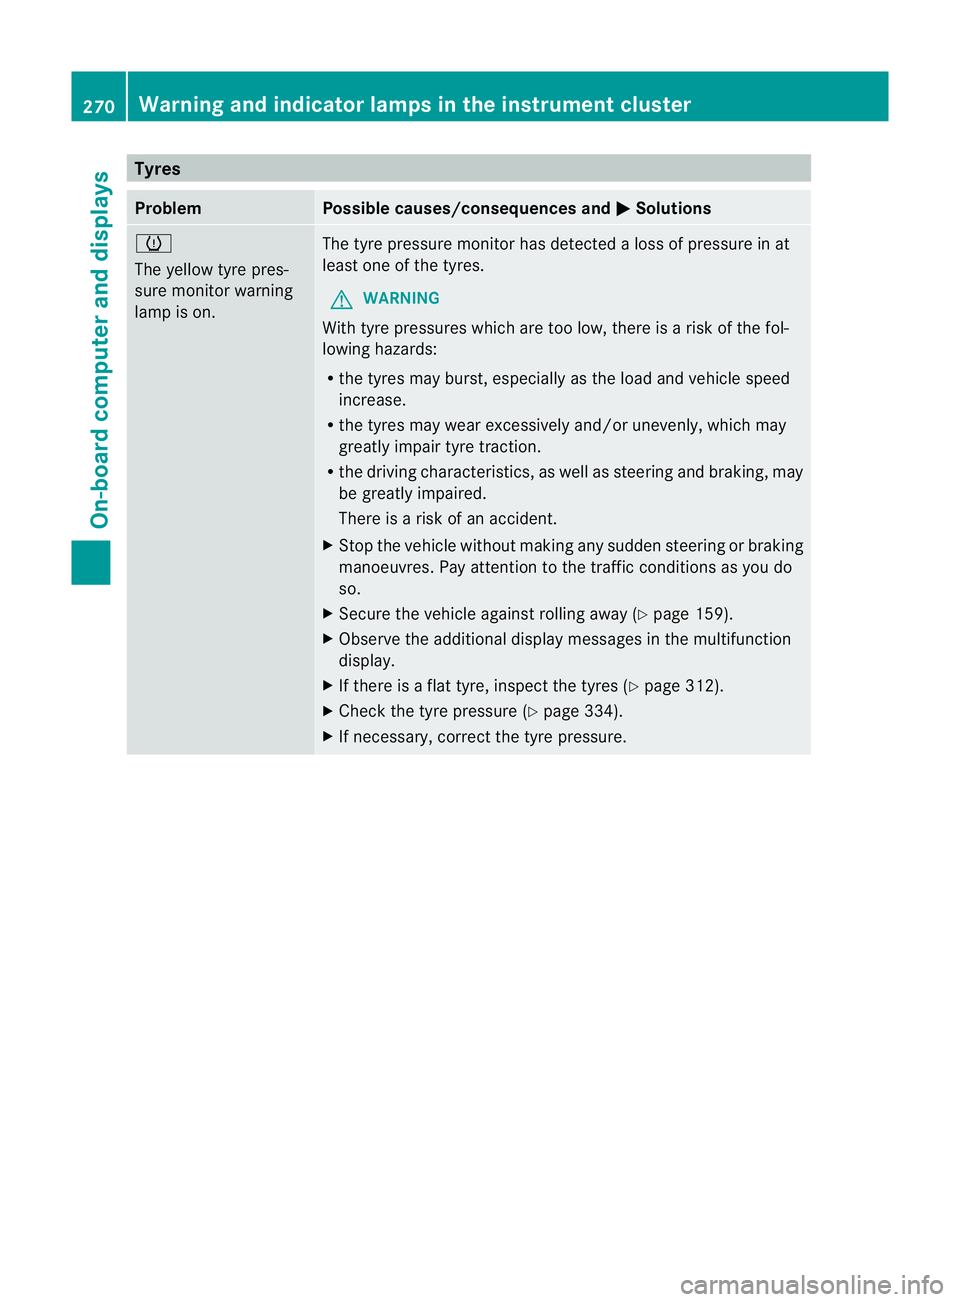
Tyres
Problem Possible causes/consequence
sand M Solutions
h
The yellow tyr
epres-
sure monitor warning
lamp is on. The tyr
epressure monitor ha sdetecte dalossofp ressure in at
leas tone of the tyres.
G WARNING
With tyr epressures which ar etoo low, ther eisariskoft he fol-
lowing hazards:
R the tyres may burst, especiallyast he load and vehicle speed
increase.
R the tyres may wear excessively and/or unevenly, which may
greatly impair tyre traction.
R the driving characteristics, as well as steering and braking, may
be greatly impaired.
There is arisk of an accident.
X Stop the vehicle without making any sudden steering or braking
manoeuvres. Pay attention to the traffic conditionsasy ou do
so.
X Secure the vehicle against rolling away (Y page 159).
X Observe the additional displaym essages in the multifunction
display.
X If there is aflat tyre, inspect the tyres (Y page 312).
X Check the tyre pressure (Y page 334).
X If necessary, correct the tyre pressure. 270
Warning and indicator lampsint
he instrument clusterOn-board computer and displays
Page 274 of 373
Useful information
............................272
Stowage areas .................................. 272
Features ............................................. 279 271Stowing and features
Page 275 of 373
Useful information
i This Owner's Manual describes all mod-
els, series and optional equipment for your
vehicle that were available at the time of
going to press. National variation sare pos-
sible. Not ethat your vehicle may not be
equipped with all of the function sdescri-
bed. This is also the case for system sand
function srelevan ttosafety.
i Read the information on qualified special-
ist workshops: (Y page 23). Stowage areas
Loading guidelines
G
WARNING
Secure and position the load as described in
the loading guidelines.
Otherwise, vehicle occupants could
be injured by the load being thrown around in
the even tofsharp braking, asudden change
in direction or an accident.
You will find further information in the "Secur-
ing aload" section.
Even if you follow all the loading guidelines,
the load will increase the risk of injury in the
event of an accident. G
WARNING
Keep the boot lid closed while the vehicle is
in operation. Otherwise, you could be pois-
oned by exhaust fumes enteringt he vehicle.
The handling characteristics of aladen vehi-
cle are dependent on the distribution of the
load within the vehicle. For this reason, you
should observe the following notes when
transporting aload:
R when transporting aload, never exceed the
maximum permissible gross vehicle weight or the permissible axle loads for the vehicle
(including occupants).
R position heavy loads as far forwards as pos-
sible and as low down in the boot as pos-
sible.
R the load must not protrude above the upper
edge of the seat backrests.
R always place the load against the rear or
front seat backrests. Make sure that the
seat backrests are securely locked into
place.
R always place the load behind unoccupied
seats if possible.
R secure the load with sufficiently stronga nd
wear-resistant lashing material. pad sharp
edges for protection.
i Load restraintsa re available at any quali-
fied specialist workshop, e.g. aMercedes-
Benz Service Centre. Stowage compartments
Important safety notes G
WARNING
The stowage compartments must be closed
when items are stored in them. Luggage nets
are not designed to secure heavy items of
luggage.
You or other vehicle occupants could be
injured by objectsb eing thrown around if you:
R brake sharply
R change direction suddenly
R are involved in an accident
Sharp-edged and fragile objectsm ust not be
placed in the luggagen et.
Do not place hard objectsint he map pockets.
Objectsm ust not protrude from the map
pockets. 272
Stowage areasStowing and features
Page 276 of 373
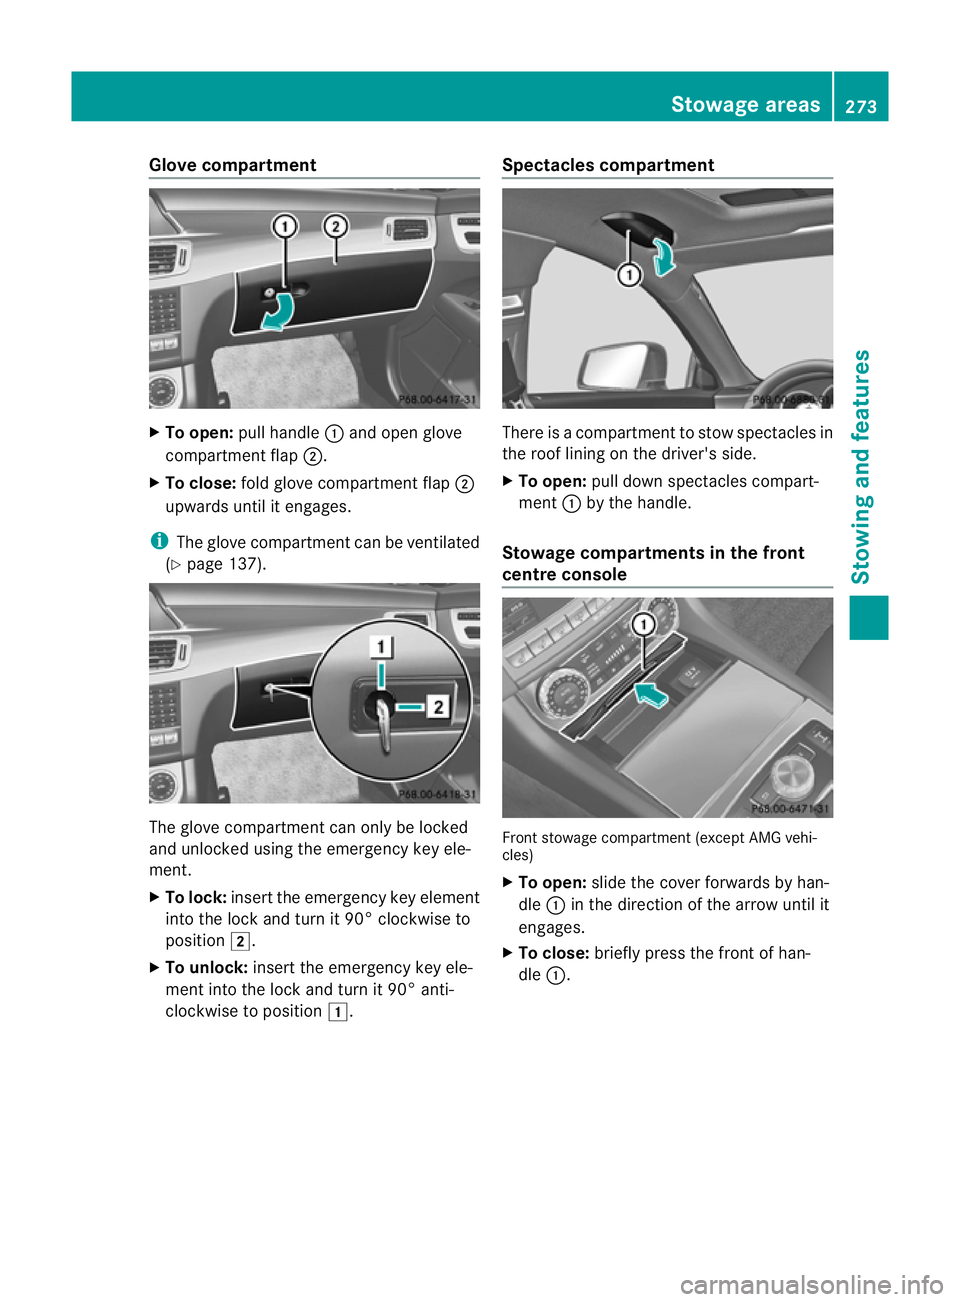
Glove compartment
X
To open: pullhandle :and open glove
compartment flap ;.
X To close: fold glove compartment flap ;
upwards until it engages.
i The glove compartment can be ventilated
(Y page 137). The glove compartment can only be locked
and unlocked using the emergency key ele-
ment.
X To lock: insert the emergency key element
into the lock and turn it 90° clockwise to
position 2.
X To unlock: insert the emergency key ele-
ment into the lock and turn it 90° anti-
clockwise to position 1. Spectacles compartment There is
acompartment to stow spectacle sin
the roof lining on the driver's side.
X To open: pulldown spectacle scompart-
ment :by the handle.
Stowag ecompartments in the front
centre console Front stowag
ecompartment (except AMG vehi-
cles)
X To open: slidethe cover forwards by han-
dle :in the direction of the arrow until it
engages.
X To close: brieflypress the front of han-
dle :. Stowage areas
273Stowing and features Z
Page 277 of 373
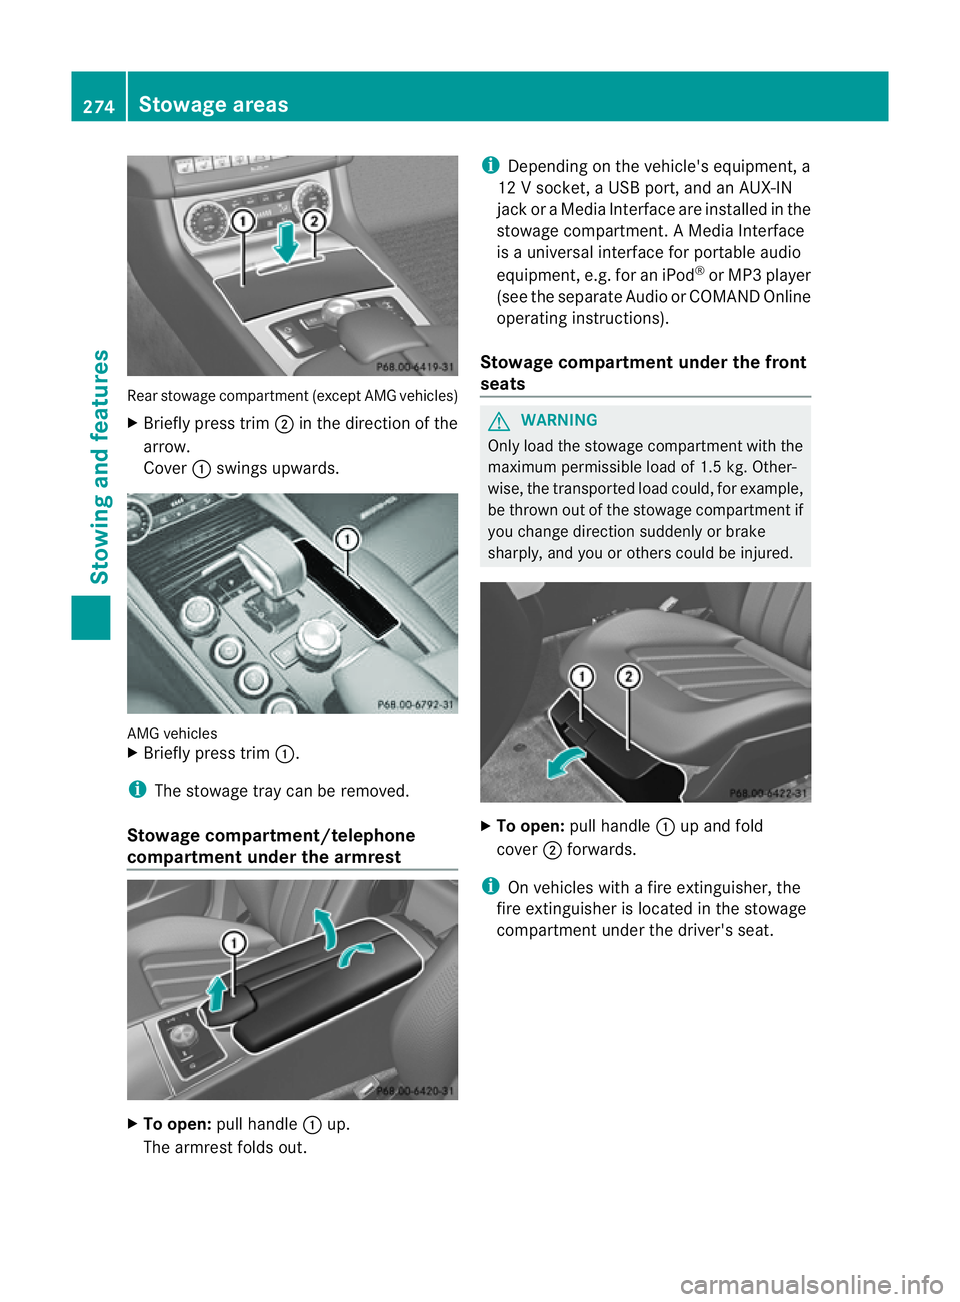
Rear stowage compartmen
t(except AMG vehicles)
X Briefly press trim ;in the direction of the
arrow.
Cover :swings upwards. AMG vehicles
X
Briefly press trim :.
i The stowage tray can be removed.
Stowage compartment/telephone
compartment under the armrest X
To open: pull handle :up.
The armrest folds out. i
Depending on the vehicle's equipment, a
12 Vsocket, aUSB port, and an AUX-IN
jack or aMedia Interface are installed in the
stowage compartment .AMedia Interface
is au niversal interface for portable audio
equipment, e.g. for an iPod ®
or MP3 player
(see the separate Audio or COMAND Online
operating instructions).
Stowage compartment under the front
seats G
WARNING
Only load the stowage compartment with the
maximum permissible load of 1.5 kg. Other-
wise, the transported load could, for example,
be thrown out of the stowage compartment if
you change direction suddenly or brake
sharply, and you or others could be injured. X
To open: pull handle :up and fold
cover ;forwards.
i On vehicles with afire extinguisher, the
fire extinguisher is located in the stowage
compartment under the driver's seat. 274
Stowage areasStowing and features
Page 278 of 373
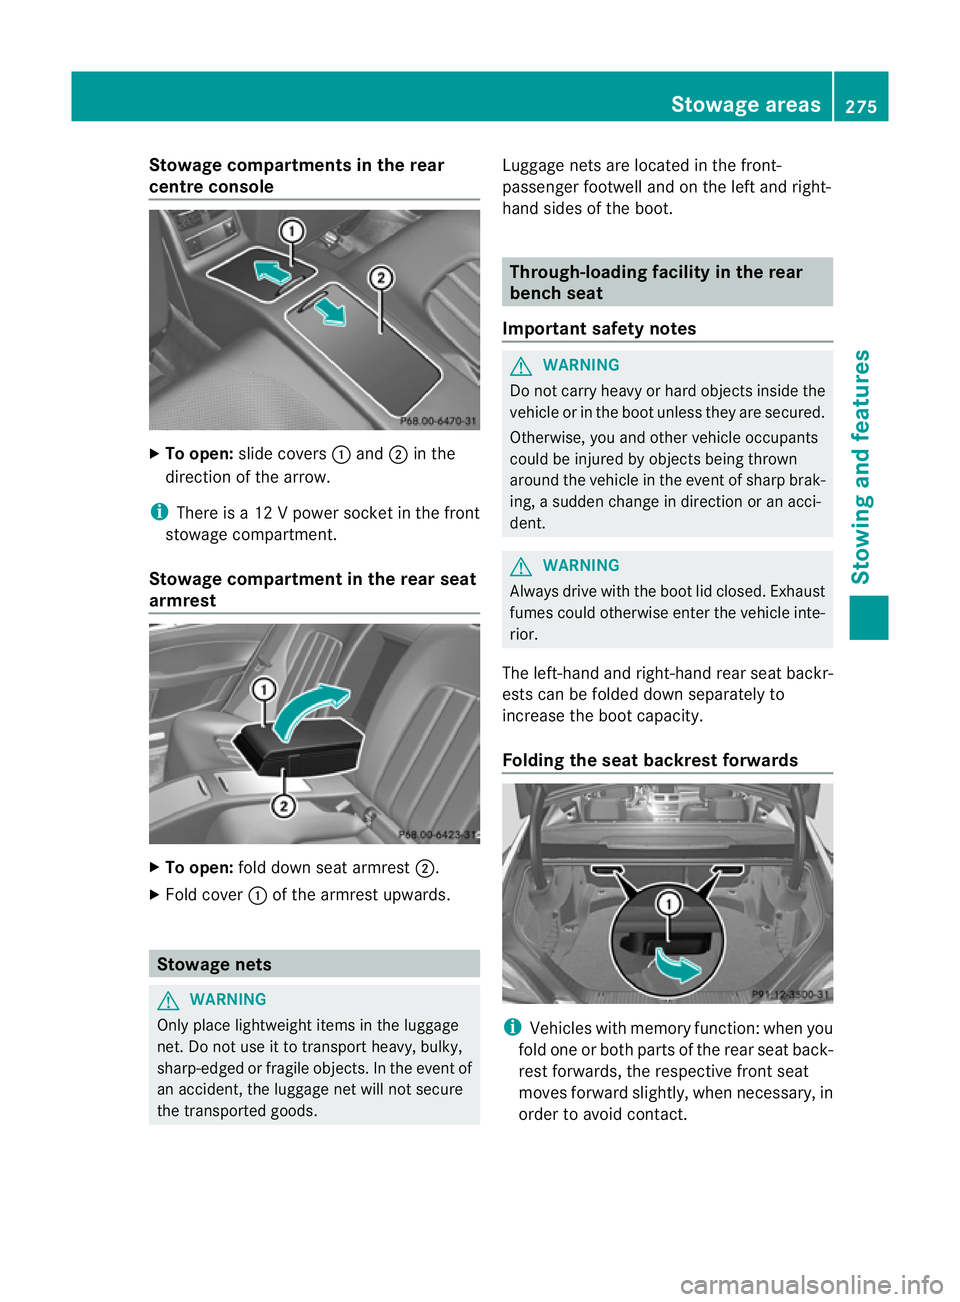
Stowage compartments in the rear
centre console
X
To open: slide covers :and ;in the
direction of the arrow.
i There is a12Vpower socket in the front
stowage compartment.
Stowage compartment in the rear seat
armrest X
To open: fold down seat armrest ;.
X Fold cover :of the armrest upwards. Stowage nets
G
WARNING
Only place lightweight items in the luggage
net. Do not use it to transport heavy, bulky,
sharp-edged or fragile objects. In the event of
an accident, the luggage net will not secure
the transported goods. Luggage nets are located in the front-
passenger footwell and on the left and right-
hand sides of the boot. Through-loading facility in the rear
bench seat
Important safety notes G
WARNING
Do not carry heavy or hard objectsi nside the
vehicle or in the boot unless they are secured.
Otherwise, you and other vehicle occupants
could be injured by objectsb eing thrown
around the vehicle in the event of sharp brak-
ing, asudden change in direction or an acci-
dent. G
WARNING
Always drive with the boot lid closed. Exhaust
fumes could otherwise enter the vehicle inte-
rior.
The left-hand and right-hand rear seat backr-
ests can be folded down separately to
increase the boot capacity.
Folding the seat backrest forwards i
Vehicles with memory function :when you
fold one or both parts of the rear seat back-
rest forwards, the respective front seat
moves forward slightly, when necessary, in
order to avoid contact. Stowage areas
275Stowing and features Z
Page 279 of 373
X
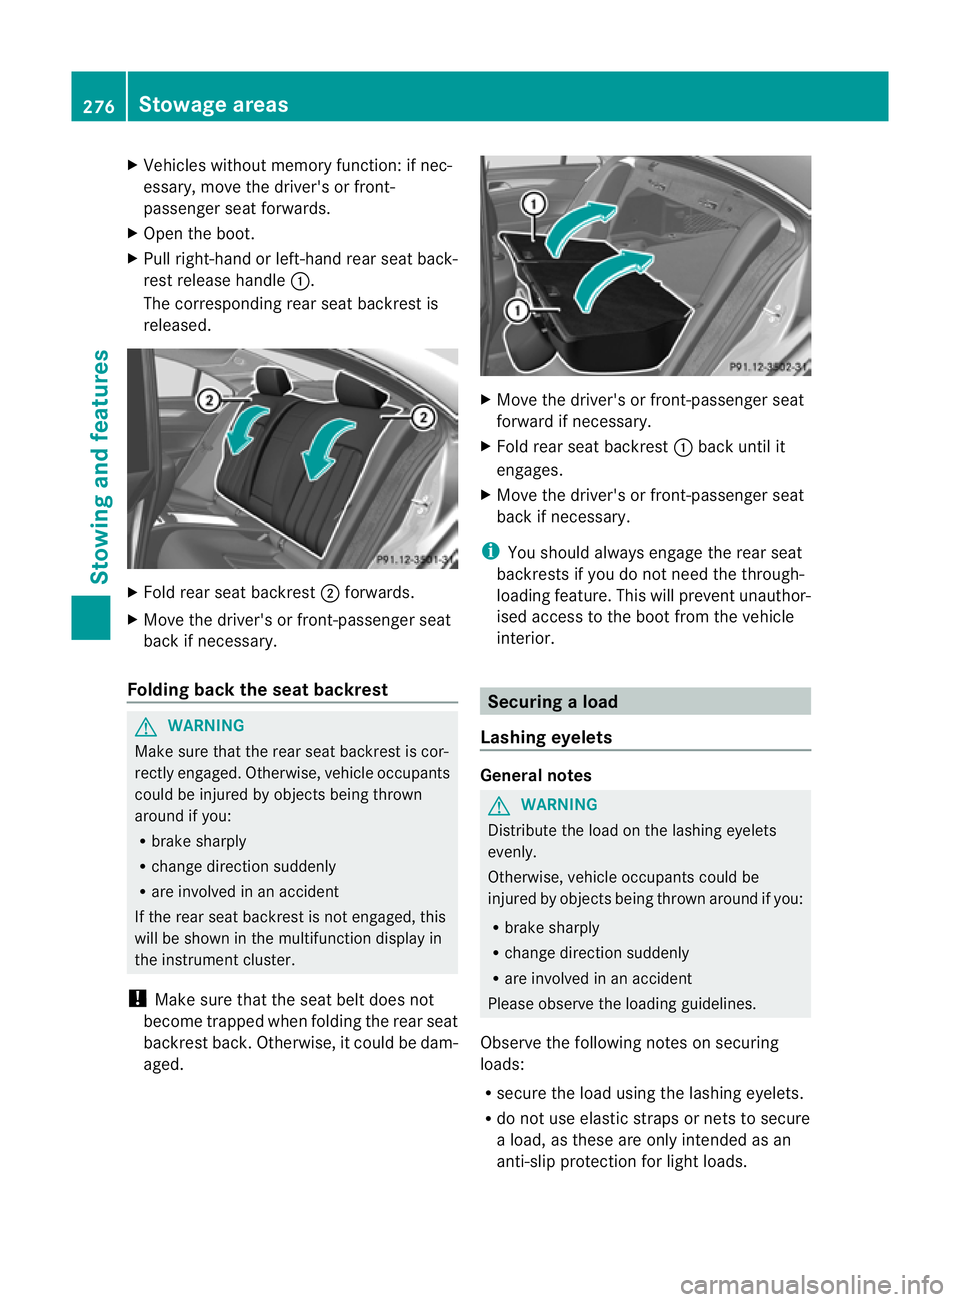
Vehicles without memory function: if nec-
essary,m ove the driver's or front-
passenger seat forwards.
X Open the boot.
X Pull right-hand or left-hand rear seat back-
rest release handle :.
The corresponding rear seat backrest is
released. X
Fold rear seat backrest ;forwards.
X Move the driver's or front-passenger seat
back if necessary.
Folding back the seat backrest G
WARNING
Make sure that the rear seat backrest is cor-
rectly engaged. Otherwise, vehicle occupants
could be injured by objects being thrown
around if you:
R brake sharply
R change direction suddenly
R are involved in an accident
If the rear seat backrest is not engaged, this
will be shown in the multifunction display in
the instrument cluster.
! Make sure that the seat belt does not
become trapped when folding the rear seat
backrest back. Otherwise, it could be dam-
aged. X
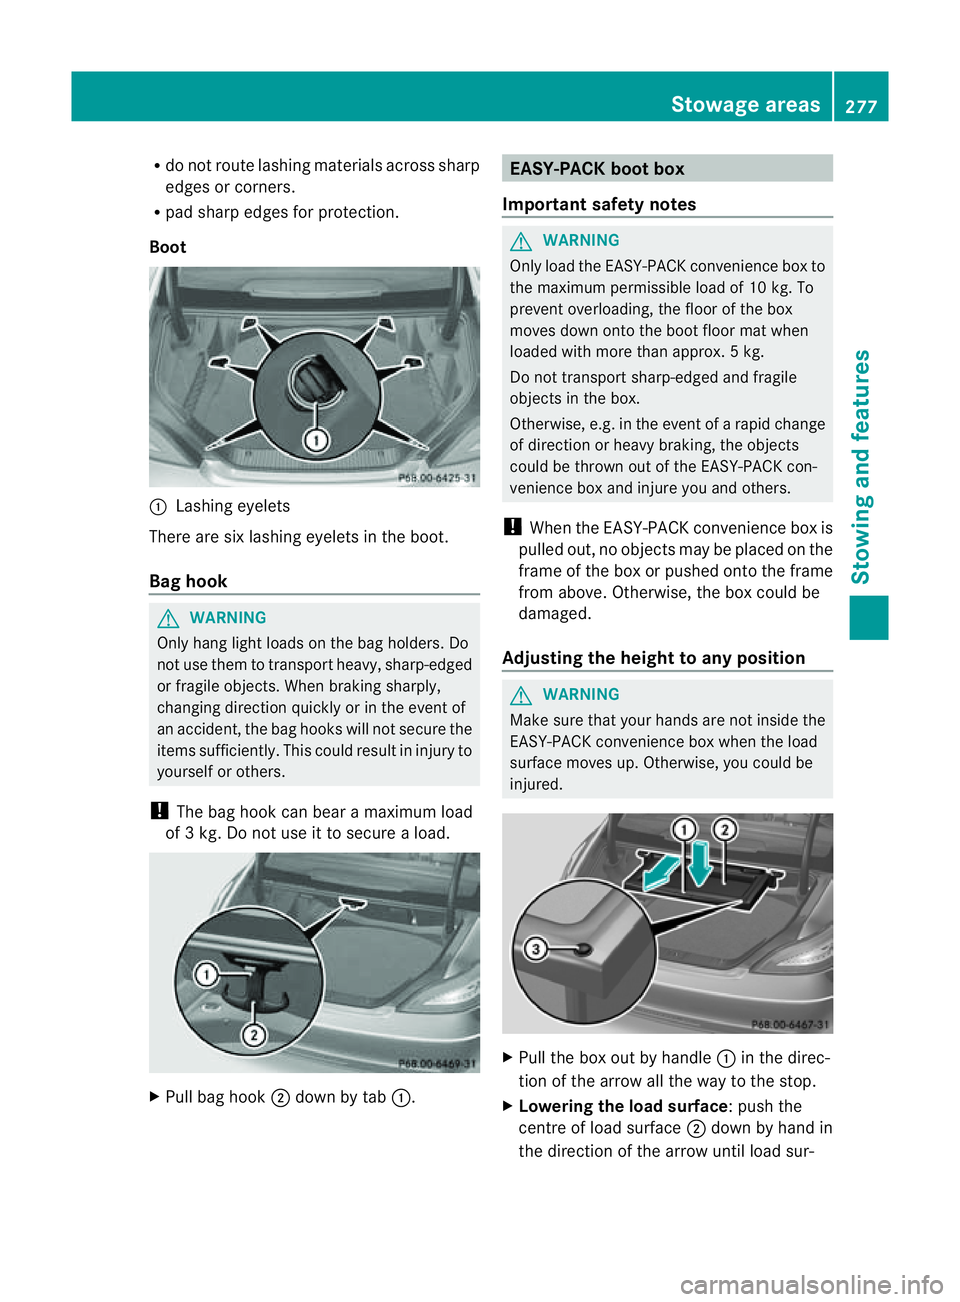
Move the driver's or front-passenger seat
forward if necessary.
X Fold rear seat backrest :back until it
engages.
X Move the driver's or front-passenger seat
back if necessary.
i You shoulda lways engage the rear seat
backrests if you do not need the through-
loading feature. This will prevent unauthor-
ised access to the boot from the vehicle
interior. Securing
aload
Lashing eyelets General notes
G
WARNING
Distribut ethe load on th elashin geyelets
evenly.
Otherwise, vehicle occupant scould be
injured by object sbein gthrown aroun difyou:
R brak esharply
R change directio nsuddenly
R are involve dinanaccident
Pleas eobserv ethe loadin gguidelines.
Observ ethe followin gnotes on securing
loads:
R secure th eload usin gthe lashin geyelets.
R do no tuse elastic straps or nets to secure
al oad, as these are only intended as an
anti-slip protection for light loads. 276
Stowage areasStowinga
nd features
Page 280 of 373
R
do not route lashing materials across sharp
edges or corners.
R pad sharp edges for protection.
Boot :
Lashing eyelets
There are six lashing eyelets in the boot.
Bag hook G
WARNING
Only hang light loads on the bag holders. Do
not use them to transport heavy, sharp-edged
or fragile objects. When brakin gsharply,
changing direction quickly or in the event of
an accident, the bag hooks will not secure the
items sufficiently. This could result in injury to
yourself or others.
! The bag hook can bear amaximum load
of 3k g. Do not use it to secure aload. X
Pull bag hook ;down by tab :. EASY-PACK boot box
Importan tsafet ynotes G
WARNING
Only load the EASY-PACK convenience box to
the maximum permissible load of 10 kg. To
preven toverloading, the floor of the box
moves down onto the boot floor mat when
loaded with more than approx. 5kg.
Do not transpor tsharp-edged and fragile
objects in the box.
Otherwise, e.g. in the event of arapid change
of direction or heavy braking, the objects
could be thrown out of the EASY-PACK con-
venience box and injure you and others.
! When the EASY-PACK convenience box is
pulledo ut, no objectsm ay be placed on the
frame of the box or pushed onto the frame
from above. Otherwise, the box could be
damaged.
Adjusting the height to any position G
WARNING
Make sure that your hands are not inside the
EASY-PACK convenience box when the load
surface moves up. Otherwise, you could be
injured. X
Pull the box out by handle :in the direc-
tion of the arrow all the way to the stop.
X Lowering the load surface:p ush the
centr eofload surface ;down by han din
th ed irection of th earrow until load sur- Stowage areas
277Stowing and featu res Z