height MERCEDES-BENZ CLS COUPE 2012 Owners Manual
[x] Cancel search | Manufacturer: MERCEDES-BENZ, Model Year: 2012, Model line: CLS COUPE, Model: MERCEDES-BENZ CLS COUPE 2012Pages: 373, PDF Size: 9.12 MB
Page 19 of 373
Remote control
Auxiliary heating/ventilation .......... 133
Changing the batterie s(au xiliary
heating) ......................................... 135
Garage door opene r....................... 287
Programming (garage door
opener) .......................................... 287
Replacing the battery (auxiliary
heatin gremote control) .................... 135
Reserve (fue ltank)
see Fuel
Reserve fuel
Display message ............................ 242
Warning lamp ................................. 267
Residual heat (climate control) ........132
Restrain tsystem
see SRS (Supplemental Restraint
System)
Rev counter ........................................ 210
Reverse gear (selector lever) ...........148
Reversing camera Cleaning instructions .....................305
Function/notes ............................. 190
Switching on/off ........................... 191
Reversing lamp
Changing bulbs .............................. 120
Reversing lamp (display message) ..239
Roller sunblind Rea rwindow .................................. 282
Roof carrier ........................................ 278
Roof lining and carpets (cleaning
instructions) ...................................... 307
Roof load (maximum) ........................366 S
Safety Childre ninthe vehicle ..................... 52
Child restraint systems ....................52
Safety system
see Driving safety system
Seat
Seat backres tdisplay message .....255
Seat belt
Adjusting the driver's and front-
passenger sea tbelt ......................... 50
Adjusting the height ......................... 50
Belt force limiter .............................. 51Belt tensioner
.................................. 51
Cleaning ......................................... 307
Display message ............................ 235
Fastening ......................................... 49
Important safety guidelines .............48
Rea rseat belt status indicator .........51
Releasing ......................................... 50
Switching bel tadjustment on/off
(on-board computer) ......................227
Warning lamp ................................. 259
Warning lamp (function) ................... 51
Seats
Adjusting (electrically). ....................98
Adjusting lumba rsuppor t.............. 101
Adjusting the 4-way lumba rsup-
por t................................................ 101
Adjusting the head restraint ............98
Cleaning the cover .........................306
Correct driver's sea tposition ........... 96
Important safety notes ....................97
Seat heating problem ....................102
Seat ventilation problem ................102
Storing settings (memory func-
tion) ............................................... 107
Switching sea theating on/off .......101
Switching the sea tventilation on/
off .................................................. 102
Selector lever
Cleaning ......................................... 306
Sensors (cleaning instructions) .......304
Service see ASSYST PLUS
Service Centre
see Qualified specialist workshop
Service menu (on-board computer) .220
Service products Brake fluid ..................................... 365
Coolant (engine) ............................ 365
Engine oil ....................................... 363
Fuel ................................................ 360
Important safety notes ..................359
Washer fluid .................................. .366
Settings
Factory (on-board computer) .........227
On-board computer .......................221
Settin gthe air distribution ...............129
Settin gthe airflow ............................ 129
SETUP (on-board computer) .............228 16
Index
Page 53 of 373
automaticall
yadjust to th eupper body
(Y page 50).
X If necessary, adjust the seat belt to the
appropriate height (Y page 50).
X If necessary, pull upwards on the shoulder
section of the seat belt to tighten the belt
across your body.
For more information about releasing the seat
belt with release button ?,see "Releasing
seat belts" (Y page 50).
Seat belt adjustment The seat-belt adjustment function adjusts the
driver' sand front-passenger seat belt to the
upper body of the occupants.
The belt strap is tightened slightly when:
R you engage the belt tongue in the belt
buckle and you then turn the key to position
2in the ignition lock.
R the key is in position 2in the ignition lock
and you then engage the belt tongue in the
buckle.
The seat-belt adjustment will apply acertain
tightenin gforc eifa ny slack is detected
between the occupant and the seat belt. Do
not hold on to the seat belt tightly while it is
adjusting. You can switc hthe belt adjustment
on and off in the on-board computer
(Y page 227).
The seat-belt adjustment is an integral part of
the PRE-SAFE ®
convenience function. More
information about PRE-SAFE ®
can be found
under "PRE-SAFE ®
(preventative occupant
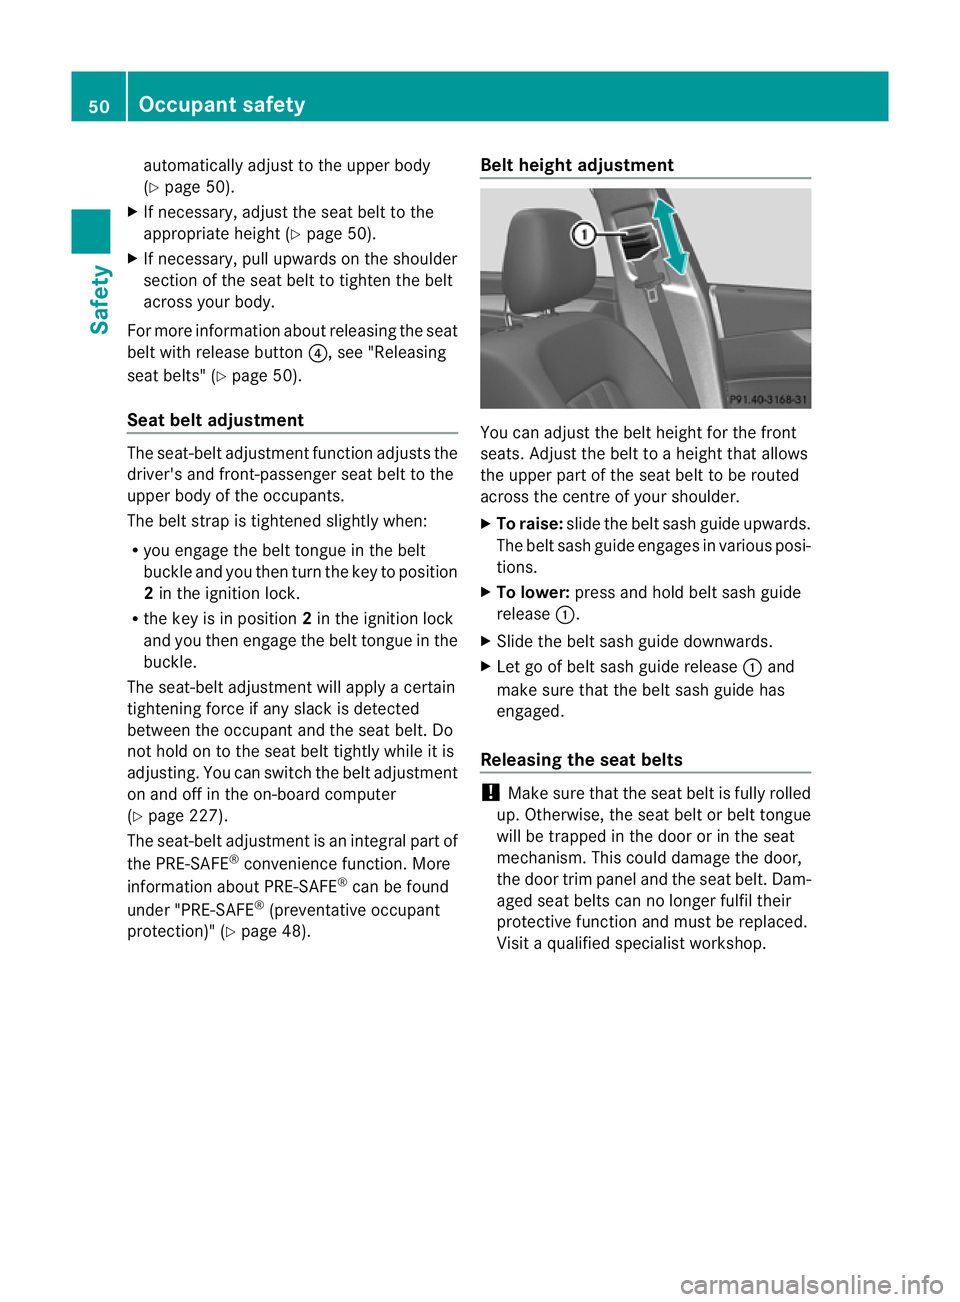
protection)" (Y page 48). Belt height adjustment You can adjust the belt height for the front
seats. Adjust the belt to
aheight that allows
the upper part of the seat belt to be routed
across the centre of your shoulder.
X To raise: slide the belt sash guide upwards.
The belt sash guide engages in various posi-
tions.
X To lower: press and hold belt sash guide
release :.
X Slide the belt sash guide downwards.
X Let go of belt sash guide release :and
make sure that the belt sash guide has
engaged.
Releasing the seat belts !
Make sure that the seat belt is fully rolled
up. Otherwise, the seat belt or belt tongue
will be trapped in the door or in the seat
mechanism. This could damage the door,
the door trim panel and the seat belt. Dam-
aged seat belts can no longer fulfil their
protective function and must be replaced.
Visit aqualified specialist workshop. 50
Occupant safetySafety
Page 61 of 373
Problems with child seat recognition
Problem Possible causes/consequences and
M Solutions
The
4 PASSENGER
AIRBAGO FF indicator
lamp on the centre con-
sole is lit. As
pecial Mercedes-Benz child seat with atransponder for auto-
matic child seat recognition has been fitted to the front-passenger
seat. The front-passenger fron tairbag has therefore been disabled
as desired. The
4 PASSENGER
AIRBA GOFF indicator
lamp on the centr econ-
sole is lit.
or
The 6 warnin glamp
light supa nd/or the
4 PASSENGER AIR-
BA GO FF indicator
lamp does not light up
briefly when you switch
the ignition on. G
Risk of injury
There is no child seat fitted to the front-passenger seat .Automatic
child seat recognition is malfunctioning.
X Remove electronic equipmen tfrom the front-passenge rseat,
e.g.:
R laptop
R mobile phone
R cards with transponders ,such as ski passes or access cards
If the 4 PASSENGER AIRBA GOFF indicator lamp is still lit:
X Visit aqualified specialist workshop. Suitable positioning of the child
restraint systems
X
To install achild restraint system on
the front-passenger seat: move the front-
passenger seat to the rearmost position
and the belt outlet height to the lowest
position.
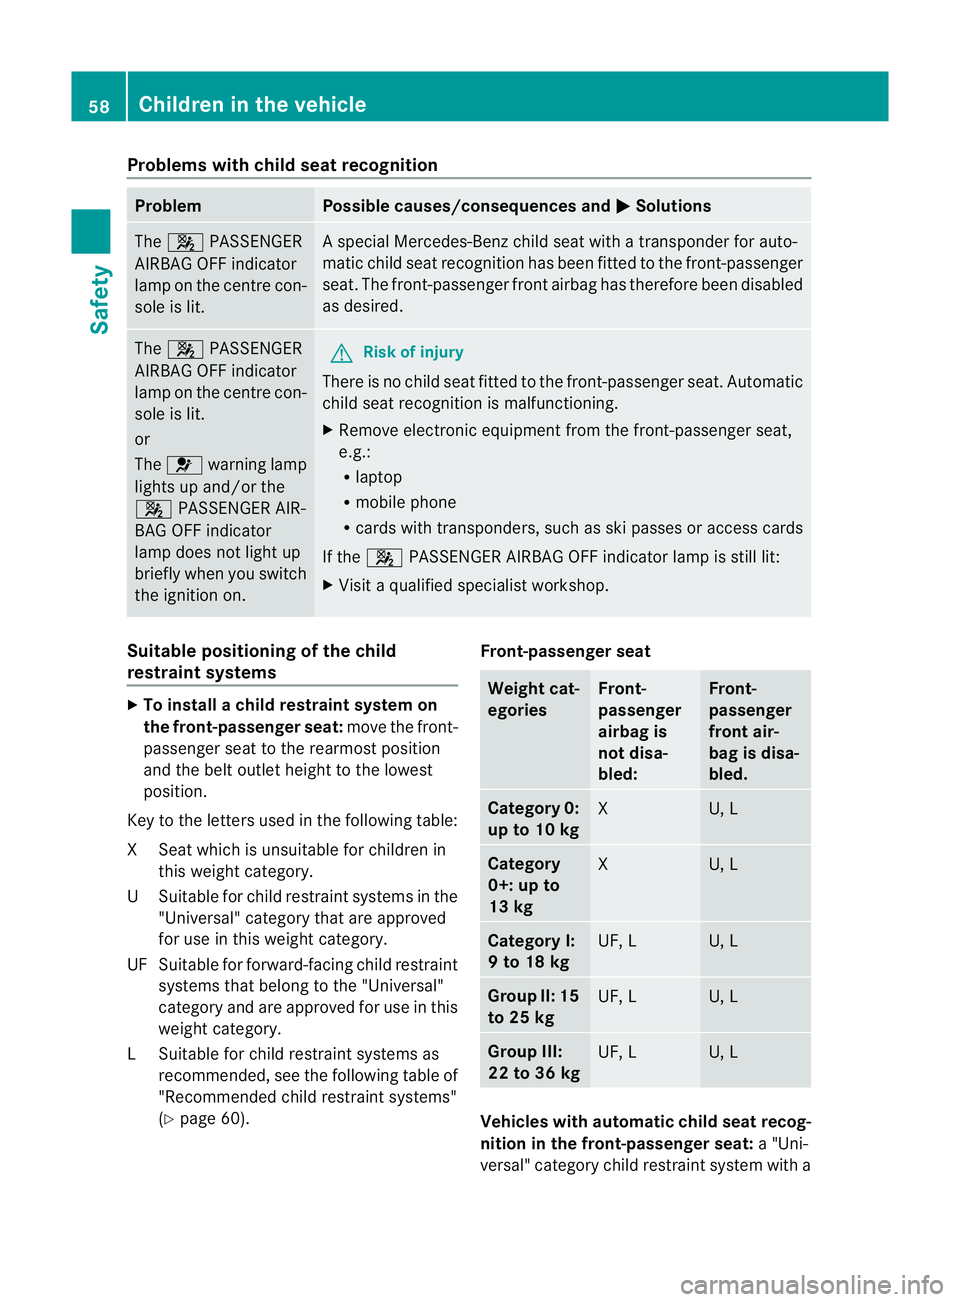
Key to the letters used in the following table:
XS eat which is unsuitable for children in
this weight category.
US uitable for child restraint systems in the
"Universal" categor ythata re approved
for use in this weigh tcategory.
UF Suitable for forward-facing child restraint systems that belon gtothe"Universal"
category and are approved for use in this
weight category.
LS uitable for child restraint systems as
recommended, see th efollowin gtable of
"Recommended child restraint systems"
(Y page 60). Front-passenger seat Weight cat-
egories Front-
passenger
airbag is
not disa-
bled: Front-
passenger
front air-
bag is disa-
bled. Categor
y0:
up to 10 kg X U, L
Category
0+: up to
13 kg
X U, L
Category I:
9to18kg
UF, L U, L
Group II:15
to 25 kg
UF, L U, L
Grou
pIII:
22 to 36 kg UF, L U, L
Vehicles with automatic child seat recog-
nition in the front-passenger seat:
a"Uni-
versal" category child restraint system with a 58
Children in thev
ehicleSafety
Page 100 of 373
settings with the memory function
(Y
page 107). Seats
Important safety notes
G
WARNING
The seats can still be adjusted when there is
no key in the ignition lock. For this reason,
children should never be left unsupervised in
the vehicle. They could adjust the seats and
become trapped. G
WARNING
Only adjust the driver's seat when the vehicle
is stationary. You will otherwise be distracted
from the road and traffic conditions and you
could lose control of the vehicle as aresult of
the seat moving. This could cause an acci-
dent. G
WARNING
If you adjust the seat height carelessly,y ou or
others could be trapped and thereby injured.
Children in particular could unintentionally
press the buttons to electrically adjust the
seats and become trapped.
Take care that:
R while moving the seats, your hands do not
get under the lever assembly of the seat
adjustment system.
R children in the vehicle do not slide their
hands under the levers. G
WARNING
Make sure that nobody can become trapped
when adjusting the seats.
Observe the notes on airbags.
Secure children as recommended; see the
"Children in the vehicle" section. G
WARNING
Make sure that the back of your head is sup-
ported at eye level by the central area of the head restraint. If your head is not supported
correctly by the head restraint, you could suf-
fer asevere neck injury in the event of an
accident. Never drive if the head restraints are
not engaged and set correctly. G
WARNING
As eat belt can only offer its intended degree
of protection when the backrest is almost ver-
tical and the occupant is sitting upright. Avoid
seat position sthat do not allow the seat belt
to be routed correctly. Adjust the backrest so
that it is as upright as possible. Never travel
with the backrest reclined too far backwards.
You could otherwise be seriously or even
fatally injured in the event of an acciden tor
sudden braking.
! To avoid damage to the seats and the seat
heating, observe the following information:
R do not spill any liquids on the seats. If
liquid is spilled on the seats, dry them as
soon as possible.
R if the seat cover sare damp or wet, do not
switch on the seat heating. The seat
heating should also not be used to dry
the seats.
R clean the seat cover sasrecommended;
see the "Interior care" section.
R do not transport heavy loads on the
seats. Do not place sharp objects on the
seat cushions ,e.g. knives, nails or tools.
The seats should only be occupied by
passengers, if possible.
R when the seat heating is in operation ,do
not cover the seats with insulating mate-
rials, e.g. blankets, coats, bags, seat cov-
ers, child seats or booster seats.
! To avoid damage to the seats and the seat
heating, observe the following information:
R do not spill any liquids on the seats. If
liquid is spilled on the seats, dry them as
soon as possible.
R if the seat cover sare damp or wet, do not
switch on the seat heating. The seat Seats
97Seats, steering wheel and mirrors Z
Page 101 of 373
heating should also not be used to dry
the seats.
R clean the seat covers as recommended;
see "Interior care".
R do not transport heavy loads on the
seats. Do not place sharp objectsont he
seat cushions, e.g. knives, nails or tools.
The seats should only be occupied by
passengers, if possible.
R when the seat heating is in operation, do
not cover the seats with insulating mate-
rials, e.g. blankets, coats, bags, seat cov-
ers, child seats or booster seats.
! Make sure that there are no objectsint he
footwell or behind the seats when moving
the seat back. There is arisk that the seats
and/or the objectsc ould be damaged.
i The head restraintsint he front seats are
fitted with the NECK-PRO system
(Y page 46). For this reason, it is not pos-
sible to remove the head restraintsf rom
the front seats.
For more information ,contact aqualified
specialist workshop.
i Further related subjects:
R Rear bench seat through-loading feature Adjusting the seats electrically
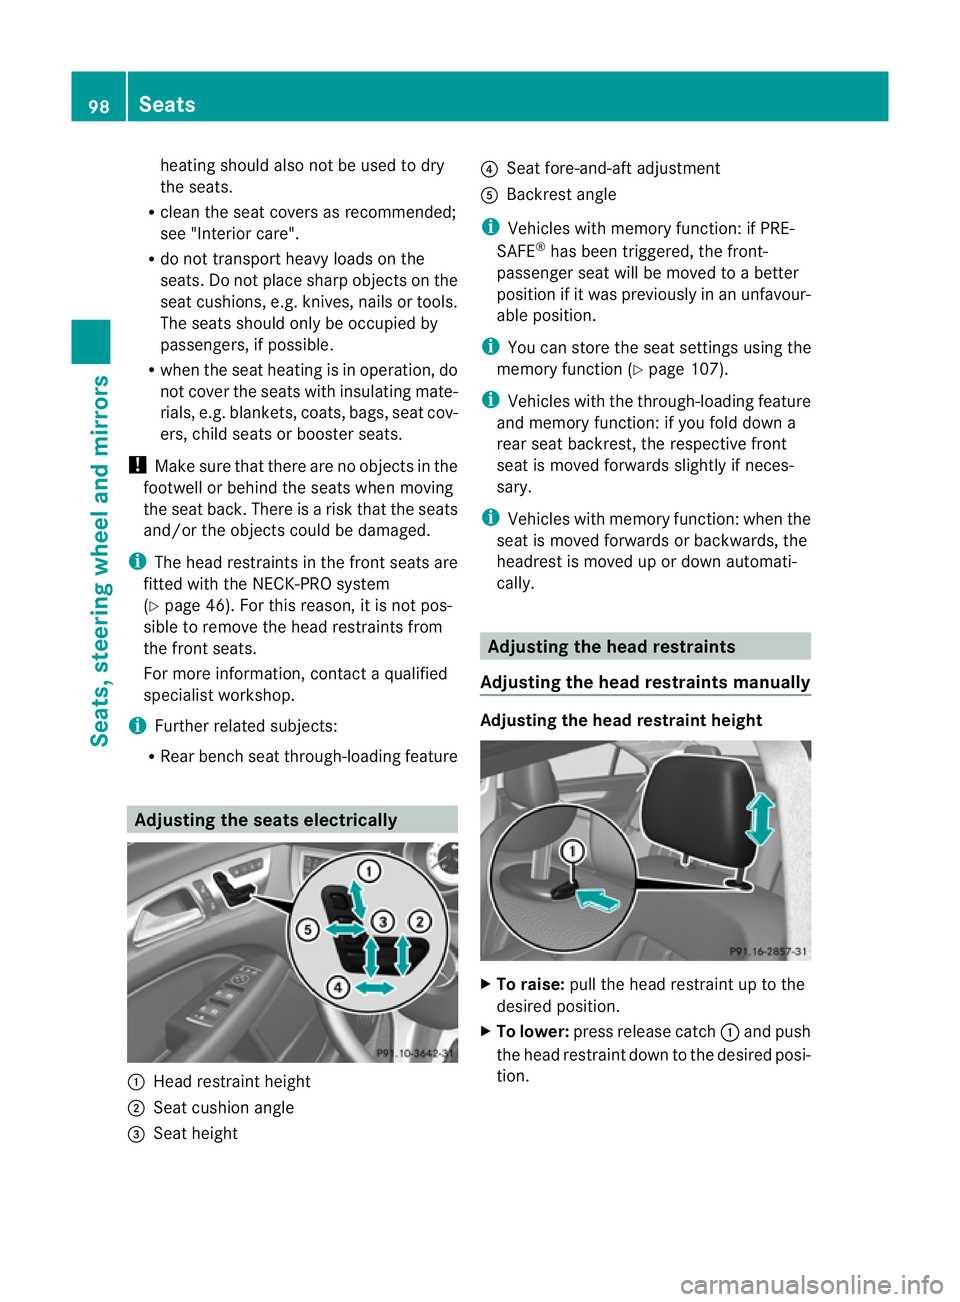
:
Head restraint height
; Seat cushion angle
= Seat height ?
Seat fore-and-aft adjustment
A Backrest angle
i Vehicles with memory function: if PRE-
SAFE ®
has been triggered, the front-
passenger seat will be moved to abetter
position if it was previously in an unfavour-
able position.
i You can store the seat settings using the
memory function (Y page 107).
i Vehicles with the through-loading feature
and memory function: if you fold down a
rear seat backrest, the respective front
seat is moved forwards slightly if neces-
sary.
i Vehicles with memory function: when the
seat is moved forwards or backwards, the
headrest is moved up or down automati-
cally. Adjusting the head restraints
Adjusting the head restraints manually Adjusting the head restraint height
X
To raise: pull the head restraint up to the
desired position.
X To lower: press release catch :and push
the head restraint down to the desired posi-
tion. 98
SeatsSeats, steering wheela
nd mirrors
Page 102 of 373
Adjusting th
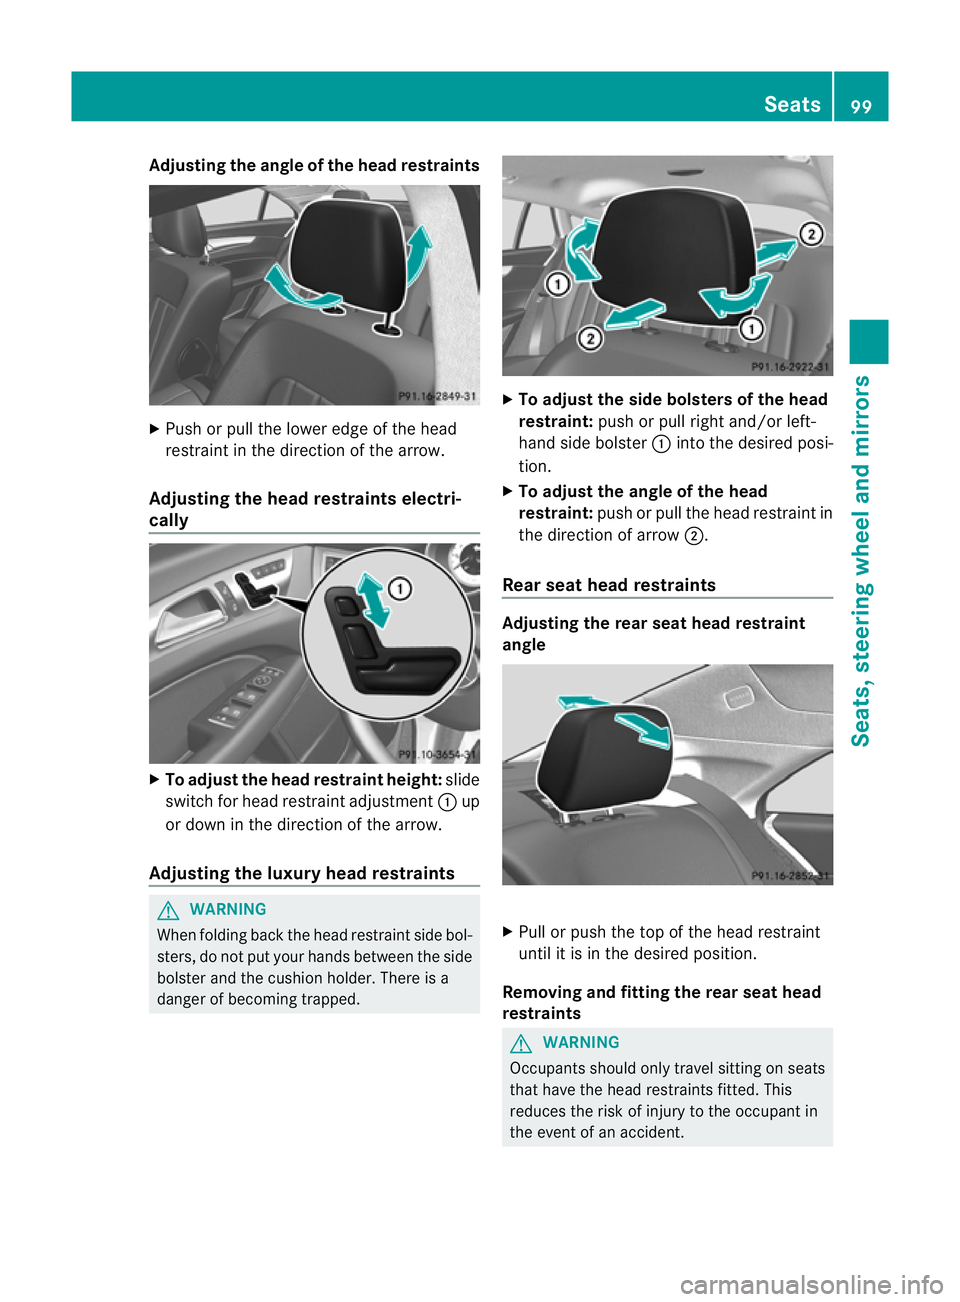
eangle of the head restraints X
Push or pull the lower edge of the head
restraint in the direction of the arrow.
Adjusting the head restraints electri-
cally X
To adjust the head restraint height: slide
switch for head restraint adjustment :up
or down in the direction of the arrow.
Adjusting the luxur yhead restraints G
WARNING
When folding back the head restraint side bol-
sters ,don ot put your hands between the side
bolster and the cushion holder. There is a
danger of becomin gtrapped. X
To adjust the side bolsters of the head
restraint: push or pull right and/or left-
hand side bolster :into the desired posi-
tion.
X To adjust the angle of the head
restraint: push or pull the head restraint in
the direction of arrow ;.
Rear seat head restraints Adjusting the rear seat head restraint
angle
X
Pull or push the top of the head restraint
until it is in the desired position.
Removing and fitting the rear seat head
restraints G
WARNING
Occupants should only travel sitting on seats
that have the head restraints fitted. This
reduces the risk of injury to the occupant in
the event of an accident. Seats
99Seats, steering wheel and mirrors Z
Page 103 of 373
!
Make sure that the rear window roller
sunblind is retracted when removing the
rear head restraints. Otherwise, you could
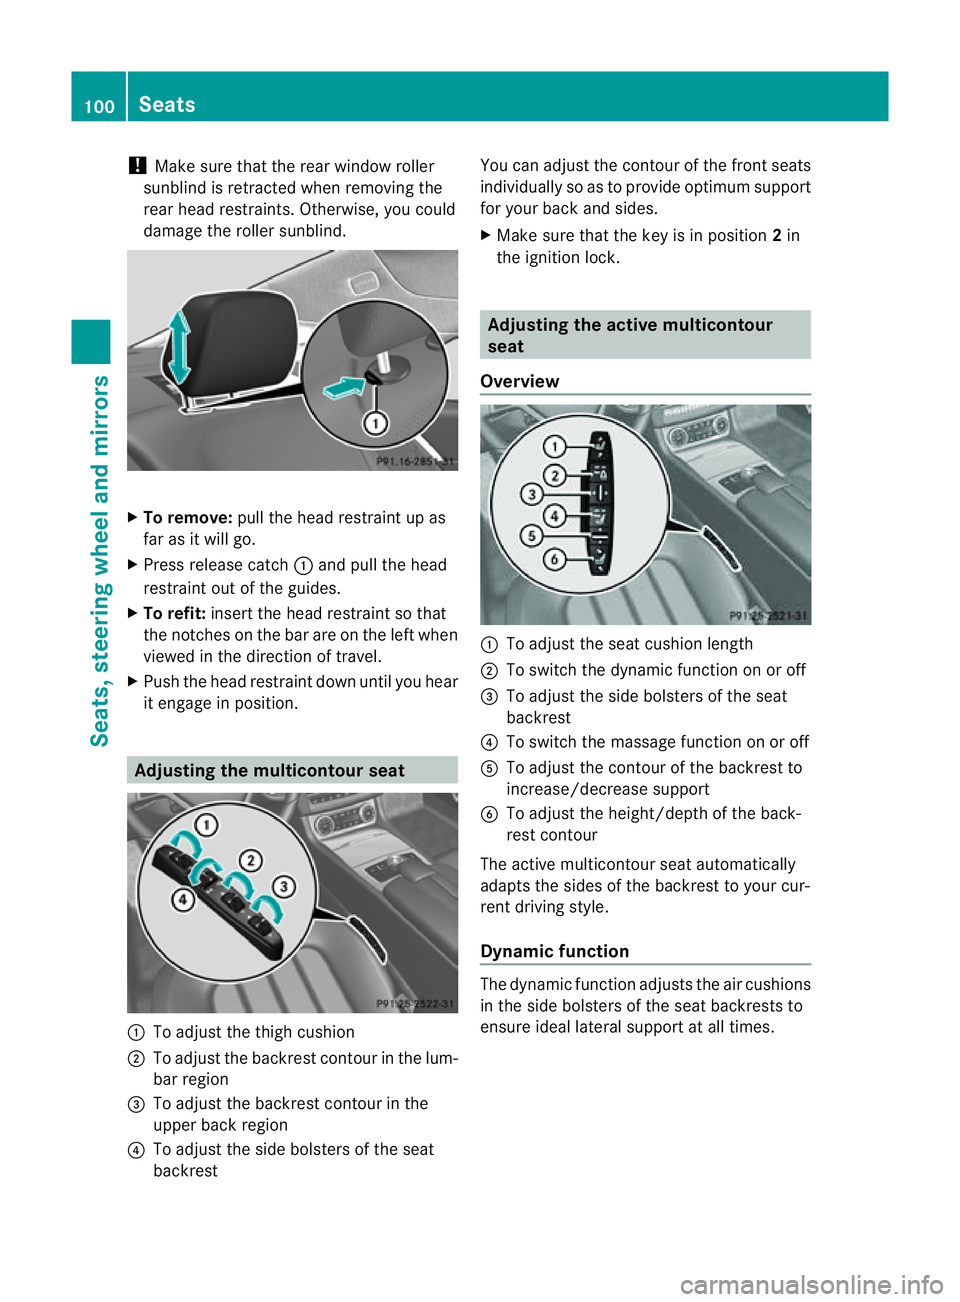
damage the roller sunblind. X
To remove: pull the head restraint up as
far as it will go.
X Press release catch :and pull the head
restraint out of the guides.
X To refit: insert the head restraint so that
the notches on the bar are on the left when
viewed in the direction of travel.
X Push the head restraint down until you hear
it engage in position. Adjusting the multicontour seat
:
To adjust the thigh cushion
; To adjust the backrest contour in the lum-
bar region
= To adjust the backrest contour in the
upper back region
? To adjust the side bolsters of the seat
backrest You can adjust the contour of the front seats
individually so as to provide optimum support
for your back and sides.
X Make sure that the key is in position 2in
the ignition lock. Adjusting the active multicontour
seat
Overview :
To adjust the seat cushion length
; To switch the dynamic function on or off
= To adjust the side bolsters of the seat
backrest
? To switch the massage function on or off
A To adjust the contour of the backrest to
increase/decrease support
B To adjust the height/depth of the back-
rest contour
The active multicontour seat automatically
adapts the sides of the backrest to your cur-
rent driving style.
Dynamic function The dynamic function adjusts the air cushions
in the side bolsters of the seat backrests to
ensure ideall
ateral support at all times.100
SeatsSeats, steering wheela
nd mirrors
Page 106 of 373
Adjusting th
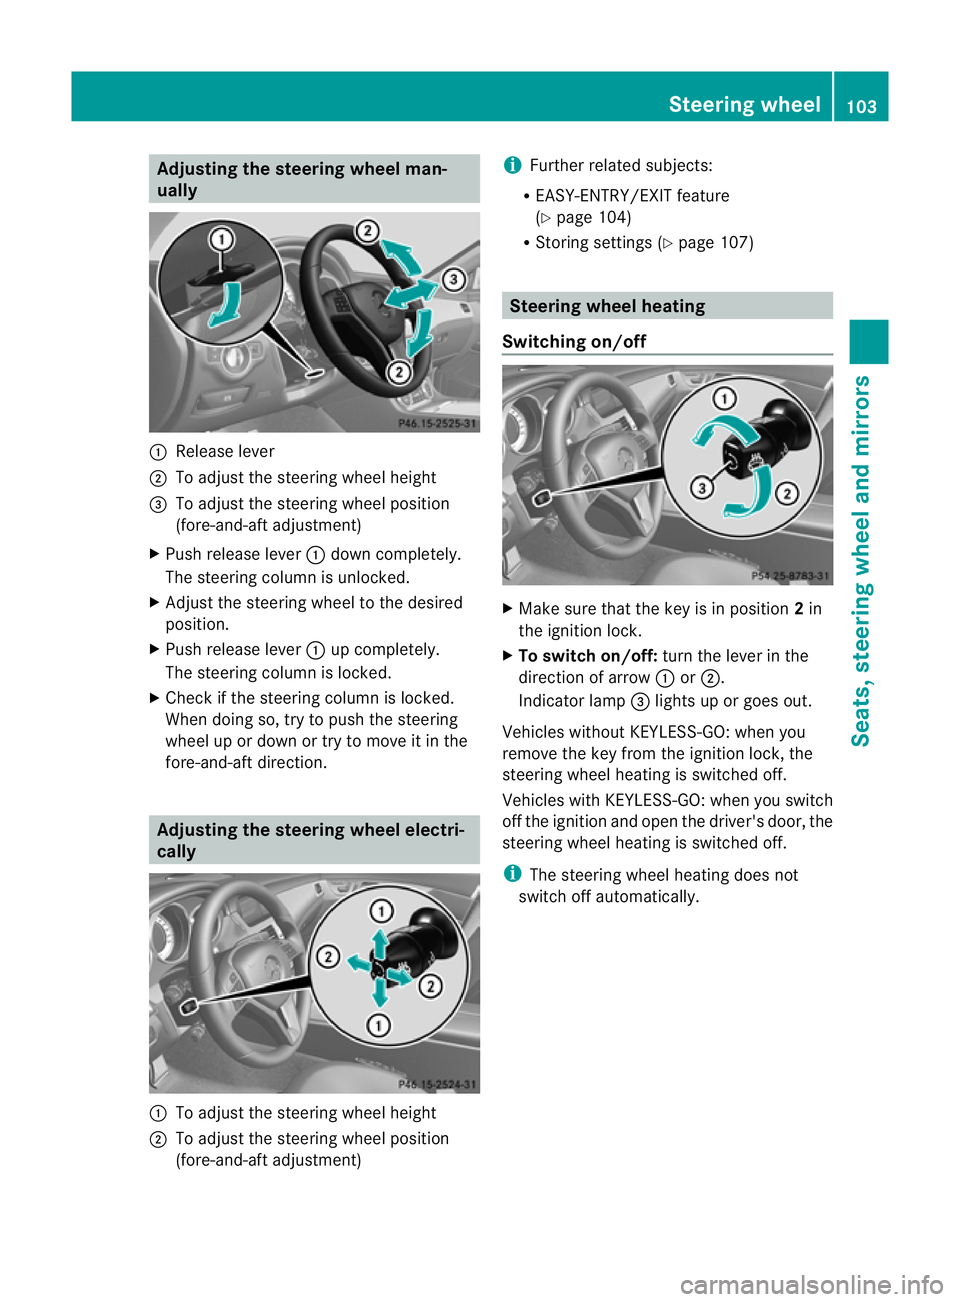
esteering wheel man-
ually :
Releas elever
; To adjust th esteering whee lheight
= To adjust th esteering whee lposition
(fore-and-af tadjustment)
X Push release lever :down completely.
The steering column is unlocked.
X Adjus tthe steering wheel to the desired
position.
X Push release lever :up completely.
The steering column is locked.
X Check if the steering column is locked.
When doing so, try to push the steering
wheel up or down or try to move it in the
fore-and-aft direction. Adjusting the steering wheel electri-
cally :
To adjust the steering wheel height
; To adjust the steering wheel position
(fore-and-aft adjustment) i
Further related subjects:
R EASY-ENTRY/EXI Tfeature
(Y page 104)
R Storing settings (Y page 107) Steering wheel heating
Switching on/off X
Make sure that the key is in position 2in
the ignition lock.
X To switch on/off: turn the lever in the
direction of arrow :or;.
Indicator lamp =lights up or goes out.
Vehicles without KEYLESS-GO: when you
remove the key from the ignition lock, the
steering wheel heating is switched off.
Vehicles with KEYLESS-GO: when you switch
off the ignition and open the driver's door, the
steering wheel heating is switched off.
i The steering wheel heating does not
switch off automatically. Steering wheel
103Seats, steering wheela nd mirrors Z
Page 184 of 373
Activating RACE START
X
Depress th ebrak epedal wit hyour left foot
and keep it depressed.
X Turn the drive program selector clockwise
(Y page 151) until the RSlamp lights up.
The RACE START Confirm: Paddle UP Cancel: Paddle DOWN message appears
in the multifunction display.
i If the activation conditions are no longer
fulfilled, RACE START is cancelled. The
RACE START cancelled message
appears in the multifunction display.
X To cancel: pull the left steerin gwheel shift
paddle (Y page 152).
or
X To confirm: pull the right steerin gwheel
shift paddle (Y page 152).
The RACE START available Depress accelerator message appears in the mul-
tifunction display.
i If you do not depress the accelerator
pedal fully within two seconds, RACE
START is cancelled. The RACE START not
possible See Owner's Manual message
appears in the multifunction display.
X Fully depress the accelerator pedal.
The engine speed rises to approximately
3500 rpm.
The RACE START Release brake to start message appears in the multifunc-
tion display.
i If you do not release the brake pedal
within five seconds, RACE START is cancel-
led. The RACE START cancelled mes-
sage appears in the multifunction display.
X Take your foot off the brake, but keep the
accelerator pedal depressed.
The vehicle pulls away at maximum accel-
eration.
The RACE START active message appears
in the multifunction display.
RACE START is deactivated when the vehicle
reaches aspeed of approximately 50 km/h. Drive program
S+is activated. SPORT han-
dling mode remains activated.
RACE START is deactivated immediately if
you release the accelerator pedal during
RACE START or if any of the activation condi-
tions are no longer fulfilled. The RACE START
not possible See Owner's Manual mes-
sage appears in the multifunction display.
i After using it several times in short suc-
cession, RACE START will be unavailable
until acertain distance has been driven. AIRMATIC
Vehicle level Important safety notes
G
WARNING
If you have selected "Comfort tuning", the
vehicle will be lowered if you lock it within
60 seconds of the engine being switched off.
Make sure, therefore, that nobody is in the
vicinit yofthe wheel housing or under the
vehicle when you lock the vehicle. Otherwise,
limbs could become trapped.
! The vehicle is lowered by about 15 mm if:
R you have selected "Comfort tuning"
R you switch off the engine and
R you lock the vehicle within approximately
60 seconds
When parking, position your vehicle so that
it does not make contact with the kerb as
the vehicle is lowered. Your vehicle could
otherwise be damaged.
Your vehicle regulates its height automati-
cally. All-round level control ensures the best
possible suspension and constant ground
clearance, even with aladen vehicle. When
you drive fast, the vehicle is lowered auto-
matically to improve driving safety and to
reduce fuel consumption. Driving systems
181Driving and parking Z
Page 185 of 373
The following vehicle levels are possible:
R
normal
R raised: the vehicle is raised by about
25 mm when compared with the normal
level.
R lowered: the vehicle is lowered by about
10 mm when compared with the normal
level.
The "Normal" and "Raised" vehicle levels can
be set manually.
The "Lowered" vehicle level is set automati-
cally:
R at speeds above 140 km/h
R if you have selected "Comfort tuning"
(Y page 182) and then lock the vehicle
within 60 seconds of the engine being
switched off
R if you have selected "Sports tuning"
(Y page 182)
Setting the vehicle level G
WARNING
Make sure that nobody is in the vicinit yofthe
wheel housing or under the vehicle while low-
ering the vehicle when it is stationary. Other-
wise, limbs could become trapped.
Select the "Normal" setting for normal road
surfaces and "Raised" for driving with snow
chains or on particularly poor road surfaces.
Your selection remains stored even if you
remove the key from the ignition lock.
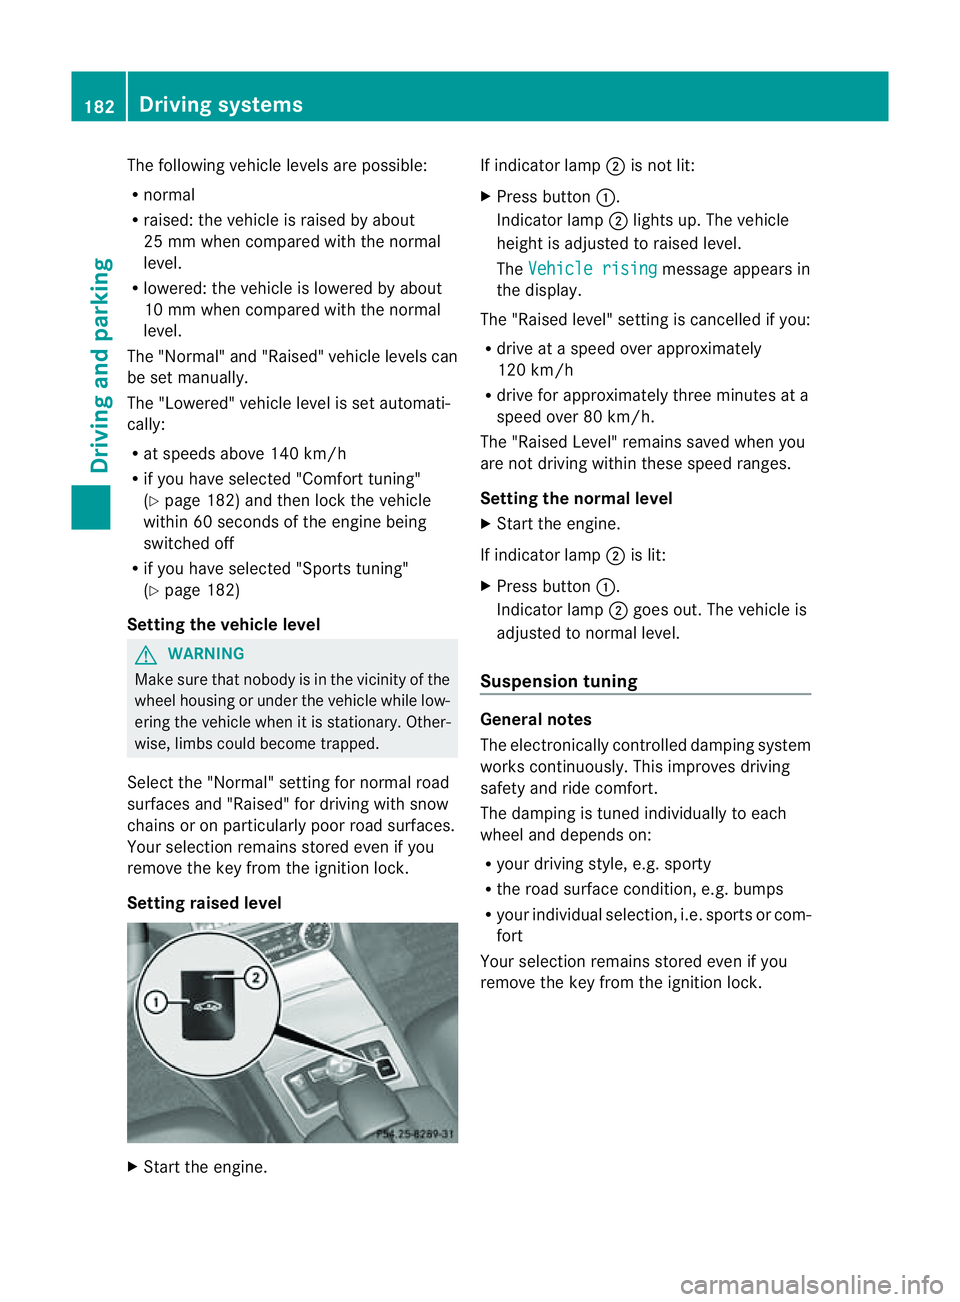
Setting raised level X
Start the engine. If indicator lamp
;is not lit:
X Press button :.
Indicator lamp ;lights up. The vehicle
height is adjusted to raised level.
The Vehicle rising message appears in
the display.
The "Raised level" setting is cancelled if you:
R drive at aspeed over approximately
120 km/h
R drive for approximately three minutes at a
speed over 80 km/h.
The "Raised Level" remains saved when you
are not driving within these speed ranges.
Setting the norma llevel
X Start the engine.
If indicator lamp ;is lit:
X Press button :.
Indicator lamp ;goes out. The vehicle is
adjusted to normal level.
Suspension tuning General notes
The electronically controlled damping system
works continuously. This improves driving
safety and ride comfort.
The damping is tuned individually to each
wheel and depends on:
R
your driving style, e.g. sporty
R the road surface condition, e.g. bumps
R your individual selection ,i.e. sports or com-
fort
Your selection remains stored even if you
remove the key from the ignition lock. 182
Driving systemsDriving and parking