instrument cluster MERCEDES-BENZ CLS SHOOTING BRAKE 2014 User Guide
[x] Cancel search | Manufacturer: MERCEDES-BENZ, Model Year: 2014, Model line: CLS SHOOTING BRAKE, Model: MERCEDES-BENZ CLS SHOOTING BRAKE 2014Pages: 417, PDF Size: 14.15 MB
Page 37 of 417
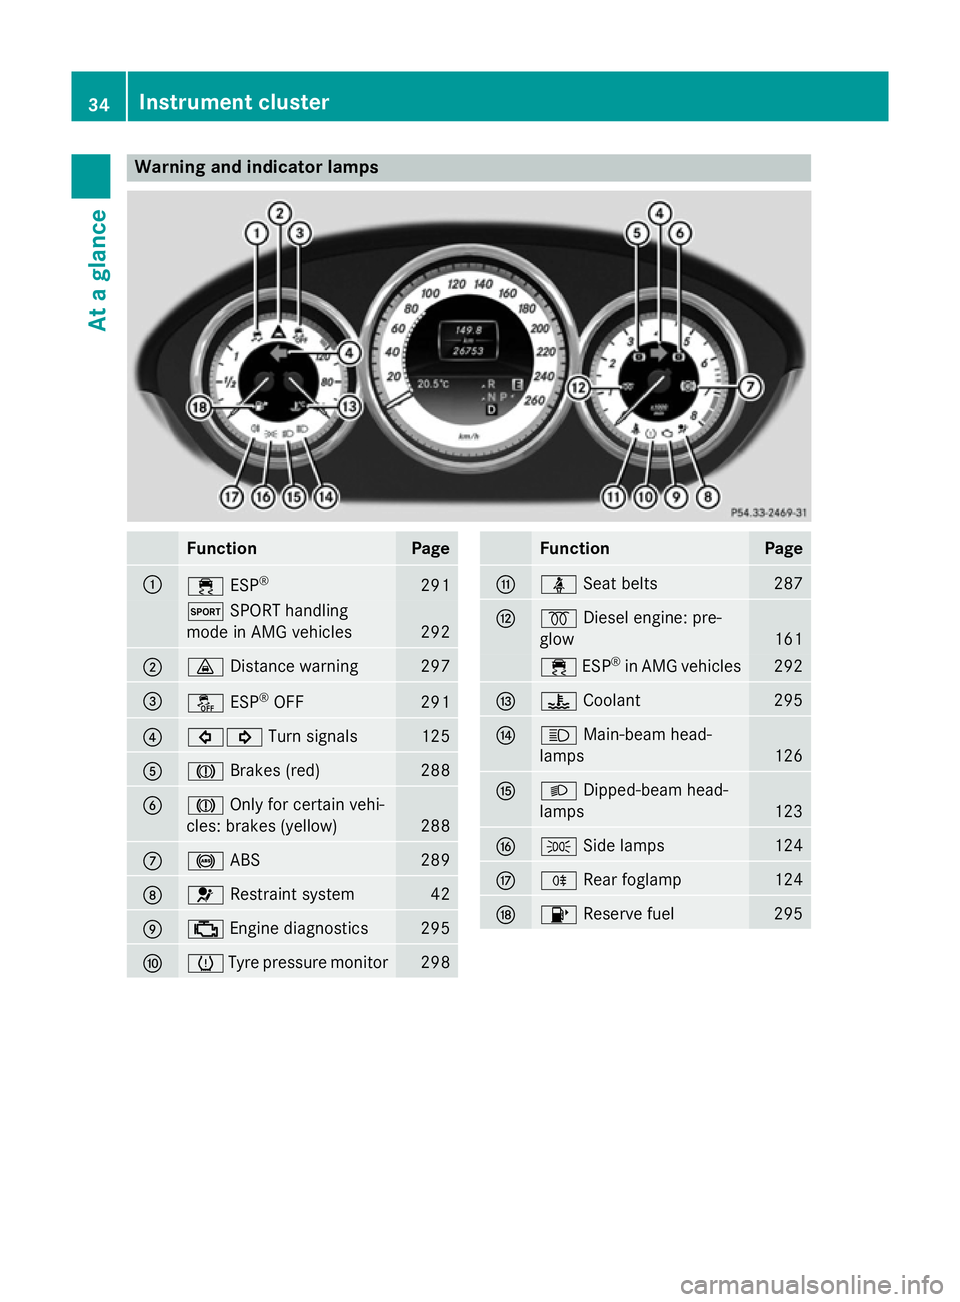
Warning and indicator lamps
Function Page
:
÷
ESP® 291
M
SPORT handling
mode in AMG vehicles 292
;
·
Distance warning 297
=
å
ESP®
OFF 291
?
#!
Turn signals 125
A
J
Brakes (red) 288
B
J
Only for certain vehi-
cles: brakes (yellow) 288
C
!
ABS 289
D
6
Restraint system 42
E
;
Engine diagnostics 295
F
h
Tyre pressure monitor 298 Function Page
G
ü
Seat belts 287
H
%
Diesel engine: pre-
glow 161
÷
ESP®
in AMG vehicles 292
I
?
Coolant 295
J
K
Main-beam head-
lamps 126
K
L
Dipped-beam head-
lamps 123
L
T
Side lamps 124
M
R
Rear foglamp 124
N
8
Reserve fuel 29534
Instrument clusterAt a glance
Page 46 of 417
See "Children in the vehicle" for further infor-
mation on children travelling in the vehicle as
well as on child restraint systems
(Y page 55). Important safety notes
G
WARNING
If the restraint system is modified, it may no
longer work as intended. The restraint system
may then not perform its intended protective function by failing in an accident or triggering
unexpectedly, for example. There is an
increased risk of injury, possibly even fatal.
Never modify parts of the restraint system. Do not attempt to modify the wiring as well as
electronic components or their software.
If it is necessary to modify an airbag system to
accommodate a person with disabilities, con- tact an authorised Mercedes-Benz Centre. Restraint system warning lamp
The operation of the restraint system is
checked when the ignition is switched on and at regular intervals while the engine is run-
ning. This allows malfunctions to be quickly
identified.
The 6 restraint system warning lamp in
the instrument cluster lights up when the igni-
tion is switched on. It goes out no later than a few seconds after the engine is started. The
various components of the restraint system
are in operational readiness.
A malfunction has occurred if the 6
restraint system warning lamp:
R does not light up when the ignition is
switched on
R does not go out after a few seconds while
the engine is running
R lights up again while the engine is running G
WARNING
If the restraint system is malfunctioning,
restraint system components may be trig-
gered unintentionally or might not be trig-
gered at all in the event of an accident with a high rate of vehicle deceleration. This can
effect belt tensioners or airbags, for example. There is an increased risk of serious or even
fatal injuries.
Have the restraint system checked and
repaired immediately at a qualified specialist
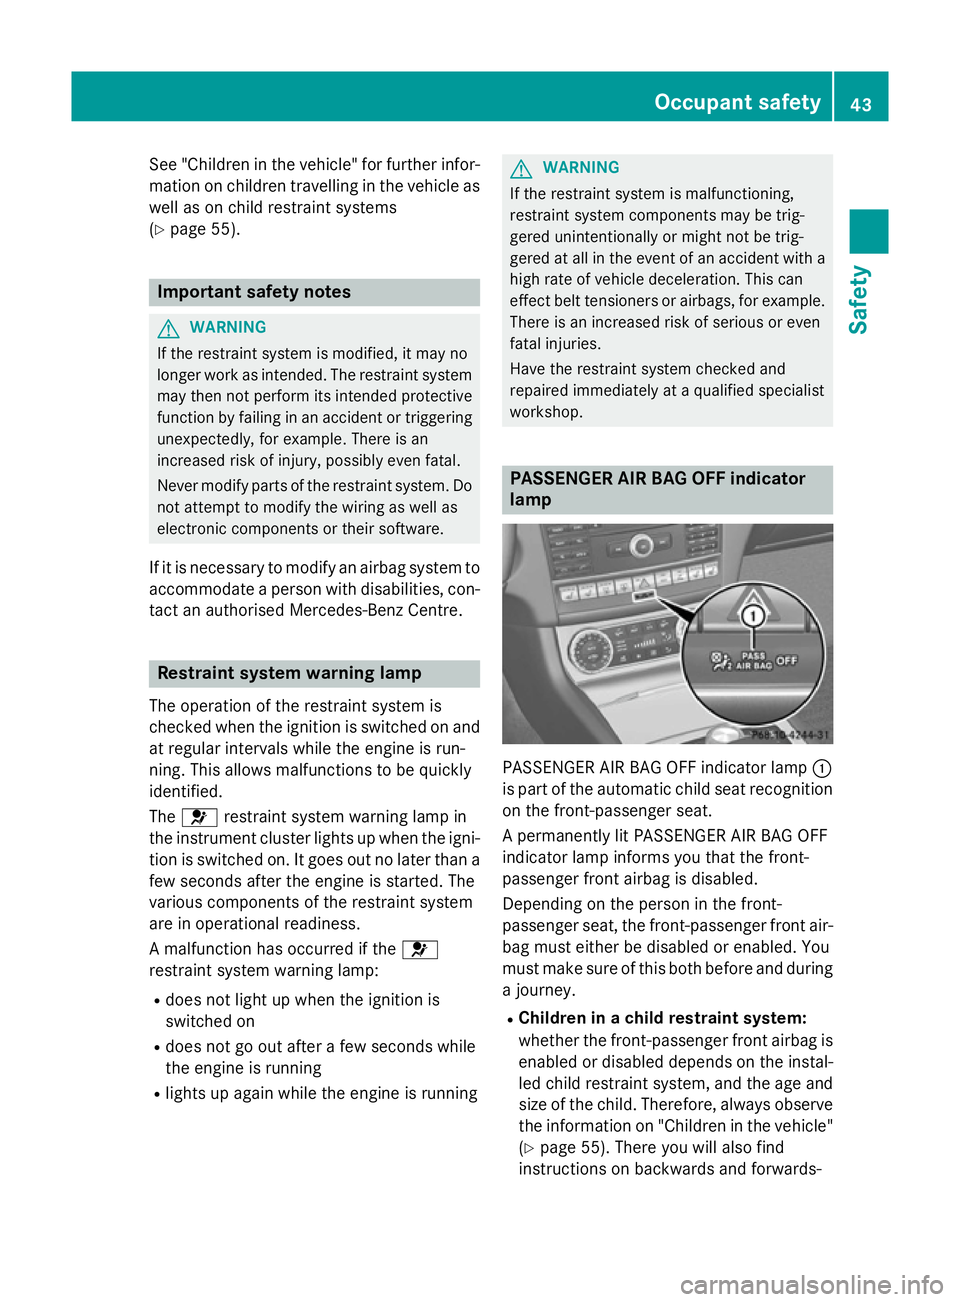
workshop. PASSENGER AIR BAG OFF indicator
lamp
PASSENGER AIR BAG OFF indicator lamp
:
is part of the automatic child seat recognition
on the front-passenger seat.
A permanently lit PASSENGER AIR BAG OFF
indicator lamp informs you that the front-
passenger front airbag is disabled.
Depending on the person in the front-
passenger seat, the front-passenger front air-
bag must either be disabled or enabled. You
must make sure of this both before and during a journey.
R Children in a child restraint system:
whether the front-passenger front airbag is
enabled or disabled depends on the instal-led child restraint system, and the age and size of the child. Therefore, always observe
the information on "Children in the vehicle" (Y page 55). There you will also find
instructions on backwards and forwards- Occupant safety
43Safety Z
Page 50 of 417
will be trapped in the door or in the seat
mechanism. This could damage the door,
the door trim panel and the seat belt. Dam- aged seat belts can no longer fulfil their
protective function and must be replaced.
Visit a qualified specialist workshop. X
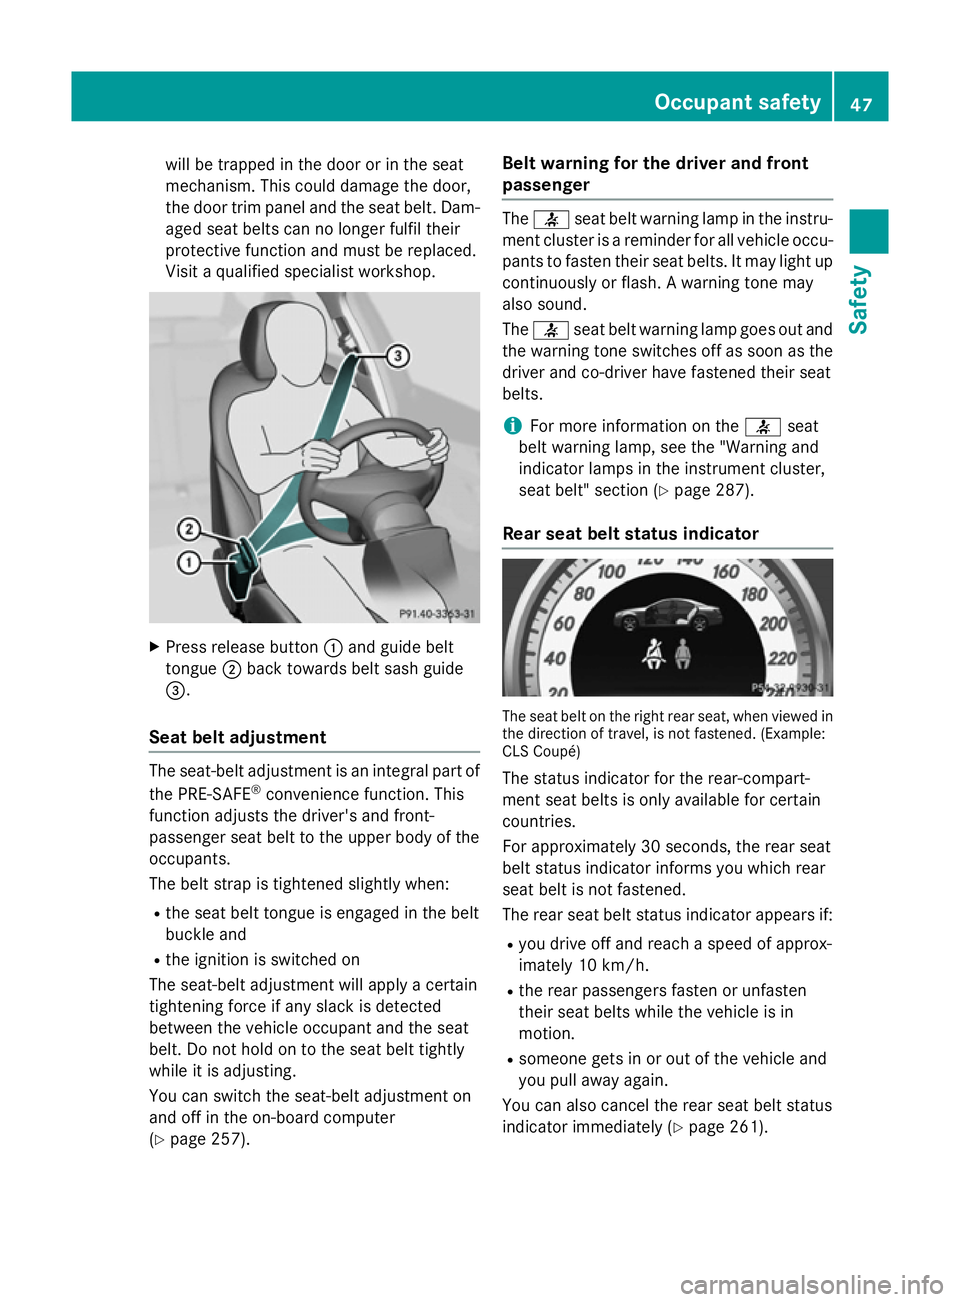
Press release button :and guide belt
tongue ;back towards belt sash guide
=.
Seat belt adjustment The seat-belt adjustment is an integral part of
the PRE-SAFE ®
convenience function. This
function adjusts the driver's and front-
passenger seat belt to the upper body of the
occupants.
The belt strap is tightened slightly when:
R the seat belt tongue is engaged in the belt
buckle and
R the ignition is switched on
The seat-belt adjustment will apply a certain
tightening force if any slack is detected
between the vehicle occupant and the seat
belt. Do not hold on to the seat belt tightly
while it is adjusting.
You can switch the seat-belt adjustment on
and off in the on-board computer
(Y page 257). Belt warning for the driver and front
passenger The
7 seat belt warning lamp in the instru-
ment cluster is a reminder for all vehicle occu-
pants to fasten their seat belts. It may light up continuously or flash. A warning tone may
also sound.
The 7 seat belt warning lamp goes out and
the warning tone switches off as soon as the driver and co-driver have fastened their seat
belts.
i For more information on the
7seat
belt warning lamp, see the "Warning and
indicator lamps in the instrument cluster,
seat belt" section (Y page 287).
Rear seat belt status indicator The seat belt on the right rear seat, when viewed in
the direction of travel, is not fastened. (Example:
CLS Coupé)
The status indicator for the rear-compart-
ment seat belts is only available for certain
countries.
For approximately 30 seconds, the rear seat
belt status indicator informs you which rear
seat belt is not fastened.
The rear seat belt status indicator appears if:
R you drive off and reach a speed of approx-
imately 10 km/h.
R the rear passengers fasten or unfasten
their seat belts while the vehicle is in
motion.
R someone gets in or out of the vehicle and
you pull away again.
You can also cancel the rear seat belt status
indicator immediately (Y page 261). Occupant safety
47Safety Z
Page 61 of 417
dent, heavy braking or sudden changes of
direction. As a result, child restraint systems
cannot perform their intended protective
function. Rear seat backrests that are not
locked can also cause additional injuries, e.g. in the event of an accident. This poses an
increased risk of injury or even fatal injury.
Always lock rear seat backrests after fitting a Top Tether belt. Observe the lock verificationindicator. Adjust the rear seat backrests so
that they are in an upright position.
If the rear seat backrest is not engaged and
locked, this will be shown in the multifunction display in the instrument cluster. A warning
tone also sounds.
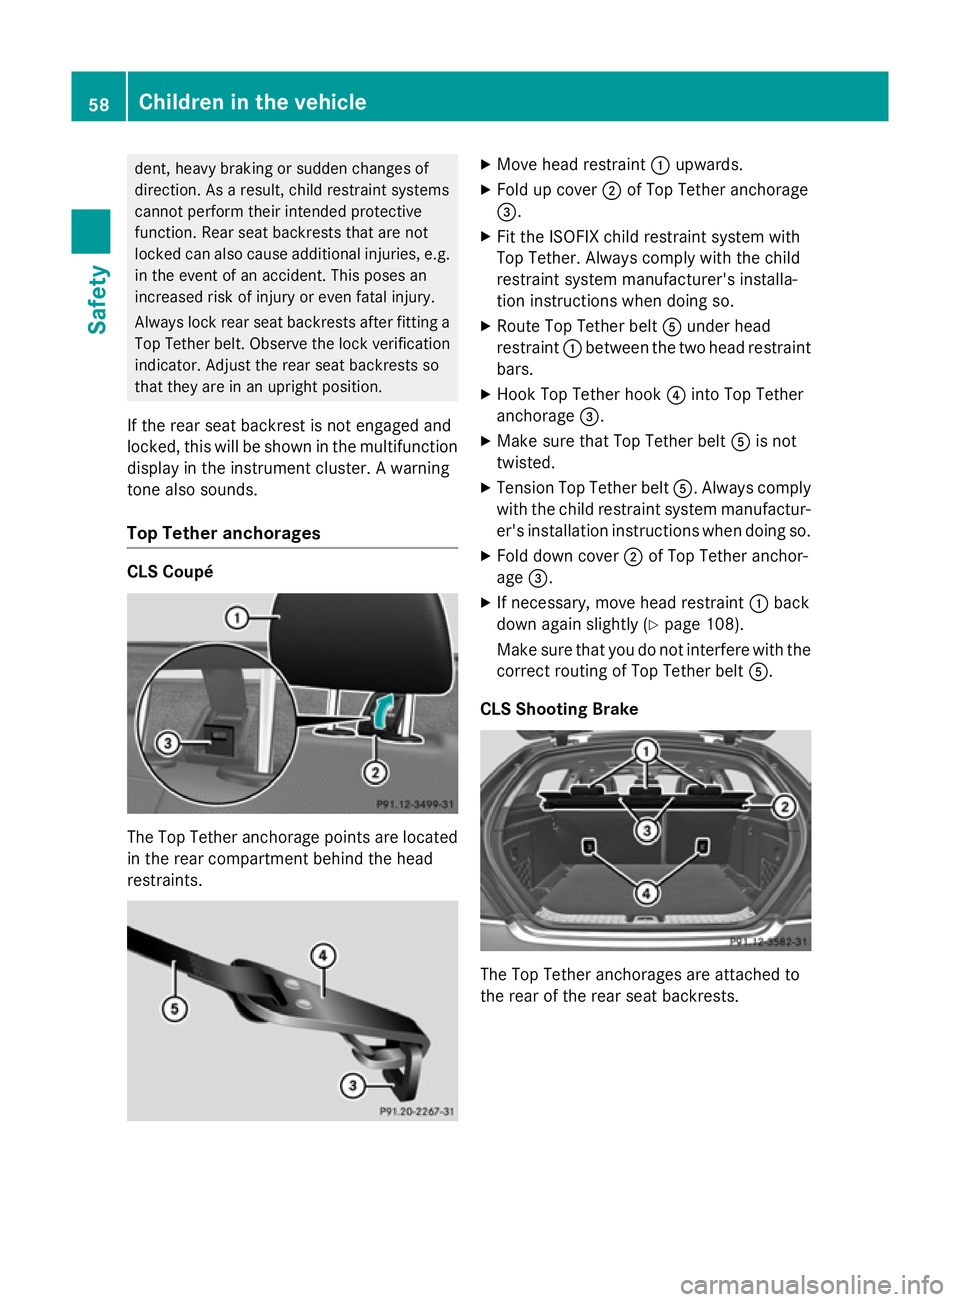
Top Tether anchorages CLS Coupé
The Top Tether anchorage points are located
in the rear compartment behind the head
restraints. X
Move head restraint :upwards.
X Fold up cover ;of Top Tether anchorage
=.
X Fit the ISOFIX child restraint system with
Top Tether. Always comply with the child
restraint system manufacturer's installa-
tion instructions when doing so.
X Route Top Tether belt Aunder head
restraint :between the two head restraint
bars.
X Hook Top Tether hook ?into Top Tether
anchorage =.
X Make sure that Top Tether belt Ais not
twisted.
X Tension Top Tether belt A. Always comply
with the child restraint system manufactur- er's installation instructions when doing so.
X Fold down cover ;of Top Tether anchor-
age =.
X If necessary, move head restraint :back
down again slightly (Y page 108).
Make sure that you do not interfere with the
correct routing of Top Tether belt A.
CLS Shooting Brake The Top Tether anchorages are attached to
the rear of the rear seat backrests.58
Children in the vehicleSafety
Page 73 of 417
Important safety notes
If you fail to adapt your driving style or if you
are inattentive, the driving safety systems can
neither reduce the risk of an accident nor
override the laws of physics. Driving safety
systems are merely aids designed to assist
driving. You are responsible for the distance
to the vehicle in front, for vehicle speed and
for braking in good time. Always adapt your
driving style to suit the prevailing road,
weather and traffic conditions and maintain a
safe distance from the vehicle in front. Drive
carefully.
i The driving safety systems described only
work as effectively as possible when there
is adequate contact between the tyres and the road surface. Please pay special atten-
tion to the notes on tyres, recommended
minimum tyre tread depths etc.
(Y page 364).
In wintry driving conditions, always use
winter tyres (M+S tyres) and, if necessary,
snow chains. Only in this way will the driv-
ing safety systems described in this section work as effectively as possible. ABS (Anti-lock Braking System)
General notes ABS regulates brake pressure in such a way
that the wheels do not lock when you brake.
This allows you to continue steering the vehi- cle when braking.
The yellow !ABS warning lamp in the
instrument cluster lights up when the ignition
is switched on. It goes out when the engine is running.
Important safety notes i
Observe the "Important safety notes" sec-
tion (Y page 70). G
WARNING
If ABS is faulty, the wheels could lock when
braking. The steerability and braking charac-
teristics may be severely impaired. Addition-
ally, further driving safety systems are deac-
tivated. There is an increased danger of skid- ding and accidents.
Drive on carefully. Have ABS checked imme-
diately at a qualified specialist workshop.
If ABS is malfunctioning, other systems,
including driving safety systems, will also
become inoperative. Observe the information on the ABS warning lamp (Y page 289) and
display messages which may be shown in the
instrument cluster (Y page 262).
ABS works from a speed of about
8 km/hupwards, regardless of road-surface
conditions. ABS works on slippery surfaces,
even when you only brake gently.
Brakes X
If ABS intervenes: continue to depress the
brake pedal with force until the braking sit- uation is over.
X To make a full brake application:
depress the brake pedal with full force.
If ABS intervenes when braking, you will feel a
pulsing in the brake pedal.
The pulsating brake pedal can be an indica-
tion of hazardous road conditions; this serves as a reminder to take extra care while driving. BAS (Brake Assist)
General notes BAS operates in emergency braking situa-
tions. If you depress the brake pedal quickly,
BAS automatically boosts the braking force,
thus shortening the stopping distance. 70
Driving safety systemsSafety
Page 76 of 417
Important safety notes
i
Observe the "Important safety notes" sec-
tion (Y page 70). G
WARNING
If ESP ®
is malfunctioning, ESP ®
is unable to
stabilise the vehicle. In addition, other driving
safety systems are switched off. This increa-
ses the risk of skidding and an accident.
Drive on carefully. Have ESP ®
checked at a
qualified specialist workshop.
! Vehicles with 4MATIC: switch off the igni-
tion when the parking brake is being tested
using a dynamometer.
Application of the brakes by ESP ®
may oth-
erwise destroy the brake system.
! Vehicles with 4MATIC: function or per-
formance tests may only be carried out on
a 2-axle dynamometer. Before operating
the vehicle on such a dynamometer, please
consult a qualified specialist workshop.
You could otherwise damage the drive train
or the brake system.
Vehicles without 4MATIC: when towing your
vehicle with the rear axle raised, it is impor-
tant that you observe the notes on ESP ®
(Y page 359).
ESP ®
is deactivated if the åwarning lamp
in the instrument cluster lights up continu-
ously when the engine is running.
If the ÷ warning lamp and the åwarn-
ing lamp are lit continuously, ESP ®
is not
available due to a malfunction.
Observe the information on warning lamps
(Y page 291) and display messages which
may be shown in the instrument cluster
(Y page 262).
i Only use wheels with the recommended
tyre sizes. Only then will ESP ®
function
properly. Characteristics of ESP
® General notes
If the
÷ ESP warning lamp goes out before
beginning the journey, ESP ®
is automatically
active.
If ESP ®
intervenes, the ÷ESP®
warning
lamp flashes in the instrument cluster.
If ESP ®
intervenes:
X Do not deactivate ESP ®
under any circum-
stances.
X When pulling away, only depress the accel-
erator pedal as far as is necessary.
X Adapt your driving style to suit the prevail-
ing road and weather conditions.
ECO start/stop function
The ECO start/stop function switches the
engine off automatically if the vehicle stops
moving. When pulling away again, the engine
starts automatically. ESP ®
remains in its pre-
viously selected status. Example:if ESP®
was deactivated before the engine was
switched off, ESP ®
remains deactivated when
the engine is switched on again.
Deactivating/activating ESP ®
(except
AMG vehicles) Important safety notes
You can select between the following sta-
tuses of ESP:
R ESP ®
is activated
R ESP ®
is deactivated G
WARNING
If you deactivate ESP ®
, ESP ®
no longer sta-
bilises the vehicle. There is an increased risk
of skidding and an accident.
Only deactivate ESP ®
in the situations descri-
bed in the following. Driving safety systems
73Safety Z
Page 77 of 417
It may be best to deactivate ESP
®
in the fol-
lowing situations:
R when using snow chains
R in deep snow
R on sand or gravel
i Activate ESP ®
as soon as the situations
described above no longer apply. ESP ®
will
otherwise not be able to stabilise the vehi-
cle if the vehicle starts to skid or a wheel
starts to spin.
Deactivating/activating ESP ®
X To deactivate: (Ypage 250).
The å ESP®
OFF warning lamp in the
instrument cluster lights up.
X To activate: (Ypage 250).
The å ESP®
OFF warning lamp in the
instrument cluster goes out.
Characteristics when ESP ®
is deactivated
If ESP ®
is deactivated and one or more wheels
start to spin, the ÷ESP®
warning lamp in
the instrument cluster flashes. In such situa-
tions, ESP ®
will not stabilise the vehicle.
If you deactivate ESP ®
:
R ESP ®
no longer improves driving stability
R engine torque is no longer limited and the
drive wheels are able to spin
The spinning of the wheels results in a cut-
ting action for better traction on loose sur-faces.
R traction control is still activated
R ESP ®
still provides support when you brake
Deactivating/activating ESP ®
(AMG
vehicles) Important safety notes
You can select between the following sta-
tuses of ESP:
R ESP ®
is activated
R SPORT handling mode is activated
R ESP ®
is deactivated G
WARNING
When SPORT handling mode is activated,
there is a greater risk of skidding and acci-
dents.
Only activate SPORT handling mode in the sit- uations described in the following. G
WARNING
If you deactivate ESP ®
, ESP ®
no longer sta-
bilises the vehicle. There is an increased risk
of skidding and an accident.
Only deactivate ESP ®
in the situations descri-
bed in the following.
It may be best to activate SPORT handling
mode in the following situations:
R when using snow chains
R in deep snow
R on sand or gravel
R on specially designated roads when the
vehicle's own oversteering and understeer- ing characteristics are desired
Driving in SPORT handling mode or without
ESP ®
requires an extremely qualified and
experienced driver.
i Activate ESP ®
as soon as the situations
described above no longer apply. ESP ®
will
otherwise not be able to stabilise the vehi-
cle if the vehicle starts to skid or a wheel
starts to spin.
Deactivating/activating ESP ®74
Driving safety systemsSafety
Page 78 of 417
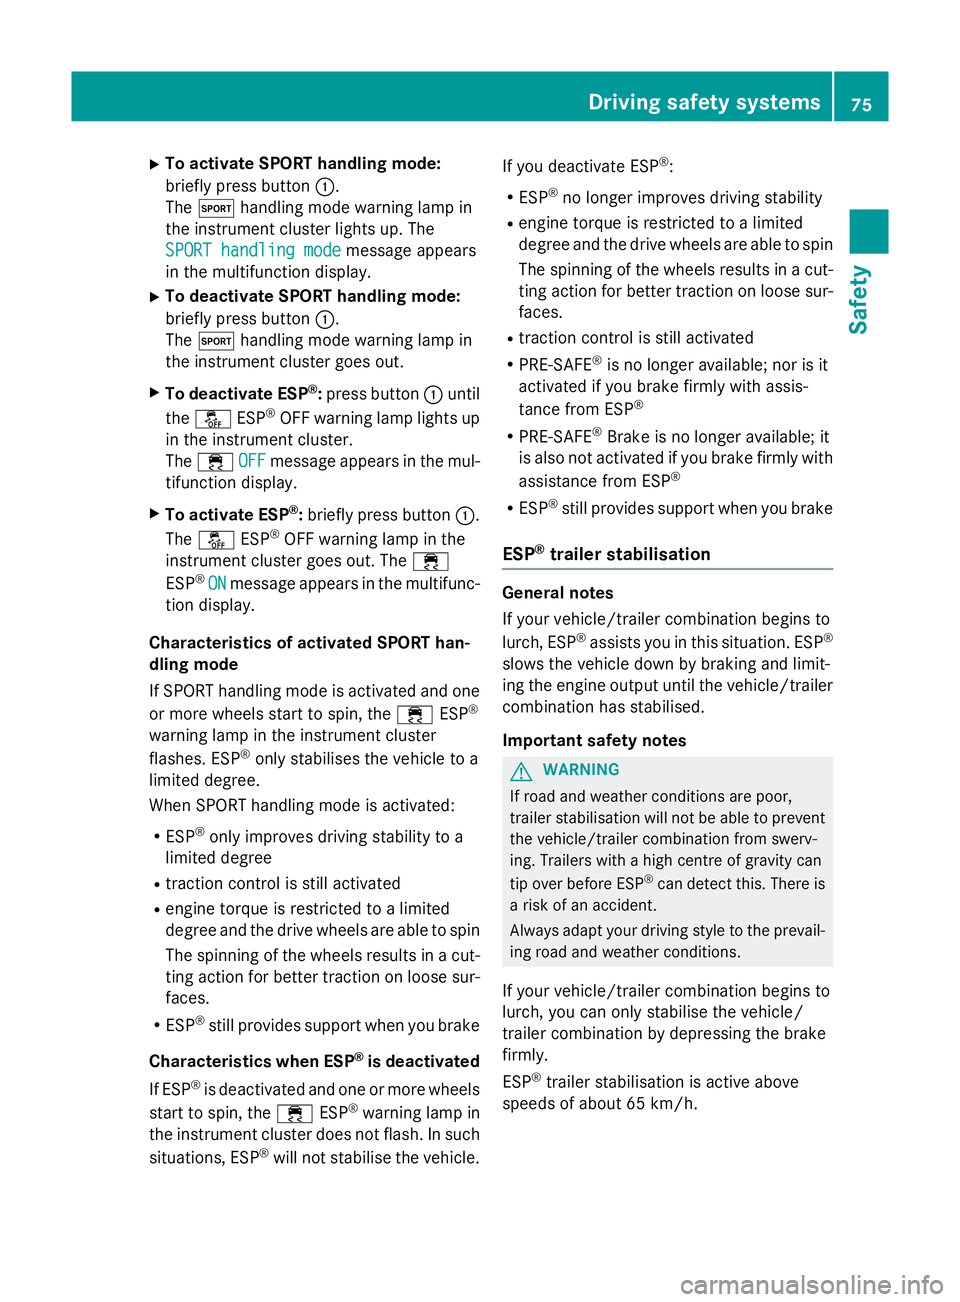
X
To activate SPORT handling mode:
briefly press button :.
The M handling mode warning lamp in
the instrument cluster lights up. The
SPORT handling mode
SPORT handling mode message appears
in the multifunction display.
X To deactivate SPORT handling mode:
briefly press button :.
The M handling mode warning lamp in
the instrument cluster goes out.
X To deactivate ESP ®
:press button :until
the å ESP®
OFF warning lamp lights up
in the instrument cluster.
The ÷ OFF
OFF message appears in the mul-
tifunction display.
X To activate ESP ®
:briefly press button :.
The å ESP®
OFF warning lamp in the
instrument cluster goes out. The ÷
ESP ®
ON
ON message appears in the multifunc-
tion display.
Characteristics of activated SPORT han-
dling mode
If SPORT handling mode is activated and one
or more wheels start to spin, the ÷ESP®
warning lamp in the instrument cluster
flashes. ESP ®
only stabilises the vehicle to a
limited degree.
When SPORT handling mode is activated:
R ESP ®
only improves driving stability to a
limited degree
R traction control is still activated
R engine torque is restricted to a limited
degree and the drive wheels are able to spin
The spinning of the wheels results in a cut-
ting action for better traction on loose sur- faces.
R ESP ®
still provides support when you brake
Characteristics when ESP ®
is deactivated
If ESP ®
is deactivated and one or more wheels
start to spin, the ÷ESP®
warning lamp in
the instrument cluster does not flash. In such
situations, ESP ®
will not stabilise the vehicle. If you deactivate ESP
®
:
R ESP ®
no longer improves driving stability
R engine torque is restricted to a limited
degree and the drive wheels are able to spin
The spinning of the wheels results in a cut-
ting action for better traction on loose sur- faces.
R traction control is still activated
R PRE-SAFE ®
is no longer available; nor is it
activated if you brake firmly with assis-
tance from ESP ®
R PRE-SAFE ®
Brake is no longer available; it
is also not activated if you brake firmly with
assistance from ESP ®
R ESP ®
still provides support when you brake
ESP ®
trailer stabilisation General notes
If your vehicle/trailer combination begins to
lurch, ESP
®
assists you in this situation. ESP ®
slows the vehicle down by braking and limit-
ing the engine output until the vehicle/trailer combination has stabilised.
Important safety notes G
WARNING
If road and weather conditions are poor,
trailer stabilisation will not be able to prevent the vehicle/trailer combination from swerv-
ing. Trailers with a high centre of gravity can
tip over before ESP ®
can detect this. There is
a risk of an accident.
Always adapt your driving style to the prevail-
ing road and weather conditions.
If your vehicle/trailer combination begins to
lurch, you can only stabilise the vehicle/
trailer combination by depressing the brake
firmly.
ESP ®
trailer stabilisation is active above
speeds of about 65 km/h. Driving safety systems
75Safety Z
Page 80 of 417
Always pay particular attention to the traffic
situation and be ready to brake, especially if
PRE-SAFE ®
Brake warns you. Terminate the
intervention in a non-critical driving situation.
In order to maintain the appropriate distance
to the vehicle in front and thus prevent a col-
lision, you must apply the brakes yourself. G
WARNING
PRE-SAFE ®
Brake does not react:
R to people or animals
R to oncoming vehicles
R to crossing traffic
R when cornering
As a result, PRE-SAFE ®
Brake may neither
give warnings nor intervene in all critical sit-
uations. There is a risk of an accident.
Always pay careful attention to the traffic sit-
uation and be ready to brake.
In the event of snowfall or heavy rain, detec-
tion can be impaired.
Detection by the radar sensor system is also
impaired in the event of:
R dirt on the sensors or obscured sensors
R interference by other radar sources
R strong radar reflections, for example, in
multi-storey car parks
R a narrow vehicle travelling in front, e.g. a
motorcycle
R a vehicle travelling in front on a different
line
Following damage to the front end of the vehi-
cle, have the radar sensor settings and oper- ation checked at a qualified specialist work-
shop. This also applies to collisions at slow
speeds where there is no visible damage to
the front of the vehicle. Function X
To activate/deactivate: activate or deac-
tivate PRE-SAFE ®
Brake in the on-board
computer (Y page 250).
If the PRE-SAFE ®
Brake is not activated, the
æ symbol appears in the multifunction
display.
This function will issue a warning if:
R at a speed of around 30 km/h or more the
distance maintained to the vehicle travel-
ling in front is insufficient for several sec-
onds.
The · distance warning lamp then lights
up in the instrument cluster.
R at a speed of approximately 7 km/h or
more, you rapidly approach a vehicle in
front.
An intermittent warning tone will then
sound and the ·distance warning lamp
will light up in the instrument cluster.
X Brake immediately to defuse the situation.
or X Take evasive action provided it is safe to do
so.
The PRE-SAFE ®
Brake function can also brake
the vehicle automatically under the following
conditions:
R the driver and front passenger have their
seat belts fastened
and
R the vehicle speed is between approx-
imately 7 km/h and 200 km/h
At speeds of up to approximately 70 km/h
PRE-SAFE ®
Brake can also detect stationary
objects. Examples of stationary objects are
stopped or parked vehicles.
You can prevent the intervention of PRE-
SAFE ®
Brake at any time by:
R depressing the accelerator pedal further
R activating kickdown
R releasing the brake pedal Driving safety systems
77Safety Z
Page 126 of 417
The exterior lighting (except the side lamps/
parking lamps) switches off automatically if
you:
R remove the key from the ignition lock
R open the driver's door with the key in posi-
tion 0
Automatic headlamp mode G
WARNING
When the light switch is set to Ã, the
dipped-beam headlamps may not be switched on automatically if there is fog, snow or othercauses of poor visibility due to the weather
conditions such as spray. There is a risk of an
accident.
In such situations, turn the light switch to
L.
The automatic headlamp feature is only an
aid. The driver is responsible for the vehicle
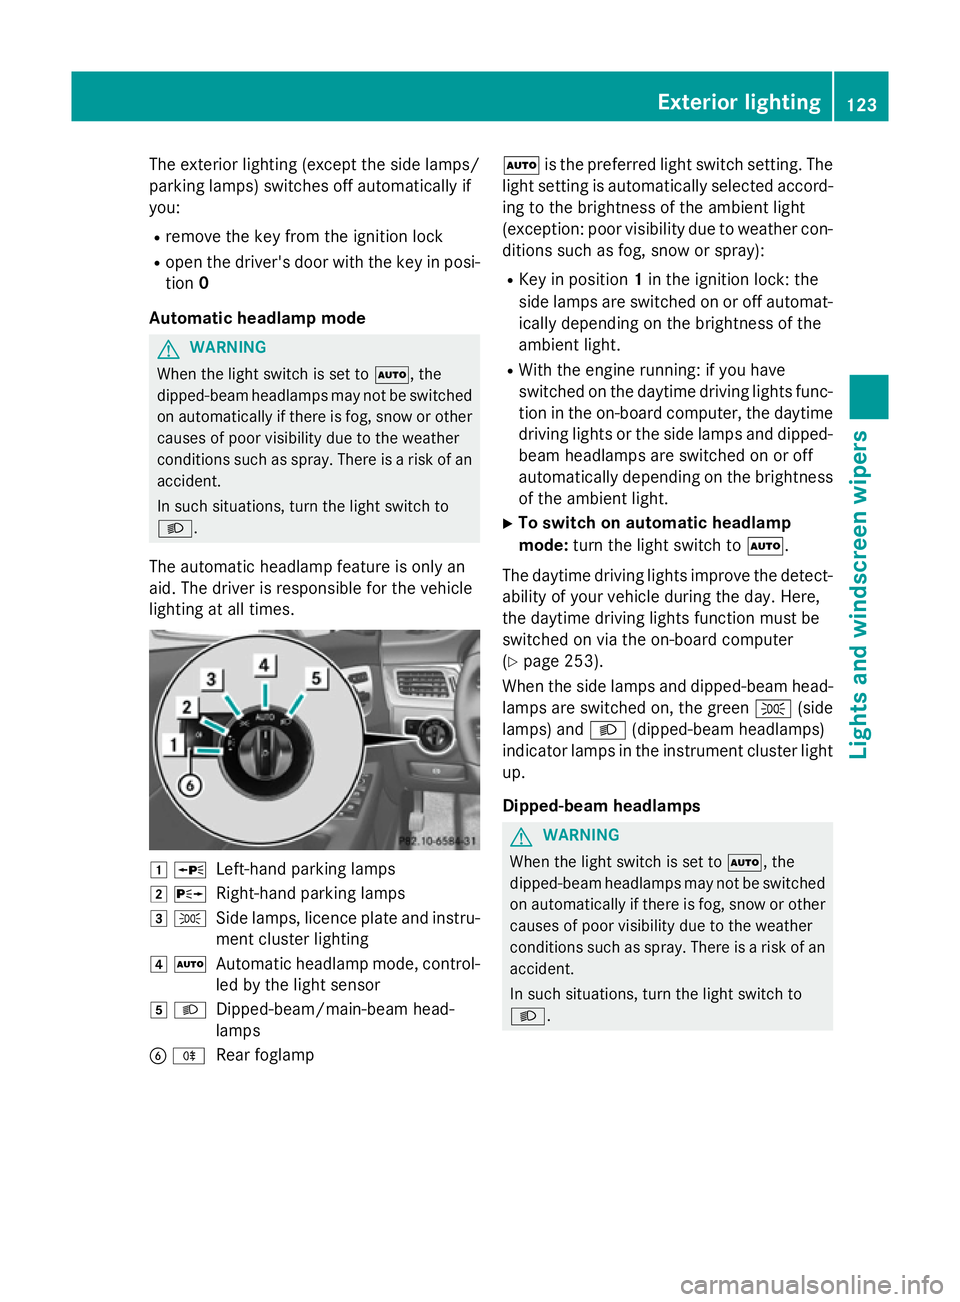
lighting at all times. 1
W
Left-hand parking lamps
2 X
Right-hand parking lamps
3 T
Side lamps, licence plate and instru-
ment cluster lighting
4 Ã
Automatic headlamp mode, control-
led by the light sensor
5 L
Dipped-beam/main-beam head-
lamps
B R
Rear foglamp Ã
is the preferred light switch setting. The
light setting is automatically selected accord- ing to the brightness of the ambient light
(exception: poor visibility due to weather con- ditions such as fog, snow or spray):
R Key in position 1in the ignition lock: the
side lamps are switched on or off automat- ically depending on the brightness of the
ambient light.
R With the engine running: if you have
switched on the daytime driving lights func-
tion in the on-board computer, the daytime
driving lights or the side lamps and dipped- beam headlamps are switched on or off
automatically depending on the brightnessof the ambient light.
X To switch on automatic headlamp
mode: turn the light switch to Ã.
The daytime driving lights improve the detect- ability of your vehicle during the day. Here,
the daytime driving lights function must be
switched on via the on-board computer
(Y page 253).
When the side lamps and dipped-beam head- lamps are switched on, the green T(side
lamps) and L(dipped-beam headlamps)
indicator lamps in the instrument cluster light up.
Dipped-beam headlamps G
WARNING
When the light switch is set to Ã, the
dipped-beam headlamps may not be switched on automatically if there is fog, snow or othercauses of poor visibility due to the weather
conditions such as spray. There is a risk of an
accident.
In such situations, turn the light switch to
L. Exterior lighting
123Lights and windscreen wipers Z