sensor MERCEDES-BENZ E-CLASS CABRIOLET 2010 User Guide
[x] Cancel search | Manufacturer: MERCEDES-BENZ, Model Year: 2010, Model line: E-CLASS CABRIOLET, Model: MERCEDES-BENZ E-CLASS CABRIOLET 2010Pages: 333, PDF Size: 7.64 MB
Page 62 of 333
under full braking. This coul
dcause you to
lose control of your vehicle and cause an acci-
dent. You shoul dtherefore adapt your driving
styl etot he different handling characteristics. ADAPTIVE BRAKE
ADAPTIV EBRAKE enhances braking safety
and offers increased braking comfort .Inaddi-
tion to the brakin gfunction ,ADAPTIVE BRAKE
also ha sthe HOL Dfunctio n(Ypage 17 2)and
hill start assist (Y page137).For further
inf ormation, se eDriving tip s(Ypage 154). PRE-SAFE
®
Brake (vehicles with DIS-
TRON IC PLUS)
PRE-SAFE ®
Brake can hel pyou to minimise
the ris kofaf rontal col lisionwithavehicle
ahead or reduce the effects of such acolli-
sion.
This function will issu eawarning at spe edsof
around 30 km/h or more if:
R for aperiod of sever alseconds, the dis-
tance to the vehicl einfront is to oshort for
the speed at which you ar etrave lling. The
· distance warning lamp in the instru-
ment cluster lights up.
R you are approaching the vehicle in front too
rapidly .Anintermittent warning tone
so unds and the ·distance warning
lamp lights up in the instrument cluster.
Due to the nature of the system, particularly
complicated driving conditions may caus ethe
system to displa yanunneces sary warning. G
Ris
kofa ccident
Pay particula rattention to the traffic condi-
tions if the ·distance warning lam pinthe
instrument clu ster lights up or an intermittent
warning tone sounds. If necessary, brak eor
manoeuvre to avo idan obstacle. If the driver and passengers have fastened
thei
rseat belts, PRE-SAFE ®
Brak ecan also
can also perform the following at speeds of
above approximately 30 km/h:
R brake the vehicle automatically from a
spee dofuptoa pproximately 20 0km/h
R trigge rpreventative passenge rprote ction
measures (PRE-SAFE ®
) G
Risk of accident
PRE-SAFE ®
Brak eiso nly an aid to assist you
whe ndriving. Yo uare responsible for main-
taining asafe distanc efrom other vehicles,
th ev ehicle' sspeed and for braking in good
time. Alway spay attention to the traffic con-
ditions. Otherwise, you may recognise dan-
gers too late, cause an acciden tand injure
yoursel fand others.
With the hel pofthe radar sensor system,
PRE-SAFE ®
Brak ecan detect obstacles that
are in fron tofyour vehicle for an extended
period of time. If you approach an obstacle
and PRE- SAFE®
Brake detects arisk of acol-
lision, the system will initially aler tyou both
visually and acoustically .Ify ou do not brake
or steer ,the vehicle will at first automatically
brake slightly. In the even tofanincreased
risk of acollision ,PRE-SAFE ®
is activated
(Y page 39). If the risk of collision remains
and you do not brake, take evasive action or
accelerat esignificantly, the vehicle may per-
form automatic emergency braking. G
Risk of accident
Only clearl ydetected obstacles will trigger a
warning and initiat ebraking assistance by
PRE-SAFE ®
Brake.
In particular, th edetection of obstacles can
be impaired if there is:
R dirt on the sensor sorthe sensor sare cov-
ered
R snow or heavy rain Dri
ving sa fety systems
59Safety
BA 207 ECE ÄJ 2010/1a; 1; 2, en-GB
mkalafa Version: 3.0.2.11 2010-01-26T13:03:22+01:00 -Seite 59 Z
Page 63 of 333
R
interference by other radar sources
R the possibility of strong radar reflections,
for example in multi-storey car parks
PRE-SAFE ®
Brak edoes not react to persons,
animals ,oncoming vehicles, crossing traffic
or whe ncornering.
PRE-SAFE ®
Brak emay not detect narrow
vehicles such as motorcycles and vehicles
drivin gona different line. G
Ri
sk of accident
Dependin gonthe cur rent speed, PRE-SAFE ®
Brak edecelerat es your ve hicle by up to
4m /s2
befo reperformin gpossible emer-
genc ybraking .This is equivalen ttoapprox-
imately 40 %ofthe maximum brakin gpower
of the vehicle. You must additionally apply the
brakes yourself in order to prevent acollision
or minimise an impact. Automatic emergency
brakin gisnot performed until immediately
prior to an accident in the even tthat you are
unable to avoid one by, for instance, taking
evasive action.
In order to maintain the appropriate distance
to the vehicle in front and thus prevent acol-
lision, you must apply the brakes yourself.
At speeds up to approximately 70 km /h,
PRE- SAFE ®
Br ake can also detect stationary
obstacles ,for example stopped or parked
vehicles. G
Risk of accident
If ,inac ritical driving situation, yo udonot
receive avisual and acoustic warning:
R PRE-SAFE ®
Brak edid not detect the risk of
ac ollision
R PRE- SAFE ®
Br ake is switched off
R PRE-SAFE ®
Brake has failed
You must then brake to avoid acollision.
X To activate: activate PRE-SAFE®
Br ake in
the on-board computer (Y page 203).
The Ä symbol appears in the lower mul-
tifunction display ,aslong as the HOLD
func tion is not activated (Y page 172).On vehicles with parkin
gguidance, the P
gear must be engage dfor the icon to be
displayed.
The radar sensor system is switched off auto-
matically in the vicinit yofradio telescope
facilities (Y page 324).
For PRE-SAFE ®
Brake to assis tyou when driv-
ing, the radar sensor system must be
switched on and operational.
PRE- SAFE ®
Br ake does not always detect
complex traffic situations properly. You can
terminate the braking action of PRE-SAFE ®
Brake in anon-critical drivin gsituation at any
time if:
R an acoustic and visual warnin goccurs
R the vehicle brakes
To end this, you can either depress the accel-
erato rpedal further, activate kickdown or
release the brak epedal.
The braking action of PRE- SAFE®
Br ake is
ended automatically if:
R you manoeuvre to avoid the obstacle
R you drive slowe rthan approximately
15 km /h
R there is no longe ranobstacle detected in
front of your vehicle
R there is no longer any danger of acollision
Following acollision or collision-related dam-
age to the front end of the vehicle, have the
con figuration and operation of the radar sen-
sors chec ked. Choose aqualified specialist
worksho pfor this which has the necessary
specialist knowledge and tools for the work
required .Mercedes-Benz recommends that
you use aMercedes-Benz Servic eCentr efor
this purpose. Anti-theft systems
Immobiliser
The immobiliser prevent syour vehicle from
being star tedw ithout the correc tkey. 60
Anti-thef
tsystemsSafety
BA 207 ECE ÄJ 2010/1a; 1; 2, en-GB
mkalafa Version: 3.0.2.11
2010-01-26T13:03:22+01:00
-Seite 60
Page 65 of 333
X
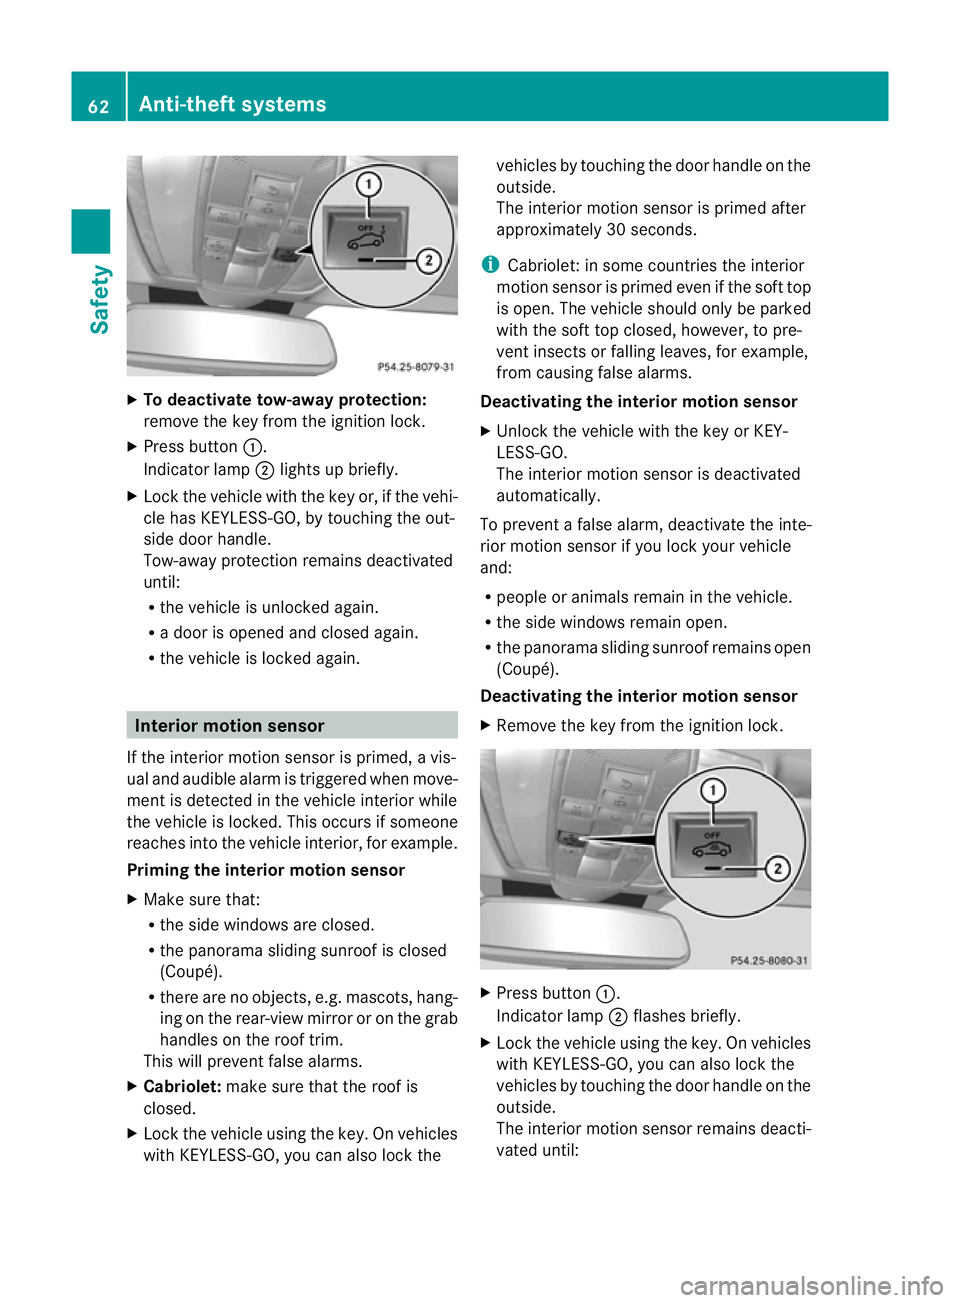
To deactivate tow-away protection:
remove the key from the ignition lock.
X Press button :.
Indicato rlamp ;lights up briefly.
X Loc kthe vehicle with the key or, if the vehi-
cle has KEYL ESS-GO,bytouching the out-
side door handle.
Tow-away protection remains deactivated
until:
R the vehicle is unlocked again.
R ad oor is opened and closed again.
R the vehicle is locked again. Interior motion sensor
If the interior motion sensor is primed, avis-
ual and audible alarm is triggered when move-
ment is detected in the vehicle interior while
the vehicle is locked. This occur sifsomeone
reaches int othe vehicle interior, for example.
Priming th einterior motion sensor
X Make sure that:
R
the side windows are closed.
R the panorama sliding sunroof is closed
(Coupé).
R there are no objects, e.g. mascots, hang-
ing on the rear-view mirror or on the grab
handles on the roof trim.
This will prevent false alarms.
X Cabriolet: makesure that the roof is
closed.
X Lock the vehicle using the key. On vehicles
with KEYLESS-GO, you can also lock the vehicles by touching the door handle on the
outside.
The interior motion senso
risp rime dafter
approximately 30 seconds.
i Cabrio let: in some countries the interior
motion sensor is primed even if the soft top
is open. The vehicle should only be parked
with the soft top closed, however, to pre-
vent insects or falling leaves ,for example,
from causing false alarms.
Deactivating th einterior motion sensor
X Unlock the vehicle with the key or KEY-
LE SS -GO.
The interio rmotion sensor is deactivated
automatically.
To prevent afalse alarm, deactivate the inte-
rior motion senso rifyou lock your vehicle
and:
R people or animals remain in the vehicle.
R the side window sremai nopen.
R the panorama sliding sunroof remains open
(Coupé).
Deactivating the interio rmotion sensor
X Remove the key from the ignition lock. X
Press button :.
Indicator lamp ;flashes briefly.
X Lock the vehicle using the key. On vehicles
with KEYL ESS-GO,you can also lock the
vehicles by touching the door handle on the
outside.
The interior motion sensor remains deacti-
vated until: 62
Anti-thef
tsystemsSafety
BA 207 ECE ÄJ 2010/1a; 1; 2, en-GB
mkalafa Version: 3.0.2.11 2010-01-26T13:03:22+01:00 -Seite 62
Page 69 of 333
Vehicl
eequipment
i Thismanua ldesc ribe sallthe standard
and optional equipment of your vehicle
which wa savailable at th etime of pur-
chase. Countr y-specif ic differences are
possible. Bear in mind tha tyour vehicle
ma ynot featur eall function sdescribed
here. Key
Key functions
Locking and unlocking centr ally The key centrally locks/unlocks:
R
the doors
R the boot lid
R the fuel filler flap G
Risk of accident
If children are left unsupervised in the vehicle,
they could:
R open adoor from inside the vehicle at any
time, even if it has been locked
R star tthe vehicle usin gakey which has been
left in the vehicle
R release the parking brake
They could thereby endanger themselves and
others. Never leave children unsupervised in
the vehicle. Alway stake the key with you
when leaving the vehicle, even if you are only
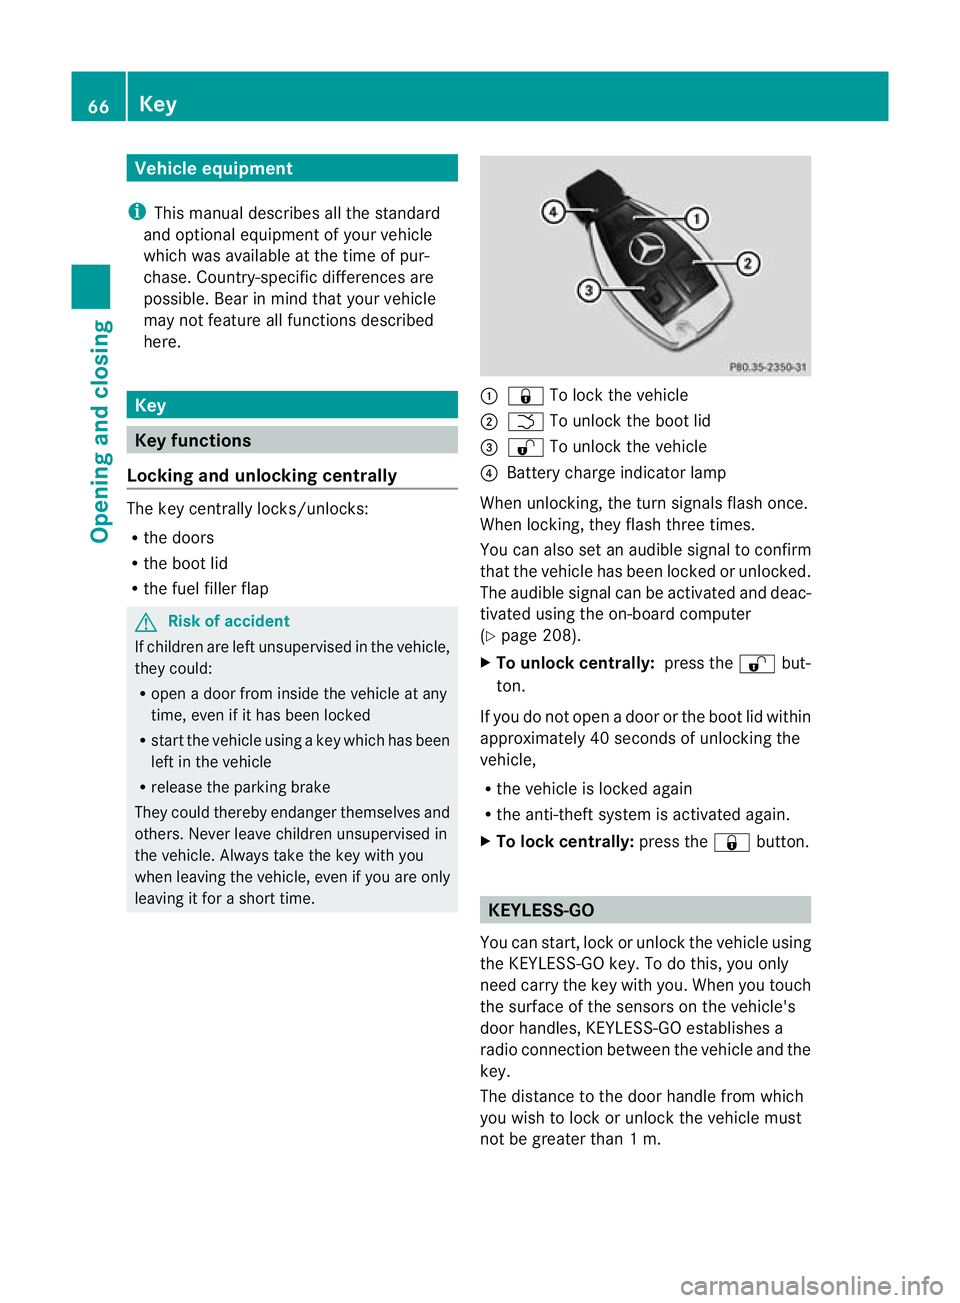
leaving it for ashort time. :
& To lock the vehicle
; F To unloc kthe boot lid
= % To unlock the vehicle
? Battery charge indicator lamp
When unlocking ,the tur nsignals flash once.
When locking, they flash three times.
You can also set an audible signal to confirm
that the vehicle has been locked or unlocked.
The audible signal can be activated and deac-
tivated using the on-board computer
(Y page 208).
X To unlock centrally: press the%but-
ton.
If you do not open adoor or the boot lid within
approximately 40 second sofunlocking the
vehicle,
R the vehicl eislocke dagain
R the anti-thef tsystem is activated again.
X To lock centrally: press the&button. KEYLESS-GO
You can start, lock or unlock the vehicle using
the KEYLESS-GO key. To do this ,you only
need carry the key with you. When you touch
the surface of the sensor sonthe vehicle's
door handles, KEYL ESS-GO establishes a
radio connection between the vehicle and the
key.
Th ed istance to the door handle from which
you wish to lock or unlock the vehicle must
not be greater than 1m.66
KeyOpening and closing
BA 20
7ECE ÄJ 2010 /1a; 1; 2, en-GB
mkalafa Version: 3.0.2.11 2010-01-26T13:03:22+01:00 -Seite 66
Page 70 of 333
When star
ting the engine and whilst driving,
KEYLESS-GO also checks whether avalid key
is in the vehicle by periodicall yestablishing
radio con tact. X
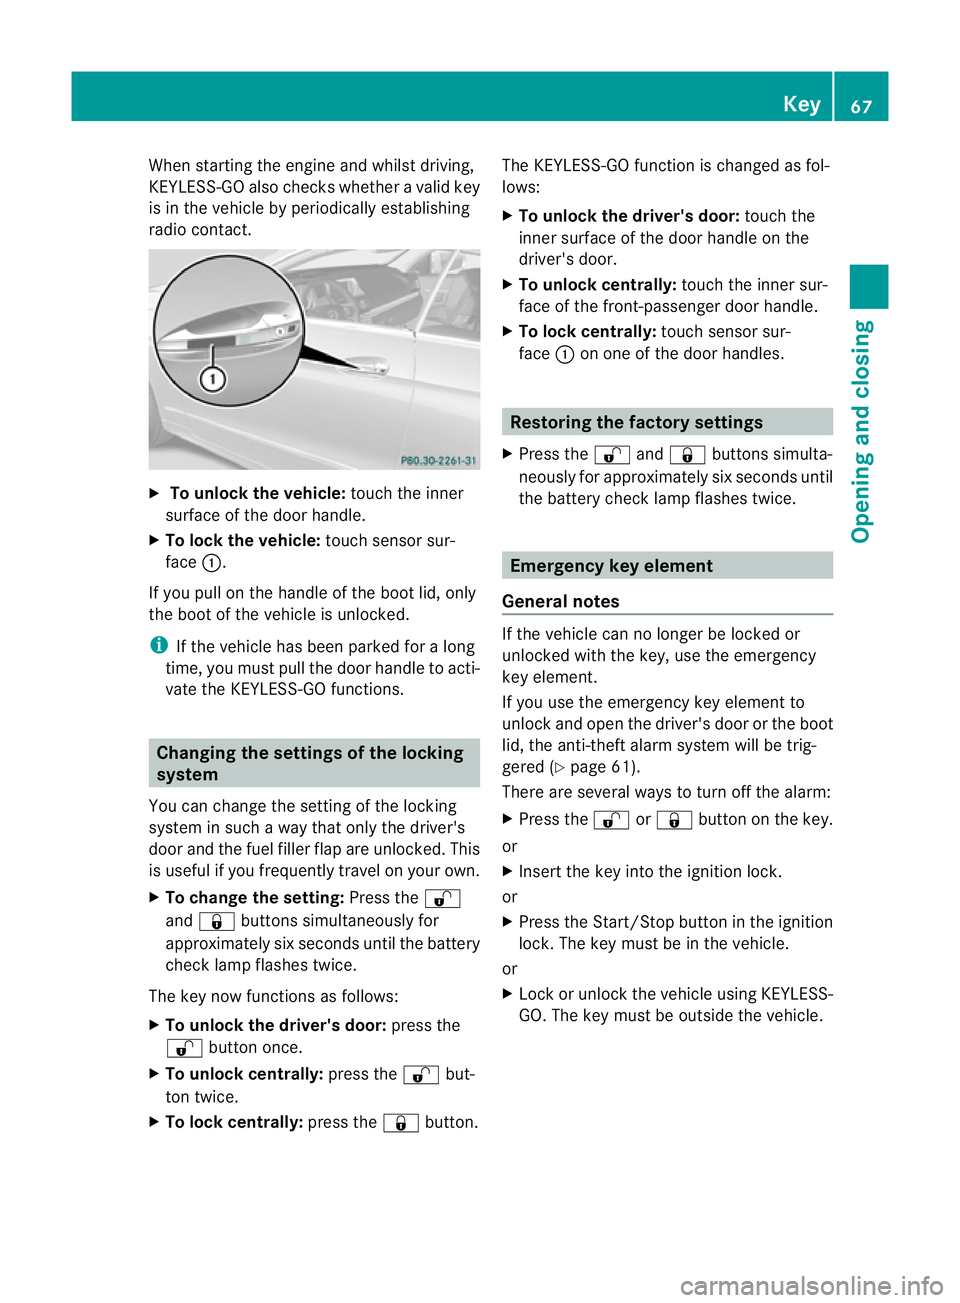
To unlock the vehicle: touch the inner
surface of the door handle.
X To lock the vehicle: touch sensorsur-
face :.
If you pull on the handle of the boot lid, only
the boot of the vehicle is unlocked.
i If the vehicle has been parked for along
time, you must pull the door handl etoacti-
vate the KEYLESS-GO functions. Changing the setting
softhe locking
system
Yo uc an change the setting of the locking
system in such away that only the driver's
door and the fuel filler flap are unlocked. This
is useful if you frequently travel on your own.
X To change the setting: Press the%
and & buttons simultaneously for
approximately six seconds until the battery
check lamp flashes twice.
The key now functions as follows:
X To unlock the driver's door: press the
% button once.
X To unlock centrally: press the%but-
ton twice.
X To lock centrally: press the&button. The KEYLESS-GO function is changed as fol-
lows:
X
To unlock the driver's door: touch the
inner surface of the door handle on the
driver' sdoor.
X To unlock centrally: touchthe inner sur-
face of the front-passenger door handle.
X To lock centrally: touchsensor sur-
face :on one of the door handles. Restoring the factor
ysettings
X Press the %and& buttons simulta-
neously for approximately six seconds until
the battery check lamp flashes twice. Emergency key element
General notes If the vehicle can no longer be locked or
unlocked with the key, use the emergency
key element.
If you use the emergency key element to
unlock and open the driver's door or the boot
lid, the anti-theft alarm system will be trig-
gered (Y
page 61).
There are several ways to turn off the alarm:
X Press the %or& button on the key.
or
X Insert the key into the ignition lock.
or
X Press the Star t/Stop butto ninthe ignition
lock .The key must be in the vehicle.
or
X Loc koru nlock the vehicl eusing KEYL ESS-
GO. The key must be outside the vehicle. Key
67Opening and closing
BA 207 ECE ÄJ 2010/1a; 1; 2, en-GB
mkalafa Version:3.0.2.11
2010-01-26T13:03:22+01:00
-Seite 67 Z
Page 78 of 333
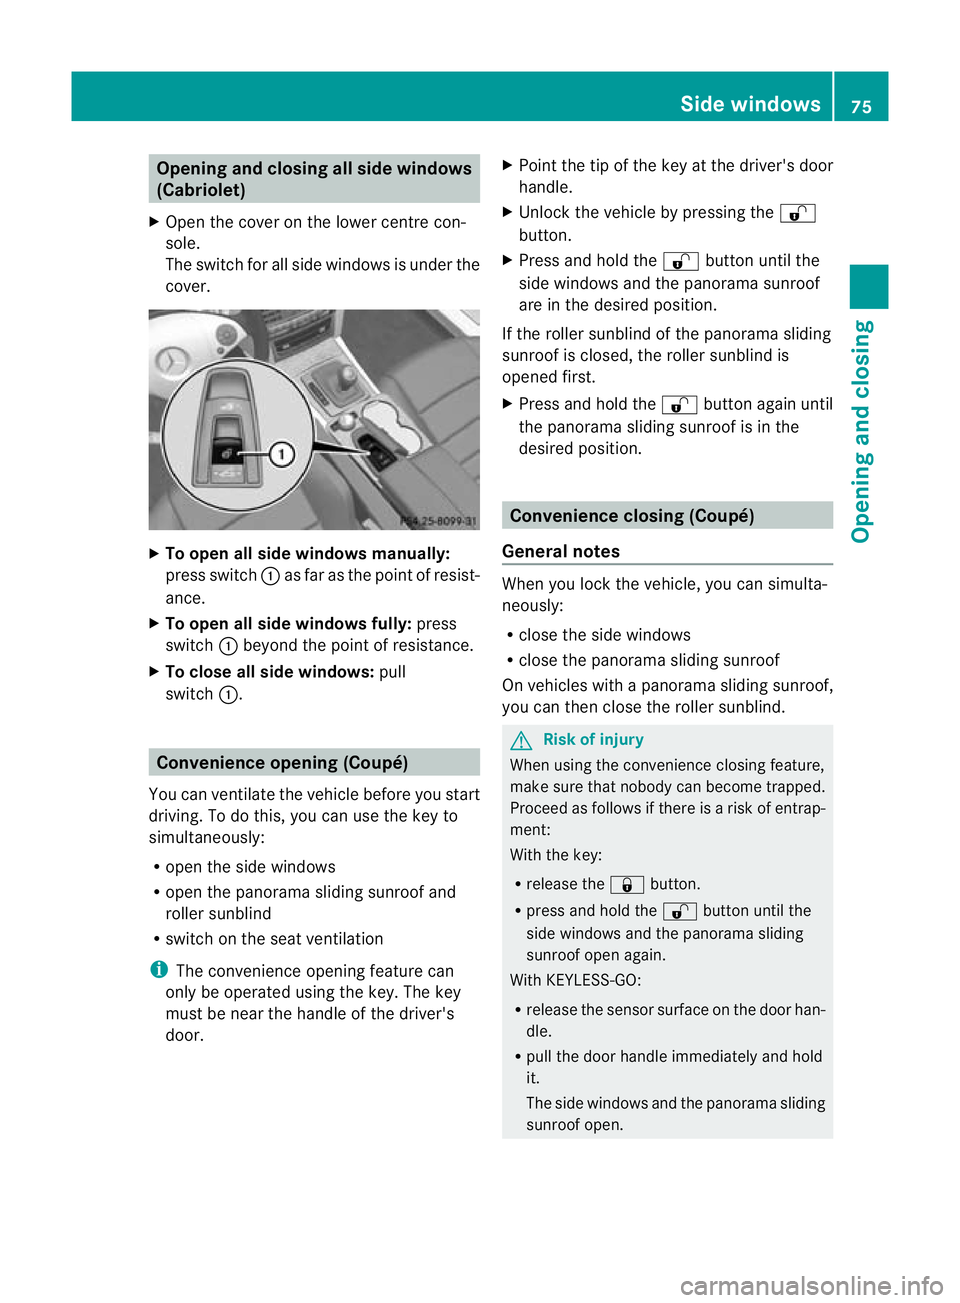
Opening and closing all side windows
(Cabriolet)
X Open the cover on the lower centr econ-
sole.
The switc hfor all side window sisunder the
cover. X
To open all side window smanually:
press switch :as far as the point of resist-
ance.
X To open all side windows fully: press
switch :beyon dthe point of resistance.
X To close all side windows: pull
switch :. Convenience opening (Coupé)
You can ven tilate the vehicle before you start
driving. To do this, you can use the key to
simultaneously:
R open the side windows
R open the panoram asliding sunroof and
roller sunblind
R switch on the seat ventilation
i The convenience opening featur ecan
only be operated using the key. The key
must be near the handle of the driver's
door. X
Point the tip of the key at the driver' sdoor
handle.
X Unloc kthe vehicle by pressing the %
button.
X Press and hold the %button until the
side windows and the panorama sunroof
ar eint he desired position.
If the roller sunblind of the panorama sliding
sunroof is closed ,the roller sunblind is
opened first.
X Press and hold the %button again until
the panorama slidin gsunroof is in the
desired position. Convenienc
eclosing (Coupé)
Genera lnotes When you lock the vehicle, you can simulta-
neously:
R
close the side windows
R close the panoram asliding sunroof
On vehicles with apanorama sliding sunroof,
you can then close the roller sunblind. G
Risk of injury
When using the convenience closing feature,
make sure that nobody can become trapped.
Proceed as follows if there is arisk of entrap-
ment:
With the key:
R release the &button.
R press and hold the %button until the
side windows and the panoram asliding
sunroof open again.
With KEYLESS-GO:
R release the sensor surfac eonthe door han-
dle.
R pull the door handl eimmediatel yand hold
it.
The sid ewindows and the panoram asliding
sunroof open. Side windows
75Opening and closing
BA 207 ECE ÄJ 2010/1a; 1; 2, en-GB
mkalafa Version: 3.0.2.11 2010-01-26T13:03:22+01:00-Seite 75 Z
Page 79 of 333
Using th
ekey i
The key must be near the handle of the
driver 'sdoor.
X Point the tip of the key at the driver' sdoor
handle.
X Loc kthe vehicle by pressin gthe & but-
ton.
X Press and hold the &button until the
side windows and the panorama sliding
sunroo fare full yclosed.
X Make sure that all the side windows and the
panorama sliding sunroof are closed.
On vehicles with apanorama sliding sunroof:
X Press and hold the &button again until
the roller sunblind of the panorama sliding
sunroof closes.
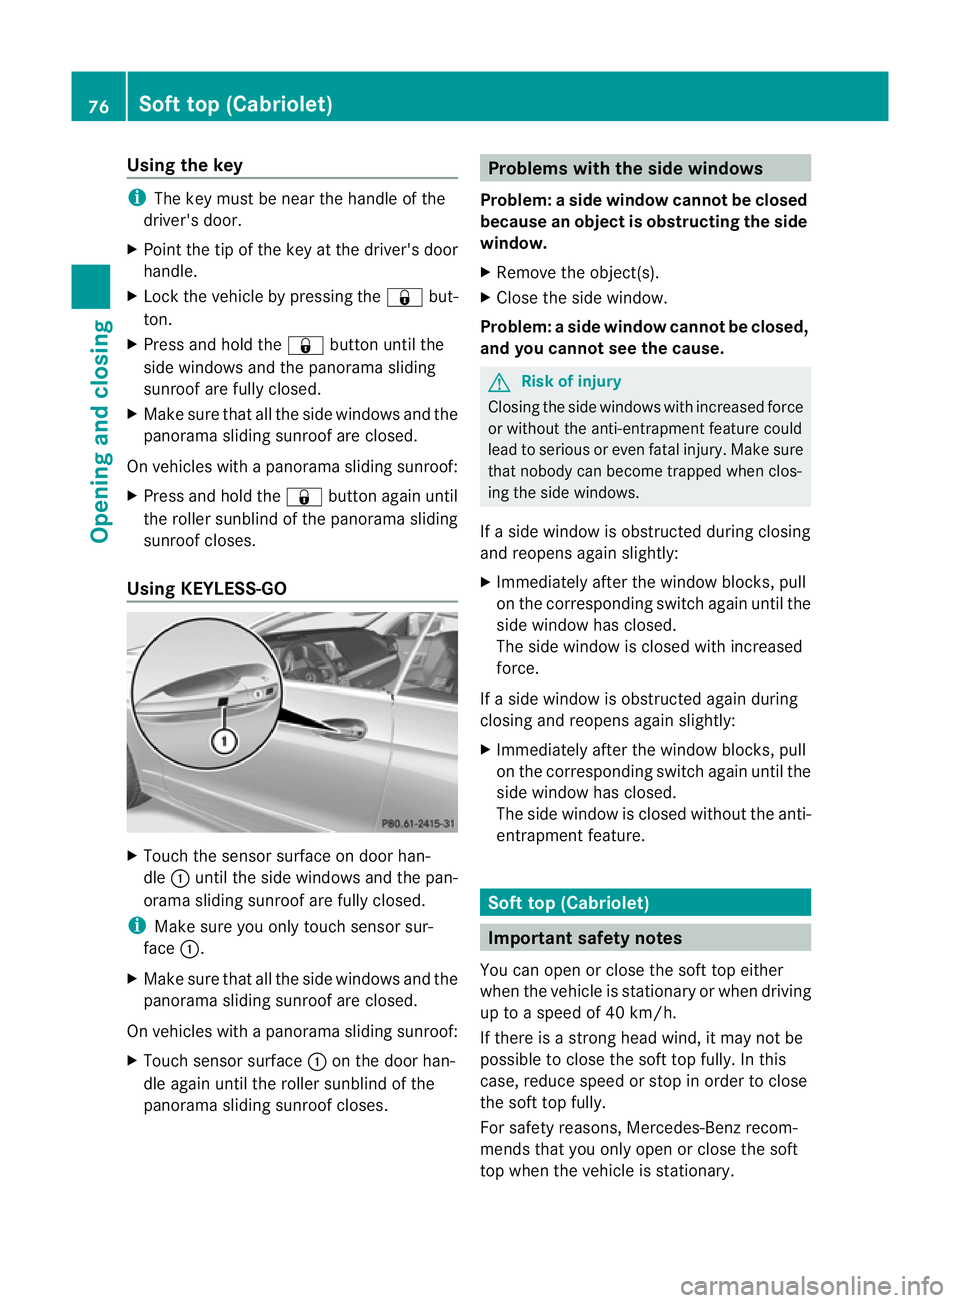
Using KEYLESS-GO X
Touch the senso rsurface on door han-
dle :until the side windows and the pan-
orama sliding sunroof are full yclosed.
i Make sure you only touch sensor sur-
face :.
X Make sure that all the side windows and the
panorama sliding sunroof are closed.
On vehicles with apanorama sliding sunroof:
X Touch senso rsurface :on the door han-
dle again until the roller sunblind of the
panorama sliding sunroof closes. Problems with the side windows
Problem: aside window cannot be closed
because an object is obstructin gthe side
window.
X Remove the object(s).
X Close the side window.
Problem :aside window cannot be closed,
and you cannot see th ecause. G
Ris
kofi njury
Closing the side windows with increased for ce
or withou tthe anti-entrapmen tfeature could
lead to serious or even fatal injury .Make sure
that nobody can becom etrapped when clos-
ing the side windows.
If as ide window is obstructed during closing
and reopen sagain slightly:
X Im me diately aft er the window blocks ,pull
on the corresponding switch again until the
side window has closed.
The side window is closed with increased
force.
If as ide window is obstructed again during
closing and reopens again slightly:
X Immediately after the window blocks, pull
on the corresponding switch again until the
side window has closed.
The side window is closed without the anti-
entrapment feature. Soft top (Cabriolet)
Important safet
ynotes
You can open or close the soft top either
when the vehicle is stationary or when driving
up to aspeed of 40 km/h.
If there is astron ghead wind, it may not be
possible to close the soft top fully. In this
case, reduc espeed or stop in order to close
the soft top fully.
For safety reasons, Mercedes-Ben zrecom-
mends that you only open or close the soft
top when the vehicle is stationary. 76
Soft top (Cabriolet)Opening and closing
BA 20
7ECE ÄJ 2010/1a; 1; 2, en-GB
mkalafa Version:3.0.2.11
2010-01-26T13:03:22+01:0
0-Seite 76
Page 91 of 333
thrown throug
hthe opening in the event of the
vehicl eoverturning. Th erefore ,alway sweara
seat belt to reduce the ri sk of injuries.
! Onlyopen the panorama sliding sunroof
if it is free of snow and ice .Otherwi se,m al-
functi onsm ay oc cur.
Do not allo wanything to protrude fro mthe
slidin gsunroof. Otherwise, the seals could
be damaged.
i Resonance noise scan occur in addition
to the usua lairflow noises when the sliding
sunroof is open. They are caused by minor
pressure fluctuations in the vehicle interior.
Change the position of the sliding sunroof
or open aside window slightly to reduce or
eliminat ethese noises. Panoram
asliding sunroof
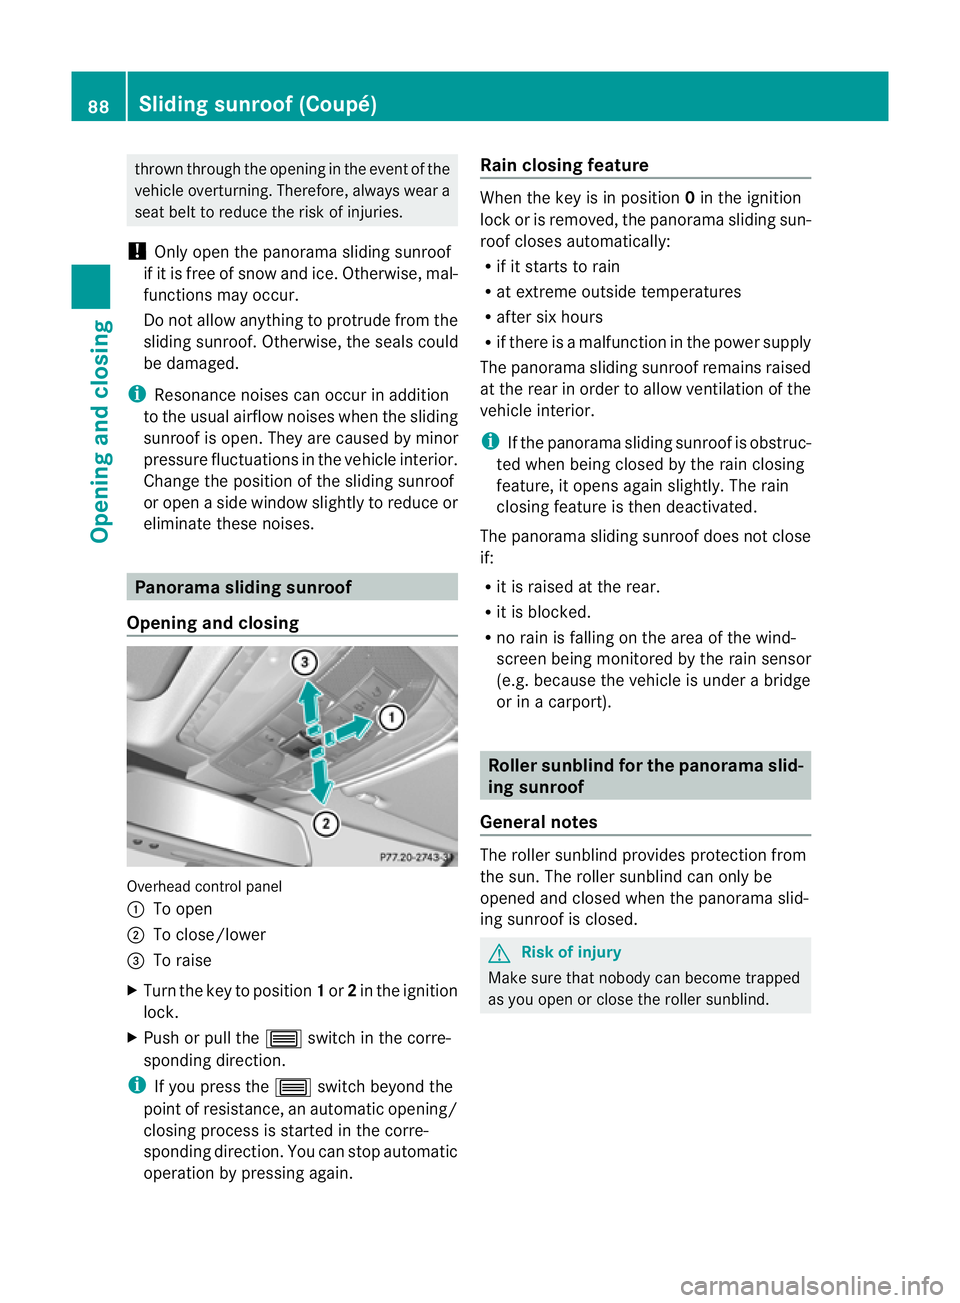
Opening and closing Overhead control panel
:
To open
; To close/lower
= To raise
X Turn the key to position 1or 2in the ignition
lock.
X Push or pull the 3switchinthe corre-
sponding direction.
i If you press the 3switchbeyond the
point of resistance, an automatic opening/
closin gproces sisstarted in the corre-
spo nding direction .You can stop automatic
operation by pressin gagain. Rain closing feature When the key is in position
0in the ignition
lock or is removed, the panoram asliding sun-
roof closes automatically:
R if it start storain
R at extreme outside temperatures
R after six hours
R if there is amalfunction in the power supply
The panorama sliding sunroof remains raised
at the rear in order to allow ventilation of the
vehicle interior.
i If the panorama sliding sunroof is obstruc-
ted when being closed by the rain closing
feature, it opens again slightly. The rain
closing feature is then deactivated.
The panorama sliding sunroof does not close
if:
R it is raised at the rear.
R it is blocked.
R no rain is falling on the area of the wind-
screen being monitored by the rain sensor
(e.g. because the vehicle is under abridge
or in acarport). Roller sunblin
dfor the panorama slid-
ing sunroof
General notes The roller sunblind provides protection from
the sun. The roller sunblind can only be
opened and closed when the panoram
aslid-
ing sunroof is closed. G
Risk of injury
Make sure that nobody can become trapped
as you open or close the roller sunblind. 88
Slidin
gsunroo f(Coupé)Openin gand closing
BA 20 7ECE ÄJ 2010 /1a; 1; 2, en-GB
mkalafa Version: 3.0.2.11 2010-01-26T13:03:22+01:00 -Seite 88
Page 111 of 333
X
Press the Rbutton.
The yellow Rindicator lam pinthe
instrumen tcluster lights up.
X To switch off the rear foglam p:press the
R button.
The yellow Rindicator lamp in the
instrument cluster goes out.
Vehicles with fron tfoglamps: when the light
switc hisint heT position, the rea rfog-
lam pcan only be switched on if the foglamps
(without dipped-beam headlamps )are
switche don.
i If you switch the engine off (key in posi-
tion 1in the ignition lock) and then restart
it, the previous rear foglamp settings are
resto red. Combination switch
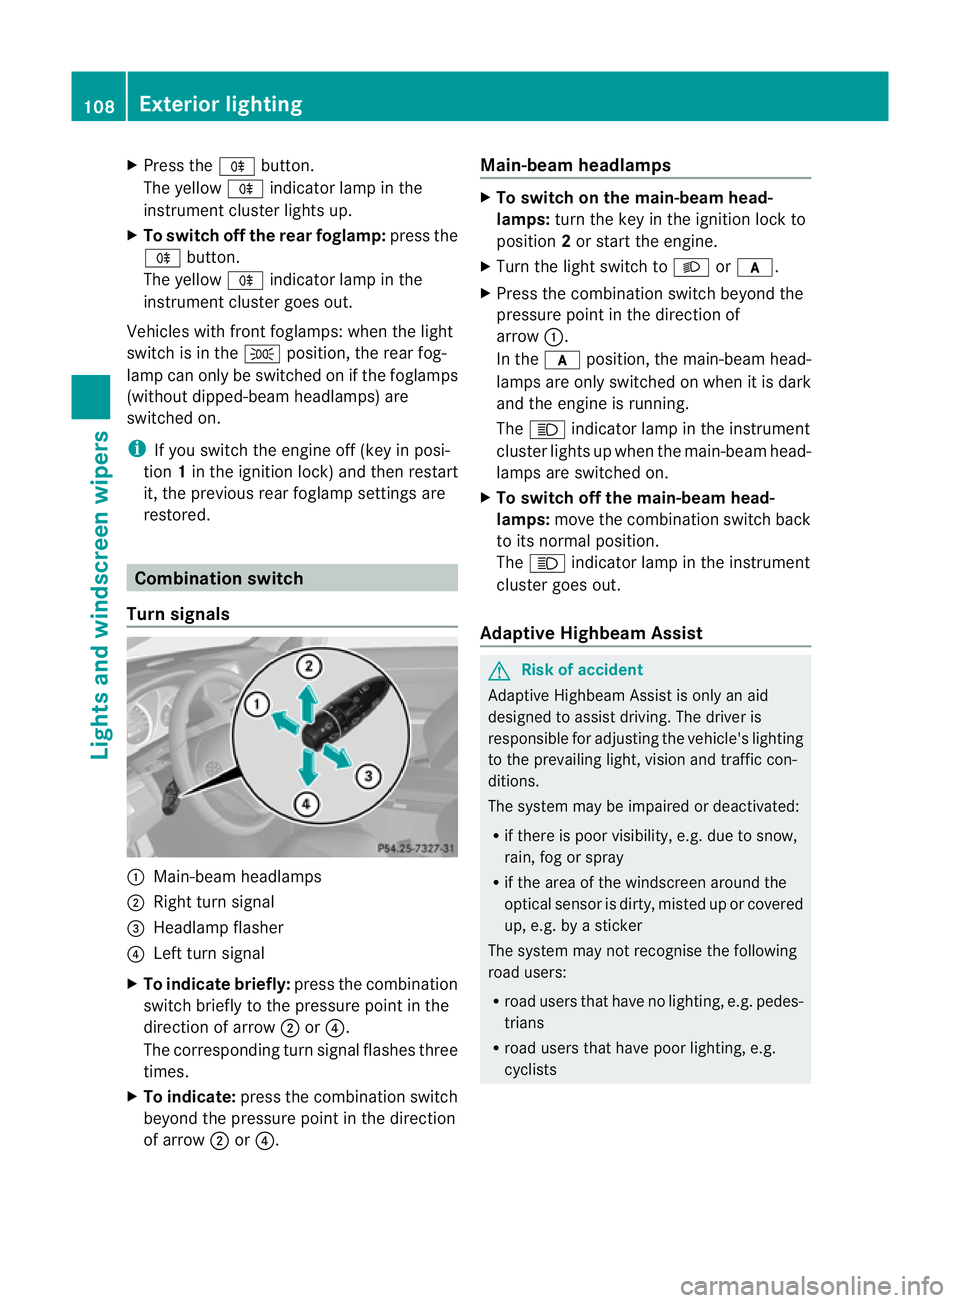
Tur nsignals :
Main-beam headlamps
; Right tur nsignal
= Headlamp flasher
? Left turn signal
X To indicate briefly: press the combination
switch briefly to the pressure point in the
direction of arrow ;or?.
The correspondin gturn signal flashes three
times.
X To indicate: press the combination switch
beyond the pressure point in the direction
of arrow ;or?. Main-beam headlamps X
To switch on the main-beam head-
lamps: turn the key in the ignition lock to
position 2or start the engine.
X Turn the light switch to Lorc.
X Press the combination switch beyond the
pressure point in the direction of
arrow :.
In the cposition, the main-beam head-
lamps are only switched on when it is dark
and the engine is running.
The K indicator lamp in the instrument
cluster lights up when the main-beam head-
lamps are switched on.
X To switch off the main-beam head-
lamps: move the combination switch back
to its normal position.
The K indicator lamp in the instrument
cluster goes out.
Adaptive Highbeam Assist G
Risk of accident
Adaptive Highbeam Assis tiso nly an aid
designe dtoassist driving. The driver is
responsible for adjustin gthe vehicle' slighting
to the prevailin glight, vision and traffic con-
ditions.
The system may be impaired or deactivated:
R if there is poor visibility, e.g. due to snow,
rain, fog or spray
R if the area of the windscreen around the
optical sensor is dirty, misted up or covered
up, e.g. by asticker
The syste mmay not recognise the following
road users:
R road users that have no lighting, e.g. pedes-
trians
R road users that have poor lighting, e.g.
cyclists 108
Exterior lightingLights and windscreen wipers
BA 207 ECE ÄJ 2010/1a; 1; 2, en-GB
mkalaf
aV ersion: 3.0.2.11
2010-01-26T13:03:22+01:00
-Seite 108
Page 112 of 333
R
roa dusers whose lighting is not clearly visi-
ble, e.g. roa dusers behind acras hb arrier
R on rare occasions: road users that have
lights that may be recognise dtoo late or not
at all
The automatic main-beam headlamps will not
be deactivated, or they may be activated
despite road users travelling in front of or
approaching the vehicle.
Thus, you coul dcaus eana ccident and injure
yoursel fand others. Always observe traffic
conditions and, if necessary ,dip the lights
manu ally.
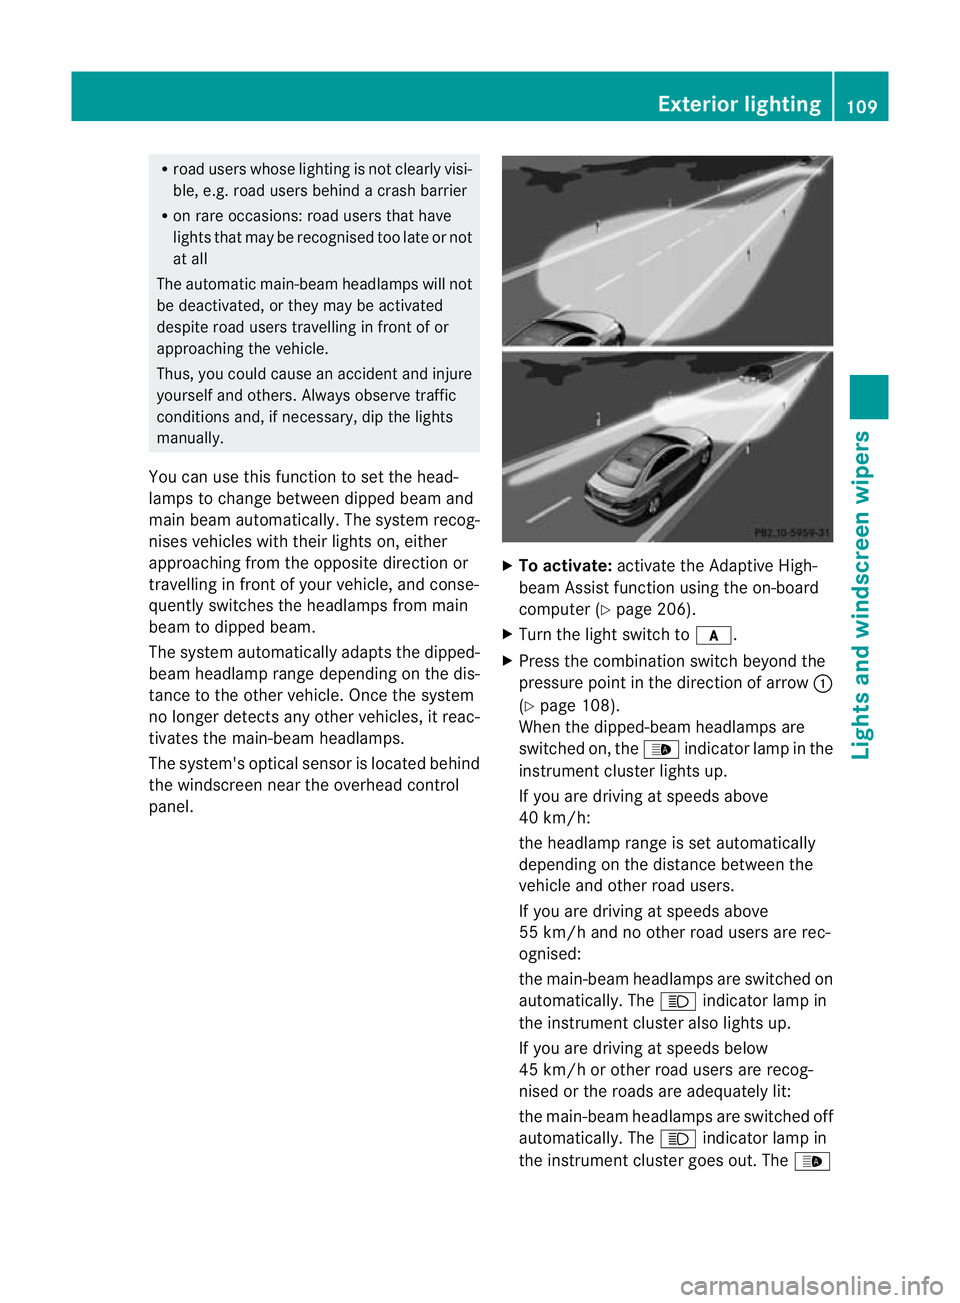
You can use this function to set the head-
lamps to change between dipped bea mand
mai nbeama utomatically. The system rec og-
nises vehicles with thei rlights on, either
approaching from the opposit edirection or
travelling in front of your vehicle, and conse-
quently switches the headlamps from main
beam to dipped beam.
The system automatically adapts the dipped-
beam headlamp range depending on the dis-
tance to the other vehicle. Once the system
no longer detect sany other vehicles, it reac-
tivates the main-bea mheadlamps.
The system's optica lsensor is located behind
the windscreen near the overhead control
panel. X
To activate: activate the Adaptive High-
beam Assist function using the on-board
computer (Y page 206).
X Turn the light switc htoc.
X Press the combination switc hbeyond the
pressur epoint in the direction of arrow :
(Y page 108).
When the dipped-beam headlamps are
switched on, the _indica torlamp in the
instrument cluster lights up.
If you are driving at speeds above
40 km/h:
the headlamp range is set automatically
depending on the distanc ebetween the
vehicle and other road users.
If you are driving at speeds above
55 km /hand no other road users are rec-
ognised:
the main-beam headlamps are switched on
automatically. The Kindicator lamp in
the instrument cluster also lights up.
If you are driving at speeds below
45 km/ horother road users are recog-
nised or the roads are adequately lit:
the main-beam headlamps are switched off
automatically. The Kindicator lamp in
the instrument cluster goe sout. The _ Exterior lighting
109Lights and windscreen wipers
BA 207 ECE ÄJ 2010/1a; 1; 2, en-GB
mkalafa Version: 3.0.2.11 2010-01-26T13:03:22+01:00-Seite 109 Z