ESP MERCEDES-BENZ E-CLASS CABRIOLET 2010 Owner's Manual
[x] Cancel search | Manufacturer: MERCEDES-BENZ, Model Year: 2010, Model line: E-CLASS CABRIOLET, Model: MERCEDES-BENZ E-CLASS CABRIOLET 2010Pages: 333, PDF Size: 7.64 MB
Page 60 of 333
R
dirt on the sensor sorthe sensor sare cov-
ered
R sno worh eavy rain
R interferenc ebyother radar sources
R strong radar reflections, for example in
multi-storey car parks
BA SP LUS does no treact to people or ani-
mals, oncomin gvehicles and crossin gtraffic.
BAS PLUS may not detect narrow vehicles
such as motorcycle sand vehicles driving on
ad ifferen tline.
Following acollision or collision-related dam-
age to the fron tend of the vehicle, have the
configuratio nand operatio nofthe radar sen-
sors chec kedataM ercedes-Ben zService
Centre.
If BAS PLU Sisn ot available due to amalfunc-
tion in the radar senso rsystem, the brake
syste mremains available with ful lbrake
boostin geffect and BAS. Adaptiv
ebrake lamps
i Adaptive brake lamps are only available in
certain countries.
If you brake sharply from aspeed of more
than 50 km/ horifbraking is assisted by BAS
or BAS PLUS, th ebrake lamp sflash rapidly.
In this way, traffic travelling behind you is
warned in an even more noticeable manner.
If you brake sharply from aspeed of more
than 70 km/ htoastandstill, the hazard warn-
ing lamps are activated automatically .Ifthe
brakes ar eapplied again, the brak elamps
light up continuously .The hazard warning
lamps switc hoff automatically if you travel
faster than 10 km/h .You can also switc hoff
th eh azard warning lamps using the hazard
warning switch button (Y page 110). ESP
®
(Electronic Stability Program)
Important safety notes If ESP
®
detect sthat the vehicle is deviating
from the direction desired by the driver ,one
or more wheels are braked to stabilis ethe
vehicle. If necessary, the engin eoutput is also
modified to keep the vehicle on the desired
course within physical limits. ESP ®
assists
the driver when pulling away on wet or slip-
pery roads. ESP ®
can also stabilise the vehi-
cle during braking.
If ESP ®
intervenes, the äwarning lamp
flashes in the instrument cluster. G
Risk of accident
If the ä warning lamp in the instrument
cluster flashes, proceed as follows:
R do not deactivate ESP ®
under any circum-
stances.
R only depress the accelerator pedal as far as
necessary when pulling away.
R adapt your driving style to suit the prevail-
ing road and weather conditions.
Otherwise ,the vehicle coul dskid.
ESP ®
cannot reduce the risk of an accident if
you drive too fast. ESP ®
cannot override the
laws of physics.
! The ignition must be switched off if you
are towing the vehicl ewith the front/rear
axle raised. Interven tion by ESP ®
coul doth-
erwise damage the brake system.
i Only use wheels with the recommended
tyre sizes. Only then will ESP ®
function
properly.
ETS (Electronic Traction Support) Traction control is part of ESP
®
.
Traction control brakes the drive wheels indi-
viduall yifthey spin. This enables you to pull
away and accelerate on slipper ysurfaces, for
example if the road surface is slippery on one
side. Driving safety systems
57Safety
BA 207 ECE ÄJ 2010/1a; 1; 2, en-GB
mkalafaV ersion: 3.0.2.11
2010-01-26T13:03:22+01:00
-Seite 57 Z
Page 61 of 333
Traction control remains active if you deacti-
vat
eE SP®
. G
Risk of accident
Tractio ncontrol can notreduce the risk of an
accident if you driv etoo fast .Traction con trol
can noto verride th elaws of physics.
Deactivating/activating ESP ®ESP
®
is activated automatically when the
engine is running.
It may be best to deactivate ESP ®
in the fol-
lowing situations:
R when using snow chains
R in deep snow
R on sand or gravel G
Risk of accident
Activate ESP ®
as soon as the situations
described above no longer apply. ESP ®
will
otherwise not be able to stabilis ethe vehicle
if the vehicle star tsto skid or awheel star ts
to spin.
If you deactivate ESP ®
:
R ESP ®
no longer improves driving stability.
R the engine's torque is no longer limited and
the drive wheels can spin. The spinnin gof
the wheels results in acutting action, which
provides better grip.
R traction control is still activated.
R ESP ®
still provides support when you
brake.
If ESP ®
is deactivated and one or more wheels
start to spin, the äwarning lamp in the
instrument cluster flashes .Insuch situations,
ESP ®
will not stabilise the vehicle.
X To deactivate:(Y page 203).
The å warning lamp in the instrument
cluster lights up. G
Risk of accident
If the å warning lamp in the instrument
cluster lights up when the engine is running, ESP
®
is deactivated or is unavailable due to a
malfunc tion. The risk that your vehicle may
star ttos kid then increase sincertain situa-
tions.
Alway sadapt your driving style to the prevail-
ing road and weather conditions.
X To activate:(Y page 203).
The å warning lamp in the instrument
cluster goes out.
ESP ®
trailer stabilisation If your trailer begins to lurch, you can only
stabilise the vehicle/
trailer combination by
depressing the brake firmly.
In this situation, ESP ®
assists you and can
detect if the trailer begins to lurch. ESP ®
slows the vehicle down by brakin gand limit-
ing the engine output until the vehicle/trailer
combination has stabilised.
Traile rstabilisatio nisa ctive above speed sof
about 65 km/h. G
Risk of accident
If road and weather conditions are poor,
trailer stabilisatio nwill not be able to prevent
the trailer from swerving and will thus be
unable to reduce the risk of an accident .Trail-
ers wit hahigh centr eofgravity can tip over
before ESP ®
can detec tthis.
Trailer stabilisation does not work if ESP ®
is
deactivated or disable dbecause of amal-
function. EBD (Electronic Brake-force Distribu-
tion)
EBD monitors and controls the brake pres-
sure on the rear wheels to improve driving
stability while braking. G
Risk of accident
If EBV is malfunctioning, the brake system is
still available with full brake boosting effect.
However, the rear wheels can still lock, e.g. 58
Driv
ings afety systemsSafety
BA 207 ECE ÄJ 2010/1a; 1; 2, en-GB
mkalafa Version: 3.0.2.11 2010-01-26T13:03:22+01:00-Seite 58
Page 62 of 333
under full braking. This coul
dcause you to
lose control of your vehicle and cause an acci-
dent. You shoul dtherefore adapt your driving
styl etot he different handling characteristics. ADAPTIVE BRAKE
ADAPTIV EBRAKE enhances braking safety
and offers increased braking comfort .Inaddi-
tion to the brakin gfunction ,ADAPTIVE BRAKE
also ha sthe HOL Dfunctio n(Ypage 17 2)and
hill start assist (Y page137).For further
inf ormation, se eDriving tip s(Ypage 154). PRE-SAFE
®
Brake (vehicles with DIS-
TRON IC PLUS)
PRE-SAFE ®
Brake can hel pyou to minimise
the ris kofaf rontal col lisionwithavehicle
ahead or reduce the effects of such acolli-
sion.
This function will issu eawarning at spe edsof
around 30 km/h or more if:
R for aperiod of sever alseconds, the dis-
tance to the vehicl einfront is to oshort for
the speed at which you ar etrave lling. The
· distance warning lamp in the instru-
ment cluster lights up.
R you are approaching the vehicle in front too
rapidly .Anintermittent warning tone
so unds and the ·distance warning
lamp lights up in the instrument cluster.
Due to the nature of the system, particularly
complicated driving conditions may caus ethe
system to displa yanunneces sary warning. G
Ris
kofa ccident
Pay particula rattention to the traffic condi-
tions if the ·distance warning lam pinthe
instrument clu ster lights up or an intermittent
warning tone sounds. If necessary, brak eor
manoeuvre to avo idan obstacle. If the driver and passengers have fastened
thei
rseat belts, PRE-SAFE ®
Brak ecan also
can also perform the following at speeds of
above approximately 30 km/h:
R brake the vehicle automatically from a
spee dofuptoa pproximately 20 0km/h
R trigge rpreventative passenge rprote ction
measures (PRE-SAFE ®
) G
Risk of accident
PRE-SAFE ®
Brak eiso nly an aid to assist you
whe ndriving. Yo uare responsible for main-
taining asafe distanc efrom other vehicles,
th ev ehicle' sspeed and for braking in good
time. Alway spay attention to the traffic con-
ditions. Otherwise, you may recognise dan-
gers too late, cause an acciden tand injure
yoursel fand others.
With the hel pofthe radar sensor system,
PRE-SAFE ®
Brak ecan detect obstacles that
are in fron tofyour vehicle for an extended
period of time. If you approach an obstacle
and PRE- SAFE®
Brake detects arisk of acol-
lision, the system will initially aler tyou both
visually and acoustically .Ify ou do not brake
or steer ,the vehicle will at first automatically
brake slightly. In the even tofanincreased
risk of acollision ,PRE-SAFE ®
is activated
(Y page 39). If the risk of collision remains
and you do not brake, take evasive action or
accelerat esignificantly, the vehicle may per-
form automatic emergency braking. G
Risk of accident
Only clearl ydetected obstacles will trigger a
warning and initiat ebraking assistance by
PRE-SAFE ®
Brake.
In particular, th edetection of obstacles can
be impaired if there is:
R dirt on the sensor sorthe sensor sare cov-
ered
R snow or heavy rain Dri
ving sa fety systems
59Safety
BA 207 ECE ÄJ 2010/1a; 1; 2, en-GB
mkalafa Version: 3.0.2.11 2010-01-26T13:03:22+01:00 -Seite 59 Z
Page 77 of 333
G
Risk of injury
Make sure that nob odyc an become trapped
as yo ucloseas idew indow .Ifthere is arisk
of becoming trapped, release the switch or
press it again to open the side window again. G
Risk of injury
Children may injur ethemselves if they open
or close the side windows.
Never leav echildren unsupervised in the vehi-
cle. Always tak ethe key with you when leaving
the vehicle, even if you ar eonly leaving it for
as hort time. G
Risk of injury
Do not leav echildren unsupervised in the
vehicle, even if they ar esecured in achild
restraint system .The children could:
R be seriously or even fatall yinjured on parts
of the vehicle
R be seriously or even fatally injured by pro-
longed exposure to extremely hig hor
extremely low temperatures
If children open adoor, they could:
R seriously or even fatally injure other people
R get out of the vehicle and injure them-
selves, or be seriously or even fatally
injure dbyap assing vehicle
Activate the override feature if children are
travelling in the vehicle. They could otherwise
open side windows while the vehicle is in
motion and thereby injure themselves or oth-
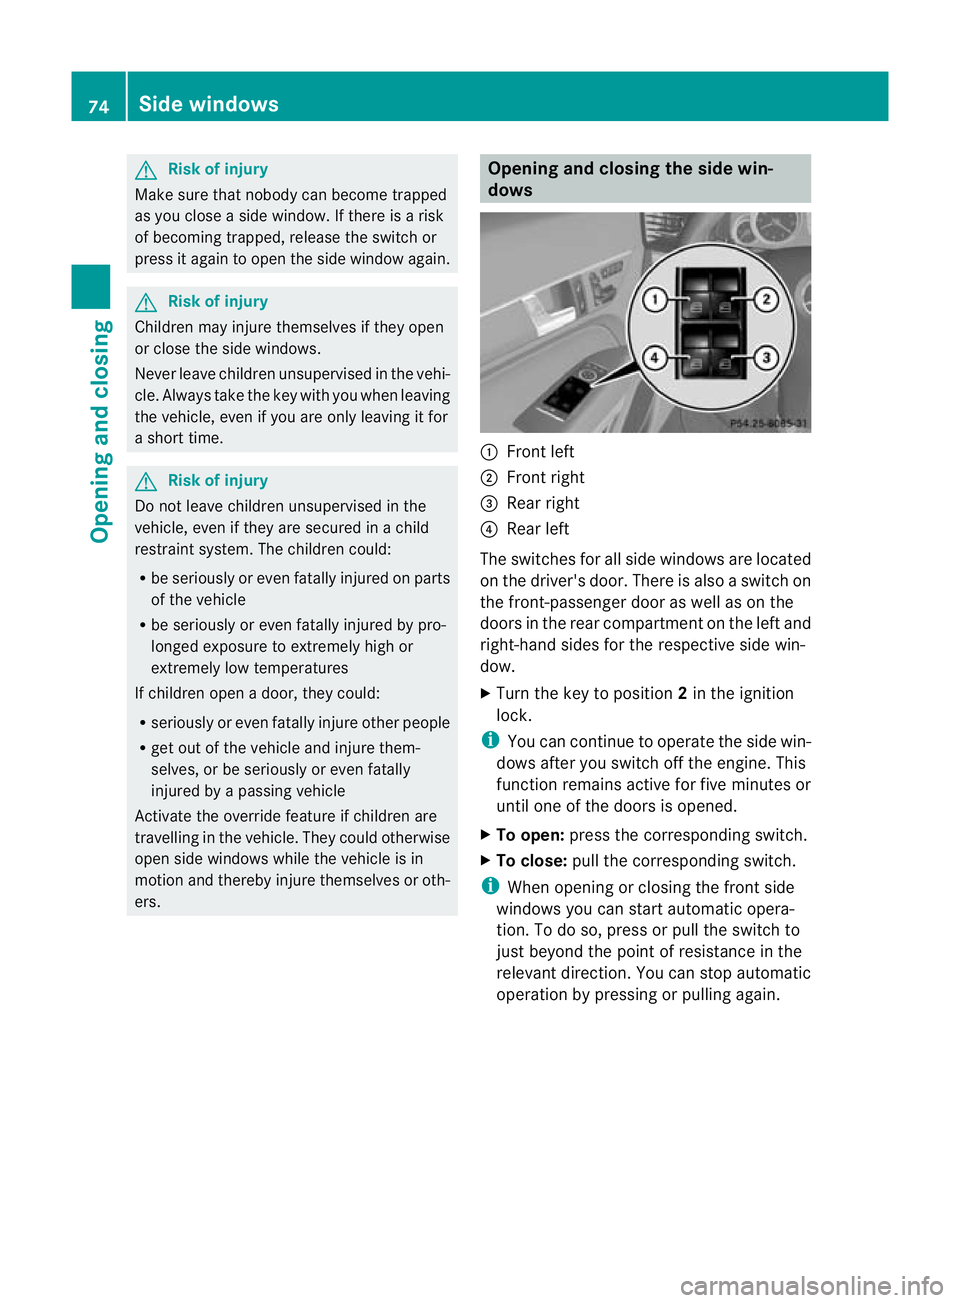
ers. Openin
gand closing th eside win-
dows :
Front left
; Front right
= Rear right
? Rear left
The switches for all side windows are located
on the driver' sdoor. There is also aswitch on
the front-passenger door as well as on the
doors in the rear compartmen tonthe lef tand
right-hand sides for the respective sid ewin-
dow.
X Turn the key to position 2in the ignition
lock.
i You can continue to operate the side win-
dows after you switch off the engine. This
func tion remains active for fiv eminutes or
until one of the doors is opened.
X To open: press the corresponding switch.
X To close: pull the corresponding switch.
i When opening or closing the front side
windows you can start automatic opera-
tion. To do so, press or pull the switch to
just beyond the point of resistance in the
relevan tdirection .You can stop automatic
operation by pressin gorpulling again. 74
Side windo
wsOpening and closing
BA 20 7ECE ÄJ 2010 /1a;1;2,e n-GB
mkalafa Version: 3.0.2.11 2010-01-26T13:03:22+01:00-Seite 74
Page 79 of 333
Using th
ekey i
The key must be near the handle of the
driver 'sdoor.
X Point the tip of the key at the driver' sdoor
handle.
X Loc kthe vehicle by pressin gthe & but-
ton.
X Press and hold the &button until the
side windows and the panorama sliding
sunroo fare full yclosed.
X Make sure that all the side windows and the
panorama sliding sunroof are closed.
On vehicles with apanorama sliding sunroof:
X Press and hold the &button again until
the roller sunblind of the panorama sliding
sunroof closes.
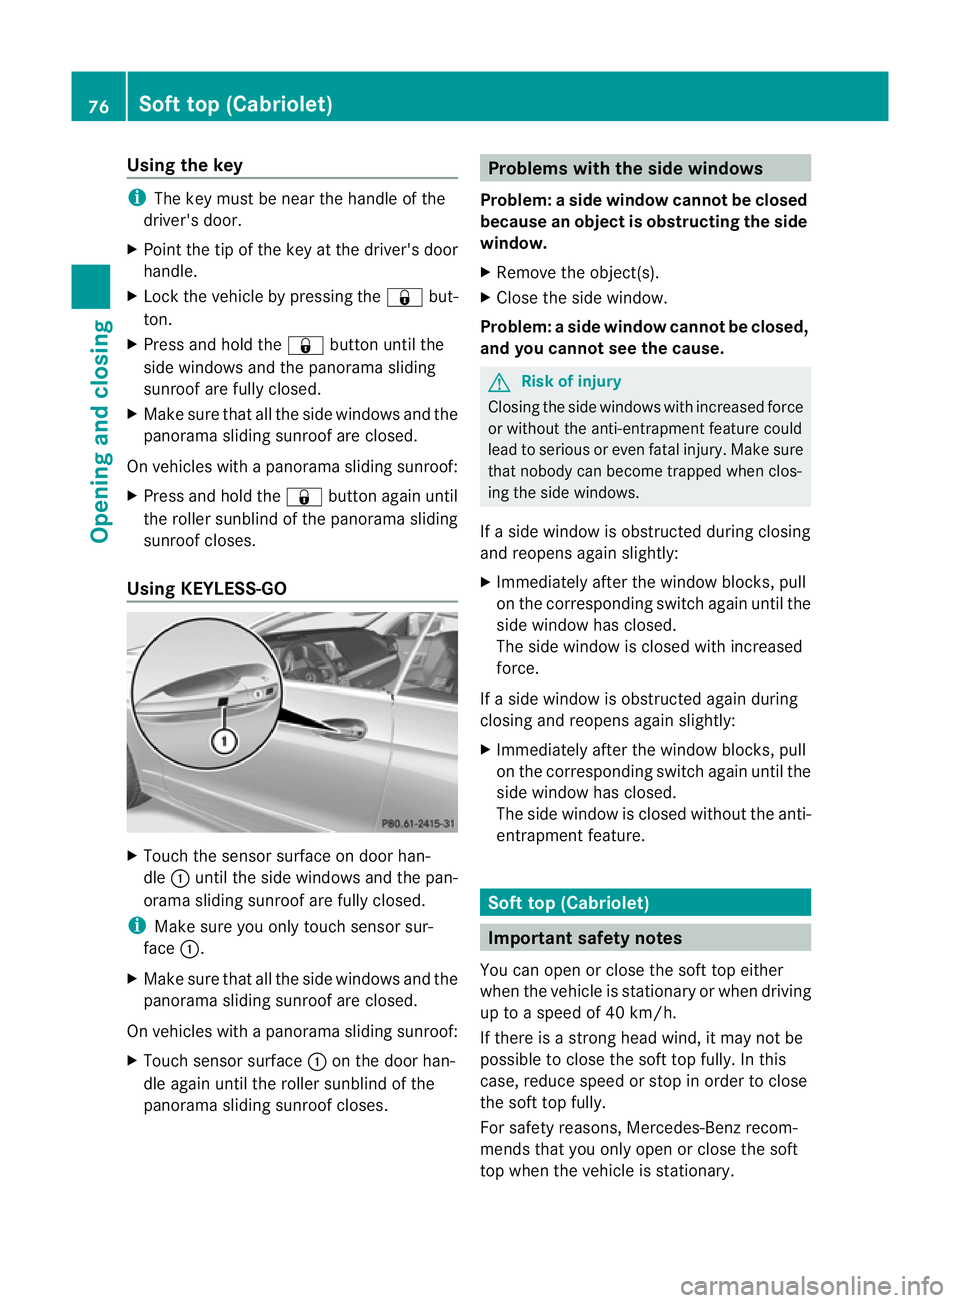
Using KEYLESS-GO X
Touch the senso rsurface on door han-
dle :until the side windows and the pan-
orama sliding sunroof are full yclosed.
i Make sure you only touch sensor sur-
face :.
X Make sure that all the side windows and the
panorama sliding sunroof are closed.
On vehicles with apanorama sliding sunroof:
X Touch senso rsurface :on the door han-
dle again until the roller sunblind of the
panorama sliding sunroof closes. Problems with the side windows
Problem: aside window cannot be closed
because an object is obstructin gthe side
window.
X Remove the object(s).
X Close the side window.
Problem :aside window cannot be closed,
and you cannot see th ecause. G
Ris
kofi njury
Closing the side windows with increased for ce
or withou tthe anti-entrapmen tfeature could
lead to serious or even fatal injury .Make sure
that nobody can becom etrapped when clos-
ing the side windows.
If as ide window is obstructed during closing
and reopen sagain slightly:
X Im me diately aft er the window blocks ,pull
on the corresponding switch again until the
side window has closed.
The side window is closed with increased
force.
If as ide window is obstructed again during
closing and reopens again slightly:
X Immediately after the window blocks, pull
on the corresponding switch again until the
side window has closed.
The side window is closed without the anti-
entrapment feature. Soft top (Cabriolet)
Important safet
ynotes
You can open or close the soft top either
when the vehicle is stationary or when driving
up to aspeed of 40 km/h.
If there is astron ghead wind, it may not be
possible to close the soft top fully. In this
case, reduc espeed or stop in order to close
the soft top fully.
For safety reasons, Mercedes-Ben zrecom-
mends that you only open or close the soft
top when the vehicle is stationary. 76
Soft top (Cabriolet)Opening and closing
BA 20
7ECE ÄJ 2010/1a; 1; 2, en-GB
mkalafa Version:3.0.2.11
2010-01-26T13:03:22+01:0
0-Seite 76
Page 97 of 333
=
Sea tcushion angle
? Sea tfore-and-aft adjustment
i Adjust the sea tcushion angle so that your
thighs ar elightly supported.
Seat fore-and-af tadjustment X
Lift handle ?and slide the seat forwards
or backwards.
Seat cushio nangle X
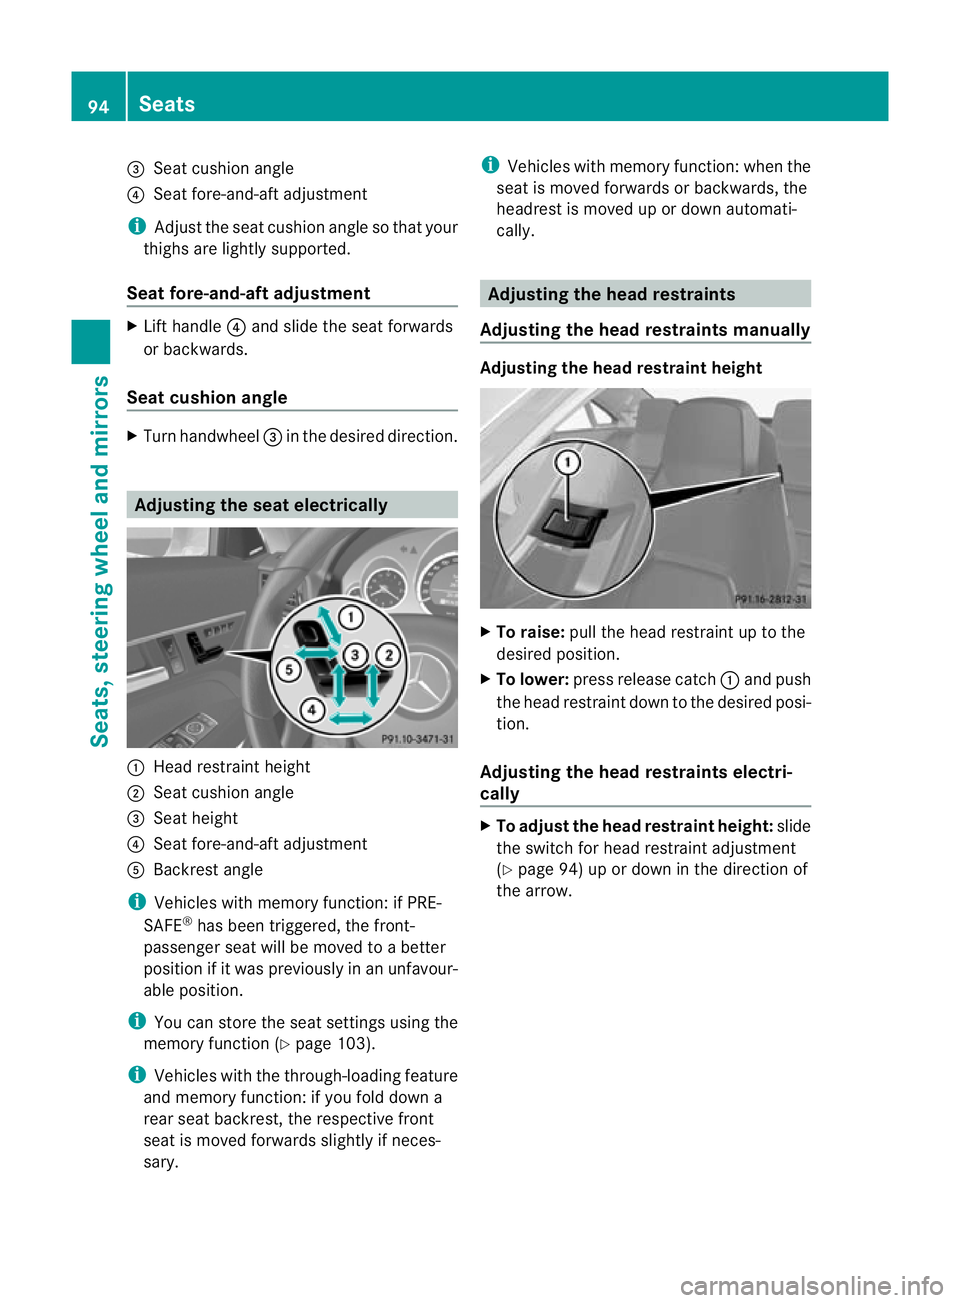
Tur nhandwheel =in the desired direction. Adjusting the seat electrically
:
Head restraint height
; Seat cushion angle
= Seat height
? Seat fore-and-aft adjustment
A Backrest angle
i Vehicles with memory function: if PRE-
SAFE ®
has been triggered, the front-
passenger seat will be moved to abetter
position if it was previously in an unfavour-
able position.
i You can store the seat settings using the
memory function (Y page 103).
i Vehicles with the through-loading feature
and memory function: if you fold down a
rear seat backrest ,the respective front
seat is moved forwards slightl yifneces-
sary. i
Vehicles with memory function: when the
seat is moved forwards or backwards, the
headrest is moved up or down automati-
cally. Adjusting the hea
drestraints
Adjusting the head restraints manually Adjusting the head restraint height
X
To raise: pull the head restraint up to the
desired position.
X To lower: press release catch :and push
the head restraint down to the desired posi-
tion.
Adjusting the head restraints electri-
cally X
To adjust the head restraint height: slide
the switch for head restraint adjustment
(Y page 94) up or down in the direction of
the arrow. 94
SeatsSeats, steering wheel and mirrors
BA 20
7ECE ÄJ 2010 /1a; 1; 2, en-GB
mkalafa Version: 3.0.2.11 2010-01-26T13:03:22+01:00 -Seite 94
Page 103 of 333
Adjusting th
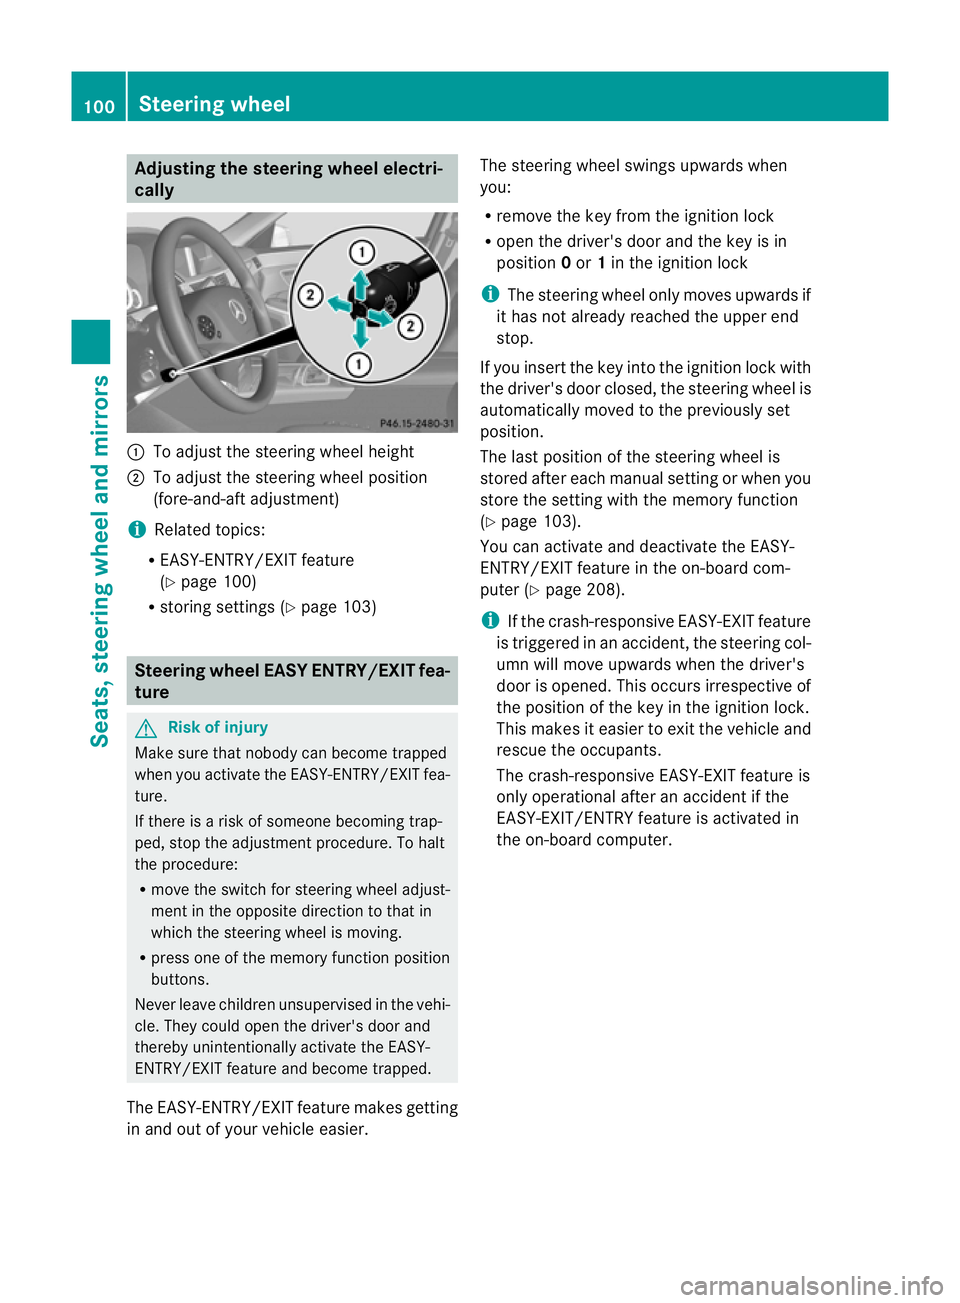
esteering wheel electri-
cally :
To adjust th esteering whee lheight
; To adjust th esteering whee lposi tion
(fore-and-af tadjustment)
i Related topics:
R EASY-ENTRY/EXIT feature
(Y page 100)
R storing setting s(Ypage 103) Steering whee
lEASY ENTRY/EXIT fea-
ture G
Ris
kofi njury
Mak esuret hat nob ody can become trapped
when you activa tethe EASY-ENTRY/EXIT fea-
ture.
If there is arisk of someon ebecoming trap-
ped, stop th eadjustmen tprocedure. To ha lt
the procedure:
R move the switch for steering whee ladjust-
ment in the opposite direction to that in
which the steerin gwheel is moving.
R press one of the memory function position
buttons.
Never leave children unsu pervis edin the vehi-
cle. They could open the driver's door and
thereby unintentionally activate the EASY-
ENTRY/EXIT featur eand become trapped.
The EASY-ENTRY/EXIT feature makes getting
in and out of you rvehicle easier. The steering wheel swings upwards when
you:
R
remove the key from the ignition lock
R open the driver' sdoor and the key is in
position 0or 1in the ignition lock
i The steering wheel only moves upwards if
it has not already reached the upper end
stop.
If you inser tthe key int othe ignition lock with
the driver's door closed ,the steering wheel is
automatically moved to the previously set
position.
The last position of the steering wheel is
stored after eac hmanual setting or when you
store the setting with the memory function
(Y page 103).
You can activate and deactivat ethe EASY-
ENTRY/ EXIT feature in th eon-board com-
puter (Y page208).
i If the crash-responsive EASY-EXIT feature
is trigge redinana ccident,the steering col-
um nw ill move upwards when the driver's
door is opened. This occur sirrespective of
th ep osition of the key in the ignition lock.
This makes it easier to exit the vehicle and
rescue the occupants.
The crash-responsive EASY- EXIT feature is
only operational afte ranaccidentif the
EASY-EXIT/ENTRY featur eisactivate din
the on-board computer. 100
Steerin
gwheelSeats, steering wheel an dmirrors
BA 207ECE ÄJ 2010 /1a;1;2,e n-GB
mkalafa Version: 3.0.2.11 2010-01-26T13:03:22+01:00-Seite 100
Page 104 of 333
Mirrors
Rear-view mirror
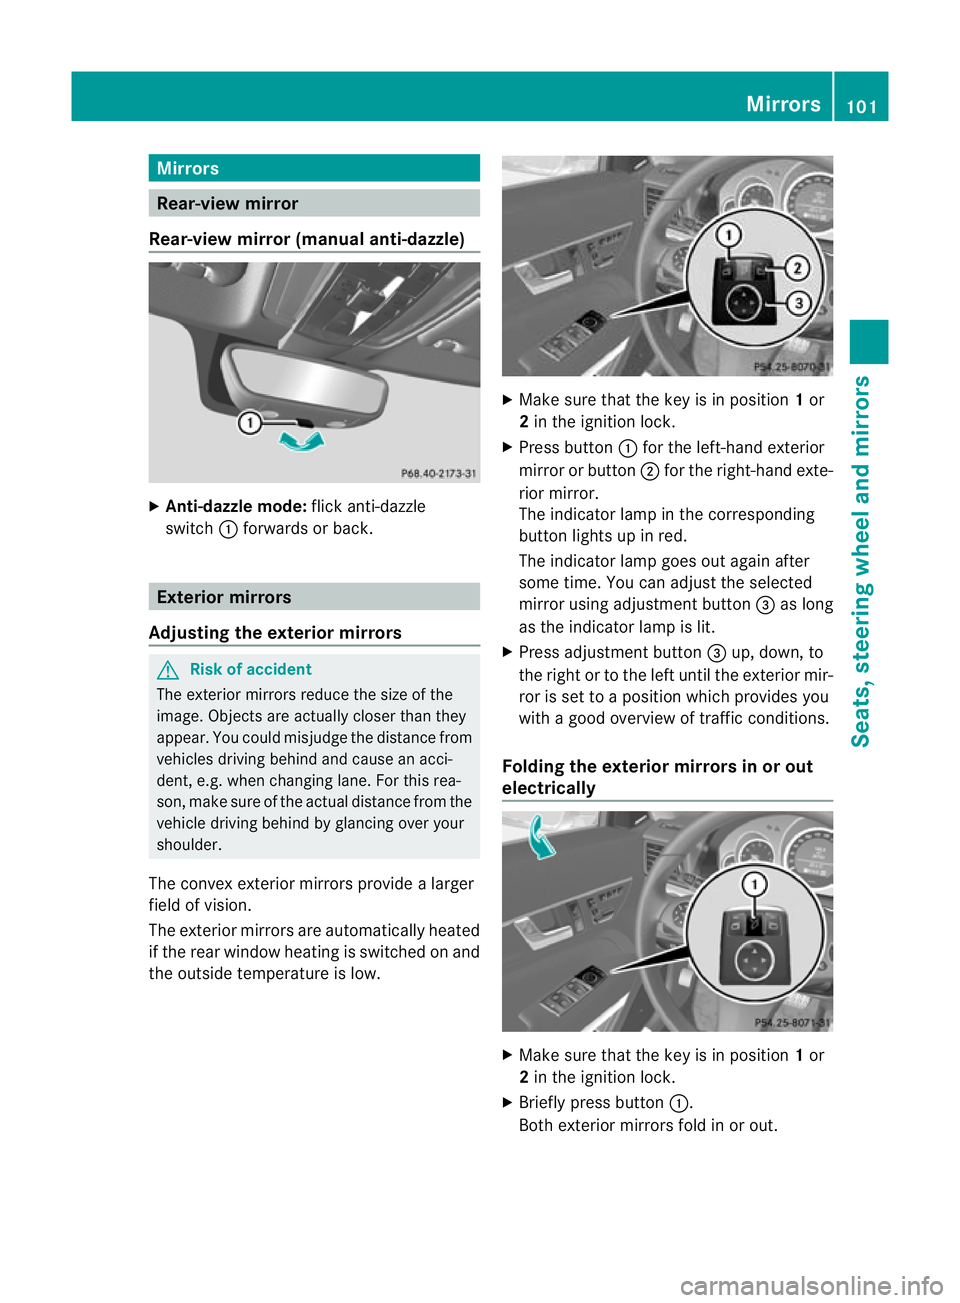
Rear-view mirror (manual anti-dazzle) X
Anti-dazzl emode: flick anti-dazzle
switch :forwards or back. Exterior mirrors
Adjusting the exterior mirrors G
Risk of accident
The exterior mirrors reduce the size of the
image .Object sare actu ally closer than they
appear. You could misjudge the distance from
vehicles driving behind and cause an acci-
dent, e.g. when changing lane. For this rea-
son, make sure of the actual distance from the
vehicle driving behind by glancing over your
shoulder.
The convex exterior mirrors provide alarger
field of vision.
The exterior mirrors are automatically heated
if the rear window heating is switched on and
the outside temperature is low. X
Make sure that the key is in position 1or
2 in the ignition lock.
X Press button :for the left-hand exterior
mirror or button ;for the right-hand exte-
rior mirror.
The indicator lamp in the corresponding
button lights up in red.
The indicator lamp goes out again after
some time. You can adjust the selected
mirror using adjustmen tbutton =as long
as the indicator lamp is lit.
X Press adjustment button =up, down, to
the right or to the left until the exterior mir-
ror is se ttoaposition which provides you
with agood overview of traffic conditions.
Folding th eexterior mirror sinorout
electrically X
Make sure that th ekey is in position 1or
2 in the ignition lock.
X Briefly press button :.
Bot hexterior mirrors fold in or out. Mirrors
101Seats, steering whee land mirrors
BA 20 7ECE ÄJ 2010/1a; 1; 2, en-GB
mkalafa Version: 3.0.2.11 2010-01-26T13:03:22+01:00-Seite1 01 Z
Page 107 of 333
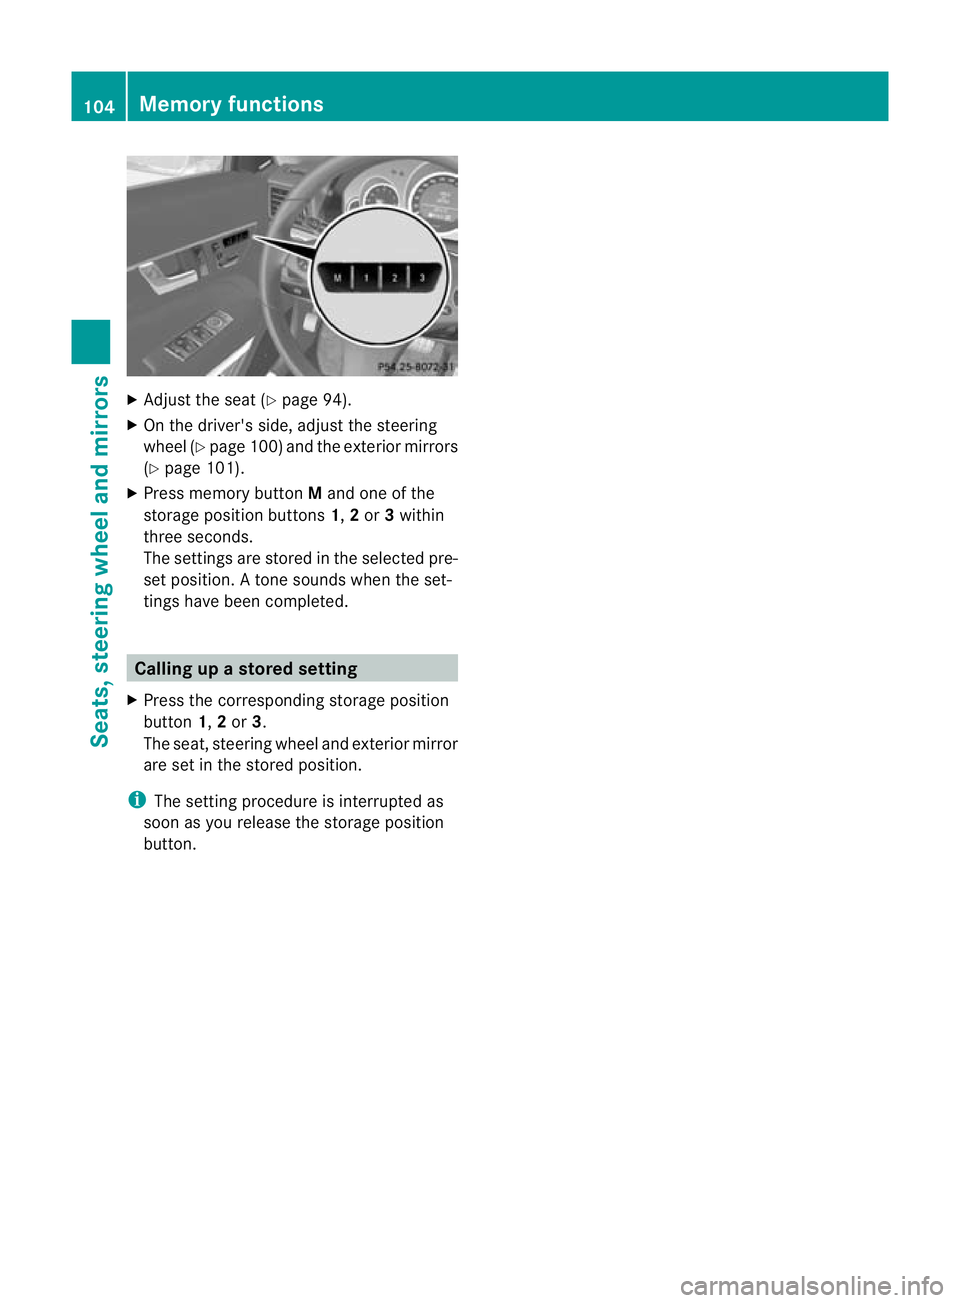
X
Adjust the sea t(Ypage 94).
X On the driver' sside, adjust the steering
wheel (Y page 100 )and the exterio rmirrors
(Y page 101).
X Press memory button Mand one of the
storage position buttons 1,2or 3within
three seconds.
The settings are stored in the selected pre-
set position .Atone sounds when the set-
tings have been completed. Calling up
astore dsetting
X Pres sthe co rresponding storage position
button 1,2or 3.
The seat ,steerin gwheel and exteri or mirror
are set in the store dposition.
i The settin gprocedure is interrup tedas
soon as you release the storage position
but ton. 104
Memory functionsSeats, steering wheel and mirrors
BA 207 ECE ÄJ 2010/1a; 1; 2, en-GB
mkalafa
Version: 3.0.2.11 2010-01-26T13:03:22+01:00-Seite1 04
Page 110 of 333
Dipped-bea
mheadlamps X
To switch on th edipped -bea mh ead-
lamps: turn thekeyin th eignition loc kto
posi tion 2or star tthe engine.
X Tur nthe light switc htoL.
The L indicator lam pint he instrument
cluster lights up.
Daytime driving lights In vehicles for countries wher
edaytime driv-
ing lights are not legall yrequired, you can
activate/deactivate the "daytime driving
lights" function via the on-boar dcomputer
(Y page 205).
X To activat ethe daytime drivin glights:
activate the "daytime driving lights" func-
tion via the on-board computer.
X Turn the light switch to c.
When the engine is on: depending on the
ambient light conditions, the daytim edriv-
ing lights or th edipped-bea mheadlamps
are switched on.
When the dipped-beam headlamps are
switched on, the Lindicator lam pinthe
instrumen tcluster lights up.
Automatic headlamps G
Risk of accident
If the light switch is set to c,the dipped-
beam headlamps will not com eonautomati-
cally if it is foggy. This could endanger you and
others. Therefore, turn the light switch to
L in fog.
The automatic headlamp feature is only an
aid. The driver is responsible for the vehicle's
lighting at all times.
X To switch on automatic headlamp
mode: turn the ligh tswitch to c.
Key in position 1in the ignition lock: the
side lamps are switched on or off automat-
ically depending on the brightness of the
ambient light. With the engine running: depending on the
brightness of the ambient light, the daytime
driving lights
20
or the dipped-beam head-
lamps are switched on or off automatically.
When the dipped-beam headlamps are
switched on, the Lindicator lamp in the
instrument cluster lights up.
Foglamps and rear foglamps Front foglamps
Only vehicles with fron
tfoglamps have the
"Foglamps" func tion. G
Risk of accident
If you suspec tthat drivin gconditions will be
foggy ,turn the light switch to Lbefore you
start your journey. Otherwise, your vehicle
may not be visible and you could endanger
yourself and others.
X To switch on the front foglamps: turn the
key in the ignitio nlock to position 2or start
the engine.
X Tur nthe light switc htoT,Lor
c.
X Press the Nbutton.
The green Nindicator lam pint he inst ru-
ment cluster lights up.
X To switc hoff the fron tfoglamps: press
the N button.
The green Nindicator lamp in the instru-
ment cluster goes out.
i If you switch the engine off (key in posi-
tion 1in the ignition lock) and then restart
it, the previous foglamp settings are
restored.
Rear foglamp
X To switch on the rear foglamp: turn the
key in the ignition lock to position 2or start
the engine.
X Turn the light switch to Lorc.
20 Only if daytim edrivin glights have been activated via the on-board computer. Exterior lighting
107Lights and windscree nwipers
BA 207ECE ÄJ 2010 /1a; 1; 2, en-GB
mkalafa Version: 3.0.2.11 2010-01-26T13:03:22+01:00 -Seite 107 Z