ESP MERCEDES-BENZ E-CLASS CABRIOLET 2010 Repair Manual
[x] Cancel search | Manufacturer: MERCEDES-BENZ, Model Year: 2010, Model line: E-CLASS CABRIOLET, Model: MERCEDES-BENZ E-CLASS CABRIOLET 2010Pages: 333, PDF Size: 7.64 MB
Page 180 of 333
Problems wit
hPARKTRONIC Problem Possible causes/consequences and
M Solutions
Only the red segments
in the PARKTRONIC
warning display
sare lit.
Yo ua lso hear awarning
tone for approximately
two seconds.
PARKTRONIC is deacti-
vated after approx-
imately 20 seconds and
the indicator lamp in
the PARKTRONIC but-
ton lights up. PARKTRONIC has malfunctioned and has switched itself off.
X
If problems persist, have PARKTRONIC checked at aqualified
specialist workshop. Only the red segments
in the PARKTRONIC
warning display
sare lit.
PARKTRONIC is deacti-
vate dafter approx-
imatel y20seconds. The PARKTRONI
Csensors are dirt yorthere is interference.
X Clean the PARKTRONI Csensors (Y page 267).
X Switch the ignition back on. The problem may be caused by an exter
nalsource of radio or
ultrasoun dwaves.
X See if PARKTRONIC functions in adifferent location. Parking Guidance
Important safet ynotes Parking Guidance is an electronic parking aid
with ultrasound. Ultrasound is used to meas-
ure the road on both sides of the vehicle. A
suitable parking space is indicated by the
parking symbol. You receiv esteering instruc-
tions when parking. You may also use PARK-
TRONIC (Y page 174). G
Risk of accident
Parking Guidance is merely an aid and may
recommen dparking spaces that are not suit-
able for parking. For example, these might be
spaces where parking is prohibited ,drive-
ways, unsuitabl esurfaces, etc.
Parking Guidance measures the parking
space as you drive past it. Any later changes
to the parking space are not taken into
account. For instance, this may be the case when the vehicle parked in front of or behind
the space changes its position or when an
obstacle is moved into the parking space.
Parking Guidance does not relieve you of the
responsibility for paying attention. If you rely
solely on Parking Guidance, you could cause
an accident and injure yourself and others.
You are always responsible for safety and
must continue to pay attention to your imme-
diate surroundings when parking and
manoeuvring.
G
Risk of accident
Objects located above the height range of
Parking Guidance will not be detected when
the parking space is measured. Thes eare not
take ninto account whe nthe parkin gproce-
dure is calculated, e.g .overhanging loads ,tail
sections or loading ramps of good svehicles.
In some circumstances, Parking Guidance Driving systems
177Drivingand pa rking
BA 20 7ECE ÄJ 2010 /1a;1;2,e n-GB
mkalafa Version: 3.0.2.11 2010-01-26T13:03:22+01:00-Seite 177 Z
Page 182 of 333
Parking
G
Ris
kofa ccident
PARKTRONIC and Parking Guidance are
merely parking aids and may not detect all
obstacles .They do not reliev eyou of the
responsibilit yofpaying attention.
You are always responsible for safety and
must continue to pay attention to your imme-
diate surroundings when parking and
manoeuvring. You could otherwise endanger
yourself and others.
X Stop the vehicle when the parking space
symbol shows the desired parking space in
the instrumen tcluster.
X Vehicles with manual transmission: shift to
reverse gear.
Vehicles with automatic transmission: shift
into position R.
The multifunction display shows the
Chec kvehicle surroundings Con‐
firm with OK message.
X Press aon themultifunction steering
wheel to confirm.
The multifunction display switches to Park-
ing Guidance.
Depending on your distance from the park-
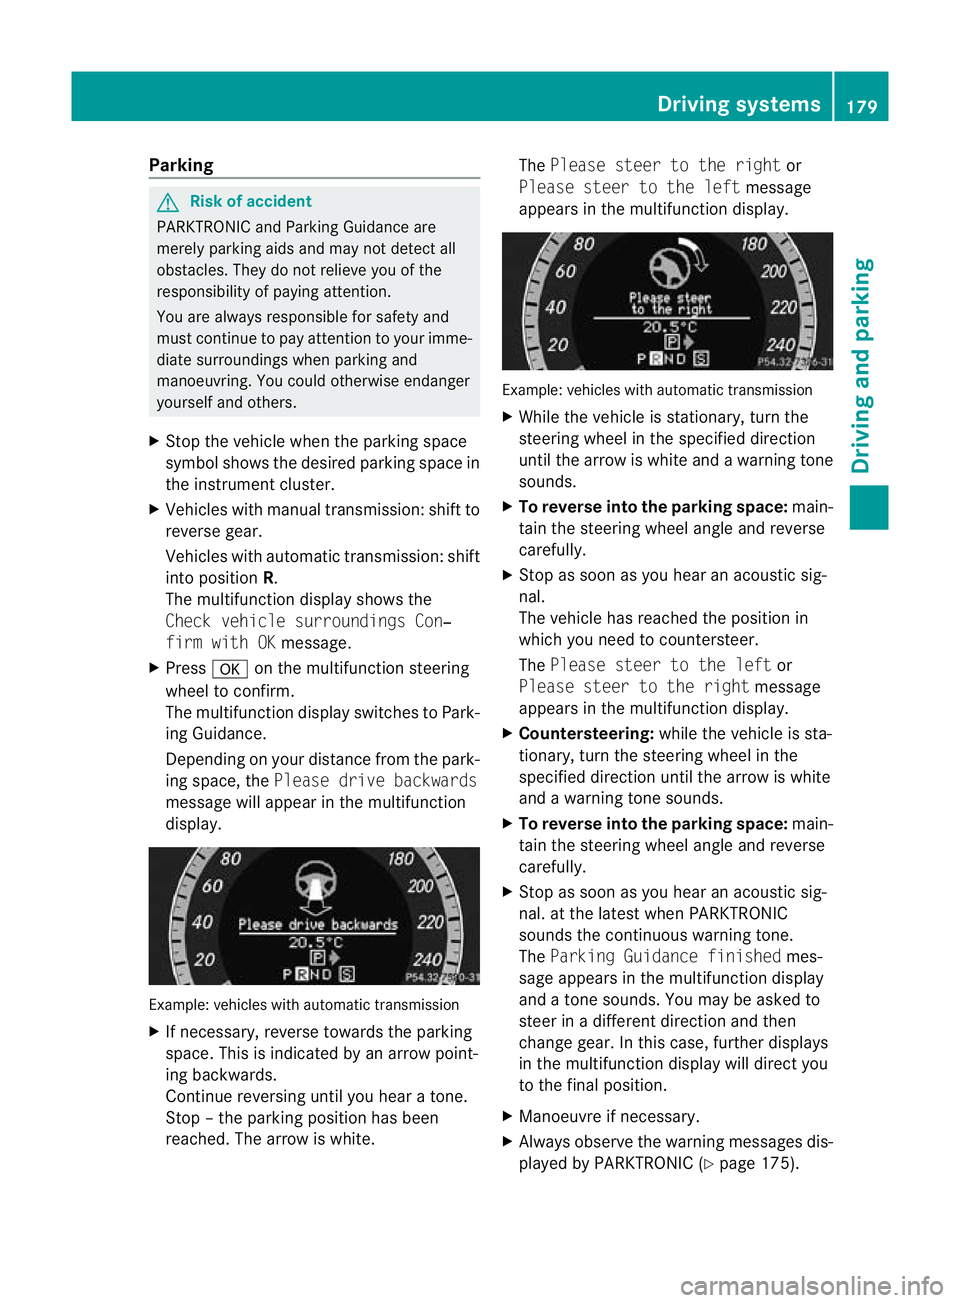
ing space, the Please drivebackwards
message will appear in th emultifunction
display. Example: vehicles with automatic transmission
X
If necessary, reverse towards the parking
space. This is indicated by an arrow point-
ing backwards.
Continue reversing until you hear atone.
Stop –the parkin gposition has been
reached. The arrow is white. The
Please stee rtothe right or
Please steer to the left message
appe arsint he multifunction display. Example: vehicles wit
hautomatic transmission
X Whil ethe vehicle is stationary ,turn the
steering wheel in the specified direction
until the arrow is white and awarning tone
sounds.
X To reverse into the parking space: main-
tain the steering wheel angle and reverse
carefully.
X Stop as soon as you hear an acoustic sig-
nal.
The vehicle has reached the position in
which you need to countersteer.
The Please stee rtothe left or
Please steer to the right message
appe arsint he multifunction display.
X Countersteering: while the vehicle is sta-
tionary, tur nthe steering wheel in the
specifie ddirection until the arrow is white
and awarning tone sounds.
X To reverse into the parking space: main-
tain the steering wheel angle and reverse
carefully.
X Stop as soon as you hear an acoustic sig-
nal. at the latest when PARKTRONIC
sounds the continuous warning tone.
The Parkin gGuidance finished mes-
sage appe arsint he multifunction display
and atone sounds. You ma ybeasked to
steer in adifferent direction and then
change gear. In this case, further displays
in the multifunction displa ywill direct you
to the final position.
X Manoeuvr eifnecessary.
X Alway sobserv ethe warnin gmessages dis-
played by PARKTRONI C(Ypage 175). Driving systems
179Driving and parking
BA 207ECE ÄJ 2010 /1a;1;2,e n-GB
mkalafa Version: 3.0.2.11 2010-01-26T13:03:22+01:00-Seite 179 Z
Page 183 of 333
Cancelling Parking Guidance
X
Press th ePARKT RONIC butto nonthe
cen treconsole (Y page176).
Parking Gui dance is cancelle dimmediately
and PARKTRONIC is deactivated.
Parkin gGuidance is cancelled automatically
if it is no longer possible to guide you into the
parking space, or if amalfunction occurs.
The parking space symbol disapp ears and the
Parking Guidance cancelled message
appe arsint he multifunction display.
Trailer towing For vehicles with
atrailer to whitch, the min-
imum length for parkin gspaces is slightly
increased.
If you have attached atrailer to your vehicle,
yo us hould not use Parkin gGuidance. When
the electrical connection is established
betwee nyour vehicle and the trailer ,Parking
Guidance ceases to be available. PARK-
TRONIC is deactivated for the rear area. Reversin
gcamera
Important safety guidelines Th
er eversing camera is an optica lparking
aid. It shows the area behind your vehicle in
the COMAND APS displ ay.G
Risk of injury
Make sure that no persons or animal sare in
th em anoeuvring range. Otherwise ,they
coul dbei njured.
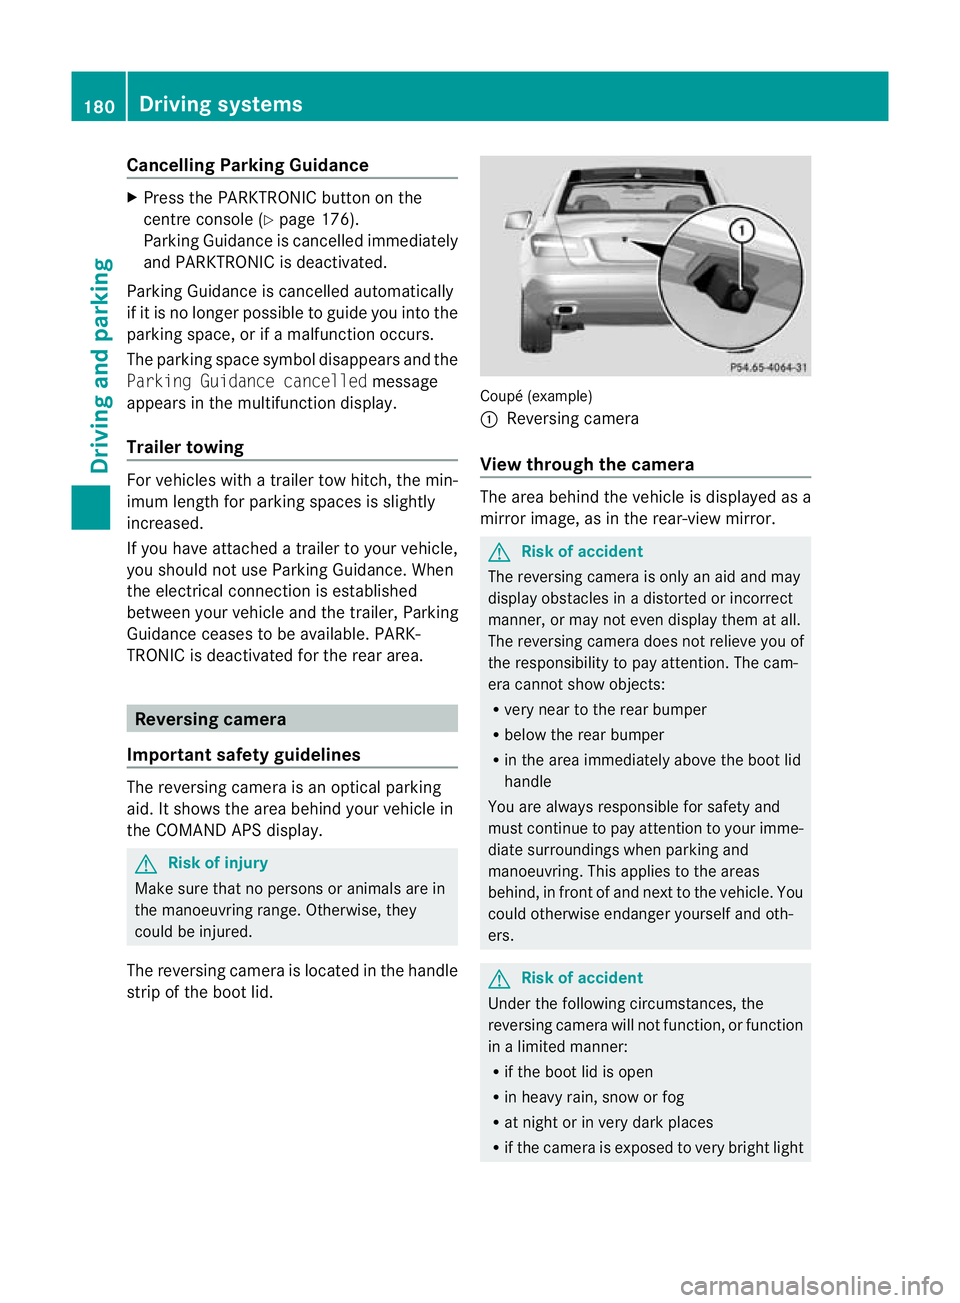
The reversin gcamera is located in the handle
strip of the boot lid. Coupé (example)
:
Reversing camera
View through the camera The area behind the vehicle is displ
ayedas a
mirror image, as in the rear-view mirror. G
Risk of accident
The reversing camera is only an aid and may
display obstacles in adistorted or incorrect
manner, or may not even display them at all.
The reversing camer adoes not relieve you of
the responsibilit ytopay attention. The cam-
era cannot show objects:
R very near to the rear bumper
R below the rear bumper
R in the area immediately above the boot lid
handle
You are always responsible for safety and
must continue to pay attention to your imme-
diate surroundings when parking and
manoeuvring. This applies to the areas
behind, in front of and next to the vehicle. You
could otherwise endanger yourself and oth-
ers. G
Risk of accident
Under the following circumstances, the
reversing camera will not function, or function
in alimited manner:
R if the boot lid is open
R in heavy rain, snow or fog
R at night or in very dark places
R if the camer aisexposed to very brigh tlight 180
Drivin
gsystemsDrivin gand pa rking
BA 20 7ECE ÄJ 2010 /1a;1;2,e n-GB
mkalafa Version: 3.0.2.11 2010-01-26T13:03:22+01:00-Seite 180
Page 184 of 333
R
if the area is lit by fluorescen tlight (the dis-
play may flicker)
R if ther eisas udden change in temperature,
e.g. when drivin gintoah eatedgarage in
winter
R if the camer alens is dirt yorobstruc ted
R if the rear of your vehicle is damaged. In this
even thave the camera position and setting
checked at aqualified specialist workshop.
Mercedes-Ben zrecom mends that you use
aM ercedes-Benz Ser vice Centre for this
purpose.
Do not use the reversing camera in these
type sofs ituation .You could, otherwise,
injure other sordamage objects and your
vehicle while you are parking.
Activating the reversing camera X
Make sure that the key is in position 2in
the ignition lock.
X Make sure that the "Reversing camera"
function is selected in COMAND APS (see
the separate operating instructions for
COMAND APS).
X Engage reverse gear.
The area behind the vehicle is shown in the
COMAND APS display.
Guide lines in the COMAND APS display
Depending on the date of manufacture of the
vehicle, the guide lines are shown in the
COMAND APS display. G
Risk of accident
Please note that objects not on ground level
may appear to be further away than they
actually are. Thes einclude:
R the bumper of the vehicl eparked behind
R trailer tow bars
R the tail-end of alorry
R slanted posts
The lines are only guides, not accurate meas-
urements of the distance to an obstacle.
Therefore, you should never pass the red line
when approachin ganobstacle. You could oth- erwise cause an accident and injur
eyourself
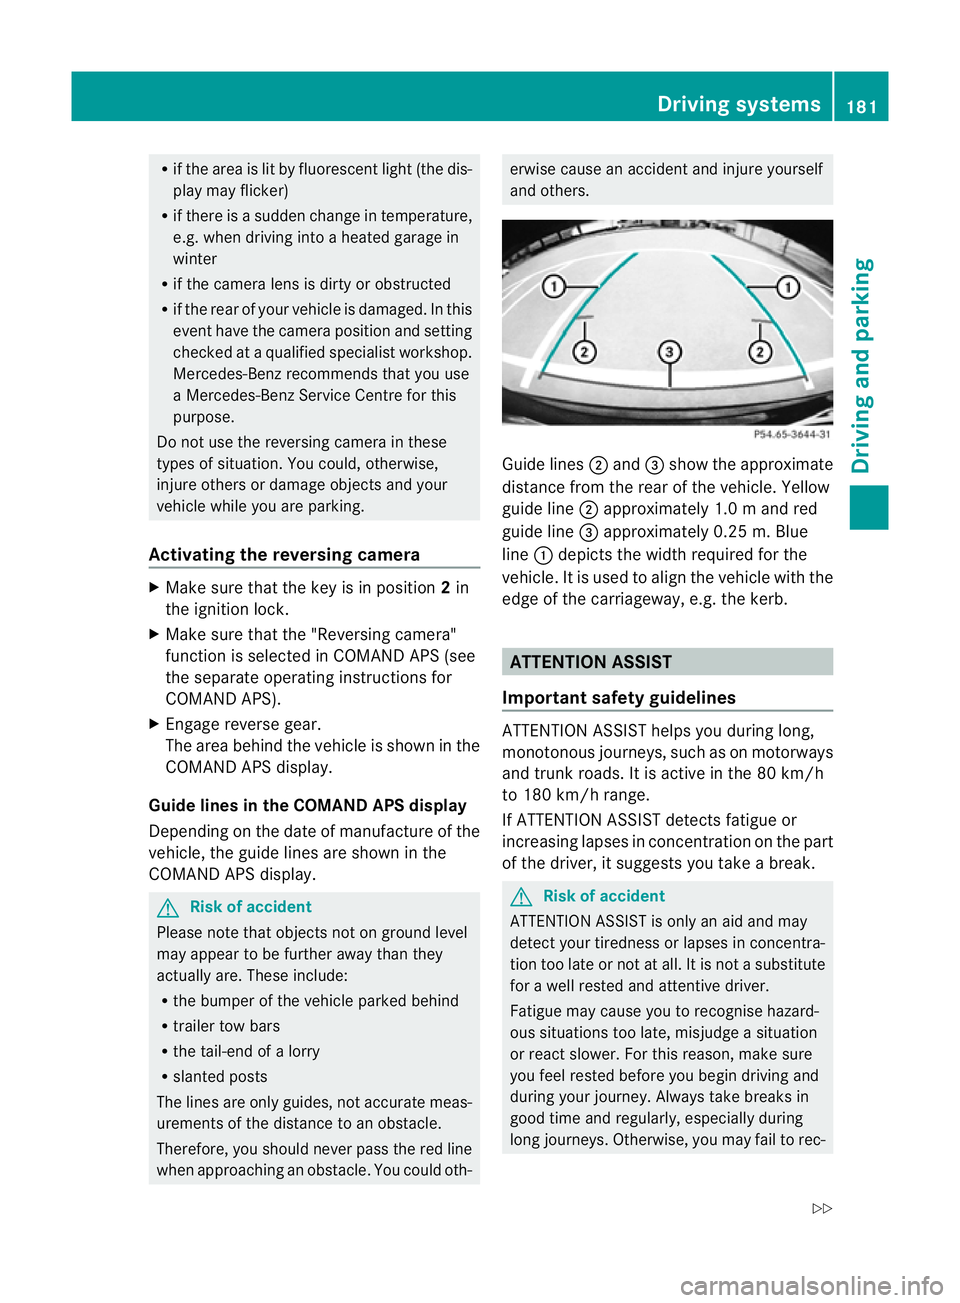
and others. Guide lines
;and =show the approximate
distance from the rear of the vehicle. Yellow
guide line ;approximately 1. 0mand red
guid eline =approximately 0.2 5m.Blue
line :depicts the width required for the
vehicle. It is used to align the vehicle with the
edge of the carriageway, e.g. the kerb. ATTENTION ASSIST
Important safet yguidelines ATTENTION ASSIST help
syou during long,
monotonous journeys, such as on motorways
and trunk roads. It is active in the 80 km /h
to 180 km/ hrange.
If ATTENTION ASSIST detects fatigue or
increasing lapses in concentration on the part
of the driver, it suggests you take abreak. G
Ris
kofa ccident
ATTENTION ASSIST is only an aid and may
detect your tiredness or lapses in concentra-
tion too late or not at all. It is not asubstitute
for aw ell reste dand attentiv edriver.
Fatigue may cause yo utorecognise hazard-
ous situations to olate ,misjudge asituation
or reac tslower .For this rea son, make sure
you fee lreste dbefore you begin driving and
duri ngyour jour ney. Always tak ebreaks in
good time and regularly ,especiall yduring
long jour neys. Otherwise ,you may fai ltorec- Driving systems
181Driving and parking
BA 207 ECE ÄJ 2010/1a; 1; 2, en-GB
mkalafa Version: 3.0.2.11 2010-01-26T13:03:22+01:00-Seite 181 Z
Page 187 of 333
R
the roa dtypec hanges (e.g. mot orway,
country road).
R yo uh avet ravelle dacertainminimum
distanc ewithou tthe roa dsign being
repeated or detec teda gain. Blind Spot Assist
Important safety guidelines Blin
dSpot Assist uses aradar sensor system
to monitor the areas on both sides of your
vehicle. Blin dSpot Assist provides assistance
at speeds higher than 30 km/h. Awarning
display in the exterior mirrors draws your
attention to vehicles in the monitored area. If
you then indicat eaturn toward sthat side
before changing lane, you will also receive
visual and audible collision warnings. For this
purpose, Blind Spot Assist uses sensor sinthe
rea rbumper. G
Risk of accident
Blind Spot Assis tiso nly an aid designe dto
assis tdriving. It may fail to detec tsome vehi-
cles and is no substitute for attentiv edriving.
Blind Spo tAssist can notd etect road and traf-
fic conditions. It may fail to detect narrow
vehicles, such as motor cycles or bicycles ,or
only detec tthem too late.
Monitoring ma ybeaffected by dirty sensors,
stro ngspra yorp oor visibility caused by snow,
rai norm ist, for example. In this case, vehicles
are detected late or not at all.
Always pay attention to traffic conditions and
your surroundings. Otherwise, you may fail to
recognise dangers in time, cause an accident
and injur eyoursel fand others.
The radar senso rsystem is automatically
deactivated near radio telescope facilities
(Y page 324).
For Blind Spot Assist to assist you when driv-
ing, the radar sensor syste mmust be activa-
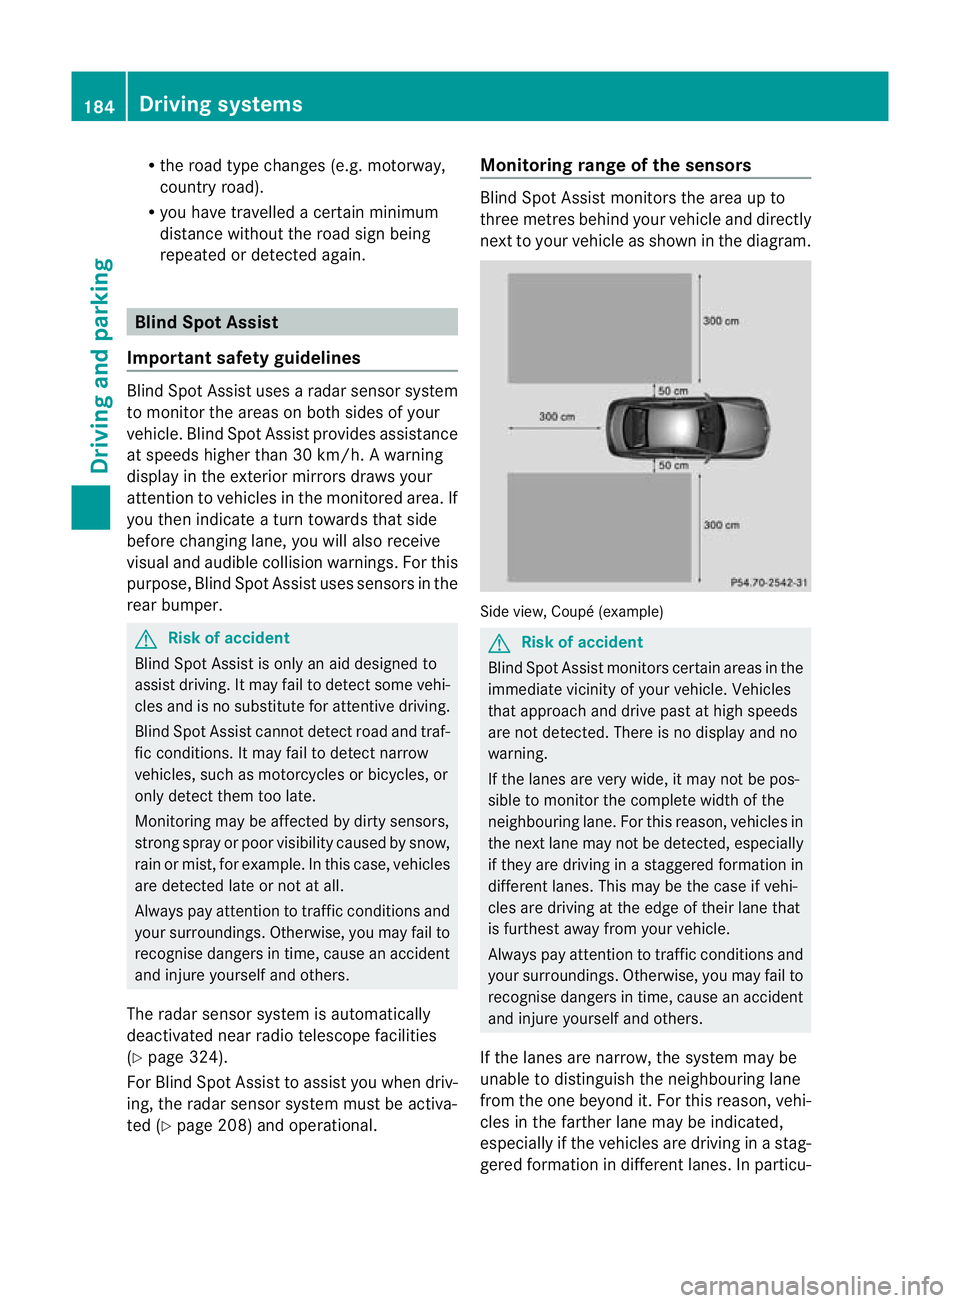
ted (Y page 208 )and operational. Monitoring range of the sensors Blind Spot Assist monitors the area up to
three metres behind your vehicl
eand directly
next to your vehicl easshown in the diagram. Sid
eview, Coupé (example) G
Risk of accident
Blind Spot Assist monitors certain areas in the
immediate vicinit yofyour vehicle. Vehicles
that approach and driv epast at high speeds
are not detected. There is no display and no
warning.
If the lanes are very wide, it may not be pos-
sible to monitor the complete width of the
neighbouring lane. For this reason, vehicles in
the next lane may not be detected, especially
if they are driving in astaggered formation in
different lanes .This ma ybethe case if vehi-
cles ar edrivin gatt he edge of their lan ethat
is furthest away from your vehicle.
Always pay attention to traffic conditions and
your surroundings. Otherwise, you ma yfail to
recognise dangers in time, cause an accident
and injure yourself and others.
If the lanes are narrow, the system may be
unable to distinguish the neighbouring lane
from the one beyond it. For this reason, vehi-
cles in the farther lane may be indicated,
especially if the vehicles are driving in astag-
gered formation in different lanes .Inparticu- 184
Driving systemsDriving and parking
BA 207 ECE ÄJ 2010/1a; 1; 2, en-GB
mkalafa
Version:3.0.2.11
2010-01-26T13:03:22+01:00
-Seite 184
Page 191 of 333
Gen
eral information i
When towing atrail er,s et the tyr epres-
sure on th erear axle of the towing vehicle
for am aximum load; se ethe tyr epressure
table in th efuel filler flap.
You will find installatio ndimensions and loads
in the "Technical data” section
(Y page 322).
The maximum permissible trailer drawbar
noseweight on the ball coupling is 75 kg.
However ,the actual noseweight must not
exceed the value given on the trailer tow hitch
and trailer identification plates. The lowest
weight applies.
! Use anoseweight as close as possible to
the maximum permissible noseweight .Do
not use anoseweight of less than 50 kg,
otherwise the trailer ma ycome loose.
Bear in min dthat the payload and the rear
axl eload ar ereduced by the actual nose-
weight.
Please not ethat when towing atrailer, PARK-
TRONIC (Y page 174) and parkin gguidance
(Y page 177 )are onl yavail ablew ith limita-
tions, or not at all.
i The height of the ball coupling changes
with the load of the vehicle. If necessary,
use atrailer wit haheight-adjustable draw-
bar.
Driving tips i
Observ ethe notes on ESP ®
trailer stabi-
lisation (Y page 58).
In Germany, the maximum permissible speed
for vehicle/ trailer combinations depends on
the type of trailer and is either 80 km/ hor
100 km/h. In some countries ,higher maxi-
mum speeds are permissible for vehicle/
trailer combinations. Befor ebeginnin gthe
journey ,check the trailer's documen tsto see
what the maximum permitted speed is.
For certain Mercedes-Benz vehicles, the max-
imum permissible rear axle load is increased
when towing atrailer. Refer to th e"Technical data
"section to fin dout whether this applies
to your vehicle. If you utilise any of the added
maximum rear axle load when towing atrailer,
th ev ehicle/ trailer combination may not
exceed amaximum spee dof100 km/h for
reasons concerning the operating permit.
This als oapplies in countries in which the
permissible maximum speed for vehicle/
trailer combinations is above 10 0km/h.
When towing atrailer, your vehicle's handling
characteristics wil lbedifferent in comparison
to when drivin gwithout atrailer.
Th ev ehicle/ trailer combination:
R is heavier
R is restricted in its acceleration and gradi-
ent-climbin gcapability
R has an increased braking distance
R is affected more by stron gcrosswinds
R demand smore sensitive steering
R consume smore fuel
On long and steep downhil lgradients ,you
must shift to alower gear in good time, or on
vehicles with automatic transmission ,select
the shift range 1,2or 3.
i This also applies if you have activated
cruise control, SPEEDTRONIC or DI S-
TRONIC PLUS.
This will use the brakin geffect of th eengine,
so les sbraking wil lberequired to maintain
the speed. This relieves the load on the brake
system and prevent sthe brakes from over-
heating and wearing too quickly .Ifyou need
additional braking, depress the brake pedal
repeatedly rather than con tinuously.
Driving tips R
Maintain agreater distance from th evehi-
cle in front than when driving without a
trailer.
R Avoid braking abruptly. If possible, brake
gently at first to allow the trailer to run on.
Then increase the braking force rapidly.
R The values given for gradient-climbing
capabilities from astandstill refer to sea 188
Trailer towingDrivin
gand pa rking
BA 20 7ECE ÄJ 2010 /1a; 1; 2, en-GB
mkalafa Version: 3.0.2.11 2010-01-26T13:03:22+01:00 -Seite 188
Page 193 of 333
!
You can connect consumer swithapower
ratin gofupto2 40Wtot he permanent
power supply and up to 18 0Wto the power
supp lythat is switched on via the ignition
lock.
You must not charge atrailer battery using
th ep ower supply.
The trailer's permanen tpower supply is
switched off in the even toflow vehicle supply
voltage and after six hour satthe latest.
You can obtai nfurther information about
installing the trailer electrics from aqualified
specialist workshop, e.g. aMercedes-Benz
Ser vice Centre.
X To switch the connected power supply
on or off: turn the key in the ignitio nlock
to position 2or 0respec tively. Bulb failur
eindicator for LEDs
i If LE Dlamps are fitted in the trailer, an
error message may appear in the multi-
function display –even if there is no fault –
if th ecorrespondin gLED chain's current
draw drops below 50 milliamperes (mA).
To ensure reliabl eoperation of the bulb failure
indic ator,am inimum current of 50 mA must
be guaranteed by the manufacturer of each
LED chain in the trailer lighting. Trailer with 7-pin connector
General information If you
rtrailer ha sa7-pin connector, you can
connect it to the 13-pin socket on the ball
coupling using an adapter or, if necessary, an
adapter cable. Both of thes ecan be obtained
at aq ualified specialist workshop, e.g. at a
Mercedes-Benz Service Centre. Fittin
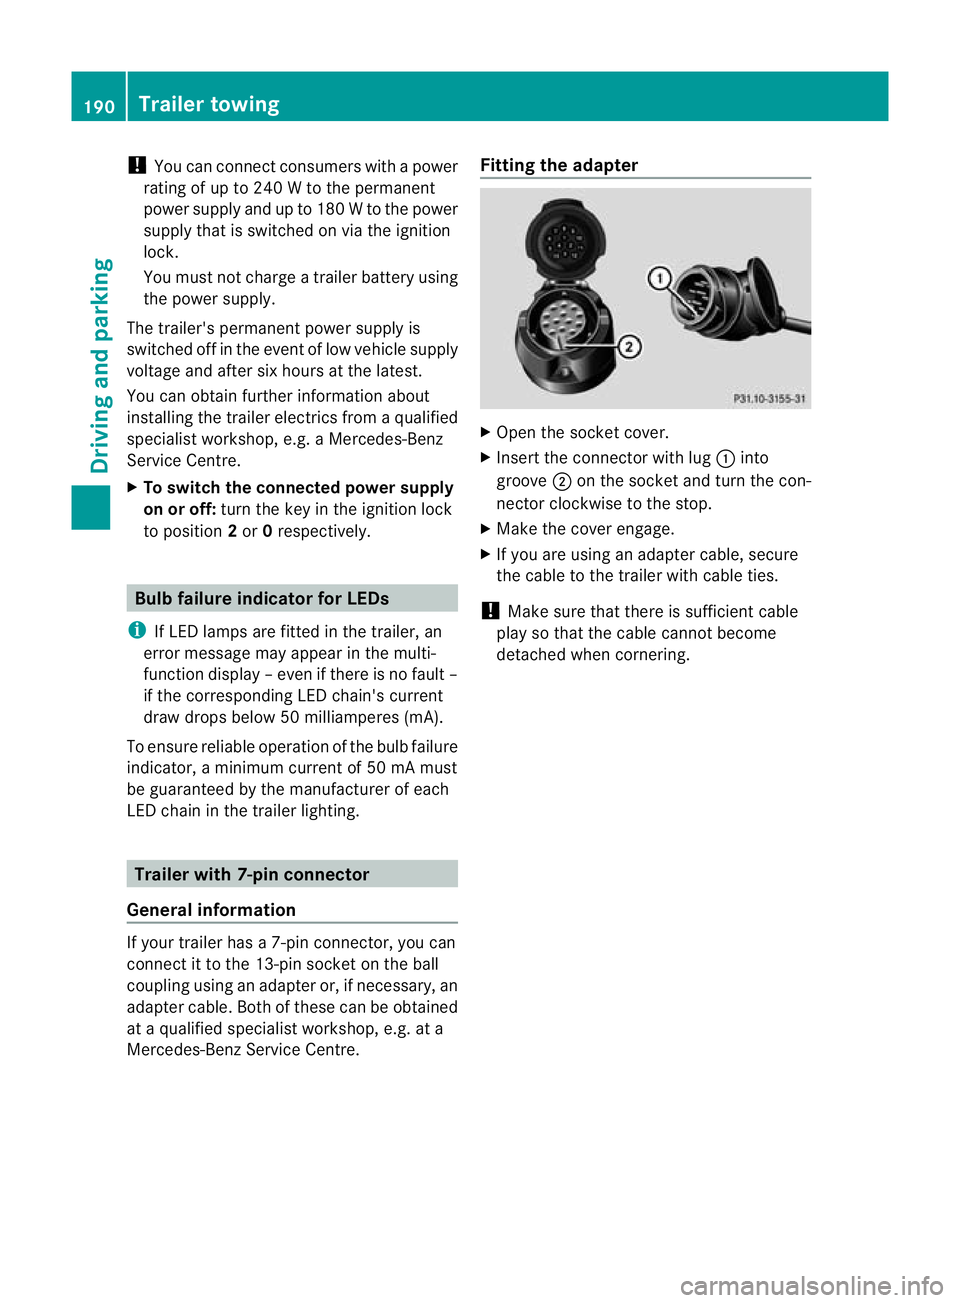
gthe adapter X
Open th esocke tcover.
X Insert the connector with lug :into
groove ;on the socket and tur nthe con-
nector clockwi seto the stop.
X Make the cover engage.
X If you are using an adapter cable, secure
the cabl etothe trailer with cable ties.
! Make sur ethat ther eissufficient cable
pla ysot hat the cable cannot become
detached when cornering. 190
Trailer towingDriving and parking
BA 20
7ECE ÄJ 2010/1a; 1; 2, en-GB
mkalafa Version: 3.0.2.11 2010-01-26T13:03:22+01:00-Seite 190
Page 196 of 333
Outsid
etemperature display
The outside temperature display is in the mul-
tifunction display. G
Risk of accident
At temperatures just above freezing point ,the
str eetm ay be icy, especially in woode dareas
or on bridges .Ifyou do not adapt your driving
style to the conditions, th evehicle could skid.
For this reason ,adapt your driving style and
speed to the weather conditions.
Changes in the outside temperatur eare dis-
played afte rashort delay. Speedomete
rwith segments
The segments in the speedometer indicate
which speed range is available.
Cruise control mode:
The segments light up from the stored speed
to the maximum speed.
Variable SPEEDTRONI Cmode:
The segments light up from the star tofthe
scal etot he selected limit speed.
DI ST RONIC PLUS mode:
One or two segments around the stored
speed ligh tup. Opera
ting th eon-board computer
The on-board computer is activated as soon
as you tur nthe key to position 1in the ignition
lock.
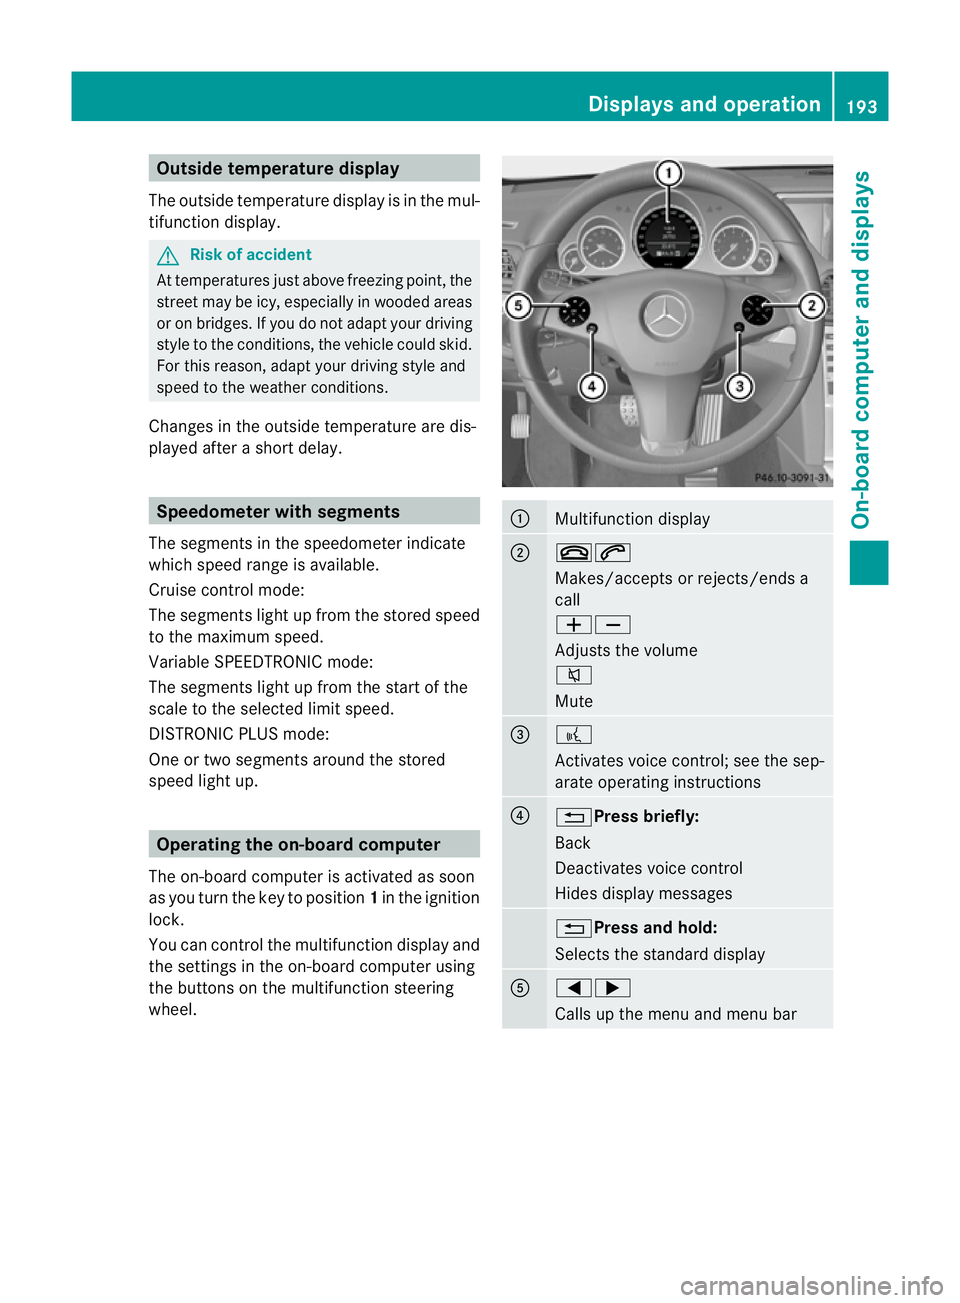
You can con trolthe multifunction display and
the setti ngsint he on-boar dcomputer using
the buttons on the multifunction steering
wheel. :
Multifunction display
;
~6
Makes/accepts or rejects/ends a
call
WX
Adjusts the volume
8
Mute
=
?
Activates voic
econtrol; see the sep-
arate operatin ginstructions ?
%Press briefly:
Back
Deactivate
svoice con trol
Hide sdispla ymessages %Press and hold:
Selects the standard display
A
=;
Calls up the men
uand menu bar Displays and operation
193On-board computer and displays
BA 207 ECE ÄJ 2010/1a; 1; 2, en-GB
mkalafa Version: 3.0.2.11 2010-01-26T13:03:22+01:00 -Seite 193 Z
Page 205 of 333
X
If only one telep hone number is stored
for aname: press the 6ora button
to start dialling.
or
X If there is more than on enumbe rfor a
particula rname: press the 6ora
button to display the numbers.
X Press the 9or: button to select the
number you want to dial.
X Press the 6ora button to start dial-
ling.
or
X If you do not want to mak eacall:press
the ~ button.
Redialling Th
eo n-board compute rsaves the last names
or numbers dialle dinthe redial memory.
X Press the =or; button on the steer-
ing wheel to selec tthe Tel menu.
X Press the 6button to switc htothe
redial memory.
X Press the 9or: button to selec tthe
desired nam eornumber.
X Press the 6ora button to start dial-
ling. Assistance menu
Speed Limit Assist Displaying Speed Limit Assist
In the
SpeedLim. Asst. function,adetec-
ted speed limi tisdisplayed under certain
conditions. You can set Speed Limit Assist
(Y page 182 )todisplay adetected speed limit
automatically for fiv eseconds. Other mes-
sages in the multifunc tion display will be hid-
den for this lengt hoftime. X
Press the =or; button on the steer-
ing wheel to select the Assist.menu.
X Press the 9or: button to select
Spee dLim. Asst.
X Press a.
Th em ultifunction display shows Speed
Limit Assis t.
When alimit speed is detected, this is
shown in the multifunction display until:
R the speed limit ceases to apply.
R you pass city limits.
R the type of road changes, e.g. motorway
or country road.
R the speed limit is no longer detected
after acertain distance.
Activating/deactiva ting th eSpeed Limit
Assist message function
X Pres sthe = or; button on the steer-
ing wheel to selec tthe Assist. menu.
X Press the 9or: button to select
Spee dLim. Asst.
X Press a.
Th em ultifunction display shows Speed
Limit Assis t.
X Press :.
The curren tselection is displayed.
X To activat eordeactivate: pressa.
Ad etected speed limi tappears automati-
cally for fiv eseconds.
When Speed Limit Assist is operational and
the message fun ction is activated, the multi-
function display shows the Äsymbol
when the ignition is switched on.
Showing the distance display This function is only available with DIS-
TRONIC PLUS.202
Menus and submenusOn-boar
dcomputer and displays
BA 20 7ECE ÄJ 2010/1a; 1; 2, en-GB
mkalafa Version:3.0.2.11
2010-01-26T13:03:22+01:0
0-Seite 202
Page 206 of 333
X
Press the =or; button on the steer-
ing wheel to select the Assist.menu.
X Press the 9or: button to select
Distance display.
X Press a.
The DI STRONIC PLUS distance display
(Y page 166) appears in the multifunction
display.
Deactivating/activating ESP ®G
Risk of accident
If the ä warning lamp in the instrument
cluster flashes ,proceed as follows:
R do not deactivate ESP ®
under any circum-
stances.
R onl ydepress the accelerator pedal as far as
necessary when pullin gaway.
R adapt your driving style to suit the prevail-
ing road and weather conditions.
Otherwise, the vehicle could skid.
ESP ®
cannot reduce the risk of an accident if
you drive too fast. ESP ®
cannot override the
laws of physics.
Further information about ESP ®
(Y page 57).
X Start the engine.
X Press the =or; button on the steer-
ing wheel to select the Assist.menu.
X Press 9or: to select ESP.
X Press a.
X To deactivate: pressaagain.
The å warning lamp in the instrument
cluster comes on. G
Risk of accident
If the å warning lamp in the instrument
cluster lights up when the engine is running,
ESP ®
is deactivated or is unavailable due to a
malfunction. The risk that your vehicle may
start to skid then increases in certain situa-
tions.
Always adapt your driving style to the prevail-
ing road and weather conditions. X
To activate: pressaagain.
The å warning lamp in the instrument
cluster goes out.
Activating/deactivating the PRE-SAFE ®
Brake This function is only availabl
ewith DIS-
TRONIC PLUS.
X Press the =or; button on the steer-
ing wheel to select the Assist.menu.
X Press 9or: to select PRE-SAFE
Brake.
X Press a.
The curren tselection is displayed.
X To activate/deac tivate: press a
again.
When PRE-SAFE ®
Brak e(Ypage 59 )isacti-
vated ,the multifunction displa yshows the
Ä symbol.
Activating/deactiva ting Attention
Assist X
Press the =or; button on the steer-
ing wheel to select the Assist.menu.
X Press the 9or: button to select
Attent ionA sst.
X Press a.
Th ec urren tselection is displayed.
X To activate/deac tivate: press a
again.
When ATTENTION ASSI ST (Ypage 18 1)is
activated, the Àsymbol appears in the
multifunction display when the ignition is on.
Activating/deactivating Blind Spot
Assist You can use the
BlindSpot Asst. function
to activate or deactivate Blind Spot Assist
(Y page 184). Menus an
dsubmenus
203On-board computer and displays
BA 207 ECE ÄJ 2010/1a; 1; 2, en-GB
mkalafa Version:3.0.2.11
2010-01-26T13:03:22+01:00
-Seite 203 Z