ESP MERCEDES-BENZ E-CLASS CABRIOLET 2010 Owner's Guide
[x] Cancel search | Manufacturer: MERCEDES-BENZ, Model Year: 2010, Model line: E-CLASS CABRIOLET, Model: MERCEDES-BENZ E-CLASS CABRIOLET 2010Pages: 333, PDF Size: 7.64 MB
Page 111 of 333
X
Press the Rbutton.
The yellow Rindicator lam pinthe
instrumen tcluster lights up.
X To switch off the rear foglam p:press the
R button.
The yellow Rindicator lamp in the
instrument cluster goes out.
Vehicles with fron tfoglamps: when the light
switc hisint heT position, the rea rfog-
lam pcan only be switched on if the foglamps
(without dipped-beam headlamps )are
switche don.
i If you switch the engine off (key in posi-
tion 1in the ignition lock) and then restart
it, the previous rear foglamp settings are
resto red. Combination switch
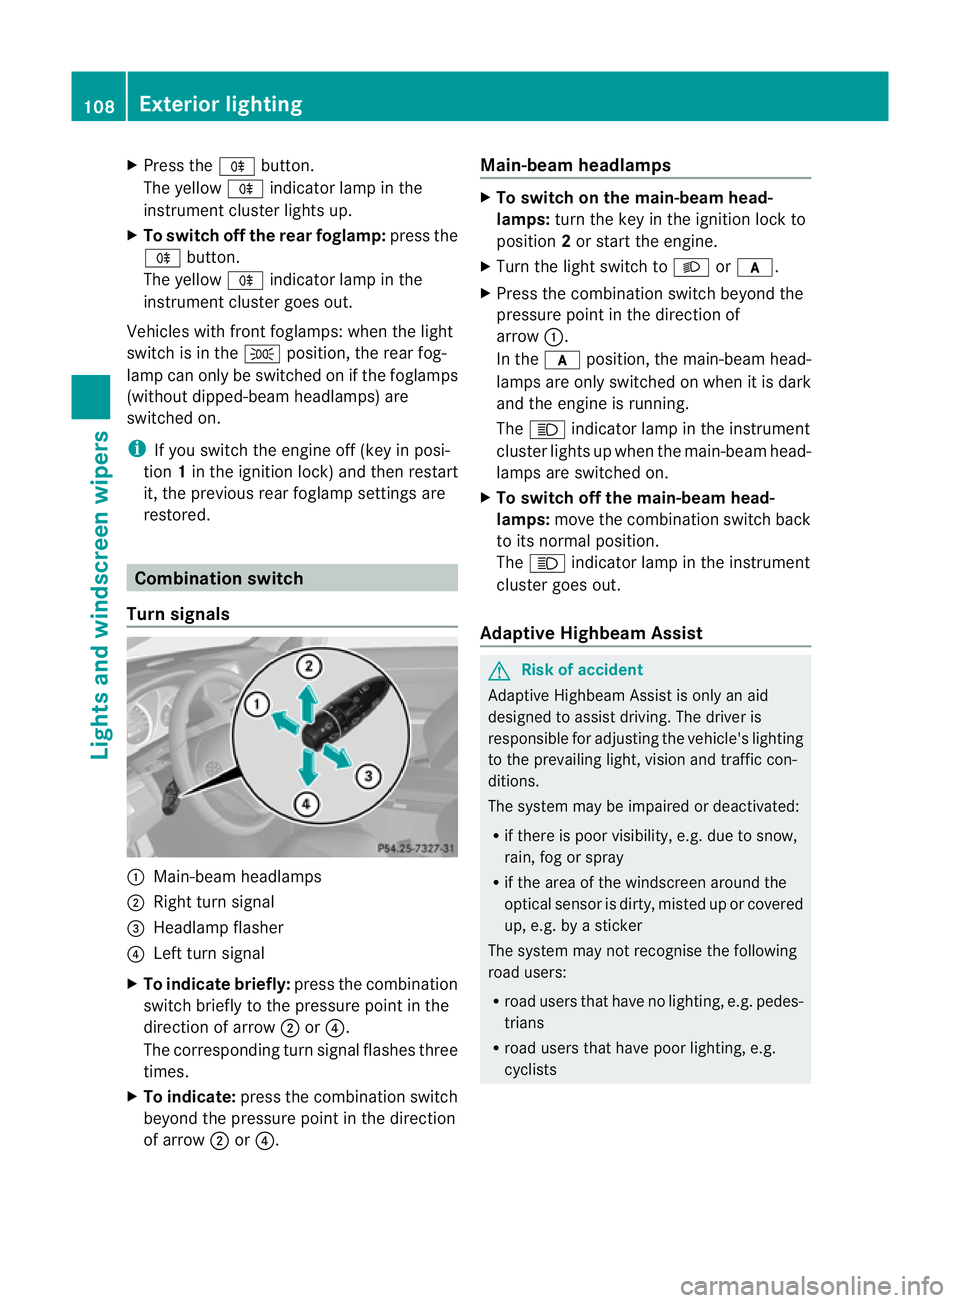
Tur nsignals :
Main-beam headlamps
; Right tur nsignal
= Headlamp flasher
? Left turn signal
X To indicate briefly: press the combination
switch briefly to the pressure point in the
direction of arrow ;or?.
The correspondin gturn signal flashes three
times.
X To indicate: press the combination switch
beyond the pressure point in the direction
of arrow ;or?. Main-beam headlamps X
To switch on the main-beam head-
lamps: turn the key in the ignition lock to
position 2or start the engine.
X Turn the light switch to Lorc.
X Press the combination switch beyond the
pressure point in the direction of
arrow :.
In the cposition, the main-beam head-
lamps are only switched on when it is dark
and the engine is running.
The K indicator lamp in the instrument
cluster lights up when the main-beam head-
lamps are switched on.
X To switch off the main-beam head-
lamps: move the combination switch back
to its normal position.
The K indicator lamp in the instrument
cluster goes out.
Adaptive Highbeam Assist G
Risk of accident
Adaptive Highbeam Assis tiso nly an aid
designe dtoassist driving. The driver is
responsible for adjustin gthe vehicle' slighting
to the prevailin glight, vision and traffic con-
ditions.
The system may be impaired or deactivated:
R if there is poor visibility, e.g. due to snow,
rain, fog or spray
R if the area of the windscreen around the
optical sensor is dirty, misted up or covered
up, e.g. by asticker
The syste mmay not recognise the following
road users:
R road users that have no lighting, e.g. pedes-
trians
R road users that have poor lighting, e.g.
cyclists 108
Exterior lightingLights and windscreen wipers
BA 207 ECE ÄJ 2010/1a; 1; 2, en-GB
mkalaf
aV ersion: 3.0.2.11
2010-01-26T13:03:22+01:00
-Seite 108
Page 112 of 333
R
roa dusers whose lighting is not clearly visi-
ble, e.g. roa dusers behind acras hb arrier
R on rare occasions: road users that have
lights that may be recognise dtoo late or not
at all
The automatic main-beam headlamps will not
be deactivated, or they may be activated
despite road users travelling in front of or
approaching the vehicle.
Thus, you coul dcaus eana ccident and injure
yoursel fand others. Always observe traffic
conditions and, if necessary ,dip the lights
manu ally.
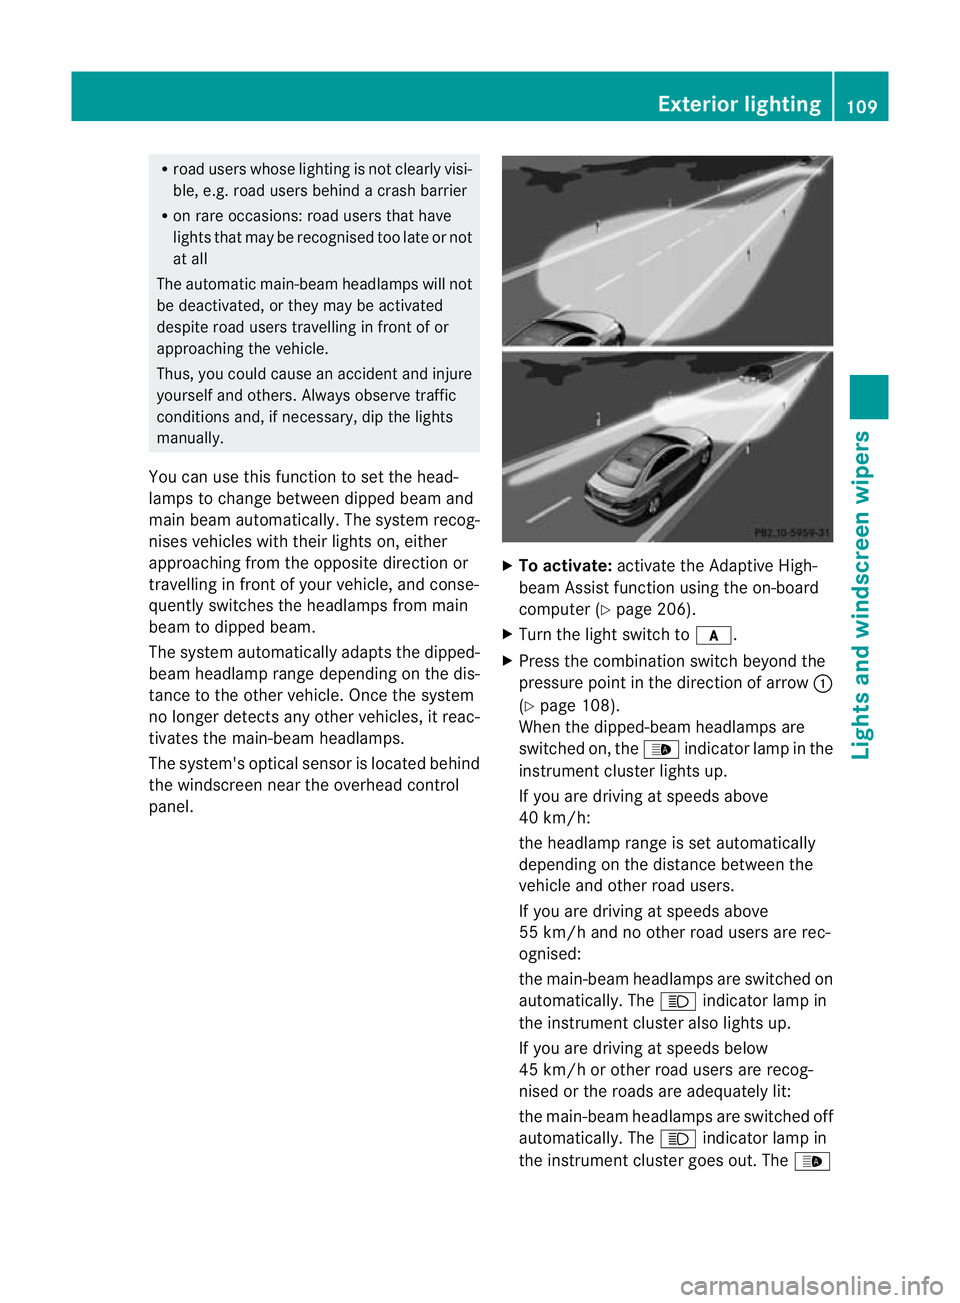
You can use this function to set the head-
lamps to change between dipped bea mand
mai nbeama utomatically. The system rec og-
nises vehicles with thei rlights on, either
approaching from the opposit edirection or
travelling in front of your vehicle, and conse-
quently switches the headlamps from main
beam to dipped beam.
The system automatically adapts the dipped-
beam headlamp range depending on the dis-
tance to the other vehicle. Once the system
no longer detect sany other vehicles, it reac-
tivates the main-bea mheadlamps.
The system's optica lsensor is located behind
the windscreen near the overhead control
panel. X
To activate: activate the Adaptive High-
beam Assist function using the on-board
computer (Y page 206).
X Turn the light switc htoc.
X Press the combination switc hbeyond the
pressur epoint in the direction of arrow :
(Y page 108).
When the dipped-beam headlamps are
switched on, the _indica torlamp in the
instrument cluster lights up.
If you are driving at speeds above
40 km/h:
the headlamp range is set automatically
depending on the distanc ebetween the
vehicle and other road users.
If you are driving at speeds above
55 km /hand no other road users are rec-
ognised:
the main-beam headlamps are switched on
automatically. The Kindicator lamp in
the instrument cluster also lights up.
If you are driving at speeds below
45 km/ horother road users are recog-
nised or the roads are adequately lit:
the main-beam headlamps are switched off
automatically. The Kindicator lamp in
the instrument cluster goe sout. The _ Exterior lighting
109Lights and windscreen wipers
BA 207 ECE ÄJ 2010/1a; 1; 2, en-GB
mkalafa Version: 3.0.2.11 2010-01-26T13:03:22+01:00-Seite 109 Z
Page 113 of 333
indicator lamp in the instrumen
tcluster
stays on.
X To deactivate: movethe combina tion
switc hback to its normal posi tion.
The _ indicator lam pinthe instrument
cluster goes out.
Headlam pflasher X
To switch on: turnthe key in the igni tion
lock to position 1or 2or star tthe engine.
X Pull the combina tion switc hbrieflyint he
direction of arrow =.Ha
zard warning lamps The hazar
dwarnin glamps automatically
switc hon:
R if an airbag is deployed
R if the vehicle decelerates rapidl yfrom a
speed of more than 70 km/h and comes to
as tandstill
X To switch on the hazar dwarning lamps:
press button :.
All turn signals flash. If you now switch on
at urn signal using the combination switch,
only the turn signal lamp on the corre-
sponding side of the vehicle will flash.
X To switch off the haza rdwarning
lamps: press button :.
The hazard warning lamp switche soff auto-
matically if th evehicle reaches aspeed of
over 10 km/ hagain after full brake applica-
tion. i
The hazard warnin glamps still operate if
the ignition is switched off. Adjusting the headlamp range (halo-
gen headlamps)
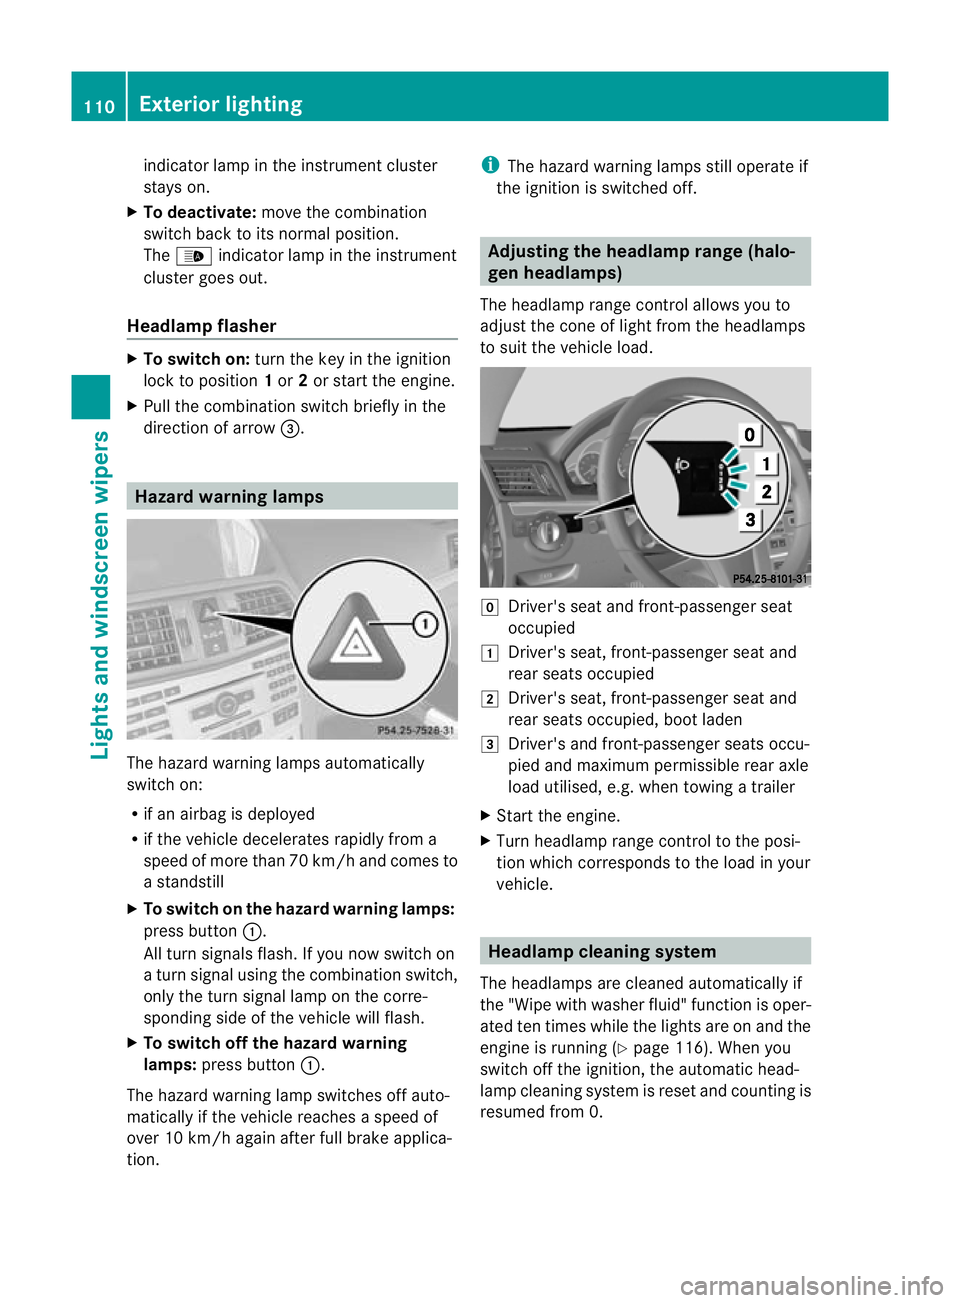
The headlamp range control allow syou to
adjust the con eoflight from the headlamps
to suit the vehicle load. g
Driver' sseat and front-passenger seat
occupied
1 Driver's seat, front-passenger seat and
rear seats occupied
2 Driver's seat, front-passenger seat and
rear seats occupied, boot laden
3 Driver's and front-passenger seats occu-
pied and maximu mpermissible rear axle
load utilised, e.g. when towing atrailer
X Start th eengine.
X Turn headlamp range control to the posi-
tion which corresponds to the load in your
vehicle. Headlamp clean
ings ystem
Th eh eadlamps are cleaned automatically if
the "Wipe with washer fluid" function is oper-
ated ten times while the lights are on and the
engine is running (Y page 116). When you
switc hoff th eignition, the automatic head-
lam pcleaning system is reset and countin gis
resume dfrom 0. 110
Exterior lightingLi
gh ts and windscreen wipers
BA 207 ECE ÄJ 2010/1a; 1; 2, en-GB
mkalafa Version:3.0.2.11
2010-01-26T13:03:22+01:0
0-Seite 110
Page 115 of 333
Active:
if you are driving at speeds below
70 km/h and you switc honthe rear foglamp.
No tactive: if you are driving at speeds above
10 0k m/h or yo uswitch off the rear foglamp
following activat ion. Interior lighting
Overv
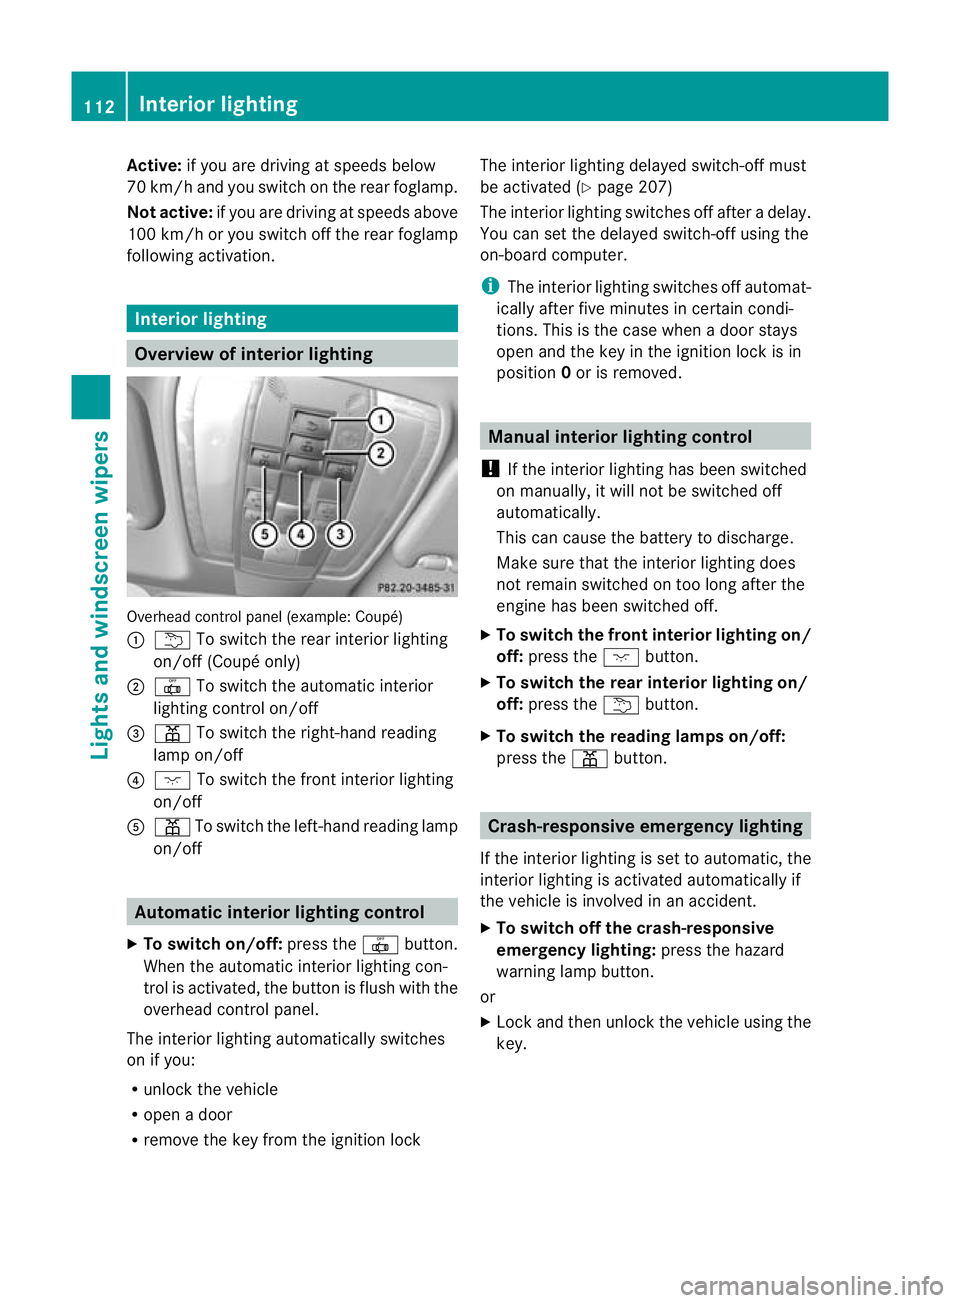
iewofi nterio rlighting Overhead control panel (example: Coupé)
:
u To switc hthe rea rinterior lighting
on/off (Coupé only)
; | To switc hthe automa tici nterior
lighting control on/off
= p To switc hthe right-han dreading
lam pon/off
? c To switch the fron tinterior lighting
on/off
A p To switch the left-hand reading lamp
on/off Automatic interior lighting control
X To switch on/off: pressthe | button.
When the automatic interior lighting con-
trol is activa ted, the button is flush with the
overhead control panel.
The interior lighting automatically switches
on if you:
R unloc kthe vehicle
R open adoor
R remove the key from the ignition lock The interior lightin
gdelayed switch-off must
be activated (Y page 207)
The interior lightin gswitches off after adelay.
You can set the delayed switch-off using the
on-board computer.
i The interior lighting switches off automat-
icall yafter five minutes in certain condi-
tions. This is th ecase when adoor stays
open and the key in the ignition lock is in
position 0or is removed. Manua
linterior lighting control
! If the interior lightin ghas been switched
on manually, it will not be switched off
automatically.
This can cause the batter ytodischarge.
Make sure that the interior lighting does
not remain switched on too long after the
engine has been switched off.
X To switch the front interior lighting on/
off: press the cbutton.
X To switch the rear interior lighting on/
off: press the ubutton.
X To switch the reading lamp son/off:
press the pbutton. Crash-responsive emergency lighting
If the interior lightin gisset to automatic ,the
interior lighting is activated automatically if
the vehicle is involved in an accident.
X To switch of fthe crash-responsive
emergenc ylighting: press the hazard
warning lamp button.
or
X Lock and then unlock the vehicle using the
key. 112
Interior lightingLights and windscreen wipers
BA 20
7ECE ÄJ 2010 /1a; 1; 2, en-GB
mkalafa Version: 3.0.2.11 2010-01-26T13:03:22+01:00 -Seite 112
Page 116 of 333
Changing bulbs
Important safety notes
Xenon bulbs If your vehicle is equipped wit
hxenon bulb s,
you ca nrecognise this by th efollowing: the
cone of light from th exenon bulbs moves
from th etop to the bottomand back again
whe nyou star tthe engine. Fo rthis to be
observed ,the lights must be switched on
before startin gthe engine. G
Risk of injury
Xenon bulb scarry ahigh voltage. You could
get an electric shock and be seriously or even
fatally injured if you touch the electric con-
tacts on xenon bulbs. Therefore, never
remov ethe cover from xenon bulbs.
Do not change xenon bulbs yourself, but have
them replaced at aqualified specialist work-
sho pwhich has the necessar yspecialist
knowledge and tools to carry out the work
required.
Mercedes-Ben zrecom mends that you use a
Mercedes-Benz Service Centre for this pur-
pose. In particular, work relevant to safety or
on safety-related systems must be carried out
at aq ualified specialist workshop.
Bulbs and lamps are an important aspect of
vehicle safety. You must therefore make sure
that thes efunction correctly at all times.
Have the headlamp setting checked regularly.
Other bulbs G
Risk of injury
Bulbs and lights can become very hot. For this
reason, allow them to cool down before
changin gthem. Otherwise, you coul dburn
yourself when you touch them.
Keep bulbs out of the reach of children. Oth-
er wise ,they could damage them, for example,
and inj uret hemselves.
Never use abulbw hich ha sbeend ropped.
Suc hab ulbm ay explod eand injure you. Halogen bulb
sare pressu rised and could
explode when yo uchange them, especiall yif
the yarever yhot. Yo ushould therefor ewear
eye protec tion and gloves when you are
changing them.
There are bulbs other than the xenon bulbs
that you cannot replace. Replace only the
bulbs listed (Y page 113). Hav ethe bulbs that
you cannot replac eyourself changed at a
qualified specialist workshop.
Mercedes-Ben zrecom mends that you use a
Mercedes-Ben zService Cent refor this pur-
pose .Inp articular, work relevant to safety or
on safety-related systems must be carried out
at aq ualified specialist workshop.
If you require assistanc echangi ngbulbs, con-
sult aqualified specialist workshop.
Do not touch the glass tube of new bulbs with
your bare hands. Even minor contamination
can burn int othe glass surface and reduce
the servic elife of the bulbs. Always use alint-
free clot horonly touch the bas eofthe bulb
when fit ting.
Only use bulb softhe cor rect type.
If the new bul bstill doe snot light up, consult
aq ualified specialist workshop.
Bulbs and lamps are an important aspect of
vehicle safety. You must therefore make sure
that these function correctly at all times.
Have the headlamp setting checked regularly. Overview: changing bulbs/bulb types
You can change the following bulbs .The bulb
typ ecan be found in the legend. Changin
gbulbs
113Lightsand windscreen wipers
BA 20 7ECE ÄJ 2010/1a; 1; 2, en-GB
mkalafa Version:3.0.2.11
2010-01-26T13:03:22+01:0
0-Seite 113 Z
Page 128 of 333
X
Tur nthe key to position 2in the ignition
lock.
X Set the desired temperature.
X To activa te:press the Ãbutton.
The indicator lamp above the Ãbutton
lights up. Automatic air distribution and air-
flow are activated.
X THERMOTRONI Cluxury 3-zone automatic
climate control: press switch Gup or down
and select the desired level (Y page 122).
FOCUS Air flow high/air distributio nvia
the centre and side vents
MEDIU MAir flow medium/air distribution
via the centre and side vents
DIFFUSE Air flow low/air distribution via the centre, side and defroster vents
i This setting is especially effec tive in auto-
mati cmode when outside tempera tures
are high.
X To deactivate: press the air distribution
button.
THERMATIC 2-zone automatic climate con-
trol: press button F(Ypage 121).
THERMOTRONIC luxury 3-zone automatic
climate control: press button
I (Ypage 122).
The indicator lamp above the Ãbutton
goes out.
or
X Press the airflow button.
THERMATIC 2-zone automatic climate con-
trol: press button G(Ypage 121).
THERMOTRONIC luxury 3-zone automatic
climate control: press button
H (Ypage 122).
The indicator lamp above the Ãbutton
goes out. Setting the temperature
THERMATIC 2-zone automatic climate
control Different temperatures can be set for the
driver'
sand front-passenger sides.
X Turn the key to position 2in the ignition
lock.
X To increase/reduce: pressbutton Eor
H up or down (Y page 121).
Only change the temperature setting in
small increments. Start at 22 †.
THERMOTRONIC luxur y3-zon eauto-
matic climate control Climate zone
sofTHERMOTRONIC luxury 3-zone
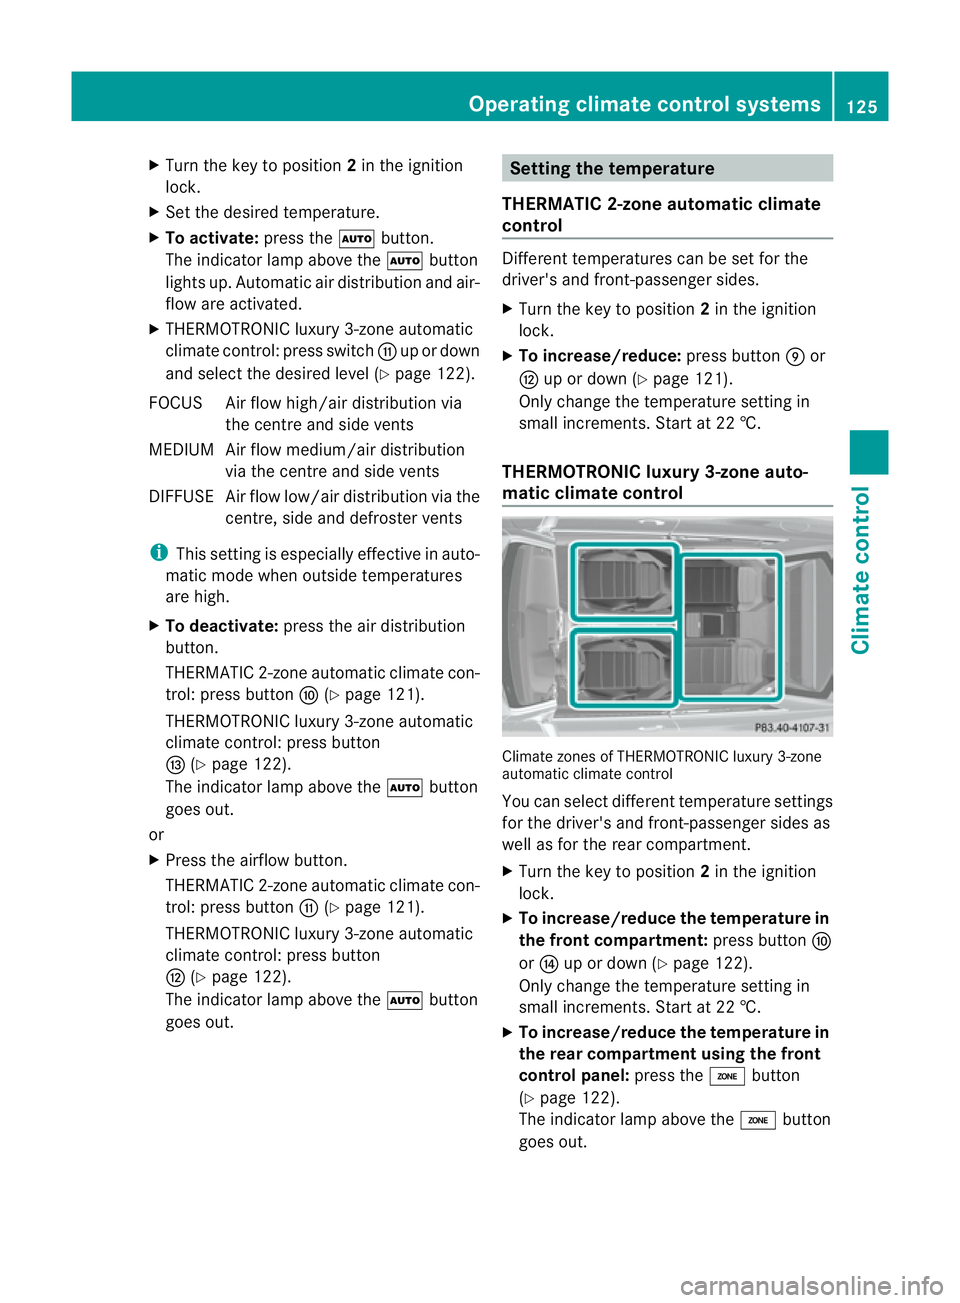
automatic climat econtrol
You can select different temperature settings
for the driver' sand front-passenger sides as
well as for the rear compartment.
X Turn the key to position 2in the ignition
lock.
X To increase/reduce the temperature in
the front compartment: pressbutton F
or J up or down (Y page 122).
Only change the temperature setting in
small increments. Start at 22 †.
X To increase/reduce the temperature in
the rear compartment using the front
control panel: press theábutton
(Y page 122).
The indicator lamp above the ábutton
goes out. Operating climate contro
lsystems
125Climate co ntrol
BA 207ECE ÄJ 2010 /1a; 1; 2, en-GB
mkalafa Version: 3.0.2.11 2010-01-26T13:03:22+01:00 -Seite 125 Z
Page 137 of 333

Vehicl
eequipment
i Thismanua ldesc ribe sallthe standard
and optional equipment of your vehicle
which wa savailable at th etime of pur-
chase. Countr y-specif ic differences are
possible. Bear in mind tha tyour vehicle
ma ynot featur eall function sdescribed
here. Running-in notes
Important safet
yinstructions G
Risk of accident
New brake pads/lini ngso nly have optimal
braking performance after several hundred
kilome tres. Un tilt hen ,compensate for this by
applying greater force to the brake pedal. This
also applies when brake pads/linings or
brake discs have been changed. Th
ef irst 1500 km
The mor eyou look after the engin ewhen it is
new, the happier you will be with its perform-
anc eint he future.
R Therefore, drive at varying speeds and
engin espeeds for the first 1500 km.
R Avoi doverstrainin gthe vehicle during this
period, e.g. drivin gatfull throttle.
R Change gear in good time, at the latest
when the rev counter needle is 2
/ 3 of the
way to the red area in the rev counter dis-
play.
R Do not manually shift to alower gear to
brake the vehicle.
Vehicles with automatic transmission:
R If possible, do not depress the accelerator
pedal past the point of resistanc e(kick-
down).
R Only select shift ranges 3,2or 1whe ndriv-
ing slowly, e.g .inmountainou sterrain. Af
ter1 500 km, you may gradually bring the
vehicl euptof ull road and engine speeds.
i Also observe these running-in notes when
the vehicle's engine, front-axle transmis-
sion or differential have been replaced. Driving
Important safety notes
G
Risk of accident
Do not place any objects in the driver' sfoot-
well. If you use afloormat or carpet in the
driver's footwell, make sure that it is correctly
secured and that there is sufficient clearance
for the pedals.
Do not place several floormats on top of one
another.
Loose object sorthe floormats coul dother-
wise get caught between the pedals if you
accelerate or brake suddenly. You will then
not be able to brake, declutch or accelerate
as intended. Thi scould lead to accident sand
injury. G
Risk of accident
Do not chang edown for additional engine
brakin gonas lippery road surface. This could
cause the drive wheels to lose their grip and
the vehicle could skid. This could cause you
to lose control of your vehicle and cause an
accident.
! Warm up the engine quickly. Do not use
the engine's full performanc euntil it has
reache doperating temperature.
Only set the automatic transmission to the
respective driv eposition swhen the vehicle
is stationary.
Where possible, avoid spinnin gthe drive
wheels when pulling away on slippery
roads. Otherwise, you could damage the
drive train. 134
DrivingDriving and pa
rking
BA 20 7ECE ÄJ 2010 /1a; 1; 2, en-GB
mkalafa Version: 3.0.2.11 2010-01-26T13:03:22+01:00 -Seite 134
Page 138 of 333

Key positions
Key g
To remove th ekey
1 Powe rsupply for some consumers, such
as the windscreen wipers.
2 Ignition (power supply for all consumers)
and drive position
3 To start the engine
i The key can be turned in the ignition lock
even if it is not the correc tkey for the vehi-
cle. The ignition is then not switched on.
The engin ecannot be started.
KEYLESS-GO Pressing the Start/Stop button several times
in succession corresponds to the different
key positions in the ignition lock. This is only
the case if you are not depressing the brake
pedal.
If you depress the brake pedal and press the
Start/Stop button ,the engin estart simmedi-
ately. X
Position 0:ifStart/Sto pbutton :has not
yet been pressed, this corresponds to the
key being removed from the ignition.
X Position 1:pressStart/Sto pbutton :.
You can now activat ethe windscreen wip-
ers, for example.
i If you then open the driver's door when in
this position ,the power supply is deactiva-
ted.
X Position 2(ignition): press Start/Stop but-
ton :twice.
i If you press Start/Stop button :once
when in this position and the driver's door
is open, the power supply is deactivated
again.
Removing th eStart/Stop button
You can remove the Start/Stop butto nfrom
th ei gnition lock and star tthe vehicle as nor-
ma lusing the key.
i You do not hav etoremov ethe Start/Stop
button from the ignition lock when you
leav ethe vehicle. X
Remove Start/Stop button :from ignition
lock ;.
i When you inser tthe Start/Stop button
int ot he ignition lock ,the system needs
2s econds recognition tim ebefor eyou can
use the Start/Stop button. Driving
135Driving and parking
BA 207ECE ÄJ 2010/1a; 1; 2, en-GB
mkalafa Version:3.0.2.11
2010-01-26T13:03:22+01:0
0-Seite 135 Z
Page 140 of 333

!
Change gear in good time and avoid spin-
ning the wheels. Otherwise, you could dam-
age the vehicle.
i Follow the shift recommendations in the
multifunction displa yfor an economical
drivin gstyle.
i The vehicle locks centrally once you have
pulled away. The locking knobs in the doors
drop down.
You can ope nthe doors from the insid eat
any time.
You can also deactivate the automatic lock-
ing feature (Y page 208).
Automatic transmission i
It is only possibl etoshift the transmission
from position Pto the desired position if
you depress the brake pedal. Onl ythen is
the select or lever lock released.
X Depress th ebrake peda land keep it
depressed.
X Shift the transmissio ntoposition Dor R.
X Release the parkin gbrake (Y page 153).
X Releas ethe brake pedal.
X Carefully depress the accelerator pedal.
i The vehicle lock scentrally onc eyou have
pulled away .The lockin gknobs in the doors
drop down.
You can open the doors from the inside at
any time.
You can also deactivat ethe automatic lock-
ing featur e(Ypage 20 8).
i Upshif tstake place at higher engine
speeds after acold star t.This helps the
catalytic converter to reach its operating
temperature mor equickly.
Hill star tassist G
Risk of accident
Never leav ethe vehicle when it is held by hill
star tassist. Af tera pproximately one second, hill start assist will no longer brak
eyour vehi-
cle and it coul droll away.
Hill star tassist helps you when pulling away
forwards or in reverse on an uphil lgradient.
It hold sthe vehicle for ashort tim eafter you
have removed you rfoot from the brake pedal.
This gives you enough tim etomove your foot
from the brake pedal to the accelerator pedal
and depress it befor ethe vehicle begin sto
roll.
X Take your foo toff th ebrake pedal.
i Once yo uhave taken your foot off the
brake pedal, the vehicle is held for around
one second.
X Pull away.
Hill start assis twill not function if:
R you are pulling away on alevel road or a
downhill gradient.
R on vehicles with automatic transmission,
the transmission is in position N
R the vehicle is secured with the parking
brake.
R ESP ®
is malfunctioning. Switching off the engine
Important safety instructions G
Risk of accident
If the engin eisn ot run ning, there is no power
assistance for the steerin gand brakes. Steer-
ing and braking will then require significantly
greate reffort.
As aresult, yo umight lose contr olof the vehi-
cle, cause an acc identand injure yoursel fand
others.
Therefore, do not switch off the engine while
yo ua re driving. Dri
ving
137Driving and parking
BA 207 ECE ÄJ 2010/1a ;1;2,en-GB
mkalafa Version: 3.0.2.11 2010-01-26T13:03:22+01:00-Seite 137 Z
Page 143 of 333

Problems wit
hthe engine Problem Possible causes/consequences and
M Solutions
Th
ee ngine doe snot
start. The HOL
Dfunction or DISTRONIC PLUS is activated.
X Deactivat ethe HOL Dfunction (Y page 172)orDISTRONIC
PLUS (Y page 160).
X Try to start th eengine again. The engine doe
snot
start. The starter motor
can be heard. R
There is amalfunction in the engine electronics.
R There is amalfunction in the fuel supply.
R The on-board voltage is too low because the starter battery is
too weak or discharged.
X Before attempting to start the engine again, turn the key in the
ignition back to position 0or press the Start/Stop button
repeatedly until all indicator lamps in the instrumen tcluster go
out.
X Try to star tthe engin eagain (Y page 136). Avoid excessively
long and frequen tattempt stostart the engine as thes ewill drain
the battery.
If the engine does not start after several attempts:
X Consult aqualified specialist workshop. The engine does not
start
.The starter motor
can be heard. The
reserve fuel warning
lam pisl it and the fuel
gauge displa yshows 0. The fuel tan
kise mpty.
X Refue lthe vehicle. The engin
edoes not
start. You cannot hear
the starter motor. The on-boar
dvoltage is too low because the starter battery is too
weak or discharged.
X Jump-start the vehicle (Y page 289).
If the engin edoes not star tdespite attempt stojump-start it:
X Consult aqualified specialist workshop. The starter motor was exposed to
athermal load that was too high.
X Allo wthe starter motor to cool down for approximatel ytwo
minutes.
X Try to start the engine again.
If the engine still does not start:
X Consult aqualified specialist workshop. 140
DrivingDrivin
gand pa rking
BA 20 7ECE ÄJ 2010 /1a;1;2,e n-GB
mkalafa Version: 3.0.2.11 2010-01-26T13:03:22+01:00-Seite 140