key MERCEDES-BENZ E-CLASS CABRIOLET 2010 Manual Online
[x] Cancel search | Manufacturer: MERCEDES-BENZ, Model Year: 2010, Model line: E-CLASS CABRIOLET, Model: MERCEDES-BENZ E-CLASS CABRIOLET 2010Pages: 333, PDF Size: 7.64 MB
Page 255 of 333
X
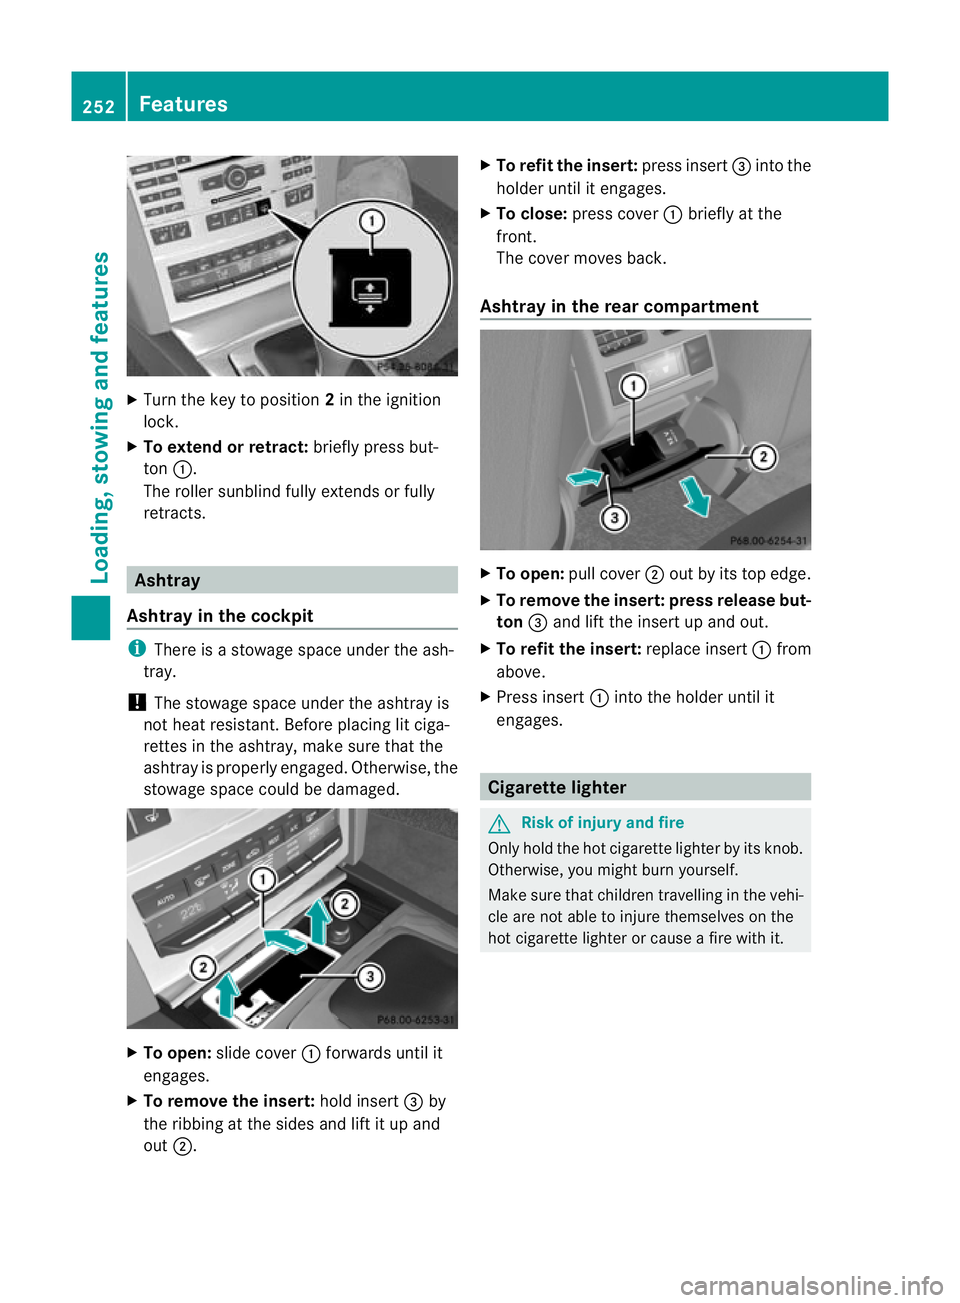
Tur nthe key to position 2in the ignition
lock.
X To extend or ret ract: briefly press but-
ton :.
The roller sunblind fully extends or fully
retracts. Ashtray
Ashtray in the cockpit i
There is astowag espace under the ash-
tray.
! The stowage space under the ashtra yis
not hea tresistant .Befor eplacing lit ciga-
rettes in the ashtray, make sure that the
ashtray is properly engaged. Otherwise, the
stowage space could be damaged. X
To open: slide cover :forwards until it
engages.
X To remove the insert: hold insert=by
the ribbing at the sides and lift it up and
out ;. X
To refit the insert: press insert=intothe
holder until it engages.
X To close: press cover :briefl yatthe
front.
The cover moves back.
Ashtray in th erear compartment X
To open: pull cover ;out by its top edge.
X To remove the insert: press release but-
ton =and lift the insert up and out.
X To refit the insert: replace insert:from
above.
X Press insert :intot he holder until it
engages. Cigaret
telighter G
Risk of injur
yand fire
Only hold the hot cigarette lighter by its knob.
Otherwise, you might burn yourself.
Make sure that children travelli ngin the vehi-
cle are not able to injur ethemselves on the
hot cigarette lighte rorcause afire with it. 252
FeaturesLoading
,stowin gand features
BA 20 7ECE ÄJ 2010/1a; 1; 2, en-GB
mkalafa Version:3.0.2.11
2010-01-26T13:03:22+01:0
0-Seite 252
Page 256 of 333
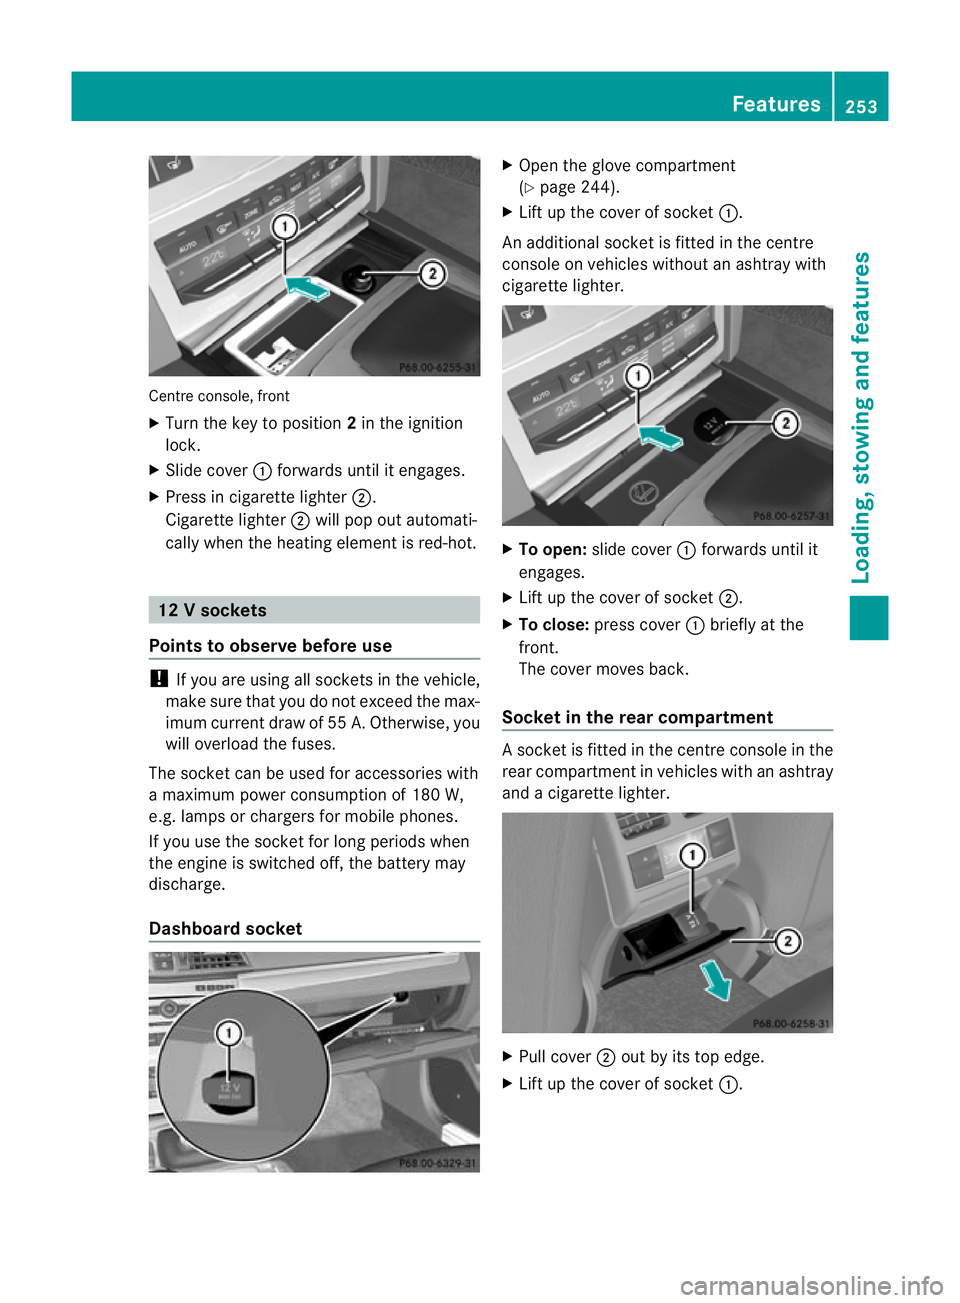
Centre console, front
X
Turn the key to position 2in the ignition
lock.
X Slide cover :forwards until it engages.
X Press in cigarette ligh ter;.
Cigarett elighter ;will pop out automati-
cally when th eheating element is red-hot. 12
Vsockets
Point stoo bserve befo reuse !
If you are using all so cketsi nt he vehicle,
make surethat yo udonot excee dthe max-
im um current dra wof55A.O therwise, you
wil loverl oadt he fuses.
The socket can be used for accessories with
am aximum power consumptio nof180 W,
e.g .lamp sorc hargers for mobi lephones.
If you use the socket for long periods when
the engine is switched off ,the battery may
discharge.
Dashboar dsocket X
Open the glove compartment
(Y pag e244).
X Lift up the cove rofsocket :.
An additional socket is fitted in the centre
console on vehicles without an ashtray with
cigarette lighter. X
To open: slide cover :forwards until it
engages.
X Lif tu pt he cover of socket ;.
X To close: press cover :briefly at the
front.
The cover moves back.
Socket in th erear compartment As
ocke tisf itted in the centre console in the
rear compartment in vehicles with an ashtray
and acigarett elighter. X
Pull cover ;out by its top edge.
X Lif tu pt he cover of socket :. Featu
res
253Loading, stowing and features
BA 207ECE ÄJ 2010 /1a; 1; 2, en-GB
mkalafa Version: 3.0.2.11 2010-01-26T13:03:22+01:00 -Seite 253 Z
Page 257 of 333
Mob
ilep hone G
Ris
kofa ccident
Observe the lega lrequirements of the country
in which you are currently driv ingr egarding
operating mobile communications equipment
in av ehicle.
If it is permitted by law to operate communi-
cations equipment while the vehic leis in
motion, you must only do so if the traffic sit-
uation permits. Otherwise, you could be dis-
tracted from the traffic conditions, cause an
accident and injur eyourself and others.
Two-way rad iosa nd fax equipment use dwith-
out low-reflection exter iora erials can inter-
fere with the vehicle's electronics and thereby
jeopardis ethe operating safety of the vehicle
and your safety. Therefore, you must only use
this equipment if it is correctly connected to
as eparate reflection-free exterior aerial. G
Risk of injury
Excessive levels of electromagnetic radiation
may cause damage to your health and the
health of others. Usin ganexterior aerial takes
into account current scientific discussions
relating to the possible health risk posed by
electromagnetic fields.
To ensure optimum reception quality for
mobil ephones in the vehicle and to minimise
mutua linfluences between the vehicl eelec-
tronics and mobile phones, Mercedes-Benz
recommends the use of an approved exterior
aerial. An exterior aerial conduct sthe elec-
tromagnetic fields generated by awireless
device to the exterior of the vehicle; the field
strength within the vehicle interior is lower
than in avehicle that does not have an exte-
rior aerial.
i There are various mobile phone brackets
that may be fit tedtoy our vehicle; in some
cases, these ar ecountry-specific. You can
obtain these mobile phone bracke ts from a
qualified specialist workshop, e.g. a
Mercedes-Benz Servic eCentre. The functions and services available when
you use the phone depend on your mobile
phone model and service provider.
Inserting the mobile phone
X Open the telephone compart ment
(Y page 245).
X Place the mobil ephone bracket int othe
pre-installed bracket ;see the separate
mobile phone bracket installation instruc-
tions.
X Insert the mobile phone into the mobile
phone bracket ;see the separate mobile
phone bracket installation instructions.
If the mobile phone is inser tedint he mobile
phone bracket ,you can speak to the person
you ar ecalling using the hands-free system.
You can operate the telephone using the
6 and~ button sonthe multifunc tion
steerin gwheel. You can operate other mobile
phone func tions via the on-boar dcomputer
(Y page 200).
When you tak ethe key out of the ignition lock,
the mobile phone stay sonb ut you can no
longer use the hands-free system.
If you are making acall and you would like to
take the key out of the ignition lock, first
remove the mobile phone from the bracket.
Otherwise, the call will be ended. Floormat on the driver'
sside G
Risk of accident
Make sure that there is sufficien tclearance
around the pedals when floormats are used,
and that the floormats are properly secured.
The floormats must be correctly secured at all
times using retainer sand press-s tuds.
Befor eyou driv eoff, check the floormat sand
secure if necessary. Afloormat which is not
properly secured can slip and, thereby, inter-
fere with the movemen tofthe pedals.
Do not plac efloormats on top of one another. 254
FeaturesLoading
,stowin gand features
BA 20 7ECE ÄJ 2010/1a; 1; 2, en-GB
mkalafa Version: 3.0.2.11 2010-01-26T13:03:22+01:00 -Seite 254
Page 262 of 333
X
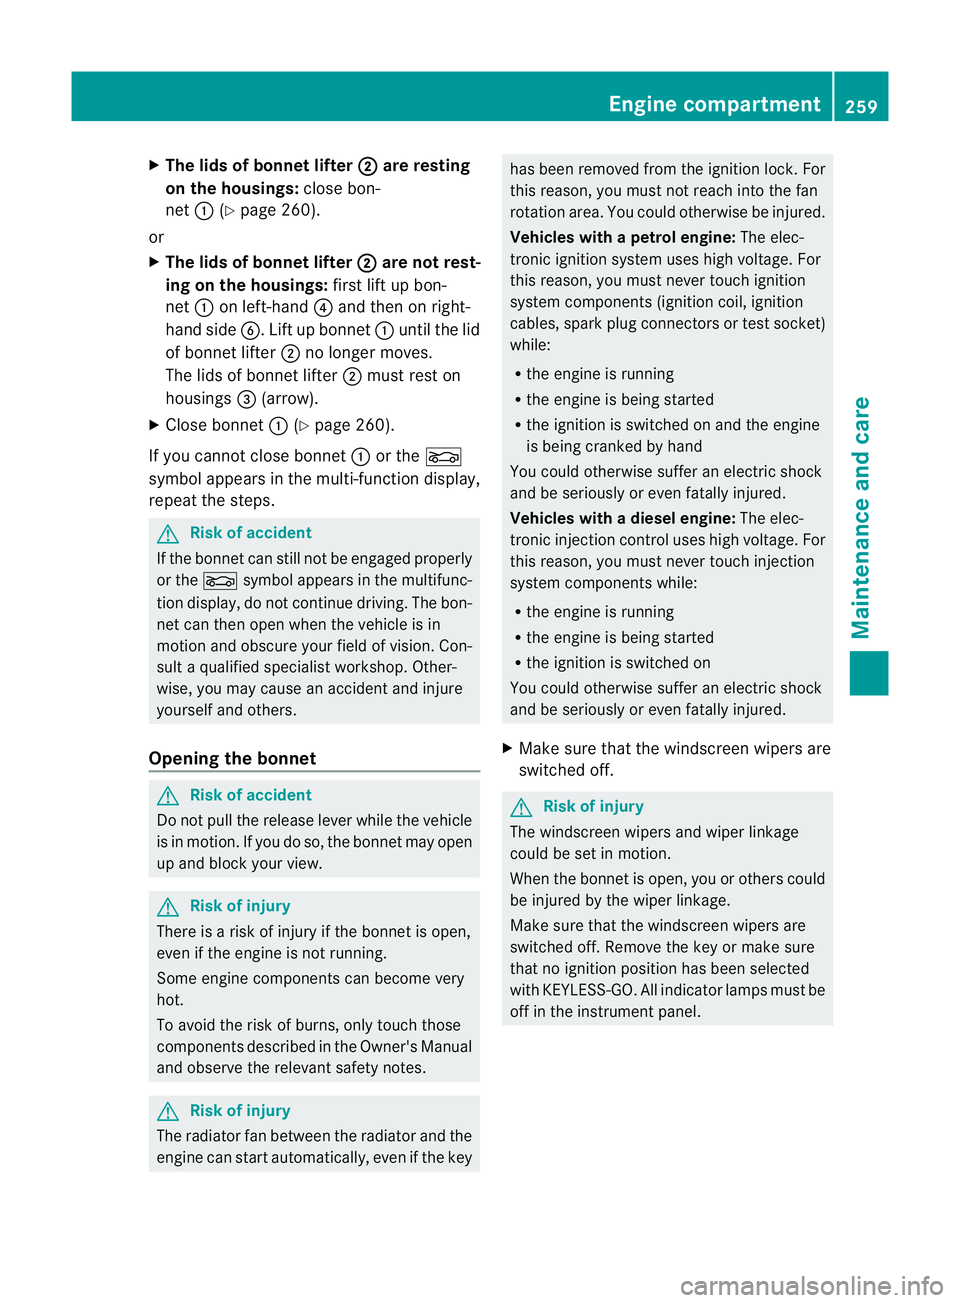
The lids of bonnet lifter ; are resting
on the hous ings:close bon-
net :(Ypage 260).
or
X The lids of bonnet lifter ; are no
trest-
in gont he housings: first lift up bon-
net :on left-h and?and then on right-
hand side B.Lift up bonnet :until the lid
of bonnet lifter ;no longe rmoves.
The lids of bonnet lifter ;must rest on
housings =(arrow).
X Close bonnet :(Ypage 260).
If you can notc lose bonnet :or the L
symbol appears in the multi-function display,
repeat the steps. G
Risk of accident
If the bonnet can still not be engaged properly
or the Lsymbol appears in the multifunc-
tion display, do not continue driving. The bon-
net can then open when the vehicle is in
motion and obscure your field of vision. Con-
sult aqualified specialist workshop .Other-
wise ,you may cause an accident and injure
yourself and others.
Opening th ebonnet G
Risk of accident
Do not pull the release lever while the vehicle
is in motion .Ifyou do so, the bonne tmay open
up and block your view. G
Risk of injury
There is arisk of injur yifthe bonnet is open,
even if the engin eisnot running.
Som eengine compone ntsc an become very
hot.
To avoid the risk of burns, only touch those
components described in the Owner's Manual
and observe the relevant safety notes. G
Risk of injury
The radiator fan between the radiator and the
engine can start automatically, even if the key has been removed from the ignition lock. For
this reason, you must not reach into the fan
rotation area. You could otherwise be injured.
Vehicles with
apetrol engine: The elec-
tronic ignition system uses high voltage. For
this reason ,you must never touc hignition
system component s(ignition coil, ignition
cables, spark plug connectors or test socket)
while:
R the engine is running
R the engine is being started
R the ignition is switched on and the engine
is being cranked by hand
You could otherwise suffer an electric shock
and be seriously or even fatally injured.
Vehicles with adiesel engine: The elec-
tronic injection control uses high voltage. For
this reason ,you must never touc hinjection
system components while:
R the engi neis running
R the engin eisbeing started
R the ignition is switched on
You could otherwise suffer an electric shock
and be seriously or even fatally injured.
X Make sure that the windscreen wipers are
switched off. G
Risk of injury
The windscreen wipers and wiper linkage
could be set in motion.
When the bonnet is open, you or others could
be injured by the wiper linkage.
Make sure that the windscreen wipers are
switched off .Remov ethe key or make sure
that no ignition position has been selected
with KEYLESS-GO. All indi cator lamps must be
off in the instrumen tpanel. Engine compartment
259Maintenance and care
BA 207 ECE ÄJ 2010/1a; 1; 2, en-GB
mkalafaV ersion: 3.0.2.11
2010-01-26T13:03:22+01:00
-Seite 259 Z
Page 264 of 333
Adding engine oil
H
Environmenta
lnote
When toppin guptheoil, tak ecaren ot to spill
any .Ifo il enter sthe soil or waterways, it is
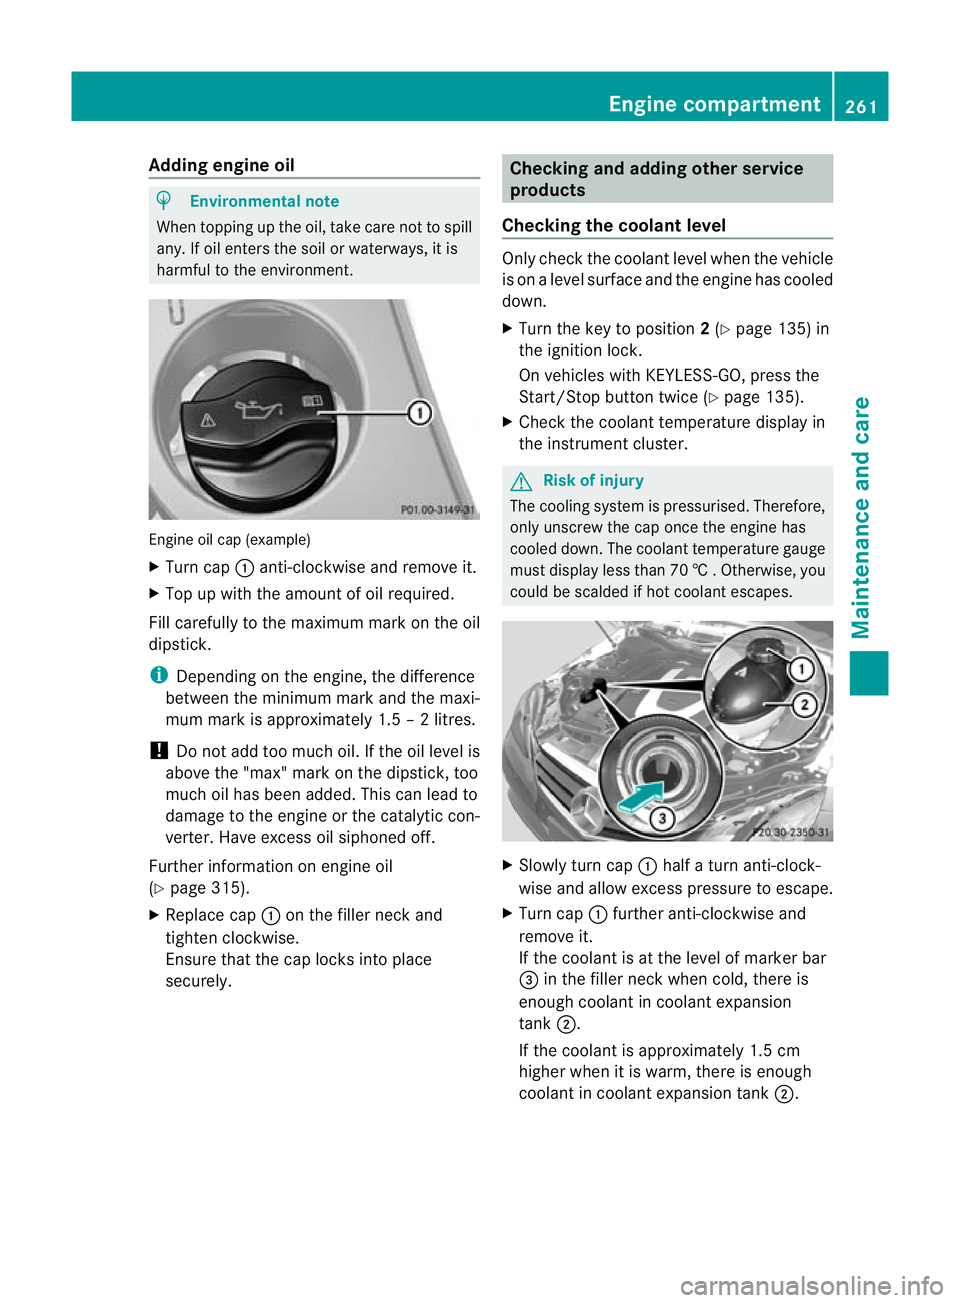
harmful to the environmen t.Engine oil cap (example)
X
Turn cap :anti-clockwise and remove it.
X Top up with the amount of oil required.
Fill carefully to the maximum mark on the oil
dipstick.
i Depending on the engine, the difference
between the minimum mark and the maxi-
mum mark is approximately 1.5 –2litres.
! Do not add too muc hoil. If the oil level is
above the "max "mark on the dipstick, too
much oil has been added. This can lead to
damage to the engine or the catalytic con-
verter .Have excess oil siphoned off.
Further information on engin eoil
(Y page 315).
X Replac ecap : on the filler nec kand
tighten clockwise.
Ensure that the cap locks int oplace
securely. Checking and addin
gother service
products
Checking th ecoolan tlevel Only check th
ecoolant leve lwhen th evehicle
is on alevel surface and th eengine has cooled
dow n.
X Tur nthe ke ytop osition 2(Y page 135) in
th ei gnitio nlock.
On vehicles with KEYLESS -GO, press the
Star t/Stop butto ntwice (Y page 135).
X Check the coolant temperature display in
the instrument cluster. G
Risk of injury
The cooling system is pressurised. Therefore,
only unscrew the cap once the engine has
cooled down. The coolant temperature gauge
must display less than 70 †.Otherwi se,you
could be scalded if ho tcoolant escapes. X
Slowl yturn cap :half aturna nti-clock-
wis eand allo wexcess pressure to escape.
X Turn cap :further anti-clockwis eand
remove it.
If the coolant is at the level of marker bar
= in the filler neck when cold, ther eis
enough coolan tincoolant expansion
tank ;.
If the coolant is approximately 1. 5cm
higher when it is warm, ther eisenough
coolant in coolant expansion tank ;. Engin
ecompartment
261Maintenance and care
BA 207ECE ÄJ 2010/1a; 1; 2, en-GB
mkalafa Version:3.0.2.11
2010-01-26T13:03:22+01:0
0-Seite 261 Z
Page 267 of 333
thi
sreason, following acar wash, drive with
particular care unti lthe brakes are dry. G
Risk of accident
Th ev ehicle is braked when th eHOLDfunction
or DISTRONI CPLUSisa ctivated. Therefore,
dea ctivate th eHOLD function and DISTRONIC
PLU Sbefor ethe vehicle is washed in an auto-
matic car wash.
You can wash the vehicle in an automatic car
wash from the ver ystart.
! We recommend automatic car washes
with an adjustable 40
high-pressure pre-
cleaning program. In car washes that use
hig hw ater pressures, there is adanger that
as mall quantity of water may leak int othe
vehicle.
! Cabriolet: do not treat the vehicle with
hot wax under any circumstan ces.
! Cabriolet: pull the key out of the ignition
lock when washing the vehicle .This
ensures that the win ddeflector on the
windscreen is retracted. The wind deflector
may otherwise be damaged.
If the vehicle is ver ydirty, pre-wash it before
cleaning it in an automatic car wash.
! In car washes with atowing mechanism,
make sure that the automatic transmission
is in transmission position N,otherwis ethe
vehicle could be damaged.
! Make sur ethat the side windows ar ecom-
pletel yclosed, that the ventilation/heater
blowe risfully turned off and that the wind-
screen wiper switch is set to 0.Otherwi se,
the rain/light senso rmay be activated, trig-
gering unintended wiper movemen ts.T his
could cau se damage to the vehicle.
After using an automatic car wash, wip eoff
wax from th ewindscreen and the wiper
blades. This will prevent smears and reduce
wiping noises caused by residue on the wind-
screen. High-pressur
ecleaners G
Risk of accident
Do not use high-pressur ecleaners with circu-
lar-jet nozzles (dirt grinders) to clean your
vehicle, in particular the tyres. You could oth-
erwise damage the tyres and cause an acci-
dent.
! Always maintain adistance of at least
30 cm between the vehicle and the high-
pressure cleaner nozzle. Information about
the correct distance is available from the
equipment manufacturer.
Move the high-pressure cleaner nozzle
around when cleaning your vehicle.
Do not aim directly at any of the following:
R tyres
R door joint
R soft top (Cabriolet)
R wind deflector net (Cabriolet)
R electrical components
R battery
R connectors
R lights
R seals
R trim elements
R ventilation slots
Damaged seals or electrical components
can lead to leaks or failures.
Cleanin gthe whee ls !
Do not use acidic whee lcleaning products
to remov ebrake dust .This could damage
wheel bolts and brake componen ts.
! Do not park up the vehicle for an extended
perio dstraight after cleaning it, particularly
after having cleaned the wheels with wheel
cleaner. Wheel cleaners could cause
increased corrosio nofthe brake discs and
brake pads/linings. For this reason, you
should drive for afew minutes after clean-
ing. Brakin gheats the brak ediscs and
40 In accordance with the specification sfor Cabriolet programs. 264
CareMaintenance and care
BA 20
7ECE ÄJ 2010/1a; 1; 2, en-GB
mkalafa Version: 3.0.2.11 2010-01-26T13:03:22+01:00-Seite 264
Page 269 of 333
i
Cover the soft top with asuitable cover if
you plan to leave the vehicle outsid efor a
long period of time.
Cleaning AIRCAP Cleaning th
ewind deflector
Clean the wind deflector on the windscreen
with the soft top closed.
X Apply the parkin gbrake firmly.
X Vehicle swith key: turn the key to position
2 (Y page 135) in the ignition lock.
X Vehicles with KEYLESS-GO: press the
Star t/Stop butto ntwice (Y page 135).
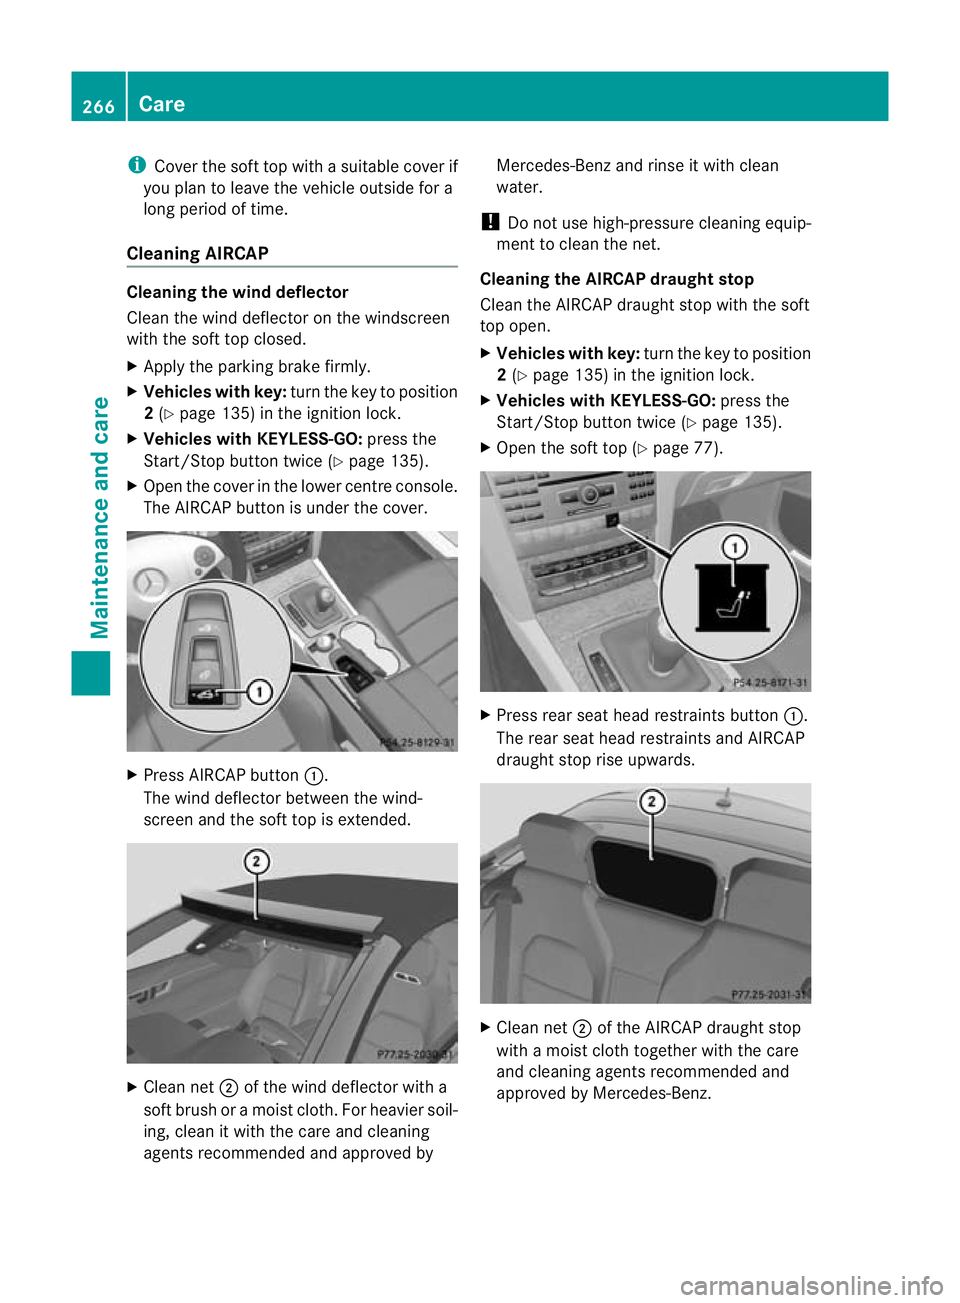
X Open the cover in the lower centre console.
The AIRCA Pbutton is under the cover. X
Press AIRCAP button :.
The wind deflector betwee nthe wind-
screen and the soft top is extended. X
Clean net ;of the wind deflec torw ith a
soft brush or amoist cloth. For heavier soil-
ing, clea nitwith the care and cleaning
agents recommended and approved by Mercedes-Ben
zand rins eitwithc lean
water.
! Do not us ehigh-pressure cleaning equip-
ment to clean the net.
Cleanin gthe AIRCA Pdraught stop
Clea nthe AIRCA Pdraught stop with th esoft
top open.
X Vehicles with key: turnthe key to position
2 (Y page 135) in the ignition lock.
X Vehicle swith KEYLESS-GO: press the
Star t/Stop butto ntwice (Y page 135).
X Open the soft top (Y page 77). X
Press rear seat head restraint sbutton :.
The rear seat head restraint sand AIRCAP
draugh tstop rise upwards. X
Clea nnet; of the AIRCAP draught stop
with amoist clot htogether with the care
and cleanin gagents recommended and
approved by Mercedes-Benz. 266
CareMaintenance and care
BA 20
7ECE ÄJ 2010/1a; 1; 2, en-GB
mkalafa Version:3.0.2.11
2010-01-26T13:03:22+01:0
0-Seite 266
Page 270 of 333
Cleaning th
ewindows G
Ris
kofi njury
Switch off th ewindscree nwipers and remove
the key fro mthe ignition lock befor ecleaning
the windscreen or the wiper blades. On vehi-
cles with KEYLESS-GO, press the Star t/Stop
butto nuntil all indicato rlamps in the instru-
ment cluster go out. The windscreen wipers
could otherwise move and injure you.
X Clea nthe insid eand outside of the win-
dow swithadamp cloth and acleaning
agent that is recommended and approved
by Mercedes-Benz.
! Do not use dry cloths, abrasive products,
solvents or cleaning agents containing sol-
vent stoc lean the inside of the windows.
Do not use hard object stoclean the insides
of the windows, e.g. an ice scraper or ring.
There is otherwise arisk of damaging the
windows.
! Clean the water drainage channels of the
windscreen and the rear window at regular
intervals. Under certain circumstances,
deposits such as leaves, petals and pollen
may prevent water from drainin gaway
leading to corrosion damage.
Cleaning the wiper blades G
Risk of injury
Switch off the windscreen wipers and remove
the key from the ignition lock before cleaning
the windscreen or the wiper blades. On vehi-
cles with KEYL ESS-GO, pres sthe Start/S top
button until all indicator lamps in the instru-
ment cluster go out. The windscreen wipers
could otherwise mov eand injure you.
! Do not pull on the wipe rblade. Otherwise,
the wiper blade could be damaged.
! Do not clean wiper blades too often and
do not rub them too hard. Otherwise, the
graphite coating could be damaged. This
could cause wiper noise. X
Fold the wiper arm saway from the wind-
screen.
X Carefully clean the wiper blades with a
damp cloth.
X Fold the windscreen wipers back again
before switching on the ignition.
! Hold the wiper arm securely when folding
back. The windscreen could be damaged if
the wiper arm hits against it suddenly.
Cleaning the headlamps X
Clean the plastic lamp lenses on the head-
lamps using awet sponge and amild clean-
ing agent, e.g. Mercedes-Benz car sham-
poo or cleaning cloths.
! Only use cleaning agents or cleaning
cloths which are suitable for plastic head-
lamp lenses. Unsuitable cleaning agents or
cleaning cloths could scratc hordamage
the plastic headlamp lenses.
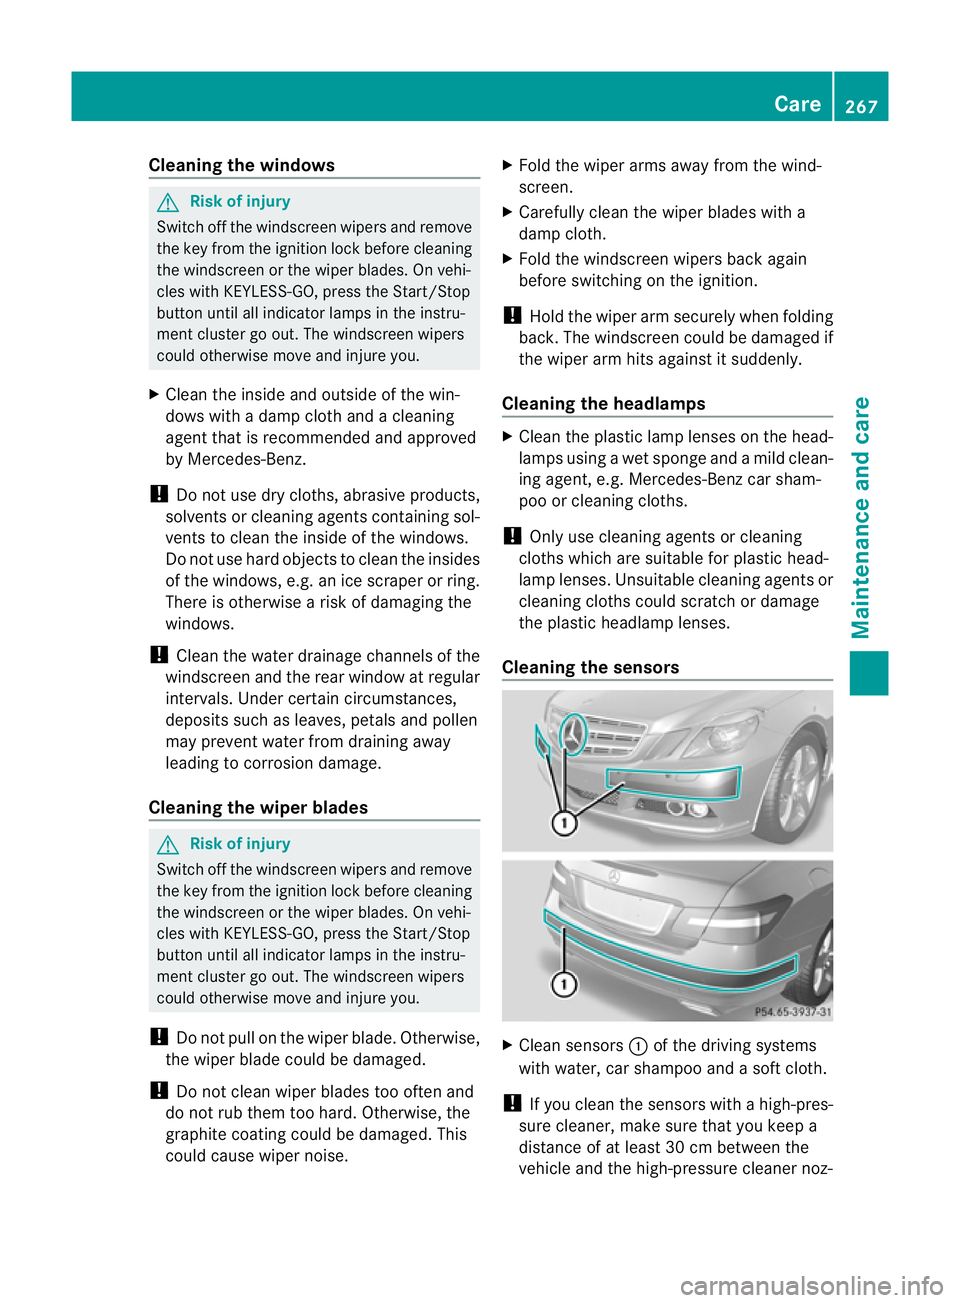
Cleaning the sensors X
Clean sensors :of the driving systems
with water, car shampoo and asoft cloth.
! If you clea nthe sensor swithahigh-pres-
sure cleaner ,make sure that you keep a
distance of at least 30 cm between the
vehicle and the high-pressure cleaner noz- Care
267Maintenance and care
BA 207 ECE ÄJ 2010/1a; 1; 2, en-GB
mkalafa Version:3.0.2.11
2010-01-26T13:03:22+01:00
-Seite 267 Z
Page 276 of 333
After an accident
Problem Possible causes/consequences and
M Solutions
Fue
lisl eaking from the
vehicle. G
Ris
kofe xplosion or fire
The fuel line or the fuel tan kisf aulty.
X Immediately turn the key to position 0(Ypage 135)in the ignition
lock and remove it.
X Do not restart the engine under any circumstances.
X Consult aqualified special istworkshop. You are unable to
determine the exten
tof
the damag e. X
Consult aqualified specialis tworkshop. You can
notd etect any
damage. X
Start the engine as normal. The active bonnet func-
tion (pedestrian protec-
tion) has been trig-
gered. Your vehicle has been involved in
afrontal collision.
X Rese tthe triggered activ ebonnet (pedestrian protection)
(Y page 258). The NECK
-PRO head
restraints on the driv-
er's and front-
passenger seats have
been triggered. Your vehicle has been involved in
arear-end collision.
X Reset the triggered NECK-PRO head restraint s(Ypage 40). Where will
Ifind...? Wa
rning triangle
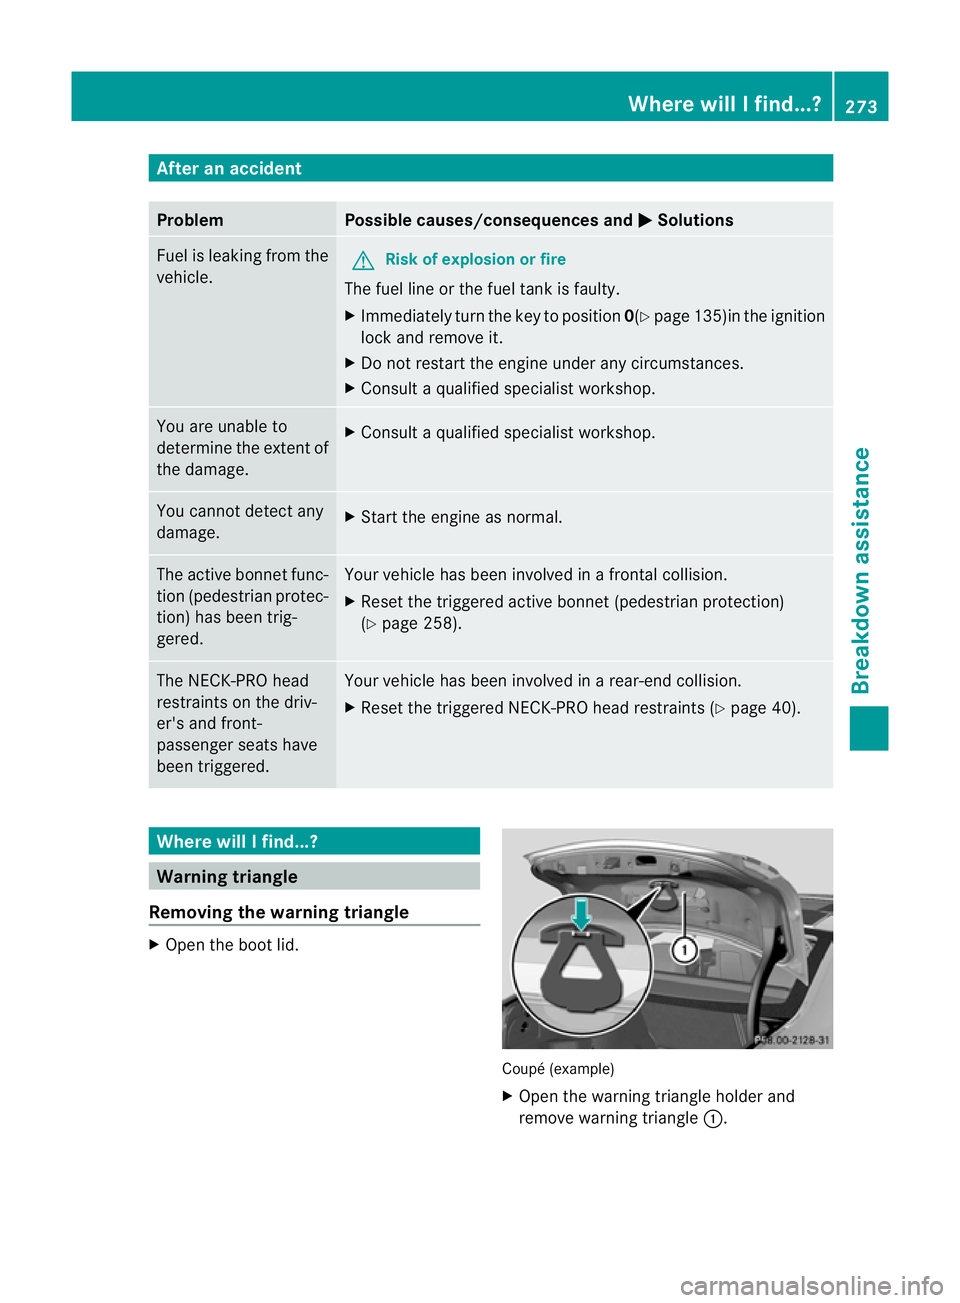
Removing the warning triangle X
Open the boot lid. Coupé (example)
X
Open the warning triangle holder and
remove warning triangle :. Where will
Ifind...?
273Breakdown assistance
BA 207ECE ÄJ 2010 /1a; 1; 2, en-GB
mkalafa Version: 3.0.2.11 2010-01-26T13:03:22+01:00 -Seite 273 Z
Page 279 of 333
tha
tyou additionally equip your vehicle
with the TIREFI Tkit if you fit tyres that do
not featur erun-flat properties ,e.g. winter
tyres .You can obtain aTIREFIT kit from a
Mercedes-Benz Service Centre ,for exam-
ple.
X Stop the vehicle as far away as possible
from traffic on solid, non-slipper yand level
ground.
X Switch on the hazard warning lamps.
X Firmly depress the parking brake.
X Bring the front wheels into the straight-
ahead position.
X Vehicles with manua ltran smission:
engage first or reverse gear.
X Vehicles with au tomatic transmission:
move the selector lever to P.
X Switch off the engine.
X Vehicles without KEYLESS-GO: remove
the key from the ignition lock.
X Vehicles with KEYLESS-GO: openthe
driver's door.
The on-boar delectronics have status 0,
which is the same as the key having been
removed.
X Vehicles with KEYLESS-GO: removethe
Star t/Stop butto nfrom th eignition lock
(Y page 135).
X All occupan ts must get out of the vehicle.
Make sur ethat they ar enot endangered as
they get out of the vehicle.
X Make sure that no one is near the danger
area whilst awheel is being changed. Any-
one who is not directly assisting in the
wheel change should, for example, stand
behind the barrier.
X Get out of the vehicle. Pay attention to traf-
fic conditions when doing so.
X Close the driver's door.
X Plac ethe warnin gtriangl e(Ypage 273) a
suitable distanc eaway .Observ elegal
requirements. TIREFIT kit
Using th eTIREFIT kit You can use the TIREFIT kit to seal small
punctures, particularly those in the tyre tread.
You can use TIREFIT at outside temperatures
down to -20 †.
G
Risk of accident
In the following situations, your safety is at
particular risk and tyre sealant is unable to
provide breakdown assistance if:
R ther eare cuts or punctures in th etyre
greater than 4mm
R the whee lrim is damaged
R you have driven at very low tyre pressures
or on aflat tyre
Do not drive any fur ther. Consult aqualified
specialist workshop which has the necessary
specialist knowledg eand tool stocarry out
the work required.
Mercedes-Benz recommends that you use a
Mercedes-Benz Service Centr efor this pur-
pose. In particular ,work relevant to safet yor
on safety-related system smust be carried out
at aq ualified specialist workshop.
X Do not remov eany foreig nobjects which
have penetrated the tyre, e.g. screw sor
nails.
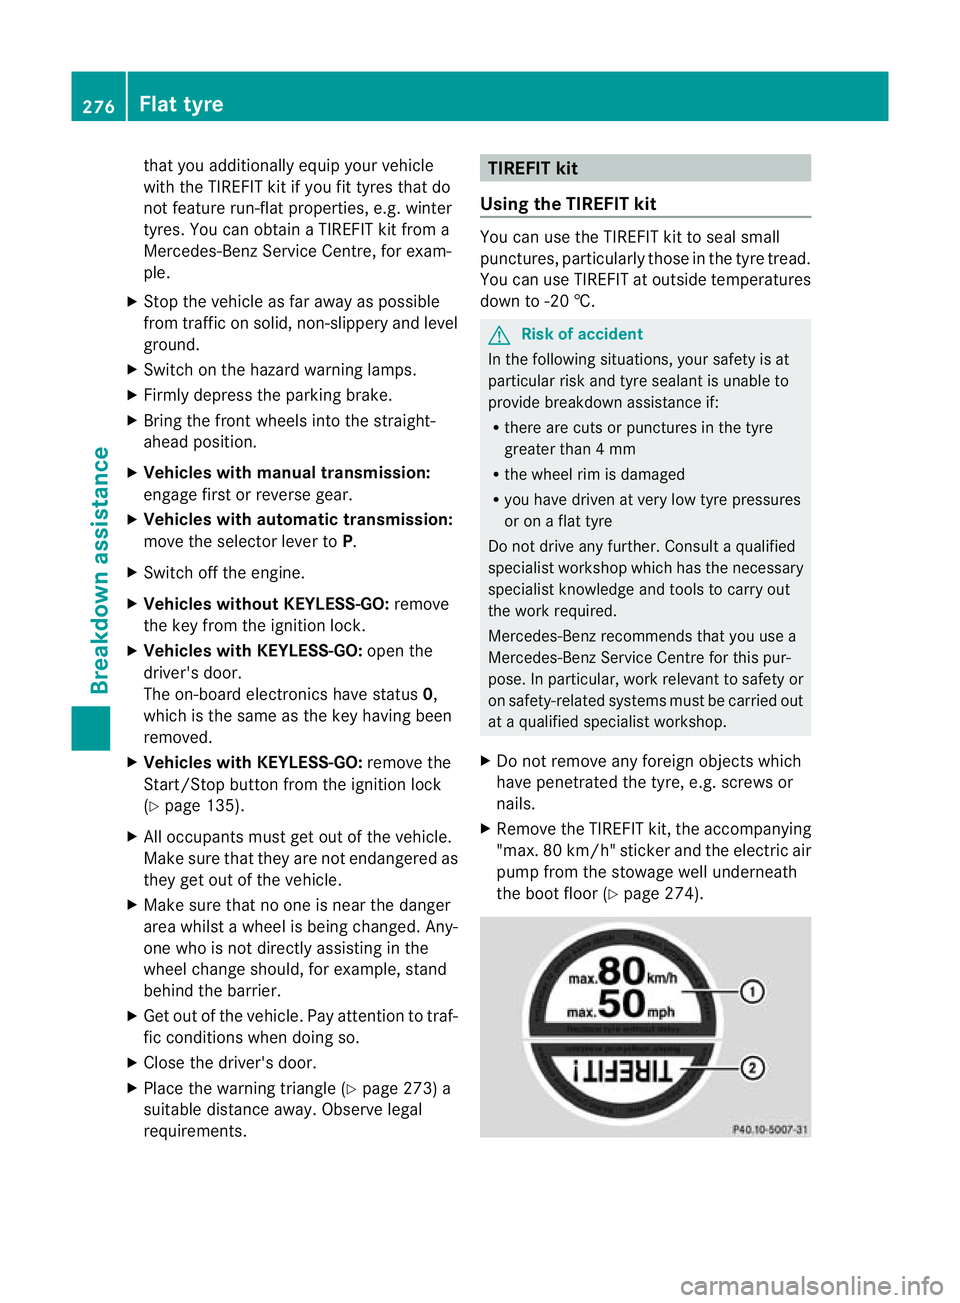
X Remove the TIREFI Tkit,t he accompanying
"max. 80 km /h"sticker and the electric air
pump from the stowage well underneath
the boo tfloor (Y page 274). 276
Flat tyreBreakdown assis
tance
BA 207ECE ÄJ 2010/1a; 1; 2, en-GB
mkalafa Version:3.0.2.11
2010-01-26T13:03:22+01:0
0-Seite 276