check engine MERCEDES-BENZ E-Class CABRIOLET 2013 C207 User Guide
[x] Cancel search | Manufacturer: MERCEDES-BENZ, Model Year: 2013, Model line: E-Class CABRIOLET, Model: MERCEDES-BENZ E-Class CABRIOLET 2013 C207Pages: 372, PDF Size: 12.69 MB
Page 75 of 372
The Product label with FCC ID and IC
certification number can be found in the
battery case of the SmartKey.
R Do not keep the SmartKey:
-with electronic devices, e.g. a mobile
phone or another SmartKey
- with
metallic objects, e.g. coins or metal
foil
- inside metallic objects, e.g. a metal case
This can affect the SmartKey's
functionality.
Keep the SmartKey away from strong
magnetic fields. Otherwise, the remote
control function could be affected. SmartKey functions
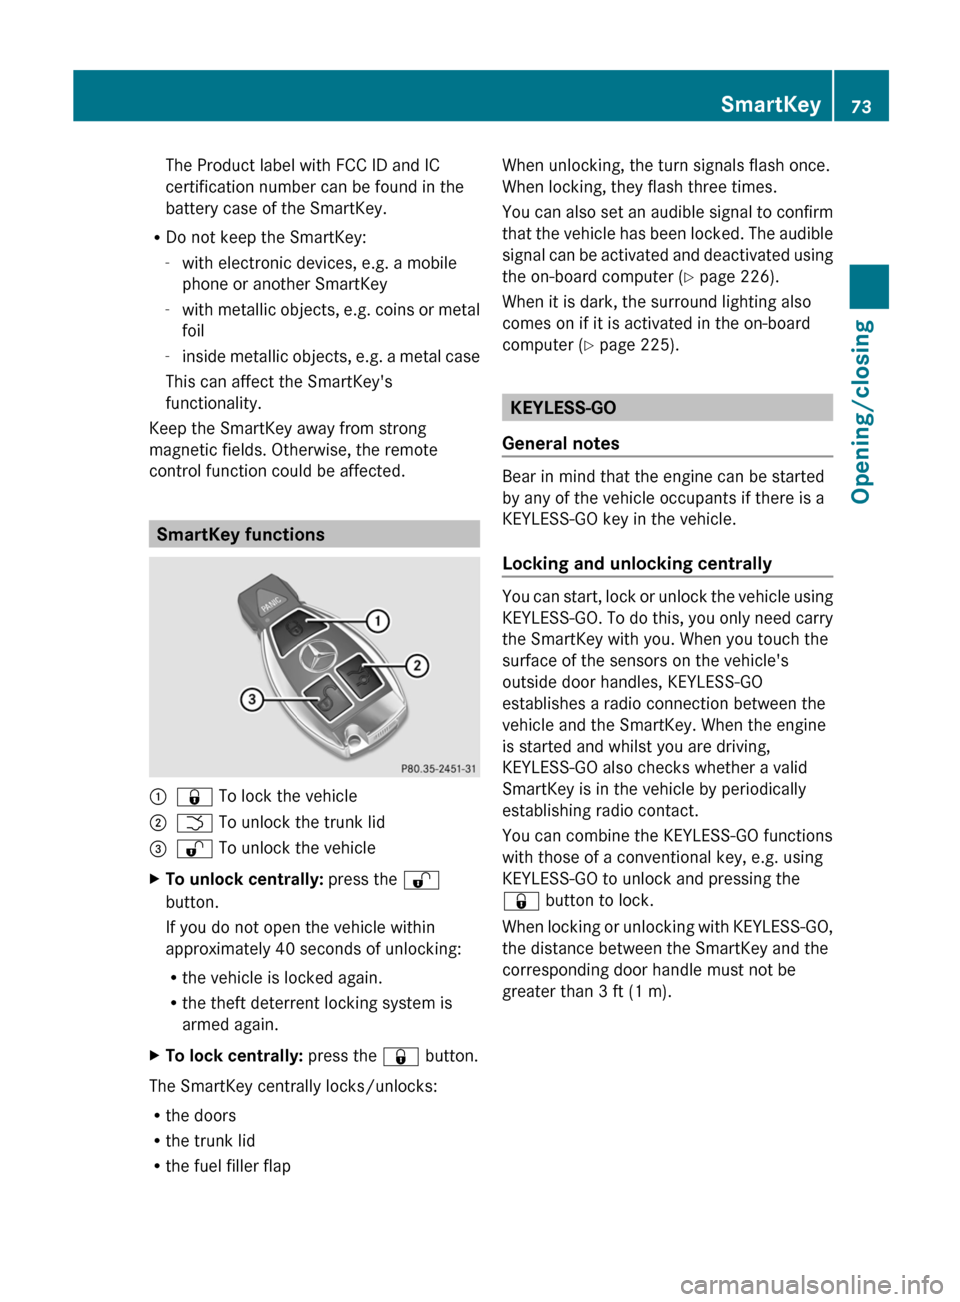
:
& To lock the vehicle
; F To unlock the trunk lid
= % To unlock the vehicle
X To unlock centrally: press the %
button.
If you do not open the vehicle within
approximately
40 seconds of unlocking:
R the vehicle is locked again.
R the theft deterrent locking system is
armed again.
X To lock centrally: press the & button.
The SmartKey centrally locks/unlocks:
R the doors
R the trunk lid
R the fuel filler flap When unlocking, the turn signals flash once.
When locking, they flash three times.
You
can also set an audible signal to confirm
that the vehicle has been locked. The audible
signal can be activated and deactivated using
the on-board computer (Y page 226).
When it is dark, the surround lighting also
comes on if it is activated in the on-board
computer (Y page 225). KEYLESS-GO
General notes Bear in mind that the engine can be started
by any of the vehicle occupants if there is a
KEYLESS-GO key in the vehicle.
Locking and unlocking centrally
You can start, lock or unlock the vehicle using
KEYLESS-GO.
To do this, you only need carry
the SmartKey with you. When you touch the
surface of the sensors on the vehicle's
outside door handles, KEYLESS-GO
establishes a radio connection between the
vehicle and the SmartKey. When the engine
is started and whilst you are driving,
KEYLESS-GO also checks whether a valid
SmartKey is in the vehicle by periodically
establishing radio contact.
You can combine the KEYLESS-GO functions
with those of a conventional key, e.g. using
KEYLESS-GO to unlock and pressing the
& button to lock.
When locking or unlocking with KEYLESS-GO,
the distance between the SmartKey and the
corresponding door handle must not be
greater than 3 ft (1 m). SmartKey
73
Opening/closing Z
Page 80 of 372
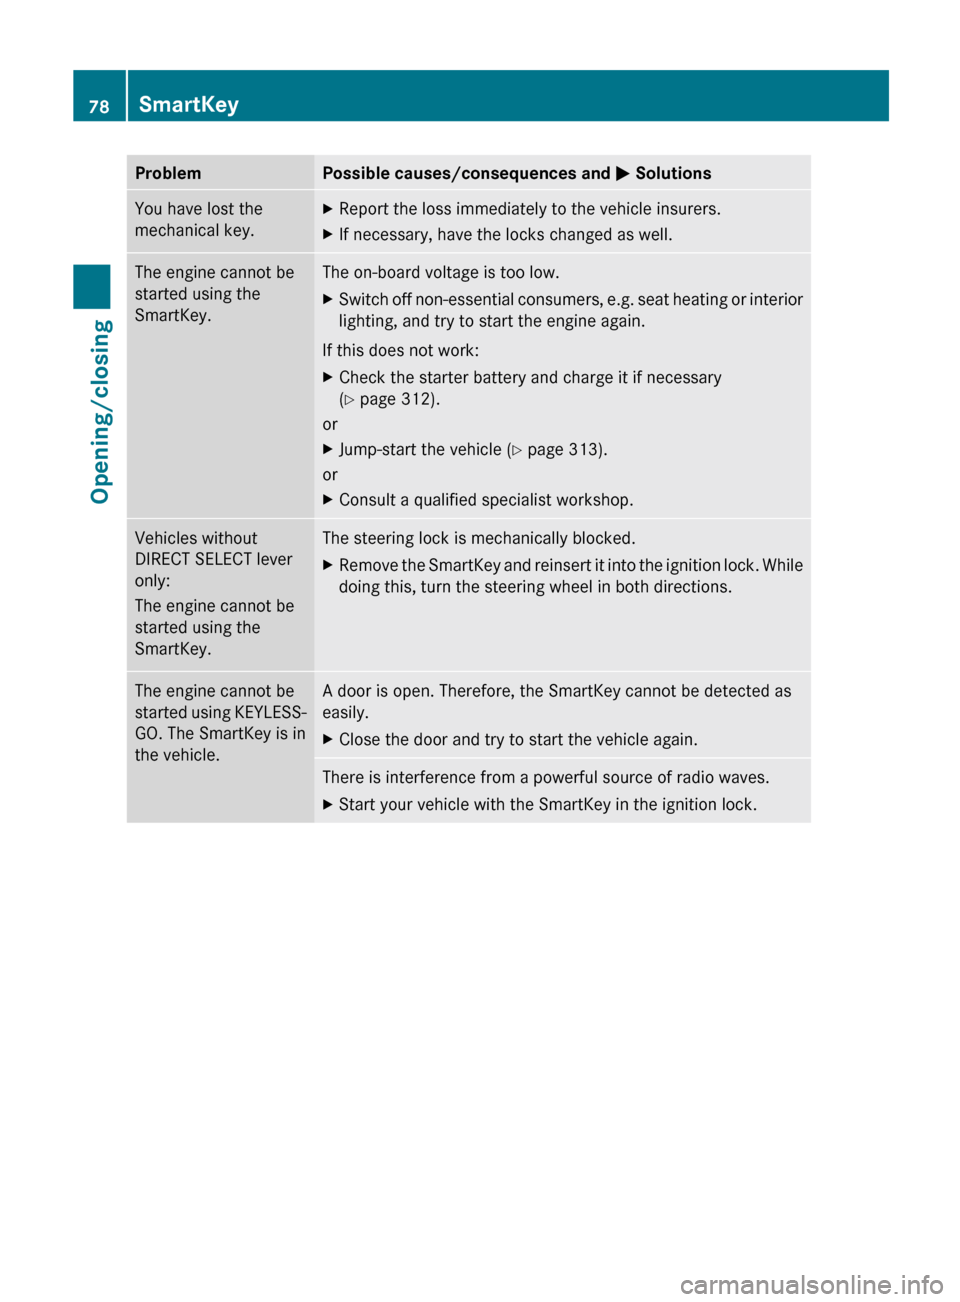
Problem Possible causes/consequences and
M SolutionsYou have lost the
mechanical key. X
Report the loss immediately to the vehicle insurers.
X If necessary, have the locks changed as well. The engine cannot be
started using the
SmartKey. The on-board voltage is too low.
X
Switch off non-essential consumers, e.g. seat heating or interior
lighting, and try to start the engine again.
If this does not work:
X Check the starter battery and charge it if necessary
(Y page 312).
or
X Jump-start the vehicle (Y page 313).
or
X Consult a qualified specialist workshop. Vehicles without
DIRECT SELECT lever
only:
The engine cannot be
started using the
SmartKey. The steering lock is mechanically blocked.
X
Remove the SmartKey and reinsert it into the ignition lock. While
doing this, turn the steering wheel in both directions. The engine cannot be
started
using KEYLESS-
GO. The SmartKey is in
the vehicle. A door is open. Therefore, the SmartKey cannot be detected as
easily.
X
Close the door and try to start the vehicle again. There is interference from a powerful source of radio waves.
X
Start your vehicle with the SmartKey in the ignition lock.78
SmartKey
Opening/closing
Page 83 of 372
X
Turn the mechanical key counter-clockwise
to position 1.
The door is unlocked.
X Turn the mechanical key back and remove
it.
X Insert the mechanical key into the
SmartKey.
If you use the mechanical key to unlock and
open the driver's door, the anti-theft alarm
system will be triggered
(Y page 70). Locking the vehicle (mechanical key)
If
the vehicle can no longer be locked with the
SmartKey, use the mechanical key.
X Open the driver's door.
X Close the front-passenger door and the
trunk lid.
X Press the locking button (Y page 79).
X Check whether the locking knob on the
front-passenger door is still visible. If
necessary,
press the locking knob down by
hand ( Y page 79).
X Close the driver's door.
X Take the mechanical key out of the
SmartKey (Y page 74).
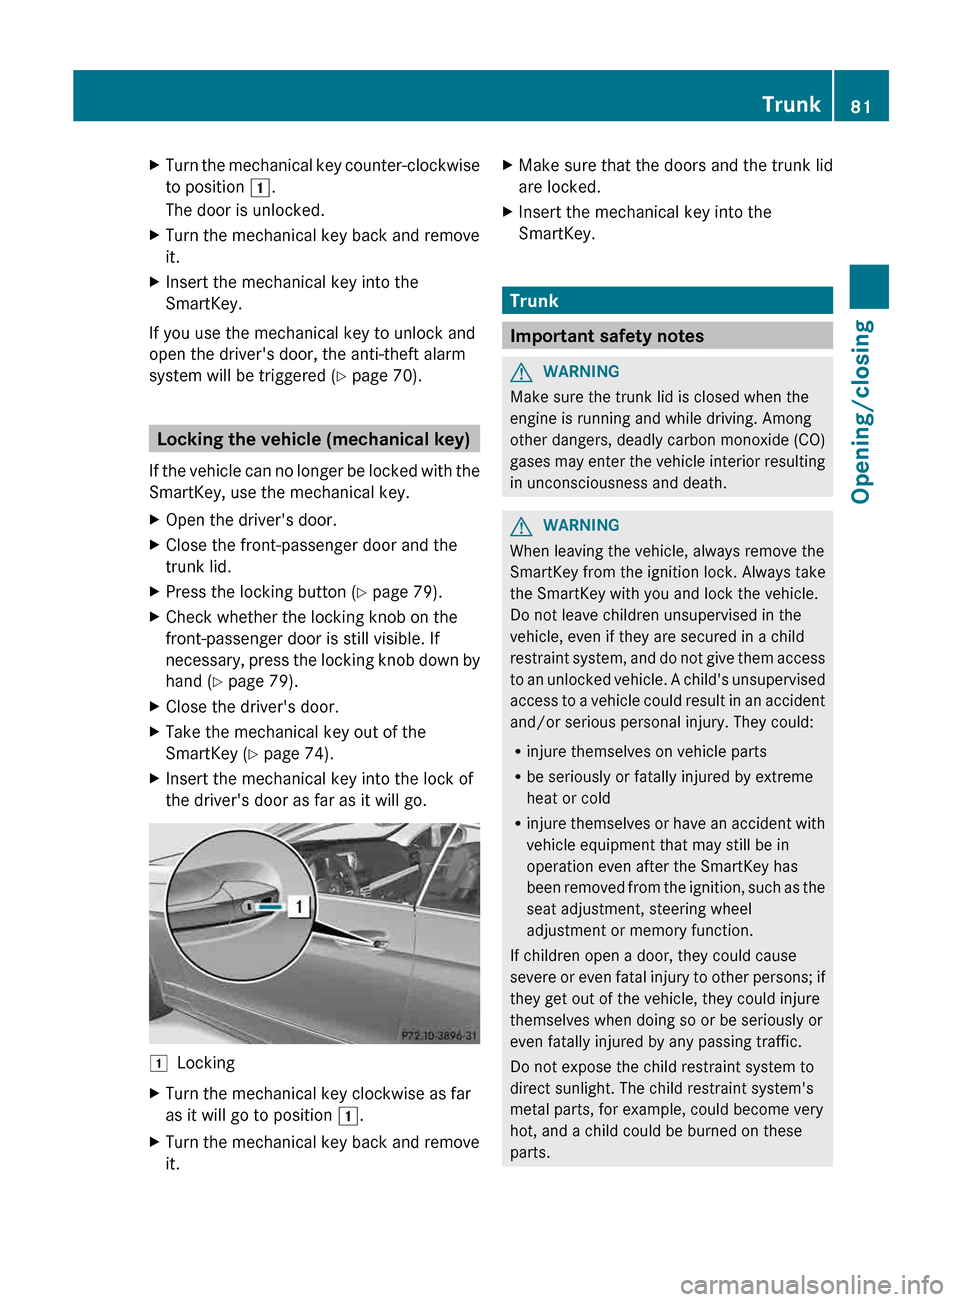
X Insert the mechanical key into the lock of
the driver's door as far as it will go. 1
Locking
X Turn the mechanical key clockwise as far
as it will go to position 1.
X Turn the mechanical key back and remove
it. X
Make sure that the doors and the trunk lid
are locked.
X Insert the mechanical key into the
SmartKey. Trunk
Important safety notes
G
WARNING
Make sure the trunk lid is closed when the
engine is running and while driving. Among
other dangers, deadly carbon monoxide (CO)
gases
may enter the vehicle interior resulting
in unconsciousness and death. G
WARNING
When leaving the vehicle, always remove the
SmartKey from the ignition lock. Always take
the SmartKey with you and lock the vehicle.
Do not leave children unsupervised in the
vehicle, even if they are secured in a child
restraint
system, and do not give them access
to an unlocked vehicle. A child's unsupervised
access to a vehicle could result in an accident
and/or serious personal injury. They could:
R injure themselves on vehicle parts
R be seriously or fatally injured by extreme
heat or cold
R injure themselves or have an accident with
vehicle equipment that may still be in
operation even after the SmartKey has
been removed from the ignition, such as the
seat adjustment, steering wheel
adjustment or memory function.
If children open a door, they could cause
severe or even fatal injury to other persons; if
they get out of the vehicle, they could injure
themselves when doing so or be seriously or
even fatally injured by any passing traffic.
Do not expose the child restraint system to
direct sunlight. The child restraint system's
metal parts, for example, could become very
hot, and a child could be burned on these
parts. Trunk
81
Opening/closing Z
Page 93 of 372
to under 25 mph (40 km/h) and pull the
soft top switch again.
X To close: press and hold soft-top
switch : until the soft top is fully closed.
The Convertible Top in Operation
message appears in the multifunction
display.
If you drive faster than 25 mph (40 km/h)
during the closing procedure, the closing
procedure
is stopped and the Open/Close
Convertible Top Completely message
is displayed in the multifunction display. To
fully close the soft top, reduce speed back
to under 25 mph (40 km/h) and push the
soft top switch again. Opening and closing using the
SmartKey
Important safety notes G
WARNING
Make sure nobody can be trapped or injured
by moving parts such as the soft-top linkage
or
soft-top compartment cover when opening
or closing the soft top.
If there is a risk of entrapment, immediately
release the % or & button on the
SmartKey. The soft-top mechanism stops
immediately.
Opening/closing The SmartKey must be close to the driver's
door handle.
X
Point the tip of the SmartKey at the driver's
door handle.
X To open: press and hold the % button
on the SmartKey until the soft top is fully
opened.
The Convertible Top in Operation
message appears in the multifunction display. The seat ventilation is switched on.
The rear side windows open.
X To close: press and hold the & button
on the SmartKey until the soft top is fully
closed.
The Convertible Top in Operation
message appears in the multifunction
display.
The soft top and the side windows
close. Closing the soft top manually
Important safety notes G
WARNING
Remove wristwatches and any jewelry such
as
rings or bracelets. You could otherwise get
caught, be injured and damage the vehicle.
Always grip the soft top at the indicated
gripping points when closing the soft top
manually. You could otherwise be injured.
If the soft top cannot be closed automatically,
check the following points:
R Is the trunk partition engaged
(Y page 96)?
R Are the head restraints on the rear bench
seats extended?
R Is the trunk lid closed?
R Is the on-board voltage sufficient?
Start the engine if necessary.
If automatic operation still does not work, the
soft top can be closed manually.
To carry out this work, you will need the
assistance of another person.
i Closing the soft top manually is a
complex, technically demanding process
which requires a great deal of force. Only
close the soft top manually in extreme
emergencies. Preferably, contact a
qualified specialist workshop. Soft top (Cabriolet)
91Opening/closing Z
Page 131 of 372

The interior lighting automatically switches
on if you:
R
unlock the vehicle
R open a door
R remove
the SmartKey from the ignition lock
The interior light is activated for a short while
when the SmartKey is removed from the
ignition lock. You can activate this delayed
switch-off using the on-board computer
(Y page 225).
Manual interior lighting control Front overhead control panel
:
u To switch the rear interior lighting
on/off (Coupe only)
; | To switch the automatic interior
lighting control on/off
= p To switch the right-hand reading
lamp on/off
? c To switch the front interior lighting
on/off
A p
To switch the left-hand reading lamp
on/off
X To switch the front interior lighting on/
off: press the c button.
X To switch the rear interior lighting on/
off (Coupe only): press the u button.
X To switch the reading lamps on/off:
press the p button. Crash-responsive emergency lighting
The
interior lighting is activated automatically
if the vehicle is involved in an accident.
X To switch off the crash-responsive
emergency lighting: press the hazard
warning lamp button.
or
X Lock and then unlock the vehicle using the
SmartKey. Replacing bulbs
Important safety notes
Xenon bulbs G
DANGER
Xenon bulbs carry a high voltage. You could
get
an electric shock and be seriously or even
fatally injured if you touch the electric
contacts on Xenon bulbs. Therefore, never
remove the cover from Xenon bulbs.
Do not change the Xenon bulbs yourself, but
have them replaced at a qualified workshop.
If your vehicle is equipped with Xenon bulbs,
you can recognize this by the following: the
cone of light from the Xenon bulbs moves
from the top to the bottom and back again
when you start the engine. For this to be
observed, the lights must be switched on
before starting the engine.
Bulbs and lamps are an important aspect of
vehicle safety. You must therefore make sure
that these function correctly at all times.
Have the headlamp setting checked regularly.
Other bulbs G
WARNING
Bulbs and lamps can become very hot. For
this reason, allow them to cool down before
changing them. Otherwise, you could burn
yourself when you touch them. Replacing bulbs
129
Lights and windshield wipers
Z
Page 159 of 372
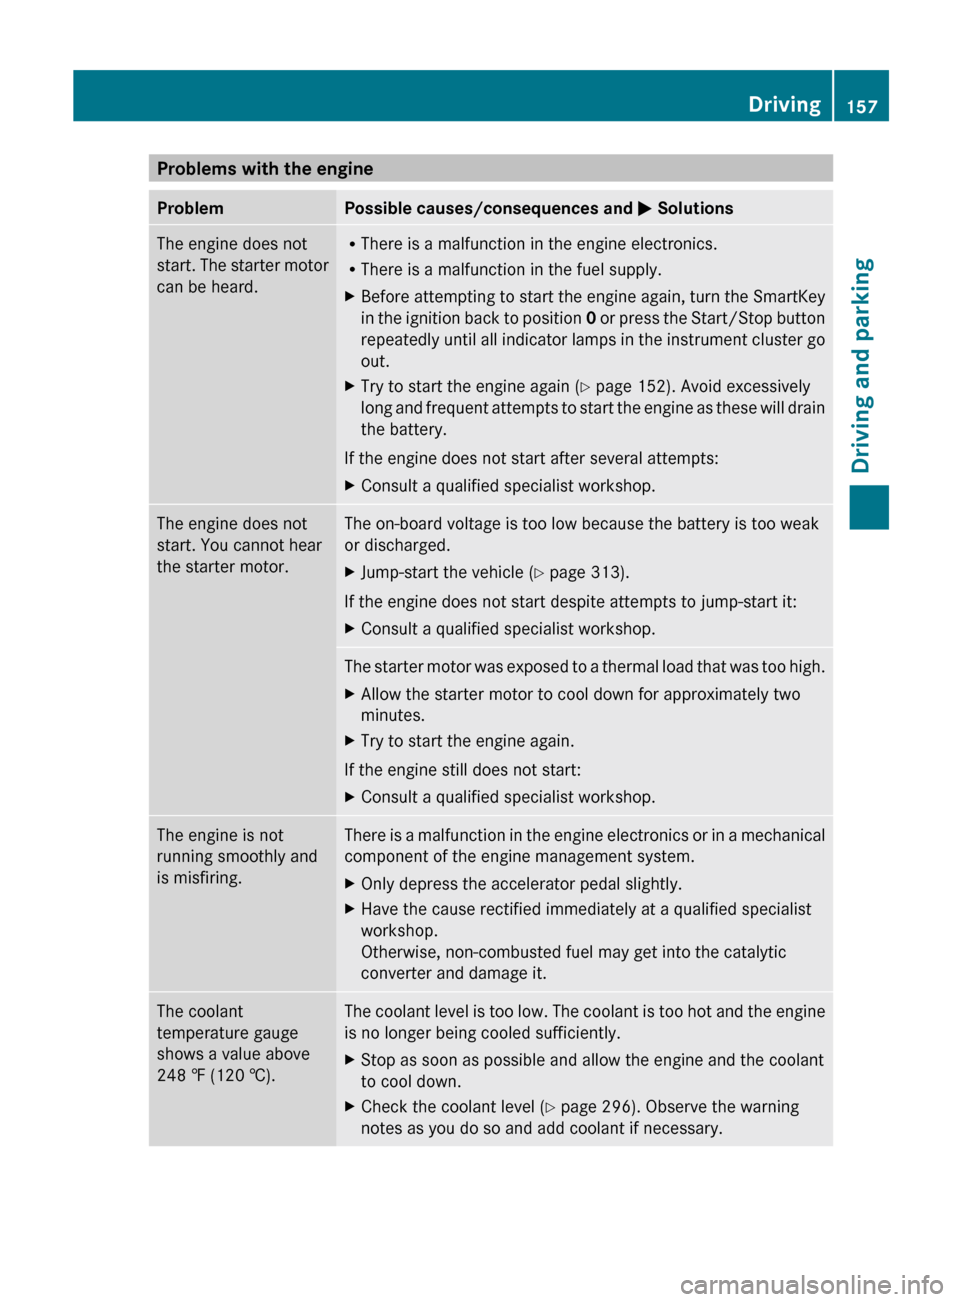
Problems with the engine
Problem Possible causes/consequences and
M SolutionsThe engine does not
start.
The starter motor
can be heard. R
There is a malfunction in the engine electronics.
R There is a malfunction in the fuel supply.
X Before attempting to start the engine again, turn the SmartKey
in
the ignition back to position 0 or press the Start/Stop button
repeatedly until all indicator lamps in the instrument cluster go
out.
X Try to start the engine again (Y page 152). Avoid excessively
long
and frequent attempts to start the engine as these will drain
the battery.
If the engine does not start after several attempts:
X Consult a qualified specialist workshop. The engine does not
start. You cannot hear
the starter motor. The on-board voltage is too low because the battery is too weak
or discharged.
X
Jump-start the vehicle (Y page 313).
If the engine does not start despite attempts to jump-start it:
X Consult a qualified specialist workshop. The starter motor was exposed to a thermal load that was too high.
X
Allow the starter motor to cool down for approximately two
minutes.
X Try to start the engine again.
If the engine still does not start:
X Consult a qualified specialist workshop. The engine is not
running smoothly and
is misfiring. There is a malfunction in the engine electronics or in a mechanical
component of the engine management system.
X
Only depress the accelerator pedal slightly.
X Have the cause rectified immediately at a qualified specialist
workshop.
Otherwise, non-combusted fuel may get into the catalytic
converter and damage it. The coolant
temperature gauge
shows a value above
248 ‡
(120 †). The coolant level is too low. The coolant is too hot and the engine
is no longer being cooled sufficiently.
X
Stop as soon as possible and allow the engine and the coolant
to cool down.
X Check the coolant level (Y page 296). Observe the warning
notes as you do so and add coolant if necessary. Driving
157
Driving and parking Z
Page 160 of 372
Automatic transmission
Important safety notes
G
WARNING
If the engine speed is above the idling speed
and you engage transmission position D or
R,
the vehicle could pull away suddenly. There
is a risk of an accident.
When engaging transmission position D or R,
always firmly depress the brake pedal and do
not simultaneously accelerate. G
WARNING
The automatic transmission switches to
neutral position N when you switch off the
engine. The vehicle may roll away. There is a
risk of an accident.
After switching off the engine, always switch
to parking position P. Prevent the parked
vehicle from rolling away by applying the
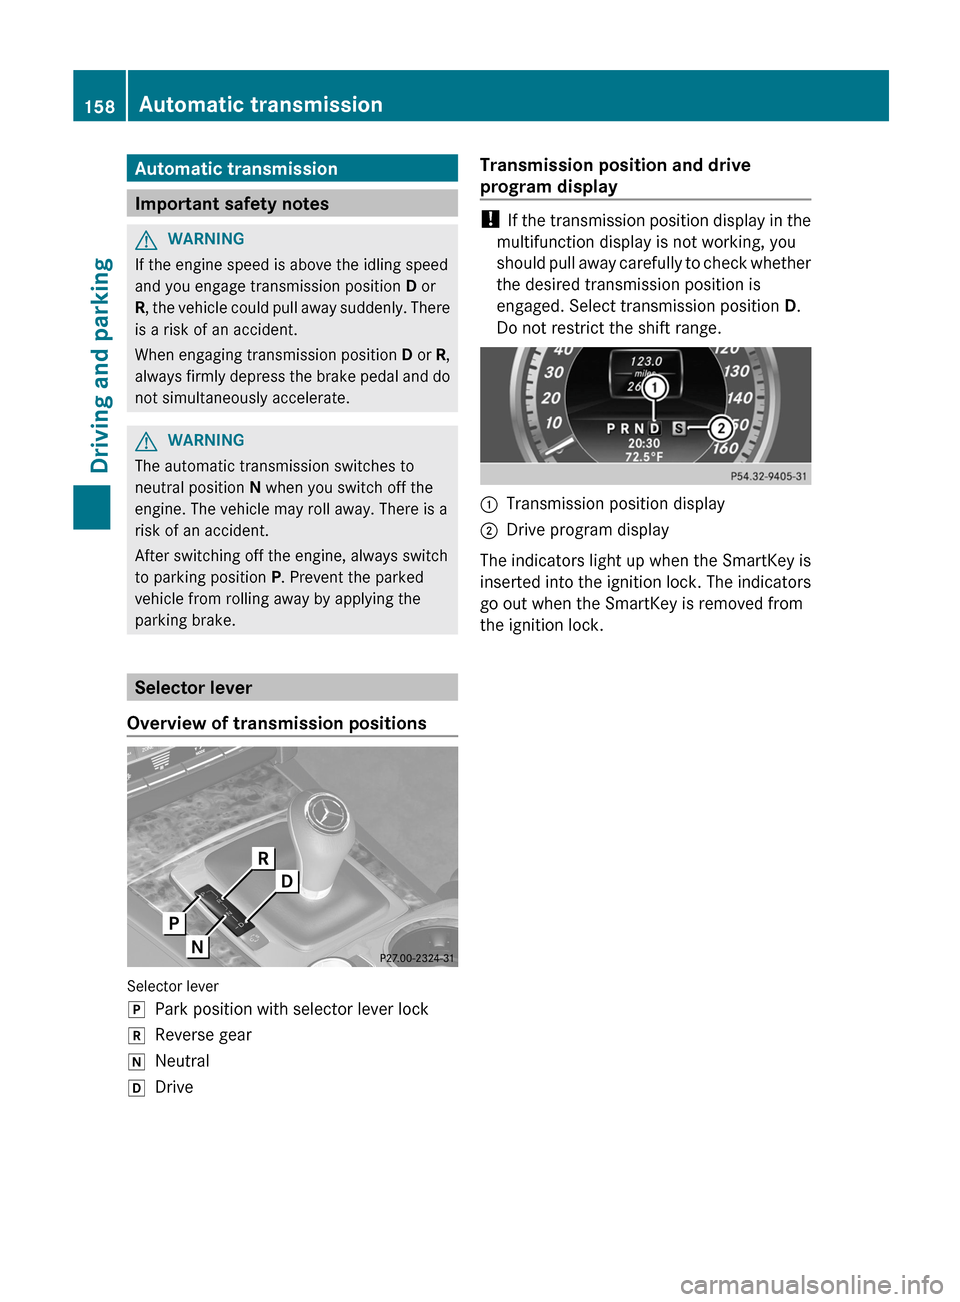
parking brake. Selector lever
Overview of transmission positions Selector lever
j
Park position with selector lever lock
k Reverse gear
i Neutral
h Drive Transmission position and drive
program display !
If
the transmission position display in the
multifunction display is not working, you
should pull away carefully to check whether
the desired transmission position is
engaged. Select transmission position D.
Do not restrict the shift range. :
Transmission position display
; Drive program display
The indicators light up when the SmartKey is
inserted
into the ignition lock. The indicators
go out when the SmartKey is removed from
the ignition lock. 158
Automatic transmission
Driving and parking
Page 161 of 372
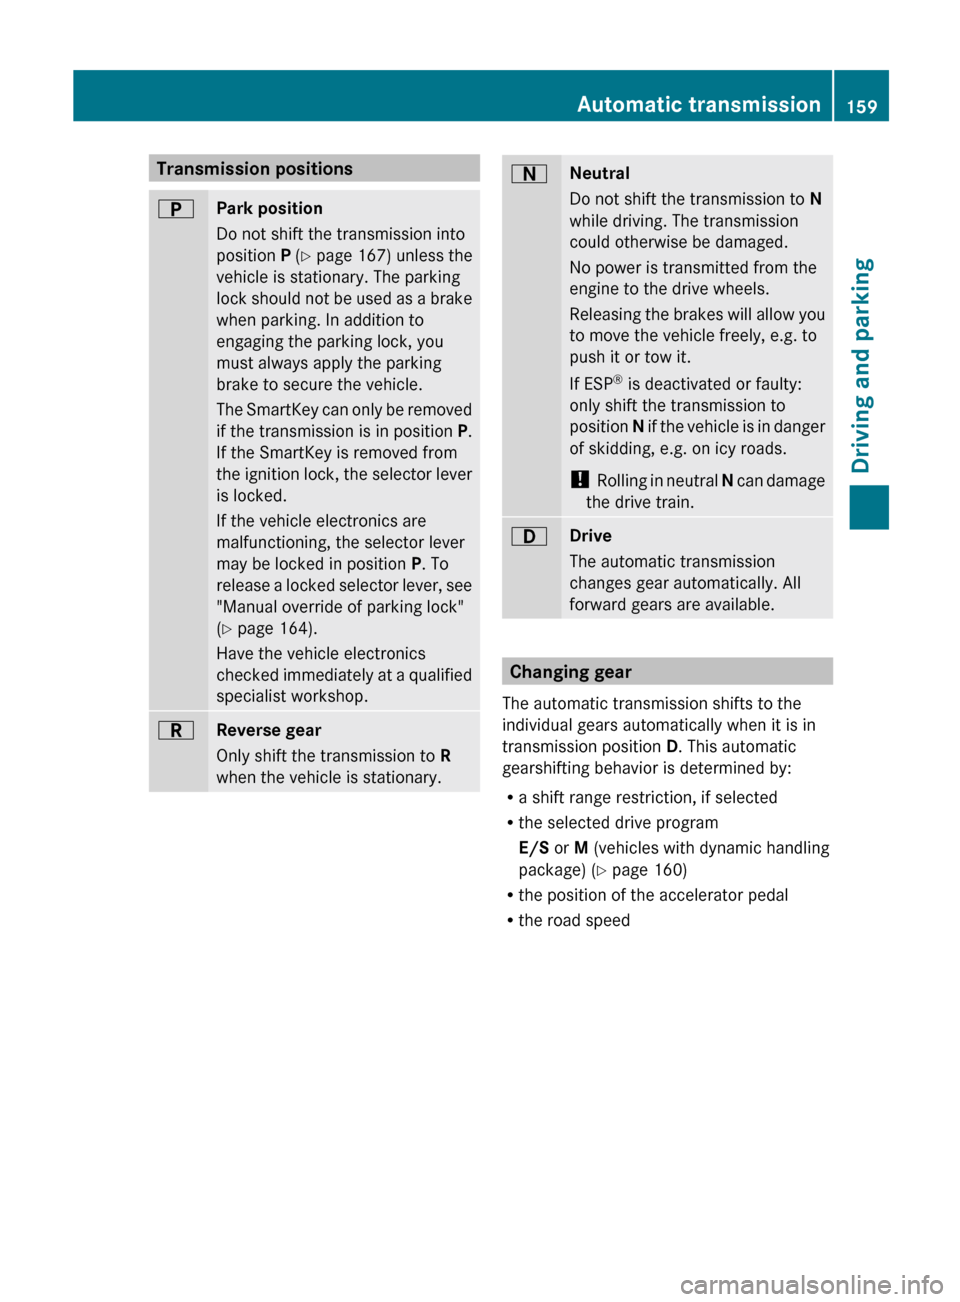
Transmission positions
B
Park position
Do not shift the transmission into
position
P (Y page
167) unless the
vehicle is stationary. The parking
lock should not be used as a brake
when parking. In addition to
engaging the parking lock, you
must always apply the parking
brake to secure the vehicle.
The SmartKey can only be removed
if the transmission is in position P.
If the SmartKey is removed from
the ignition lock, the selector lever
is locked.
If the vehicle electronics are
malfunctioning, the selector lever
may be locked in position P. To
release a locked selector lever, see
"Manual override of parking lock"
(Y page 164).
Have the vehicle electronics
checked immediately at a qualified
specialist workshop. C
Reverse gear
Only shift the transmission to
R
when the vehicle is stationary. A
Neutral
Do not shift the transmission to
N
while driving. The transmission
could otherwise be damaged.
No power is transmitted from the
engine to the drive wheels.
Releasing
the brakes will allow you
to move the vehicle freely, e.g. to
push it or tow it.
If ESP ®
is deactivated or faulty:
only shift the transmission to
position N if the vehicle is in danger
of skidding, e.g. on icy roads.
! Rolling in neutral N can damage
the drive train. 7
Drive
The automatic transmission
changes gear automatically. All
forward gears are available.
Changing gear
The automatic transmission shifts to the
individual gears automatically when it is in
transmission position D. This automatic
gearshifting behavior is determined by:
R a shift range restriction, if selected
R the selected drive program
E/S or M (vehicles with dynamic handling
package) ( Y page 160)
R the position of the accelerator pedal
R the road speed Automatic transmission
159
Driving and parking Z
Page 166 of 372
Problems with the transmission
Problem Possible causes/consequences and
M SolutionsThe transmission has
problems shifting gear. The transmission is losing oil.
X
Have the transmission checked at a qualified specialist
workshop immediately. The acceleration ability
is deteriorating.
The transmission no
longer changes gear. The transmission is in emergency mode.
It is only possible to shift into second
gear and reverse gear.
X Stop the vehicle.
X Shift the transmission to position P.
X Switch off the engine.
X Wait at least ten seconds before restarting the engine.
X Shift the transmission to position D or R.
If D
is selected, the transmission shifts into second gear; if R is
selected, the transmission shifts into reverse gear.
X Have the transmission checked at a qualified specialist
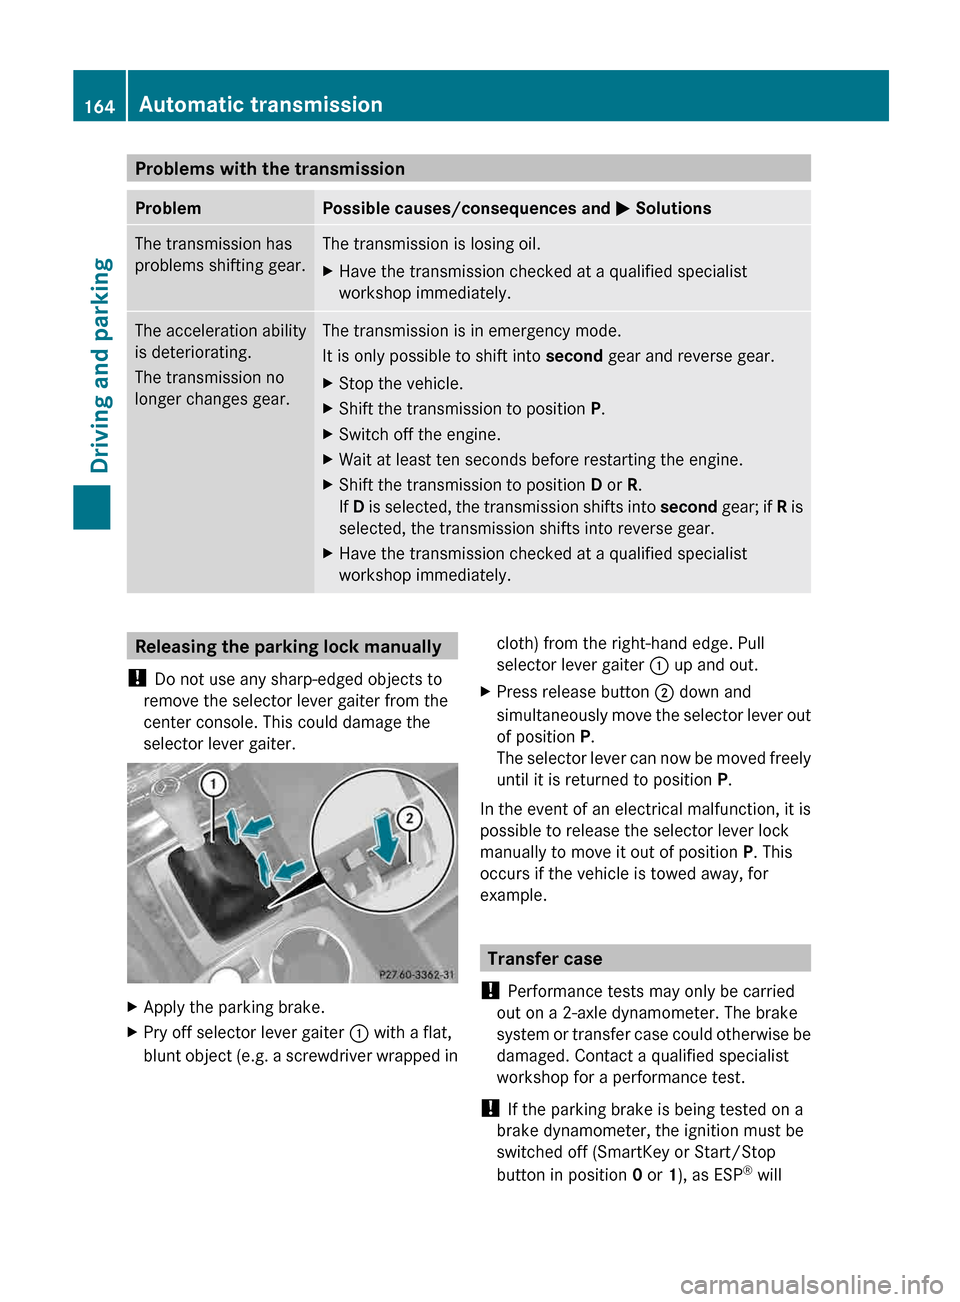
workshop immediately. Releasing the parking lock manually
! Do not use any sharp-edged objects to
remove the selector lever gaiter from the
center console. This could damage the
selector lever gaiter. X
Apply the parking brake.
X Pry off selector lever gaiter : with a flat,
blunt
object (e.g. a screwdriver wrapped in cloth) from the right-hand edge. Pull
selector lever gaiter : up and out.
X Press release button ; down and
simultaneously
move the selector lever out
of position P.
The selector lever can now be moved freely
until it is returned to position P.
In the event of an electrical malfunction, it is
possible to release the selector lever lock
manually to move it out of position P. This
occurs if the vehicle is towed away, for
example. Transfer case
! Performance tests may only be carried
out on a 2-axle dynamometer. The brake
system
or transfer case could otherwise be
damaged. Contact a qualified specialist
workshop for a performance test.
! If the parking brake is being tested on a
brake dynamometer, the ignition must be
switched off (SmartKey or Start/Stop
button in position 0 or 1), as ESP®
will 164
Automatic transmission
Driving and parking
Page 168 of 372
vehicle with the SmartKey or with KEYLESS-
GO.
The position of the fuel filler cap is displayed
8 in the instrument cluster. The arrow
next to the filling pump indicates the side of
the vehicle.
Opening
X
Switch off the engine.
X Remove the SmartKey from the ignition
lock.
X KEYLESS-GO: open the driver’s door.
This corresponds to key position 0:
"SmartKey removed".
The driver’s door can be closed again.
X Press the fuel filler flap in the direction of
arrow :.
The fuel filler flap opens slightly.
X Open the fuel filler flap fully.
X Turn the fuel filler flap counter-clockwise
and remove it.
X Insert the fuel filler cap into the holder
bracket on the inside of filler flap ;.
X Completely insert the filler neck of the fuel
pump nozzle into the tank and refuel.
X Only fill the tank until the pump nozzle
switches off.
i Do not add any more fuel after the pump
stops filling for the first time. Otherwise,
fuel may leak out.
Closing X
Replace the cap on the filler neck and turn
clockwise until it engages audibly.
X Close the fuel filler flap.
i Close the fuel filler flap before locking the
vehicle. Otherwise, the locking pin of the
central locking prevents the fuel filler flap
from closing.
i The 8 reserve fuel light flashes if you
are driving with the fuel filler cap open. In
addition, the ; Check Engine warning lamp may light up. A message appears in
the multifunction display
(Y page 241).
For further information on warning and
indicator lamps in the instrument cluster,
see ( Y page 262).166
Refueling
Driving and parking