keyless MERCEDES-BENZ E-Class CABRIOLET 2013 C207 User Guide
[x] Cancel search | Manufacturer: MERCEDES-BENZ, Model Year: 2013, Model line: E-Class CABRIOLET, Model: MERCEDES-BENZ E-Class CABRIOLET 2013 C207Pages: 372, PDF Size: 12.69 MB
Page 80 of 372
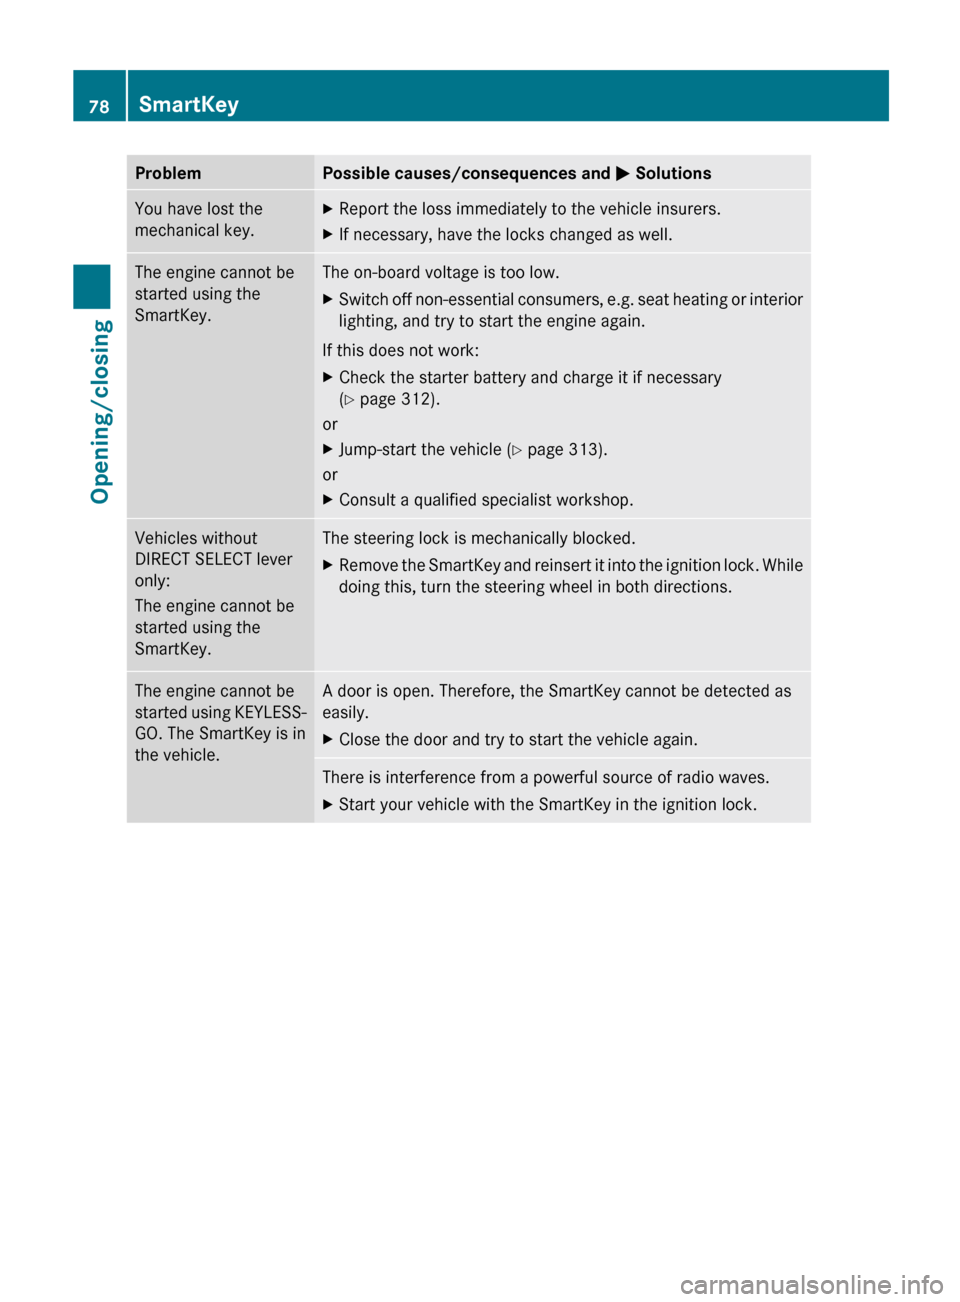
Problem Possible causes/consequences and
M SolutionsYou have lost the
mechanical key. X
Report the loss immediately to the vehicle insurers.
X If necessary, have the locks changed as well. The engine cannot be
started using the
SmartKey. The on-board voltage is too low.
X
Switch off non-essential consumers, e.g. seat heating or interior
lighting, and try to start the engine again.
If this does not work:
X Check the starter battery and charge it if necessary
(Y page 312).
or
X Jump-start the vehicle (Y page 313).
or
X Consult a qualified specialist workshop. Vehicles without
DIRECT SELECT lever
only:
The engine cannot be
started using the
SmartKey. The steering lock is mechanically blocked.
X
Remove the SmartKey and reinsert it into the ignition lock. While
doing this, turn the steering wheel in both directions. The engine cannot be
started
using KEYLESS-
GO. The SmartKey is in
the vehicle. A door is open. Therefore, the SmartKey cannot be detected as
easily.
X
Close the door and try to start the vehicle again. There is interference from a powerful source of radio waves.
X
Start your vehicle with the SmartKey in the ignition lock.78
SmartKey
Opening/closing
Page 82 of 372
X
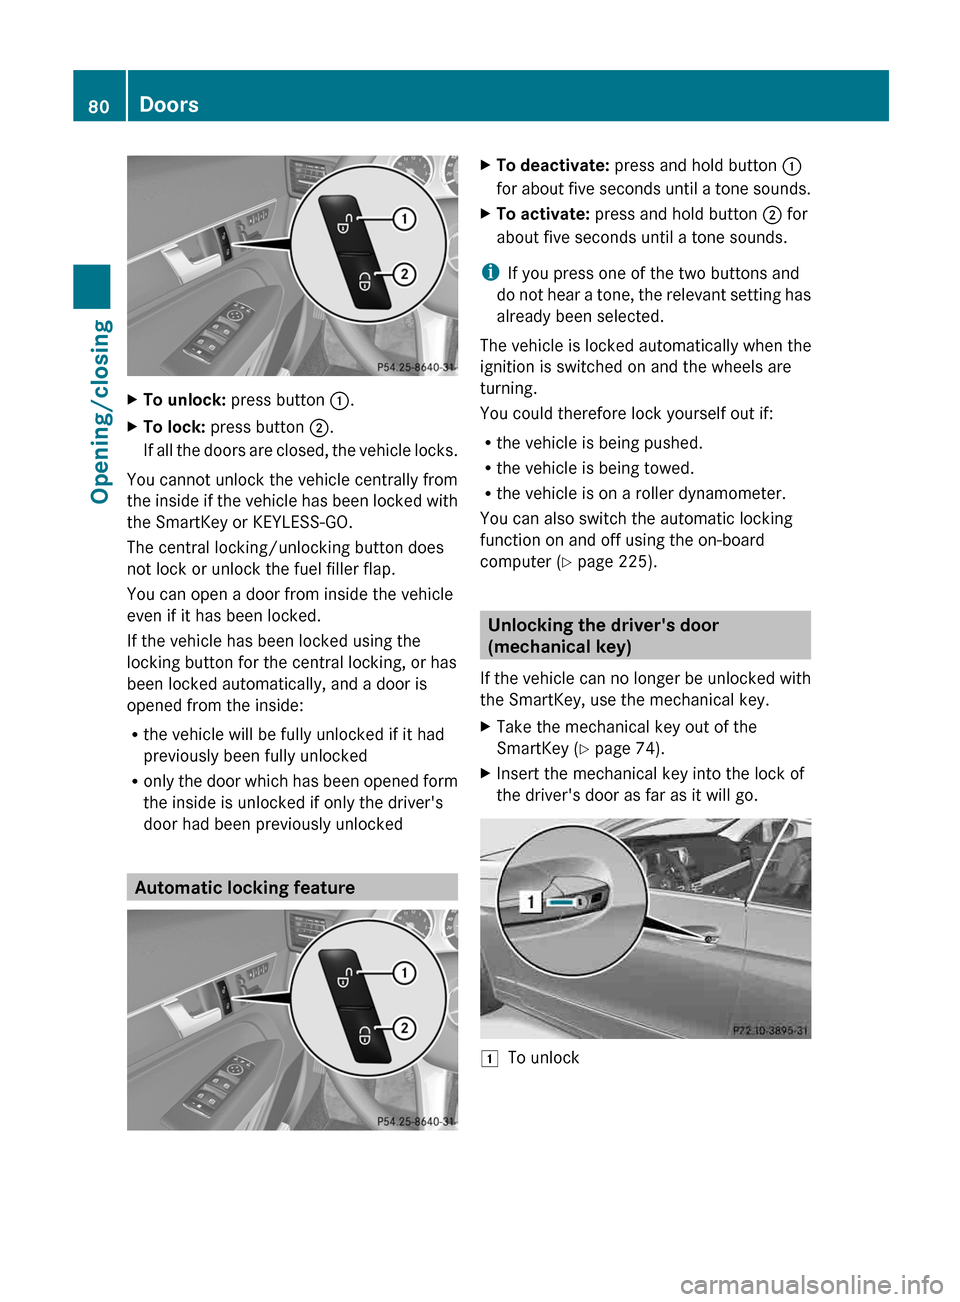
To unlock: press button :.
X To lock: press button ;.
If all the doors are closed, the vehicle locks.
You cannot unlock the vehicle centrally from
the
inside if the vehicle has been locked with
the SmartKey or KEYLESS-GO.
The central locking/unlocking button does
not lock or unlock the fuel filler flap.
You can open a door from inside the vehicle
even if it has been locked.
If the vehicle has been locked using the
locking button for the central locking, or has
been locked automatically, and a door is
opened from the inside:
R the vehicle will be fully unlocked if it had
previously been fully unlocked
R only the door which has been opened form
the inside is unlocked if only the driver's
door had been previously unlocked Automatic locking feature X
To deactivate: press and hold button :
for
about five seconds until a tone sounds.
X To activate: press and hold button ; for
about five seconds until a tone sounds.
i If you press one of the two buttons and
do
not hear a tone, the relevant setting has
already been selected.
The vehicle is locked automatically when the
ignition is switched on and the wheels are
turning.
You could therefore lock yourself out if:
R the vehicle is being pushed.
R the vehicle is being towed.
R the vehicle is on a roller dynamometer.
You can also switch the automatic locking
function on and off using the on-board
computer (Y page 225). Unlocking the driver's door
(mechanical key)
If
the vehicle can no longer be unlocked with
the SmartKey, use the mechanical key.
X Take the mechanical key out of the
SmartKey (Y page 74).
X Insert the mechanical key into the lock of
the driver's door as far as it will go. 1
To unlock80
Doors
Opening/closing
Page 84 of 372
G
WARNING
Do not carry heavy or hard objects in the
passenger compartment or trunk unless they
are firmly secured in place.
Unsecured or improperly positioned cargo
increases a child's risk of injury in the event
of
R strong braking maneuvers
R sudden changes of direction
R an accident
! The trunk lid swings upwards when
opened. Therefore, make sure that there is
sufficient clearance above the trunk lid.
i Opening dimensions of the trunk lid
(Y page 367).
Do not leave the SmartKey in the trunk. You
could otherwise lock yourself out.
The trunk lid can be:
R opened and closed manually from outside
R opened automatically from outside
R opened automatically from inside
R locked separately
R opened with the emergency release button
R unlocked with the mechanical key Opening/closing from outside
Opening X
Press the % button on the SmartKey.
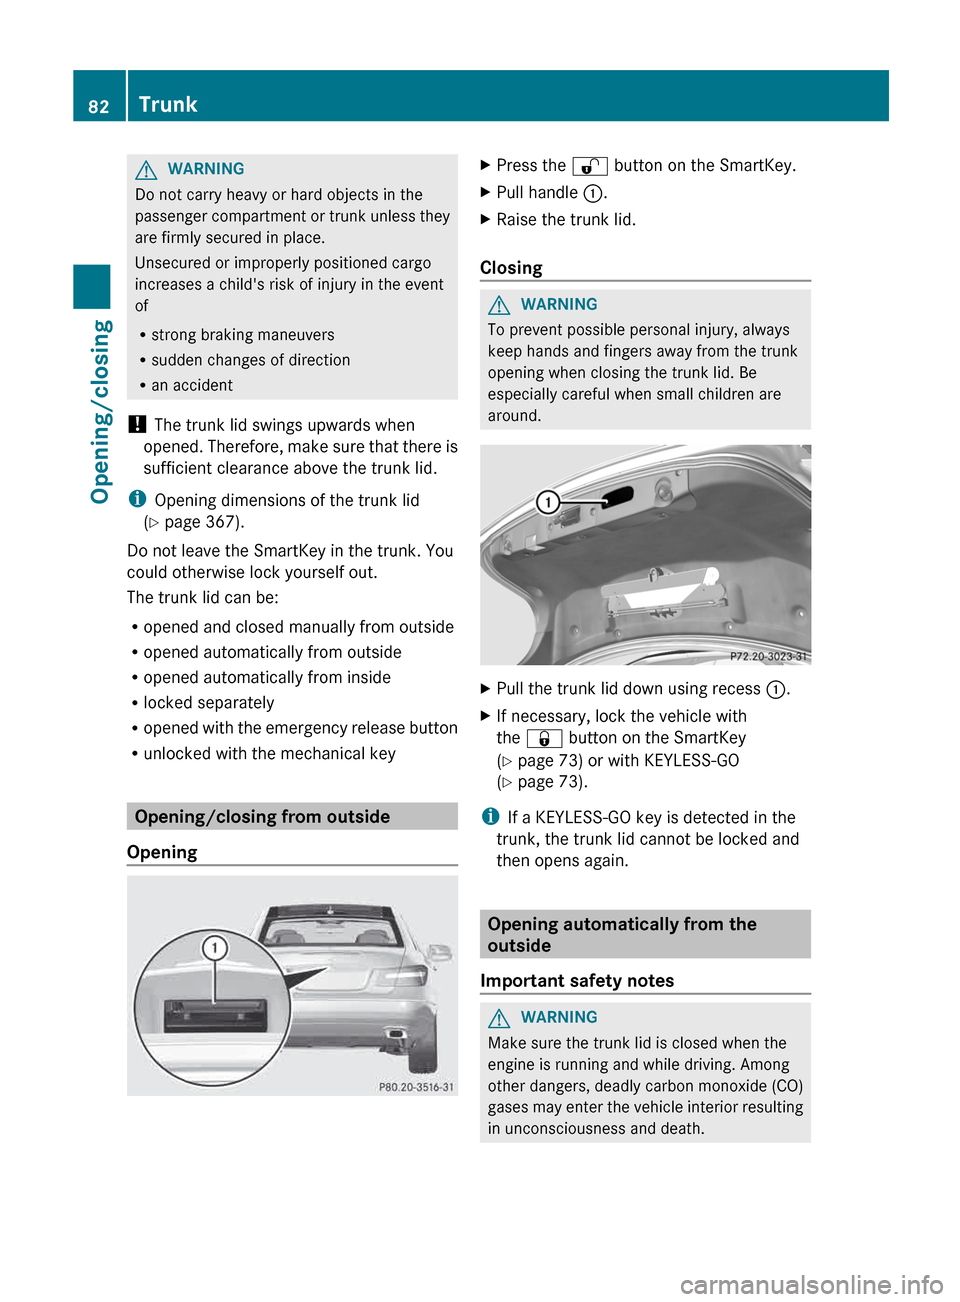
X Pull handle :.
X Raise the trunk lid.
Closing G
WARNING
To prevent possible personal injury, always
keep hands and fingers away from the trunk
opening when closing the trunk lid. Be
especially careful when small children are
around. X
Pull the trunk lid down using recess :.
X If necessary, lock the vehicle with
the & button on the SmartKey
(Y page 73) or with KEYLESS-GO
(Y page 73).
i If a KEYLESS-GO key is detected in the
trunk, the trunk lid cannot be locked and
then opens again. Opening automatically from the
outside
Important safety notes G
WARNING
Make sure the trunk lid is closed when the
engine is running and while driving. Among
other dangers, deadly carbon monoxide (CO)
gases
may enter the vehicle interior resulting
in unconsciousness and death. 82
Trunk
Opening/closing
Page 85 of 372

!
The trunk lid swings upwards when
opened.
Therefore, make sure that there is
sufficient clearance above the trunk lid.
i Opening dimensions of the trunk lid
(Y page 367).
Opening You can unlock and open the trunk lid
simultaneously with the SmartKey.
X
Press and hold the F button on the
SmartKey until the trunk lid opens. Opening automatically from the
inside
Important safety notes G
WARNING
Make sure the trunk lid is closed when the
engine is running and while driving. Among
other dangers, deadly carbon monoxide (CO)
gases
may enter the vehicle interior resulting
in unconsciousness and death.
i Opening dimensions of the trunk lid
(Y page 367).
Opening X
To open: pull remote operating switch for
trunk lid : until the trunk lid opens.
You can open the trunk lid from the driver's
seat when the vehicle is stationary and
unlocked. Locking the trunk separately
You
can lock the trunk separately. If you then
unlock the vehicle centrally, the trunk
remains locked and cannot be opened.
X Close the trunk lid.
X Take the mechanical key out of the
SmartKey (Y page 74). 1
Basic position
2 Locking
X Insert the mechanical key into the trunk lid
lock as far as the stop.
X Turn the mechanical key clockwise from
position 1 to position 2.
X Remove the mechanical key.
X Insert the mechanical key into the
SmartKey. Unlocking the trunk (mechanical key)
! The trunk lid swings upwards when
opened.
Therefore, make sure that there is
sufficient clearance above the trunk lid.
If the trunk cannot be unlocked with the
SmartKey or KEYLESS-GO, use the
mechanical key.
If you use the mechanical key to unlock and
open the trunk lid, the anti-theft alarm system
will be triggered ( Y page 70).
X Take the mechanical key out of the
SmartKey (Y page 74).
X Insert the mechanical key into the trunk lid
lock as far as the stop. Trunk
83
Opening/closing Z
Page 88 of 372
You can use the SmartKey to open or close
all side windows simultaneously.
X
Close the soft top (Y page 90).
X Open the trunk partition ( Y page 96).
X Vehicles without KEYLESS-GO: point the
tip of the SmartKey at the door handle on
the driver's door.
X Vehicles with KEYLESS-GO: the
SmartKey must be within 6 ft (2 m) of the
vehicle.
X To open all side windows: press
the %
button on the SmartKey until the
side windows are fully opened.
X To interrupt the opening procedure:
release the % button.
X To close all side windows: press the
&
button on the SmartKey until the side
windows are fully closed.
X To interrupt the closing procedure:
release the & button.
Convenience closing with KEYLESS-GO G
WARNING
When using the convenience closing feature,
make
sure that nobody can become trapped.
Proceed as follows if there is a risk of
entrapment:
R release the locking button on the door
handle.
R pull the door handle immediately and hold
it.
The side windows open.
With KEYLESS-GO you can close all side
windows simultaneously. The KEYLESS-GO
key must be outside the vehicle. All the doors
must be closed. X
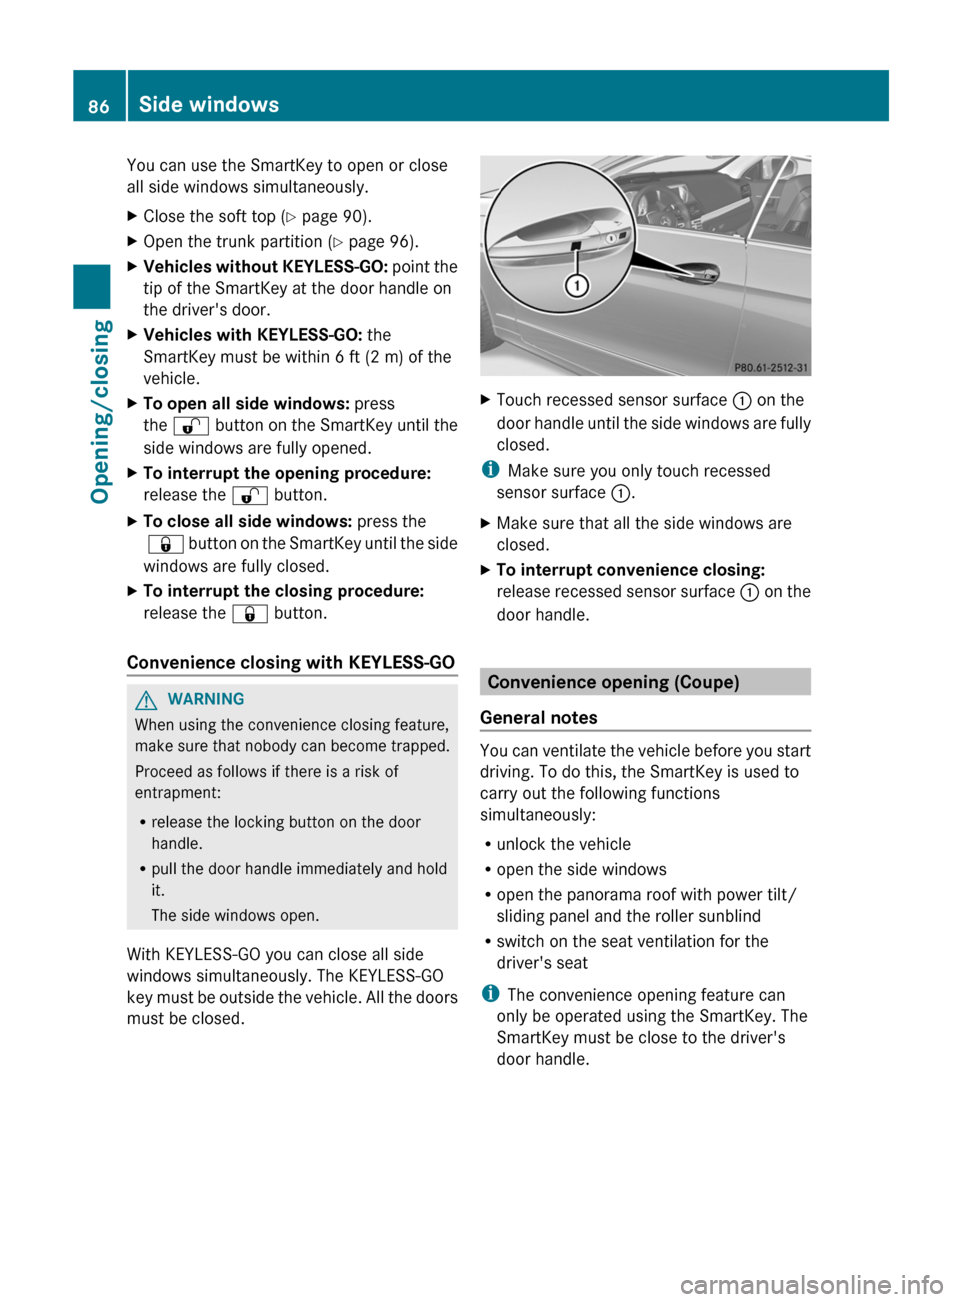
Touch recessed sensor surface : on the
door
handle until the side windows are fully
closed.
i Make sure you only touch recessed
sensor surface :.
X Make sure that all the side windows are
closed.
X To interrupt convenience closing:
release
recessed sensor surface : on the
door handle. Convenience opening (Coupe)
General notes You can ventilate the vehicle before you start
driving. To do this, the SmartKey is used to
carry out the following functions
simultaneously:
R
unlock the vehicle
R open the side windows
R open the panorama roof with power tilt/
sliding panel and the roller sunblind
R switch on the seat ventilation for the
driver's seat
i The convenience opening feature can
only be operated using the SmartKey. The
SmartKey must be close to the driver's
door handle. 86
Side windows
Opening/closing
Page 89 of 372
Convenience opening
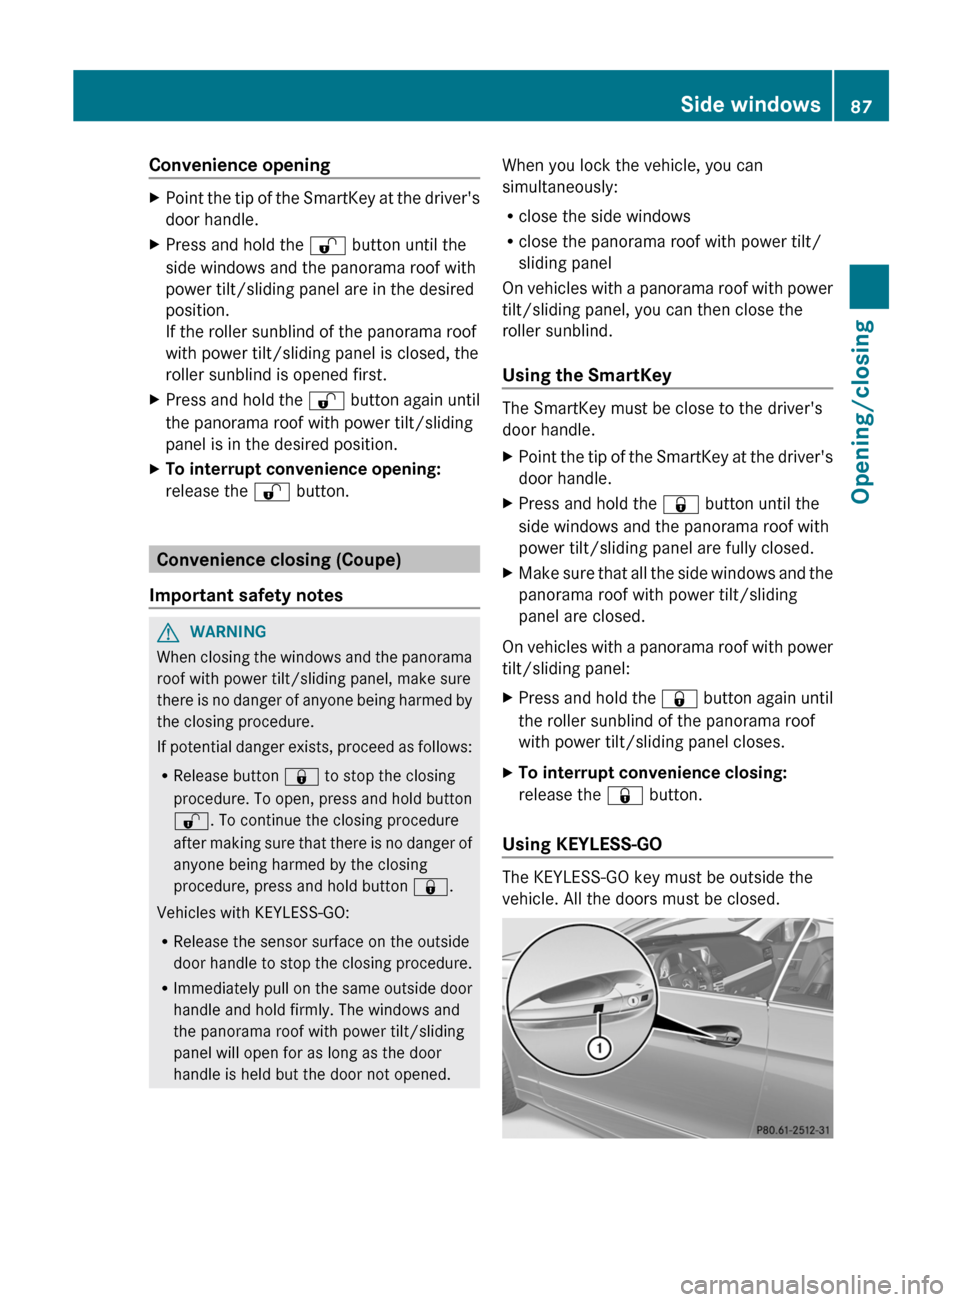
X
Point the tip of the SmartKey at the driver's
door handle.
X Press and hold the % button until the
side windows and the panorama roof with
power tilt/sliding panel are in the desired
position.
If the roller sunblind of the panorama roof
with power tilt/sliding panel is closed, the
roller sunblind is opened first.
X Press and hold the % button again until
the panorama roof with power tilt/sliding
panel is in the desired position.
X To interrupt convenience opening:
release the % button.Convenience closing (Coupe)
Important safety notes G
WARNING
When closing the windows and the panorama
roof with power tilt/sliding panel, make sure
there
is no danger of anyone being harmed by
the closing procedure.
If potential danger exists, proceed as follows:
R Release button & to stop the closing
procedure. To open, press and hold button
%. To continue the closing procedure
after making sure that there is no danger of
anyone being harmed by the closing
procedure, press and hold button &.
Vehicles with KEYLESS-GO:
R Release the sensor surface on the outside
door handle to stop the closing procedure.
R Immediately pull on the same outside door
handle and hold firmly. The windows and
the panorama roof with power tilt/sliding
panel will open for as long as the door
handle is held but the door not opened. When you lock the vehicle, you can
simultaneously:
R
close the side windows
R close the panorama roof with power tilt/
sliding panel
On
vehicles with a panorama roof with power
tilt/sliding panel, you can then close the
roller sunblind.
Using the SmartKey The SmartKey must be close to the driver's
door handle.
X
Point the tip of the SmartKey at the driver's
door handle.
X Press and hold the & button until the
side windows and the panorama roof with
power tilt/sliding panel are fully closed.
X Make sure that all the side windows and the
panorama roof with power tilt/sliding
panel are closed.
On vehicles with a panorama roof with power
tilt/sliding panel:
X Press and hold the &
button again until
the roller sunblind of the panorama roof
with power tilt/sliding panel closes.
X To interrupt convenience closing:
release the & button.
Using KEYLESS-GO The KEYLESS-GO key must be outside the
vehicle. All the doors must be closed. Side windows
87
Opening/closing Z
Page 116 of 372
EASY-ENTRY/EXIT feature
Important safety notes G
WARNING
Make sure that nobody can become trapped
when you activate the EASY-ENTRY/EXIT
feature.
If there is a risk of someone becoming
trapped, stop the adjustment procedure. To
halt the procedure:
R press the steering column adjustment
button.
R press one of the memory function position
buttons.
The steering column stops moving
immediately.
Do not keep the memory function position
button pressed as this will start the memory
function and set the steering wheel and seat
in motion.
Do not leave children unattended in the
vehicle.
They could open the driver's door and
thereby unintentionally activate the EASY-
ENTRY/EXIT feature and become trapped. G
WARNING
Let the system complete the adjustment
procedure before setting the vehicle in
motion. All steering wheel adjustment must
be completed before setting the vehicle in
motion. Driving off with the steering wheel
still adjusting could cause the driver to lose
control of the vehicle.
The
EASY-ENTRY/EXIT feature makes getting
in and out of your vehicle easier.
You can activate and deactivate the EASY-
ENTRY/EXIT feature in the on-board
computer (Y page 226). Position of the steering wheel when the
EASY-ENTRY/EXIT feature is active The steering wheel swings upwards when
you:
R
remove
the SmartKey from the ignition lock
R open the driver's door and KEYLESS-GO is
in position 1
R open the driver's door and the SmartKey is
in position 0 or 1 in the ignition lock
i The steering wheel only moves upwards if
it has not already reached the upper end
stop.
Position of the steering wheel for
driving The steering wheel is moved to the last
selected position when:
R
the driver's door is closed.
R you insert the SmartKey into the ignition
lock.
or
R you press the Start/Stop button once on
vehicles with KEYLESS-GO.
When you close the driver's door with the
ignition switched on, the steering wheel is
also automatically moved to the previously
set position.
The last position of the steering wheel is
stored when you switch off the ignition or
when you store the setting with the memory
function ( Y page 117).
Crash-responsive EASY-EXIT feature If the crash-responsive EASY-EXIT feature is
triggered
in an accident, the steering column
will move upwards when the driver's door is
opened. This occurs irrespective of the
position of the SmartKey in the ignition lock.
This makes it easier to exit the vehicle and
rescue the occupants.
The crash-responsive EASY-EXIT feature is
only operational if the EASY-EXIT/ENTRY
feature is activated in the on-board computer. 114
Steering wheel
Seats, steering wheel and mirrors
Page 135 of 372
3
Å Intermittent wipe, high (rain sensor
set to high sensitivity)
4 ° Continuous wipe, slow
5 ¯ Continuous wipe, fast
B í Single wipe/ î To wipe the
windshield using washer fluid
X Switch on the ignition.
X Turn the combination switch to the
corresponding position.
In the Ä
or Å position, the appropriate
wiping frequency is set automatically
according to the intensity of the rain. In
the Å position, the rain sensor is more
sensitive than in the Ä position, causing
the windshield wipers to wipe more
frequently. Replacing the wiper blades
Important safety notes G
WARNING
For safety reasons, switch off the windshield
wipers and remove the SmartKey from the
ignition
lock before changing the wiper blades
(vehicles with KEYLESS-GO: make sure that
the on-board electronics are in state 0).
Otherwise, the wiper motor could be switched
on suddenly and cause injury.
! Never open the hood if a windshield wiper
arm has been folded away from the
windshield.
Never fold a windshield wiper arm without
a wiper blade back onto the windshield.
Hold the windshield wiper arm firmly when
you change the wiper blade. If you release
the windshield wiper arm without a wiper
blade and it falls onto the windshield, the
windshield may be damaged by the force of
the impact.
Mercedes-Benz recommends that you have
the wiper blades changed at a qualified
specialist workshop. !
To avoid damaging the wiper blades,
make sure that you touch only the wiper
arm of the wiper.
Replacing the wiper blades Removing the wiper blades
X
Remove the SmartKey from the ignition
lock or turn it to position 0 (KEYLESS-GO).
X Fold the wiper arm away from the
windshield until it engages. X
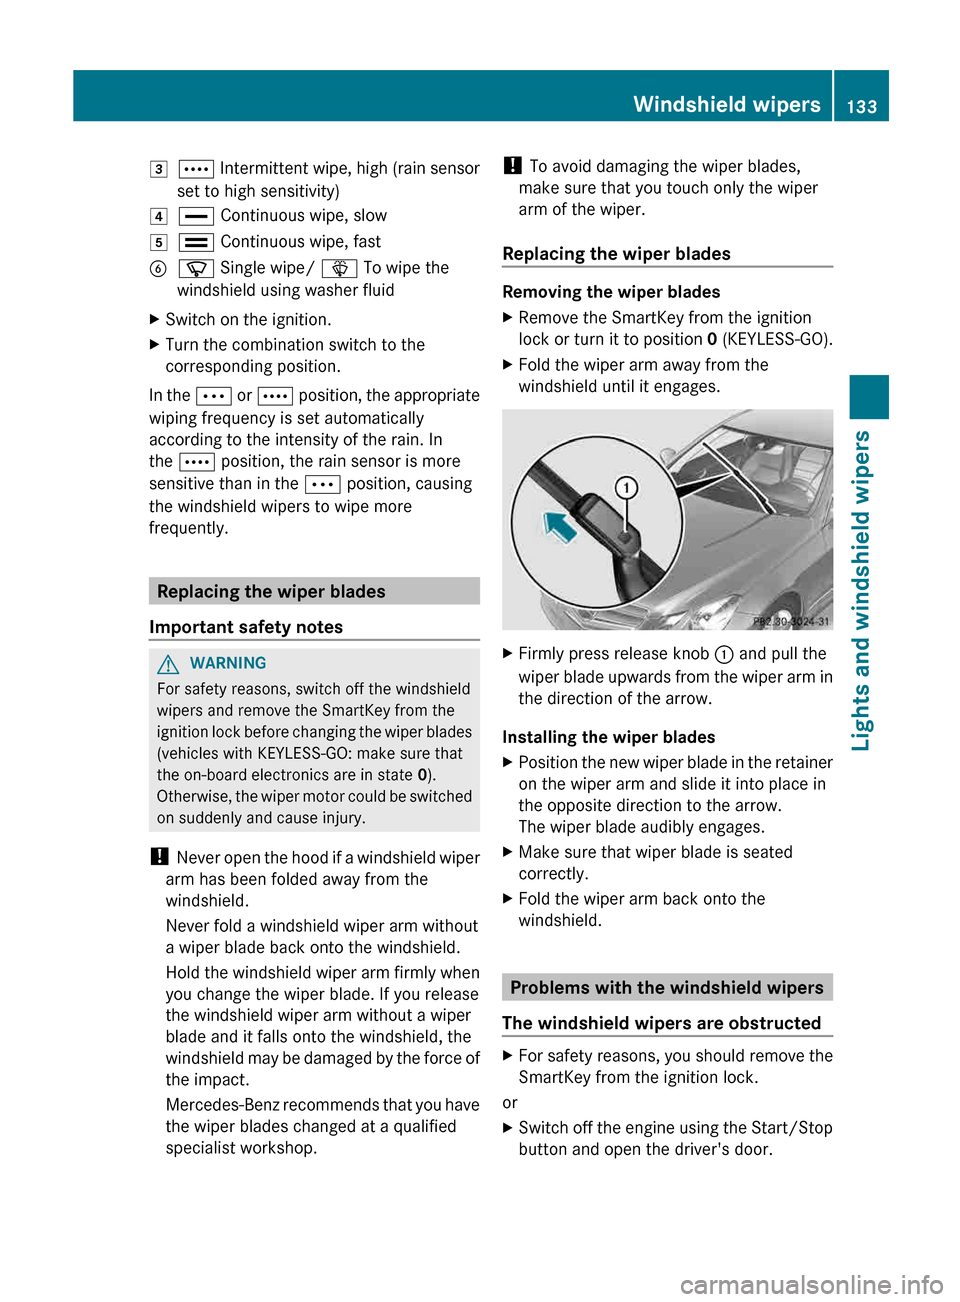
Firmly press release knob : and pull the
wiper
blade upwards from the wiper arm in
the direction of the arrow.
Installing the wiper blades
X Position the new wiper blade in the retainer
on the wiper arm and slide it into place in
the opposite direction to the arrow.
The wiper blade audibly engages.
X Make sure that wiper blade is seated
correctly.
X Fold the wiper arm back onto the
windshield. Problems with the windshield wipers
The windshield wipers are obstructed X
For safety reasons, you should remove the
SmartKey from the ignition lock.
or
X Switch off the engine using the Start/Stop
button and open the driver's door. Windshield wipers
133
Lights and windshield wipers Z
Page 153 of 372
G
WARNING
If the parking brake has not been fully
released when driving, the parking brake can:
R overheat and cause a fire
R lose its hold function.
There is a risk of fire and an accident. Release
the parking brake fully before driving off.
! Warm up the engine quickly. Do not use
the engine's full performance until it has
reached operating temperature.
Only shift the automatic transmission to
the desired drive position when the vehicle
is stationary.
Where possible, avoid spinning the drive
wheels when pulling away on slippery
roads. You could otherwise damage the
drive train. SmartKey positions
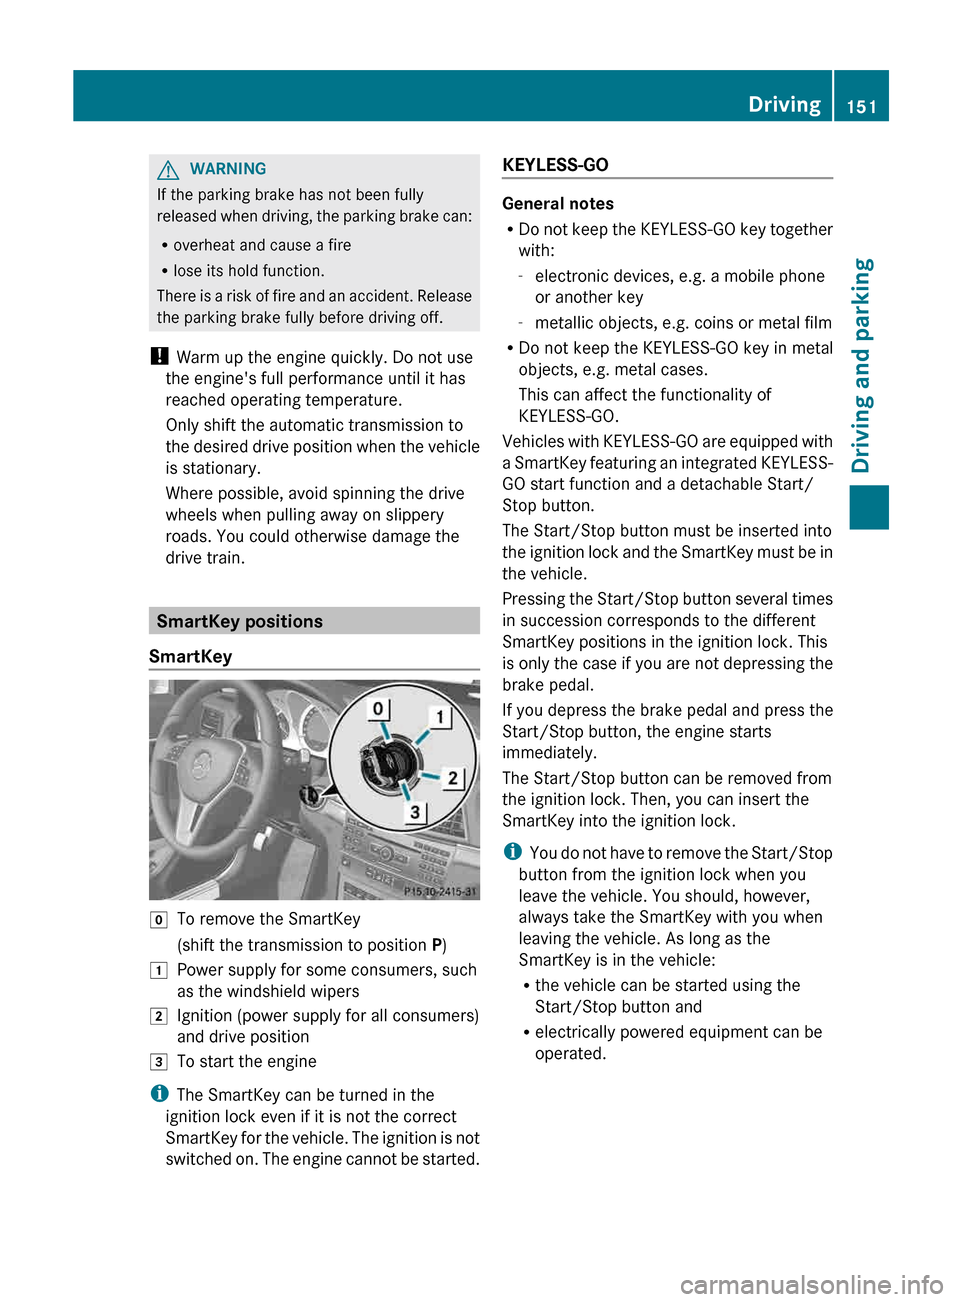
SmartKey g
To remove the SmartKey
(shift the transmission to position P)
1 Power supply for some consumers, such
as the windshield wipers
2 Ignition (power supply for all consumers)
and drive position
3 To start the engine
i The SmartKey can be turned in the
ignition lock even if it is not the correct
SmartKey
for the vehicle. The ignition is not
switched on. The engine cannot be started. KEYLESS-GO General notes
R
Do
not keep the KEYLESS-GO key together
with:
- electronic devices, e.g. a mobile phone
or another key
- metallic objects, e.g. coins or metal film
R Do not keep the KEYLESS-GO key in metal
objects, e.g. metal cases.
This can affect the functionality of
KEYLESS-GO.
Vehicles with KEYLESS-GO are equipped with
a SmartKey featuring an integrated KEYLESS-
GO start function and a detachable Start/
Stop button.
The Start/Stop button must be inserted into
the ignition lock and the SmartKey must be in
the vehicle.
Pressing the Start/Stop button several times
in succession corresponds to the different
SmartKey positions in the ignition lock. This
is only the case if you are not depressing the
brake pedal.
If you depress the brake pedal and press the
Start/Stop button, the engine starts
immediately.
The Start/Stop button can be removed from
the ignition lock. Then, you can insert the
SmartKey into the ignition lock.
i You do not have to remove the Start/Stop
button from the ignition lock when you
leave the vehicle. You should, however,
always take the SmartKey with you when
leaving the vehicle. As long as the
SmartKey is in the vehicle:
R the vehicle can be started using the
Start/Stop button and
R electrically powered equipment can be
operated. Driving
151
Driving and parking Z
Page 154 of 372
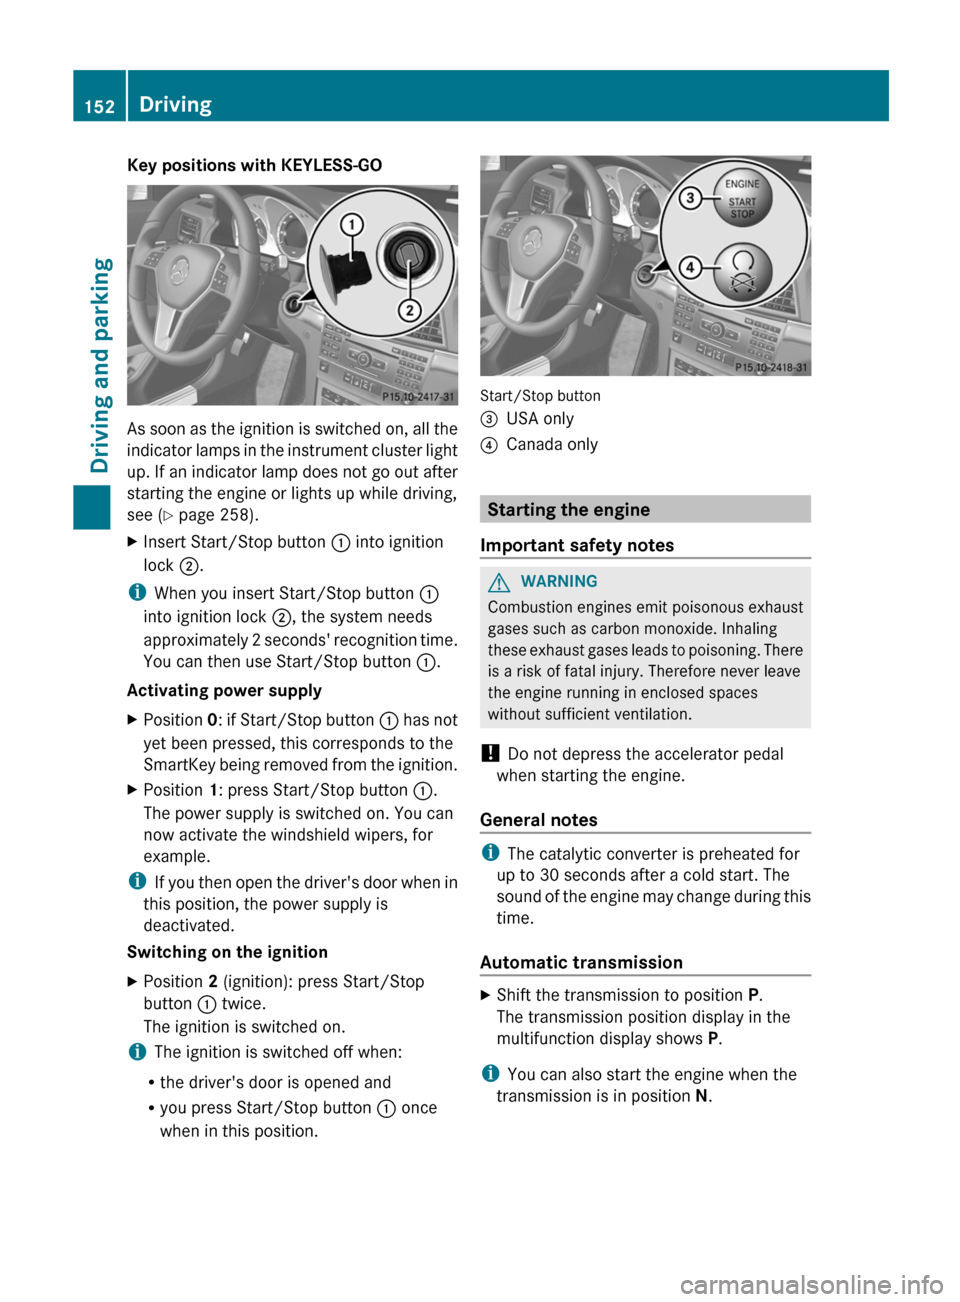
Key positions with KEYLESS-GO
As soon as the ignition is switched on, all the
indicator
lamps in the instrument cluster light
up. If an indicator lamp does not go out after
starting the engine or lights up while driving,
see ( Y page 258).
X Insert Start/Stop button : into ignition
lock ;.
i When you insert Start/Stop button :
into ignition lock ;, the system needs
approximately
2 seconds' recognition time.
You can then use Start/Stop button :.
Activating power supply
X Position 0:
if Start/Stop button : has not
yet been pressed, this corresponds to the
SmartKey being removed from the ignition.
X Position 1: press Start/Stop button :.
The power supply is switched on. You can
now activate the windshield wipers, for
example.
i If
you then open the driver's door when in
this position, the power supply is
deactivated.
Switching on the ignition
X Position 2 (ignition): press Start/Stop
button : twice.
The ignition is switched on.
i The ignition is switched off when:
R the driver's door is opened and
R you press Start/Stop button : once
when in this position. Start/Stop button
=
USA only
? Canada only Starting the engine
Important safety notes G
WARNING
Combustion engines emit poisonous exhaust
gases such as carbon monoxide. Inhaling
these
exhaust gases leads to poisoning. There
is a risk of fatal injury. Therefore never leave
the engine running in enclosed spaces
without sufficient ventilation.
! Do not depress the accelerator pedal
when starting the engine.
General notes i
The catalytic converter is preheated for
up to 30 seconds after a cold start. The
sound
of the engine may change during this
time.
Automatic transmission X
Shift the transmission to position P.
The transmission position display in the
multifunction display shows P.
i You can also start the engine when the
transmission is in position N. 152
Driving
Driving and parking