airbag MERCEDES-BENZ E-CLASS CABRIOLET 2015 Owner's Manual
[x] Cancel search | Manufacturer: MERCEDES-BENZ, Model Year: 2015, Model line: E-CLASS CABRIOLET, Model: MERCEDES-BENZ E-CLASS CABRIOLET 2015Pages: 349, PDF Size: 12.51 MB
Page 102 of 349
Correct driver's seat position
G
WARNING
You could lose control of the vehicle while
driving if you:
R adjust the driver's seat, steering wheel or
mirrors
R fasten the seat belt
There is a risk of an accident.
Adjust the driver's seat, head restraint, steer-
ing wheel and mirrors and fasten your seat
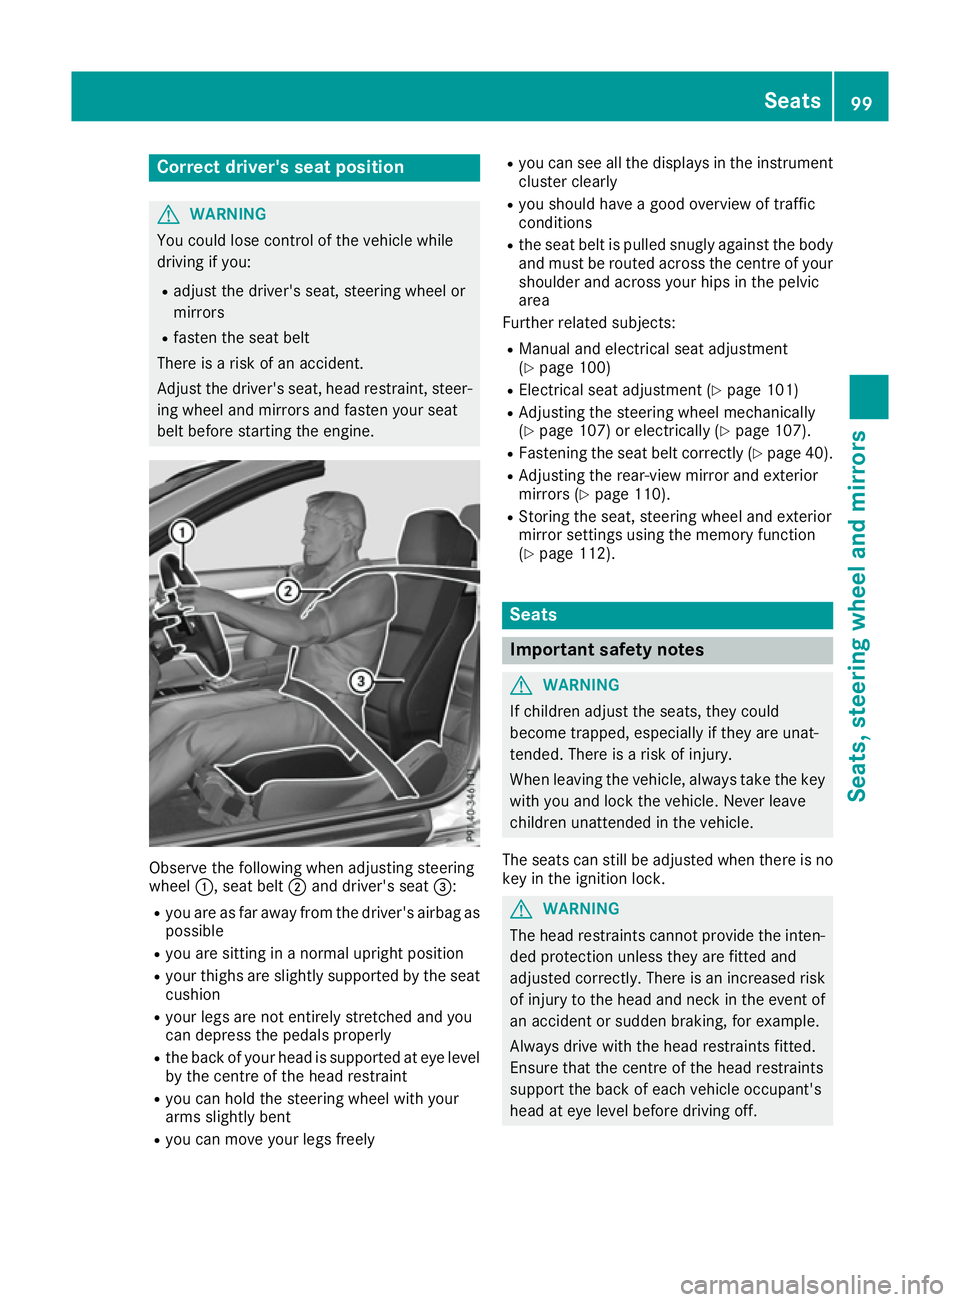
belt before starting the engine. Observe the following when adjusting steering
wheel
:, seat belt ;and driver's seat =:
R you are as far away from the driver's airbag as
possible
R you are sitting in a normal upright position
R your thighs are slightly supported by the seat
cushion
R your legs are not entirely stretched and you
can depress the pedals properly
R the back of your head is supported at eye level
by the centre of the head restraint
R you can hold the steering wheel with your
arms slightly bent
R you can move your legs freely R
you can see all the displays in the instrument
cluster clearly
R you should have a good overview of traffic
conditions
R the seat belt is pulled snugly against the body
and must be routed across the centre of your
shoulder and across your hips in the pelvic
area
Further related subjects:
R Manual and electrical seat adjustment
(Y page 100)
R Electrical seat adjustment (Y page 101)
R Adjusting the steering wheel mechanically
(Y page 107) or electrically (Y page 107).
R Fastening the seat belt correctly (Y page 40).
R Adjusting the rear-view mirror and exterior
mirrors (Y page 110).
R Storing the seat, steering wheel and exterior
mirror settings using the memory function
(Y page 112). Seats
Important safety notes
G
WARNING
If children adjust the seats, they could
become trapped, especially if they are unat-
tended. There is a risk of injury.
When leaving the vehicle, always take the key with you and lock the vehicle. Never leave
children unattended in the vehicle.
The seats can still be adjusted when there is no
key in the ignition lock. G
WARNING
The head restraints cannot provide the inten-
ded protection unless they are fitted and
adjusted correctly. There is an increased risk of injury to the head and neck in the event of
an accident or sudden braking, for example.
Always drive with the head restraints fitted.
Ensure that the centre of the head restraints
support the back of each vehicle occupant's
head at eye level before driving off. Seats
99Seats, steering wheel and mirrors Z
Page 103 of 349

Observe the safety notes on "Airbags"
(Y
page 42) and "Children in the vehicle"
(Y page 49). G
WARNING
You could lose control of the vehicle while
driving if you:
R adjust the driver's seat, steering wheel or
mirrors
R fasten the seat belt
There is a risk of an accident.
Adjust the driver's seat, head restraint, steer-
ing wheel and mirrors and fasten your seat
belt before starting the engine. G
WARNING
If you adjust the seat height carelessly, you or other vehicle occupants could be trapped andthereby injured. Children in particular could
accidentally press the electrical seat adjust-
ment buttons and become trapped. There is a
risk of injury.
While moving the seats, make sure that your
hands or other body parts do not get under the
lever assembly of the seat adjustment sys-
tem. G
WARNING
When adjusting a seat, you or another vehicle occupant could become trapped by the guiderail of the seat, for instance. There is a risk of
injury.
Make sure that no one has any part of their
body within the sweep of the seat when
adjusting it.
! To avoid damage to the seats and the seat
heating, observe the following information:
R do not spill any liquids on the seats. If liquid
is spilled on the seats, dry them as soon as possible.
R if the seat covers are damp or wet, do not
switch on the seat heating. The seat heat-
ing should also not be used to dry the seats.
R clean the seat covers as recommended;
see "Interior care".
R do not transport heavy loads on the seats.
Do not place sharp objects on the seat cushions, e.g. knives, nails or tools. The
seats should only be occupied by passen-
gers, if possible.
R when the seat heating is in operation, do
not cover the seats with insulating materi-
als, e.g. blankets, coats, bags, seat covers,
child seats or booster seats.
! Make sure that there are no objects in the
footwell under or behind the seats when mov- ing the seats back. There is a risk that the
seats and/or the objects could be damaged.
i The head restraints in the front seats are
fitted with the NECK-PRO system (Y page 47).
For this reason, it is not possible to remove
the head restraints from the front seats.
For more information, contact a qualified spe-
cialist workshop. Adjusting the seats manually and
electrically :
Backrest angle
; Seat height
= Seat cushion angle
? Seat fore-and-aft adjustment
X Seat fore-and-aft adjustment: lift lever?
and slide the seat forwards or backwards.
X Release lever ?again.
Make sure that you hear the seat engage in
position.
X To adjust the seat cushion angle: turn
handwheel =in the desired direction. 100
SeatsSeats, steering wheel and mirrors
Page 119 of 349
Combination switch
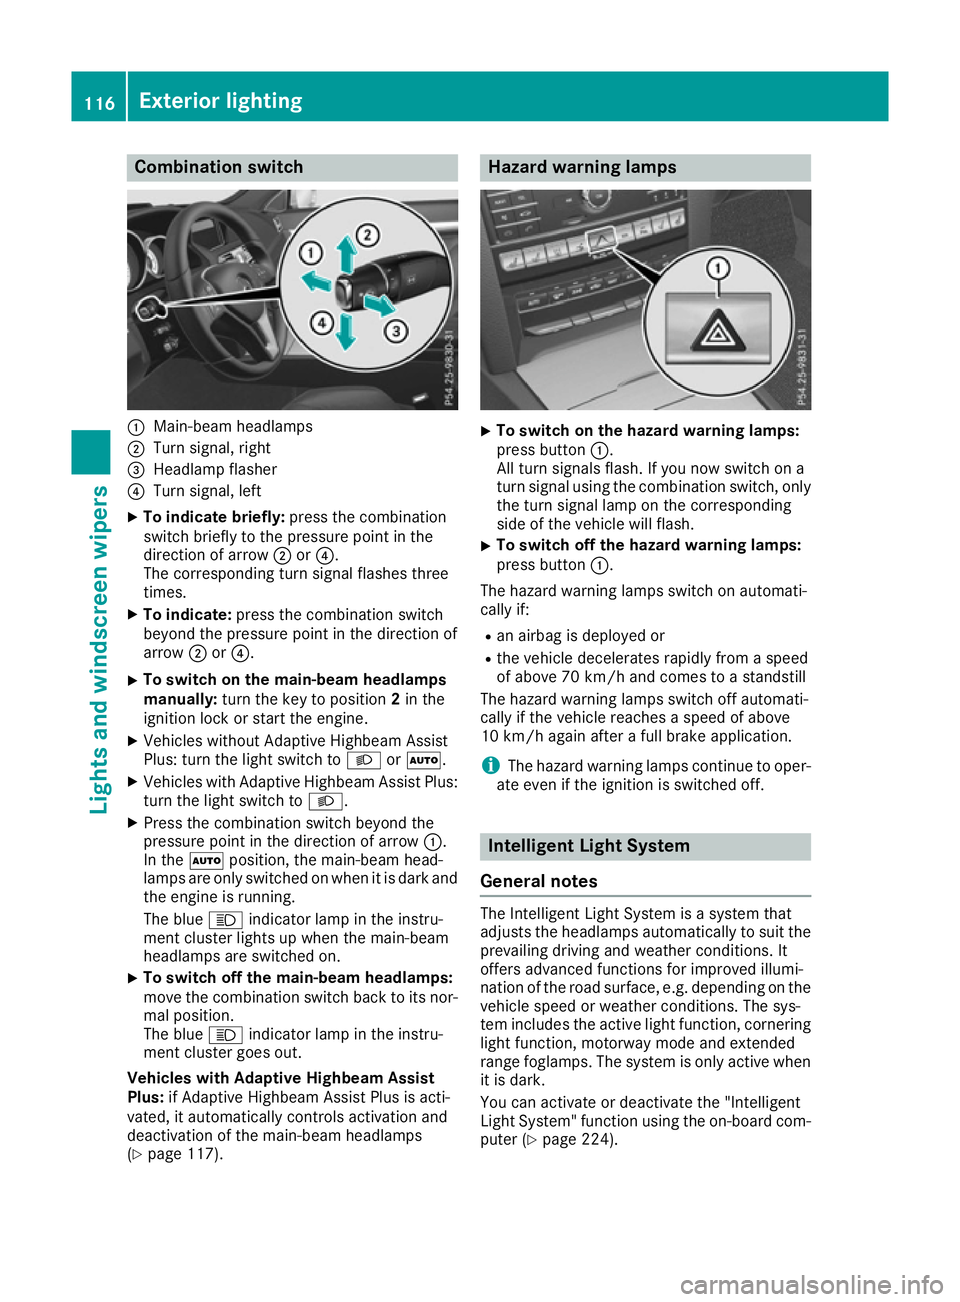
:
Main-beam headlamps
; Turn signal, right
= Headlamp flasher
? Turn signal, left
X To indicate briefly: press the combination
switch briefly to the pressure point in the
direction of arrow ;or?.
The corresponding turn signal flashes three
times.
X To indicate: press the combination switch
beyond the pressure point in the direction of
arrow ;or?.
X To switch on the main-beam headlamps
manually:
turn the key to position 2in the
ignition lock or start the engine.
X Vehicles without Adaptive Highbeam Assist
Plus: turn the light switch to LorÃ.
X Vehicles with Adaptive Highbeam Assist Plus:
turn the light switch to L.
X Press the combination switch beyond the
pressure point in the direction of arrow :.
In the Ãposition, the main-beam head-
lamps are only switched on when it is dark and
the engine is running.
The blue Kindicator lamp in the instru-
ment cluster lights up when the main-beam
headlamps are switched on.
X To switch off the main-beam headlamps:
move the combination switch back to its nor- mal position.
The blue Kindicator lamp in the instru-
ment cluster goes out.
Vehicles with Adaptive Highbeam Assist
Plus: if Adaptive Highbeam Assist Plus is acti-
vated, it automatically controls activation and
deactivation of the main-beam headlamps
(Y page 117). Hazard warning lamps
X
To switch on the hazard warning lamps:
press button :.
All turn signals flash. If you now switch on a
turn signal using the combination switch, only the turn signal lamp on the corresponding
side of the vehicle will flash.
X To switch off the hazard warning lamps:
press button :.
The hazard warning lamps switch on automati-
cally if:
R an airbag is deployed or
R the vehicle decelerates rapidly from a speed
of above 70 km/h and comes to a standstill
The hazard warning lamps switch off automati-
cally if the vehicle reaches a speed of above
10 km/h again after a full brake application.
i The hazard warning lamps continue to oper-
ate even if the ignition is switched off. Intelligent Light System
General notes The Intelligent Light System is a system that
adjusts the headlamps automatically to suit the
prevailing driving and weather conditions. It
offers advanced functions for improved illumi-
nation of the road surface, e.g. depending on the vehicle speed or weather conditions. The sys-
tem includes the active light function, corneringlight function, motorway mode and extended
range foglamps. The system is only active when it is dark.
You can activate or deactivate the "Intelligent
Light System" function using the on-board com-
puter (Y page 224). 116
Exterior lightingLights and windscreen wipers
Page 236 of 349
Display messages
Possible causes/consequences and
M
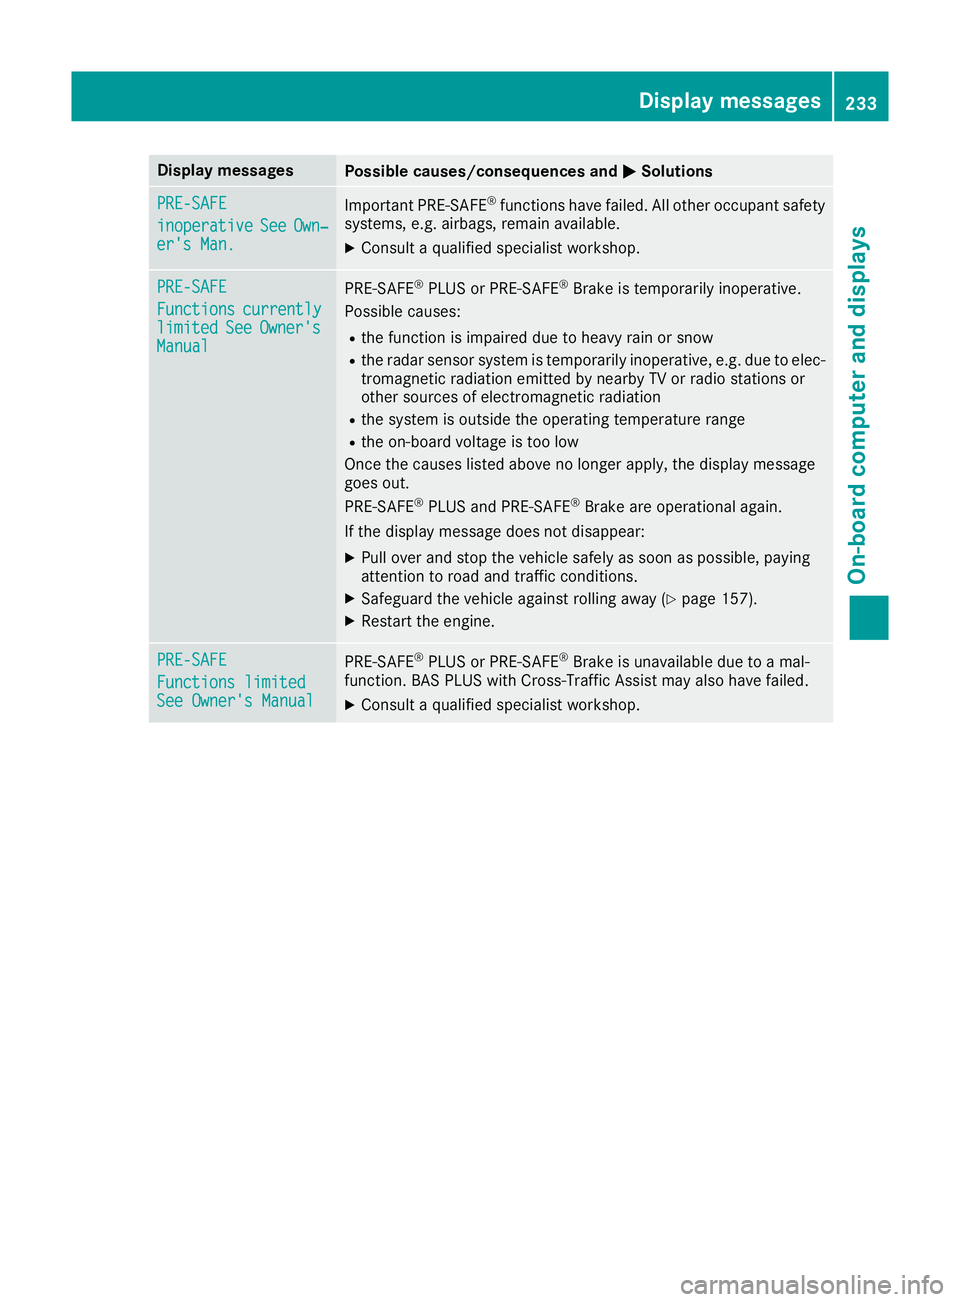
MSolutions PRE-SAFE
PRE-SAFE
inoperative inoperative
See
SeeOwn‐
Own‐
er's Man.
er's Man. Important PRE-SAFE
®
functions have failed. All other occupant safety
systems, e.g. airbags, remain available.
X Consult a qualified specialist workshop. PRE-SAFE
PRE-SAFE
Functions Functions
currently
currently
limited
limited See
See Owner's
Owner's
Manual
Manual PRE
‑SAFE ®
PLUS or PRE‑ SAFE®
Brake is temporarily inoperative.
Possible causes:
R the function is impaired due to heavy rain or snow
R the radar sensor system is temporarily inoperative, e.g. due to elec-
tromagnetic radiation emitted by nearby TV or radio stations or
other sources of electromagnetic radiation
R the system is outside the operating temperature range
R the on-board voltage is too low
Once the causes listed above no longer apply, the display message
goes out.
PRE ‑SAFE ®
PLUS and PRE ‑SAFE®
Brake are operational again.
If the display message does not disappear:
X Pull over and stop the vehicle safely as soon as possible, paying
attention to road and traffic conditions.
X Safeguard the vehicle against rolling away (Y page 157).
X Restart the engine. PRE-SAFE PRE-SAFE
Functions limited Functions limited
See Owner's Manual See Owner's Manual
PRE
‑SAFE ®
PLUS or PRE‑ SAFE®
Brake is unavailable due to a mal-
function. BAS PLUS with Cross-Traffic Assist may also have failed.
X Consult a qualified specialist workshop. Display
messages
233On-board computer and displays Z
Page 238 of 349

Display messages
Possible causes/consequences and
M
MSolutions ý If this symbol appears in the multifunction display, a seat belt tongue
has not been inserted in a rear seat belt buckle.
G WARNING
A seat belt which is not worn correctly, or which has not been engaged
in the seat belt buckle correctly, cannot provide the intended level of protection.
This poses an increased risk of injury.
X If necessary, ask the occupants in the rear to fasten their seat belts
(Y page 40).
Observe the additional information on the rear seat belt status indi-
cator (Y page 42). 6
Restraint sys. mal‐ Restraint sys. mal‐
function Consult function Consult
workshop workshop The restraint system is faulty. The
6warning lamp also lights up in
the instrument cluster.
G WARNING
The airbags or belt tensioners may either be triggered unintentionally or, in the event of an accident, may not be triggered.
This poses an increased risk of injury.
X Consult a qualified specialist workshop immediately.
Observe the additional information on the restraint system
(Y page 37). 6
Front left malfunc‐ Front left malfunc‐
tion Consult work‐ tion Consult work‐
shop shopor
Front right
Front right
malfunction
malfunction Consult
Consult
workshop
workshop The restraint system has malfunctioned at the front on the left or right.
The 6 warning lamp also lights up in the instrument cluster.
G WARNING
The airbags or belt tensioners may either be triggered unintentionally or, in the event of an accident, may not be triggered.
This poses an increased risk of injury.
X Consult a qualified specialist workshop immediately. Display
messages
235On-board computer and displays Z
Page 239 of 349

Display messages
Possible causes/consequences and
M
MSolutions 6
Rear left malfunc‐ Rear left malfunc‐
tion Consult work‐ tion Consult work‐
shop shopor
Rear right
Rear right
malfunction
malfunction Consult
Consult
workshop
workshop The restraint system has malfunctioned at the rear on the left or right.
The 6 warning lamp also lights up in the instrument cluster.
G WARNING
The airbags or belt tensioners may either be triggered unintentionally or, in the event of an accident, may not be triggered.
This poses an increased risk of injury.
X Consult a qualified specialist workshop immediately. 6
Left windowbag mal‐ Left windowbag mal‐
function Consult function Consult
workshop workshoporRight
Right
windowbag malfunc‐
windowbag malfunc‐
tion Consult work‐ tion Consult work‐
shop shop The left or right windowbag (Coupé) or headbag (Cabriolet) is mal-
functioning.
The 6 warning lamp also lights up in the instrument cluster.
G WARNING
The left or right windowbag (Coupé) or headbag (Cabriolet) may either
be triggered unintentionally or, in the event of an accident, may not be triggered.
This poses an increased risk of injury.
X Consult a qualified specialist workshop immediately. Lights
Display messages
Possible causes/consequences and
M MSolutions b
Left dipped beam Left dipped beam
(example) The corresponding bulb is faulty.
X Consult a qualified specialist workshop.
or X Check whether you are permitted to replace the bulb yourself
(Y page 119).
i LED light bulbs: the display message for the corresponding lamp
only appears when all the LEDs in the lamp have failed. b
Intell. Light Sys‐ Intell. Light Sys‐
tem inoperative tem inoperative The Intelligent Light System is faulty. The lights remain available with-
out the Intelligent Light System.
X Consult a qualified specialist workshop. b
Malfunction Malfunction
See
SeeOwn‐
Own‐
er's Manual
er's Manual The exterior lighting is faulty.
X Consult a qualified specialist workshop. 236
Display
messagesOn-board computer and displays
Page 261 of 349
Warning/
indicator
lamp
N N
Signal type
Possible causes/consequences and M
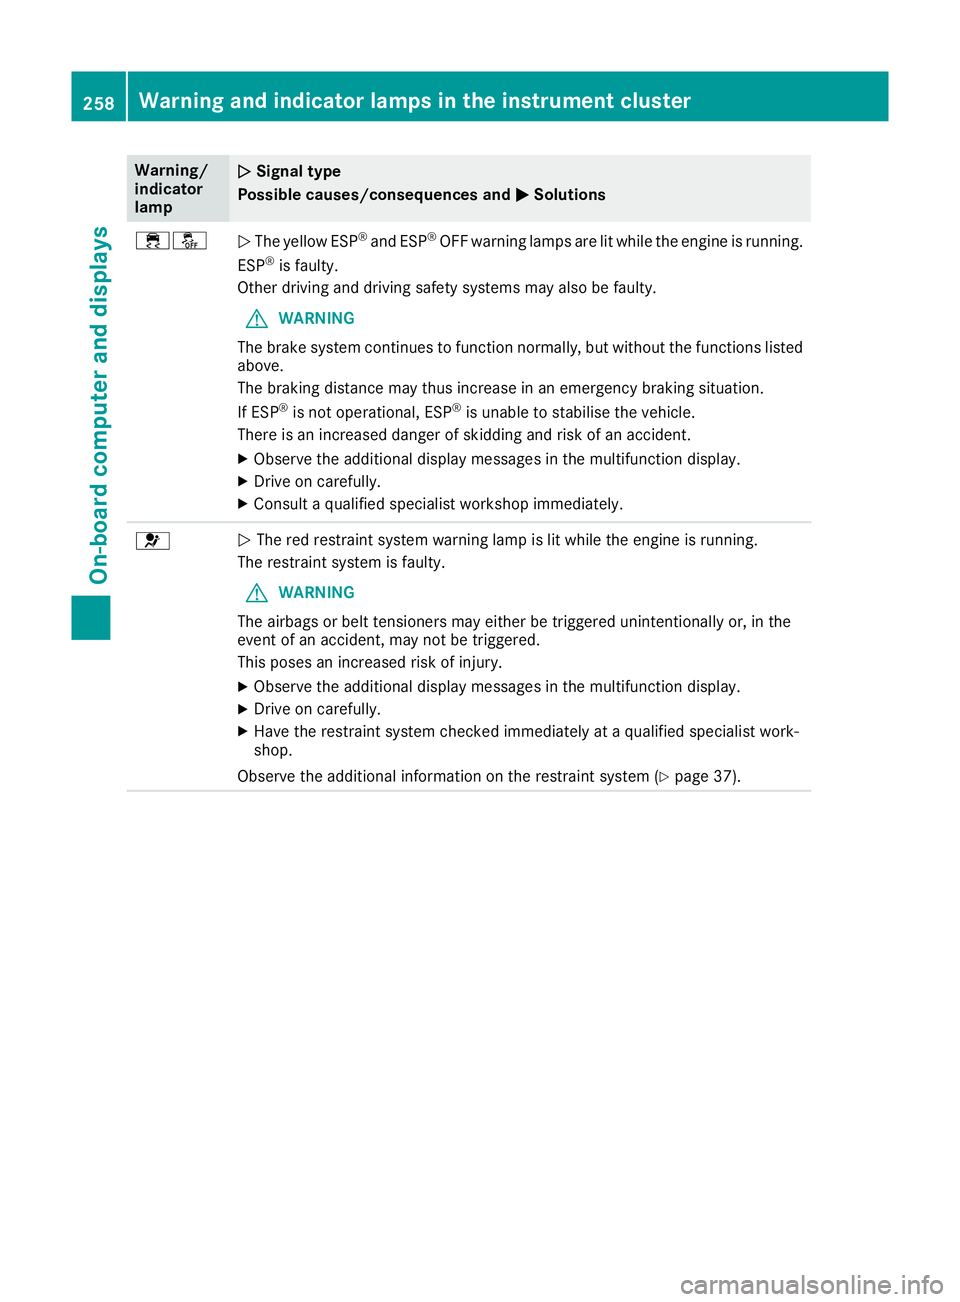
M Solutions ֌
N
The yellow ESP ®
and ESP ®
OFF warning lamps are lit while the engine is running.
ESP ®
is faulty.
Other driving and driving safety systems may also be faulty.
G WARNING
The brake system continues to function normally, but without the functions listed above.
The braking distance may thus increase in an emergency braking situation.
If ESP ®
is not operational, ESP ®
is unable to stabilise the vehicle.
There is an increased danger of skidding and risk of an accident.
X Observe the additional display messages in the multifunction display.
X Drive on carefully.
X Consult a qualified specialist workshop immediately. 6
N
The red restraint system warning lamp is lit while the engine is running.
The restraint system is faulty.
G WARNING
The airbags or belt tensioners may either be triggered unintentionally or, in the
event of an accident, may not be triggered.
This poses an increased risk of injury.
X Observe the additional display messages in the multifunction display.
X Drive on carefully.
X Have the restraint system checked immediately at a qualified specialist work-
shop.
Observe the additional information on the restraint system (Y page 37).258
Warning and indicator lamps in the instrument clusterOn-board computer and displays
Page 305 of 349
Cleaning the plastic trim
G
WARNING
Care products and cleaning agents containing solvents can cause surfaces in the cockpit to
become porous. This could result in plastic
parts breaking away when the airbags are
deployed. There is a danger of injury.
Do not use care products and cleaning agents containing solvents to clean the cockpit.
! Do not affix the following to plastic surfaces:
R stickers
R films
R scented oil bottles or similar items
You could otherwise damage the plastic.
! Do not allow cosmetics, insect repellent or
sunscreen to come in contact with the plastic trim. This maintains the high-quality look of
the surfaces.
X Wipe the plastic trim with a damp, lint-free
cloth, e.g. a microfibre cloth.
X Heavy soiling: use car care and cleaning
products recommended and approved by
Mercedes-Benz.
The surface may change colour temporarily.
Wait until the surface is dry again.
Cleaning the steering wheel and gear or selector lever X
Thoroughly wipe with a damp cloth or use
leather care agents that have been recom-
mended and approved by Mercedes-Benz.
Cleaning wooden trim and trim ele-
ments !
Do not use solvent-based cleaning agents
such as tar remover, wheel cleaners, polishes
or waxes. There is otherwise a risk of damag- ing the surface.
X Wipe the wooden trim and trim elements with
a damp, lint-free cloth, e.g. a microfibre cloth.
X Heavy soiling: use car care and cleaning
products recommended and approved by
Mercedes-Benz. Cleaning the seat covers General notes
! Do not use a microfibre cloth to clean covers
made out of real leather, artificial leather or
DINAMICA. If used frequently, this can dam-
age the cover.
i Note that regular care is essential to make
sure that the appearance and comfort of the
covers are retained over time.
Genuine leather seat covers
Leather is a natural product.
It has natural surface properties, e.g.:
R unevenness in structure
R marks caused by growth and injury
R subtle colour differences
These are characteristics of leather and not
material faults.
! To retain the natural appearance of the
leather, observe the following cleaning
instructions:
R Clean genuine leather covers carefully with
a damp cloth and then wipe the covers
down with a dry cloth.
R Make sure that the leather does not
become soaked. It may otherwise become
rough and cracked.
R Only use leather care agents that have
been tested and approved by Mercedes-
Benz. You can obtain these from a qualified
specialist workshop.
Seat covers from other materials
! Observe the following when cleaning:
R clean artificial leather covers with a cloth
moistened with a solution containing 1%
detergent (e.g. washing-up liquid).
R clean cloth covers with a microfibre cloth
moistened with a solution containing 1%
detergent (e.g. washing-up liquid). Rub
carefully, and always wipe entire seat sec-
tions to avoid leaving visible lines. Leave
the seat to dry afterwards. Cleaning results
depend on the type of dirt and how long it
has been there.
R Clean DINAMICA covers with a damp cloth.
Make sure that you wipe entire seat sec-
tions to avoid leaving visible lines. 302
CareMaintenance and care