door lock MERCEDES-BENZ E-CLASS CABRIOLET 2015 Owner's Manual
[x] Cancel search | Manufacturer: MERCEDES-BENZ, Model Year: 2015, Model line: E-CLASS CABRIOLET, Model: MERCEDES-BENZ E-CLASS CABRIOLET 2015Pages: 349, PDF Size: 12.51 MB
Page 85 of 349
function has been deactivated. You can deacti-
vate the double lock function by deactivating the
interior motion sensor (Y page 72).
For all countries: when a locked door is opened
from inside the vehicle, the previous unlocking
process will be observed if the vehicle has been:
R locked with the locking button for the central
locking or
R locked automatically
The vehicle will be fully unlocked if it had previ-
ously been fully unlocked. Only the door which
has been opened from the inside is unlocked if
only the driver's door had been previously
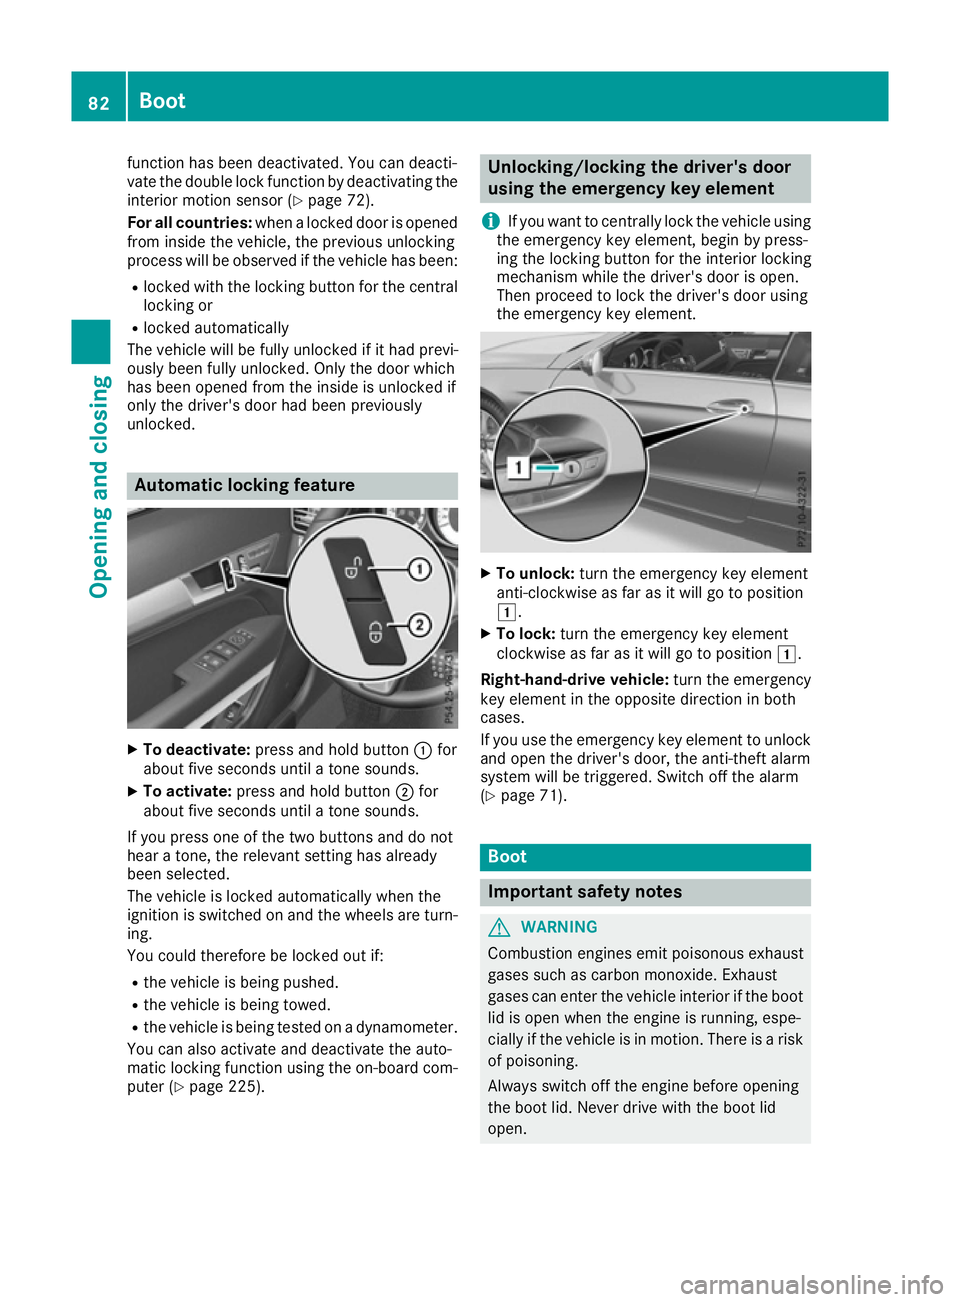
unlocked. Automatic locking feature
X
To deactivate: press and hold button :for
about five seconds until a tone sounds.
X To activate: press and hold button ;for
about five seconds until a tone sounds.
If you press one of the two buttons and do not
hear a tone, the relevant setting has already
been selected.
The vehicle is locked automatically when the
ignition is switched on and the wheels are turn-
ing.
You could therefore be locked out if:
R the vehicle is being pushed.
R the vehicle is being towed.
R the vehicle is being tested on a dynamometer.
You can also activate and deactivate the auto-
matic locking function using the on-board com- puter (Y page 225). Unlocking/locking the driver's door
using the emergency key element
i If you want to centrally lock the vehicle using
the emergency key element, begin by press-
ing the locking button for the interior locking
mechanism while the driver's door is open.
Then proceed to lock the driver's door using
the emergency key element. X
To unlock: turn the emergency key element
anti-clockwise as far as it will go to position
1.
X To lock: turn the emergency key element
clockwise as far as it will go to position 1.
Right-hand-drive vehicle: turn the emergency
key element in the opposite direction in both
cases.
If you use the emergency key element to unlock
and open the driver's door, the anti-theft alarm
system will be triggered. Switch off the alarm
(Y page 71). Boot
Important safety notes
G
WARNING
Combustion engines emit poisonous exhaust
gases such as carbon monoxide. Exhaust
gases can enter the vehicle interior if the boot
lid is open when the engine is running, espe-
cially if the vehicle is in motion. There is a risk of poisoning.
Always switch off the engine before opening
the boot lid. Never drive with the boot lid
open. 82
BootOpening and closing
Page 87 of 349

You can lock the boot separately. If you then
unlock the vehicle centrally, the boot remains
locked and cannot be opened.
X Close the boot lid.
X Take the emergency key element out of the
key (Y page 76). X
Insert the emergency key element into the
boot lid lock as far as the stop.
X Turn the emergency key element clockwise
from position 1to position 2.
X Pull out the emergency key element.
X Insert the emergency key element into the
key. Unlocking the boot (emergency key
element)
! The boot lid swings upwards when opened.
Therefore, make sure that there is sufficient
clearance above the boot lid.
If the boot cannot be unlocked with the key or
KEYLESS-GO, use the emergency key element.
If you use the emergency key element to unlock
and open the boot lid, the anti-theft alarm sys-
tem will be triggered. Switch off the alarm
(Y page 71).
X Take the emergency key element out of the
key (Y page 76).
X Insert the emergency key element into the
boot lid lock as far as the stop. X
Turn the emergency key element from posi-
tion 1anti-clockwise as far as it will go to
position 2. When doing so, also pull the boot
lid handle.
The boot is unlocked.
X Turn the emergency key element back to posi-
tion 1and remove it.
X Insert the emergency key element into the
key (Y page 76). Side windows
Important safety notes
G
WARNING
While opening the side windows, body parts
could become trapped between the side win- dow and the door frame as the side window
moves. There is a risk of injury.
Make sure that nobody touches the side win-
dow during the opening procedure. If some-
body becomes trapped, release the switch or pull the switch to close the side window again. G
WARNING
While closing the side windows, body parts in the closing area could become trapped. There is a risk of injury.
When closing make sure that no parts of the
body are in the closing area. If somebody
becomes trapped, release the switch or press
the switch to open the side window again. 84
Side windowsOpening and closing
Page 88 of 349
G
WARNING
If children operate the side windows they
could become trapped, particularly if they are left unsupervised. There is a risk of injury.
Activate the override feature for the rear side
windows. When leaving the vehicle, always
take the key with you and lock the vehicle.
Never leave children unattended in the vehi-
cle. Side window reversing feature
The side windows are equipped with an auto-
matic reversing feature. If a solid object blocks
or restricts a side window during the closing
process, the side window opens again automat-
ically. The automatic reversing feature is, how-
ever, only an aid and is no substitute for your
attention when closing a side window. G
WARNING
The reversing function does not react:
R to soft, light and thin objects, e.g. small fin-
gers
R over the last 4 mm of the closing movement
R during resetting
R when closing the side window again man-
ually immediately after automatic reversing
This means that the reversing function cannot prevent someone being trapped in these sit-
uations. There is a risk of injury.
When closing make sure that no parts of the
body are in the closing area. If someone
becomes trapped, press the switch to open
the side window again. Opening and closing the side win-
dows
The switches for all side windows are located on
the driver's door. There is also a switch on the
front-passenger door as well as on the doors in
the rear compartment on the left and right-hand sides for the corresponding side window.
The switches on the driver's door take prece-
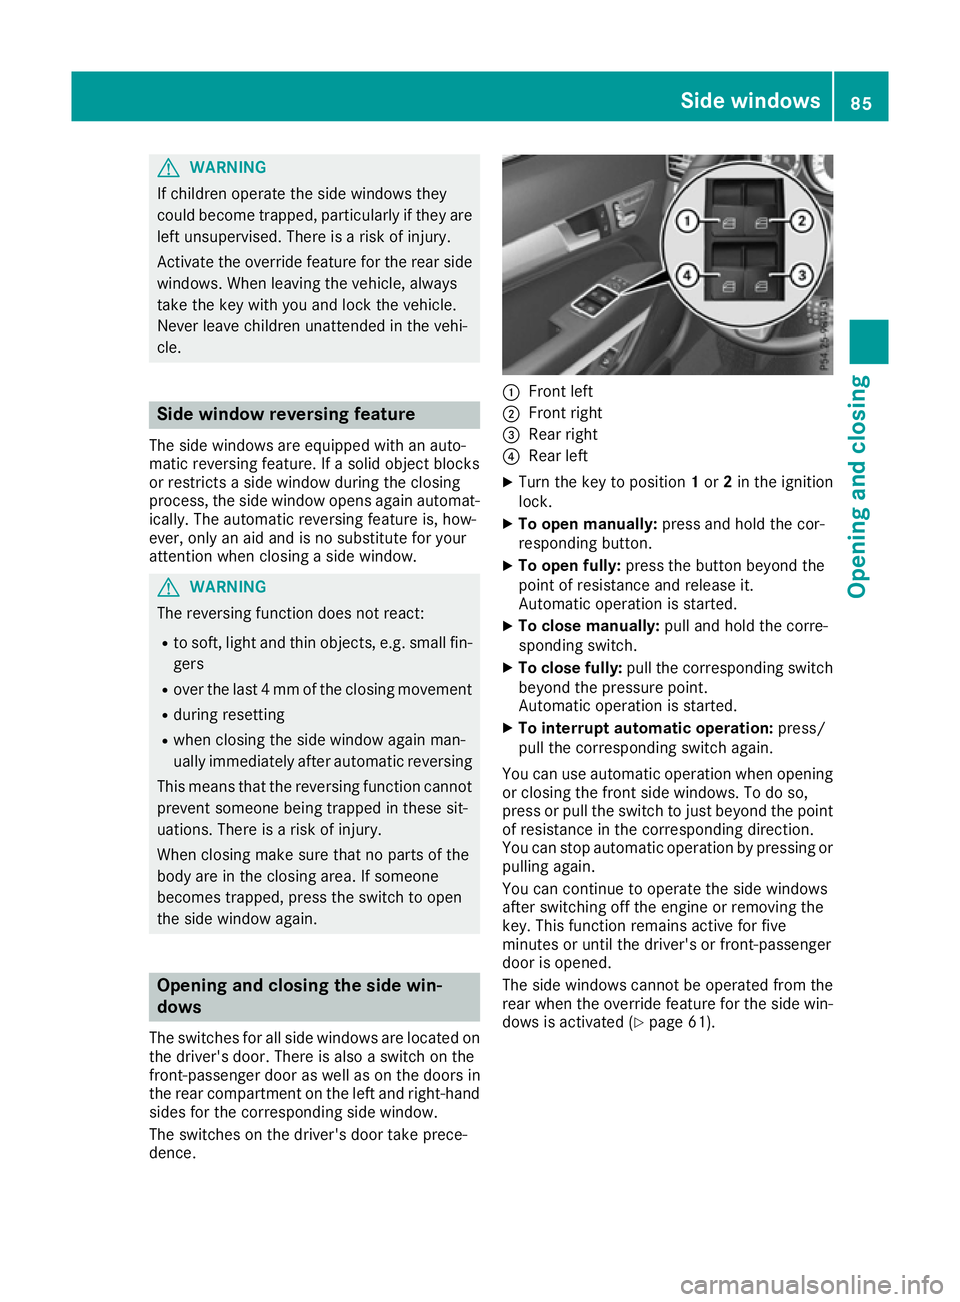
dence. :
Front left
; Front right
= Rear right
? Rear left
X Turn the key to position 1or 2in the ignition
lock.
X To open manually: press and hold the cor-
responding button.
X To open fully: press the button beyond the
point of resistance and release it.
Automatic operation is started.
X To close manually: pull and hold the corre-
sponding switch.
X To close fully: pull the corresponding switch
beyond the pressure point.
Automatic operation is started.
X To interrupt automatic operation: press/
pull the corresponding switch again.
You can use automatic operation when opening or closing the front side windows. To do so,
press or pull the switch to just beyond the point
of resistance in the corresponding direction.
You can stop automatic operation by pressing or pulling again.
You can continue to operate the side windows
after switching off the engine or removing the
key. This function remains active for five
minutes or until the driver's or front-passenger
door is opened.
The side windows cannot be operated from the
rear when the override feature for the side win-
dows is activated (Y page 61). Side windows
85Opening and closing Z
Page 90 of 349
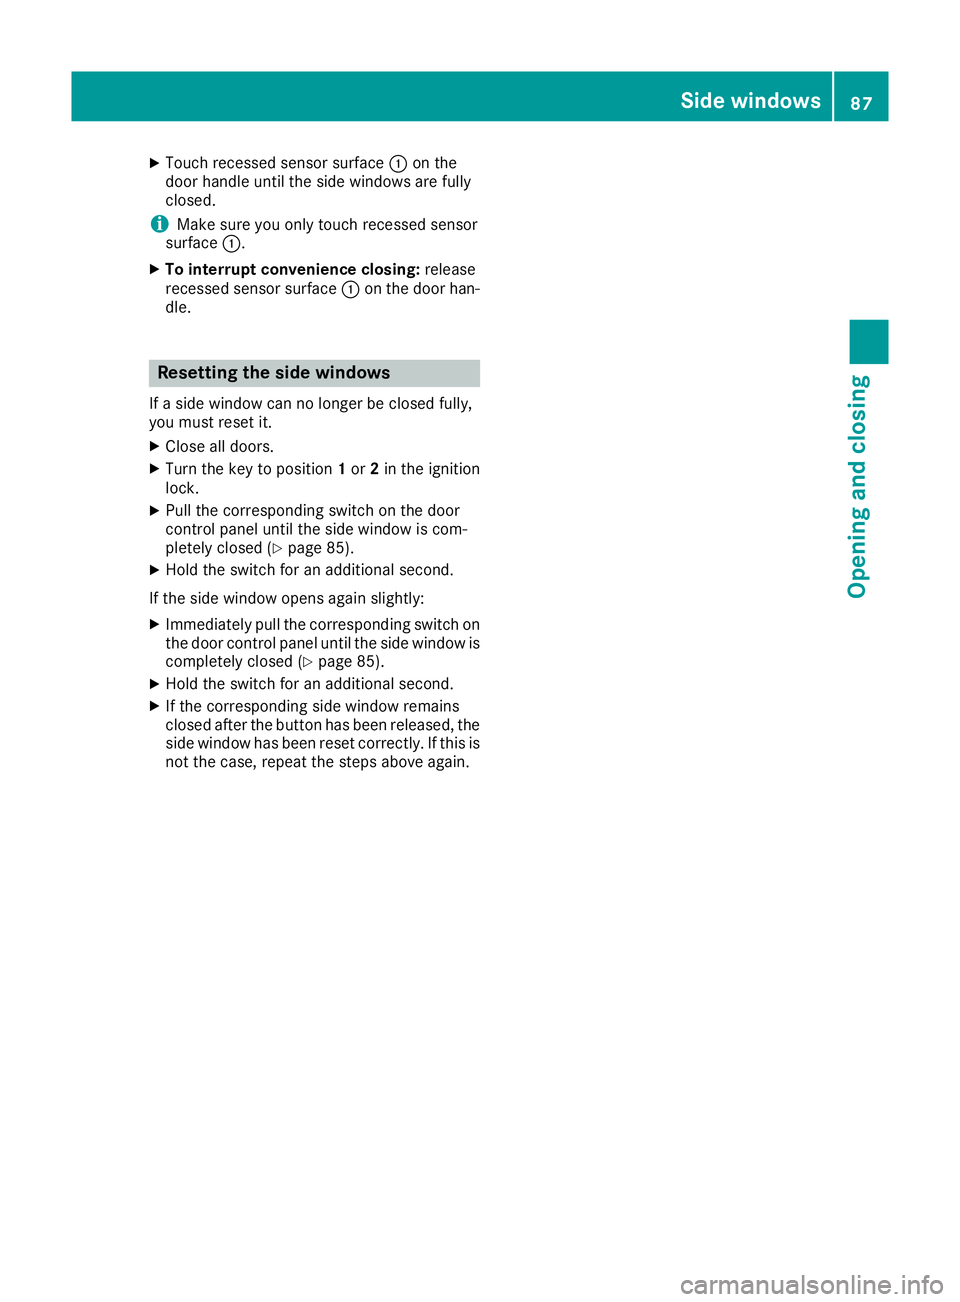
X
Touch recessed sensor surface :on the
door handle until the side windows are fully
closed.
i Make sure you only touch recessed sensor
surface :.
X To interrupt convenience closing: release
recessed sensor surface :on the door han-
dle. Resetting the side windows
If a side window can no longer be closed fully,
you must reset it.
X Close all doors.
X Turn the key to position 1or 2in the ignition
lock.
X Pull the corresponding switch on the door
control panel until the side window is com-
pletely closed (Y page 85).
X Hold the switch for an additional second.
If the side window opens again slightly: X Immediately pull the corresponding switch on
the door control panel until the side window is completely closed (Y page 85).
X Hold the switch for an additional second.
X If the corresponding side window remains
closed after the button has been released, the
side window has been reset correctly. If this is
not the case, repeat the steps above again. Side windows
87Opening and closing Z
Page 93 of 349
Opening and closing with the key
Important safety notes G
WARNING
When opening or closing the soft top, there is a risk that parts of the body could become
trapped by moving parts such as the roof
mechanism, the boot lid, or the side windows.
There is a risk of injury.
When opening or closing the roof, make sure
that no parts of the body are in the vicinity of moving parts. Release the switch if somebody
becomes trapped.
Opening and closing The key must be near the door handle.
X To open: press the %button in the key
until the soft top is completely opened.
The Top in operation
Top in operation message appears in
the multifunction display. The seat ventilation
is switched on. The rear side windows open.
X To close: press the&button in the key
until the soft top is completely closed.
The Top in operation
Top in operation message appears in
the multifunction display. The soft top and the
side windows close. Closing the soft top manually
Important safety notes G
WARNING
Closing the soft top manually is a complex,
technically challenging procedure which can
also be physically demanding. It could lead to you trapping yourself or other persons. There
is a risk of injury.
Where possible, have the soft top closed man-
ually at a qualified specialist workshop.
If the soft top cannot be closed automatically,
check the following points:
R Is the boot separator engaged (Y page 94)?
R Are the head restraints on the rear bench
seats extended? R
Is the boot lid closed?
R Is the on-board voltage sufficient?
Start the engine if necessary.
If automatic operation still does not work, the
soft top can be closed manually.
The help of a second person is required in car-
rying out this procedure.
Closing the soft top X
Apply the parking brake.
X Open the side windows.
X Lower the head restraints automatically
(Y page 102) or manually (Y page 102).
X Remove the key from the ignition lock.
X Open the boot.
X Take the two straps out of the vehicle tool kit
(Y page 305).
X Take the Allen key out of the Owner's Manual
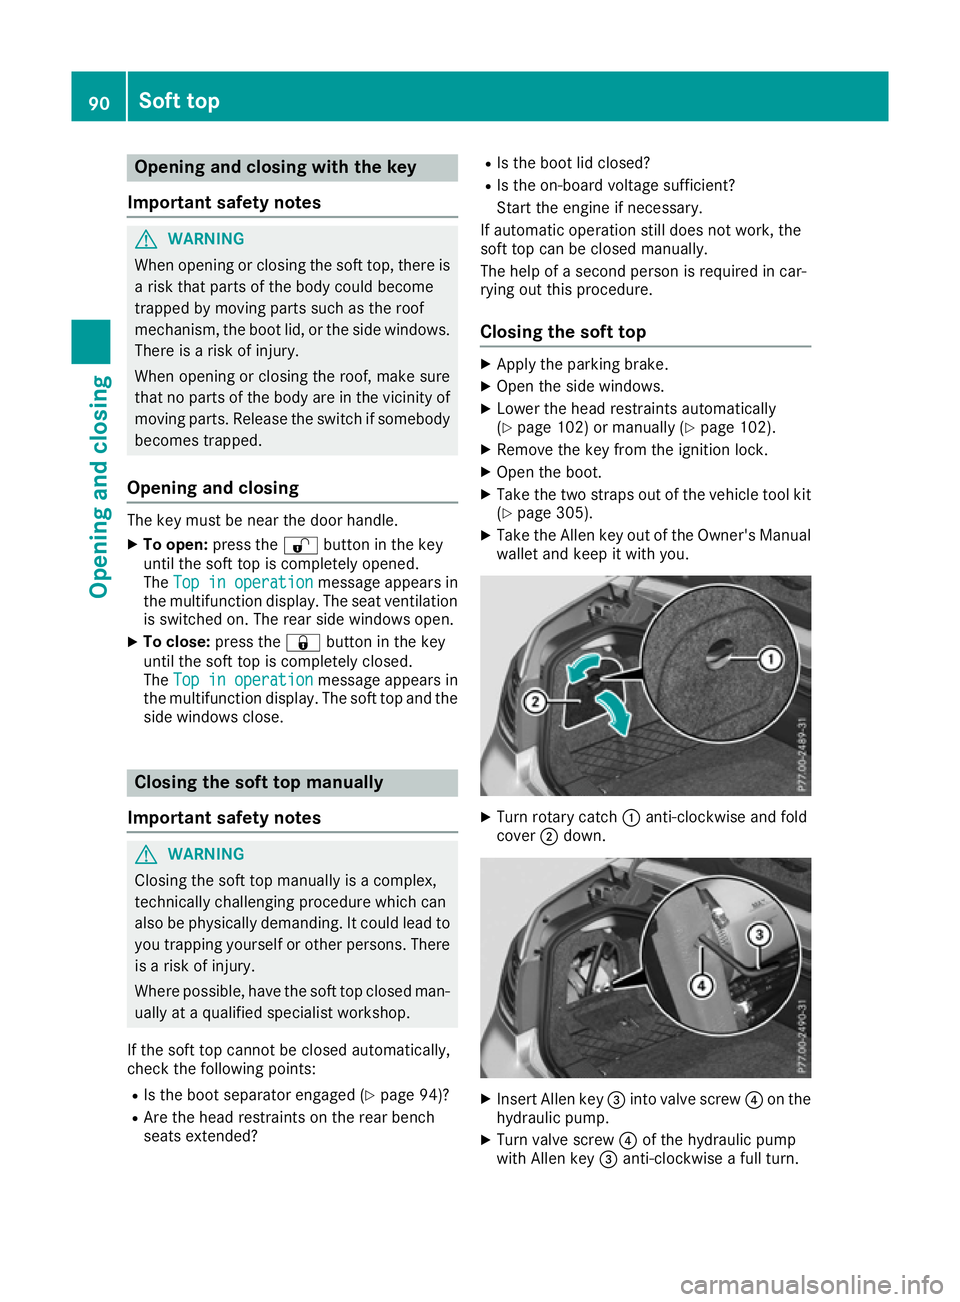
wallet and keep it with you. X
Turn rotary catch :anti-clockwise and fold
cover ;down. X
Insert Allen key =into valve screw ?on the
hydraulic pump.
X Turn valve screw ?of the hydraulic pump
with Allen key =anti-clockwise a full turn. 90
Soft topOpening and closing
Page 110 of 349

The electrically adjustable steering wheel can
still be adjusted when there is no key in the igni- tion lock. Adjusting the steering wheel man-
ually
G
WARNING
The steering wheel may move unexpectedly if you adjust it while driving. This could cause
you to lose control of the vehicle. There is a
risk of an accident.
Make sure that the steering wheel is locked
before driving off. Never unlock the steering
wheel when the vehicle is in motion. :
Release lever
; To adjust the steering wheel height
= To adjust the steering wheel position (fore-
and-aft adjustment)
X Push release lever :down completely.
The steering column is unlocked.
X Adjust the steering wheel to the desired posi-
tion.
X Push release lever :up completely.
The steering column is locked.
X Check if the steering column is locked. When
doing so, try to push the steering wheel up or
down or try to move it in the fore-and-aft
direction. Adjusting the steering wheel electri-
cally
:
To adjust the steering wheel height
; To adjust the steering wheel position (fore-
and-aft adjustment)
i Further related subjects:
R EASY-ENTRY/EXIT feature (Y page 109)
R Storing settings (Y page 112) Steering wheel heating
Switching on/off X
Turn the key to position 2in the ignition lock
(Y page 139).
X To switch on/off: turn the lever in the direc-
tion of arrow :or;.
Indicator lamp =lights up or goes out.
Vehicles without KEYLESS-GO: when you
remove the key from the ignition lock, the steer-
ing wheel heating is switched off.
Vehicles with KEYLESS-GO: when you switch off the ignition and open the driver's door, the
steering wheel heating is switched off. Steering wheel
107Seats, steering wheel and mirrors Z
Page 112 of 349
Problems with the steering wheel heating
Problem
Possible causes/consequences and
M
MSolutions The steering wheel heat-
ing has switched itself
off prematurely or can-
not be switched on. The on-board voltage is too low because too many electrical consum-
ers are switched on.
X Switch off electrical consumers that you do not need, such as the
rear window heating or interior lighting.
Once the battery is sufficiently charged, the steering wheel heating
will switch back on automatically. EASY-ENTRY/EXIT feature
Important safety notes G
WARNING
When the EASY-ENTRY/EXIT feature adjusts
the steering wheel, you and other vehicle
occupants – particularly children – could
become trapped. There is a risk of injury.
While the EASY-ENTRY/EXIT feature is mak-
ing adjustments, make sure that no one has
any body parts in the sweep of the steering
wheel.
Move the steering wheel adjustment lever if
there is a risk of entrapment by the steering
wheel. The adjustment process is stopped.
Vehicles with a memory function: if there is a
risk of becoming trapped by the steering wheel, you can also press one of the memory function
position buttons. The adjustment process is
stopped. G
WARNING
If children activate the EASY-ENTRY/EXIT fea- ture, they can become trapped, particularly
when unattended. There is a risk of injury.
When leaving the vehicle, always take the key with you and lock the vehicle. Never leave
children unattended in the vehicle. G
WARNING
If you drive off while the EASY-ENTRY/EXIT
feature is making adjustments, you could lose
control of the vehicle. There is a risk of an
accident. Always wait until the adjustment process is
complete before driving off.
The EASY-ENTRY/EXIT feature makes getting in
and out of your vehicle easier.
You can activate and deactivate the EASY-
ENTRY/EXIT feature in the on-board computer
(Y page 227).
Position of the steering wheel when the EASY-ENTRY/EXIT feature is active The steering wheel tilts upwards if you:
R remove the key from the ignition lock
R with KEYLESS-GO: open the driver's door;
KEYLESS-GO must be in position 1
R with the key: open the driver's door; the key
must be in position 0or 1in the ignition lock
(Y page 139)
i The steering wheel only moves upwards if it
has not already reached the upper stop.
Position of the steering wheel for driv-
ing The steering wheel is moved to the previously
set position if:
R the driver's door is closed and
R with KEYLESS-GO: you press the Start/Stop
button once
or
R with the key: you insert the key into the igni-
tion lock
If you close the driver's door with the key inser-
ted in the ignition lock, the steering wheel is
automatically moved to the previously set posi- tion. Steering wheel
109Seats, steering wheel and mirrors Z
Page 113 of 349
The last position of the steering wheel is stored
when you switch off the ignition or when you
store the setting with the memory function
(Y page 112).
Crash-responsive EASY-EXIT feature If the crash-responsive EASY-EXIT feature is trig-
gered in an accident, the steering column will
move upwards when the driver's door is opened. This occurs irrespective of the position of the
key in the ignition lock. This makes it easier to
exit the vehicle and rescue the occupants.
The crash-responsive EASY-EXIT feature is only
operational if the EASY-EXIT/ENTRY feature is
activated in the on-board computer
(Y page 227). Mirrors
Rear-view mirror
X
Anti-dazzle mode: pivot anti-dazzle
switch :forwards or back. Exterior mirrors
Adjusting the exterior mirrors G
WARNING
You could lose control of the vehicle while
driving if you:
R adjust the driver's seat, steering wheel or
mirrors
R fasten the seat belt
There is a risk of an accident. Adjust the driver's seat, head restraint, steer-
ing wheel and mirrors and fasten your seat
belt before starting the engine. G
WARNING
The exterior mirrors reduce the size of the
image. Objects visible in the mirrors are
closer than they appear. You could misjudge
the distance from road users driving behind
you when changing lanes, for instance. There is a risk of an accident.
You should therefore always look over your
shoulder to determine the actual distance
from road users driving behind you. X
Turn the key to position 1or 2in the ignition
(Y page 139).
X Press button :for the left-hand exterior mir-
ror or button ;for the right-hand exterior
mirror.
The indicator lamp in the corresponding but-
ton lights up in red.
The indicator lamp goes out again after some
time. You can adjust the selected mirror using
adjustment button =as long as the indicator
lamp is lit.
X Press adjustment button =up, down, or to
the left or right until you have adjusted the
exterior mirror to the correct position. You
should have a good overview of traffic condi-
tions.
The convex exterior mirrors provide a larger field of vision.
After the engine has been started, the exterior
mirrors are automatically heated if the rear win-
dow heating is switched on and the outside tem- perature is low. Heating takes a maximum of tenminutes. 110
MirrorsSeats, steering wheel and mirrors
Page 114 of 349
i
The exterior mirrors can also be heated
manually by switching on the rear window
heating.
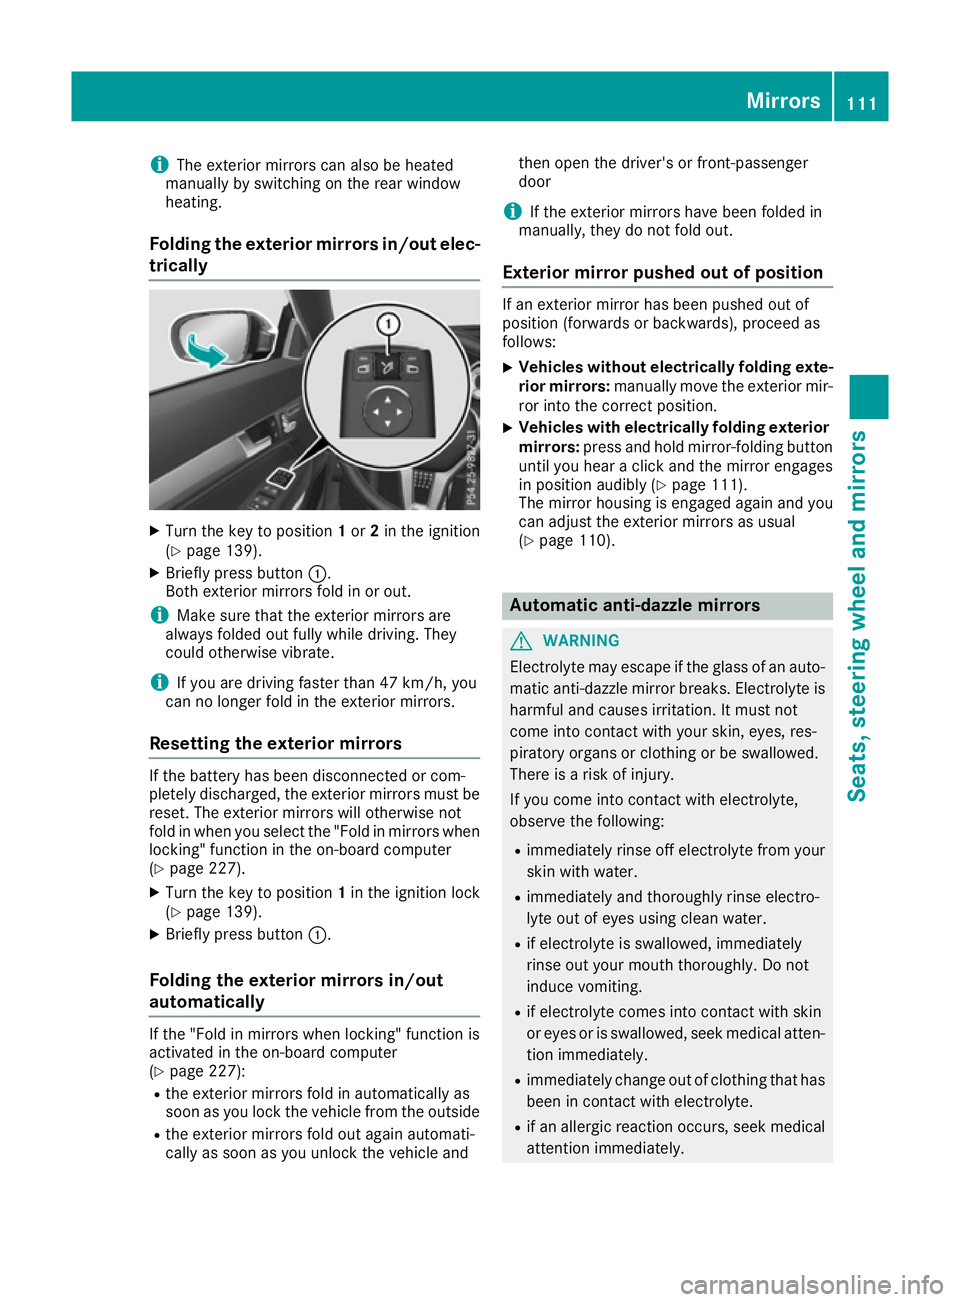
Folding the exterior mirrors in/out elec- trically X
Turn the key to position 1or 2in the ignition
(Y page 139).
X Briefly press button :.
Both exterior mirrors fold in or out.
i Make sure that the exterior mirrors are
always folded out fully while driving. They
could otherwise vibrate.
i If you are driving faster than 47 km/h,
you
can no longer fold in the exterior mirrors.
Resetting the exterior mirrors If the battery has been disconnected or com-
pletely discharged, the exterior mirrors must be
reset. The exterior mirrors will otherwise not
fold in when you select the "Fold in mirrors whenlocking" function in the on-board computer
(Y page 227).
X Turn the key to position 1in the ignition lock
(Y page 139).
X Briefly press button :.
Folding the exterior mirrors in/out
automatically If the "Fold in mirrors when locking" function is
activated in the on-board computer
(Y page 227):
R the exterior mirrors fold in automatically as
soon as you lock the vehicle from the outside
R the exterior mirrors fold out again automati-
cally as soon as you unlock the vehicle and then open the driver's or front-passenger
door
i If the exterior mirrors have been folded in
manually, they do not fold out.
Exterior mirror pushed out of position If an exterior mirror has been pushed out of
position (forwards or backwards), proceed as
follows:
X Vehicles without electrically folding exte-
rior mirrors: manually move the exterior mir-
ror into the correct position.
X Vehicles with electrically folding exterior
mirrors: press and hold mirror-folding button
until you hear a click and the mirror engages
in position audibly (Y page 111).
The mirror housing is engaged again and you
can adjust the exterior mirrors as usual
(Y page 110). Automatic anti-dazzle mirrors
G
WARNING
Electrolyte may escape if the glass of an auto- matic anti-dazzle mirror breaks. Electrolyte is
harmful and causes irritation. It must not
come into contact with your skin, eyes, res-
piratory organs or clothing or be swallowed.
There is a risk of injury.
If you come into contact with electrolyte,
observe the following:
R immediately rinse off electrolyte from your
skin with water.
R immediately and thoroughly rinse electro-
lyte out of eyes using clean water.
R if electrolyte is swallowed, immediately
rinse out your mouth thoroughly. Do not
induce vomiting.
R if electrolyte comes into contact with skin
or eyes or is swallowed, seek medical atten-
tion immediately.
R immediately change out of clothing that has
been in contact with electrolyte.
R if an allergic reaction occurs, seek medical
attention immediately. Mir
rors
111Seats, ste ering wheel and mirrors Z
Page 117 of 349
Exterior lighting
General notes
For reasons of safety, Mercedes-Benz recom-
mends that you drive with the lights switched on even during the daytime. Therefore, your vehicle
is equipped with special daytime driving lamps.
In some countries, operation of the headlamps
varies due to legal requirements and self-
imposed obligations. Driving abroad
General notes If your journey takes you to countries where
vehicles are driven on the opposite side of the
road to the country in which the vehicle is reg-
istered, your headlamps must be switched to
symmetrical dipped beam as soon as possible
after crossing the border (exception: vehicles
with static LED headlamps). This prevents
oncoming traffic from being dazzled. Symmetri-
cal lights do not illuminate as large an area of the edge of the carriageway.
Vehicles with static LED headlamps It is not necessary to switch your headlamps to
symmetrical dipped beam when driving in coun-
tries where vehicles are driven on the opposite
side of the road to the country in which the vehi- cle is registered. Legal requirements are fulfilled
without switching the headlamps to symmetri-
cal dipped beam.
Vehicles with Intelligent Light System X
Before crossing the border, set the head-
lamps to symmetrical dipped beam and after
returning back to asymmetrical dipped beam via the "Dipped-beam headlamps for driving
on the right/left" function in the on-board
computer (Y page 224).
If the headlamps are converted to symmetrical
dipped beam, the "motorway mode" and "exten- ded range foglamps" functions are not available. Setting the exterior lighting
Setting options Exterior lighting can be set by:
R using the light switch
R using the combination switch (Y page 116)
R using the on-board computer (Y page 224)
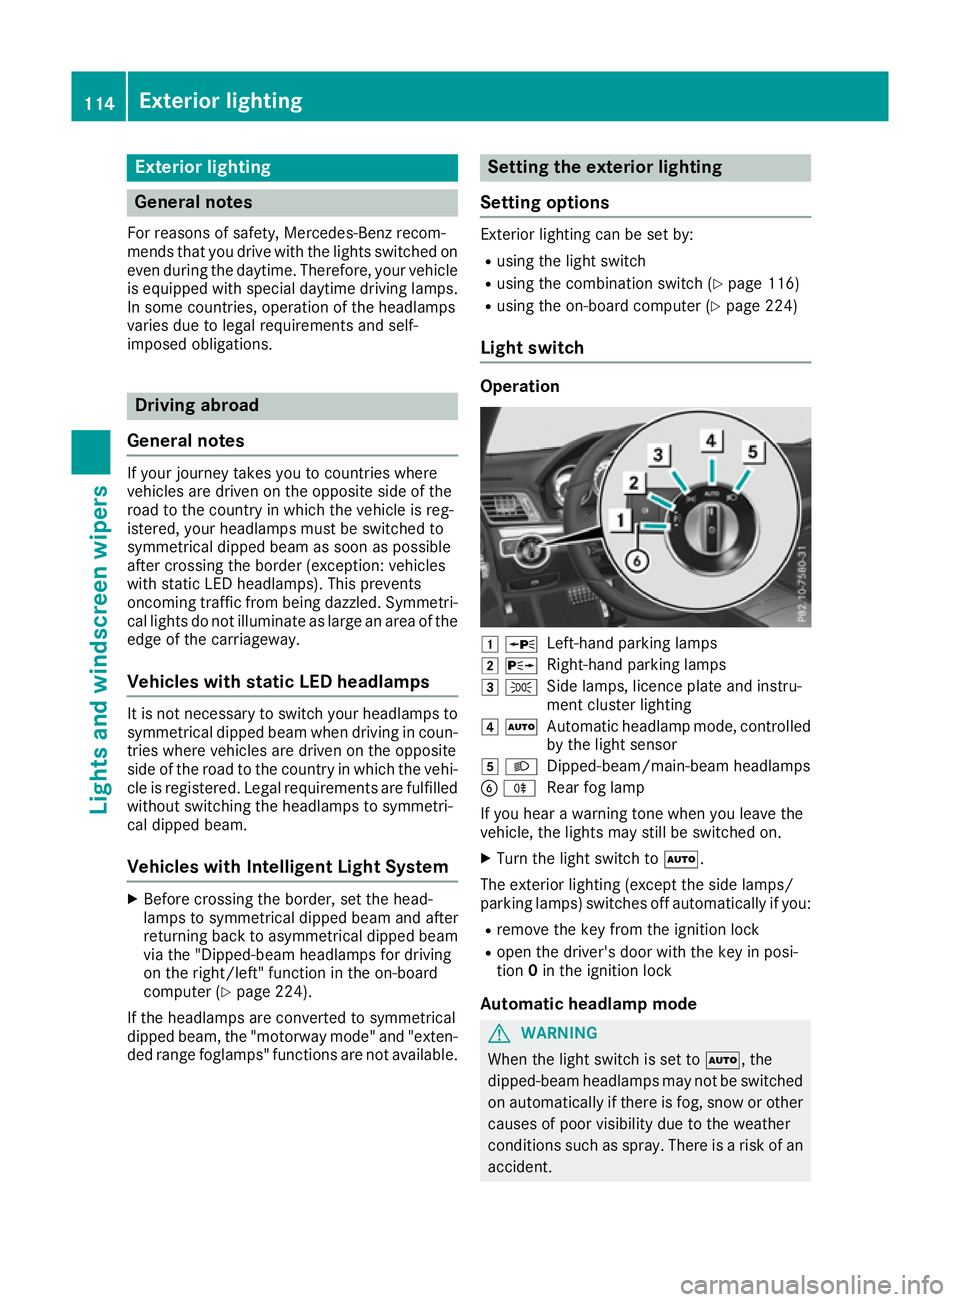
Light switch Operation
1
W
Left-hand parking lamps
2 X
Right-hand parking lamps
3 T
Side lamps, licence plate and instru-
ment cluster lighting
4 Ã
Automatic headlamp mode, controlled
by the light sensor
5 L
Dipped-beam/main-beam headlamps
B R
Rear fog lamp
If you hear a warning tone when you leave the
vehicle, the lights may still be switched on.
X Turn the light switch to Ã.
The exterior lighting (except the side lamps/
parking lamps) switches off automatically if you: R remove the key from the ignition lock
R open the driver's door with the key in posi-
tion 0in the ignition lock
Automatic headlamp mode G
WARNING
When the light switch is set to Ã, the
dipped-beam headlamps may not be switched on automatically if there is fog, snow or othercauses of poor visibility due to the weather
conditions such as spray. There is a risk of an
accident. 114
Exterior lightingLights and windscreen wipers