interior lights MERCEDES-BENZ E-CLASS CABRIOLET 2015 Owners Manual
[x] Cancel search | Manufacturer: MERCEDES-BENZ, Model Year: 2015, Model line: E-CLASS CABRIOLET, Model: MERCEDES-BENZ E-CLASS CABRIOLET 2015Pages: 349, PDF Size: 12.51 MB
Page 10 of 349
Rear control panel ........................
.124
Setting the air distribution ............. 128
Setting the air vents ..................... .136
Setting the airflow ......................... 129
Setting the climate mode .............. .128
Setting the temperature ................ 128
Setting the temperature,
THERMATIC ................................... 128
Setting the temperature,
THERMOTRONIC ............................ 128
Switching air-recirculation mode
on/off ............................................ 131
Switching on/off ........................... 125
Switching residual heat on/off ...... 132
Switching the rear window heat-
ing on/off ...................................... 130
Switching the ZONE function on/
off ................................................. .129
THERMATIC automatic climate
control (2-zone) ............................ .124
THERMOTRONIC (3-zone) auto-
matic climate control ..................... 124
Cockpit
Overview .......................................... 29
see Instrument cluster
COLLISION PREVENTION ASSIST
PLUS
Activating/deactivating ................. 221
Display message ............................ 232
Operation/notes .............................. 64
COMAND display
Cleaning ......................................... 301
COMAND Online
Switching on/off ........................... 263
Combination switch .......................... 116
Connecting a USB device
See also Digital Owner's Manual ... 263
Consumption statistics (on-board
computer) .......................................... 216
Controller .......................................... .264
Convenience opening/closing (air-
recirculation mode) ........................... 131
Coolant (engine)
Checking the level ......................... 292
Display message ............................ 238
Important safety notes .................. 341
Temperature gauge ........................ 213
Warning lamp ................................. 259 Cooling
see Climate control
Copyright ............................................. 28
Cornering light function
Display message ............................ 236
Function/notes ............................ .117
Cruise control
Activation conditions ..................... 164
Cruise control lever ....................... 163
Deactivating ................................... 165
Display message ............................ 245
Driving system ............................... 163
Important safety notes .................. 163
LIM indicator lamp ......................... 163
Selecting ........................................ 163
Setting a speed .............................. 165
Storing and maintaining current
speed ............................................. 164
Cup holder
Centre console .............................. 278
Important safety notes .................. 277
Rear compartment ......................... 279 D
Dashboard see Instrument cluster
Data
see Technical data
Data carrier
Selecting ........................................ 218
Data modem mode
Telephone with Bluetooth ®
(SAP
profile) .......................................... .269
Daytime driving lights
Display message ............................ 236
Function/notes ............................ .114
Switching on/off (on-board com-
puter) ............................................. 224
Dealership
see Qualified specialist workshop
Declarations of conformity ................. 26
Delayed switch-off
Exterior lighting (on-board com-
puter) ............................................. 225
Interior lighting .............................. 225
Diagnostics connection ......................26
Diesel .................................................. 339 Index
7
Page 15 of 349
Coolan
t.......................................... 259
Engine diagnostics ......................... 259
Indicator lamps
Display message ............................ 236
see Warning and indicator lamps
Indicators
see Turn signals
Insect protection on the radiator .... 291
Instrument cluster
Overview .......................................... 31
Setting s......................................... 223
Warning and indicator lamps ........... 31
Instrument cluster lighting .............. 223
Intelligent Light System
Activating/deactivating ................. 224
Display message ............................ 236
Overview ........................................ 116
Setting the dipped-beam head-
lamps for driving on the right/left .. 224
Interior lighting
Automatic control system .............. 118
Delayed switch-off (on-board
computer) ...................................... 225
Overview ........................................ 118
Reading lamp ................................. 118
Setting brightness for display/
switches (on-board computer) ....... 223
Interior motion sensor
Deactivating ..................................... 73
Function ........................................... 72
Priming ............................................ 73
Switching off .................................... 73
iPod ®
See also Digital Owner's Manua l... 263
ISOFIX child seat securing system .... 51J
Jack Storage location ............................ 305
Using ............................................. 330
Jump starting (engine) ...................... 313K
Key Changing the battery ....................... 77
Checking the battery ....................... 77 Display message ............................ 252
Door central locking/unlocking ....... 74
Emergency key element ................... 76
Important safety notes .................... 74
Loss ................................................. 79
Modifying the programming ............. 76
Opening/closing soft top ................. 90
Overview .......................................... 74
Positions (ignition lock) ................. 139
Problem (malfunction) ..................... 79
Starting the engine ........................ 141
Key positions
Key ................................................ 139
KEYLESS GO .................................. 139
KEYLESS-GO
Deactivation ..................................... 75
Display message ............................ 253
Locking ............................................ 75
Removing the Start/Stop button ... 140
Start/Stop button .......................... 139
Starting the engine ........................ 141
Unlocking ......................................... 75
Kickdown
Driving tips .................................... 150
Manual drive progra m.................... 153
Kneebag ............................................... 43 L
Lamps see Warning and indicator lamps
Lane Keeping Assist
Activating/deactivating ................. 222
Display message ............................ 242
Function/information .................... 202
Lane package ..................................... 200
Lashing eyelets ................................. 276
Licence plate lamp (display mes-
sage) ................................................... 236
Light sensor (display message) ....... 237
Lighting
see Lights
Lights
Activating/deactivating the Intel-
ligent Light System ........................ 224
Activating/deactivating the inte-
rior lighting delayed switch-off ....... 225
Active light function ....................... 117 12
Index
Page 16 of 349
Adaptive Highbeam Assist PLUS .... 117
Automatic headlamp mode ............ 114
Cornering light function ................. 117
Dipped-beam headlamps ............... 115
Driving abroad ............................... 114
Foglamps (extended range) ........... 117
Hazard warning lamps ..................
.116
Headlamp flasher ........................... 116
Light switch ................................... 114
Main-beam headlamps ................... 116
Motorway mode ............................ .117
Parking lamps ................................ 115
Rear foglamp ................................. 115
Setting brightness for display/
switches (on-board computer) ....... 223
Side lamps ..................................... 115
Switching the daytime driving
lights on/off (on-board com-
puter) ............................................. 224
Switching the exterior lighting
delayed switch-off on/off (on-
board computer) ............................ 225
Switching the surround lighting
on/off (on-board computer) .......... 225
Turn signals ................................... 116
see Interior lighting
see Replacing bulbs
LIM indicator lamp
Cruise control ................................ 163
DISTRONIC PLUS ........................... 169
Variable SPEEDTRONIC ................. 166
Limiting the speed
see SPEEDTRONIC
LINGUATRONIC
see Separate operating instructions
Loading guidelines ............................ 272
Locking
see Central locking
Locking (doors)
Automatic ........................................ 82
Emergency locking ........................... 82
From inside (central locking but-
ton) ................................................. .81
Locking centrally
see Central locking
Locking verification signal (on-
board computer) .............................. .226 Luggage cover
see Boot separator
Lumbar support
Adjusting the 4-way lumbar sup-
port ................................................ 104 M
M+S tyres .......................................... .323
Main-beam headlamps
Adaptive Highbeam Assist PLUS .... 117
Changing bulbs .............................. 120
Display message ............................ 236
Switching on/off ........................... 116
Maintenance
see ASSYST PLUS
Manual transmission
Engaging reverse gear ................... 146
Gear leve r...................................... 146
Pulling away ................................... 141
Shift recommendation ................... 147
Starting the engine ........................ 141
Matt finish (cleaning instructions) .. 297
Media Interface
USB port in the armrest of the
centre console ............................... 274
see Separate operating instructions
Memory card (audio) ......................... 218
Memory function ............................... 112
Mercedes-Benz Contact
Display message ............................ 232
Mercedes-Benz emergency call
system
Switch in the overhead control
panel .............................................. 281
Mercedes-Benz Intelligent Drive
360°camera .................................. 192
Active Blind Spot Assist ................. 203
Active Lane Keeping Assist ............ 206
Active Parking Assist ..................... 183
ATTENTION ASSIST ........................ 196
Blind Spot Assist ............................ 200
Cruise control ................................ 163
DISTRONIC PLUS ........................... 168
DISTRONIC PLUS with Steering
Assist and Stop&Go Pilot ............... 176
General notes ................................ 162
Lane Keeping Assist ...................... 202 Index
13
Page 41 of 349
Restraint system warning lamp
The functions of the restraint system are
checked after the ignition is switched on and at
regular intervals while the engine is running.
Therefore, malfunctions can be detected in
good time.
The 6 restraint system warning lamp in the
instrument cluster lights up when the ignition is switched on. It goes out no later than a few sec-
onds after the vehicle is started. The compo-
nents of the restraint system are in operational
readiness.
A malfunction has occurred if the 6restraint
system warning lamp:
R does not light up after the ignition is switched
on
R does not go out after a few seconds with the
engine running
R lights up again while the engine is running G
WARNING
If the restraint system is malfunctioning,
restraint system components may be trig-
gered unintentionally or might not be trig-
gered at all in the event of an accident with a high rate of vehicle deceleration. This can
effect belt tensioners or airbags, for example. There is an increased risk of serious or even
fatal injuries.
Have the restraint system checked and
repaired immediately at a qualified specialist
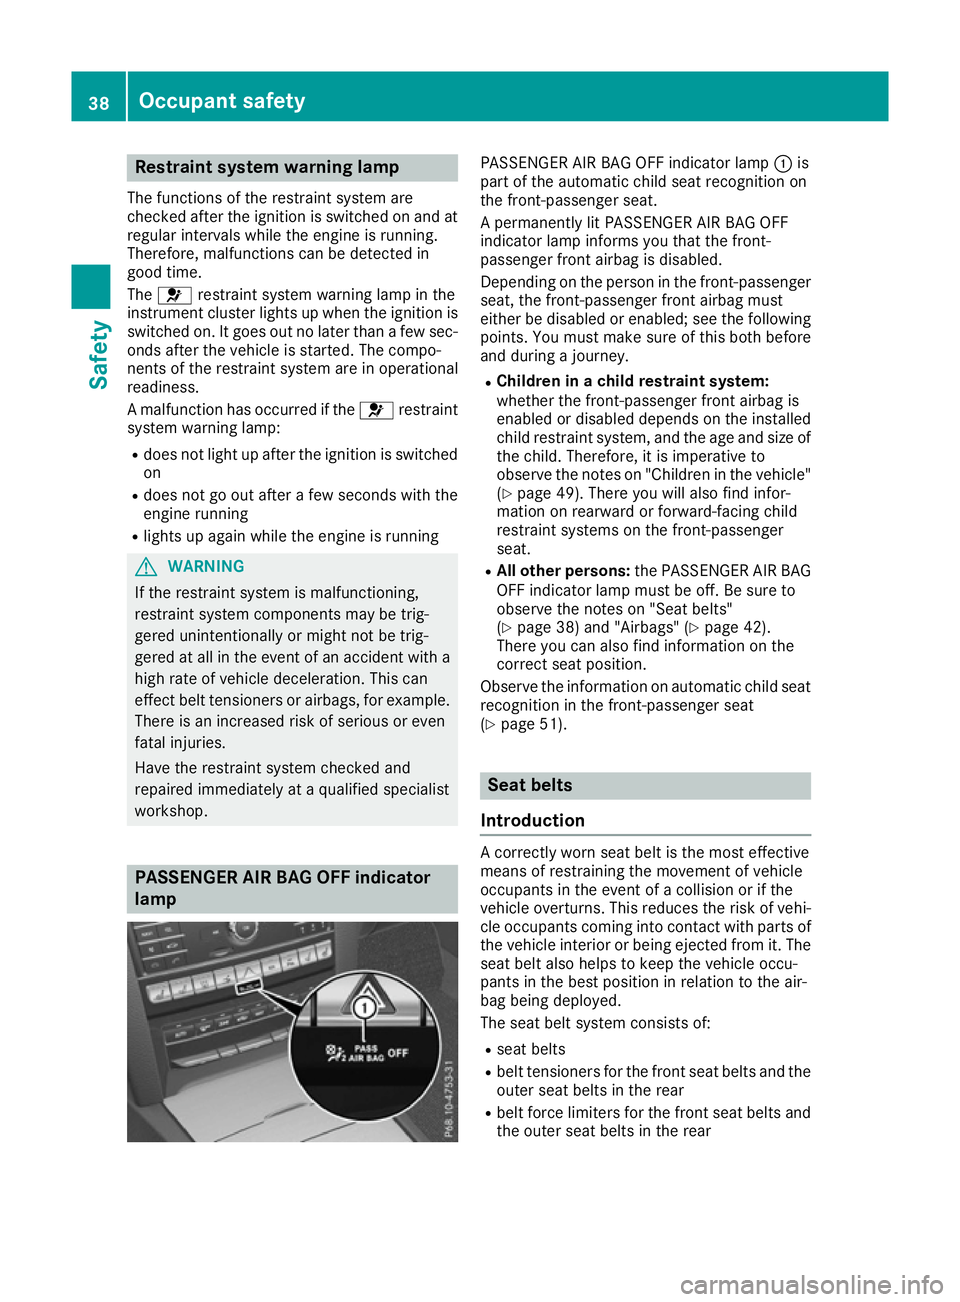
workshop. PASSENGER AIR BAG OFF indicator
lamp PASSENGER AIR BAG OFF indicator lamp
:is
part of the automatic child seat recognition on
the front-passenger seat.
A permanently lit PASSENGER AIR BAG OFF
indicator lamp informs you that the front-
passenger front airbag is disabled.
Depending on the person in the front-passenger seat, the front-passenger front airbag must
either be disabled or enabled; see the following
points. You must make sure of this both before
and during a journey.
R Children in a child restraint system:
whether the front-passenger front airbag is
enabled or disabled depends on the installed
child restraint system, and the age and size of the child. Therefore, it is imperative to
observe the notes on "Children in the vehicle"
(Y page 49). There you will also find infor-
mation on rearward or forward-facing child
restraint systems on the front-passenger
seat.
R All other persons: the PASSENGER AIR BAG
OFF indicator lamp must be off. Be sure to
observe the notes on "Seat belts"
(Y page 38) and "Airbags" (Y page 42).
There you can also find information on the
correct seat position.
Observe the information on automatic child seat recognition in the front-passenger seat
(Y page 51). Seat belts
Introduction A correctly worn seat belt is the most effective
means of restraining the movement of vehicle
occupants in the event of a collision or if the
vehicle overturns. This reduces the risk of vehi- cle occupants coming into contact with parts of
the vehicle interior or being ejected from it. The
seat belt also helps to keep the vehicle occu-
pants in the best position in relation to the air-
bag being deployed.
The seat belt system consists of:
R seat belts
R belt tensioners for the front seat belts and the
outer seat belts in the rear
R belt force limiters for the front seat belts and
the outer seat belts in the rear 38
Occupant safetySafety
Page 75 of 349
A visual and audible alarm is triggered if the
alarm system is primed and you open:
R a door
R the vehicle with the emergency key element
R the boot lid
R the bonnet
X To stop the alarm with the key: press the
% or& button on the key.
The alarm stops.
or X Remove the Start/Stop button from the igni-
tion lock.
X Insert the key into the ignition lock.
The alarm stops.
X To stop the alarm using KEYLESS-GO:
grasp the outside door handle. The key must
be outside the vehicle.
The alarm stops.
or X Press the Start/Stop button on the dash-
board. The key must be inside the vehicle.
The alarm stops.
The alarm does not switch off, even if you close the open door that has triggered it, for example. Tow-away protection
Function An audible and visual alarm is triggered if your
vehicle's angle of inclination is altered while
tow-away protection is primed. This can occur if the vehicle is jacked up on one side, for exam-
ple.
Priming X
Make sure that:
R the doors are closed
R the boot lid is closed
Only then is tow-away protection primed.
X Lock the vehicle with the key or KEYLESS-GO.
Tow-away protection is primed after approx-
imately 30 seconds. Switching off X
Unlock the vehicle with the key or KEYLESS-
GO.
or X Insert the key into the ignition lock.
Tow-away protection is switched off automat-
ically.
Deactivating X
Remove the key from the ignition lock.
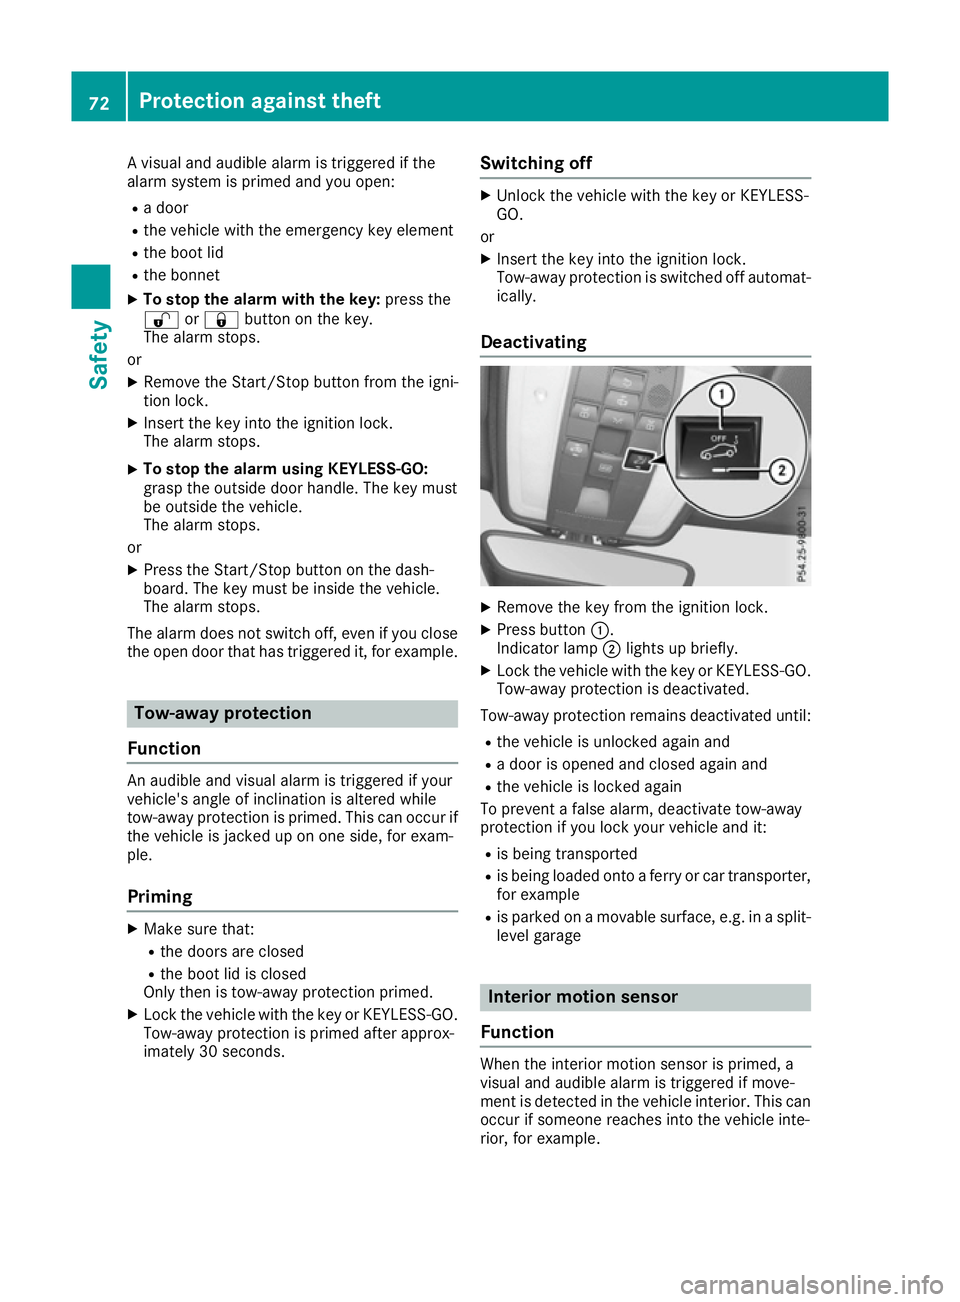
X Press button :.
Indicator lamp ;lights up briefly.
X Lock the vehicle with the key or KEYLESS-GO.
Tow-away protection is deactivated.
Tow-away protection remains deactivated until:
R the vehicle is unlocked again and
R a door is opened and closed again and
R the vehicle is locked again
To prevent a false alarm, deactivate tow-away
protection if you lock your vehicle and it:
R is being transported
R is being loaded onto a ferry or car transporter,
for example
R is parked on a movable surface, e.g. in a split-
level garage Interior motion sensor
Function When the interior motion sensor is primed, a
visual and audible alarm is triggered if move-
ment is detected in the vehicle interior. This can
occur if someone reaches into the vehicle inte-
rior, for example. 72
Protection against theftSafety
Page 121 of 349
Adaptive Highbeam Assist Plus cannot take into
account road, weather or traffic conditions.
Adaptive Highbeam Assist Plus is only an aid.
You are responsible for adjusting the vehicle's
lighting to the prevailing light, visibility and traf-
fic conditions.
In particular, the detection of obstacles can be
restricted if there is:
R poor visibility, e.g. due to fog, heavy rain or
snow
R dirt on the sensors or if the sensors are
obscured
Switching Adaptive Highbeam Assist
Plus on/off X
To switch on: turn the light switch to Ã.
X Press the combination switch beyond the
pressure point in the direction of arrow :.
The _ indicator lamp in the multifunction
display lights up when it is dark and the light
sensor switches on the dipped-beam head-
lamps.
At speeds above approx. 25 km/h: the
headlamp range is automatically controlled
according to the distance to other road users.
At speeds above approx. 30 km/h:
R If no other road users are detected, the
main-beam headlamps are automatically
switched on.
R If other road users are detected, the partial
main-beam headlamps are automatically
switched on.
The K indicator lamp in the instrument
cluster also lights up.
At speeds below approx. 25 km/h or
when there is sufficient street lighting:
R The partial main-beam headlamps are
switched off automatically.
R The main-beam headlamps are switched off
automatically.
The K indicator lamp in the instrument
cluster goes out. The _indicator lamp in
the multifunction display remains lit.
X To switch off: move the combination switch
back to its normal position or move the light
switch to another position.
The _ indicator lamp in the multifunction
display goes out. Headlamps misted up on the inside
Certain climatic and physical conditions may
cause moisture to form in the headlamp. This
moisture does not affect the functionality of the headlamp. Interior lighting
Overview of interior lighting
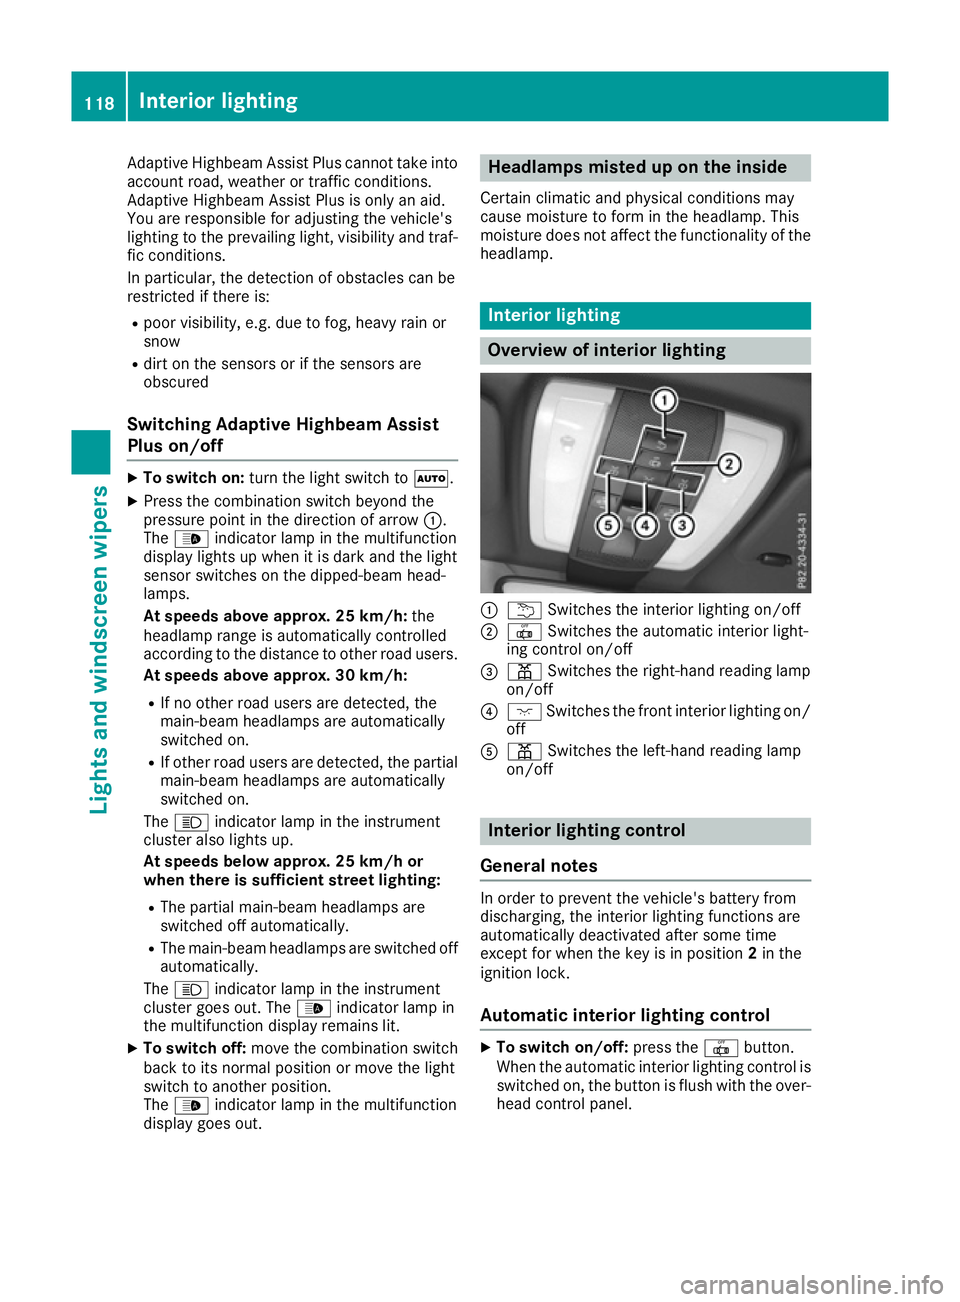
:
u Switches the interior lighting on/off
; | Switches the automatic interior light-
ing control on/off
= p Switches the right-hand reading lamp
on/off
? c Switches the front interior lighting on/
off
A p Switches the left-hand reading lamp
on/off Interior lighting control
General notes In order to prevent the vehicle's battery from
discharging, the interior lighting functions are
automatically deactivated after some time
except for when the key is in position 2in the
ignition lock.
Automatic interior lighting control X
To switch on/off: press the|button.
When the automatic interior lighting control is
switched on, the button is flush with the over- head control panel. 118
Interior lightingLights and
windscreen wipers
Page 122 of 349
The interior lighting automatically switches on if
you:
R unlock the vehicle
R open a door
R remove the key from the ignition lock
The interior lighting is activated for a short time
when the key is removed from the ignition lock.
You can activate this delayed switch-off using
the on-board computer (Y page 225).Replacing bulbs
Important safety notes
G
WARNING
Bulbs, lamps and plug connectors can
become very hot during use. When replacing a bulb, you could burn yourself on these com-
ponents. There is a risk of injury.
Allow these components to cool down before replacing the bulb.
Vehicles with static LED headlamps:
Do not use a bulb that has been dropped or if its glass tube has been scratched.
The bulb may explode if:
R you touch it
R it is hot
R you drop it
R you scratch it
Only operate bulbs in enclosed lamps designed
for that purpose. Only fit spare bulbs of the same
type and the specified voltage.
Marks on the glass tube reduce the service life
of the bulbs. Do not touch the glass tube with
your bare hands. If necessary, clean the glass
tube when cold with alcohol or spirit and rub it
off with a lint-free cloth.
Protect bulbs from moisture during operation.
Do not allow bulbs to come into contact with
liquids.
Only replace the bulbs listed (Y page 119).
Have the bulbs that you cannot replace yourself
replaced at a qualified specialist workshop.
If you require assistance replacing bulbs, con-
sult a qualified specialist workshop.
If the new bulb still does not light up, consult a
qualified specialist workshop. Headlamps and lights are an important aspect of
vehicle safety. You must therefore make sure
that these function correctly at all times. Have
the headlamp setting checked regularly.
Vehicles with Intelligent Light System
The front and rear light clusters of your vehicle
are equipped with LED light bulbs. Do not
replace the bulbs yourself. Contact a qualified
specialist workshop, which has the necessary
specialist knowledge and tools to carry out the
work required.
Lamps are an important aspect of vehicle safety. You must therefore make sure that these func-
tion correctly at all times. Have the headlamp
setting checked regularly. Overview of bulb replacement – bulbs
You can replace the following bulbs. The details
for the bulb type can be found in the legend. Static LED headlamps
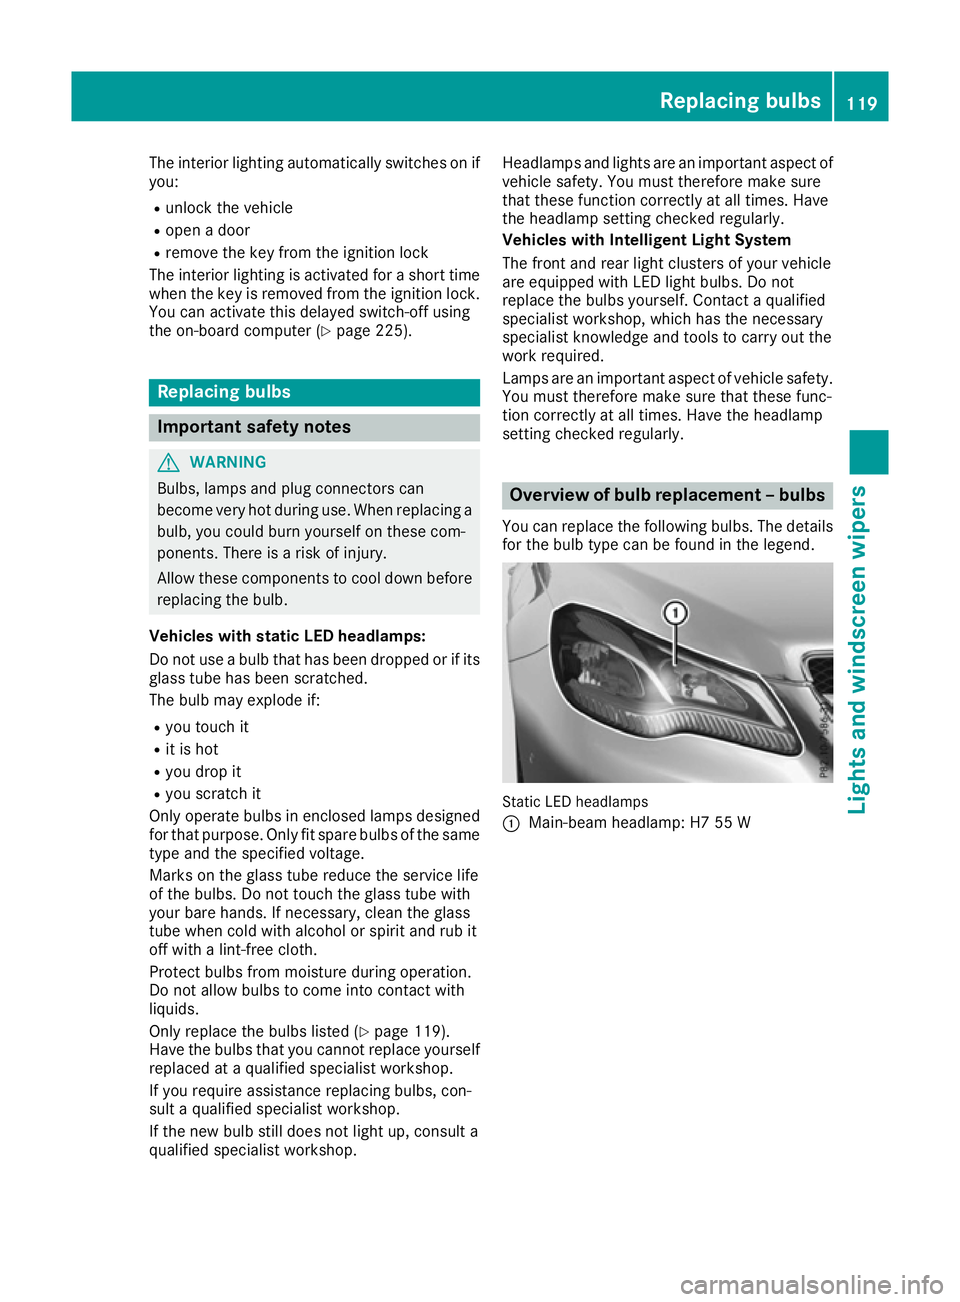
:
Main-beam headlamp: H7 55 W Replacing bulbs
119Lights and windscreen wipers Z
Page 134 of 349
Problems with the rear window heating
Problem
Possible causes/consequences and
M
MSolutions The rear window heating
has switched off prema-
turely or cannot be acti-
vated. The battery has not been sufficiently charged.
X Switch off any consumers that are not required, e.g. reading lamps,
interior lighting or the seat heating.
When the battery is sufficiently charged, the rear window heating
can be activated again. Switching air-recirculation mode
on/off
General notes You can deactivate the flow of fresh air if
unpleasant odours are entering the vehicle from
outside. The air already inside the vehicle will
then be recirculated.
If you activate air-recirculation mode, the win-
dows can mist up more quickly, in particular at
low temperatures. Only use air-recirculation
mode briefly to prevent the windows misting up.
Activating/deactivating X
Turn the key to position 2in the ignition lock
(Y page 139).
X To activate: press thegbutton.
The indicator lamp above the gbutton
lights up.
X To deactivate: press thegbutton.
The indicator lamp above the gbutton
goes out.
i Air-recirculation mode is deactivated auto-
matically:
R after approximately five minutes at outside
temperatures below approximately 5 †
R after approximately five minutes if cooling
with air dehumidification is deactivated
R after approximately 30 minutes at outside
temperatures above approximately 5 † if
the "Cooling with air dehumidification"
function is activated Convenience opening or closing using
the air-recirculation button G
WARNING
When using convenience closing, you could
become trapped within the sweep of the clos- ing window. There is a risk of injury.
Monitor the entire closing procedure when
using convenience closing. When closing,
make sure that no one has any parts of the
body within the closing area. G
WARNING
During convenience opening parts of the body could be drawn in or become trapped
between the side window and window frame.
There is a risk of injury.
When opening, make sure that nobody is
touching the side window. If someone
becomes trapped, immediately press
the W switch in the door to stop the move-
ment of the side windows. To continue closing
the side window, pull on the Wswitch.
X Convenience closing feature: press and
hold the gbutton until the side windows
are closed.
The indicator lamp above the gbutton
lights up. Air-recirculation mode is activated.
If parts of the body are in the closing area during convenience closing, proceed as follows:
X Press the Wbutton to stop the side win-
dows.
The side windows stop.
X To then open the side windows, press the
W button again.
i Notes on the reversing feature for the side
windows (Y page 85) Operating the climate control system
131Climate control Z
Page 135 of 349
X
Convenience opening feature: press and
hold the gbutton until the side windows
are opened. The side windows move back to
their original positions.
The indicator lamp above the gbutton
goes out. Air-recirculation mode is deactiva-
ted.
i If you open the side windows manually after
closing them using the convenience closing
feature, they will remain in this position when
opened using the convenience opening fea-
ture. Switching the residual heat on/off
General notes It is possible to make use of the residual heat of
the engine to continue heating the vehicle for
approximately 30 minutes after the engine has
been switched off. The heating time depends on
the set interior temperature.
The "residual heat" function only functions opti- mally with the side windows closed.
The "residual heat" function only functions opti-
mally with the soft top closed.
Activating/deactivating X
Turn the key to position 0in the ignition lock
or remove it (Y page 139).
X To switch on: press theÌbutton.
The indicator lamp above the Ìbutton
lights up.
i If the residual heat function is switched on,
the windows may mist up on the inside.
i The blower will run at a low speed regardless
of the airflow setting.
i If you activate the residual heat function at
high temperatures, only the ventilation will be
activated. The blower runs at medium speed.
X To switch off: press theÌbutton.
The indicator lamp above the Ìbutton
goes out.
Residual heat is deactivated automatically:
R after approximately 30 minutes
R when the ignition is switched on
R if the battery voltage drops
R when the auxiliary heating is switched on Auxiliary heating
Important safety notes G
DANGER
If the exhaust pipe is blocked or sufficient
ventilation is not possible, toxic exhaust
fumes can enter the vehicle, especially car-
bon monoxide. This is the case, e.g. in
enclosed spaces, or if the vehicle is stuck in
snow. There is a risk of fatal injuries.
You should switch off the auxiliary heating in
enclosed spaces which do not have an extrac- tion system, e.g. a garage. If the vehicle is
stuck in snow and you must leave the auxiliary
heating running, keep the exhaust pipe and
the area around the vehicle clear of snow. To guarantee a sufficient supply of fresh air, open
a window on the side of the vehicle away from the wind. G
WARNING
When the auxiliary heating is switched on,
parts of the vehicle can become very hot.
Flammable materials such as leaves, grass or twigs may ignite if they come into contact
with:
R hot parts of the exhaust system
R the exhaust gas itself
There is a risk of fire.
When the auxiliary heating is switched on,
make sure that:
R no flammable materials come into contact
with hot vehicle components
R the exhaust gas can escape from the
exhaust pipe unhindered
R the exhaust gas does not come into contact
with flammable materials.
The auxiliary heating and the exhaust gas dis-
charge location can be found in front of the right- hand front wheel.
! Operating the auxiliary heating/ventilation
draws on the vehicle battery. After you have
heated or ventilated the vehicle a maximum of two times, drive for a longer distance. 132
Operating the climate control systemClimate control
Page 136 of 349
i
Switch the auxiliary heating on regularly
once a month for about ten minutes.
The auxiliary heating heats the air in the vehicle
interior to the set temperature. This occurs with- out using the heat of the running engine. The
auxiliary heating is operated directly using the
vehicle's fuel. For this reason, the tank content
must be at least at reserve fuel level to ensure
that the auxiliary heating functions.
The auxiliary heating/ventilation automatically
adjusts to changes in temperature and weather conditions. For this reason, the auxiliary heating
could switch from ventilation mode to heating
mode or from heating mode to ventilation mode.
The auxiliary heating switches off automatically after 50 minutes. This time limit can be altered.
To do this, visit a qualified specialist workshop.
You cannot use the auxiliary ventilation to cool
the vehicle interior to a temperature lower than
the outside temperature.
Before switching on X
Turn the key to position 2in the ignition lock
(Y page 139).
X Set the desired temperature.
Auxiliary heating or auxiliary ventilation can also
be switched on if the manually set climate con-
trol is activated. Optimum comfort is attained by setting the system to automatic mode. Set the
temperature to 22 †.
The auxiliary heating or auxiliary ventilation can
be switched on/off using the button on the
centre console or the remote control.
The on-board computer can be used to specify
up to three departure times, one of which may
be preselected (Y page 226). Switching the auxiliary heating/venti-
lation on or off using the button on the
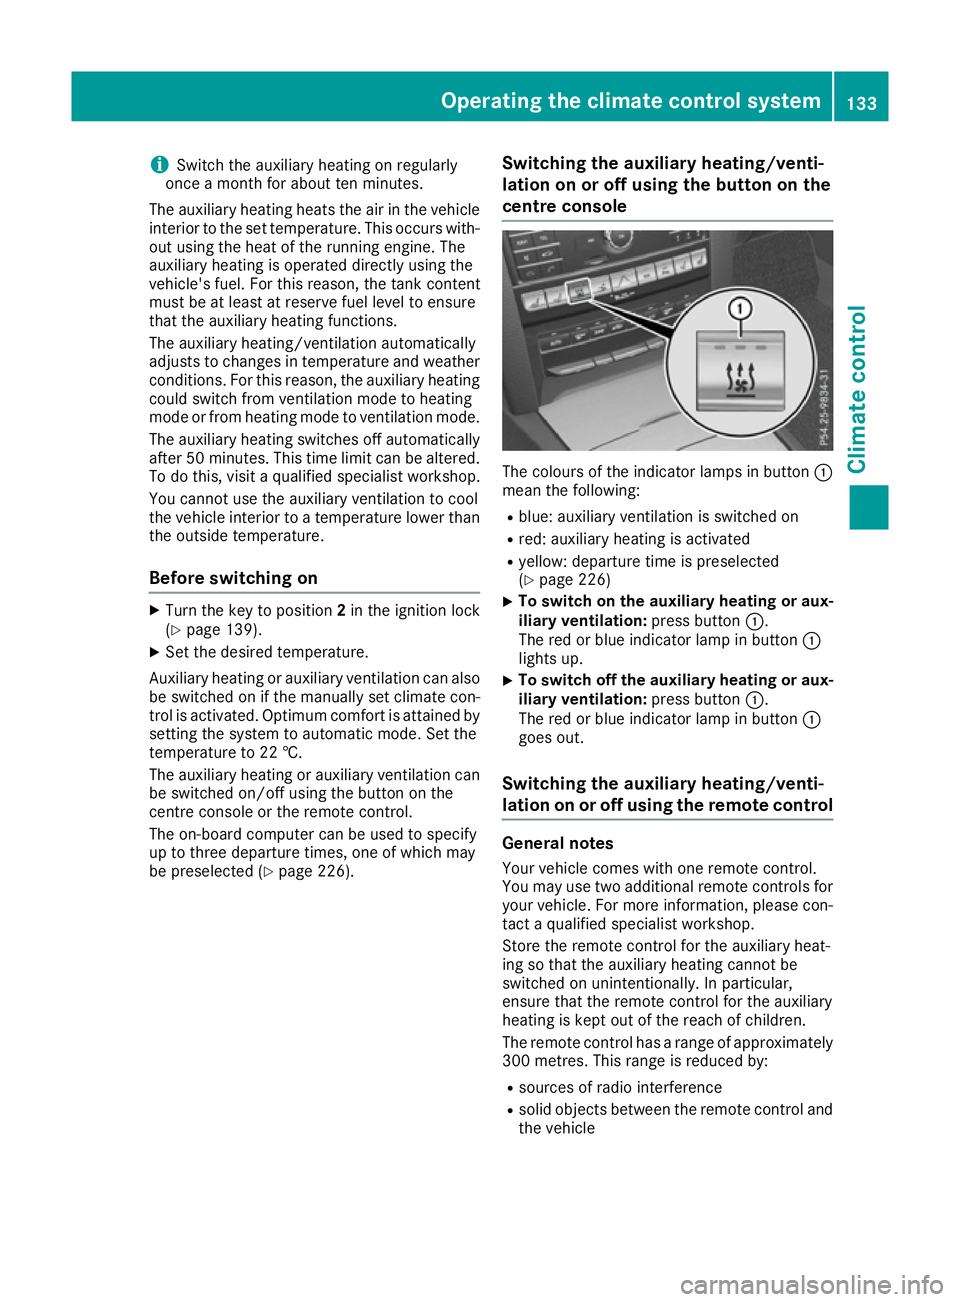
centre console The colours of the indicator lamps in button
:
mean the following:
R blue: auxiliary ventilation is switched on
R red: auxiliary heating is activated
R yellow: departure time is preselected
(Y page 226)
X To switch on the auxiliary heating or aux-
iliary ventilation:
press button:.
The red or blue indicator lamp in button :
lights up.
X To switch off the auxiliary heating or aux-
iliary ventilation: press button:.
The red or blue indicator lamp in button :
goes out.
Switching the auxiliary heating/venti-
lation on or off using the remote control General notes
Your vehicle comes with one remote control.
You may use two additional remote controls for your vehicle. For more information, please con-
tact a qualified specialist workshop.
Store the remote control for the auxiliary heat-
ing so that the auxiliary heating cannot be
switched on unintentionally. In particular,
ensure that the remote control for the auxiliary
heating is kept out of the reach of children.
The remote control has a range of approximately
300 metre s. Thisrange is reduced by:
R sources of radio interference
R solid objects between the remote control and
the vehicle Operating the climate control system
133Climate control Z