fuel reserve MERCEDES-BENZ E-CLASS CABRIOLET 2015 Owners Manual
[x] Cancel search | Manufacturer: MERCEDES-BENZ, Model Year: 2015, Model line: E-CLASS CABRIOLET, Model: MERCEDES-BENZ E-CLASS CABRIOLET 2015Pages: 349, PDF Size: 12.51 MB
Page 14 of 349
Fuel
Additives ........................................ 339
Consumption statistics .................. 216
Displaying the current consump-
tion ................................................ 216
Displaying the range ...................... 216
Fuel gauge ...................................... .31
Grade (petrol) ................................ 338
Important safety notes .................. 337
Notes for E 200, E 250, E400 ........ 339
Problem (malfunction) .................. .157
Quality (diesel )............................... 339
Refuelling ....................................... 154
Tank content/reserve fue l............. 338
Fuel filler flap
Opening ......................................... 155
Fuel filter (white display message) .. 240
Fuel level
Calling up the range (on-board
computer) ...................................... 216
Gaug e.............................................. 31
Fuel reserve
see Fuel
Fuel tank
Capacity ........................................ 338
Problem (malfunction) ................... 157
Fuse allocation chart (vehicle tool
kit) ...................................................... 305
Fuses
Allocation chart ............................. 319
Before changing ............................. 319
Dashboard fuse box ....................... 319
Fuse box in the boot ...................... 320
Fuse box in the engine compart-
ment .............................................. 319
Important safety notes .................. 318 G
Garage door opener Clearing the memory ..................... 284
Frequencies ................................... 285
General notes ................................ 282
Important safety notes .................. 283
Opening/closing the garage doo r..2 84
Problems when programming ....... .284
Programming (button in the rear-
view mirror) ................................... 283 Synchronising the rolling code ....... 284
Genuine Mercedes-Benz parts ........... 24
Glove compartment .......................... 273
Google™ Local Search
See also Digital Owner's Manual ... 263 H
Hazard warning lamps ......................116
Head level heating (AIRSCARF) ........106
Head restraint
Lowering manually (rear) .............. .102
Head restraints
Adjusting ....................................... 101
Adjusting (electrically) ................... 102
Adjusting (manually) ..................... .101
Adjusting (rear) .............................. 102
see NECK-PRO head restraints
Headbag
Display message ............................ 236
Operation ......................................... 44
Headlamp flasher .............................. 116
Headlamps
Misting up ...................................... 118
see Automatic headlamp mode
Heating
see Climate control
High-pressure cleaners .................... 297
Hill start assist .................................. 142
HOLD function
Activating ....................................... 178
Deactivating ................................... 178
Display message ............................ 241
Function/notes ............................ .177
Home address
See also Digital Owner's Manual ... 263
Horn ...................................................... 29 I
Ignition lock see Key positions
Immobiliser .......................................... 71
Indicator and warning lamp
Restraint system ............................ 258
Indicator and warning lamps
COLLISION PREVENTION ASSIST
PLUS .............................................. 261 Index
11
Page 19 of 349
Pulling away
Automatic transmission ................. 141
General notes ................................ 141
Manual transmission ......................1 41Q
QR code Mercedes-Benz Guide App ................. 1
Rescue card ..................................... 27
Qualified specialist workshop ........... 27R
Radiator cover ................................... 291
Radio
Selecting a station ......................... 218
see separate operating instructions
Radio mode
See also Digital Owner's Manual ... 263
Radio-based vehicle components
Declaration of conformity ................ 26
Reading lamp ..................................... 118
Rear compartment
Setting the temperature ................ 128
Rear foglamp
Display message ............................ 236
Switching on/off ........................... 115
Rear seat
Display message ............................ 250
Rear window heating
Problem (fault) ............................... 131
Switching on/off ........................... 130
Rear-compartment seat belt sta-
tus indicator ........................................ 42
Rear-view mirror
Anti-dazzle mode (automatic) ....... .111
Dipping (manual) ........................... 110
Refuelling
Fuel gauge ....................................... 31
Important safety notes .................. 154
Refuelling process ......................... 155
see Fuel
Remote control
Auxiliary heating/ventilation .......... 133
Changing the batteries (auxiliary
heating) ......................................... 135
Garage door opener ....................... 282 Programming (garage door
opener) .......................................... 283
Replacing bulbs
Important safety notes .................. 119
Overview of bulb types .................. 119
Replacing the battery (auxiliary
heating remote control) .................... 135
Rescue card ......................................... 27
Reserve (fuel tank)
see Fuel
Reserve fuel
Display message ............................ 239
Warning lamp ................................. 259
Residual heat (climate control) ........132
Restraint system
Display message ............................ 235
Introduction ..................................... 37
Problem (malfunction) ................... 258
Warning lamp (function) ................... 38
Rev counter ........................................ 213
Reverse gear
Engaging (manual transmission) .... 146
Reversing camera
Cleaning instructions ..................... 300
Display in the multimedia system .. 189
Function/notes ............................ .188
Switching on/off ........................... 188
Reversing feature
Side windows ................................... 85
Reversing lamp (display message) .. 236
Roll bar
Display message ............................ 234
Operation ......................................... 45
Roof
Overview .......................................... 88
see Soft top
Roof lining and carpets (cleaning
instructions) ...................................... 303
Roof load (maximum) ........................ 342
Route guidance
See also Digital Owner's Manual ... 263 S
Safety Children in the vehicle ..................... 49
see Occupant safety 16
Index
Page 24 of 349
Variable SPEEDTRONIC
see SPEEDTRONIC
Vehicle
Correct use ...................................... 27
Data acquisition ............................... 27
Display message ............................ 248
Electronics ..................................... 335
Equipment ....................................... 25
Implied warranty .............................. 27
Individual settings .......................... 223
Leaving parked up ......................... 159
Locking (in an emergency) ............... 82
Locking (key) ................................... 74
Lowering ........................................ 332
Pulling away ................................... 141
Raising ........................................... 330
Registration ..................................... 27
Securing from rolling away ............ 330
Tow-starting ................................... 315
Towing away .................................. 315
Transporting .................................. 317
Unlocking (in an emergency) ........... 82
Unlocking (key) ................................ 74
Vehicle data ................................... 342
Vehicle data ....................................... 342
Vehicle dimensions ........................... 342
Vehicle emergency locking ................ 82
Vehicle identification number
see VIN
Vehicle identification plate .............. 336
Vehicle tool kit .................................. 305
Video
Operating the DVD ......................... 218
See also Digital Owner's Manua l... 263
VIN
Seat ............................................... 337
Type plate ...................................... 336 W
Warning and indicator lamps ABS ................................................ 256
Brakes ........................................... 255
Distance warning signal ................. 261
ESP ®
.............................................. 256
ESP ®
OFF ....................................... 257
Fuel tank ........................................ 259
General notes ................................ 253 LIM (cruise control) ........................ 163
LIM (DISTRONIC PLUS) .................. 169
LIM (variable SPEEDTRONIC) ......... 166
Overview .......................................... 31
PASSENGER AIR BAG OFF ............... 38
Reserve fue l................................... 259
Seat belt ........................................ 254
Tyre pressure monitor ................... 262
Warning triangle ................................ 304
Washer fluid
Display message ............................ 252
Wheel and tyre combinations
Tyres .............................................. 333
Wheel bolt tightening torque ........... 332
Wheel chock ...................................... 330
Wheels
Changing a whee l.......................... 328
Changing/replacing ....................... 329
Checking ........................................ 321
Cleaning ......................................... 299
Emergency spare wheel ................. 333
Fitting a new wheel ........................ 332
Fitting a wheel ............................... 329
Important safety notes .................. 321
Information on driving .................... 321
Removing a whee l.......................... 331
Storing ........................................... 329
Tightening torque ........................... 332
Wheel size/tyre size ...................... 333
Wind deflector (cleaning instruc-
tions) .................................................. 298
Windows
Cleaning ......................................... 299
see Side windows
Windscreen
Demisting ...................................... 129
Windscreen washer fluid
see Windscreen washer system
Windscreen washer system
Important safety notes .................. 342
Topping up ..................................... 293
Windscreen wipers
Problem (malfunction) ................... 122
Replacing the wiper blades ............ 120
Switching on/of f........................... 120
Winter operation
Important safety notes .................. 323
Radiator cover ............................... 291 Index
21
Page 34 of 349
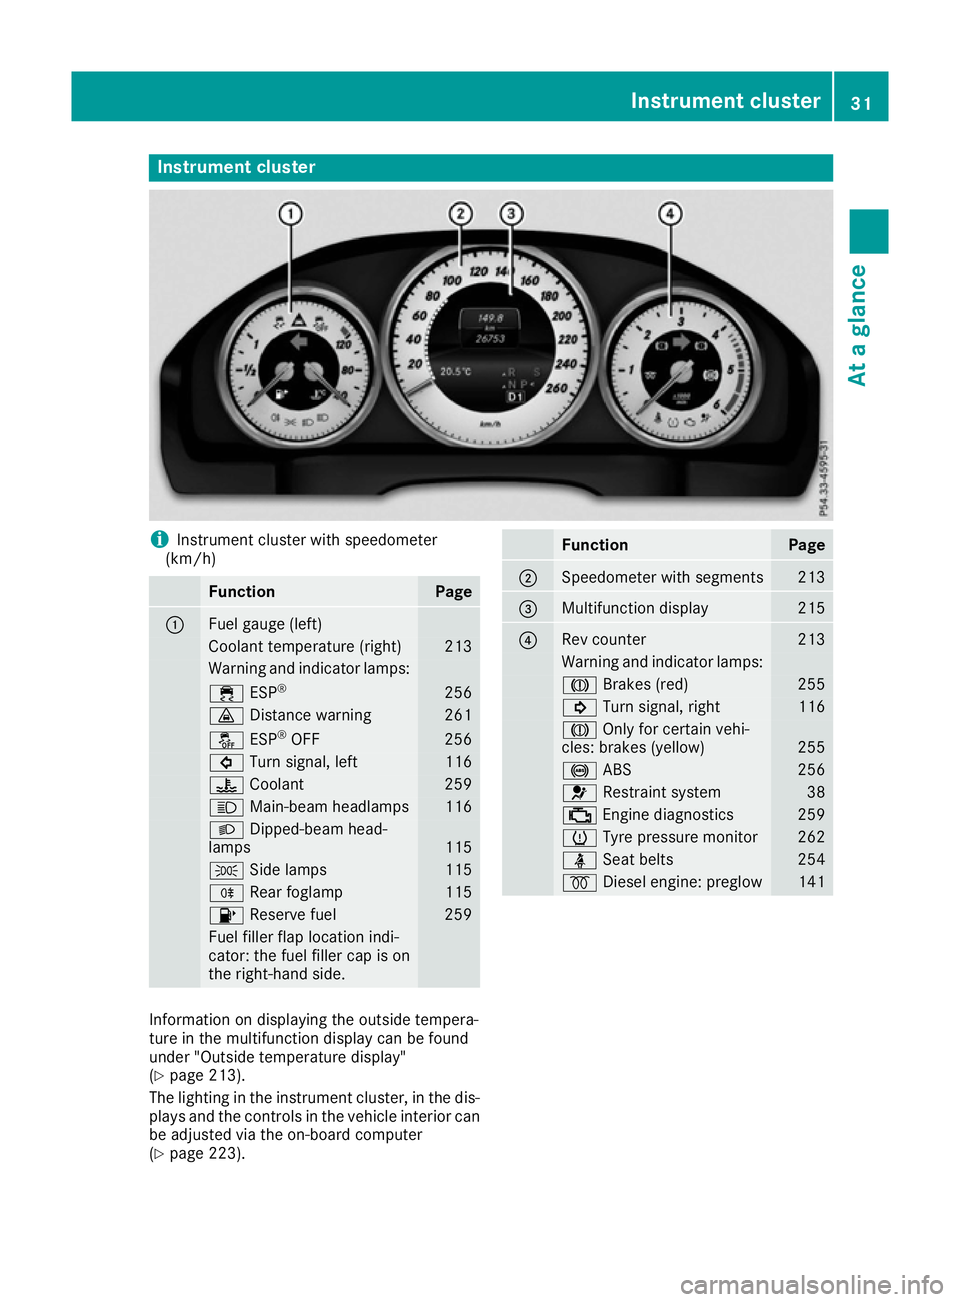
Instrument cluster
i
Instrument cluster with speedometer
(km/h) Function Page
:
Fuel gauge (left)
Coolant temperature (right) 213
Warning and indicator lamps:
÷
ESP® 256
·
Distance warning 261
å
ESP®
OFF 256
#
Turn signal, left 116
?
Coolant 259
K
Main-beam headlamps 116
L
Dipped-beam head-
lamps 115
T
Side lamps 115
R
Rear foglamp 115
8
Reserve fuel 259
Fuel filler flap location indi-
cator: the fuel filler cap is on
the right-hand side. Function Page
;
Speedometer with segments 213
=
Multifunction display 215
?
Rev counter 213
Warning and indicator lamps:
J
Brakes (red) 255
!
Turn signal, right 116
J
Only for certain vehi-
cles: brakes (yellow) 255
!
ABS 256
6
Restraint system 38
;
Engine diagnostics 259
h
Tyre pressure monitor 262
ü
Seat belts 254
%
Diesel engine: preglow 141
Information on displaying the outside tempera-
ture in the multifunction display can be found
under "Outside temperature display"
(Y
page 213).
The lighting in the instrument cluster, in the dis- plays and the controls in the vehicle interior can
be adjusted via the on-board computer
(Y page 223). Instrument cluster
31At a glance
Page 136 of 349
i
Switch the auxiliary heating on regularly
once a month for about ten minutes.
The auxiliary heating heats the air in the vehicle
interior to the set temperature. This occurs with- out using the heat of the running engine. The
auxiliary heating is operated directly using the
vehicle's fuel. For this reason, the tank content
must be at least at reserve fuel level to ensure
that the auxiliary heating functions.
The auxiliary heating/ventilation automatically
adjusts to changes in temperature and weather conditions. For this reason, the auxiliary heating
could switch from ventilation mode to heating
mode or from heating mode to ventilation mode.
The auxiliary heating switches off automatically after 50 minutes. This time limit can be altered.
To do this, visit a qualified specialist workshop.
You cannot use the auxiliary ventilation to cool
the vehicle interior to a temperature lower than
the outside temperature.
Before switching on X
Turn the key to position 2in the ignition lock
(Y page 139).
X Set the desired temperature.
Auxiliary heating or auxiliary ventilation can also
be switched on if the manually set climate con-
trol is activated. Optimum comfort is attained by setting the system to automatic mode. Set the
temperature to 22 †.
The auxiliary heating or auxiliary ventilation can
be switched on/off using the button on the
centre console or the remote control.
The on-board computer can be used to specify
up to three departure times, one of which may
be preselected (Y page 226). Switching the auxiliary heating/venti-
lation on or off using the button on the
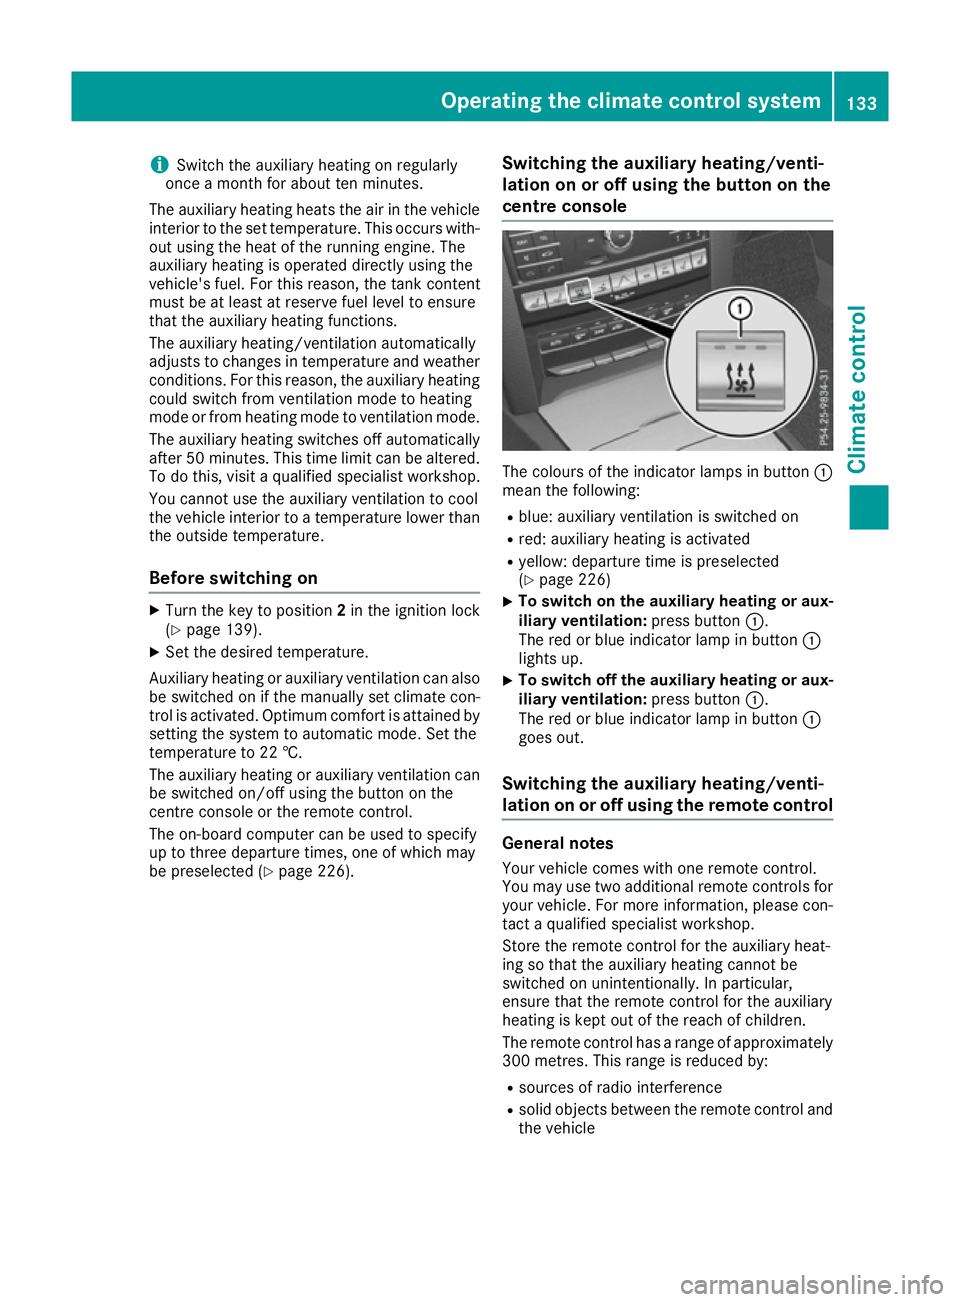
centre console The colours of the indicator lamps in button
:
mean the following:
R blue: auxiliary ventilation is switched on
R red: auxiliary heating is activated
R yellow: departure time is preselected
(Y page 226)
X To switch on the auxiliary heating or aux-
iliary ventilation:
press button:.
The red or blue indicator lamp in button :
lights up.
X To switch off the auxiliary heating or aux-
iliary ventilation: press button:.
The red or blue indicator lamp in button :
goes out.
Switching the auxiliary heating/venti-
lation on or off using the remote control General notes
Your vehicle comes with one remote control.
You may use two additional remote controls for your vehicle. For more information, please con-
tact a qualified specialist workshop.
Store the remote control for the auxiliary heat-
ing so that the auxiliary heating cannot be
switched on unintentionally. In particular,
ensure that the remote control for the auxiliary
heating is kept out of the reach of children.
The remote control has a range of approximately
300 metre s. Thisrange is reduced by:
R sources of radio interference
R solid objects between the remote control and
the vehicle Operating the climate control system
133Climate control Z
Page 139 of 349
Problems with the auxiliary heating/ventilation
Problem
Possible causes/consequences and
M
MSolutions FAIL
¨ The signal transmission between the transmitter and the vehicle is
faulty.
X
Change your position in relation to the vehicle, moving closer if
necessary. FAIL The auxiliary heating cannot be switched on or has switched itself off.
The starter battery is not sufficiently charged.
X Charge the starter battery. The fuel tank content is below the reserve fuel level.
X Refuel at the nearest filling station. The auxiliary heating or auxiliary ventilation is faulty.
X Have the auxiliary heating or auxiliary ventilation checked at a
qualified specialist workshop. Air vents
Important safety notes
G
WARNING
Very hot or very cold air can flow from the air vents. This could result in burns or frostbite in the immediate vicinity of the air vents. There
is a risk of injury.
Make sure that all vehicle occupants always
maintain a sufficient distance to the air out-
lets. If necessary, redirect the airflow to
another area of the vehicle interior.
In order to ensure the direct flow of fresh air
through the air vents into the vehicle interior,
please observe the following notes:
R keep the air inlet between the windscreen and
the bonnet free of blockages, such as ice,
snow or leaves.
R never cover the vents or ventilation grilles in
the vehicle interior. Adjusting the air vents
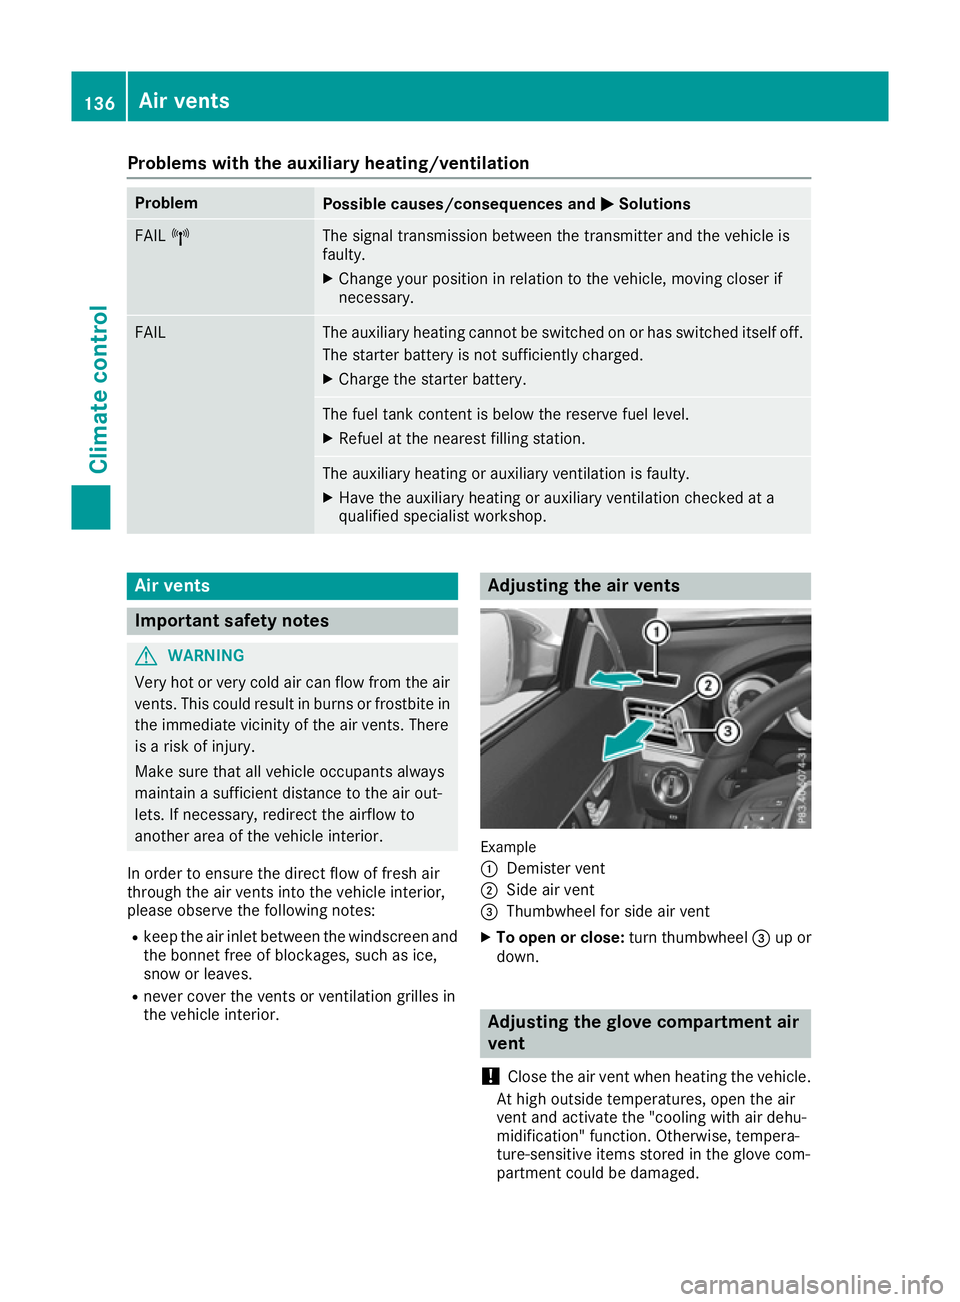
Example
:
Demister vent
; Side air vent
= Thumbwheel for side air vent
X To open or close: turn thumbwheel=up or
down. Adjusting the glove compartment air
vent
! Close the air vent when heating the vehicle.
At high outside temperatures, open the air
vent and activate the "cooling with air dehu-
midification" function. Otherwise, tempera-
ture-sensitive items stored in the glove com-
partment could be damaged. 136
Air ventsClimate control
Page 148 of 349
Problems with the engine
Problem
Possible causes/consequences and
M
MSolutions The engine does not
start. The HOLD function or DISTRONIC PLUS is activated.
X Deactivate the HOLD function (Y page 177) or DISTRONIC PLUS
(Y page 174).
X Try to start the engine again. The engine does not
start. The starter motor
can be heard. R
There is a malfunction in the engine electronics.
R There is a malfunction in the fuel supply.
Before attempting to start the engine again:
X Turn the key back to position 0in the ignition lock.
or X Press the Start/Stop button repeatedly until all indicator lamps in
the instrument cluster go out.
X Try to start the engine again (Y page 140). Avoid excessively long
and frequent attempts to start the engine, as this will drain the
battery.
If the engine does not start after several attempts:
X Consult a qualified specialist workshop. The engine does not
start. The starter motor
can be heard. The
reserve fuel warning
lamp is lit and the fuel
gauge display shows
0. The fuel tank is empty.
X Refuel the vehicle. The engine does not
start. You cannot hear
the starter motor. The on-board voltage is too low because the battery is too weak or
discharged.
X Jump-start the vehicle (Y page 313).
If the engine does not start despite attempts to jump-start it:
X Consult a qualified specialist workshop. The starter motor was exposed to a thermal load that was too high.
X Allow the starter motor to cool down for approximately two minutes.
X Try to start the engine again.
If the engine still does not start: X Consult a qualified specialist workshop. Vehicles with a petrol
engine:
The engine is not running
smoothly and is misfir-
ing. There is a malfunction in the engine electronics or in a mechanical
component of the engine management system.
X Only depress the accelerator pedal slightly.
Otherwise, non-combusted fuel may get into the catalytic converter
and damage it.
X Have the cause rectified immediately at a qualified specialist work-
shop. Driving
145Driving and parking Z
Page 242 of 349
Display messages
Possible causes/consequences and
M
MSolutions #
See Owner's Manual See Owner's Manual The battery is not being charged.
A warning tone also sounds.
Possible causes:
R faulty alternator
R torn poly-V-belt
R a malfunction in the electronics
! Do not continue driving. The engine could otherwise overheat.
X Stop the vehicle immediately, paying attention to road and traffic
conditions, and switch off the engine.
X Safeguard the vehicle against rolling away (Y page 157).
X Consult a qualified specialist workshop. #
Stop vehicle See Stop vehicle See
Owner's Manual Owner's Manual The battery is no longer being charged and the battery charge level is
too low.
A warning tone also sounds.
X Stop the vehicle immediately, paying attention to road and traffic
conditions, and switch off the engine.
X Safeguard the vehicle against rolling away (Y page 157).
X Observe the instructions in the #See SeeOwner's
Owner's Manual
Manualdisplay
message.
X Consult a qualified specialist workshop. 4
Check Check
eng.
eng.oil
oillev.
lev.
when
when next
nextrefuelling
refuelling The engine oil level has dropped to the minimum level.
A warning tone also sounds.
! Avoid long journeys when there is too little coolant in the cooling
system. Otherwise the engine will be damaged.
X Check the oil level when next refuelling, at the latest (Y page 291).
X If necessary, top up the engine oil (Y page 292).
X Have the engine checked at a qualified specialist workshop if the
engine oil needs topping up more often than usual.
Information on approved engine oils can be obtained from any quali-
fied specialist workshop or on the Internet at http://bevo.mercedes-
benz.com. 8
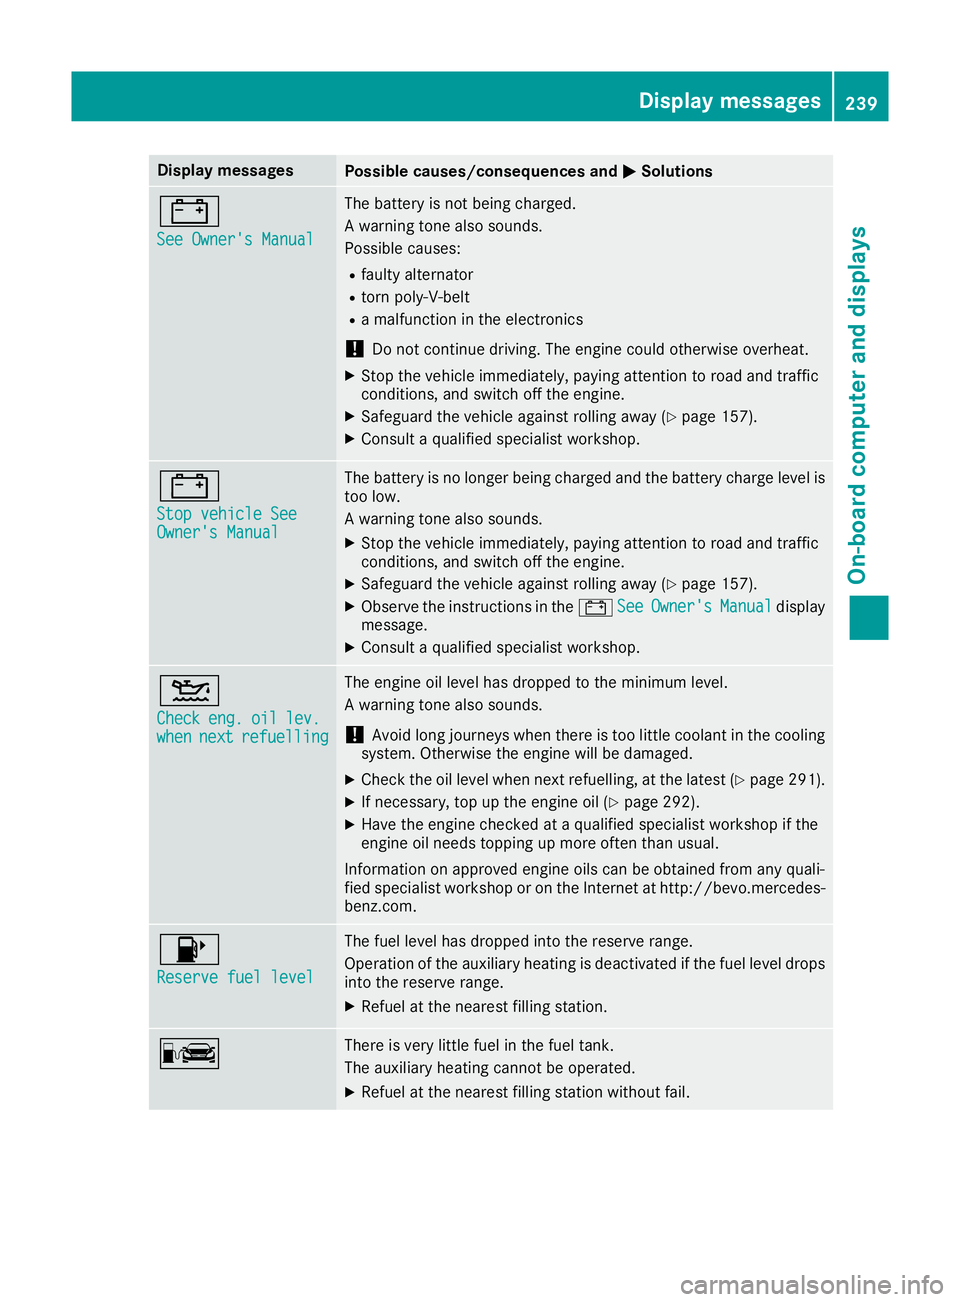
Reserve fuel level Reserve fuel level The fuel level has dropped into the reserve range.
Operation of the auxiliary heating is deactivated if the fuel level drops
into the reserve range.
X Refuel at the nearest filling station. C There is very little fuel in the fuel tank.
The auxiliary heating cannot be operated.
X Refuel at the nearest filling station without fail. Display
messages
239On-board computer and displays Z
Page 243 of 349
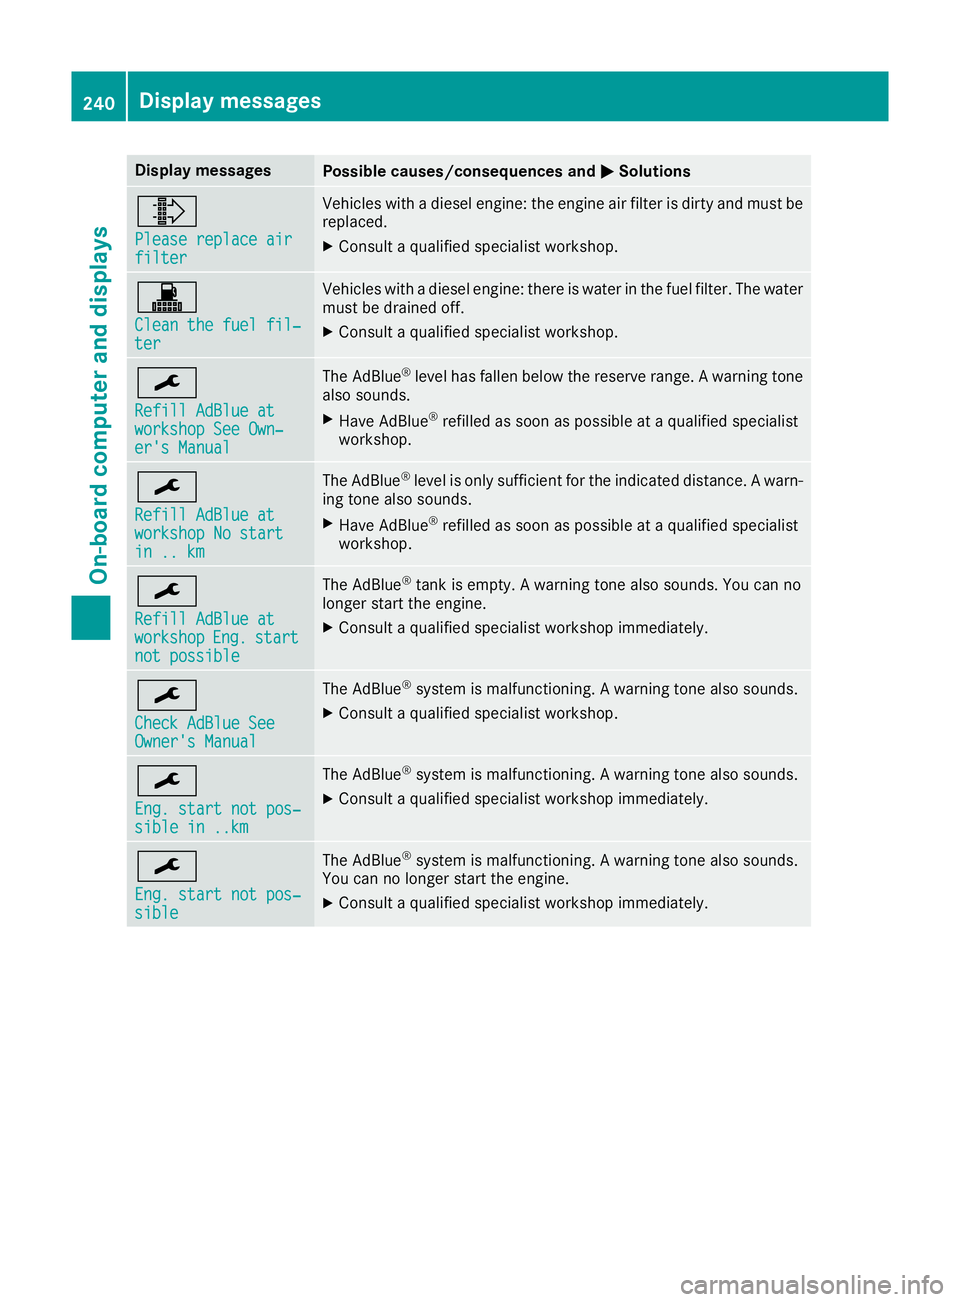
Display messages
Possible causes/consequences and
M
MSolutions ¸
Please replace air Please replace air
filter filter Vehicles with a diesel engine: the engine air filter is dirty and must be
replaced.
X Consult a qualified specialist workshop. !
Clean the fuel fil‐ Clean the fuel fil‐
ter ter Vehicles with a diesel engine: there is water in the fuel filter. The water
must be drained off.
X Consult a qualified specialist workshop. ¯
Refill AdBlue at Refill AdBlue at
workshop See Own‐ workshop See Own‐
er's Manual er's Manual The AdBlue
®
level has fallen below the reserve range. A warning tone
also sounds.
X Have AdBlue ®
refilled as soon as possible at a qualified specialist
workshop. ¯
Refill AdBlue at Refill AdBlue at
workshop No start workshop No start
in .. km in .. km The AdBlue
®
level is only sufficient for the indicated distance. A warn-
ing tone also sounds.
X Have AdBlue ®
refilled as soon as possible at a qualified specialist
workshop. ¯
Refill AdBlue at Refill AdBlue at
workshop workshop
Eng.
Eng. start
start
not possible
not possible The AdBlue
®
tank is empty. A warning tone also sounds. You can no
longer start the engine.
X Consult a qualified specialist workshop immediately. ¯
Check AdBlue See Check AdBlue See
Owner's Manual Owner's Manual The AdBlue
®
system is malfunctioning. A warning tone also sounds.
X Consult a qualified specialist workshop. ¯
Eng. start not pos‐ Eng. start not pos‐
sible in ..km sible in ..km The AdBlue
®
system is malfunctioning. A warning tone also sounds.
X Consult a qualified specialist workshop immediately. ¯
Eng. start not pos‐ Eng. start not pos‐
sible sible The AdBlue
®
system is malfunctioning. A warning tone also sounds.
You can no longer start the engine.
X Consult a qualified specialist workshop immediately. 240
Display
messagesOn-board computer and displays
Page 262 of 349
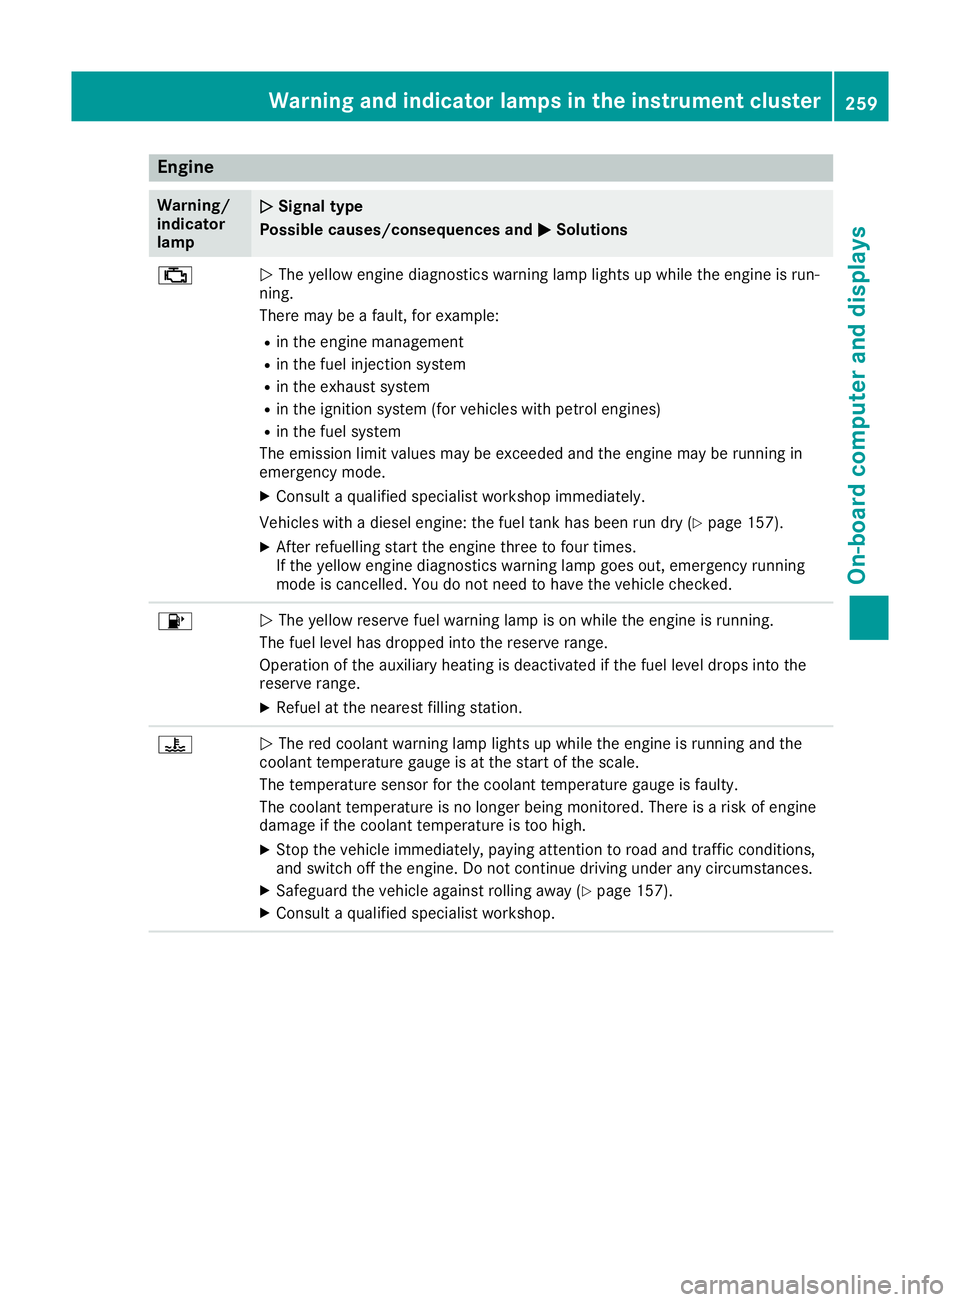
Engine
Warning/
indicator
lamp
N N
Signal type
Possible causes/consequences and M
MSolutions ;
N
The yellow engine diagnostics warning lamp lights up while the engine is run-
ning.
There may be a fault, for example:
R in the engine management
R in the fuel injection system
R in the exhaust system
R in the ignition system (for vehicles with petrol engines)
R in the fuel system
The emission limit values may be exceeded and the engine may be running in
emergency mode.
X Consult a qualified specialist workshop immediately.
Vehicles with a diesel engine: the fuel tank has been run dry (Y page 157).
X After refuelling start the engine three to four times.
If the yellow engine diagnostics warning lamp goes out, emergency running
mode is cancelled. You do not need to have the vehicle checked. 8
N
The yellow reserve fuel warning lamp is on while the engine is running.
The fuel level has dropped into the reserve range.
Operation of the auxiliary heating is deactivated if the fuel level drops into the
reserve range.
X Refuel at the nearest filling station. ?
N
The red coolant warning lamp lights up while the engine is running and the
coolant temperature gauge is at the start of the scale.
The temperature sensor for the coolant temperature gauge is faulty.
The coolant temperature is no longer being monitored. There is a risk of engine
damage if the coolant temperature is too high.
X Stop the vehicle immediately, paying attention to road and traffic conditions,
and switch off the engine. Do not continue driving under any circumstances.
X Safeguard the vehicle against rolling away (Y page 157).
X Consult a qualified specialist workshop. Warning and indicator lamps in the instrument cluster
259On-board computer and displays Z