snow chains MERCEDES-BENZ E-CLASS CABRIOLET 2015 Owners Manual
[x] Cancel search | Manufacturer: MERCEDES-BENZ, Model Year: 2015, Model line: E-CLASS CABRIOLET, Model: MERCEDES-BENZ E-CLASS CABRIOLET 2015Pages: 349, PDF Size: 12.51 MB
Page 12 of 349
Active Blind Spot Assist ................. 203
Active Driving Assistance pack-
age ................................................. 203
Active Lane Keeping Assist ............ 206
Active Parking Assist ..................... 183
ATTENTION ASSIST ........................ 196
Blind Spot Assist ............................ 200
Cruise control ................................ 163
Display message ............................ 241
Distronic Plus ................................ 168
Dynamic handling package with
sports mode .................................. 179
HOLD functio n............................... 177
Lane Keeping Assist ...................... 202
Lane package ................................ 200
PARKTRONIC ................................. 179
Reversing camera .......................... 188
SPEEDTRONIC ............................... 165
Traffic Sign Assist .......................... 197
Driving tips
Aquaplaning ................................... 161
Automatic transmission ................. 149
Brakes ........................................... 160
Downhill gradient ........................... 160
Driving abroad ............................... 114
Driving in winter ............................. 162
Driving on flooded roads ................ 161
Driving on wet roads ...................... 161
General .......................................... 159
Icy road surfaces ........................... 162
Limited braking efficiency on sal-
ted roads ....................................... 161
New brake pads/linings ................ 161
Running-in tips ............................... 138
Snow chains .................................. 324
Symmetrical dipped beam ............. 114
Towing a trailer .............................. 209
Wet road surface ........................... 161
DVD video
Operating (on-board computer) ..... 218
See also Digital Owner's Manua l... 263
Dynamic handling package with
sports mode ....................................... 179 E
E10 see Fuel EASY-ENTRY feature
Activating/deactivating ................. 227
Function/note s............................. 109
EASY-EXIT feature
Crash-responsive ........................... 110
Function/note s............................. 109
Switching on/of f........................... 227
EBD (electronic brake force distri-
bution)
Display message ............................ 231
Function/note s................................ 69
ECO display
Function/note s............................. 159
On-board computer ....................... 216
ECO start/stop function
Automatic engine start .................. 143
Automatic engine switch-off .......... 142
Deactivating/activating ................. 143
General information ....................... 142
Important safety notes .................. 142
Introduction ................................... 142
Electromagnetic compatibility
Declaration of conformity ................ 26
Electronic Stability Program
see ESP ®
(Electronic Stability Program)
Emergency
Automatic measures after an acci-
dent ................................................. 49
Emergency closing
Soft top ............................................ 90
Emergency key
Unlocking the driver's door .............. 82
Emergency key element
Function/note s................................ 76
General notes .................................. 76
Inserting .......................................... 76
Locking vehicle ................................ 82
Removing ......................................... 76
Emergency release
Driver's door .................................... 82
Emergency spare wheel
General notes ................................ 334
Important safety notes .................. 333
Removing ....................................... 334
Storage location ............................ 334
Stowing .......................................... 334
Technical data ............................... 334 Index
9
Page 21 of 349
Skibag
................................................ 275
SMS
See also Digital Owner's Manual ... 263
Snow chains ...................................... 324
Sockets
General notes ................................ 280
Rear compartment .........................2 81
Soft top
AIRCAP ............................................ 95
Cleaning ......................................... 298
Closing manually in an emer-
gency ............................................... 90
Display message ............................ 252
Draught stop ................................... .94
Fitting/removing the AIRCAP
draught stop .................................... 96
Important safety notes .................... 88
Opening/closing (with key) .............. 90
Opening/closing (with soft-top
switch) ............................................. 89
Problem (malfunction) ..................... 98
Re-locking ........................................ 94
Soft-top switch .................................... 89
Sound
Switching on/off ........................... 264
Specialist workshop ............................ 27
Speed, controlling
see Cruise control
Speedometer
Activating/deactivating the addi-
tional speedometer ........................ 223
Digital ............................................ 216
In the Instrument cluster ................ .31
Segments ...................................... 213
Selecting a display uni t.................. 223
SPEEDTRONIC
Deactivating variable ..................... 167
Display message ............................ 244
Function/note s............................. 165
Important safety notes .................. 165
LIM indicator lamp ......................... 166
Permanent ..................................... 168
Selecting ........................................ 166
Storing the current speed .............. 166
Variabl e......................................... 166
Start/stop function
see ECO start/stop function Starting (engine)
................................ 140
STEER CONTROL .................................. 71
Steering
Display message ............................ 251
Steering Assist and Stop&Go Pilot
(DISTRONIC PLUS)
Activating/deactivating ................. 222
Display message ............................ 245
Steering assistant STEER CON-
TROL
see STEER CONTROL
Steering wheel
Adjusting (electrically) ................... 107
Adjusting (manually) ...................... 107
Button overview ............................... 32
Buttons (on-board computer) ......... 214
Cleaning ......................................... 302
Gearshift paddle s........................... 151
Important safety notes .................. 106
Steering wheel heating .................. 107
Storing settings (memory func-
tion) ............................................... 112
Steering wheel gearshift paddles .... 151
Steering wheel heating
Problem (malfunction) ................... 109
Switching on/of f........................... 107
Stowage areas ................................... 272
Stowage compartments
Armrest (under) ............................. 274
Centre console .............................. 273
Cup holde r..................................... 277
Glove compartment ....................... 273
Important safety information ......... 272
Under driver's seat/front-
passenger sea t.............................. 274
Stowage net ....................................... 274
Stowage space
Stowage net ................................... 274
Stowage well beneath the boot
floor .................................................... 277
Summer tyres .................................... 323
Sun visor ............................................ 279
Surround lighting (on-board com-
puter) .................................................. 225
Switching on media mode
Via the device list .......................... 270 18
Index
Page 25 of 349
Slippery road surfaces ................... 162
Snow chains .................................. 324
Winter tyres
Limiting the speed (on-board com-
puter) ............................................. 225
M+S tyres ...................................... 323
Wiper blades
Cleaning ......................................... 299
Important safety notes .................. 120
Replacing ....................................... 120
Wooden trim (cleaning instruc-
tions) .................................................. 302
Workshop
see Qualified specialist workshop Z
ZONE function Switching on/of f........................... 129 22
Index
Page 64 of 349
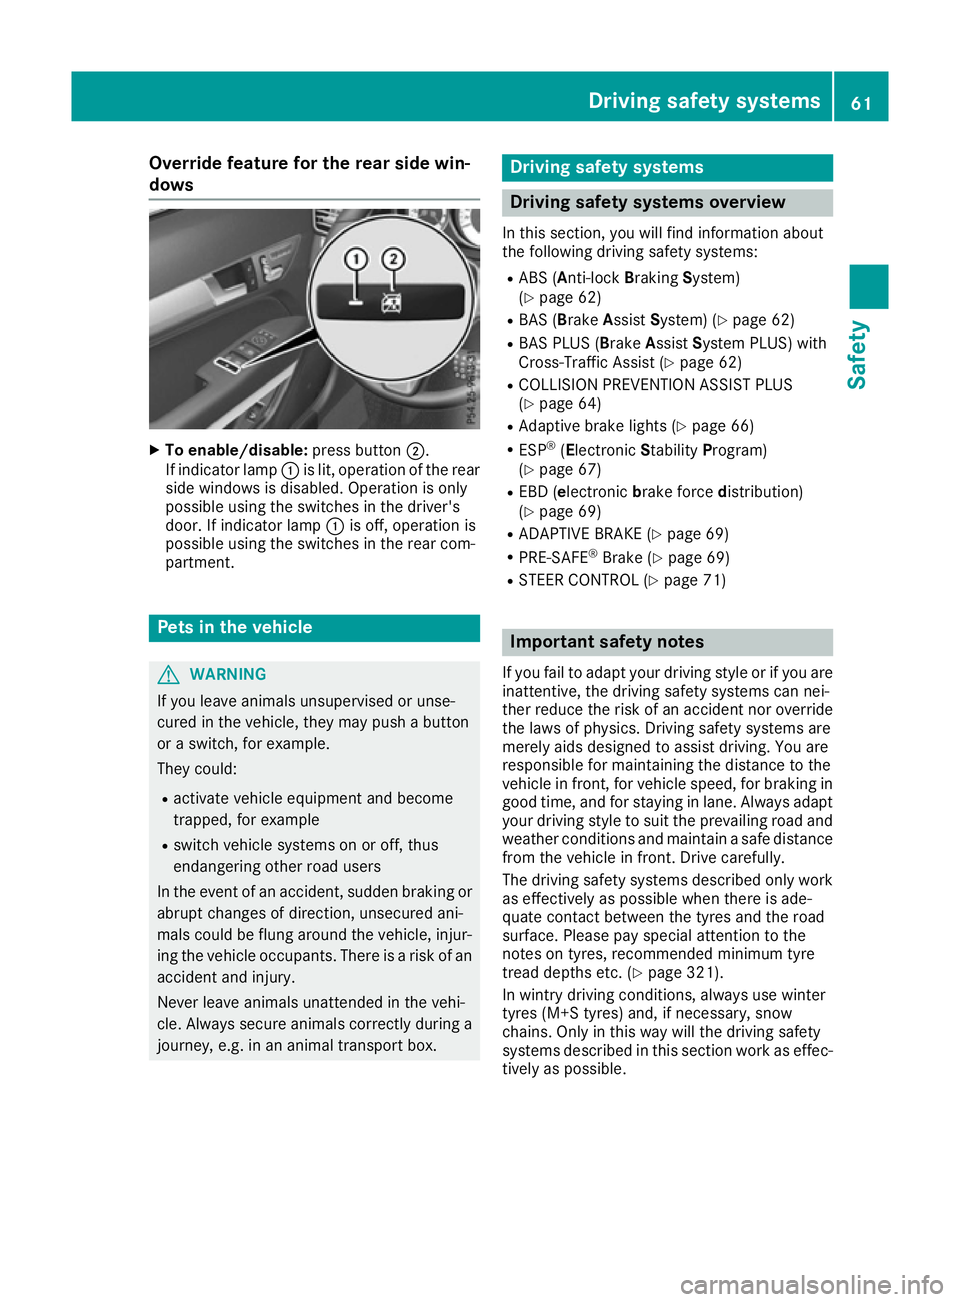
Override feature for the rear side win-
dows X
To enable/disable: press button;.
If indicator lamp :is lit, operation of the rear
side windows is disabled. Operation is only
possible using the switches in the driver's
door. If indicator lamp :is off, operation is
possible using the switches in the rear com-
partment. Pets in the vehicle
G
WARNING
If you leave animals unsupervised or unse-
cured in the vehicle, they may push a button
or a switch, for example.
They could:
R activate vehicle equipment and become
trapped, for example
R switch vehicle systems on or off, thus
endangering other road users
In the event of an accident, sudden braking or
abrupt changes of direction, unsecured ani-
mals could be flung around the vehicle, injur-
ing the vehicle occupants. There is a risk of an accident and injury.
Never leave animals unattended in the vehi-
cle. Always secure animals correctly during a
journey, e.g. in an animal transport box. Driving safety systems
Driving safety systems overview
In this section, you will find information about
the following driving safety systems:
R ABS (A nti-lock Braking System)
(Y page 62)
R BAS (Brake AssistSystem) (Y page 62)
R BAS PLUS (B rakeAssist System PLUS) with
Cross-Traffic Assist (Y page 62)
R COLLISION PREVENTION ASSIST PLUS
(Y page 64)
R Adaptive brake lights (Y page 66)
R ESP ®
(Electronic StabilityProgram)
(Y page 67)
R EBD (e lectronic brake force distribution)
(Y page 69)
R ADAPTIVE BRAKE (Y page 69)
R PRE-SAFE ®
Brake (Y page 69)
R STEER CONTROL (Y page 71) Important safety notes
If you fail to adapt your driving style or if you are
inattentive, the driving safety systems can nei-
ther reduce the risk of an accident nor override the laws of physics. Driving safety systems are
merely aids designed to assist driving. You are
responsible for maintaining the distance to the
vehicle in front, for vehicle speed, for braking in
good time, and for staying in lane. Always adapt
your driving style to suit the prevailing road and weather conditions and maintain a safe distance
from the vehicle in front. Drive carefully.
The driving safety systems described only work as effectively as possible when there is ade-
quate contact between the tyres and the road
surface. Please pay special attention to the
notes on tyres, recommended minimum tyre
tread depths etc. (Y page 321).
In wintry driving conditions, always use winter
tyres (M+S tyres) and, if necessary, snow
chains. Only in this way will the driving safety
systems described in this section work as effec-
tively as possible. Driving safety systems
61Safety Z
Page 71 of 349
Deactivating/activating ESP
®Important safety notes
You can select between the following statuses
of ESP ®
:
R ESP ®
is activated
R ESP ®
is deactivated. G
WARNING
If you deactivate ESP ®
, ESP ®
no longer sta-
bilises the vehicle. There is an increased risk
of skidding and an accident.
Only deactivate ESP ®
in the situations descri-
bed in the following.
It may be best to deactivate ESP ®
in the follow-
ing situations:
R when using snow chains
R in deep snow
R on sand or gravel
i Activate ESP ®
as soon as the situations
described above no longer apply. ESP ®
will
otherwise not be able to stabilise the vehicle
if the vehicle starts to skid or a wheel starts to
spin.
Deactivating/activating ESP ®
You can deactivate or activate ESP ®
via the on-
board computer (Y page 221).
ESP ®
deactivated:
The å ESP®
OFF warning lamp in the instru-
ment cluster lights up.
ESP ®
activated:
The å ESP®
OFF warning lamp in the instru-
ment cluster goes out.
Characteristics when ESP ®
is deactivated
If ESP ®
is deactivated and one or more wheels
start to spin, the ÷ESP®
warning lamp in the
instrument cluster flashes. In such situations,
ESP ®
will not stabilise the vehicle.
If you deactivate ESP ®
:
R ESP ®
no longer improves driving stability
R Engine torque is no longer limited and the
drive wheels are able to spin
The spinning of the wheels results in a cutting action for better traction on loose surfaces. R
Traction control is still activated
R COLLISION PREVENTION ASSIST is no longer
available; nor is it activated if you brake firmly
with assistance from ESP ®
R PRE-SAFE ®
is no longer available; it is also not
activated if you brake firmly with assistance
from ESP ®
R PRE-SAFE ®
Brake is no longer available; it is
also not activated if you brake firmly with
assistance from ESP ®
R ESP ®
still provides support when you brake
firmly
ESP ®
trailer stabilisation General notes
If your vehicle/trailer combination begins to
lurch, ESP ®
assists you in this situation. ESP ®
slows the vehicle down by braking and limiting
the engine output until the vehicle/trailer com- bination has stabilised.
Important safety notes G
WARNING
If road and weather conditions are poor,
trailer stabilisation will not be able to prevent the vehicle/trailer combination from swerv-
ing. Trailers with a high centre of gravity can
tip over before ESP ®
can detect this. There is
a risk of an accident.
Always adapt your driving style to the prevail-
ing road and weather conditions.
If your vehicle/trailer combination begins to
lurch, you can only stabilise the vehicle/trailer
combination by depressing the brake firmly.
ESP ®
trailer stabilisation is active above speeds
of approximately 65 km/h.
ESP ®
trailer stabilisation does not work if ESP ®
is deactivated or disabled because of a malfunc- tion. 68
Driving safety syste
msSafety
Page 165 of 349
These notes must be observed under all cir-
cumstances. You could otherwise damage
the engine, the electronics or the transmis-
sion.
If you must drive on stretches of road on which
water has collected, please bear in mind that:
R in the case of standing water, the water level
must be no higher than the lower edge of the vehicle body
R you should drive no faster than walking pace Winter driving
G
WARNING
If you shift down on a slippery road surface in an attempt to increase the engine's braking
effect, the drive wheels could lose their grip.
This increases the risk of skidding and having
an accident.
Do not shift down for additional engine brak-
ing on a slippery road surface. G
DANGER
If the exhaust pipe is blocked or adequate
ventilation is not possible, poisonous gases
such as carbon monoxide (CO) may enter the vehicle. This is the case, e.g. if the vehicle
becomes trapped in snow. There is a risk of
fatal injury.
If you leave the engine or the auxiliary heating
running, make sure the exhaust pipe and area
around the vehicle are clear of snow. To
ensure an adequate supply of fresh air, open a window on the side of the vehicle that is not
facing into the wind.
Have your vehicle winterproofed at a qualified
specialist workshop at the onset of winter.
You should drive particularly carefully on slip-
pery road surfaces. Avoid sudden acceleration,
steering and braking manoeuvres. If the vehicle threatens to skid or cannot be
stopped when moving at low speed:
X Vehicles with manual transmission: shift
to neutral.
X Vehicles with automatic transmission:
shift the transmission to position
N.
X Try to bring the vehicle under control by using
corrective steering.
The outside temperature indicator is not
designed to serve as an ice-warning device and
is therefore unsuitable for that purpose.
Changes in the outside temperature are dis-
played after a short delay.
Indicated temperatures just above the freezing
point do not guarantee that the road surface is
free of ice. The road may still be icy, especially in wooded areas or on bridges. The vehicle could
skid if you fail to adapt your driving style. Always
adapt your driving style and drive at a speed to
suit the prevailing weather conditions.
You should pay special attention to road condi-
tions when temperatures are around freezing
point.
Further information on driving with snow chains (Y page 324).
Further information on driving with summer
tyres (Y page 323).
Observe the notes in the "Winter operation" sec-
tion (Y page 323). Driving systems
Mercedes-Benz Intelligent Drive
Mercedes-Benz Intelligent Drive stands for inno-
vative driver assistance and safety systems
which enhance comfort and support the driver in critical situations. With these intelligent co-ordi-
nated systems Mercedes-Benz has set a mile-
stone on the path towards autonomous driving.
Mercedes-Benz Intelligent Drive embraces all
elements of active and passive safety in one well
thought-out system – for the safety of the vehi-
cle occupants and that of other road users.
Further information on driving safety systems
(Y page 61). 162
Driving systemsDriving and parking
Page 187 of 349
R
snowfall or heavy rain may lead to a parking
space being measured inaccurately.
R pay attention to the PARKTRONIC
(Y page 181) warning messages during the
parking procedure.
R you can intervene in the steering procedure to
correct it at any time. Active Parking Assist
will then be cancelled.
R when transporting a load which protrudes
from your vehicle, you should not use Active
Parking Assist.
R never use Active Parking Assist when snow
chains are fitted.
R make sure that the tyre pressures are always
correct. This has a direct influence on the
parking characteristics of the vehicle.
Use Active Parking Assist for parking spaces
that are:
R parallel or at right angles to the direction of
travel
R on straight roads, not bends.
R on the same level as the road, e.g. not on the
pavement.
Detecting parking spaces Objects located above the height range of Active
Parking Assist will not be detected when the
parking space is measured. These are not taken into account when the parking procedure is cal-culated, e.g. overhanging loads, tail sections or
loading ramps of goods vehicles. G
WARNING
If there are objects above the detection range:
R Active Park Assist may steer too early
R the vehicle may not stop in front of these
objects
This could cause a collision. There is a risk of
an accident.
If objects are located above the detection
range, stop and deactivate Active Parking
Assist.
For further information on the detection range
(Y page 180). Active Parking Assist does not assist you park-
ing in spaces at right angles to the direction of
travel if:
R two parking spaces are located directly next
to one another
R the parking space is directly next to a low
obstacle such as a low kerb
R you forward park
Active Parking Assist does not assist you park-
ing in spaces that are parallel or at right angles
to the direction of travel if:
R the parking space is on a kerb
R the system reads the parking space as being
blocked, for example by foliage or grass pav-
ing blocks
R the area is too small for the vehicle to
manoeuvre into
R the parking space is bordered by an obstacle,
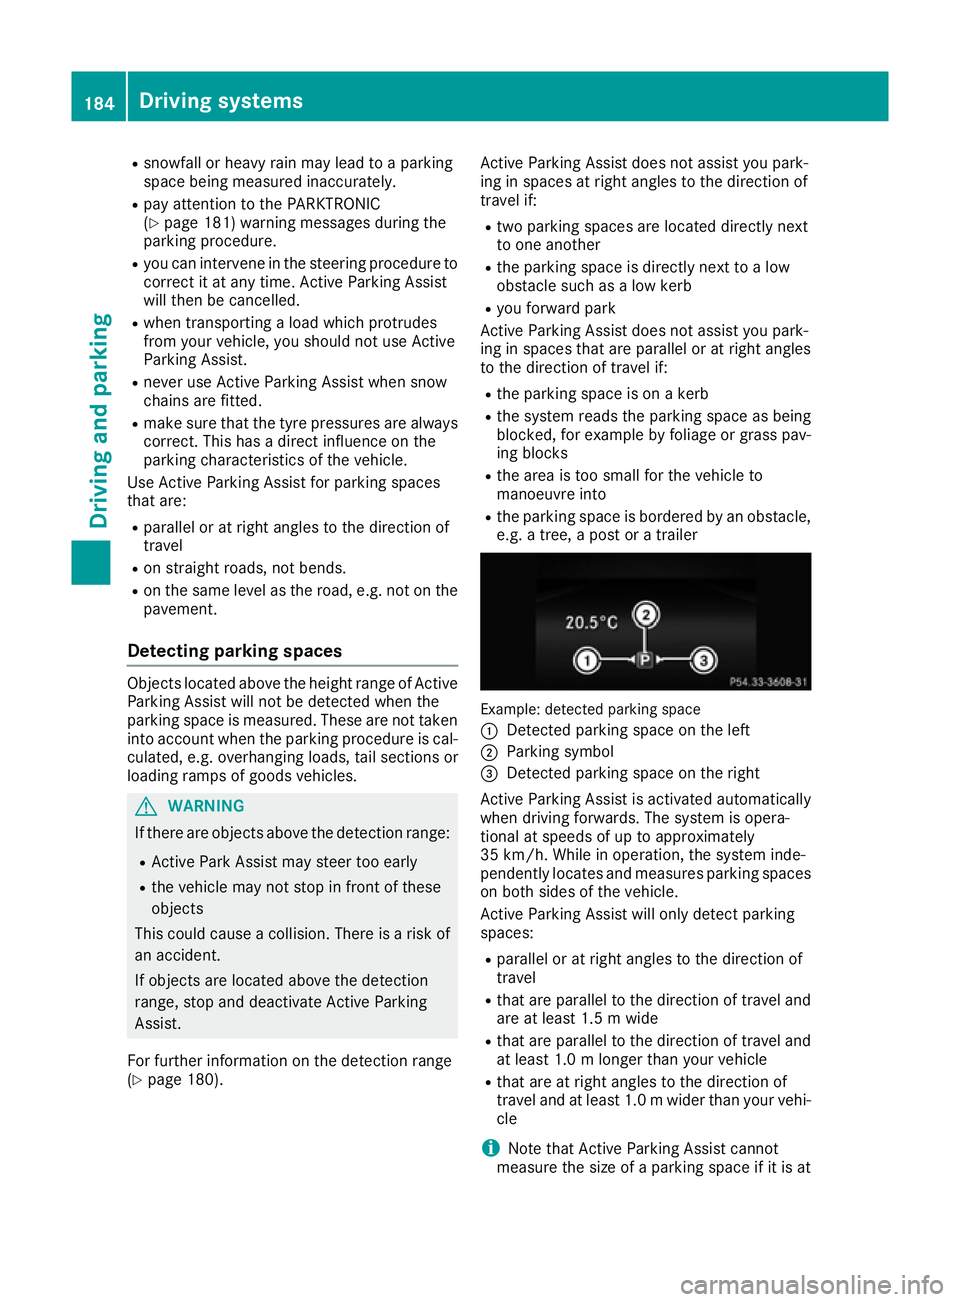
e.g. a tree, a post or a trailer Example: detected parking space
:
Detected parking space on the left
; Parking symbol
= Detected parking space on the right
Active Parking Assist is activated automatically
when driving forwards. The system is opera-
tional at speeds of up to approximately
35 km/h. While in operation, the system inde-
pendently locates and measures parking spaces on both sides of the vehicle.
Active Parking Assist will only detect parking
spaces:
R parallel or at right angles to the direction of
travel
R that are parallel to the direction of travel and
are at least 1.5 m wide
R that are parallel to the direction of travel and
at least 1.0 m longer than your vehicle
R that are at right angles to the direction of
travel and at least 1.0 mwider than your vehi-
cle
i Note that Active Parking Assist cannot
measure the size of a parking space if it is at 184
Driving systemsDriving and parking
Page 224 of 349
The assistance graphic shows you the status
and further information on the following driv-
ing systems or driving safety systems:
R Traffic Sign Assist (Y page 197)
R DISTRONIC PLUS (Y page 168)
R PRE-SAFE ®
Brake (Y page 69)
R COLLISION PREVENTION ASSIST PLUS
(Y page 64)
R ATTENTION ASSIST (Y page 196)
R Lane Keeping Assist (Y page 202)
R Active Lane Keeping Assist (Y page 206)
X Press :to display the ATTENTION ASSIST
assessment.
Traffic Sign Assist You can activate or deactivate the warning func-
tion of Traffic Sign Assist in the Traffic
Traffic Sign Sign
Assist
Assist menu. When the message function is
activated, detected traffic signs and information appear in the multifunction display for five sec-
onds.
X Press the =or; button on the steering
wheel to select the Assist.
Assist.menu.
X Using 9or:, select Traffic Sign
Traffic Sign
Assist
Assist.
X Press ato confirm.
The current selection appears.
X To activate/deactivate the message func-
tion: press aagain.
Further information about Traffic Sign Assist
(Y page 197).
Deactivating/activating ESP ®i
Observe the important safety notes on ESP ®
(Y page 67). G
WARNING
If you deactivate ESP ®
, ESP ®
no longer sta-
bilises the vehicle. There is an increased risk
of skidding and an accident.
Only deactivate ESP ®
in the situations descri-
bed in the following.
It may be best to deactivate ESP ®
in the follow-
ing situations:
R when using snow chains
R in deep snow
R on sand or gravel For further information about ESP
®
, see
(Y page 67).
X Start the engine.
X Press the =or; button on the steering
wheel to select the Assist.
Assist. menu.
X Press 9or: to select ESP ESP.
X Press ato confirm.
The current selection appears.
X To activate/deactivate: pressaagain.
ESP ®
is deactivated if the åwarning lamp in
the instrument cluster lights up continuously
when the engine is running.
If the ÷ warning lamp and the åwarning
lamp are lit continuously, ESP ®
is not available
due to a malfunction.
Observe the information on warning lamps
(Y page 256).
Observe the information on display messages
(Y page 230).
Activating/deactivating PRE-SAFE ®
Brake PRE
‑SAFE ®
Brake is only available for vehicles
with the Driving Assistance package.
X Press the =or; button on the steering
wheel to select the Assist. Assist.menu.
X Press the 9or: button to select PRE-
PRE-
SAFE Brake
SAFE Brake.
X Press ato confirm.
The current selection appears.
X To activate/deactivate: press theabut-
ton again.
When PRE-SAFE ®
Brake is deactivated, the
assistance graphic shows the æsymbol in
the multifunction display.
For more information on PRE ‑SAFE®
Brake, see
(Y page 69).
Activating/deactivating COLLISION
PREVENTION ASSIST PLUS X
Press the =or; button on the steering
wheel to select the Assist. Assist.menu.
X Press the 9or: button to select Col‐
Col‐
lision Prevent.
lision Prevent.. Menus and submenus
221On-board computer and displays Z
Page 327 of 349
When you have fitted the M+S tyres:
X Check the tyre pressures (Y page 324).
X Restart the tyre pressure loss warning system
(Y page 326).
X Restart the tyre pressure monitor
(Y page 328).
Further information on driving with the emer-
gency spare wheel (Y page 333).Snow chains
G
WARNING
If you have fitted snow chains to the front
wheels, they may scrape against the vehicle
body or chassis components. This could
cause damage to the vehicle or the tyres.
There is a risk of an accident.
To avoid hazardous situations:
R never fit snow chains on the front wheels
R fit snow chains to the rear wheels in pairs.
! Vehicles with steel wheels:
if you fit snow
chains on steel wheels, you may damage the
hub caps. Remove the hub caps from the rel- evant wheels before fitting the snow chains.
For safety reasons, Mercedes-Benz recom-
mends that you only use snow chains that have been specifically approved for your vehicle by
Mercedes-Benz, or that are of a corresponding
standard of quality. For more information,
please contact a qualified specialist workshop.
If you intend to fit snow chains, please bear the
following points in mind:
R snow chains cannot be fitted to all wheel-tyre
combinations. Permissible wheel-tyre combi-
nations (Y page 333).
R only use snow chains if the road surface is
completely snow-covered. Remove the snow
chains as soon as possible when you come to
a road that is not snow-covered.
R local regulations may restrict the use of snow
chains. Observe the appropriate regulations if you wish to fit snow chains.
R do not exceed the maximum permissible
speed of 50 km/h.
i When pulling away with snow chains fitted,
you can deactivate ESP ®
(Y page 221). This
way you can allow the wheels to spin in a con- trolled manner, achieving increased driving
force (cutting action).
Further information on driving with the emer-
gency spare wheel (Y page 333). Tyre pressure
Tyre pressure specifications
G
WARNING
Underinflated or overinflated tyres pose the
following risks:
R the tyres may burst, especially as the load
and vehicle speed increase.
R the tyres may wear excessively and/or
unevenly, which may greatly impair tyre
traction.
R the driving characteristics, as well as steer-
ing and braking, may be greatly impaired.
There is a risk of an accident.
Observe the recommended tyre pressure and check the tyre pressure of all the tyres includ-
ing the spare wheel:
R at least every two weeks
R when the load changes
R before embarking on a longer journey
R for changed operating conditions, e.g. off-
road driving
If necessary, correct the tyre pressure. G
WARNING
If you fit unsuitable accessories onto tyre
valves, the tyre valves may be overloaded and malfunction, which can cause tyre pressure
loss. Due to their design, retrofitted tyre pres-
sure monitors keep the tyre valve open. This
can also result in tyre pressure loss. There is a risk of accident.
Only screw standard valve caps or valve caps
specifically provided by Mercedes-Benz for
your vehicle onto the tyre valve. G
WARNING
If the tyre pressure drops repeatedly, the
wheel, valve or tyre may be damaged. Tyre 324
Tyre pressureWheels and tyres
Page 329 of 349
the
Serv.
Serv. menu of the multifunction display.
Information on the message display can be
found in the "Restarting the tyre pressure loss
warning system" section (Y page 326).
Important safety notes The tyre pressure warning system does not warn
you of an incorrectly set tyre pressure. Observe the notes on the recommended tyre pressure
(Y page 324).
The tyre pressure loss warning does not replace the need to regularly check the tyre pressures.
An even loss of pressure on several tyres at the
same time cannot be detected by the tyre pres-
sure loss warning system.
The tyre pressure monitor is not able to warn
you of a sudden loss of pressure, e.g. if the tyre is penetrated by a foreign object. In the event of
a sudden loss of pressure, bring the vehicle to a halt by braking carefully. Avoid abrupt steering
manoeuvres.
The function of the tyre pressure loss warning
system is limited or delayed if:
R snow chains are fitted to your vehicle's tyres.
R road conditions are wintry.
R you are driving on sand or gravel.
R you adopt a very sporty driving style (corner-
ing at high speeds or driving with high rates of
acceleration).
R you are towing a very heavy or large trailer.
R you are driving with a heavy load (in the vehi-
cle or on the roof).
Restarting the tyre pressure loss warn-
ing system Restart the tyre pressure loss warning system if
you have:
R changed the tyre pressure
R changed the wheels or tyres
R fitted new wheels or tyres
X Before restarting, make sure that the tyre
pressures are set properly on all four tyres for the respective operating conditions. The rec-
ommended tyre pressures can be found in the
tyre pressure table on the fuel filler flap.
The tyre pressure loss warning system can
only give reliable warnings if you have set the correct tyre pressure. If an incorrect tyre pressure is set, these incorrect values will be
monitored.
X Observe the notes in the section on tyre pres-
sures (Y page 324).
X Make sure that the key is in position 2in the
ignition lock (Y page 139).
X Press the =or; button on the steering
wheel to select the Serv.
Serv. menu.
X Press the 9or: button on the steering
wheel to select the Tyre pressure
Tyre pressure menu.
X Press the abutton.
The Run Flat Indicator active Run Flat Indicator active
Restart with OK
Restart with OK message appears in the
multifunction display.
If you wish to confirm the restart: X Press the abutton.
The Tyre
Tyre press.
press. now
nowOK?
OK?message appears
in the multifunction display.
X Press the 9or: button to select Yes
Yes .
X Press the abutton.
The Run Flat Indicator restarted
Run Flat Indicator restarted mes-
sage appears in the multifunction display.
After a teach-in period, the tyre pressure loss warning system will monitor the set tyre pres-
sures of all four tyres.
If you wish to cancel the restart: X Press the %button.
or X When the Tyre press. now OK?
Tyre press. now OK? message
appears, press the 9or: button to
select Cancel
Cancel .
X Press the abutton.
The tyre pressure values stored at the last
restart will continue to be monitored. Tyre pressure monitor
General notes If a tyre pressure monitor system is fitted, the
vehicle's wheels have sensors fitted that moni-
tor the tyre pressures in all four tyres. The tyre
pressure monitor warns you if the pressure
drops in one or more of the tyres. The tyre pres- sure monitor only functions if the corresponding
sensors are fitted to all wheels.
Information on tyre pressures is shown in the
multifunction display. After a few minutes of
driving, the current tyre pressure of each tyre is 326
Tyre pressureWheels and tyres