navigation system MERCEDES-BENZ E-Class COUPE 2010 C212 Comand Manual
[x] Cancel search | Manufacturer: MERCEDES-BENZ, Model Year: 2010, Model line: E-Class COUPE, Model: MERCEDES-BENZ E-Class COUPE 2010 C212Pages: 224, PDF Size: 7.4 MB
Page 87 of 224
As soon as the vehicle location is found again,
route guidance continues in the usual
manner.
Navigation Announcements
GWarning
Navigation announcements are intended to
direct you while driving without diverting your
attention from the road and driving.
Please always use this feature instead of
consulting the map display for directions.
Consulting the symbols or map display for
directions may cause you to divert your
attention from driving and increase your risk
of an accident.
i During an active telephone call, the
navigation announcements are
suppressed.
If you have missed an announcement, you can
call up the current announcement at any
time.
XTo request current announcement: In
map view with the menu system
( Y page 54) displayed, select RPT.XTo switch off navigation
announcements: During the
announcement, press the B button.
You will briefly see the message: The
driving instructions have been
muted .XTo switch navigation announcements
back on manually: In map view with the
menu system (Y page 54) displayed, select
RPT .
or
XStart a new route calculation ( Y page 70).
or
XIf COMAND is switched on again or the
engine is restarted.XTo set the volume of the
announcements: Set the volume during
the automatic announcement ( Y page 35).
or
XCall up an announcement manually by
selecting RPT in map view with the menu
system displayed.XAdjust the volume.
Audio Fadeout
The Audio Fadeout function, if activated,
lowers the volume of the current audio source
when a navigation announcement is issued.
As soon as the navigation announcement has
ended, the audio source will be played with
the previous volume ( Y page 60).
Canceling Route Guidance
XIn the map display with the menu system
displayed ( Y page 54) select Destination
£ Cancel Route Guidance .
Resuming Route Guidance
XSelect Destination £Continue Route
Guidance in map view with the menu
system displayed.
COMAND calculates the route.
Detour Function
i The Detour function blocks a route
segment ahead. You can set the length of
the block. COMAND calculates a detour
route if possible.
XSelect Route£Detour in map view with
the menu system displayed.XTo set the length of block: Select
Longer or Shorter repeatedly until the
required length is set.
The blocked segment is highlighted in red/
white on the map. Shown at the top of the
display is the length of the blockedRoute Guidance85NavigationZ
Page 88 of 224
segment and the route segment to which
the block goes.XTo cancel the function: Select Back.XTo start route calculation: Select Start,
see also ( Y page 70).XTo delete block: In map view with the
menu system displayed, select Route
£ Detour £Delete .
Alternative Route
i You can have other routes calculated for
the original route guidance using the
Alternative Route function.
XIn the map display with the menu system
displayed ( Y page 54) select Route
£ Alternative Route .
The display is split into two halves. On the
left is the map, which displays one or more
alternative routes between the start and
the destination. The current route is
highlighted in dark blue, other alternative
routes are light blue (day mode). If the
display is in night mode, the representation
is inverse.
The right side of the display shows
information on the active alternative route,
e.g. length of the segment and the
estimated time of arrival.XTo select next or previous alternative
route: Select Next or Previous .
The selected route is now highlighted in
dark blue.XTo return to the original route guidance:
Select Back.XTo start route guidance with the
selected alternative route guidance:
Select Start.
Route Browser
i The route browser provides an overview
of the route. You can move along the route
segment by segment using the route
browser and view information and details
about the route segments.XIn the map display with the menu system
displayed, select Route£Route
Browser .
The route browser is in the display.
The top of the display shows information on
the highlighted route segment, e.g. the
road name or number and the segment
length of the road to be driven.
The highlighted route segment is identified
on the map by its white color and red edge.XTo display next or previous route
segment: Select Next or Previous .XTo enlarge or reduce the map display:
Select ; or :.XTo close route browser: Select Back.
Displaying Destination Information
XIn the map display with the menu system
( Y page 54) shown, select Route
£ Destination Information .
The destination information is given in the
display.
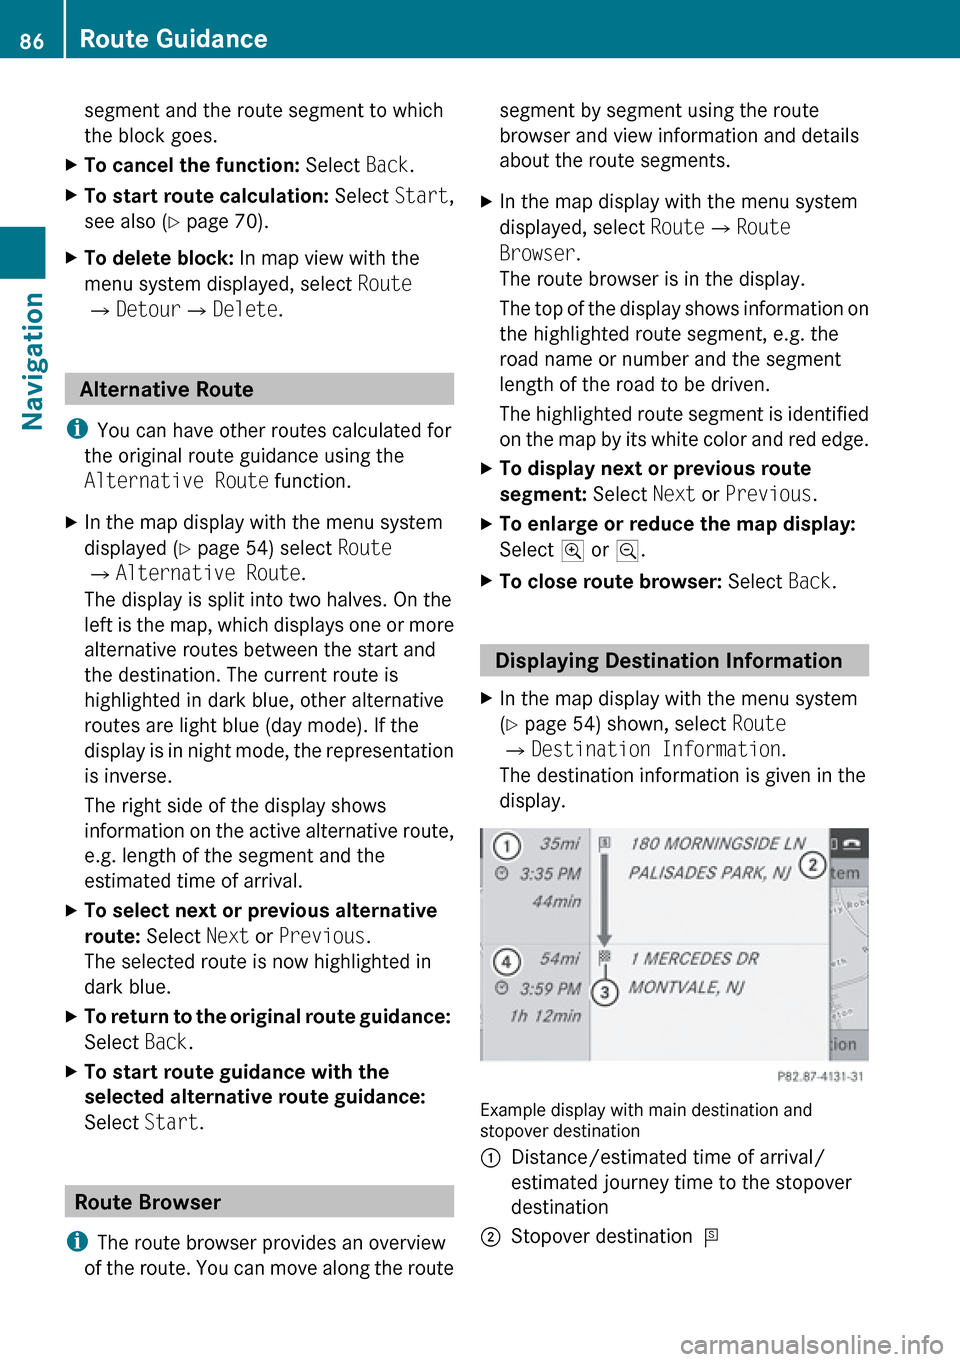
Example display with main destination and
stopover destination
1Distance/estimated time of arrival/
estimated journey time to the stopover
destination2Stopover destination =86Route GuidanceNavigation
Page 89 of 224
3Main destination4Distance/estimated time of arrival/
estimated journey time to the main
destination <
i
When calculating the estimated time of
arrival, COMAND uses the time set on the
COMAND as its basis. For this reason, the
time on COMAND must be set correctly
( Y page 41). The calculation of the
estimated time of arrival does not
specifically take into consideration
whether it is summer time or standard time
at the destination. It is not taken into
consideration whether or not the
destination is in a different time zone. The
distance to the destination, the estimated
time of arrival and the estimated remaining
journey time 1, 4 are not displayed until
the route calculation is complete.
XTo close the destination information:
Slide om p.
or
XPress the k button.
Traffic Messages
i Optional satellite radio equipment and a
subscription to SIRIUS XM Satellite Radio
service provider are required for the
satellite radio reception referred to here.
You can find more information on SatRadio
in chapter “Satellite Radio” ( Y page 127).
COMAND can receive and incorporate traffic
messages via satellite radio into the
navigation system. Traffic report messages
and map symbols can then be viewed in the
COMAND display.
Real-Time Traffic Notifications in the
Map
COMAND can display certain traffic events in
the map. The notifications are shown in the
map scale range from 0.05 mi to 20 mi.
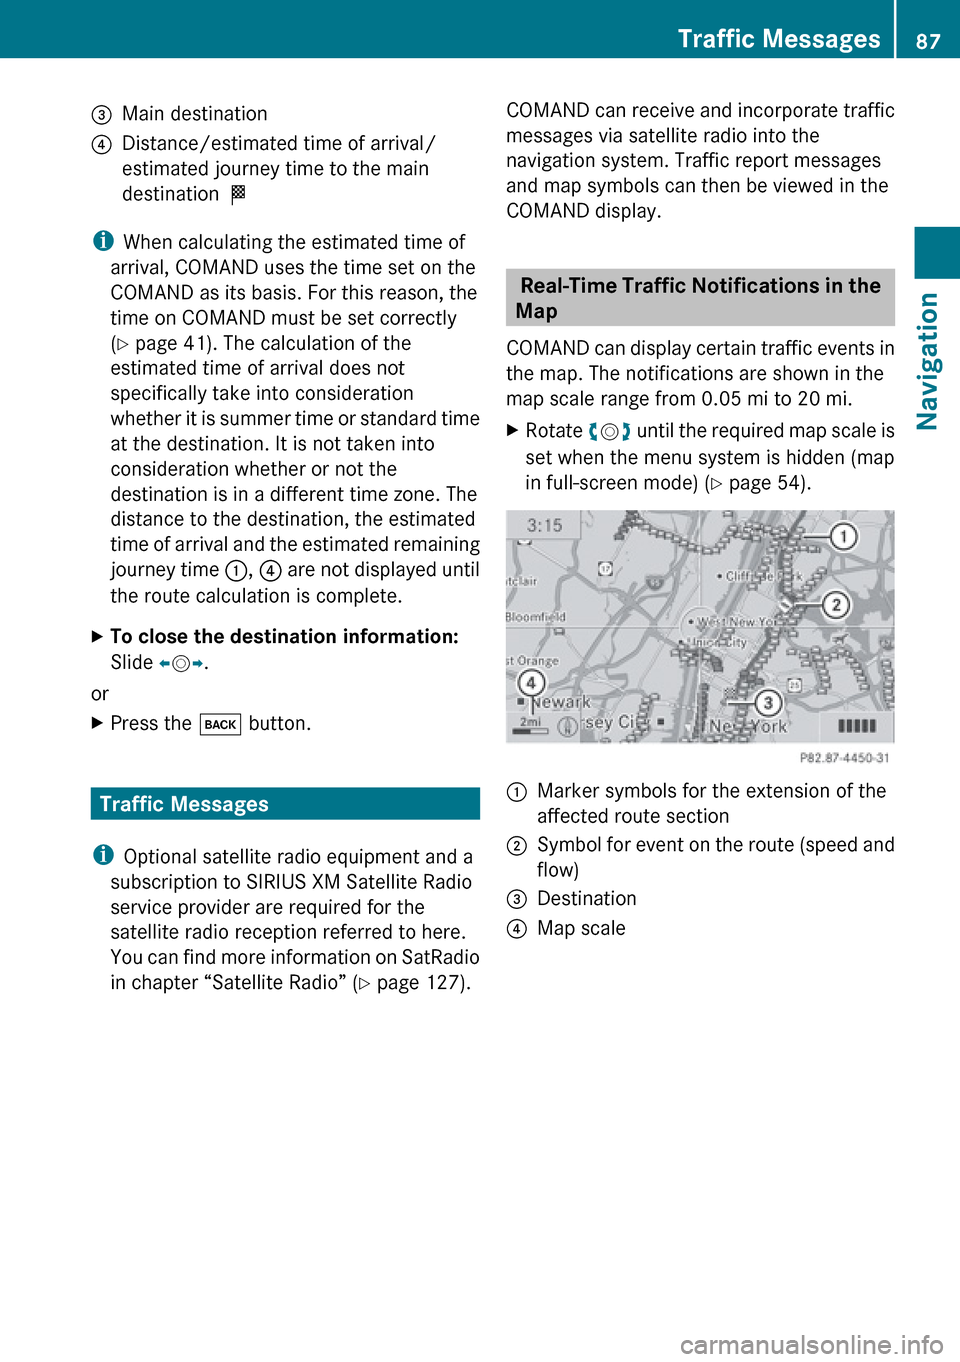
XRotate ym z until the required map scale is
set when the menu system is hidden (map
in full-screen mode) ( Y page 54).1Marker symbols for the extension of the
affected route section2Symbol for event on the route (speed and
flow)3Destination4Map scaleTraffic Messages87NavigationZ
Page 91 of 224
Displaying Real-Time Traffic ReportsXIf necessary, switch to navigation mode
and show the menu system ( Y page 54).XSelect Traffic .
If you see a dialogue box displaying the
message No Traffic Messages ,
this either means:
R Messages were not yet received
R there are no messages available
XTo cancel the search: Select Cancel .XTo close the message: Select OK
If there are traffic reports, you will see a list.
The content of the list varies depending on
whether route guidance is active or not.
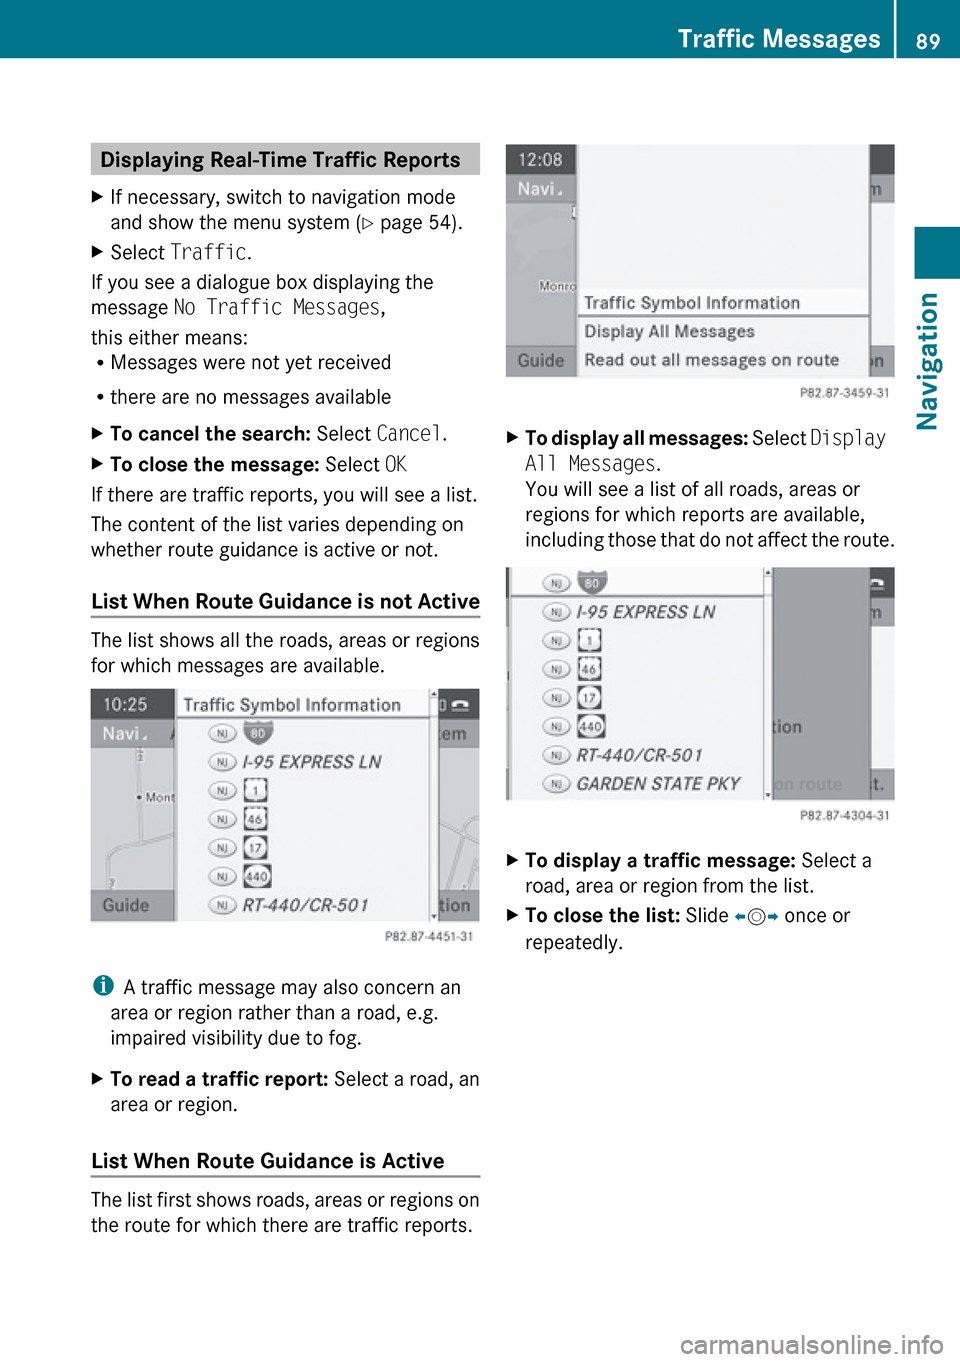
List When Route Guidance is not Active
The list shows all the roads, areas or regions
for which messages are available.
i A traffic message may also concern an
area or region rather than a road, e.g.
impaired visibility due to fog.
XTo read a traffic report: Select a road, an
area or region.
List When Route Guidance is Active
The list first shows roads, areas or regions on
the route for which there are traffic reports.
XTo display all messages: Select Display
All Messages .
You will see a list of all roads, areas or
regions for which reports are available,
including those that do not affect the route.XTo display a traffic message: Select a
road, area or region from the list.XTo close the list: Slide om p once or
repeatedly.Traffic Messages89NavigationZ
Page 92 of 224
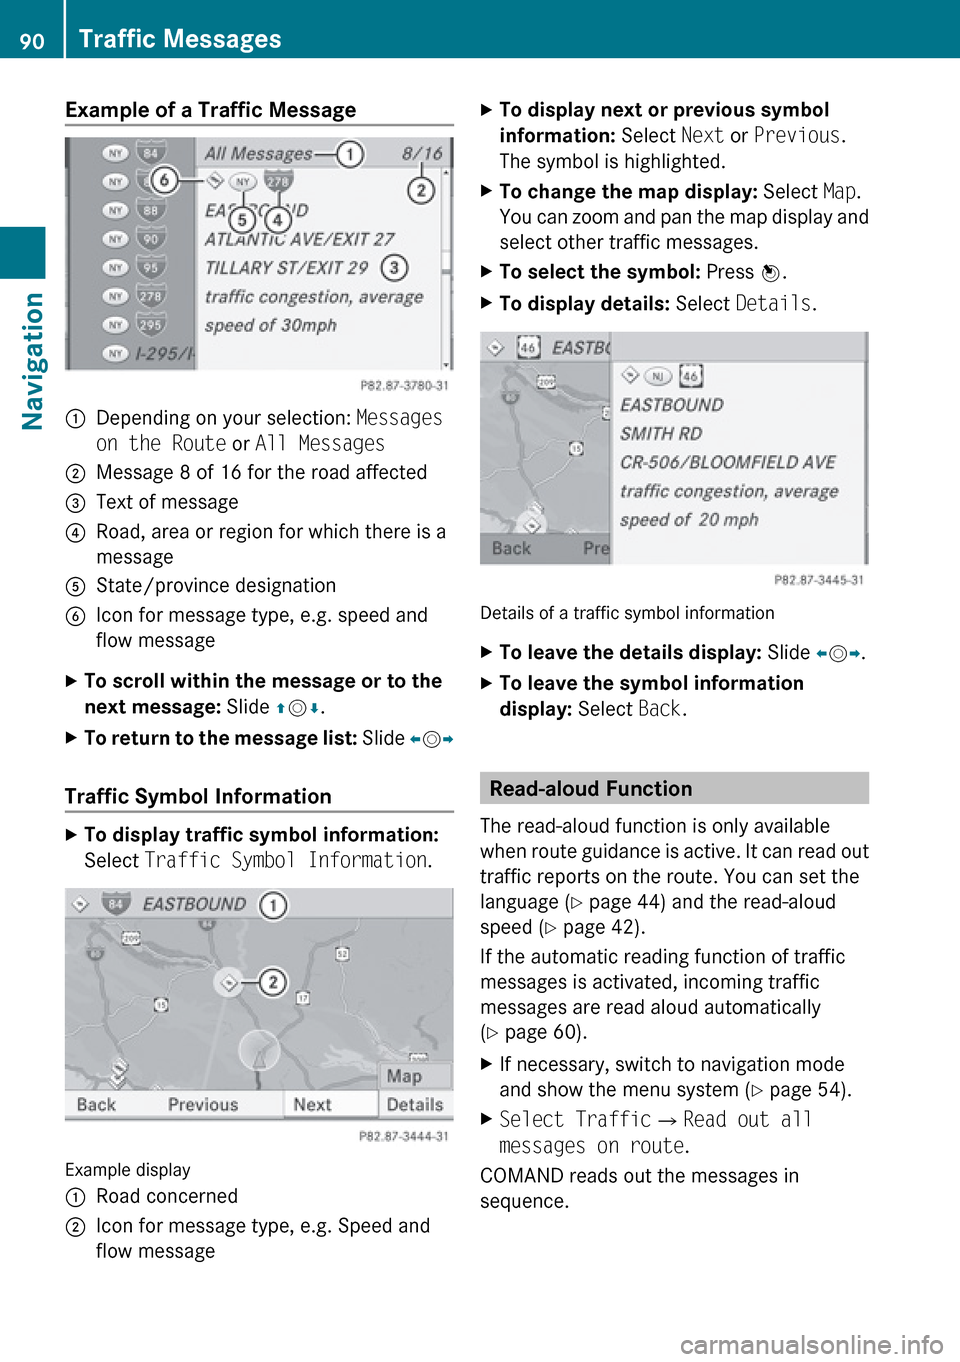
Example of a Traffic Message 1Depending on your selection: Messages
on the Route or All Messages2Message 8 of 16 for the road affected3Text of message4Road, area or region for which there is a
message5State/province designation6Icon for message type, e.g. speed and
flow messageXTo scroll within the message or to the
next message: Slide qm r.XTo return to the message list: Slide om p
Traffic Symbol Information
XTo display traffic symbol information:
Select Traffic Symbol Information .
Example display
1Road concerned2Icon for message type, e.g. Speed and
flow messageXTo display next or previous symbol
information: Select Next or Previous .
The symbol is highlighted.XTo change the map display: Select Map.
You can zoom and pan the map display and
select other traffic messages.XTo select the symbol: Press n.XTo display details: Select Details .
Details of a traffic symbol information
XTo leave the details display: Slide om p.XTo leave the symbol information
display: Select Back.
Read-aloud Function
The read-aloud function is only available
when route guidance is active. It can read out
traffic reports on the route. You can set the
language ( Y page 44) and the read-aloud
speed ( Y page 42).
If the automatic reading function of traffic
messages is activated, incoming traffic
messages are read aloud automatically
( Y page 60).
XIf necessary, switch to navigation mode
and show the menu system ( Y page 54).XSelect Traffic £Read out all
messages on route .
COMAND reads out the messages in
sequence.
90Traffic MessagesNavigation
Page 93 of 224
iThe Messages on the Route menu item
has no function if there are no messages
relating to the route.XTo cancel read-out of current message:
Select Cancel Read-aloud Function .
or
XPress the F button.
COMAND reads the current message aloud
and then ends the read-aloud function.
Dynamic Rerouting
COMAND can recalculate the route by taking
into account traffic messages received along
the route.
You can set the options for dynamic rerouting
in the NAVI menu ( Y page 55).
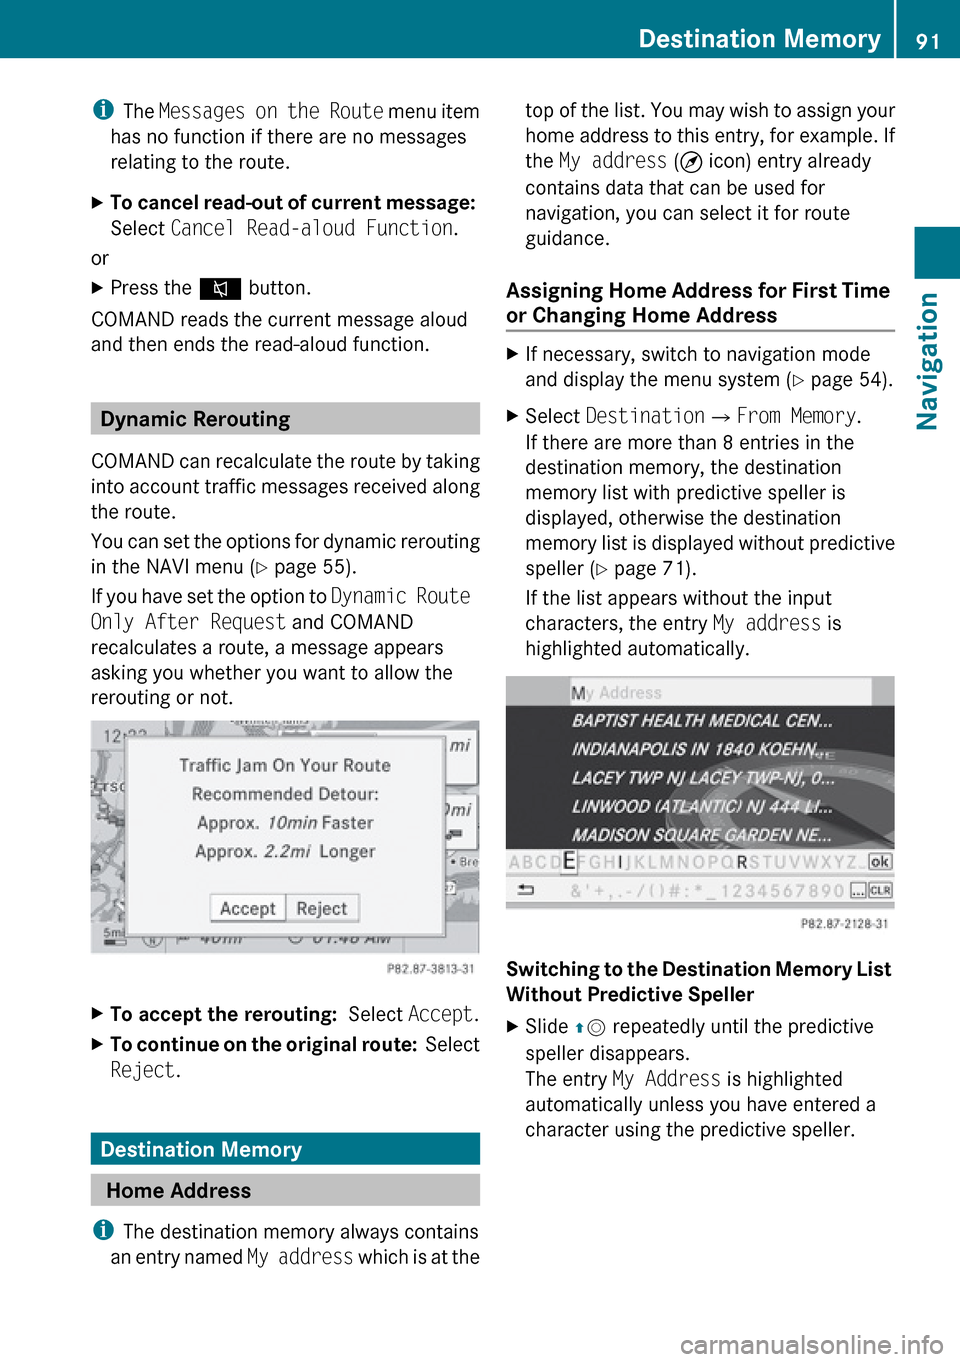
If you have set the option to Dynamic Route
Only After Request and COMAND
recalculates a route, a message appears
asking you whether you want to allow the
rerouting or not.
XTo accept the rerouting: Select Accept.XTo continue on the original route: Select
Reject .
Destination Memory
Home Address
i The destination memory always contains
an entry named My address which is at the
top of the list. You may wish to assign your
home address to this entry, for example. If
the My address (¤ icon) entry already
contains data that can be used for
navigation, you can select it for route
guidance.
Assigning Home Address for First Time
or Changing Home Address XIf necessary, switch to navigation mode
and display the menu system ( Y page 54).XSelect Destination £From Memory .
If there are more than 8 entries in the
destination memory, the destination
memory list with predictive speller is
displayed, otherwise the destination
memory list is displayed without predictive
speller ( Y page 71).
If the list appears without the input
characters, the entry My address is
highlighted automatically.
Switching to the Destination Memory List
Without Predictive Speller
XSlide qm repeatedly until the predictive
speller disappears.
The entry My Address is highlighted
automatically unless you have entered a
character using the predictive speller.Destination Memory91NavigationZ
Page 95 of 224
guidance. If not, then first assign a
destination to this entry ( Y page 91).XIf necessary, switch to navigation mode
and display the menu system ( Y page 54).XSelect Destination £From Memory .
You will see a list with or without predictive
speller depending on how many entries
exist in the address book.XDestination memory with predictive
speller: Slide qm repeatedly until the list
appears without the predictive speller.
or
XSelect d at the bottom right in the
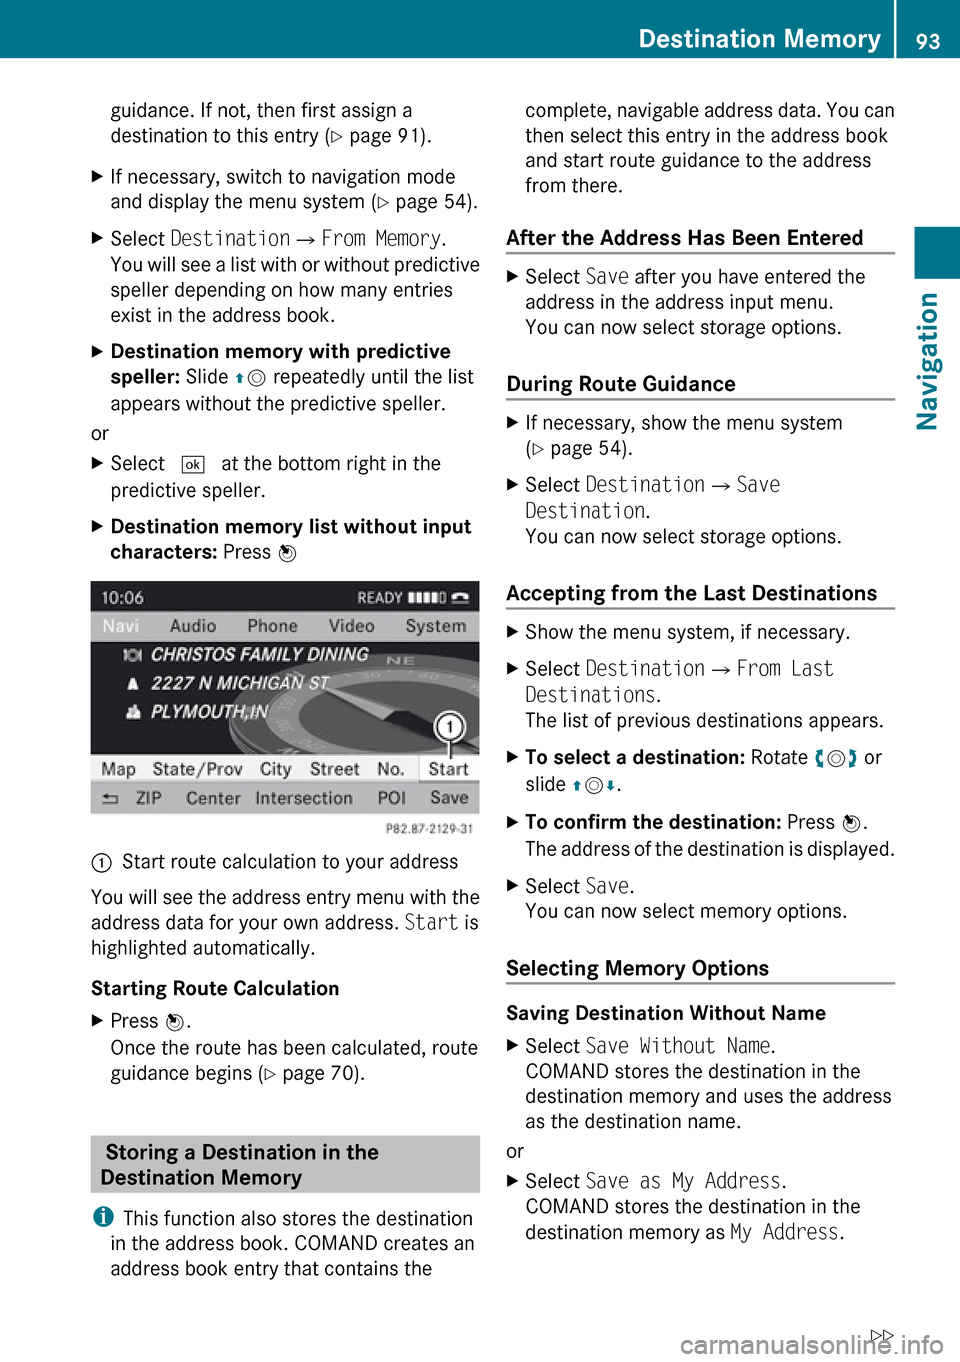
predictive speller.XDestination memory list without input
characters: Press n1Start route calculation to your address
You will see the address entry menu with the
address data for your own address. Start is
highlighted automatically.
Starting Route Calculation
XPress n.
Once the route has been calculated, route
guidance begins ( Y page 70).
Storing a Destination in the
Destination Memory
i This function also stores the destination
in the address book. COMAND creates an
address book entry that contains the
complete, navigable address data. You can
then select this entry in the address book
and start route guidance to the address
from there.
After the Address Has Been EnteredXSelect Save after you have entered the
address in the address input menu.
You can now select storage options.
During Route Guidance
XIf necessary, show the menu system
( Y page 54).XSelect Destination £Save
Destination .
You can now select storage options.
Accepting from the Last Destinations
XShow the menu system, if necessary.XSelect Destination £From Last
Destinations .
The list of previous destinations appears.XTo select a destination: Rotate ym z or
slide qm r.XTo confirm the destination: Press n.
The address of the destination is displayed.XSelect Save.
You can now select memory options.
Selecting Memory Options
Saving Destination Without Name
XSelect Save Without Name .
COMAND stores the destination in the
destination memory and uses the address
as the destination name.
or
XSelect Save as My Address .
COMAND stores the destination in the
destination memory as My Address.Destination Memory93NavigationZ
Page 96 of 224
If the selected address book entry already
contains address data that can be used for
navigation ( ¤ icon), a prompt will appear
asking whether you wish to overwrite the
existing data.XSelect Yes or No.
After selecting Yes, the Saving
Procedure Successful message
appears; selecting No cancels the
procedure.
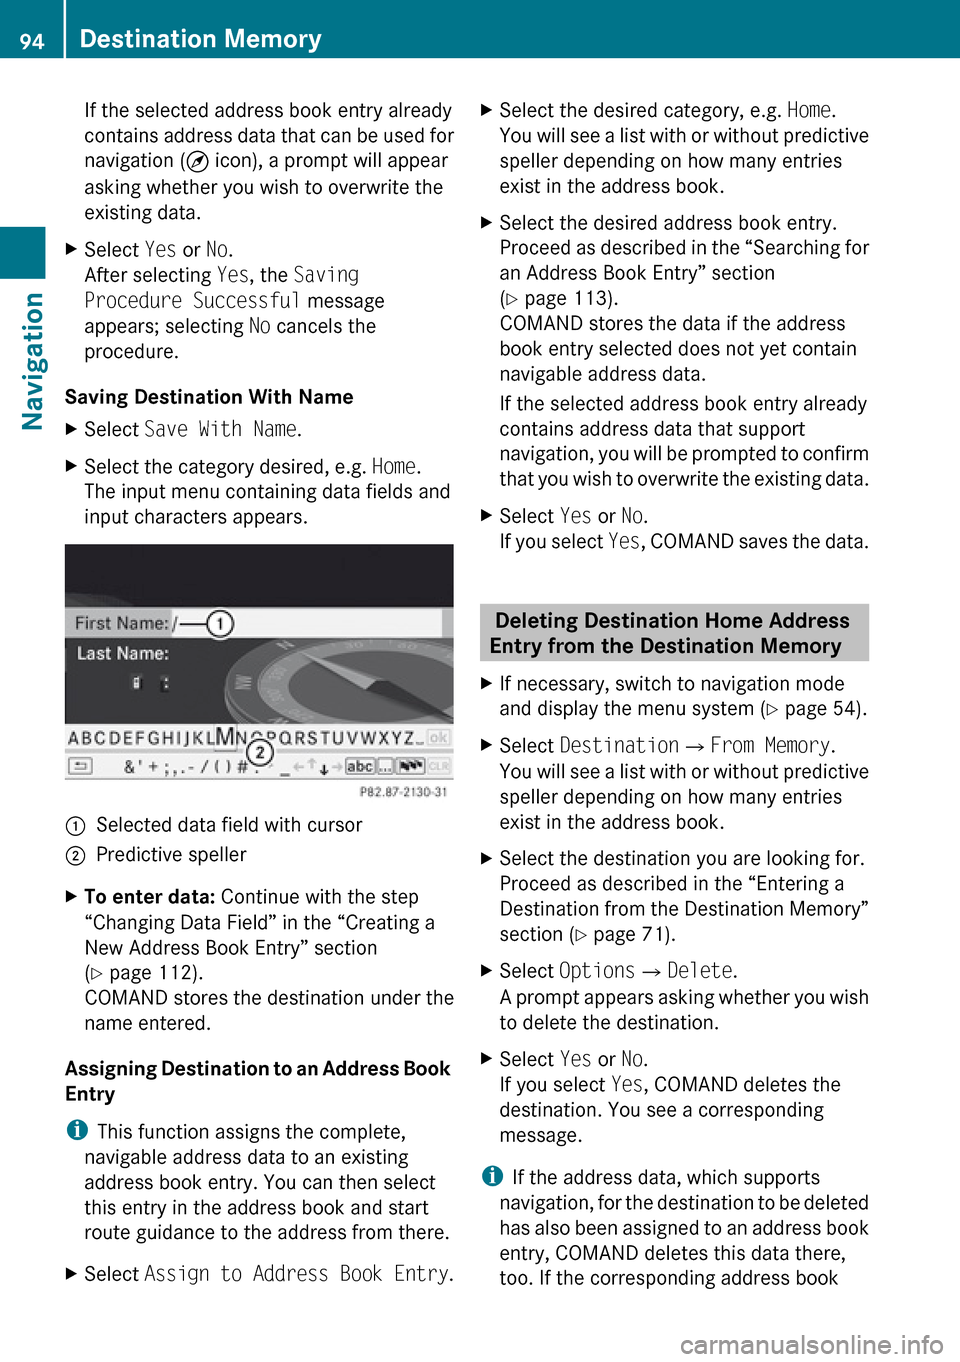
Saving Destination With Name
XSelect Save With Name .XSelect the category desired, e.g. Home.
The input menu containing data fields and
input characters appears.1Selected data field with cursor2Predictive spellerXTo enter data: Continue with the step
“Changing Data Field” in the “Creating a
New Address Book Entry” section
( Y page 112).
COMAND stores the destination under the
name entered.
Assigning Destination to an Address Book
Entry
i This function assigns the complete,
navigable address data to an existing
address book entry. You can then select
this entry in the address book and start
route guidance to the address from there.
XSelect Assign to Address Book Entry .XSelect the desired category, e.g. Home.
You will see a list with or without predictive
speller depending on how many entries
exist in the address book.XSelect the desired address book entry.
Proceed as described in the “Searching for
an Address Book Entry” section
( Y page 113).
COMAND stores the data if the address
book entry selected does not yet contain
navigable address data.
If the selected address book entry already
contains address data that support
navigation, you will be prompted to confirm
that you wish to overwrite the existing data.XSelect Yes or No.
If you select Yes, COMAND saves the data.
Deleting Destination Home Address
Entry from the Destination Memory
XIf necessary, switch to navigation mode
and display the menu system ( Y page 54).XSelect Destination £From Memory .
You will see a list with or without predictive
speller depending on how many entries
exist in the address book.XSelect the destination you are looking for.
Proceed as described in the “Entering a
Destination from the Destination Memory”
section ( Y page 71).XSelect Options £Delete .
A prompt appears asking whether you wish
to delete the destination.XSelect Yes or No.
If you select Yes, COMAND deletes the
destination. You see a corresponding
message.
i If the address data, which supports
navigation, for the destination to be deleted
has also been assigned to an address book
entry, COMAND deletes this data there,
too. If the corresponding address book
94Destination MemoryNavigation
Page 97 of 224
entry does not contain any other data, e.g.
phone numbers, COMAND deletes the
entire address book entry.
Last Destinations
i COMAND automatically saves the last
destinations used for the last route
calculation. If the memory is full, COMAND
deletes the oldest destination. You can also
save a destination from the last
destinations to the destination memory.
Here it is saved permanently.
Saving a Destination Permanently in
the Destination Memory
XProceed as described in the “Accepting
from the Last Destinations” section
( Y page 72).
Saving the Vehicle Position in the List
of Last Destinations
XIf necessary, switch to navigation mode
and display the menu system ( Y page 54).XSelect Position £Save Vehicle
Position .
COMAND saves the current vehicle
position as a destination in the list of last
destinations.
Saving the Crosshair Position in the
List of Last Destinations
i A crosshair appears on the map if you
have moved the map manually. You can
store the crosshair position as a
destination in the list of last destinations.
XIf necessary, display the menu system:
Press n.XSelect Position £Save Crosshair
Position .
COMAND saves the crosshair position as a
destination in the list of last destinations.
Deleting One of the Last Destinations
XIf necessary, switch to navigation mode
and display the menu system ( Y page 54).XSelect Destination £From Last
Destinations .
The list of last destinations appears.XSelect the desired destination.XSelect Options £Delete .
A query appears.XSelect Yes or No.
If you select Yes, COMAND deletes the
destination. You see a corresponding
message.Last Destinations95NavigationZ
Page 116 of 224

symbol 2 contain complete address data
from the navigation system, which support
navigation and are covered by the digital map
data. You can quickly start route guidance to
this kind of entry ( Y page 116).
Switching from the Predictive Speller
to the ListXSlide mq or press n and hold it until the
predictive speller is hidden.
or
XSelect d.
Switching from the List to the
Predictive Speller
XSelect Back from the list.
or
XPress the k button next to the
COMAND controller.
Searching
Searching via Predictive Speller
XSwitch from the list to the predictive speller
if necessary.XTo change the language of the
predictive speller: Select !.XTo switch the character set of the
predictive speller : Select k.
Depending on the previous setting, you will
change to letters with special characters or
to numbers with special characters.XTo enter characters: Select the
characters for the required entry one after
another.XTo delete individual characters: Select
õ and briefly press n.
or
XPress the 2 button next to the
COMAND controller.
Each time you enter or delete a character,
the closest match will be displayed at the
top of the list.XTo delete an entire entry: Select õ
and press n until the entire entry has been
deleted.
or
XPress the 2 button next to the
COMAND controller and hold it until the
entire entry is deleted.XTo end search: Switch from the predictive
speller to the list.
The top list entry is highlighted
automatically.XBack to the address book: If necessary,
switch from the list to the predictive speller
and select á in the predictive speller.
or
XPress the k button next to the
COMAND controller.
Searching via the List
XIf necessary, switch from the predictive
speller to the list ( Y page 113).XTurn ym z or slide qm r until the desired
entry is highlighted in the list.
Deleting Entry
XSearch for the required entry
( Y page 113).XSelect Options £Delete .
or
XSelect Delete from the address book
( Y page 112).
A deletion prompt appears.XSelect Yes or No.
The entry will be deleted or retained on the
basis of the selection.
i Deleting an entry in the phone book on
the mobile phone does not delete the entry
in the address book.
114Address BookTelephone