turn signal MERCEDES-BENZ E-Class COUPE 2011 C207 User Guide
[x] Cancel search | Manufacturer: MERCEDES-BENZ, Model Year: 2011, Model line: E-Class COUPE, Model: MERCEDES-BENZ E-Class COUPE 2011 C207Pages: 344, PDF Size: 14.06 MB
Page 129 of 344
Mercedes-Benz recommends that you use an
authorized Mercedes-Benz Center for this
purpose. In particular, work relevant to safety
or on safety-related systems must be carried
out at a qualified specialist workshop.
If you require assistance changing bulbs,
consult a qualified specialist workshop.
Do not touch the glass tube of new bulbs with
your bare hands. Even minor contamination
can burn into the glass surface and reduce
the service life of the bulbs. Always use a lint-
free cloth or only touch the base of the bulb
when installing.
Only use bulbs of the correct type.
If the new bulb still does not light up, consult
a qualified specialist workshop.
Bulbs and lamps are an important aspect of
vehicle safety. You must therefore make sure
that these function correctly at all times.
Have the headlamp setting checked regularly.
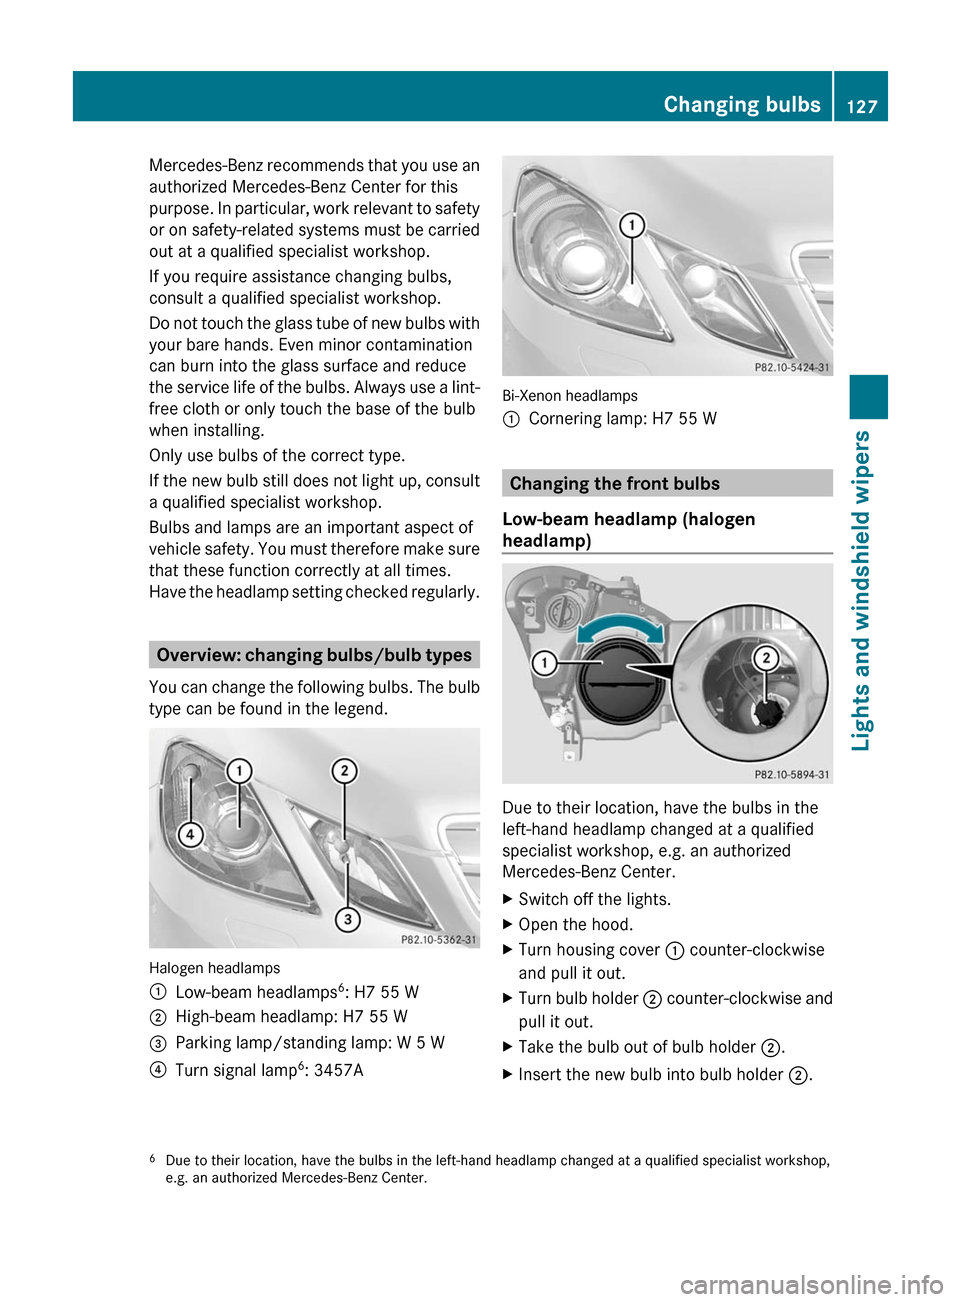
Overview: changing bulbs/bulb types
You can change the following bulbs. The bulb
type can be found in the legend.
Halogen headlamps
:Low-beam headlamps6: H7 55 W;High-beam headlamp: H7 55 W=Parking lamp/standing lamp: W 5 W?Turn signal lamp6: 3457A
Bi-Xenon headlamps
:Cornering lamp: H7 55 W
Changing the front bulbs
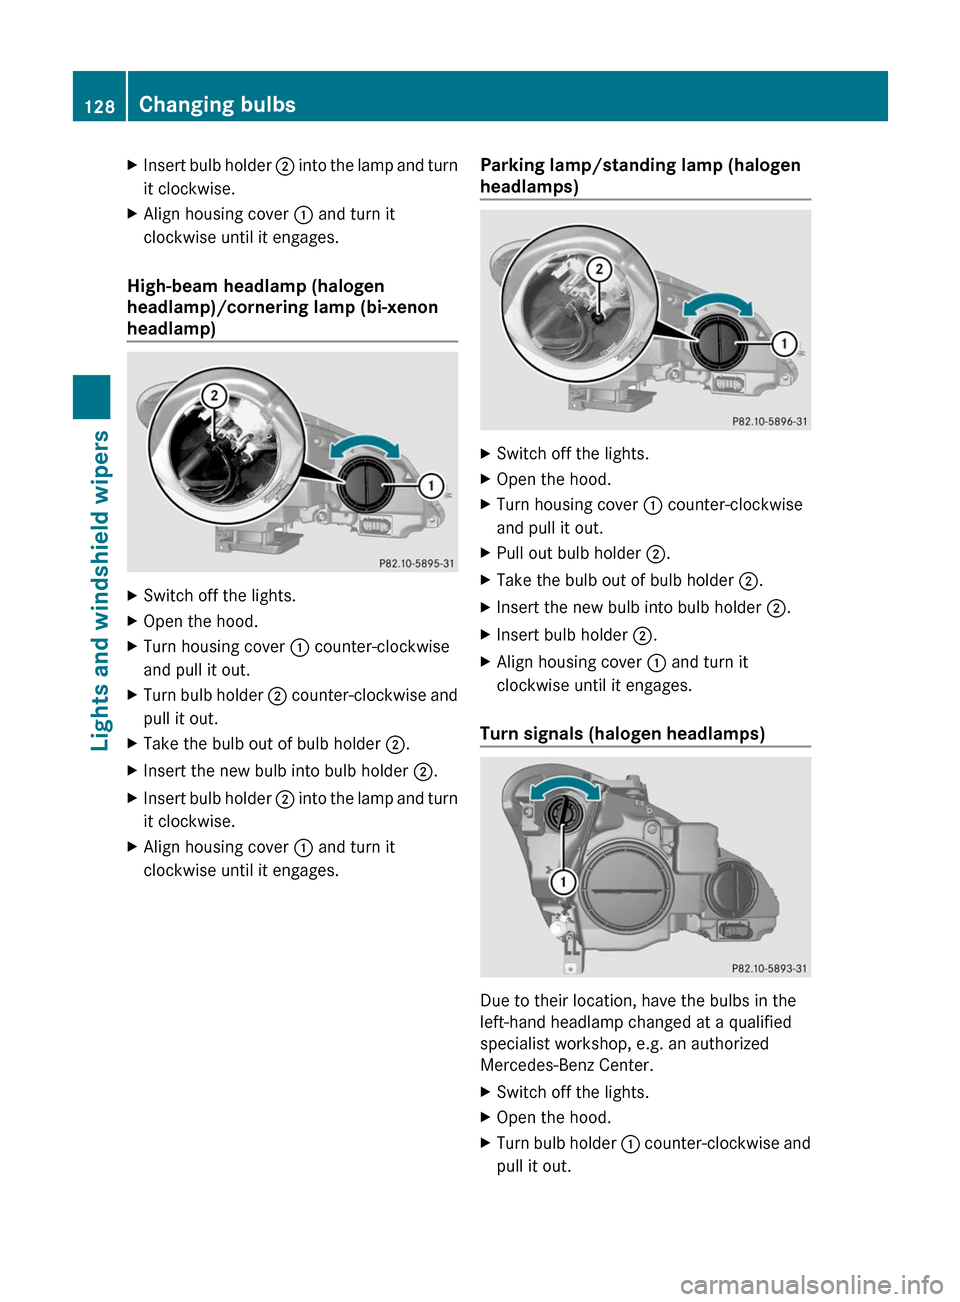
Low-beam headlamp (halogen
headlamp)
Due to their location, have the bulbs in the
left-hand headlamp changed at a qualified
specialist workshop, e.g. an authorized
Mercedes-Benz Center.
XSwitch off the lights.XOpen the hood.XTurn housing cover : counter-clockwise
and pull it out.
XTurn bulb holder ; counter-clockwise and
pull it out.
XTake the bulb out of bulb holder ;.XInsert the new bulb into bulb holder ;.6Due to their location, have the bulbs in the left-hand headlamp changed at a qualified specialist workshop,e.g. an authorized Mercedes-Benz Center.
Changing bulbs127Lights and windshield wipersBA 207 USA, CA Edition B 2011; 1; 3, en-USd2sboikeVersion: 3.0.3.62010-05-20T10:38:09+02:00 - Seite 127Z
Page 130 of 344
XInsert bulb holder ; into the lamp and turn
it clockwise.
XAlign housing cover : and turn it
clockwise until it engages.
High-beam headlamp (halogen
headlamp)/cornering lamp (bi-xenon
headlamp)
XSwitch off the lights.XOpen the hood.XTurn housing cover : counter-clockwise
and pull it out.
XTurn bulb holder ; counter-clockwise and
pull it out.
XTake the bulb out of bulb holder ;.XInsert the new bulb into bulb holder ;.XInsert bulb holder ; into the lamp and turn
it clockwise.
XAlign housing cover : and turn it
clockwise until it engages.
Parking lamp/standing lamp (halogen
headlamps)
XSwitch off the lights.XOpen the hood.XTurn housing cover : counter-clockwise
and pull it out.
XPull out bulb holder ;.XTake the bulb out of bulb holder ;.XInsert the new bulb into bulb holder ;.XInsert bulb holder ;.XAlign housing cover : and turn it
clockwise until it engages.
Turn signals (halogen headlamps)
Due to their location, have the bulbs in the
left-hand headlamp changed at a qualified
specialist workshop, e.g. an authorized
Mercedes-Benz Center.
XSwitch off the lights.XOpen the hood.XTurn bulb holder : counter-clockwise and
pull it out.
128Changing bulbsLights and windshield wipers
BA 207 USA, CA Edition B 2011; 1; 3, en-USd2sboikeVersion: 3.0.3.62010-05-20T10:38:09+02:00 - Seite 128
Page 153 of 344
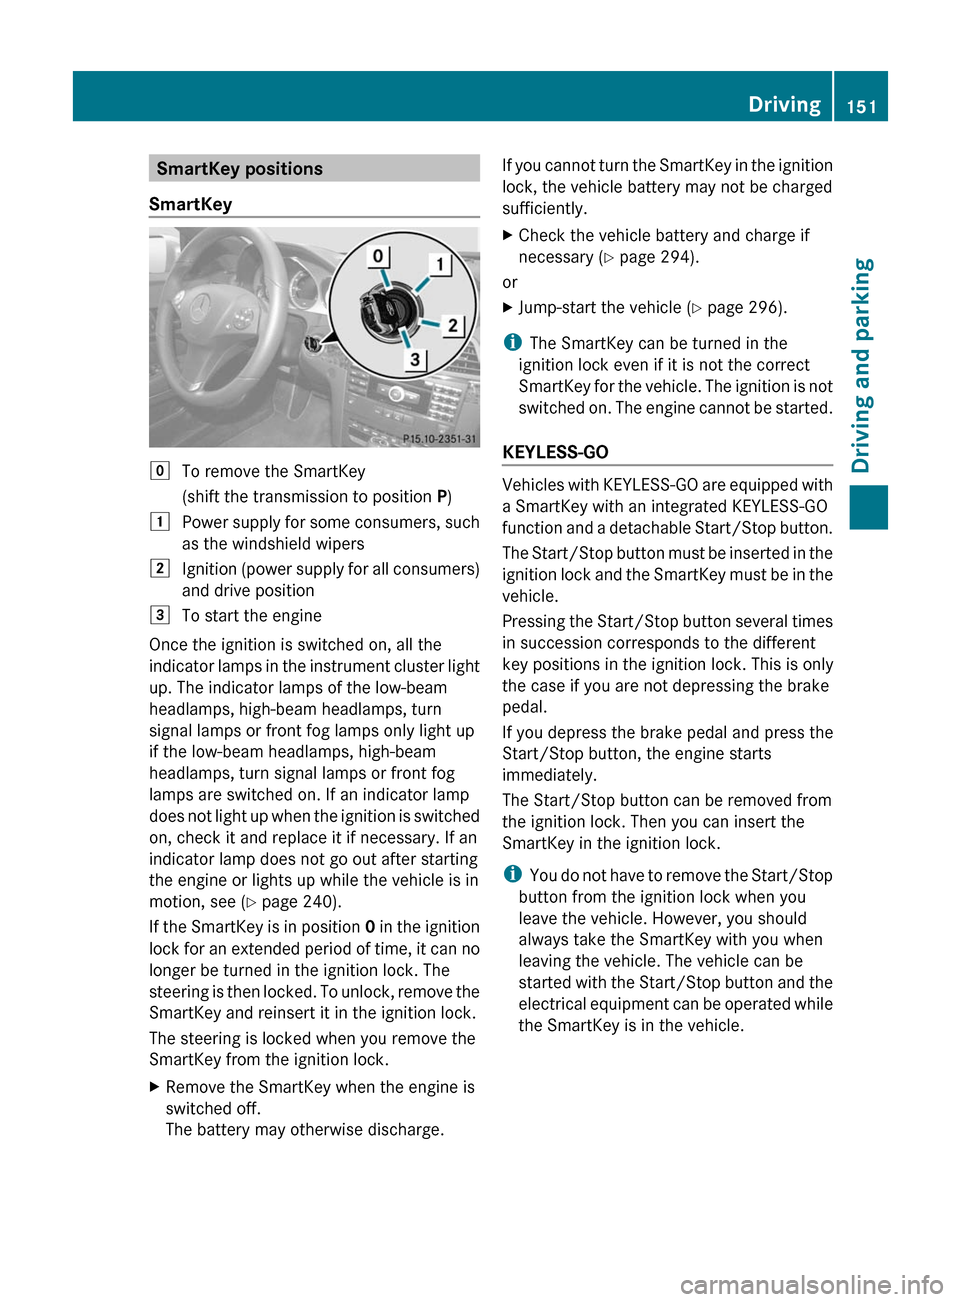
SmartKey positions
SmartKeygTo remove the SmartKey
(shift the transmission to position P)1Power supply for some consumers, such
as the windshield wipers2Ignition (power supply for all consumers)
and drive position3To start the engine
Once the ignition is switched on, all the
indicator lamps in the instrument cluster light
up. The indicator lamps of the low-beam
headlamps, high-beam headlamps, turn
signal lamps or front fog lamps only light up
if the low-beam headlamps, high-beam
headlamps, turn signal lamps or front fog
lamps are switched on. If an indicator lamp
does not light up when the ignition is switched
on, check it and replace it if necessary. If an
indicator lamp does not go out after starting
the engine or lights up while the vehicle is in
motion, see ( Y page 240).
If the SmartKey is in position 0 in the ignition
lock for an extended period of time, it can no
longer be turned in the ignition lock. The
steering is then locked. To unlock, remove the
SmartKey and reinsert it in the ignition lock.
The steering is locked when you remove the
SmartKey from the ignition lock.
XRemove the SmartKey when the engine is
switched off.
The battery may otherwise discharge.If you cannot turn the SmartKey in the ignition
lock, the vehicle battery may not be charged
sufficiently.XCheck the vehicle battery and charge if
necessary ( Y page 294).
or
XJump-start the vehicle ( Y page 296).
i
The SmartKey can be turned in the
ignition lock even if it is not the correct
SmartKey for the vehicle. The ignition is not
switched on. The engine cannot be started.
KEYLESS-GO
Vehicles with KEYLESS-GO are equipped with
a SmartKey with an integrated KEYLESS-GO
function and a detachable Start/Stop button.
The Start/Stop button must be inserted in the
ignition lock and the SmartKey must be in the
vehicle.
Pressing the Start/Stop button several times
in succession corresponds to the different
key positions in the ignition lock. This is only
the case if you are not depressing the brake
pedal.
If you depress the brake pedal and press the
Start/Stop button, the engine starts
immediately.
The Start/Stop button can be removed from
the ignition lock. Then you can insert the
SmartKey in the ignition lock.
i You do not have to remove the Start/Stop
button from the ignition lock when you
leave the vehicle. However, you should
always take the SmartKey with you when
leaving the vehicle. The vehicle can be
started with the Start/Stop button and the
electrical equipment can be operated while
the SmartKey is in the vehicle.
Driving151Driving and parkingBA 207 USA, CA Edition B 2011; 1; 3, en-USd2sboikeVersion: 3.0.3.62010-05-20T10:38:09+02:00 - Seite 151Z
Page 154 of 344
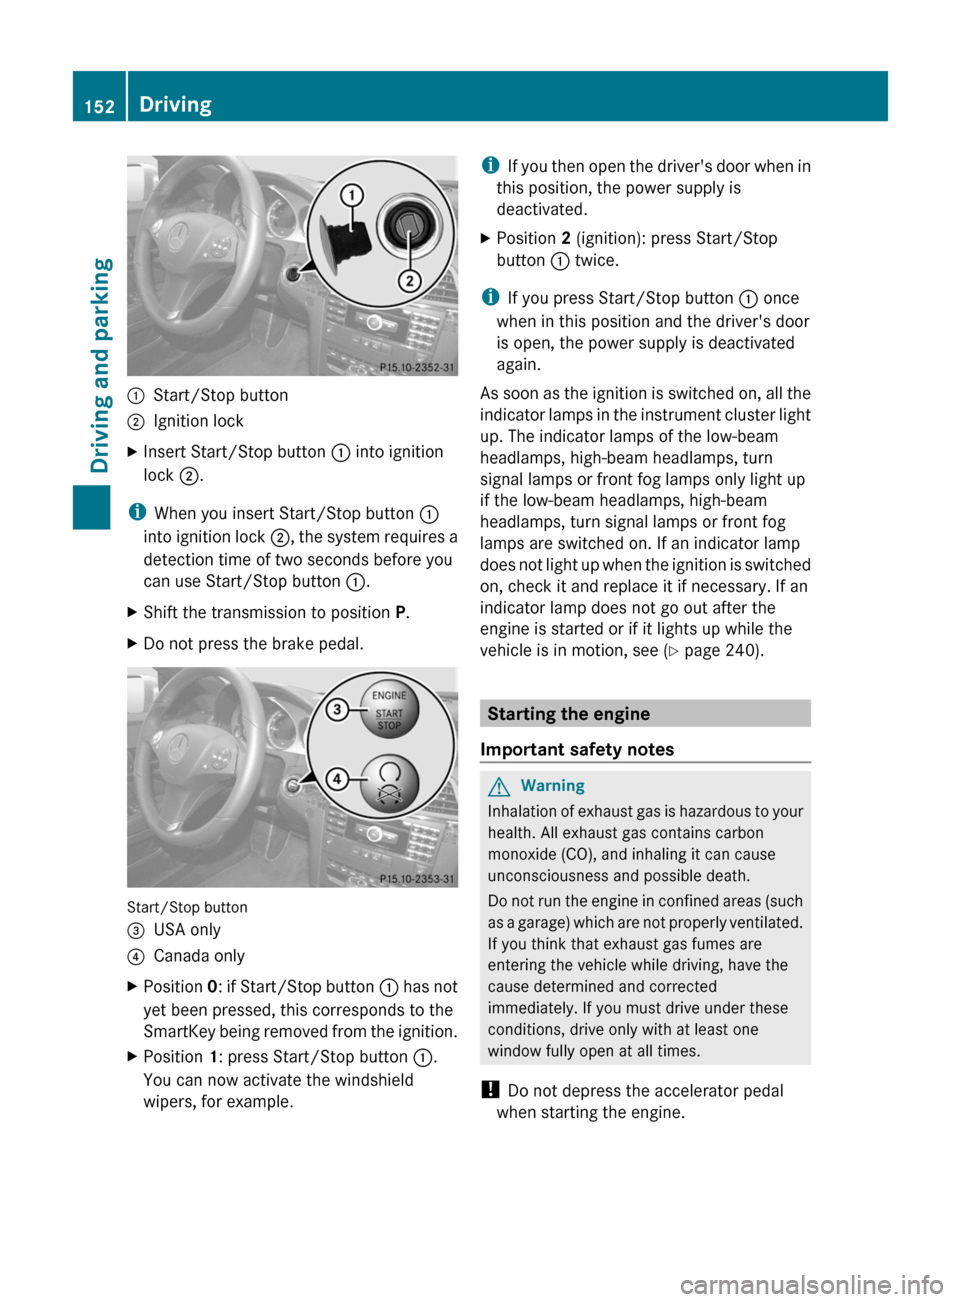
:Start/Stop button;Ignition lockXInsert Start/Stop button : into ignition
lock ;.
i
When you insert Start/Stop button :
into ignition lock ;, the system requires a
detection time of two seconds before you
can use Start/Stop button :.
XShift the transmission to position P.XDo not press the brake pedal.
Start/Stop button
=USA only?Canada onlyXPosition 0: if Start/Stop button : has not
yet been pressed, this corresponds to the
SmartKey being removed from the ignition.XPosition 1: press Start/Stop button :.
You can now activate the windshield
wipers, for example.i If you then open the driver's door when in
this position, the power supply is
deactivated.XPosition 2 (ignition): press Start/Stop
button : twice.
i
If you press Start/Stop button : once
when in this position and the driver's door
is open, the power supply is deactivated
again.
As soon as the ignition is switched on, all the
indicator lamps in the instrument cluster light
up. The indicator lamps of the low-beam
headlamps, high-beam headlamps, turn
signal lamps or front fog lamps only light up
if the low-beam headlamps, high-beam
headlamps, turn signal lamps or front fog
lamps are switched on. If an indicator lamp
does not light up when the ignition is switched
on, check it and replace it if necessary. If an
indicator lamp does not go out after the
engine is started or if it lights up while the
vehicle is in motion, see ( Y page 240).
Starting the engine
Important safety notes
GWarning
Inhalation of exhaust gas is hazardous to your
health. All exhaust gas contains carbon
monoxide (CO), and inhaling it can cause
unconsciousness and possible death.
Do not run the engine in confined areas (such
as a garage) which are not properly ventilated.
If you think that exhaust gas fumes are
entering the vehicle while driving, have the
cause determined and corrected
immediately. If you must drive under these
conditions, drive only with at least one
window fully open at all times.
! Do not depress the accelerator pedal
when starting the engine.
152DrivingDriving and parking
BA 207 USA, CA Edition B 2011; 1; 3, en-USd2sboikeVersion: 3.0.3.62010-05-20T10:38:09+02:00 - Seite 152
Page 157 of 344
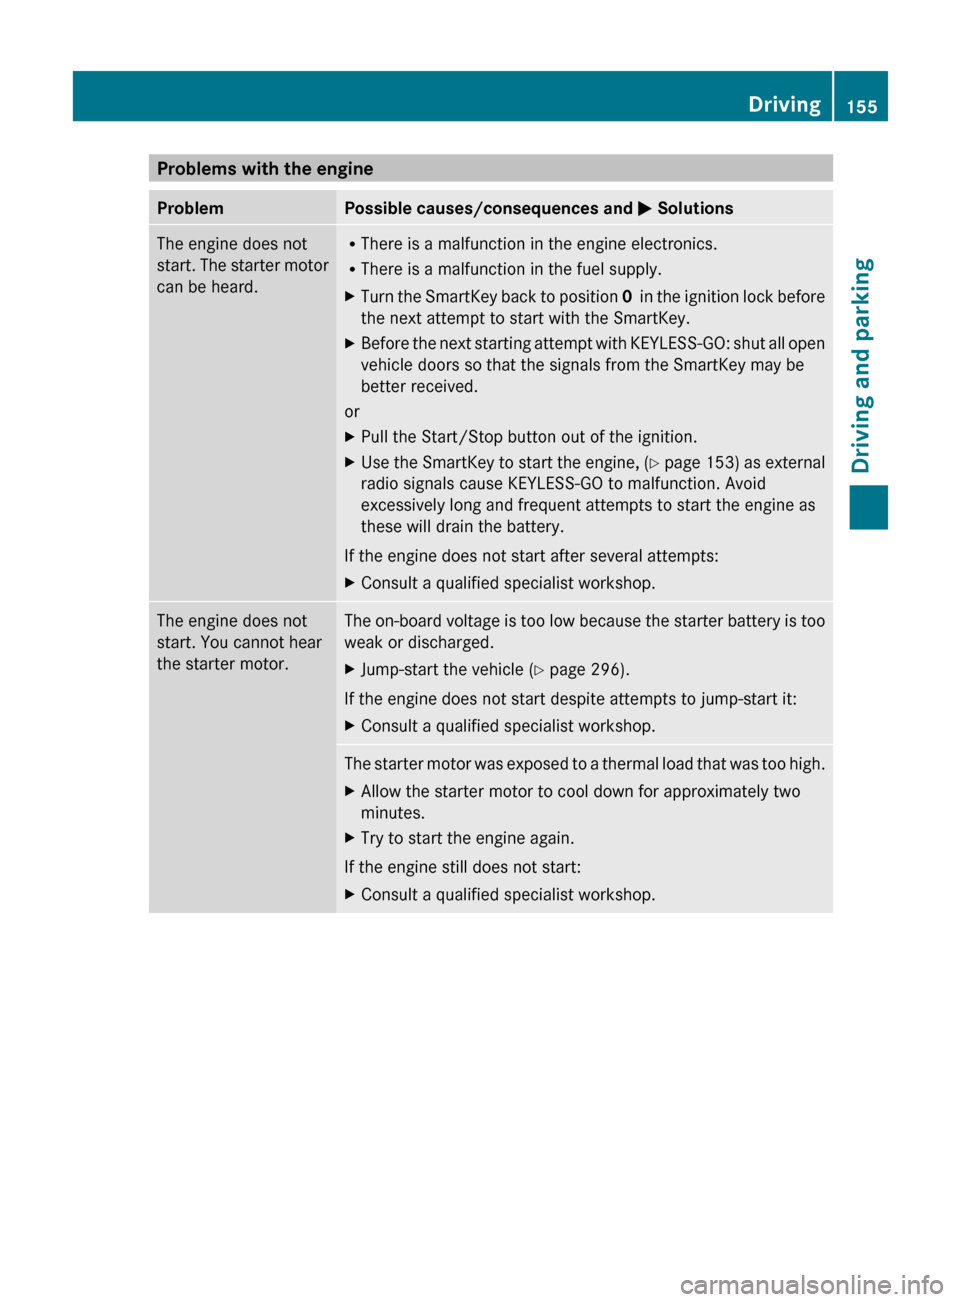
Problems with the engineProblemPossible causes/consequences and M SolutionsThe engine does not
start. The starter motor
can be heard.R There is a malfunction in the engine electronics.
R There is a malfunction in the fuel supply.XTurn the SmartKey back to position 0 in the ignition lock before
the next attempt to start with the SmartKey.XBefore the next starting attempt with KEYLESS-GO: shut all open
vehicle doors so that the signals from the SmartKey may be
better received.
or
XPull the Start/Stop button out of the ignition.XUse the SmartKey to start the engine, (Y page 153) as external
radio signals cause KEYLESS-GO to malfunction. Avoid
excessively long and frequent attempts to start the engine as
these will drain the battery.
If the engine does not start after several attempts:
XConsult a qualified specialist workshop.The engine does not
start. You cannot hear
the starter motor.The on-board voltage is too low because the starter battery is too
weak or discharged.XJump-start the vehicle ( Y page 296).
If the engine does not start despite attempts to jump-start it:
XConsult a qualified specialist workshop.The starter motor was exposed to a thermal load that was too high.XAllow the starter motor to cool down for approximately two
minutes.XTry to start the engine again.
If the engine still does not start:
XConsult a qualified specialist workshop.Driving155Driving and parkingBA 207 USA, CA Edition B 2011; 1; 3, en-USd2sboikeVersion: 3.0.3.62010-05-20T10:38:09+02:00 - Seite 155Z
Page 168 of 344
Vehicles with automatic transmissionXApply the parking brake firmly.XShift the transmission to position P.
Using the SmartKey
XTurn the SmartKey to position 0 in the
ignition lock and remove it.
The immobilizer is activated.
iThe SmartKey can only be removed if the
transmission is in position P.
Using KEYLESS-GO
XPress the Start/Stop button (Y page 151).
When the driver's door is closed, the Start/
Stop button is in position 1. When the
driver's door is opened, the Start/Stop
button moves to position 0. This
corresponds to removing the SmartKey.
If you attempt to turn off the engine when the
selector lever is not in position P, a warning
signal sounds.
Observe the messages in the multifunction
display.
iIn an emergency, you can turn off the
engine while the vehicle is in motion by
pressing and holding the Start/Stop button
for three seconds.
Parking brake
GWarning
Engaging the parking brake while the vehicle
is in motion can cause the rear wheels to lock
up. You could lose control of the vehicle and
cause an accident. In addition, the vehicle's
brake lights do not light up when the parking
brake is engaged.
GWarning!
When leaving the vehicle, always remove the
SmartKey from the starter switch, take it with
you, and lock the vehicle. Do not leave
children unattended in the vehicle, or with
access to an unlocked vehicle. Children could
release the parking brake and/or shift the
automatic transmission out of park position
P, either of which could result in an accident
and/or serious personal injury.
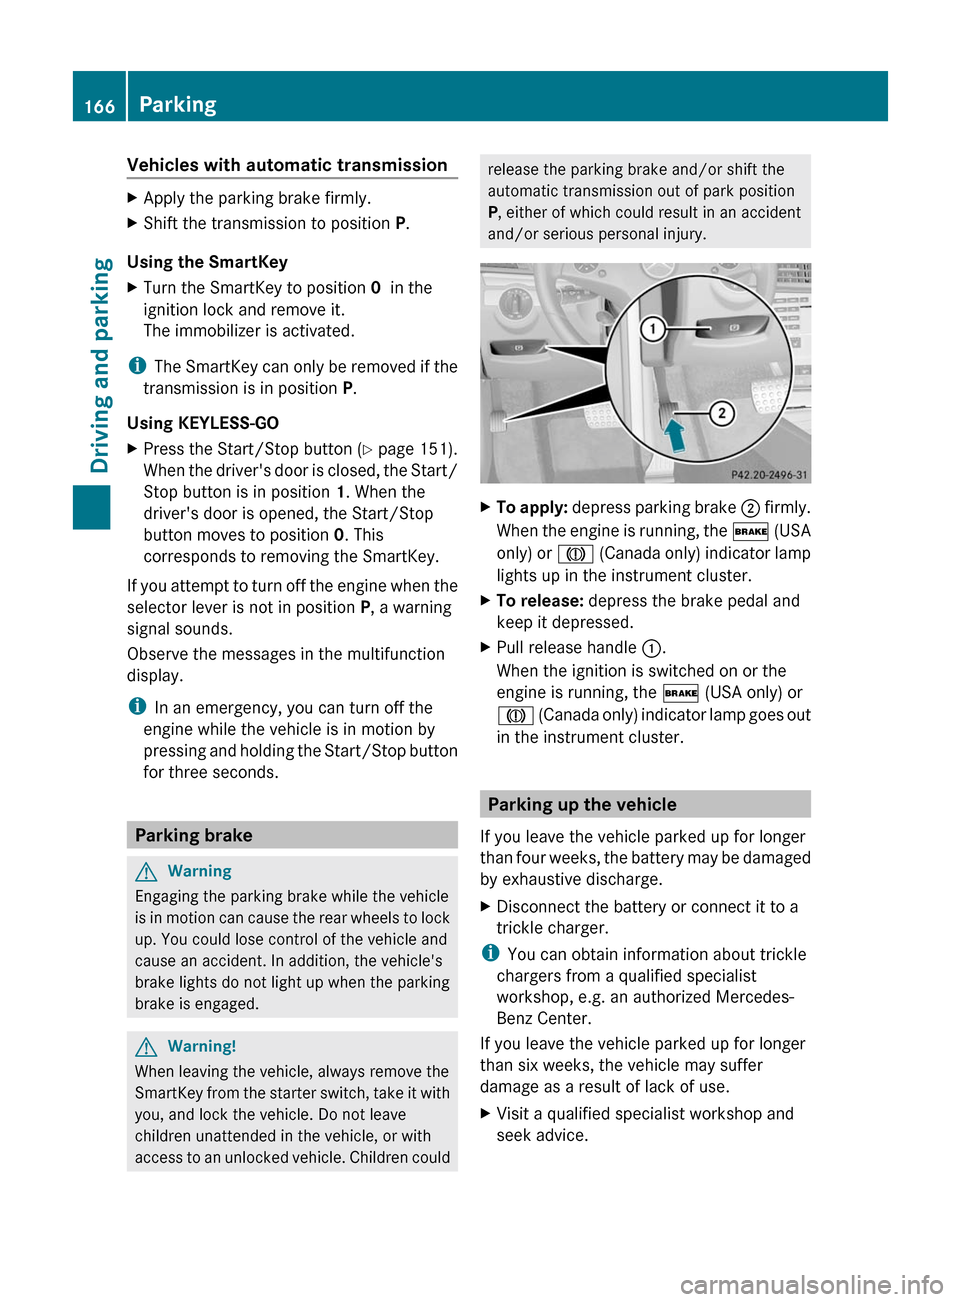
XTo apply: depress parking brake ; firmly.
When the engine is running, the $ (USA
only) or J (Canada only) indicator lamp
lights up in the instrument cluster.
XTo release: depress the brake pedal and
keep it depressed.
XPull release handle :.
When the ignition is switched on or the
engine is running, the $ (USA only) or
J (Canada only) indicator lamp goes out
in the instrument cluster.
Parking up the vehicle
If you leave the vehicle parked up for longer
than four weeks, the battery may be damaged
by exhaustive discharge.
XDisconnect the battery or connect it to a
trickle charger.
iYou can obtain information about trickle
chargers from a qualified specialist
workshop, e.g. an authorized Mercedes-
Benz Center.
If you leave the vehicle parked up for longer
than six weeks, the vehicle may suffer
damage as a result of lack of use.
XVisit a qualified specialist workshop and
seek advice.
166ParkingDriving and parking
BA 207 USA, CA Edition B 2011; 1; 3, en-USd2sboikeVersion: 3.0.3.62010-05-20T10:38:09+02:00 - Seite 166
Page 180 of 344
Changing lanes
If you wish to change to the passing lane (in
left-hand-drive vehicles, the passing lane is
the left-hand lane), DISTRONIC PLUS
supports you if:
R you are driving above 40 mph (60 km/h)
R DISTRONIC PLUS is maintaining the
distance to a vehicle in front
R you switch on the appropriate turn signals
R DISTRONIC PLUS does not detect a danger
of collision
If these conditions are met, your vehicle is
accelerated. Acceleration will be interrupted
if changing lanes takes too long or if the
distance between your vehicle and the
vehicle in front becomes too small.GWarning
DISTRONIC PLUS and Active Blind Spot Assist
are only aids designed to assist driving.
They do not relieve you of the responsibility
of paying attention. The driver remains fully
responsible for the vehicle's distance from
other vehicles, the vehicle's speed and for
braking in good time. Always pay attention to
traffic conditions and your surroundings.
Otherwise, you may fail to recognize dangers
in time, cause an accident and injure yourself
and others.
Stopping
GWarning
Never get out of the vehicle when DISTRONIC
PLUS is activated.
DISTRONIC PLUS must also never be
operated, activated or deactivated by a
passenger or from outside the vehicle.
DISTRONIC PLUS does not replace the
parking brake and must not be used for
parking.
The DISTRONIC PLUS braking effect is
canceled and the vehicle can start moving if:
R DISTRONIC PLUS is deactivated using the
cruise control lever.
R you accelerate.
R
there is a malfunction in the system or an
interruption in the power supply, e.g.
battery failure.
R the electrical system in the engine
compartment, the battery or the fuses are
tampered with.
R the battery is disconnected.
If you wish to leave the vehicle or park it,
deactivate DISTRONIC PLUS and secure the
vehicle against rolling away.
If DISTRONIC PLUS detects that the vehicle
in front is stopping, it brakes your vehicle until
it is stationary.
Once your vehicle is stationary, it remains
stationary and you do not need to depress the
brake.
i Depending on the specified minimum
distance, your vehicle will come to a
standstill at a sufficient distance behind the
vehicle in front. The specified minimum
distance is set using the control on the
cruise control lever.
You will see a warning message in the
multifunction display if DISTRONIC PLUS is
activated and:
R the driver's door is open and the driver's
seat belt is unfastened.
R the engine is switched off.
R the hood is opened.
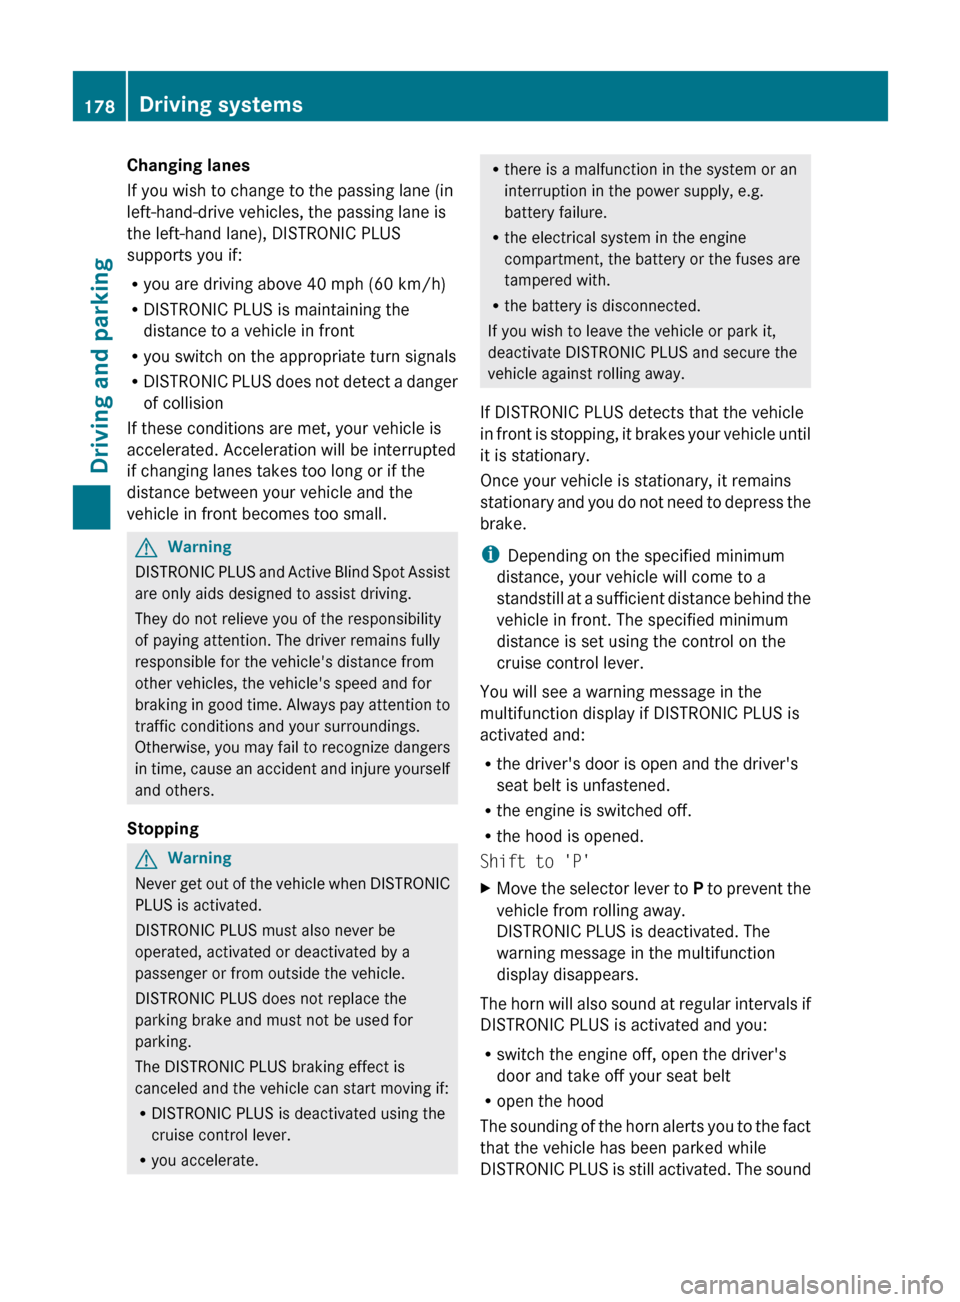
Shift to 'P'XMove the selector lever to P to prevent the
vehicle from rolling away.
DISTRONIC PLUS is deactivated. The
warning message in the multifunction
display disappears.
The horn will also sound at regular intervals if
DISTRONIC PLUS is activated and you:
R switch the engine off, open the driver's
door and take off your seat belt
R open the hood
The sounding of the horn alerts you to the fact
that the vehicle has been parked while
DISTRONIC PLUS is still activated. The sound
178Driving systemsDriving and parking
BA 207 USA, CA Edition B 2011; 1; 3, en-USd2sboikeVersion: 3.0.3.62010-05-20T10:38:09+02:00 - Seite 178
Page 193 of 344
parking spaces on the front-passenger side
as standard. Parking spaces on the driver's
side are displayed as soon as the turn signal
on the driver's side is activated. To park on
the driver's side, you must leave the driver's
side turn signal switched on until you have
engaged reverse gear.
Parking Guidance will only detect parking
spaces:
R that are parallel to the direction of travel
R that are at least 5 ft (1.5 m) wide
R that are at least 4.3 ft (1.3 m) longer than
your vehicle.
A parking space is displayed while you are
driving past it, and until you are
approximately 50 ft (15 m) away from it.
ParkingGWarning!
The Parking Guidance is only an aid and may
not detect all obstacles. The Parking
Guidance does not relieve you of the
responsibility to pay attention. You are always
responsible for safety and must continue to
pay attention to your immediate surroundings
when parking and maneuvering. Otherwise,
you could endanger yourself and others.
XStop the vehicle when the parking space
symbol shows the desired parking space in
the instrument cluster.XShift the transmission to position R.
The multifunction display shows the
Check Vehicle Surroundings Press
'OK' to Confirm message.XPress a on the multifunction steering
wheel to confirm.
The multifunction display switches to
Parking Guidance.
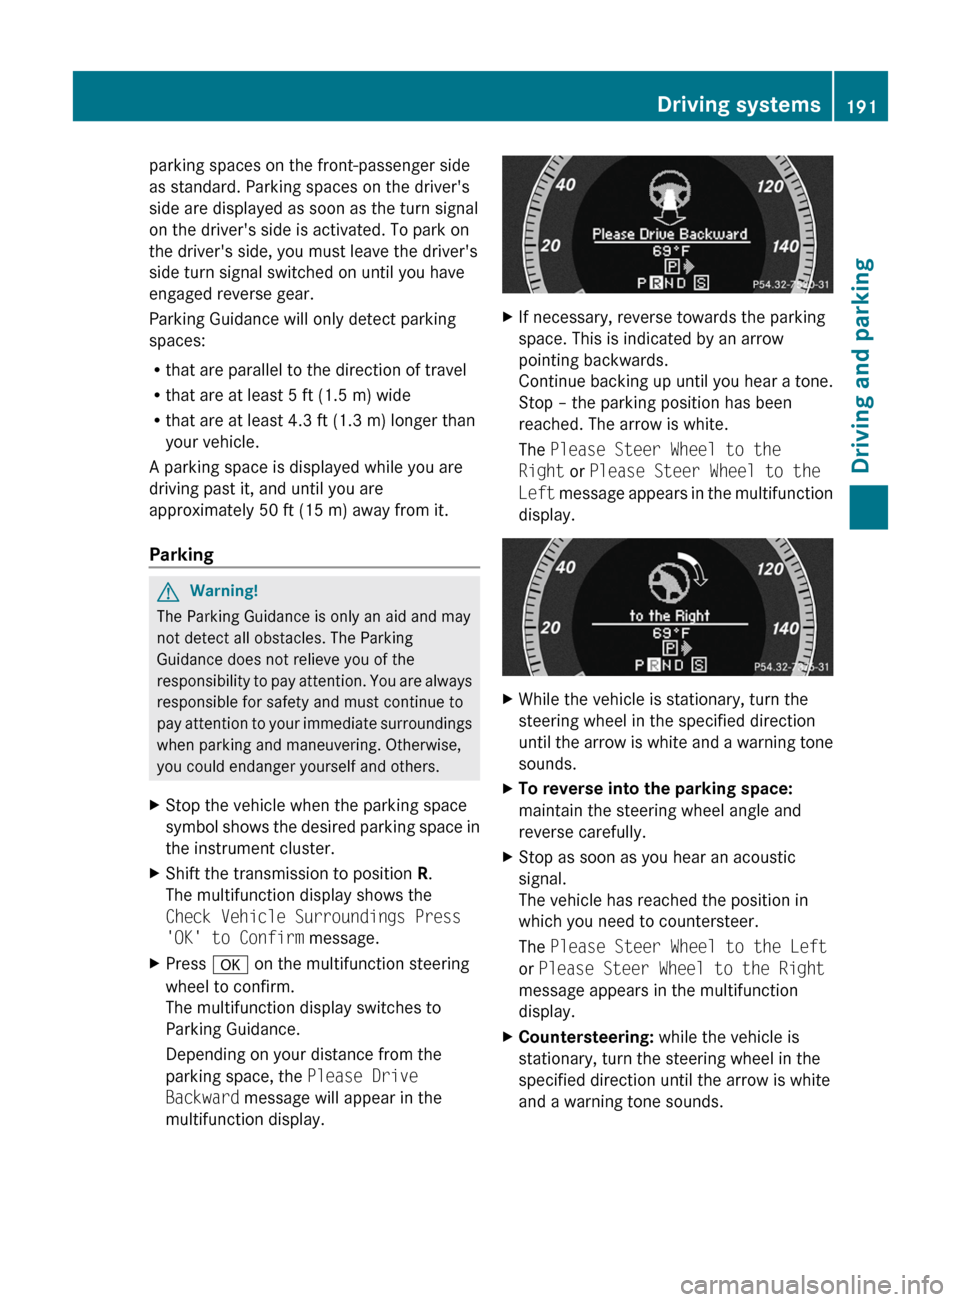
Depending on your distance from the
parking space, the Please Drive
Backward message will appear in the
multifunction display.XIf necessary, reverse towards the parking
space. This is indicated by an arrow
pointing backwards.
Continue backing up until you hear a tone.
Stop – the parking position has been
reached. The arrow is white.
The Please Steer Wheel to the
Right or Please Steer Wheel to the
Left message appears in the multifunction
display.XWhile the vehicle is stationary, turn the
steering wheel in the specified direction
until the arrow is white and a warning tone
sounds.XTo reverse into the parking space:
maintain the steering wheel angle and
reverse carefully.XStop as soon as you hear an acoustic
signal.
The vehicle has reached the position in
which you need to countersteer.
The Please Steer Wheel to the Left
or Please Steer Wheel to the Right
message appears in the multifunction
display.XCountersteering: while the vehicle is
stationary, turn the steering wheel in the
specified direction until the arrow is white
and a warning tone sounds.Driving systems191Driving and parkingBA 207 USA, CA Edition B 2011; 1; 3, en-USd2sboikeVersion: 3.0.3.62010-05-20T10:38:09+02:00 - Seite 191Z
Page 197 of 344
attention to a vehicle detected in the
monitored area. If you switch on the
corresponding turn signal before changing
lane, you will also receive visual and audible
collision warnings. For this purpose, Blind
Spot Assist uses sensors in the rear bumper.GWarning
Blind Spot Assist is only an aid designed to
assist driving. It may fail to detect some
vehicles and is no substitute for attentive
driving.
Blind Spot Assist cannot detect road and
traffic conditions. It may fail to detect narrow
vehicles, such as motorcycles or bicycles, or
may only detect them too late.
Monitoring may be affected by dirty sensors,
strong spray or poor visibility caused by snow,
rain or mist, for example. In this case, vehicles
are detected late or not at all.
Always pay attention to traffic conditions and
your surroundings. Otherwise, you may fail to
recognize dangers in time, cause an accident
and injure yourself and others.
i USA only:
This device has been approved by the FCC
as a “Vehicular Radar System”. The radar
sensor is intended for use in an automotive
radar system only. Removal, tampering, or
altering of the device will void any
warranties, and is not permitted by the
FCC. Do not tamper with, alter, or use in
any non-approved way.
Any unauthorized modification to this
device could void the user’s authority to
operate the equipment.
For Blind Spot Assist to assist you when
driving, the radar sensor system must be
switched on ( Y page 211) and operational.
Monitoring range of the sensors
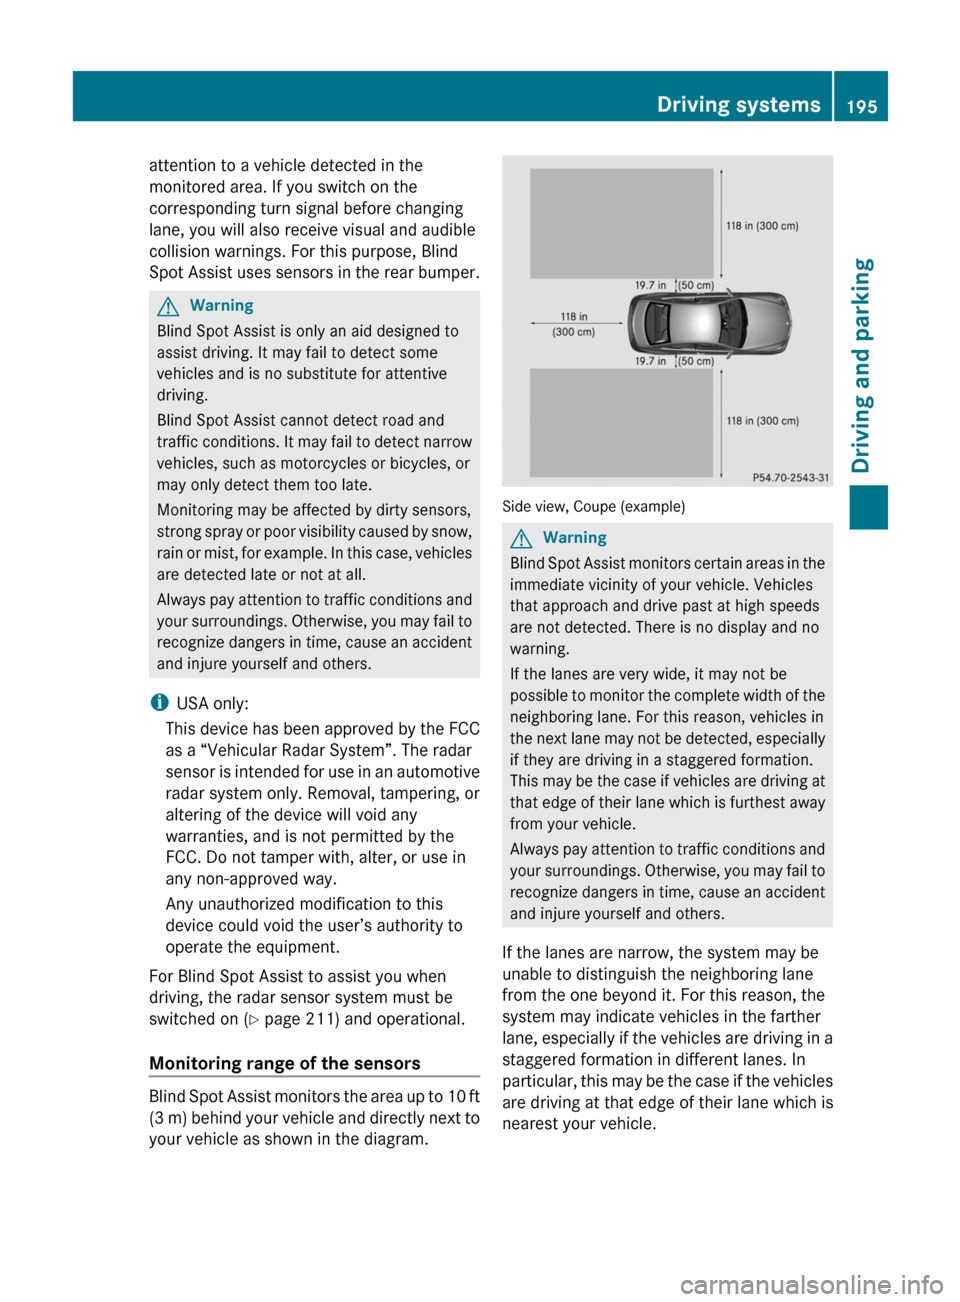
Blind Spot Assist monitors the area up to 10 ft
(3 m) behind your vehicle and directly next to
your vehicle as shown in the diagram.
Side view, Coupe (example)
GWarning
Blind Spot Assist monitors certain areas in the
immediate vicinity of your vehicle. Vehicles
that approach and drive past at high speeds
are not detected. There is no display and no
warning.
If the lanes are very wide, it may not be
possible to monitor the complete width of the
neighboring lane. For this reason, vehicles in
the next lane may not be detected, especially
if they are driving in a staggered formation.
This may be the case if vehicles are driving at
that edge of their lane which is furthest away
from your vehicle.
Always pay attention to traffic conditions and
your surroundings. Otherwise, you may fail to
recognize dangers in time, cause an accident
and injure yourself and others.
If the lanes are narrow, the system may be
unable to distinguish the neighboring lane
from the one beyond it. For this reason, the
system may indicate vehicles in the farther
lane, especially if the vehicles are driving in a
staggered formation in different lanes. In
particular, this may be the case if the vehicles
are driving at that edge of their lane which is
nearest your vehicle.
Driving systems195Driving and parkingBA 207 USA, CA Edition B 2011; 1; 3, en-USd2sboikeVersion: 3.0.3.62010-05-20T10:38:09+02:00 - Seite 195Z
Page 198 of 344
Due to the nature of the system:
R warnings may be issued unnecessarily
when driving close to crash barriers or
similar solid lane borders.
R warnings may be interrupted when driving
alongside particularly long vehicles for a
prolonged time.
The two sensors for Blind Spot Assist are
integrated into the sides of the rear bumper.
Make sure that the bumper is free of dirt, ice
or slush around the sensors. For example, the
radar sensors must not be covered by bicycle
racks or overhanging loads. In the event of a
severe impact or damage to the bumpers,
have the function of the radar sensors
checked at a qualified specialist workshop,
e.g. an authorized Mercedes-Benz Center.
Blind Spot Assist may otherwise not work
properly.
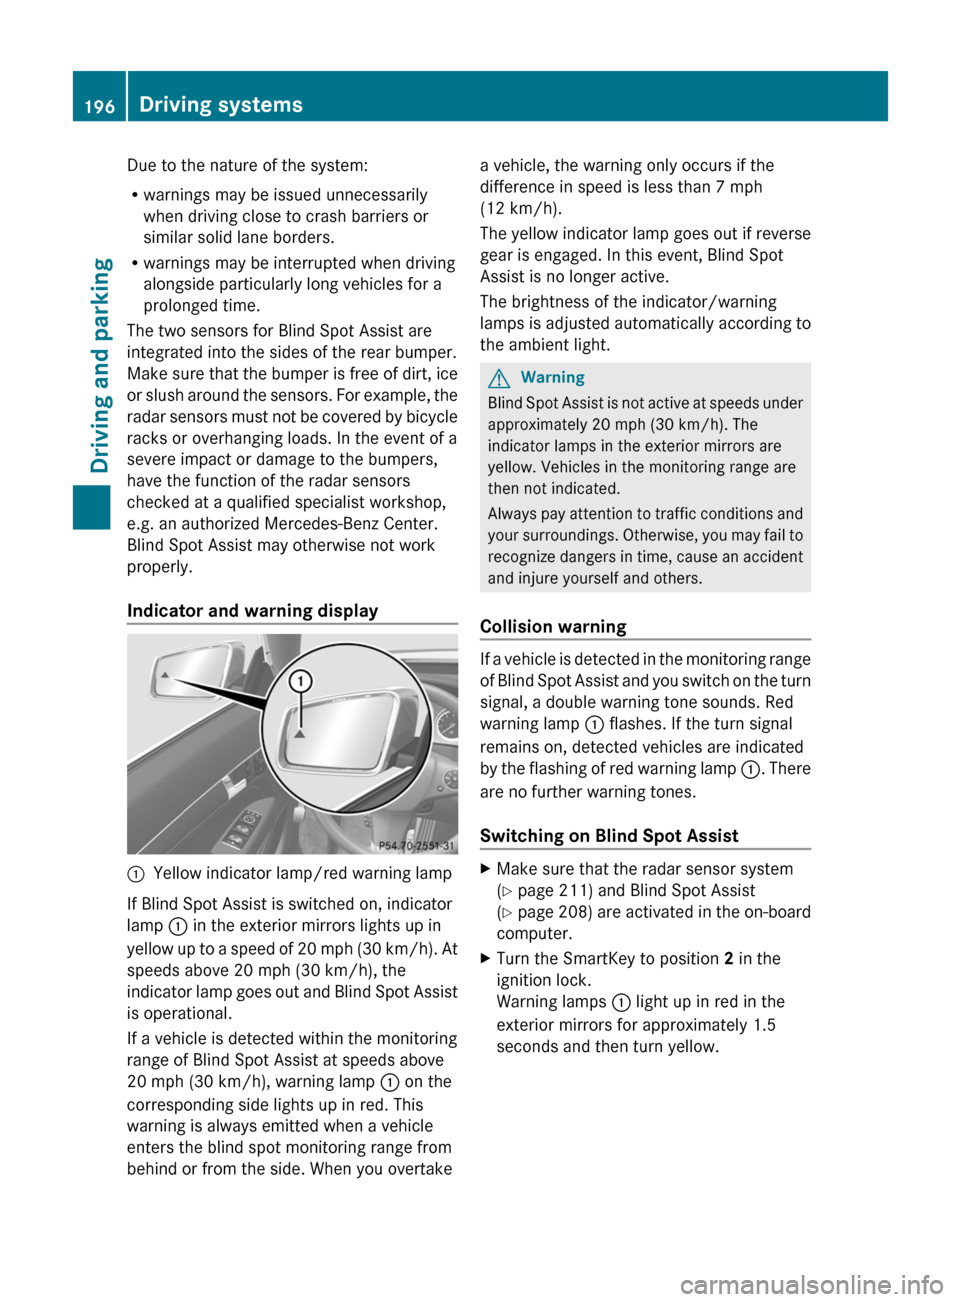
Indicator and warning display:Yellow indicator lamp/red warning lamp
If Blind Spot Assist is switched on, indicator
lamp : in the exterior mirrors lights up in
yellow up to a speed of 20 mph (30 km/h). At
speeds above 20 mph (30 km/h), the
indicator lamp goes out and Blind Spot Assist
is operational.
If a vehicle is detected within the monitoring
range of Blind Spot Assist at speeds above
20 mph (30 km/h), warning lamp : on the
corresponding side lights up in red. This
warning is always emitted when a vehicle
enters the blind spot monitoring range from
behind or from the side. When you overtake
a vehicle, the warning only occurs if the
difference in speed is less than 7 mph
(12 km/h).
The yellow indicator lamp goes out if reverse
gear is engaged. In this event, Blind Spot
Assist is no longer active.
The brightness of the indicator/warning
lamps is adjusted automatically according to
the ambient light.GWarning
Blind Spot Assist is not active at speeds under
approximately 20 mph (30 km/h). The
indicator lamps in the exterior mirrors are
yellow. Vehicles in the monitoring range are
then not indicated.
Always pay attention to traffic conditions and
your surroundings. Otherwise, you may fail to
recognize dangers in time, cause an accident
and injure yourself and others.
Collision warning
If a vehicle is detected in the monitoring range
of Blind Spot Assist and you switch on the turn
signal, a double warning tone sounds. Red
warning lamp : flashes. If the turn signal
remains on, detected vehicles are indicated
by the flashing of red warning lamp :. There
are no further warning tones.
Switching on Blind Spot Assist
XMake sure that the radar sensor system
( Y page 211) and Blind Spot Assist
( Y page 208) are activated in the on-board
computer.XTurn the SmartKey to position 2 in the
ignition lock.
Warning lamps : light up in red in the
exterior mirrors for approximately 1.5
seconds and then turn yellow.196Driving systemsDriving and parking
BA 207 USA, CA Edition B 2011; 1; 3, en-USd2sboikeVersion: 3.0.3.62010-05-20T10:38:09+02:00 - Seite 196