turn signal MERCEDES-BENZ E-Class COUPE 2011 C207 Owner's Guide
[x] Cancel search | Manufacturer: MERCEDES-BENZ, Model Year: 2011, Model line: E-Class COUPE, Model: MERCEDES-BENZ E-Class COUPE 2011 C207Pages: 344, PDF Size: 14.06 MB
Page 212 of 344
If you activate the Locator Lighting:
function, the following light up:
R the parking lamps
R the tail lamps
R the fog lamps 18
R the low-beam headlamps 19
R the license plate lamp
R the side marker lampsXPress the = or ; button on the
steering wheel to select the Settings
menu.XPress the : or 9 button to select the
Lights submenu.XPress the a button to confirm.XPress the : or 9 button to select the
Locator Lighting: function.
You will see the selected setting: Enabled
or Disabled .XPress the a button to save the setting.
To deactivate the delayed shut-off
temporarily:
XBefore leaving the vehicle, turn the
SmartKey to position 0 in the ignition lock.XTurn the SmartKey to position 2 in the
ignition lock and back to position 0.
The delayed shut-off is deactivated.
The delayed shut-off is reactivated the next
time you start the engine.
Activating/deactivating the interior
lighting delayed switch-off
When you activate the Interior Lighting
Delay: function and remove the SmartKey
from the ignition lock, the interior lighting
remains on for 10 seconds.
XPress the = or ; button on the
steering wheel to select the Settings
menu.XPress the : or 9 button to select the
Lights submenu.XPress the a button to confirm.XPress the : or 9 button to select the
Interior Lighting Delay: function.
You will see the selected setting: Enabled
or Disabled .XPress the a button to save the setting.
Vehicle
Activating/deactivating the automatic
locking feature
If you select the Automatic Door Lock:
function, the vehicle is centrally locked above
a speed of around 9 mph (15 km/h).
i Further information on the automatic
locking feature ( Y page 81).
XPress the = or ; button on the
steering wheel to select the Settings
menu.XPress the : or 9 button to select the
Vehicle submenu.XPress the a button to confirm.XPress the : or 9 button to select the
Automatic Door Lock: function.
You will see the selected setting: Enabled
or Disabled .XPress the a button to save the setting.
Activating/deactivating the acoustic
locking confirmation
If you switch on the Acoustic Lock
Feedback: function, an acoustic signal
sounds when you lock or unlock the vehicle.
When unlocking, the signal sounds once.
When locking, it sounds three times.
XPress the = or ; button on the
steering wheel to select the Settings
menu.XPress the : or 9 button to select the
Vehicle submenu.XPress the a button to confirm.18
Only for vehicles with front fog lamps.
19 Only for vehicles without front fog lamps.210Menus and submenusOn-board computer and displays
BA 207 USA, CA Edition B 2011; 1; 3, en-USd2sboikeVersion: 3.0.3.62010-05-20T10:38:09+02:00 - Seite 210
Page 225 of 344
Display messagesPossible causes/consequences and M Solutionsb
Check Left
Cornering Light
or
Check Right
Cornering LightThe left or right-hand cornering light is faulty. XCheck whether you are permitted to change the bulb yourself
( Y page 126).
or
XVisit a qualified specialist workshop.b
Check Left Low Beam
or
Check Right Low
BeamThe left or right-hand low-beam headlamp is faulty. XCheck whether you are permitted to change the bulb yourself
( Y page 126).
or
XVisit a qualified specialist workshop.b
Check Rear Left
Turn Signal
or
Check Rear Right
Turn SignalThe rear left-hand or rear right-hand turn signal is faulty.XCheck whether you are permitted to change the bulb yourself
( Y page 126).
or
XVisit a qualified specialist workshop.b
Check Front Left
Turn Signal
or
Check Front Right
Turn SignalThe front left-hand or front right-hand turn signal is faulty.XCheck whether you are permitted to change the bulb yourself
( Y page 126).
or
XVisit a qualified specialist workshop.b
Check Left Mirror
Turn Signal
or
Check Right Mirror
Turn SignalThe turn signal in the left-hand and/or right-hand exterior mirror
is faulty.XCheck whether you are permitted to change the bulb yourself
( Y page 126).
or
XVisit a qualified specialist workshop.b
Check Center Brake
LampThe high-mounted brake lamp is faulty.XCheck whether you are permitted to change the bulb yourself
( Y page 126).
or
XVisit a qualified specialist workshop.Display messages223On-board computer and displaysBA 207 USA, CA Edition B 2011; 1; 3, en-USd2sboikeVersion: 3.0.3.62010-05-20T10:38:09+02:00 - Seite 223Z
Page 268 of 344
of the garage door. People could otherwise be
injured by the movement of the door.
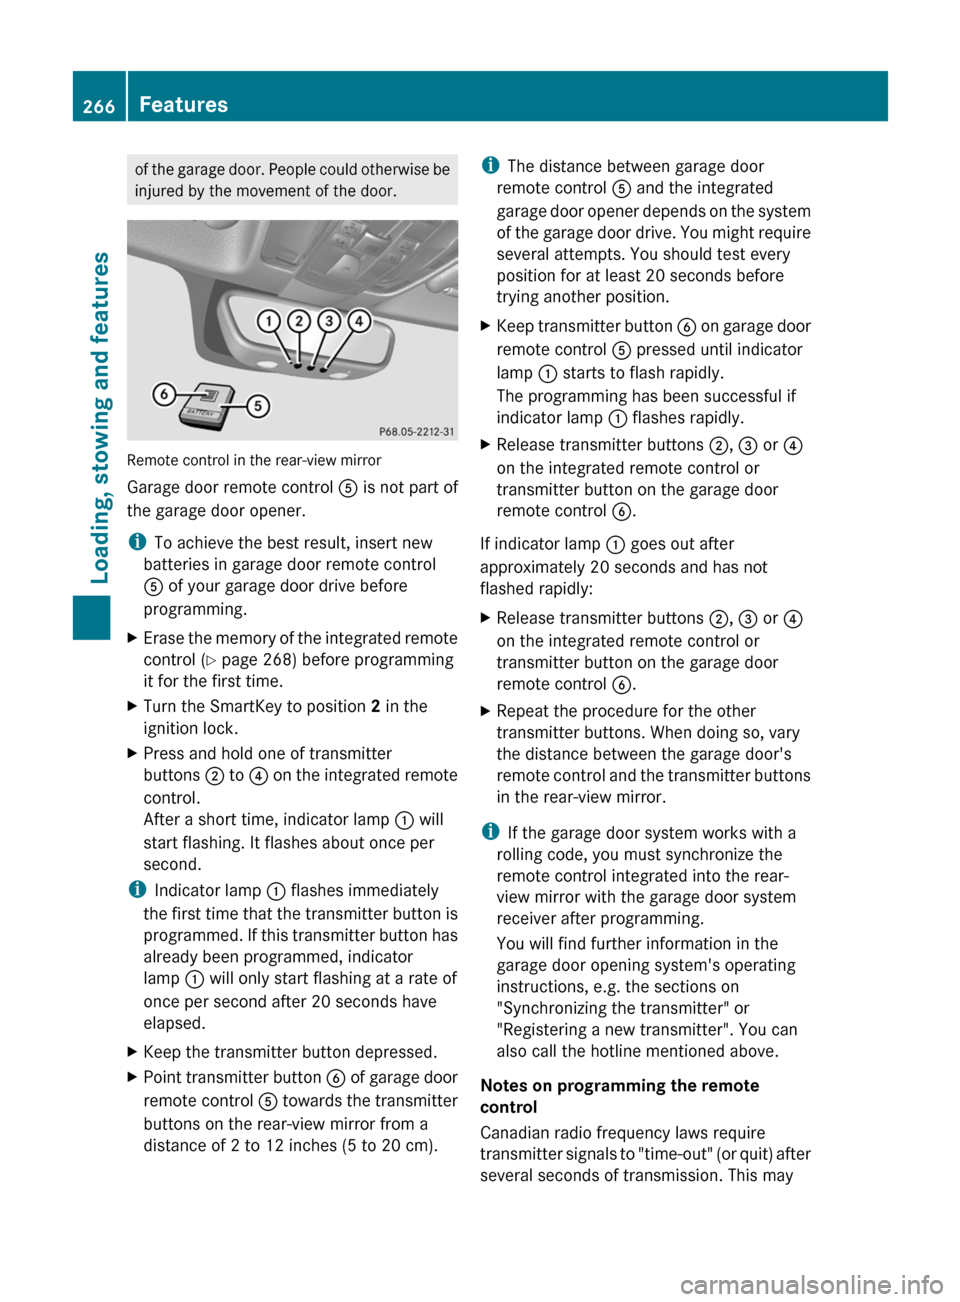
Remote control in the rear-view mirror
Garage door remote control A is not part of
the garage door opener.
i To achieve the best result, insert new
batteries in garage door remote control
A of your garage door drive before
programming.
XErase the memory of the integrated remote
control ( Y page 268) before programming
it for the first time.XTurn the SmartKey to position 2 in the
ignition lock.XPress and hold one of transmitter
buttons ; to ? on the integrated remote
control.
After a short time, indicator lamp : will
start flashing. It flashes about once per
second.
i Indicator lamp : flashes immediately
the first time that the transmitter button is
programmed. If this transmitter button has
already been programmed, indicator
lamp : will only start flashing at a rate of
once per second after 20 seconds have
elapsed.
XKeep the transmitter button depressed.XPoint transmitter button B of garage door
remote control A towards the transmitter
buttons on the rear-view mirror from a
distance of 2 to 12 inches (5 to 20 cm).i The distance between garage door
remote control A and the integrated
garage door opener depends on the system
of the garage door drive. You might require
several attempts. You should test every
position for at least 20 seconds before
trying another position.XKeep transmitter button B on garage door
remote control A pressed until indicator
lamp : starts to flash rapidly.
The programming has been successful if
indicator lamp : flashes rapidly.XRelease transmitter buttons ;, = or ?
on the integrated remote control or
transmitter button on the garage door
remote control B.
If indicator lamp : goes out after
approximately 20 seconds and has not
flashed rapidly:
XRelease transmitter buttons ;, = or ?
on the integrated remote control or
transmitter button on the garage door
remote control B.XRepeat the procedure for the other
transmitter buttons. When doing so, vary
the distance between the garage door's
remote control and the transmitter buttons
in the rear-view mirror.
i If the garage door system works with a
rolling code, you must synchronize the
remote control integrated into the rear-
view mirror with the garage door system
receiver after programming.
You will find further information in the
garage door opening system's operating
instructions, e.g. the sections on
"Synchronizing the transmitter" or
"Registering a new transmitter". You can
also call the hotline mentioned above.
Notes on programming the remote
control
Canadian radio frequency laws require
transmitter signals to "time-out" (or quit) after
several seconds of transmission. This may
266FeaturesLoading, stowing and features
BA 207 USA, CA Edition B 2011; 1; 3, en-USd2sboikeVersion: 3.0.3.62010-05-20T10:38:09+02:00 - Seite 266
Page 269 of 344
not be long enough for the integrated signal
transmitter to pick up the signal during
programming. Similar to this Canadian law,
some U.S. gate operators are designed to
"time-out" in the same manner.
If you live in Canada or have difficulties
programming the garage door opener
(regardless of where you live) when using the
programming steps (see above), proceed as
follows:XPress transmitter button ( ;, = or ?) and
hold it down during the following steps until
the setup has been completed
successfully.XAt the same time, press transmitter button
B of the garage door remote control for
two seconds, then release it for two
seconds, then press it again for two
seconds.XRepeat this sequence on transmitter
button B of the garage door remote
control until the frequency signal has been
learned.XIf the setup procedure is successful,
indicator lamp : flashes once slowly and
goes out after a few seconds.XContinue with the other programming
steps (see above).
Problems when programming
If you have problems when programming the
integrated remote control, please note the
following:
R check the transmitter frequency of garage
door remote control A (which can usually
be found on the rear of the remote control).
The integrated remote control is
compatible with equipment that operates
in the frequency range 280 to 390 MHz.
R replace the batteries in garage door remote
control A. This increases the likelihood of
garage door remote control A sending a
strong and precise signal to the integrated
remote control on the rear-view mirror.
R When aiming the garage door remote
control at the transmitter buttons on the
rear-view mirror, hold garage door remote
control A at differing distances and angles
from the transmitter button that you are
programming. Try different angles from a
distance of 2 to 12 inches (5 to 30 cm) or
the same angle from differing distances.
R If there is another garage door remote
control for the same device, perform the
programming steps again using the remote
control. Before performing these steps,
make sure that new batteries have been
installed in the garage door remote control.
R Align the antenna cable of the garage door
opener unit. This can improve signal
reception/transmission.
Opening or closing the garage door
Once programmed, the integrated remote
control will assume the function of the garage
door system's remote control. Please also
read the operating instructions for the garage
door system.
XTurn the SmartKey to position 2 in the
ignition lock.XPress transmitter button ;, = or ? in the
overhead control panel that you have
programmed to operate the garage door.
Garage door system with fixed code:
indicator lamp : lights up continuously.
Garage door system with rolling code:
indicator lamp : flashes briefly and then
lights up for approximately two seconds.
This is repeated for up to 20 seconds.
i The transmitter will transmit a signal for
as long as the transmitter button is being
pressed. The transmission will be halted
after a maximum of 20 seconds and
indicator lamp : will flash. Press the
transmitter button again, if necessary.
Features267Loading, stowing and featuresBA 207 USA, CA Edition B 2011; 1; 3, en-USd2sboikeVersion: 3.0.3.62010-05-20T10:38:09+02:00 - Seite 267Z
Page 301 of 344
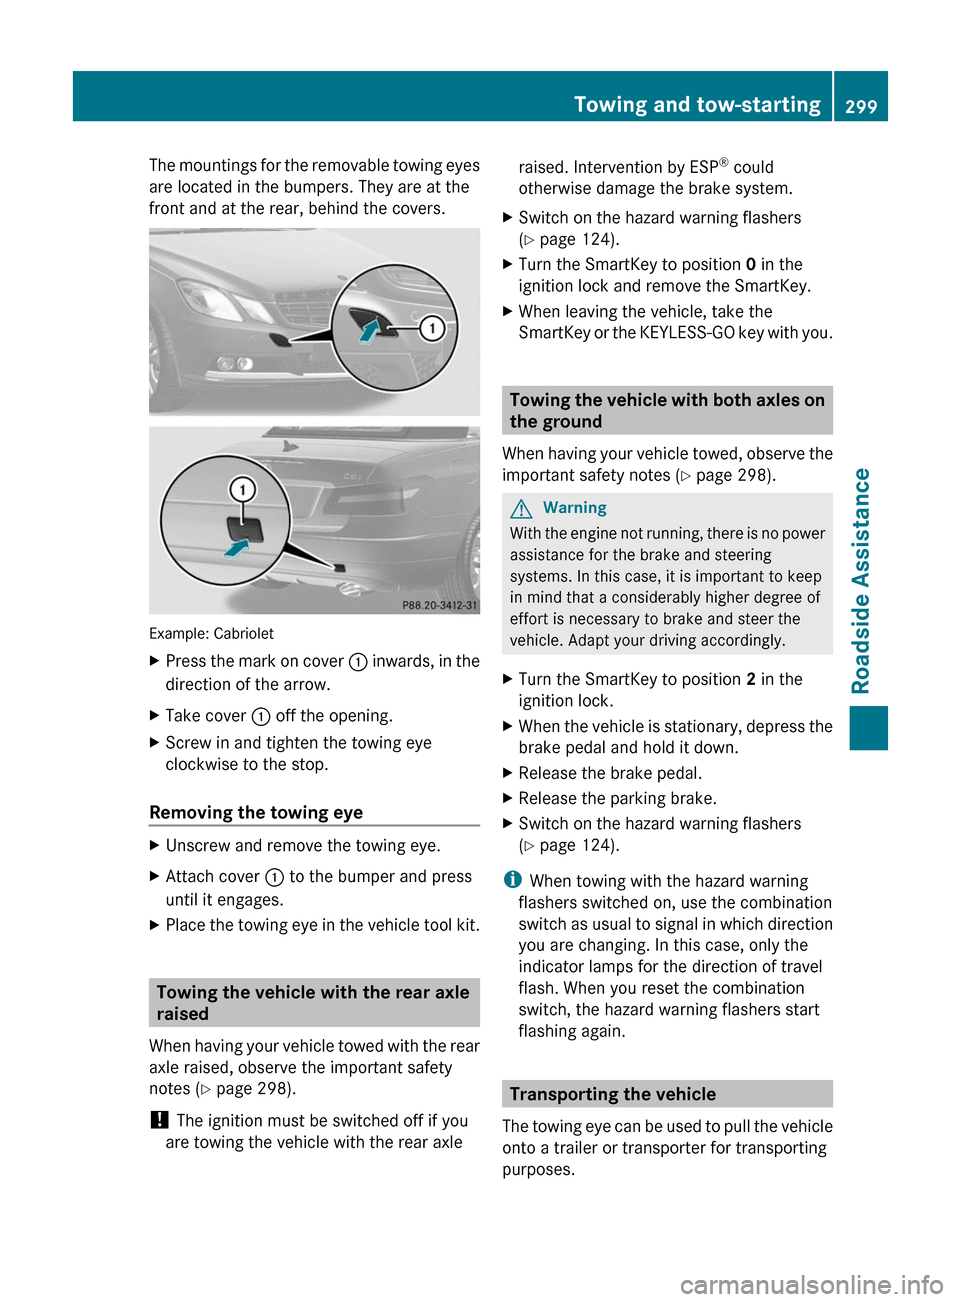
The mountings for the removable towing eyes
are located in the bumpers. They are at the
front and at the rear, behind the covers.
Example: Cabriolet
XPress the mark on cover : inwards, in the
direction of the arrow.
XTake cover : off the opening.XScrew in and tighten the towing eye
clockwise to the stop.
Removing the towing eye
XUnscrew and remove the towing eye.XAttach cover : to the bumper and press
until it engages.
XPlace the towing eye in the vehicle tool kit.
Towing the vehicle with the rear axle
raised
When having your vehicle towed with the rear
axle raised, observe the important safety
notes (Y page 298).
! The ignition must be switched off if you
are towing the vehicle with the rear axle
raised. Intervention by ESP® could
otherwise damage the brake system.
XSwitch on the hazard warning flashers
(Y page 124).
XTurn the SmartKey to position 0 in the
ignition lock and remove the SmartKey.
XWhen leaving the vehicle, take the
SmartKey or the KEYLESS-GO key with you.
Towing the vehicle with both axles on
the ground
When having your vehicle towed, observe the
important safety notes (Y page 298).
GWarning
With the engine not running, there is no power
assistance for the brake and steering
systems. In this case, it is important to keep
in mind that a considerably higher degree of
effort is necessary to brake and steer the
vehicle. Adapt your driving accordingly.
XTurn the SmartKey to position 2 in the
ignition lock.
XWhen the vehicle is stationary, depress the
brake pedal and hold it down.
XRelease the brake pedal.XRelease the parking brake.XSwitch on the hazard warning flashers
(Y page 124).
iWhen towing with the hazard warning
flashers switched on, use the combination
switch as usual to signal in which direction
you are changing. In this case, only the
indicator lamps for the direction of travel
flash. When you reset the combination
switch, the hazard warning flashers start
flashing again.
Transporting the vehicle
The towing eye can be used to pull the vehicle
onto a trailer or transporter for transporting
purposes.
Towing and tow-starting299Roadside AssistanceBA 207 USA, CA Edition B 2011; 1; 3, en-USd2sboikeVersion: 3.0.3.62010-05-20T10:38:09+02:00 - Seite 299Z