Lights MERCEDES-BENZ E-Class COUPE 2011 C207 Owner's Guide
[x] Cancel search | Manufacturer: MERCEDES-BENZ, Model Year: 2011, Model line: E-Class COUPE, Model: MERCEDES-BENZ E-Class COUPE 2011 C207Pages: 344, PDF Size: 14.06 MB
Page 144 of 344
bdirects the airflow through the
defroster, center and side air vents 12adirects the airflow through the footwell
and defroster vents
i Regardless of the air distribution setting,
airflow is always directed through the side
air vents. The side air vents can only be
closed when the controls on the side air
vents are turned downwards.
Dual-zone automatic climate control
XTurn the key to position 2 in the ignition
lock.XPress switch F up or down repeatedly until
the desired symbol appears in the display
( Y page 135).
3-zone automatic climate control
XTurn the key to position 2 in the ignition
lock.XPress switch F11
or I12
up or down
repeatedly until the desired symbol
appears in the display ( Y page 137).
Setting the airflow
Dual-zone automatic climate control
XTurn the SmartKey to position 2 in the
ignition lock.XTo increase/reduce: press switch G up
or down ( Y page 135).
3-zone automatic climate control
XTurn the SmartKey to position 2 in the
ignition lock.XTo increase/reduce: press switch H up
or down ( Y page 137).Switching the ZONE function on/offXTo switch on: press the á button
( Y page 135), ( Y page 137).
The indicator lamp above the á button
lights up.
Dual-zone automatic climate control: the
temperature setting for the driver's side is
not adopted for the front-passenger side.
3-zone automatic climate control: the
temperature setting on the driver's side is
not adopted for the front-passenger side or
the rear compartment.
When the buttons for temperature, airflow or
air distribution are activated, the temperature
setting on the driver's side is not adopted for
the other climate control zones.
XTo switch off: press the á button
( Y page 135), ( Y page 137).
The indicator lamp above the á button
goes out.
Dual-zone automatic climate control: the
temperature setting for the driver's side is
not adopted for the front-passenger side.
3-zone automatic climate control: the
temperature setting on the driver's side is
not adopted for the front-passenger side or
the rear compartment.
Defrosting the windshield
You can use this function to defrost the
windshield or to defrost the inside of the
windshield and the side windows.
i You should only select the defrosting
function until the windshield is clear again.
XTurn the SmartKey to position 2 in the
ignition lock.XTo activate: press the ¬ button.
The indicator lamp above the ¬ button
lights up.12 Canada only.
11 USA only.142Operating the control systemsClimate control
BA 207 USA, CA Edition B 2011; 1; 3, en-USd2sboikeVersion: 3.0.3.62010-05-20T10:38:09+02:00 - Seite 142
Page 145 of 344
The climate control system switches to the
following functions:
R cooling with air dehumidification on
R high airflow 13
R high temperature 13
R air distribution to the windshield and
front side windows
R air-recirculation mode offXTo deactivate: press the ¬ button.
The indicator lamp above the ¬ button
goes out. The previously selected settings
come into effect again. The cooling with air
dehumidification function remains on. Air-
recirculation mode remains deactivated.
or
XPress the à button.
The indicator lamp above the ¬ button
goes out. Airflow and air distribution are set
to automatic mode.
or
XDual-zone automatic climate control:
press switch E or H up or down
( Y page 135).
3-zone automatic climate control: press
switch F or J up or down ( Y page 137).
or
XDual-zone automatic climate control:
press switch G up or down ( Y page 135).
3-zone automatic climate control: press
switch H up or down ( Y page 137).
Maximum cooling MAX COOL
The MAX COOL function is only available in
vehicles for the USA.
MAX COOL is only operational when the
engine is running.
When you activate MAX COOL, climate
control switches to the following functions:
R maximum cooling
R maximum airflow
R air-recirculation mode onXTo activate: press the Ù button.
The indicator lamp above the button lights
up.XTo deactivate: press the Ù button
again.
The indicator lamp goes out. The previously
selected settings come into effect again.
Defrosting the windows
Windows fogged up on the inside
XActivate the "cooling with air
dehumidification" function ¿.XActivate automatic mode Ã.XIf the windows continue to fog up, activate
the defrosting function ( Y page 142).
i
You should only select this setting until
the windshield is clear again.
Windows fogged up on the outside
XSwitch on the windshield wipers.Xdual-zone automatic climate control:
press switch F up or down ( Y page 135)
until the P or O symbol appears in
the display.X3-zone automatic climate control: press
switch I up or down (Y page 137) until the
P or O symbol appears in the
display.
i You should only select this setting until
the windshield is clear again.
13 Depending on the outside temperature.Operating the control systems143Climate controlBA 207 USA, CA Edition B 2011; 1; 3, en-USd2sboikeVersion: 3.0.3.62010-05-20T10:38:09+02:00 - Seite 143Z
Page 146 of 344
Rear window heating
Activating/deactivatingGWarning
Any accumulation of snow and ice should be
removed from the rear window before driving.
Visibility could otherwise be impaired,
endangering you and others.
The rear window heating has a high current
draw. You should therefore switch it off as
soon as the window is clear as it only switches
off automatically after several minutes.
If the battery voltage is too low, the rear
window heating may switch off.
XTurn the SmartKey to position 2 in the
ignition lock.XPress the ¤ button.
The indicator lamp above the ¤ button
lights up or goes out.
Problems with the rear window heating
The rear window heating has deactivated
itself prematurely or cannot be activated.
XSwitch off any consumers that are not
required, e.g. reading lamps or interior
lighting.
When the battery is sufficiently charged,
the rear window heating is activated again
automatically.
Activating/deactivating air-
recirculation mode
You can deactivate the flow of fresh air if
unpleasant odors are entering the vehicle
from outside. The air already inside the
vehicle will then be recirculated.
The operation of the air-recirculation mode is
the same for all control panels.
GWarning
Fogged windows impair visibility,
endangering you and others. If the windows
begin to fog on the inside, switching off the
air recirculation mode immediately should
clear interior window fogging. If interior
window fogging persists, make sure the air
conditioning is activated, or press the ¬
button.XTurn the SmartKey to position 2 in the
ignition lock.XTo activate: press the g button.
The indicator lamp above the g button
lights up.
i Air-recirculation mode is activated
automatically at high outside
temperatures. When air-recirculation mode
is activated automatically, the indicator
lamp above the g button is not lit.
Outside air is added after about 30
minutes.
XTo deactivate: press the g button.
The indicator lamp above the g button
goes out.
i Air-recirculation mode switches off
automatically:
R after approximately five minutes if
outside temperatures are under about
41 ‡ (5 †)
R after approximately five minutes if
cooling with air dehumidification is
deactivated
R after approximately 30 minutes if outside
temperatures are over about
41 ‡ (5 †)
Switching the residual heat on/off
Only 3-zone automatic climate control in
vehicles in Canada features the "residual
heat" function.
It is possible to make use of the residual heat
of the engine to continue heating the
stationary vehicle for up to 30 minutes after
the engine has been switched off. The heating
time depends on the temperature that has
been set.
144Operating the control systemsClimate control
BA 207 USA, CA Edition B 2011; 1; 3, en-USd2sboikeVersion: 3.0.3.62010-05-20T10:38:09+02:00 - Seite 144
Page 147 of 344
Coupe: the "residual heat" function only
works optimally when the side windows and
panorama roof with power tilt/sliding panel
are closed.
Cabriolet: the "residual heat" function only
works optimally when the soft top is closed.
iThe blower will run at a low speed
regardless of the airflow setting.
iIf you activate the "residual heat" function
at high temperatures, only the ventilation
will be activated. The blower runs at
medium speed.
iIt is possible that the "residual heat"
function may be activated automatically an
hour after the SmartKey is removed. The
vehicle is then ventilated for 30 minutes to
dry the air-conditioning system.
XTurn the SmartKey to position 0 in the
ignition lock or remove it.
XTo switch on: press the Ì button.
The indicator lamp above the Ì button
lights up.
XTo switch off: press the Ì button.
The indicator lamp above button Ì goes
out.
iResidual heat is deactivated
automatically:
Rafter about 30 minutes
Rwhen the ignition is switched on
Rif the battery voltage drops
Rif the coolant temperature is too low
Setting the air vents
Important safety notes
GWarning
When operating the climate control, the air
that enters the passenger compartment
through the air vents can be very hot or very
cold (depending on the set temperature). This
could cause burns or frostbite to unprotected
skin in the immediate area of the air vents.
Always keep sufficient distance between
unprotected parts of the body and the air
vents. If necessary, use the air distribution
adjustment to direct the air to air vents in the
vehicle interior that are not in the immediate
area of unprotected skin.
In order to ensure the direct flow of fresh air
through the air vents into the vehicle interior,
please observe the following notes:
Rkeep the air inlet between the windshield
and the hood free of blockages, such as ice,
snow or leaves
Rnever cover the vents or air inlet and outlet
grilles in the vehicle interior.
iFor virtually draft-free ventilation, adjust
the sliders of the air vents to the center
position.
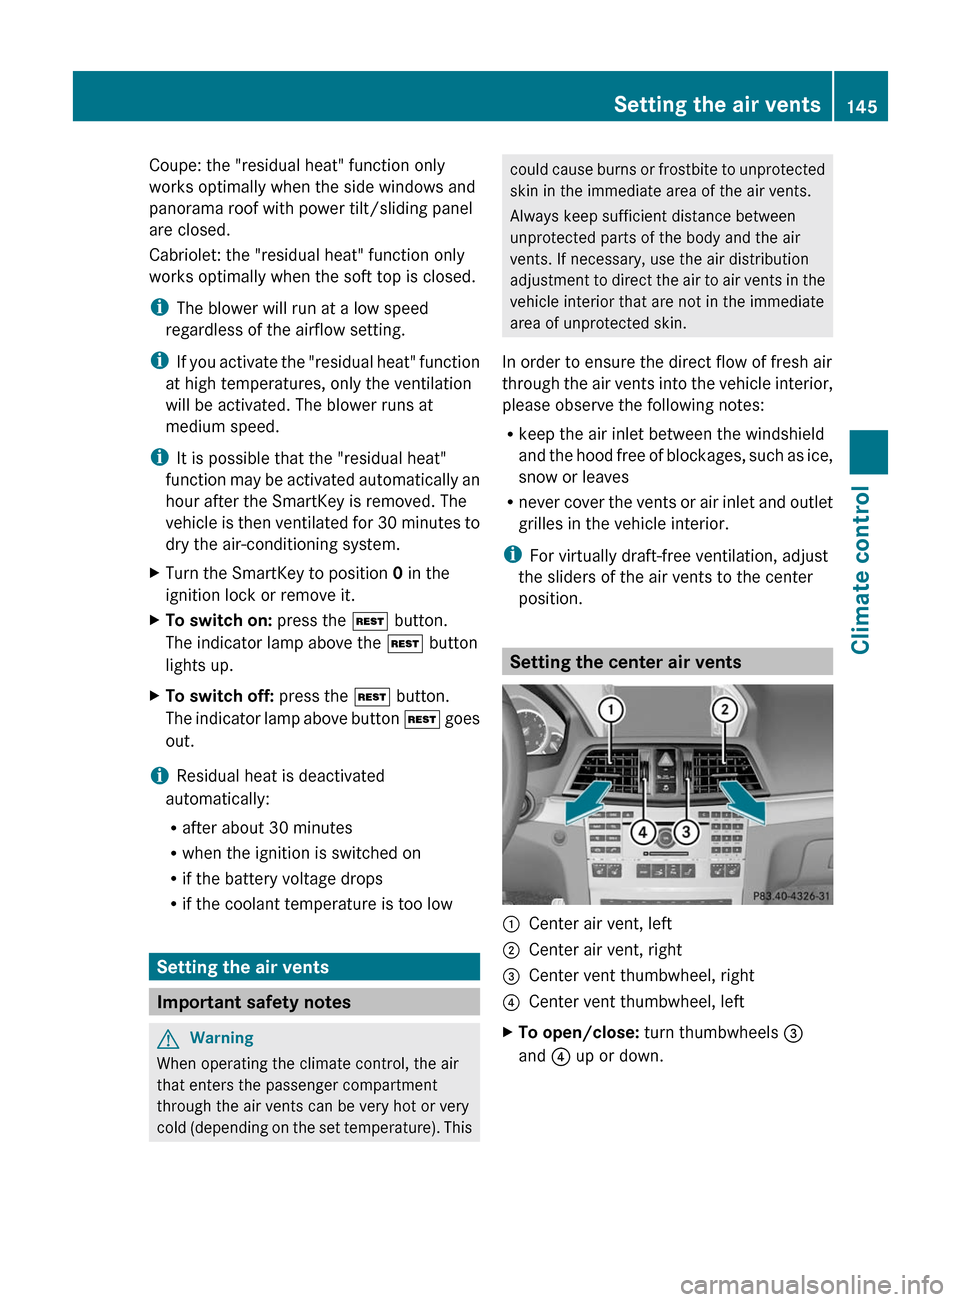
Setting the center air vents
:Center air vent, left;Center air vent, right=Center vent thumbwheel, right?Center vent thumbwheel, leftXTo open/close: turn thumbwheels =
and ? up or down.
Setting the air vents145Climate controlBA 207 USA, CA Edition B 2011; 1; 3, en-USd2sboikeVersion: 3.0.3.62010-05-20T10:38:09+02:00 - Seite 145Z
Page 153 of 344
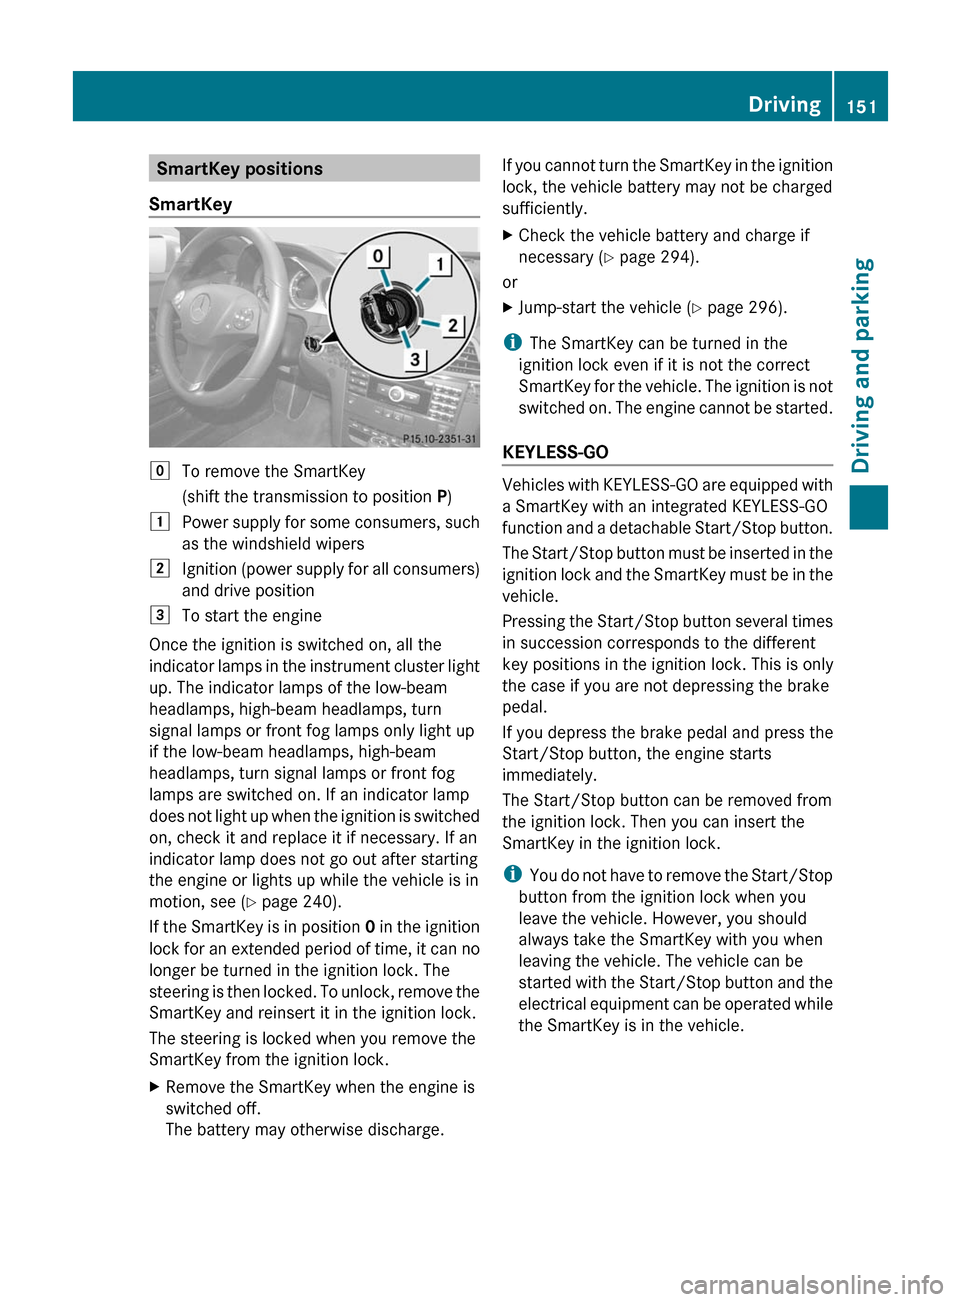
SmartKey positions
SmartKeygTo remove the SmartKey
(shift the transmission to position P)1Power supply for some consumers, such
as the windshield wipers2Ignition (power supply for all consumers)
and drive position3To start the engine
Once the ignition is switched on, all the
indicator lamps in the instrument cluster light
up. The indicator lamps of the low-beam
headlamps, high-beam headlamps, turn
signal lamps or front fog lamps only light up
if the low-beam headlamps, high-beam
headlamps, turn signal lamps or front fog
lamps are switched on. If an indicator lamp
does not light up when the ignition is switched
on, check it and replace it if necessary. If an
indicator lamp does not go out after starting
the engine or lights up while the vehicle is in
motion, see ( Y page 240).
If the SmartKey is in position 0 in the ignition
lock for an extended period of time, it can no
longer be turned in the ignition lock. The
steering is then locked. To unlock, remove the
SmartKey and reinsert it in the ignition lock.
The steering is locked when you remove the
SmartKey from the ignition lock.
XRemove the SmartKey when the engine is
switched off.
The battery may otherwise discharge.If you cannot turn the SmartKey in the ignition
lock, the vehicle battery may not be charged
sufficiently.XCheck the vehicle battery and charge if
necessary ( Y page 294).
or
XJump-start the vehicle ( Y page 296).
i
The SmartKey can be turned in the
ignition lock even if it is not the correct
SmartKey for the vehicle. The ignition is not
switched on. The engine cannot be started.
KEYLESS-GO
Vehicles with KEYLESS-GO are equipped with
a SmartKey with an integrated KEYLESS-GO
function and a detachable Start/Stop button.
The Start/Stop button must be inserted in the
ignition lock and the SmartKey must be in the
vehicle.
Pressing the Start/Stop button several times
in succession corresponds to the different
key positions in the ignition lock. This is only
the case if you are not depressing the brake
pedal.
If you depress the brake pedal and press the
Start/Stop button, the engine starts
immediately.
The Start/Stop button can be removed from
the ignition lock. Then you can insert the
SmartKey in the ignition lock.
i You do not have to remove the Start/Stop
button from the ignition lock when you
leave the vehicle. However, you should
always take the SmartKey with you when
leaving the vehicle. The vehicle can be
started with the Start/Stop button and the
electrical equipment can be operated while
the SmartKey is in the vehicle.
Driving151Driving and parkingBA 207 USA, CA Edition B 2011; 1; 3, en-USd2sboikeVersion: 3.0.3.62010-05-20T10:38:09+02:00 - Seite 151Z
Page 154 of 344
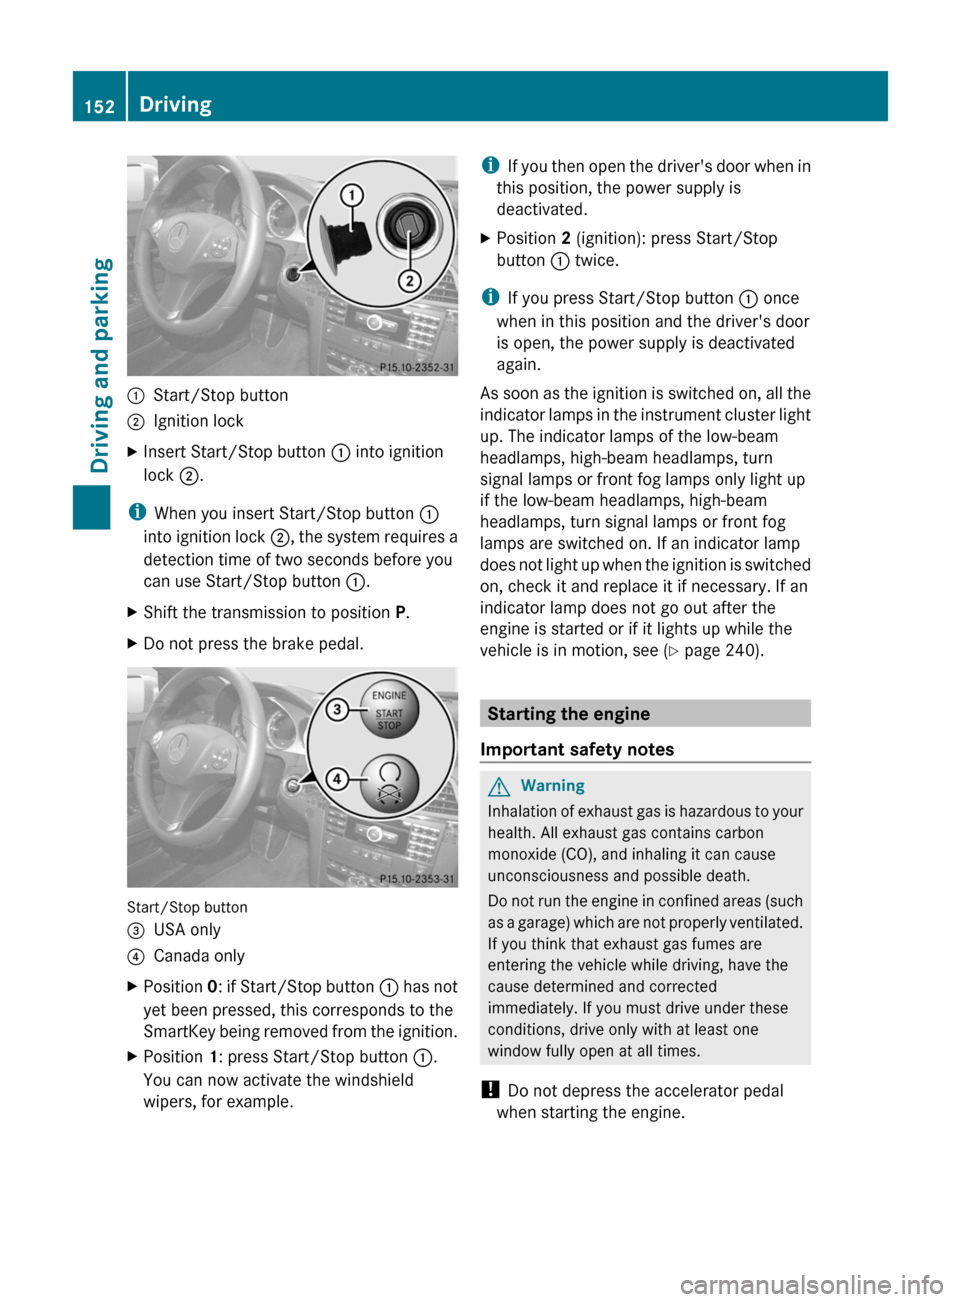
:Start/Stop button;Ignition lockXInsert Start/Stop button : into ignition
lock ;.
i
When you insert Start/Stop button :
into ignition lock ;, the system requires a
detection time of two seconds before you
can use Start/Stop button :.
XShift the transmission to position P.XDo not press the brake pedal.
Start/Stop button
=USA only?Canada onlyXPosition 0: if Start/Stop button : has not
yet been pressed, this corresponds to the
SmartKey being removed from the ignition.XPosition 1: press Start/Stop button :.
You can now activate the windshield
wipers, for example.i If you then open the driver's door when in
this position, the power supply is
deactivated.XPosition 2 (ignition): press Start/Stop
button : twice.
i
If you press Start/Stop button : once
when in this position and the driver's door
is open, the power supply is deactivated
again.
As soon as the ignition is switched on, all the
indicator lamps in the instrument cluster light
up. The indicator lamps of the low-beam
headlamps, high-beam headlamps, turn
signal lamps or front fog lamps only light up
if the low-beam headlamps, high-beam
headlamps, turn signal lamps or front fog
lamps are switched on. If an indicator lamp
does not light up when the ignition is switched
on, check it and replace it if necessary. If an
indicator lamp does not go out after the
engine is started or if it lights up while the
vehicle is in motion, see ( Y page 240).
Starting the engine
Important safety notes
GWarning
Inhalation of exhaust gas is hazardous to your
health. All exhaust gas contains carbon
monoxide (CO), and inhaling it can cause
unconsciousness and possible death.
Do not run the engine in confined areas (such
as a garage) which are not properly ventilated.
If you think that exhaust gas fumes are
entering the vehicle while driving, have the
cause determined and corrected
immediately. If you must drive under these
conditions, drive only with at least one
window fully open at all times.
! Do not depress the accelerator pedal
when starting the engine.
152DrivingDriving and parking
BA 207 USA, CA Edition B 2011; 1; 3, en-USd2sboikeVersion: 3.0.3.62010-05-20T10:38:09+02:00 - Seite 152
Page 168 of 344
Vehicles with automatic transmissionXApply the parking brake firmly.XShift the transmission to position P.
Using the SmartKey
XTurn the SmartKey to position 0 in the
ignition lock and remove it.
The immobilizer is activated.
iThe SmartKey can only be removed if the
transmission is in position P.
Using KEYLESS-GO
XPress the Start/Stop button (Y page 151).
When the driver's door is closed, the Start/
Stop button is in position 1. When the
driver's door is opened, the Start/Stop
button moves to position 0. This
corresponds to removing the SmartKey.
If you attempt to turn off the engine when the
selector lever is not in position P, a warning
signal sounds.
Observe the messages in the multifunction
display.
iIn an emergency, you can turn off the
engine while the vehicle is in motion by
pressing and holding the Start/Stop button
for three seconds.
Parking brake
GWarning
Engaging the parking brake while the vehicle
is in motion can cause the rear wheels to lock
up. You could lose control of the vehicle and
cause an accident. In addition, the vehicle's
brake lights do not light up when the parking
brake is engaged.
GWarning!
When leaving the vehicle, always remove the
SmartKey from the starter switch, take it with
you, and lock the vehicle. Do not leave
children unattended in the vehicle, or with
access to an unlocked vehicle. Children could
release the parking brake and/or shift the
automatic transmission out of park position
P, either of which could result in an accident
and/or serious personal injury.
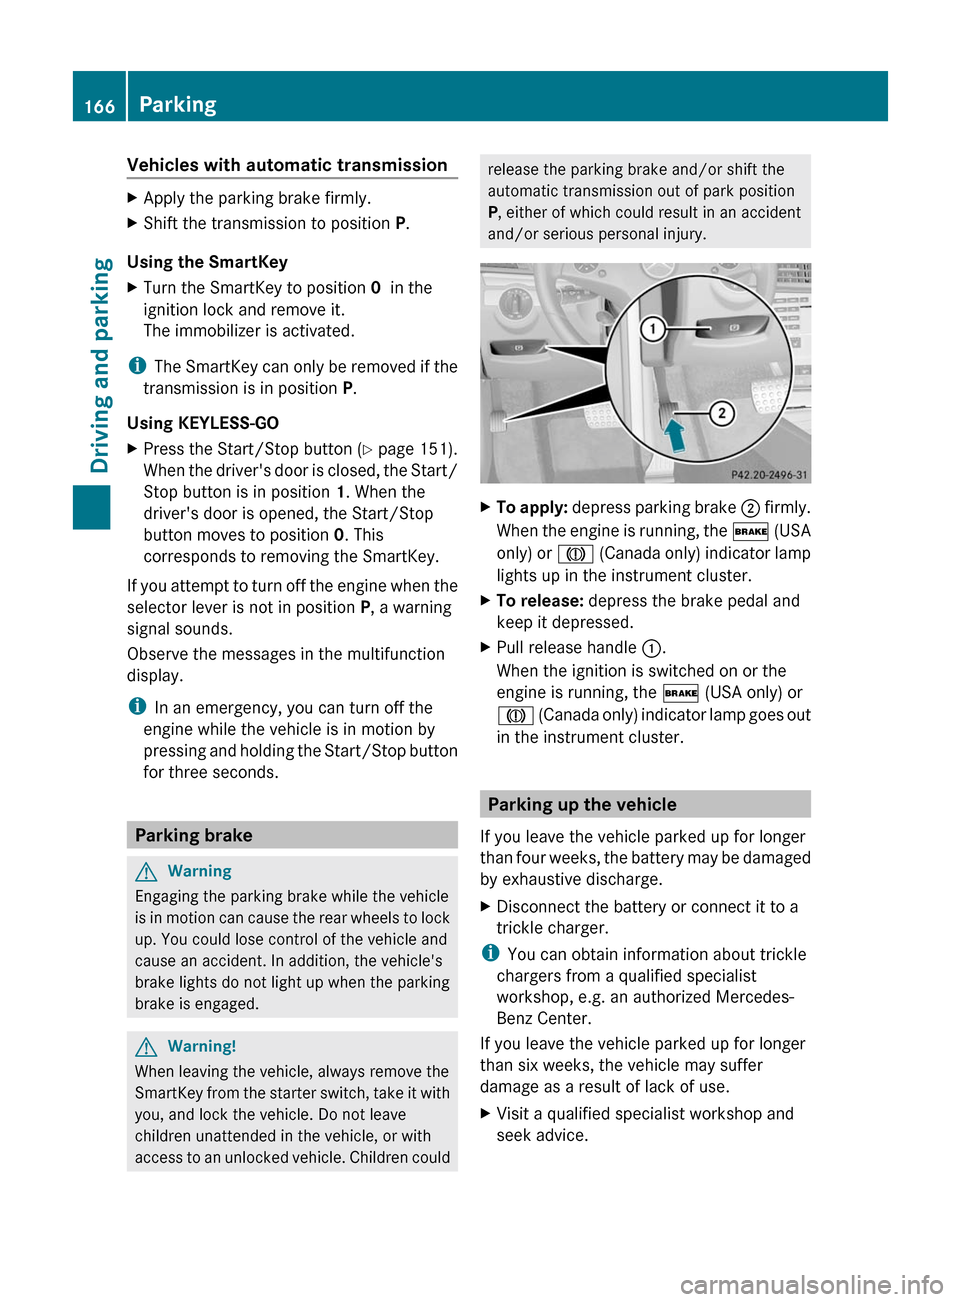
XTo apply: depress parking brake ; firmly.
When the engine is running, the $ (USA
only) or J (Canada only) indicator lamp
lights up in the instrument cluster.
XTo release: depress the brake pedal and
keep it depressed.
XPull release handle :.
When the ignition is switched on or the
engine is running, the $ (USA only) or
J (Canada only) indicator lamp goes out
in the instrument cluster.
Parking up the vehicle
If you leave the vehicle parked up for longer
than four weeks, the battery may be damaged
by exhaustive discharge.
XDisconnect the battery or connect it to a
trickle charger.
iYou can obtain information about trickle
chargers from a qualified specialist
workshop, e.g. an authorized Mercedes-
Benz Center.
If you leave the vehicle parked up for longer
than six weeks, the vehicle may suffer
damage as a result of lack of use.
XVisit a qualified specialist workshop and
seek advice.
166ParkingDriving and parking
BA 207 USA, CA Edition B 2011; 1; 3, en-USd2sboikeVersion: 3.0.3.62010-05-20T10:38:09+02:00 - Seite 166
Page 171 of 344
attention to the traffic conditions. This will
warm up the brake discs, thereby drying them
more quickly and protecting them against
corrosion.
Limited braking performance on salt
treated roadsGWarning
The layer of salt on the brake discs and the
brake pads/linings may cause a delay in the
braking effect, resulting in a significantly
longer braking distance, which could lead to
an accident.
To avoid this danger, you should:
R occasionally brake carefully, without
putting other road users at risk, when you
are driving on salted roads. This helps to
remove any salt that may have started to
build up on the brake discs and the brake
pads/linings.
R maintain a greater distance to the vehicle
ahead and drive with particular care.
R carefully apply the brakes at the end of a
trip and immediately after commencing a
new trip, so that salt residues are removed
from the brake discs.
Maintenance of the brakes
! If the red brake warning lamp lights up in
the instrument cluster and you hear a
warning tone while the engine is running,
the brake fluid level may be too low.
Observe additional warning messages in
the multifunction display.
The brake fluid level may be too low due to
brake pad wear or leaking brake lines.
Have the brake system checked
immediately. This work should be carried
out at an authorized Mercedes-Benz
Center.
All checks and maintenance work on the
brake system must be carried out at a
qualified specialist workshop. This work
should be carried out at an authorized
Mercedes-Benz Center.
Only install brake pads and use brake fluid
recommended by Mercedes-Benz.GWarning
If other than recommended brake pads are
installed, or other than recommended brake
fluid is used, the braking properties of the
vehicle can be degraded to an extent that safe
braking is substantially impaired. This could
result in an accident.
! As the ESP ®
system operates
automatically, the engine and the ignition
system must be switched off (SmartKey in
position 0 or 1 in the ignition lock or Start/
Stop button in position 0 or 1) when:
R testing the parking brake on a brake
dynamometer.
R you intend to have the vehicle towed with
one of the axles raised.
Braking maneuvers triggered automatically
by ESP ®
may seriously damage the brake
system.
If your brake system is only subjected to
moderate loads, you should regularly test
your brake system's function by forcefully
depressing the brake pedal when driving at
high speed. This will give the brake pads
better grip.
GWarning
Make sure that you do not endanger other
road users when you apply the brakes.
A description of Brake Assist (BAS) can be
found on ( Y page 65) or of BAS PLUS on
( Y page 65).
Driving tips169Driving and parkingBA 207 USA, CA Edition B 2011; 1; 3, en-USd2sboikeVersion: 3.0.3.62010-05-20T10:38:09+02:00 - Seite 169Z
Page 185 of 344
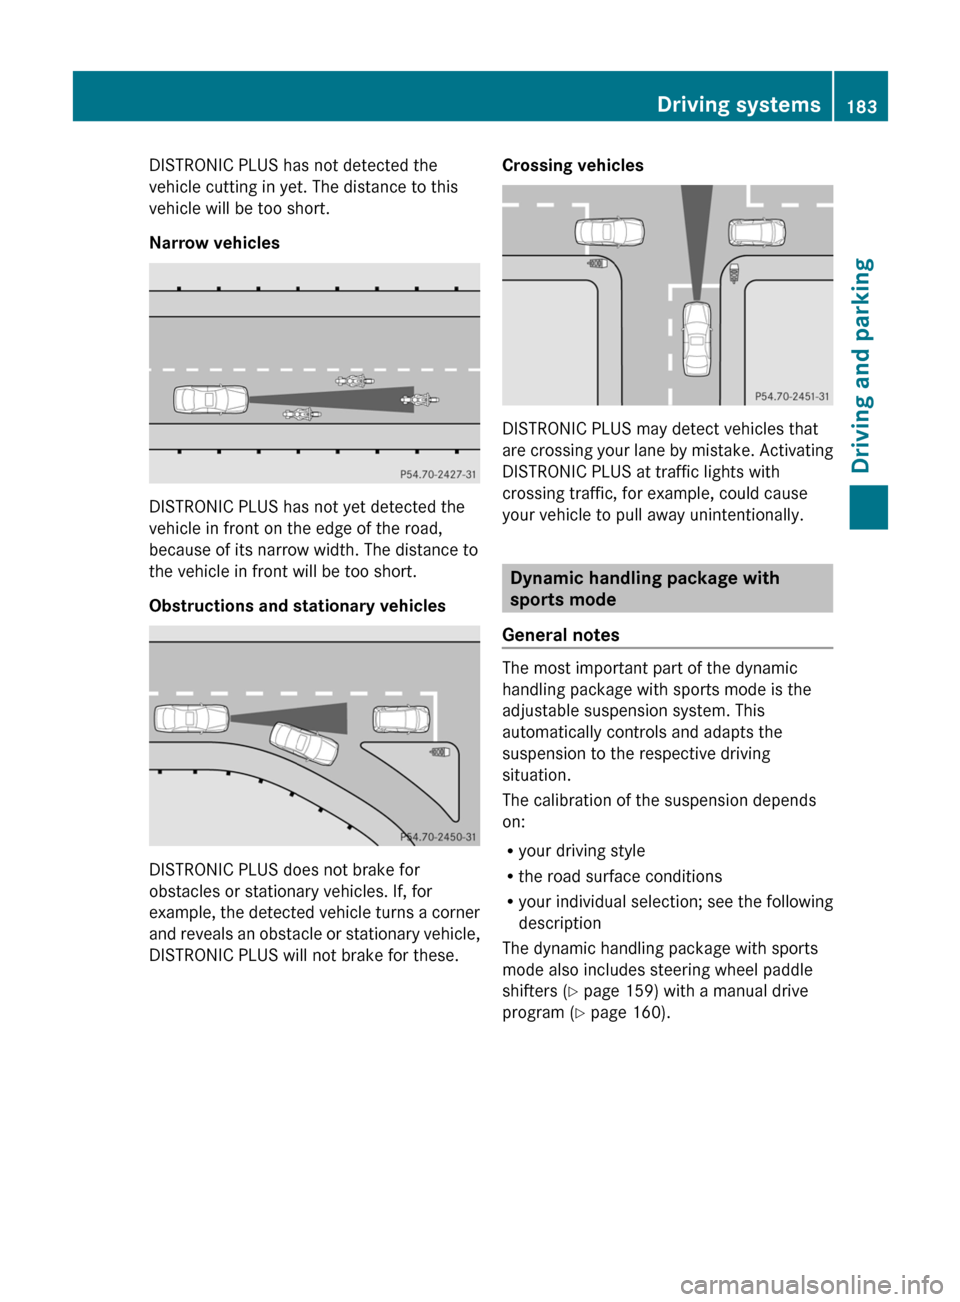
DISTRONIC PLUS has not detected the
vehicle cutting in yet. The distance to this
vehicle will be too short.
Narrow vehicles
DISTRONIC PLUS has not yet detected the
vehicle in front on the edge of the road,
because of its narrow width. The distance to
the vehicle in front will be too short.
Obstructions and stationary vehicles
DISTRONIC PLUS does not brake for
obstacles or stationary vehicles. If, for
example, the detected vehicle turns a corner
and reveals an obstacle or stationary vehicle,
DISTRONIC PLUS will not brake for these.
Crossing vehicles
DISTRONIC PLUS may detect vehicles that
are crossing your lane by mistake. Activating
DISTRONIC PLUS at traffic lights with
crossing traffic, for example, could cause
your vehicle to pull away unintentionally.
Dynamic handling package with
sports mode
General notes
The most important part of the dynamic
handling package with sports mode is the
adjustable suspension system. This
automatically controls and adapts the
suspension to the respective driving
situation.
The calibration of the suspension depends
on:
Ryour driving style
Rthe road surface conditions
Ryour individual selection; see the following
description
The dynamic handling package with sports
mode also includes steering wheel paddle
shifters (Y page 159) with a manual drive
program (Y page 160).
Driving systems183Driving and parkingBA 207 USA, CA Edition B 2011; 1; 3, en-USd2sboikeVersion: 3.0.3.62010-05-20T10:38:09+02:00 - Seite 183Z
Page 186 of 344
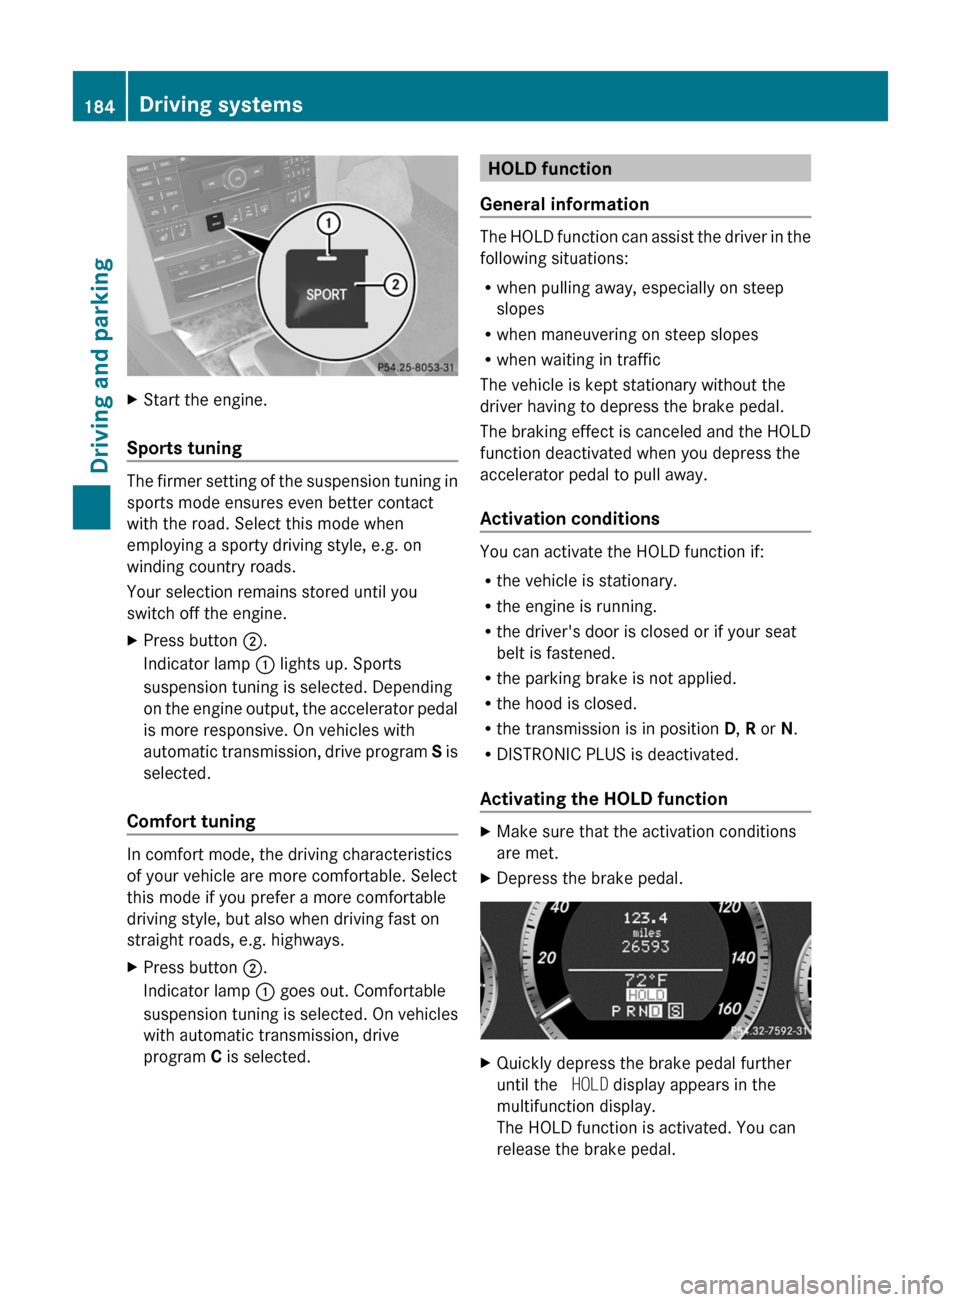
XStart the engine.
Sports tuning
The firmer setting of the suspension tuning in
sports mode ensures even better contact
with the road. Select this mode when
employing a sporty driving style, e.g. on
winding country roads.
Your selection remains stored until you
switch off the engine.
XPress button ;.
Indicator lamp : lights up. Sports
suspension tuning is selected. Depending
on the engine output, the accelerator pedal
is more responsive. On vehicles with
automatic transmission, drive program S is
selected.
Comfort tuning
In comfort mode, the driving characteristics
of your vehicle are more comfortable. Select
this mode if you prefer a more comfortable
driving style, but also when driving fast on
straight roads, e.g. highways.
XPress button ;.
Indicator lamp : goes out. Comfortable
suspension tuning is selected. On vehicles
with automatic transmission, drive
program C is selected.HOLD function
General information
The HOLD function can assist the driver in the
following situations:
R when pulling away, especially on steep
slopes
R when maneuvering on steep slopes
R when waiting in traffic
The vehicle is kept stationary without the
driver having to depress the brake pedal.
The braking effect is canceled and the HOLD
function deactivated when you depress the
accelerator pedal to pull away.
Activation conditions
You can activate the HOLD function if:
R the vehicle is stationary.
R the engine is running.
R the driver's door is closed or if your seat
belt is fastened.
R the parking brake is not applied.
R the hood is closed.
R the transmission is in position D, R or N.
R DISTRONIC PLUS is deactivated.
Activating the HOLD function
XMake sure that the activation conditions
are met.XDepress the brake pedal.XQuickly depress the brake pedal further
until the HOLD display appears in the
multifunction display.
The HOLD function is activated. You can
release the brake pedal.184Driving systemsDriving and parking
BA 207 USA, CA Edition B 2011; 1; 3, en-USd2sboikeVersion: 3.0.3.62010-05-20T10:38:09+02:00 - Seite 184