stop start MERCEDES-BENZ E-Class COUPE 2017 C207 Owner's Guide
[x] Cancel search | Manufacturer: MERCEDES-BENZ, Model Year: 2017, Model line: E-Class COUPE, Model: MERCEDES-BENZ E-Class COUPE 2017 C207Pages: 318, PDF Size: 7.35 MB
Page 138 of 318

GWARNING
Electrostatic buildup can create sparks and
ignite fuel vapors. There is a risk of fire and
explosion.
Always touch the vehicle body before opening
the fuel filler flap or touching the fuel pump
nozzle. Any existing electrostatic buildup is
thereby discharged.
!Do not use diesel to refuel vehicles with a
gasoline engine. Do not switch on the ignition
if you accidentally refuel with the wrong fuel.
Otherwise, the fuel will enter the fuel system. Even small amounts of the wrong fuel could
result in damage to the fuel system and the
engine. Notify a qualified specialist workshop
and have the fuel tank and fuel lines drained
completely.
!Overfilling the fuel tank could damage the
fuel system.
!Take care not to spill any fuel on painted
surfaces. You could otherwise damage the
paintwork.
!Use a filter when refueling from a fuel can.
Otherwise, the fuel lines and/or injection sys-
tem could be blocked by particles from the
fuel can.
Do not get into the vehicle again during the refu-
eling process. Otherwise, electrostatic charge
could build up again.
If you overfill the fuel tank, fuel could spray out
when the fuel pump nozzle is removed.
iFlexible Fuel vehicles can be recognized by
the Ethanol up to E85 sticker on the inside of
the fuel filler flap.
For further information on fuel and fuel quality
(
Ypage 309).
Refueling
General information
Pay attention to the important safety notes
(Ypage 135).
The fuel filler flap is unlocked or locked auto-
matically when you unlock or lock the vehicle
with the key or using KEYLESS-GO. The position of the fuel filler cap is displayed
8
in the instrument cluster. The arrow next
to the filling pump indicates the side of the vehi-
cle.
Opening the fuel filler flap
:To open the fuel filler flap
;To insert the fuel filler cap
=Tire pressure table
?Instruction label for fuel type to be refueled
XSwitch off the engine.
XRemove the SmartKey from the ignition lock.
or, on vehicles with KEYLESS‑GO:
XOpen the driver's door.
The on-board electronics now have status 0.
This is the same as the SmartKey having been
removed.
XRemove the Start/Stop button from the igni-
tion lock (Ypage 122).
XPress the fuel filler flap in the direction of
arrow :.
The fuel filler flap opens slightly.
XOpen the fuel filler flap fully.
XTurn the fuel filler cap counterclockwise and
remove it.
XInsert the fuel filler cap into the holder
bracket on the inside of filler flap ;.
XCompletely insert the filler neck of the fuel
pump nozzle into the tank, hook in place and
refuel.
XOnly fill the tank until the pump nozzle
switches off.
Do not add any more fuel after the pump stops
filling for the first time. Otherwise, fuel may leak
out.
136Refueling
Driving and parking
Page 141 of 318
To ensure that the vehicle is secured against
rolling away unintentionally:
Rthe parking brake must be applied.
Rthe transmission must be in positionPand the
Smartkey must be removed from the ignition lock.
Rthe front wheels must be turned towards the
curb on steep uphill or downhill gradients.
Switching off the engine
Important safety notes
GWARNING
The automatic transmission switches to neu-
tral position Nwhen you switch off the engine.
The vehicle may roll away. There is a risk of an
accident.
After switching off the engine, always switch
to parking position P. Prevent the parked vehi-
cle from rolling away by applying the parking
brake.
Vehicles with automatic transmission
XApply the parking brake firmly.
XShift the transmission to position P.
XWith the Smartkey:turn the Smartkey to
position 0in the ignition lock and remove it.
The immobilizer is activated.
XWith KEYLESS-GO: press the KEYLESS-GO
Start/Stop button (Ypage 122).
The engine stops and all the indicator lamps in
the instrument cluster go out.
When the driver's door is closed, this corre-
sponds to Smartkey position 1. When the
driver's door is open, this corresponds to
Smartkey position 0: "Smartkey removed".
If you switch the engine off with the transmis-
sion in position Ror D, the automatic transmis-
sion shifts to Nautomatically.
With the Smartkey: if you then open the driv-
er's door or the front-passenger door or remove the Smartkey from the ignition, the automatic
transmission shifts to Pautomatically.
With KEYLESS-GO: if you then open the driver's
or front-passenger door, the automatic trans-
mission shifts to P. If you want the automatic transmission to
remain in neutral
N, e.g. when having the vehicle
cleaned in an automatic car wash with a towing
system:
XVehicles with KEYLESS-GO: remove the
Start/Stop button from the ignition lock.
XInsert the Smartkey into the ignition lock.
XAll vehicles: switch the ignition on.
XDepress the brake pedal and keep it
depressed.
XShift to neutral N.
XRelease the brake pedal.
XRelease the parking brake.
XSwitch off the ignition and leave the Smartkey
in the ignition lock.
Parking brake
GWARNING
If you must brake the vehicle with the parking brake, the braking distance is considerably
longer and the wheels could lock. There is an
increased danger of skidding and accidents.
Only use the parking brake to brake the vehi-
cle when the service brake is faulty. Do not
apply the parking brake too firmly. If the
wheels lock, release the parking brake until
the wheels begin turning again.
GWARNING
If you leave children unsupervised in the vehi-
cle, they could set it in motion by, for example:
Rrelease the parking brake.
Rshift the automatic transmission out of the
parking position P.
Rstart the engine.
In addition, they may operate vehicle equip-
ment and become trapped. There is a risk of
an accident and injury.
When leaving the vehicle, always take the
SmartKey with you and lock the vehicle. Never
leave children unsupervised in the vehicle.
Parking139
Driving and parking
Z
Page 142 of 318
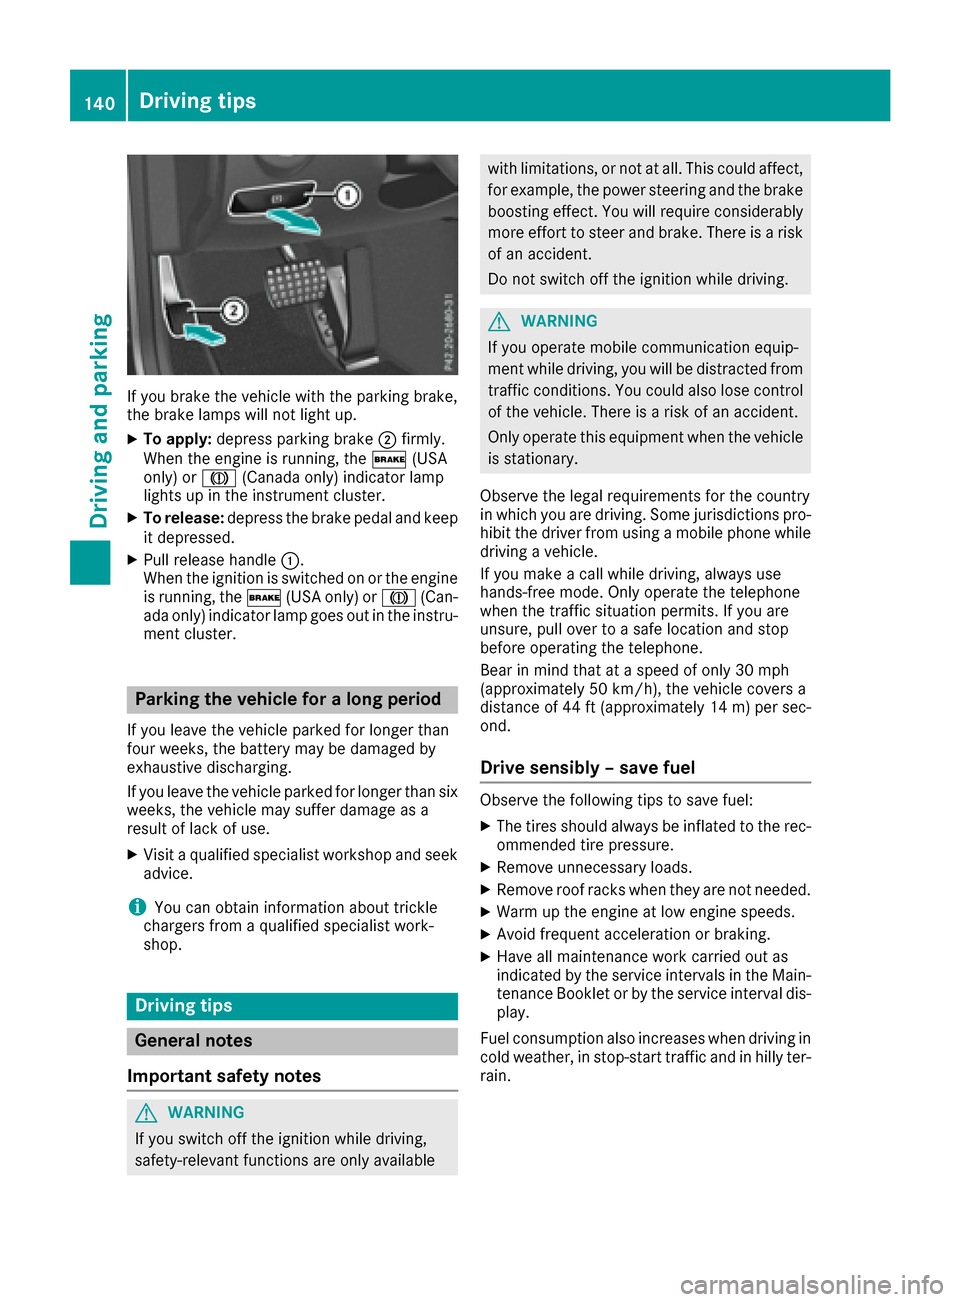
If you brake the vehicle with the parking brake,
the brake lamps will not light up.
XTo apply:depress parking brake ;firmly.
When the engine is running, the $(USA
only) or J(Canada only) indicator lamp
lights up in the instrument cluster.
XTo release: depress the brake pedal and keep
it depressed.
XPull release handle :.
When the ignition is switched on or the engine
is running, the $(USA only) or J(Can-
ada only) indicator lamp goes out in the instru-
ment cluster.
Parking the vehicle for a long period
If you leave the vehicle parked for longer than
four weeks, the battery may be damaged by
exhaustive discharging.
If you leave the vehicle parked for longer than six
weeks, the vehicle may suffer damage as a
result of lack of use.
XVisit a qualified specialist workshop and seek
advice.
iYou can obtain information about trickle
chargers from a qualified specialist work-
shop.
Driving tips
General notes
Important safety notes
GWARNING
If you switch off the ignition while driving,
safety-relevant functions are only available
with limitations, or not at all. This could affect, for example, the power steering and the brake
boosting effect. You will require considerably
more effort to steer and brake. There is a risk
of an accident.
Do not switch off the ignition while driving.
GWARNING
If you operate mobile communication equip-
ment while driving, you will be distracted from traffic conditions. You could also lose control
of the vehicle. There is a risk of an accident.
Only operate this equipment when the vehicle
is stationary.
Observe the legal requirements for the country
in which you are driving. Some jurisdictions pro-
hibit the driver from using a mobile phone while
driving a vehicle.
If you make a call while driving, always use
hands-free mode. Only operate the telephone
when the traffic situation permits. If you are
unsure, pull over to a safe location and stop
before operating the telephone.
Bear in mind that at a speed of only 30 mph
(approximately 50 km/h), the vehicle covers a
distance of 44 ft (approximately 14 m)per sec-
ond.
Drive sensibly – save fuel
Observe the following tips to save fuel:
XThe tires should always be inflated to the rec-
ommended tire pressure.
XRemove unnecessary loads.
XRemove roof racks when they are not needed.
XWarm up the engine at low engine speeds.
XAvoid frequent acceleration or braking.
XHave all maintenance work carried out as
indicated by the service intervals in the Main-
tenance Booklet or by the service interval dis-
play.
Fuel consumption also increases when driving in cold weather, in stop-start traffic and in hilly ter-
rain.
140Driving tips
Driving and parking
Page 144 of 318
RAcceleration(evaluation of all acceleration
processes):
-The bar fills up: moderate acceleration,
especially at higher speeds
-The bar empties: sporty acceleration
RConstant(assessment of driving behavior at
all times):
-The bar fills up: constant speed and avoid-
ance of unnecessary acceleration and
deceleration
-The bar empties: fluctuations in speed
RCoasting(assessment of all deceleration
processes):
-The bar fills up: anticipatory driving, keep-
ing your distance and early release of the
accelerator. The vehicle can coast without
use of the brakes.
-The bar empties: frequent braking
iAn economical driving style specially
requires driving at moderate engine speeds.
To achieve a higher value in the categories
Acceleration
and Constant:
Robserve the gearshift recommendations.
Rdrive in drive program E.
iOn long journeys at a constant speed, e.g.
on the highway, only the bar for Constantwill
change.
iThe ECO display summarizes the driving
characteristics from the start of the journey to
its completion. For this reason, the bars
change dynamically at the beginning of the
journey. On longer journeys, there are fewer
changes. For more dynamic changes, carry
out a manual reset.
For further information on the ECO display, see
(
Ypage 187).
Braking
Important safety notes
GWARNING
If you shift down on a slippery road surface in an attempt to increase the engine's braking
effect, the drive wheels could lose their grip.
There is an increased danger of skidding and
accidents.
Do not shift down for additional engine brak-
ing on a slippery road surface.
Downhill gradients
!On long and steep gradients, you must
reduce the load on the brakes by shifting to a lower gear in good time. This allows you to
take advantage of the engine's braking effect.
This helps you to avoid overheating the
brakes and wearing them out excessively.
When you take advantage of engine braking, a
drive wheel may not turn for some time, e.g.
on a slippery road surface. This could cause
damage to the drive train. This type of damage
is not covered by the Mercedes-Benz war-
ranty.
Do not depress the brake pedal continuously
while the vehicle is in motion, e.g. causing the
brakes to rub by constantly applying light pres-
sure to the pedal. This results in excessive and
premature wear to the brake pads.
Heavy and light loads
GWARNING
If you rest your foot on the brake pedal while
driving, the braking system can overheat. This increases the stopping distance and can even
cause the braking system to fail. There is a
risk of an accident.
Never use the brake pedal as a footrest. Never
depress the brake pedal and the accelerator
pedal at the same time.
!Depressing the brake pedal constantly
results in excessive and premature wear to
the brake pads.
If the brakes have been subjected to a heavy
load, do not stop the vehicle immediately, but
drive on for a short while. This allows the airflow
to cool the brakes more quickly.
Wet roads
If you have driven for a long time in heavy rain
without braking, there may be a delayed reac-
tion from the brakes when braking for the first
time. This may also occur after the vehicle has
been washed or driven through deep water.
142Driving tips
Driving and parking
Page 145 of 318
You have to depress the brake pedal more
firmly. Maintain a greater distance from the
vehicle in front.
After driving on a wet road or having the vehicle
washed, brake firmly while paying attention to
the traffic conditions. This will warm up the
brake discs, thereby drying them more quickly
and protecting them against corrosion.
Limited braking performance on salt-
treated roads
If you drive on salted roads, a layer of salt resi-
due may form on the brake discs and brake
pads. This can result in a significantly longer
braking distance.
RIn order to prevent any salt build-up, apply the
brakes occasionally while paying attention to
the traffic conditions.
RCarefully depress the brake pedal and the
beginning and end of a journey.
RMaintain a greater distance to the vehicle
ahead.
Servicing the brakes
!The brake fluid level may be too low, if:
Rif the red brake warning lamp lights up in
the instrument cluster and
Ryou hear a warning tone while the engine is
running
Observe additional warning messages in the
multifunction display.
The brake fluid level may be too low due to
brake pad wear or leaking brake lines.
Have the brake system checked immediately.
Consult a qualified specialist workshop to
arrange this.
!Vehicles with 4MATIC: function or per-
formance tests may only be carried out on a 2-
axle dynamometer. If you wish to operate the
vehicle on such a dynamometer, please con-
sult a qualified specialist workshop in
advance. You could otherwise damage the
drive train or the brake system.
!Vehicles with 4MATIC: as the ESP®sys-
tem operates automatically, the engine and
the ignition must be switched off (SmartKey in
position 0or 1in the ignition lock or Start/
Stop button in position 0or 1) while the park- ing brake is being tested on a brake dyna-
mometer.
Braking maneuvers triggered automatically
by ESP
®may seriously damage the brake sys-
tem.
!Vehicles with 4MATIC: as the ESP®sys-
tem operates automatically, the engine and
the ignition system must be switched off
(SmartKey in position 0or 1in the ignition
lock or Start/Stop button in position 0or 1)
when:
Rtesting the parking brake on a brake dyna-
mometer.
Ryou intend to have the vehicle towed with
the front axle raised.
Braking maneuvers triggered automatically
by ESP
®may seriously damage the brake sys-
tem.
All checks and maintenance work on the brake
system must be carried out at a qualified spe-
c
ialist workshop.
Have brake pads installed and brake fluid
replaced at a qualified specialist workshop.
If the brake system has only been subject to
moderate loads, you should test the functional-
ity of your brakes at regular intervals. To do so,
press firmly on the brake pedal when driving at a
high speed. This improves the grip of the brake
pads.
You can find a description of Brake Assist (BAS) on (
Ypage 63) or of BAS PLUS with Cross-Traffic
Assist on (Ypage 63).
The braking characteristics of the vehicle can be
seriously impaired if:
Rbrake pads other than those recommended
are installed
Rthe recommended brake fluid is not used
Safe braking can no longer be guaranteed.
Driving on wet roads
Hydroplaning
If water has accumulated to a certain depth on
the road surface, there is a danger of hydro-
planing occurring, even if:
Ryou drive at low speeds.
Rthe tires have adequate tread depth.
Driving tips143
Driving and parking
Z
Page 152 of 318
Drivingwit hDISTRONI CPLUS
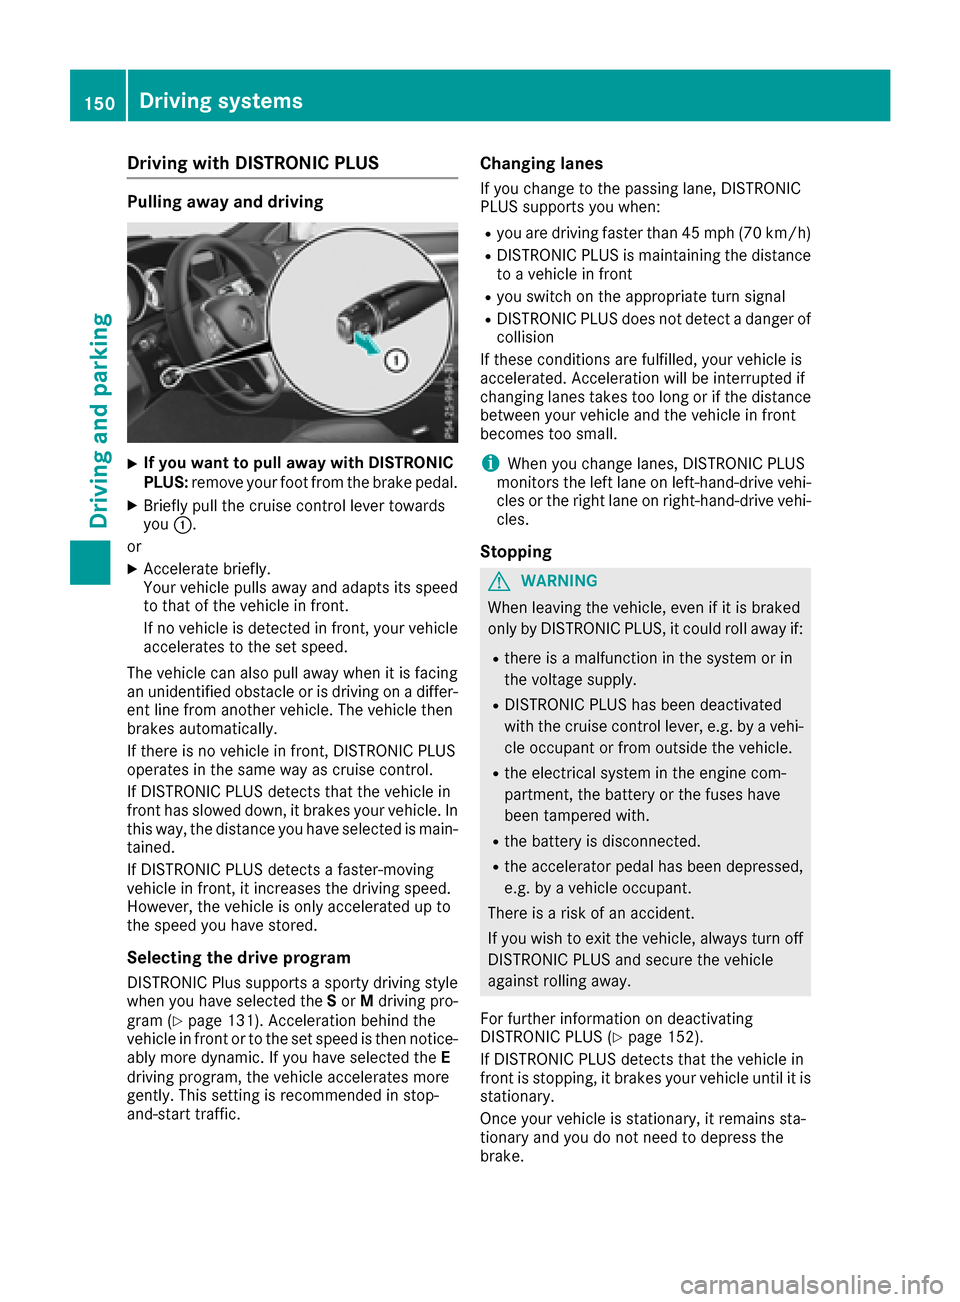
Pullin gawa yan ddrivin g
XIf you wan tto pull awa ywit hDISTRONI C
PLUS :remov eyour foot from th ebrake pedal.
XBriefly pull th ecruise contro llever toward s
you :.
or
XAccelerat ebriefly.
Your vehicle pulls away and adapt sits speed
to that of th evehicle in front.
If no vehicle is detecte din front, your vehicle
accelerates to th eset speed.
The vehicle can also pull away when it is facin g
an unidentifie dobstacl eor is drivin gon adiffer-
en tlin efrom another vehicle. The vehicle then
brake sautomatically.
If there is no vehicle in front, DISTRONIC PLU S
operates in th esam eway as cruise control.
If DISTRONIC PLU Sdetects that th evehicle in
fron thas slowed down ,it brake syour vehicle. In
this way, th edistanc eyou hav eselecte dis main -
tained.
If DISTRONIC PLU Sdetects afaster-movin g
vehicle in front, it increase sth edrivin gspeed.
However, th evehicle is only accelerated up to
th espeed you hav estored.
Selecting th edrive program
DISTRONIC Plus supports asport ydrivin gstyle
when you hav eselecte dth eS or Mdrivin gpro -
gram (
Ypage 131). Acceleration behin dth e
vehicle in fron tor to th eset speed is then notice -
ably more dynamic .If you hav eselecte dth eE
drivin gprogram, th evehicle accelerates more
gently. Thi ssetting is recommended in stop-
and-start traffic .
Changinglanes
If you chang eto th epassin glane, DISTRONIC
PLU Ssupports you when :
Ryou are drivingfaste rthan 45 mph (70 km/h)
RDISTRONIC PLU Sis maintainin gth edistanc e
to avehicle in fron t
Ryou switch on th eappropriat eturn signal
RDISTRONIC PLU Sdoe sno tdetec t adanger of
collision
If these condition sare fulfilled, your vehicle is
accelerated. Acceleration will be interrupted if
changin glanes take sto olon gor if th edistanc e
between your vehicle and th evehicle in fron t
becomes to osmall.
iWhe nyou chang elanes, DISTRONIC PLU S
monitors th elef tlan eon left-hand-drive vehi-
cles or th eright lan eon right-hand-driv evehi-
cles.
Stopping
GWARNING
Whe nleavin gth evehicle, eve nif it is brake d
only by DISTRONIC PLUS, it could roll away if:
Rthere is amalfunction in th esyste mor in
th evoltage supply.
RDISTRONIC PLU Shas bee ndeactivated
wit hth ecruise contro llever, e.g. by avehi-
cl e occupant or from outsid eth evehicle.
Rth eelectrical system in th eengin ecom-
partment, th ebattery or th efuses hav e
bee ntampered with.
Rth ebattery is disconnected.
Rth eaccelerator peda lhas bee ndepressed,
e.g. by avehicle occupant .
There is aris kof an accident.
If you wish to exit th evehicle, always turn of f
DISTRONIC PLU Sand secure th evehicle
against rollin gaway.
Fo rfurther information on deactivatin g
DISTRONIC PLU S (
Ypage 152).
If DISTRONIC PLU Sdetects that th evehicle in
fron tis stopping, it brake syour vehicle until it is
stationary.
Once your vehicle is stationary, it remain ssta-
tionary and you do no tneed to depress th e
brake .
150Driving systems
Driving an d parking
Page 153 of 318

Depending on the specified minimum distance,
your vehicle will come to a standstill at a suffi-
cient distance behind the vehicle in front. The
specified minimum distance is set using the
control on the cruise control lever.
When DISTRONIC PLUS is activated, the trans-
mission is shifted automatically to positionPif:
Rthe driver's door is open and the driver's seat
belt is unfastened.
Rthe engine is switched off, unless it is auto-
matically switched off by the ECO start/stop
function.
Ra system malfunction occurs.
Rthe power supply is not sufficient.
Setting a speed
XPress the cruise control lever up :for a
higher speed or down ;for a lower speed.
XTo adjust the set speed in 1 mph incre-
ments (1 km/h increments): briefly press
the cruise control lever up :or down ;to
the pressure point.
Every time the cruise control lever is pressed
up : or down ;, the last speed stored is
increased or reduced.
XTo adjust the set speed in 5 mph incre-
ments (10 km/h increments): briefly press
the cruise control lever up :or down ;to
the pressure point.
Every time the cruise control lever is pressed
up : or down ;, the last speed stored is
increased or reduced.
iIf you accelerate to overtake, DISTRONIC
PLUS adjusts the vehicle's speed to the last
speed stored after you have finished overtak-
ing.
Setting a specified minimum distance
You can set the specified minimum distance for
DISTRONIC PLUS by varying the time span
between one and two seconds. With this func-
tion, you can set the minimum distance that
DISTRONIC PLUS keeps to the vehicle in front,
dependent on vehicle speed. You can see this
distance in the multifunction display
(
Ypage 152).
iMake sure that you maintain a sufficient
distance to the vehicle in front and comply
with the minimum distance as required by
law. Adjust the distance to the vehicle in front
if necessary.
You can set the specified minimum distance for
DISTRONIC PLUS by varying the time span
between one and two seconds. With this func-
tion, you can set the minimum distance that
DISTRONIC PLUS keeps to the vehicle in front,
dependent on vehicle speed. You can see this
distance in the multifunction display
(
Ypage 152).
XTo increase: turn control;in direction =.
DISTRONIC PLUS then maintains a greater
distance between your vehicle and the vehicle
in front.
XTo decrease: turn control;in direction :.
DISTRONIC PLUS then maintains a shorter
distance between your vehicle and the vehicle
in front.
Driving systems151
Driving and parking
Z
Page 157 of 318
cle could come into contact with the curb or
other road boundaries. Be particularly aware of
other road users, e.g. cyclists, that are directly
next to your vehicle.
Obstacles such as building site huts on the lane
or projecting out into the lane are not detected.
An inappropriate steering intervention, e.g. afterintentionally driving over a lane marking, can be
corrected at any time if you steer slightly in the
opposite direction.
DISTRONIC PLUS with Steering Assist and
Stop&Go Pilot cannot continuously keep your
vehicle in lane. In some cases, the steering
intervention is not sufficient to bring the vehicle
back to the lane. In such cases, you must steerthe vehicle yourself to ensure that it does not
leave the lane.
The support provided by the system can be
impaired if:
Rthere is poor visibility, e.g. due to insufficient
illumination of the road, or due to snow, rain,
fog or spray
Rthere is glare, e.g. from oncoming traffic, the
sun or reflection from other vehicles (e.g. if
the road surface is wet)
Rthe windshield is dirty, fogged up, damaged or
covered, for instance by a sticker, in the vicin-
ity of the camera
Rno, or several, unclear lane markings are pres-
ent for one lane, e.g. in a construction area
Rthe lane markings are worn away, dark or cov-
ered up, e.g. by dirt or snow
Rthe distance to the vehicle in front is too small
and the lane markings thus cannot be detec-
ted
Rthe lane markings change quickly, e.g. lanes
branch off, cross one another or merge
Rthe road is narrow and winding
Rthere are strong shadows cast on the road
The system is switched to passive and no longer
assists you by performing steering interventions if:
Ryou actively change lanes
Ryou switch on the turn signal
Rtake your hands off the steering wheel or do
not steer for a prolonged period of time
iAfter you have finished changing lanes,
Steering Assist and Stop&Go Pilot are auto-
matically active again. DISTRONIC PLUS Steering Assist does not pro-
vide assistance:
Ron very sharp corners
Rwhen a loss of tire pressure or a defective tire
has been detected and displayed
Pay attention also to the important safety notes for DISTRONIC PLUS (
Ypage 147).
The steering interventions are carried out with a
limited steering moment. The system requires
the driver to keep his hands on the steering
wheel and to steer himself.
If you do not steer yourself or if you take your
hands off the steering wheel for a prolonged
period of time, the system will first alert you with
a visual warning. A steering wheel symbol
appears in the multifunction display. If you have
still not started to steer and have not taken hold
of the steering wheel after five seconds at the
l
atest, a warning tone also sounds to remind you
to take control of the vehicle. Steering Assist
and Stop&Go Pilot are switched to passive.
DISTRONIC PLUS remains active.
Activating Steering Assist and Stop&Go
Pilot
XActivate the DISTRONIC PLUS with Steering
Assist and Stop&Go Pilot function using the
on-board computer (
Ypage 192).
The DTR+: Steering Assistant Onmes-
sage appears in the multifunction display.
Steering Assist and Stop&Go Pilot are active.
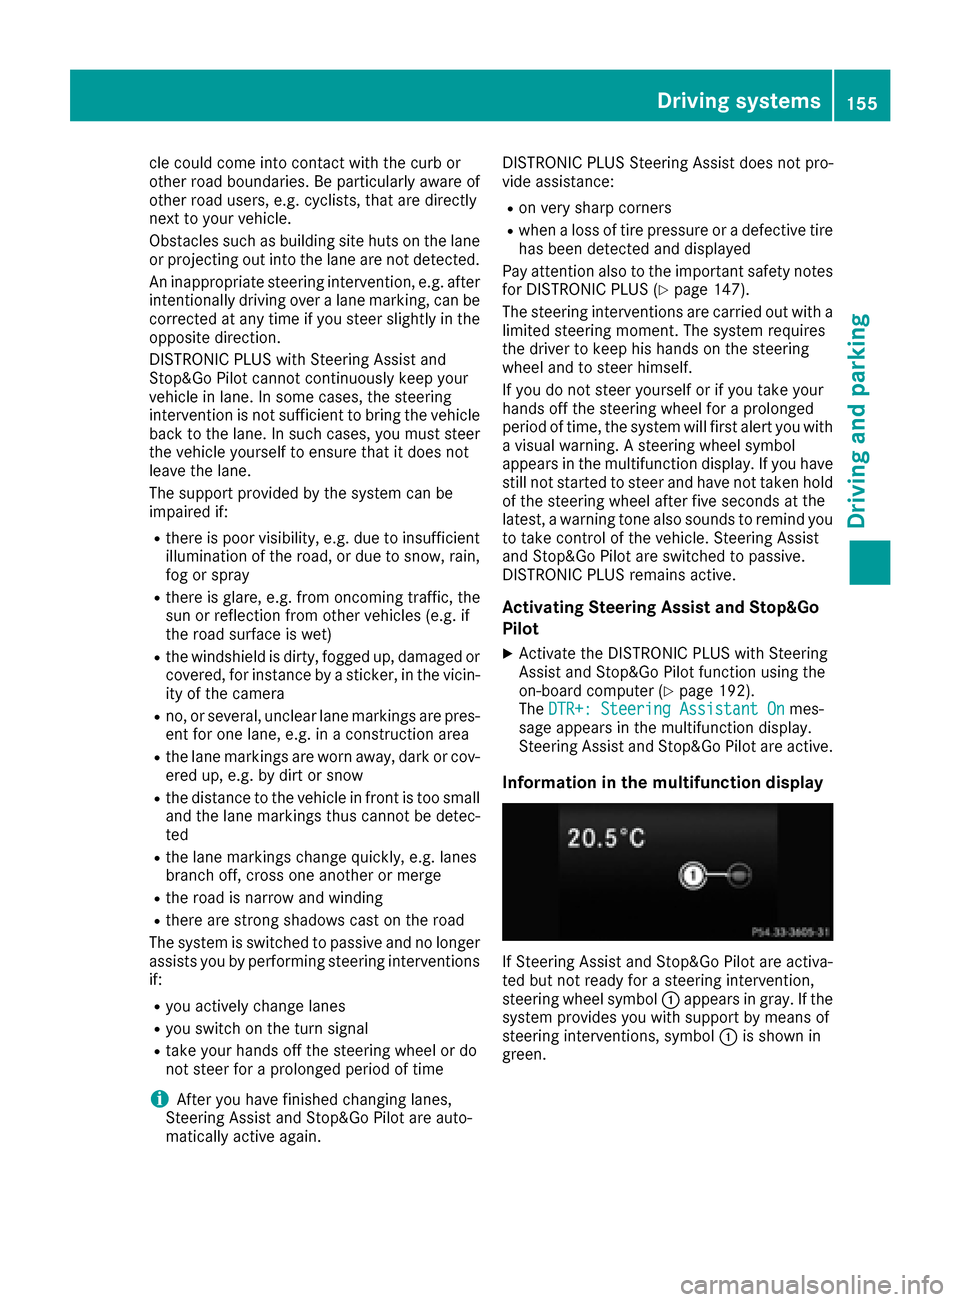
Information in the multifunction display
If Steering Assist and Stop&Go Pilot are activa-
ted but not ready for a steering intervention,
steering wheel symbol :appears in gray. If the
system provides you with support by means of
steering interventions, symbol :is shown in
green.
Driving systems155
Driving and parking
Z
Page 158 of 318
Deactivating Steering Assistand Stop&Go
Pilot
XDeactivat eth eDISTRONIC PLU Swit hSteer -
in g Assis tand Stop&Go Pilo tfunction usin g
th eon-boar dcomputer (
Ypage 192).
The DTR+: Steering Assistant Offmes-
sage appears in th emultifunction display.
Steerin gAssis tand Stop&Go Pilo tare deac -
tivated.
Whe nDISTRONIC PLU Sis deactivated or no t
available, Steerin gAssis tand Stop&Go Pilo tare
deactivated automatically.
HOL Dfunction
General notes
The HOLD function can assist th edriver in th e
following situations:
Rwhen pullin gaway, especially on steep slopes
Rwhen maneuverin gon steep slopes
Rwhen waitin gin traffic
The vehicl eis kept stationary without th edriver
havin gto depress th ebrak epedal.
The brakin geffec tis canceled and th eHOLD
function deactivated when you depress th e
accelerato rpeda lto pull away.
Important safet ynotes
GWARNIN G
Whe nleavin gth evehicle, it can still rol laway
despit ebein gbraked by th eHOLD function if:
Rthere is amalfunction in th esystem or in
th evoltag esupply.
Rth eHOLD function has been deactivated by
pressing th eaccelerato rpeda lor th ebrak e
pedal, e.g. by avehicl eoccupant .
Rtheelectrica lsystem in th eengin ecom-
partment, th ebattery or th efuses hav e
been tampered with.
Rth ebattery is disconnected
There is aris kof an accident.
If you wish to exit th evehicle, always tur nof f
th eHOLD function and secure th evehicl e
against rollin gaway.
!If DISTRONIC PLU Sor th eHOLD function is
activated, th evehicl ebrakes automatically in
certain situations.
To preven tdamage to th evehicle, deactivat e
DISTRONIC PLU Sand th eHOLD function in
th efollowing or other similar situations:
Rwhen towin gth evehicl e
Rin thecar wash
Activation conditions
You can activat eth eHOLD function if:
Rth evehicl eis stationary
Rth eengin eis running or if it has been auto-
matically switched of fby th eECO start/sto p
function
Rth edriver's doo ris closed or your seat belt is
fastene d
Rtheparkin gbrak eis release d
Rthetransmissio nis in position D,Ror N
RDISTRONIC PLU Sis deactivated
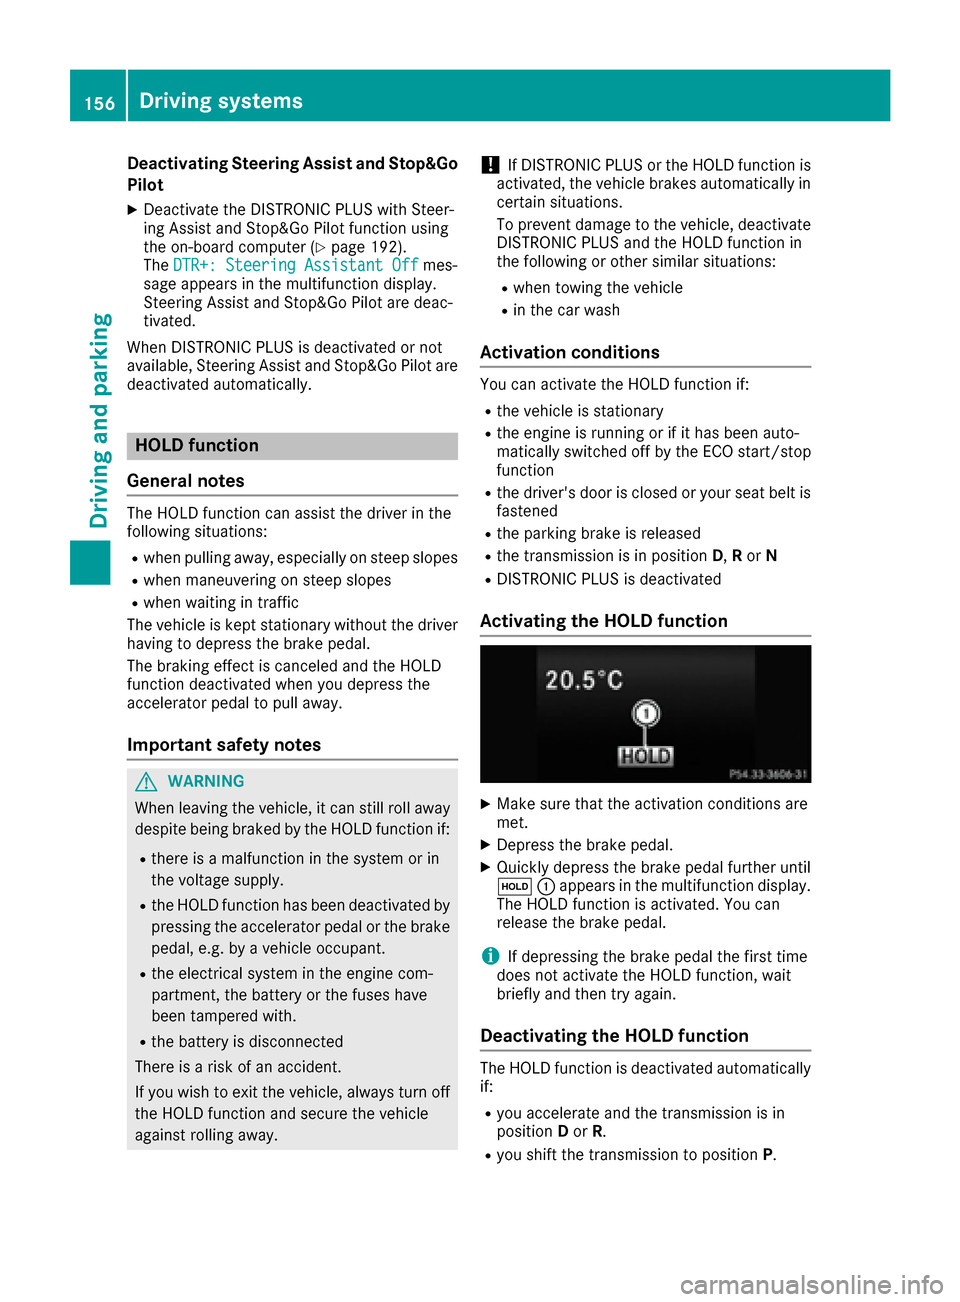
Activating th eHOL Dfunction
XMak esur ethat th eactivation condition sare
met .
XDepress th ebrak epedal.
XQuickl ydepress th ebrak epeda lfurther until
ë :appears in th emultifunction display.
The HOLD function is activated. You can
release th ebrak epedal.
iIf depressin gth ebrak epeda lth efirst time
doe sno tactivat eth eHOLD function ,wait
briefl yand then tr yagain .
Deactivating th eHOL Dfunction
The HOLD function is deactivated automatically
if:
Ryou accelerate and th etransmissio nis in
position Dor R.
Ryou shift th etransmissio nto position P.
156Driving systems
Driving and parking
Page 165 of 318
iNote that Active Parking Assist cannot
measure the length of a parking space if it is at
right angles to the direction of travel. You will
need to judge whether your vehicle will fit into
the parking space.
When driving at speeds below 19 mph
(30 km/h), you will see the parking symbol as a
status indicator in the instrument cluster. When
a parking space has been detected, an arrow
towards the right or the left also appears. By
default, Active Parking Assist only displays park-
ing spaces on the front-passenger side. Parking spaces on the driver's side are displayed as
soon as the turn signal on the driver's side is
activated. When parking on the driver's side,
this must remain switched on until you acknowl-
edge the use of Active Parking Assist by press-
ing the abutton on the multifunction steer-
ing wheel. The system automatically determines
whether the parking space is parallel or at right
angles to the direction of travel.
A parking space is displayed while you are driv- ing past it, and until you are approximately 50 ft
(15 m) away from it.
Parking
GWARNING
If you leave the vehicle when it is only being
braked by Active Parking Assist it could roll
away if:
Rthere is a malfunction in the system or in
the voltage supply.
Rthe electrical system in the engine com-
partment, the battery or the fuses have
been tampered with.
Rthe battery is disconnected.
Rthe accelerator pedal has been depressed,
e.g. by a vehicle occupant.
There is a risk of an accident.
Before leaving the vehicle, always secure it
against rolling away.
iVehicles with automatic transmission:
When PARKTRONIC detects obstacles, Active
Parking Assist brakes automatically during
the parking process. You are responsible for
braking in good time.
XStop the vehicle when the parking space sym-
bol shows the desired parking space in the
instrument cluster.
XShift the transmission to position R.
The Start Park Assist? Yes: OK No:
% message appears in the multifunction
display.
XTo cancel the procedure: press the%
button on the multifunction steering wheel or pull away.
or
XTo park using Active Parking Assist: press
the a button on the multifunction steering
wheel.
The Park Assist Active Accelerate
and Brake Observe Surroundingsmes-
sage appears in the multifunction display.
XLet go of the multifunction steering wheel.
XBack up the vehicle, being ready to brake at all
times. When backing up, drive at a speed
below approximately 6 mph (10 km/h). Oth-
erwise Active Parking Assist will be canceled.
Active Parking Assist brakes the vehicle to a
standstill when the vehicle approaches the
rear border of the parking space.
Maneuvering may be required in tight parking
spaces.
The Park Assist Active Select D
Observe Surroundingsmessage appears in
the multifunction display.
XShift the transmission to position Dwhile the
vehicle is stationary.
Active Parking Assist immediately steers in
the other direction.
The Park Assist Active Accelerate
and Brake Observe Surroundingsmes-
sage appears in the multifunction display.
iYou will achieve the best results by waiting
for the steering procedure to complete before
pulling away.
XDrive forwards and be ready to brake at all
times.
Active Parking Assist brakes the vehicle to a
standstill.
The Park Assist Active Select R
Observe Surroundingsmessage appears in
the multifunction display.
Further transmission shifts may be necessary.
As soon as the parking procedure is complete,
the Park Assist Disabled
message appears
in the multifunction display and you will hear a
Driving systems163
Driving and parking
Z