hood open MERCEDES-BENZ E-Class COUPE 2017 C207 Owner's Manual
[x] Cancel search | Manufacturer: MERCEDES-BENZ, Model Year: 2017, Model line: E-Class COUPE, Model: MERCEDES-BENZ E-Class COUPE 2017 C207Pages: 318, PDF Size: 7.35 MB
Page 12 of 318
Fuel filler flapOpening ........................................ .136
Fuel level
Calling up the range (on-board
computer) ...................................... 187
Fuel tank
Capacity ........................................ 309
Problem (malfunction) ................... 138
Fuse allocation chart (vehicle tool
kit) ...................................................... 266
Fuses
Allocation chart .............................2 79
Before changing .............................2 79
Dashboard fuse box ....................... 279
Fuse box in the engine compart-
ment .............................................. 280
Fuse box in the trunk ..................... 280
Important safety notes .................. 279
G
Garage door opener
Clearing the memory ..................... 253
General notes ................................ 250
Important safety notes .................. 250
Opening/closing the garage door .. 252
Problems when programming ........2 52
Programming (button in the rear-
view mirror) ................................... 250
Synchronizing the rolling code ....... 251
Gasoline ............................................. 309
Genuine parts ...................................... 24
Glove box ...........................................2 36
Google™ Local Search
see also Digital Operator's Man-
ual ..................................................2 29
H
Handbrake
see Parking brake
Hazard warning lamps ......................105
Head bags
Display message ............................ 203
Head restraints
Adjusting ......................................... 93
Adjusting (electrically) ..................... 93
see NECK-PRO head restraints Headlamps
Fogging up ..................................... 106
see Automatic headlamp mode
Heating
see Climate control
High beam flasher .............................1 04
High-beam headlamps
Adaptive Highbeam Assist ............. 105
Changing bulbs .............................. 108
Display message ............................ 206
Switching on/off ........................... 104
Hill start assist .................................. 124
HOLD function
Activating ....................................... 156
Deactivating ................................... 156
Display message ............................ 209
Function/notes .............................1 56
Home address
see also Digital Operator's Man-
ual ..................................................2 29
Hood
Closing ...........................................2 55
Display message ............................ 217
Important safety notes .................. 254
Opening ......................................... 254
Horn ...................................................... 32
Hydroplaning ..................................... 143
I
Ignition lock
see Key positions
Immobilizer .......................................... 72
Indicator and warning lamps
COLLISION PREVENTION ASSIST
PLUS .............................................. 227
Indicator lamps
see Warning and indicator lamps
Indicators
see Turn signals
Instrument cluster
Overview .......................................... 33
Settings ......................................... 193
Warning and indicator lamps ........... 33
Instrument cluster lighting .............. 194
Interior lighting
Automatic control .......................... 107
10Index
Page 34 of 318
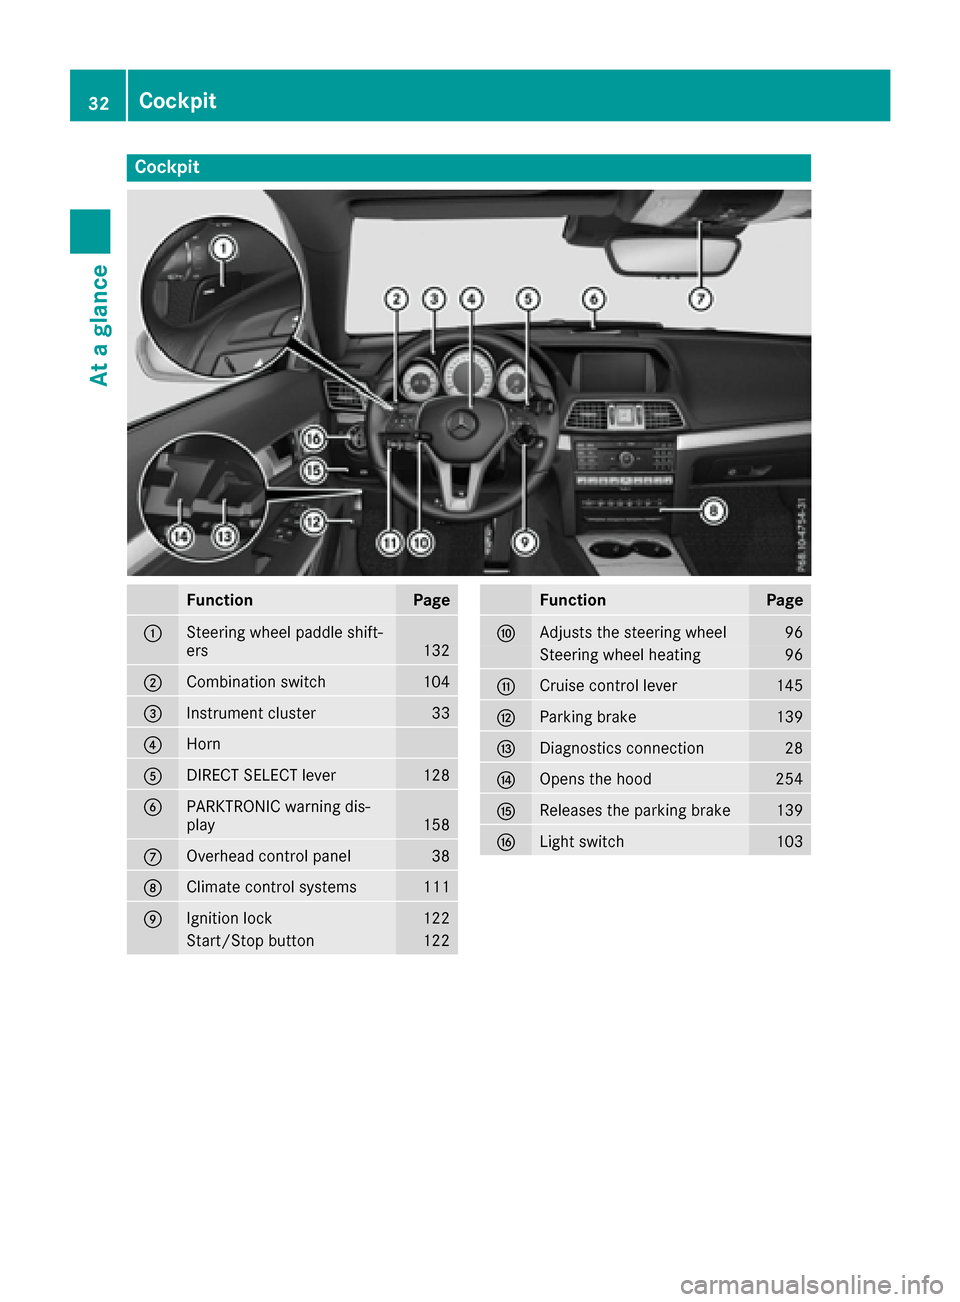
Cockpit
FunctionPage
:Steering wheel paddle shift-
ers132
;Combination switch104
=Instrument cluster33
?Horn
ADIRECT SELECT lever128
BPARKTRONIC warning dis-
play158
COverhead control panel38
DClimate control systems111
EIgnition lock122
Start/Stop button122
FunctionPage
FAdjusts the steering wheel96
Steering wheel heating96
GCruise control lever145
HParking brake139
IDiagnostics connection28
JOpens the hood254
KReleases the parking brake139
LLight switch103
32Cockpit
At a glance
Page 74 of 318
Protection against theft
Immobilizer
The immobilizer prevents your vehicle from
being started without the correct SmartKey.
XTo activate with the SmartKey:remove the
SmartKey from the ignition lock.
XTo activate with KEYLESS-GO: switch the
ignition off and open the driver's door.
XTo deactivate: switch on the ignition.
When leaving the vehicle, always take the
SmartKey with you and lock the vehicle. Anyone
can start the engine if a valid SmartKey has been
left inside the vehicle.
iThe immobilizer is always deactivated when
you start the engine.
In the event that the engine cannot be started
(yet the vehicle's battery is charged), the sys-
tem is not operational. Contact an authorized
Mercedes-Benz Center or call
1-800-FOR-MERCedes (in the USA) or
1-800-387-0100 (in Canada).
ATA (anti-theft alarm system)
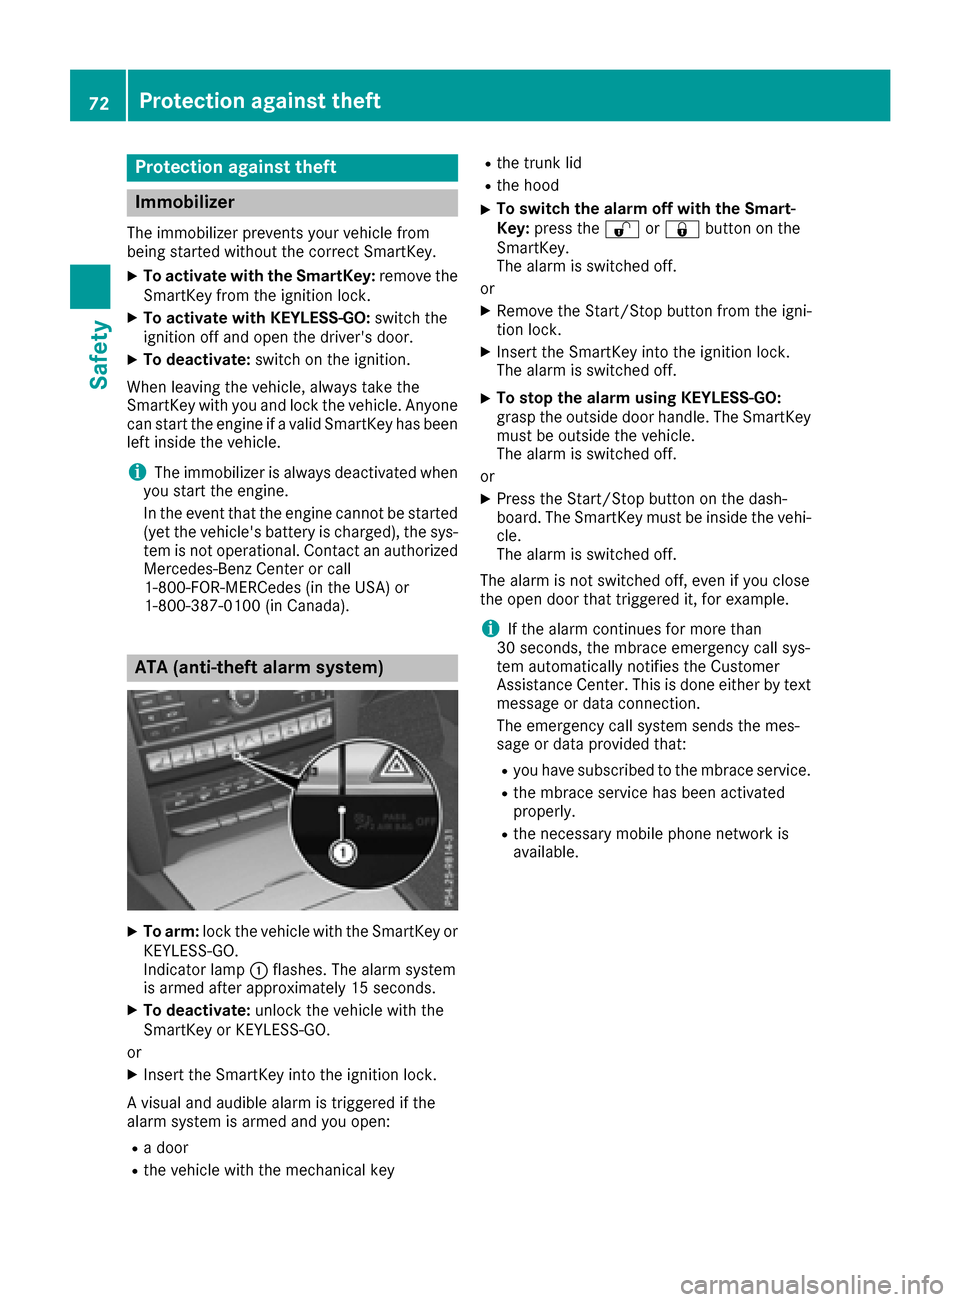
XTo arm: lock the vehicle with the SmartKey or
KEYLESS-GO.
Indicator lamp :flashes. The alarm system
is armed after approximately 15 seconds.
XTo deactivate: unlock the vehicle with the
SmartKey or KEYLESS-GO.
or
XInsert the SmartKey into the ignition lock.
A visual and audible alarm is triggered if the
alarm system is armed and you open:
Ra door
Rthe vehicle with the mechanical key
Rthe trunk lid
Rthe hood
XTo switch the alarm off with the Smart-
Key: press the %or& button on the
SmartKey.
The alarm is switched off.
or
XRemove the Start/Stop button from the igni-
tion lock.
XInsert the SmartKey into the ignition lock.
The alarm is switched off.
XTo stop the alarm using KEYLESS-GO:
grasp the outside door handle. The SmartKey
must be outside the vehicle.
The alarm is switched off.
or
XPress the Start/Stop button on the dash-
board. The SmartKey must be inside the vehi-
cle.
The alarm is switched off.
The alarm is not switched off, even if you close
the open door that triggered it, for example.
iIf the alarm continues for more than
30 seconds, the mbrace emergency call sys-
tem automatically notifies the Customer
Assistance Center. This is done either by text message or data connection.
The emergency call system sends the mes-
sage or data provided that:
Ryou have subscribed to the mbrace service.
Rthe mbrace service has been activated
properly.
Rthe necessary mobile phone network is
available.
72Protection against theft
Safety
Page 110 of 318
Lamps are an important aspect of vehicle safety.
You must therefore make sure that these func-
tion correctly at all times. Have the headlamp
setting checked regularly.
Overview: changing bulbs/bulb types
You can replace the following bulbs. The bulb
type can be found in the legend.
Static LED headlamps
:
High-beam headlamp: H7 55 W
Changing the front bulbs
High-beam headlamps (static LED head-
lamps)
XSwitch off the lights.
XOpen the hood.
XTurn housing cover :counter-clockwise and
remove it.
XTurn bulb holder ;counter-clockwise and
pull out.
XPull the bulb out of bulb holder ;.
XInsert the new bulb into bulb holder ;.
XInsert bulb holder;and turn it clockwise.
XPress on housing cover :and turn it to the
right.
Windshield wipers
Switching the windshield wipers
on/off
!
Do not operate the windshield wipers when
the windshield is dry, as this could damage
the wiper blades. Moreover, dust that has col-
lected on the windshield can scratch the glass
if wiping takes place when the windshield is
dry.
If it is necessary to switch on the windshield
wipers in dry weather conditions, always use
washer fluid when operating the windshield
wipers.
!If the windshield wipers leave smears on the
windshield after the vehicle has been washed
in an automatic car wash, wax or other resi-
dues may be the reason for this. Clean the
windshield using washer fluid after washing
the vehicle in an automatic car wash.
!Intermittent wiping with rain sensor: due to
optical influences and the windshield becom-
ing dirty in dry weather conditions, the wind-
shield wipers may be activated inadvertently.
This could then damage the windshield wiper
blades or scratch the windshield.
For this reason, you should always switch off
the windshield wipers in dry weather.
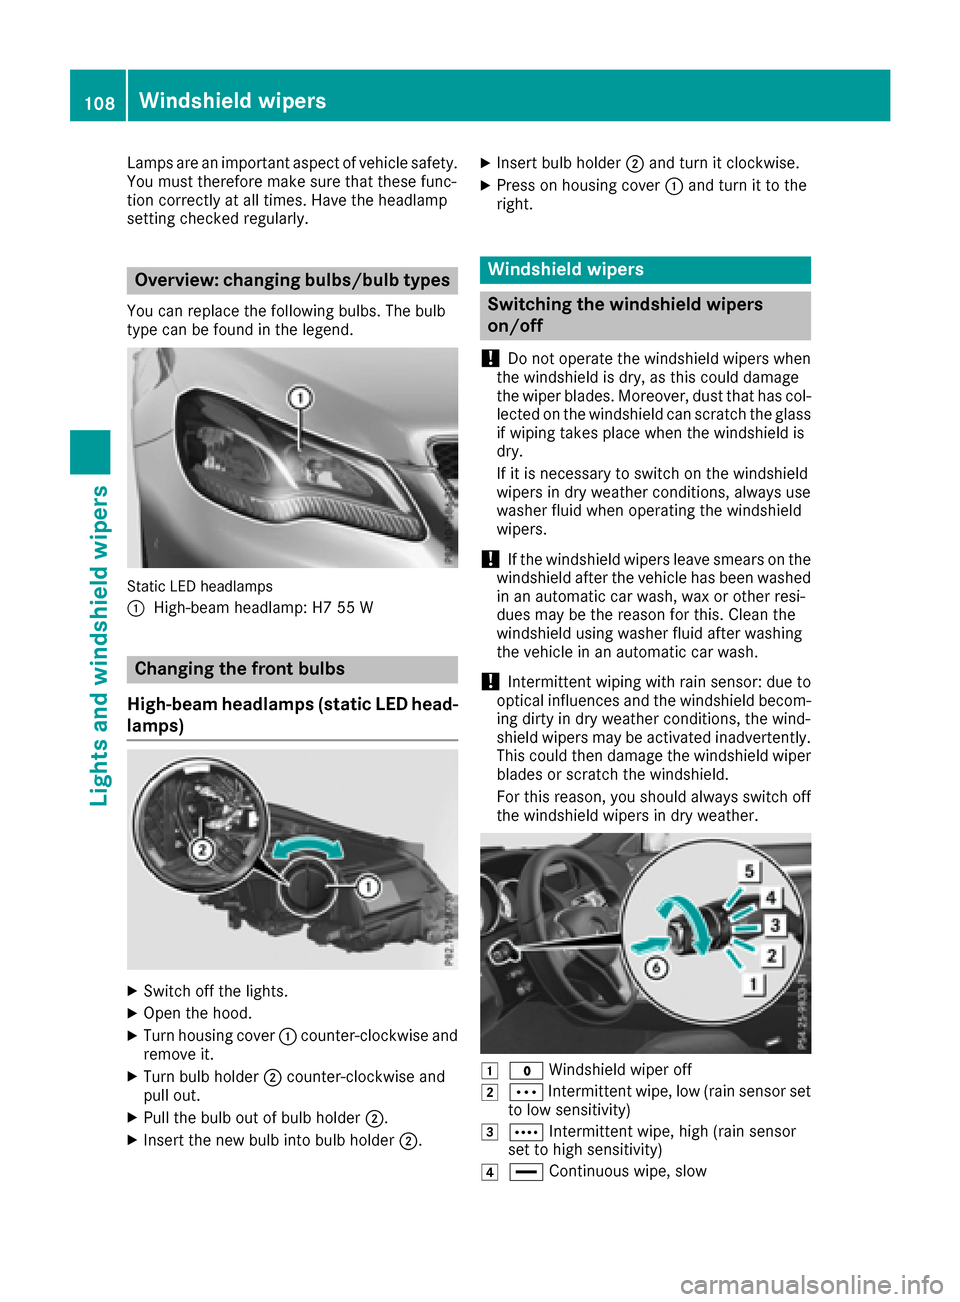
1$ Windshield wiper off
2ÄIntermittent wipe, low (rain sensor set
to low sensitivity)
3Å Intermittent wipe, high (rain sensor
set to high sensitivity)
4° Continuous wipe, slow
108Windshield wipers
Lights and windshield wipers
Page 111 of 318
5¯Continuous wipe,fast
BíSingle wipe
î Towipe wit h washer fluid
XSwitch on the ignition.
XTurn the co mbination switch to the corre-
spondin g position.
In the Ä orÅ position, the appropriate
wipin g frequency isset automatically according
to the intensity of the rain. Inthe Å position,
the rain sensor ismore sensitive than inthe
Ä position, causing the windshield wiper to
wipe more frequently.
If the wiper blades are worn, the windshield will
no longer bewiped properly. This could prevent
you from observing the traff icconditions.
Replacing the wiper blades
Important safety notes
GWAR NING
If the wind shield wiper s begin to move while
you are changing the wiper blades, you could
be trapped bythe wiper arm. There isa risk of
injury.
Alwa ysswit ch off the windshield wiper s and
ignition before changing the wiper blades.
!To avoid damaging the wiper blades, make
sure that you touch only thewiper arm of the
wiper .
!Never open the hood ifawind shield wiper
arm has been folded away from the wind-
shield.
Never fold a windshield wiper armwithout a
wiper blade back onto the windshield.
Hold the windshield wiper arm firmly when
you change the wiper blade. Ifyou release the
wind shield wiper armwithout a wiper blade
and itfalls onto the windshield, thewind shield
may bedamaged bythe force of the impact.
Mercedes-Benz recommends that you have
the wiper blades changed at a qualified spe-
cialist workshop.
Replacing the wiper blades
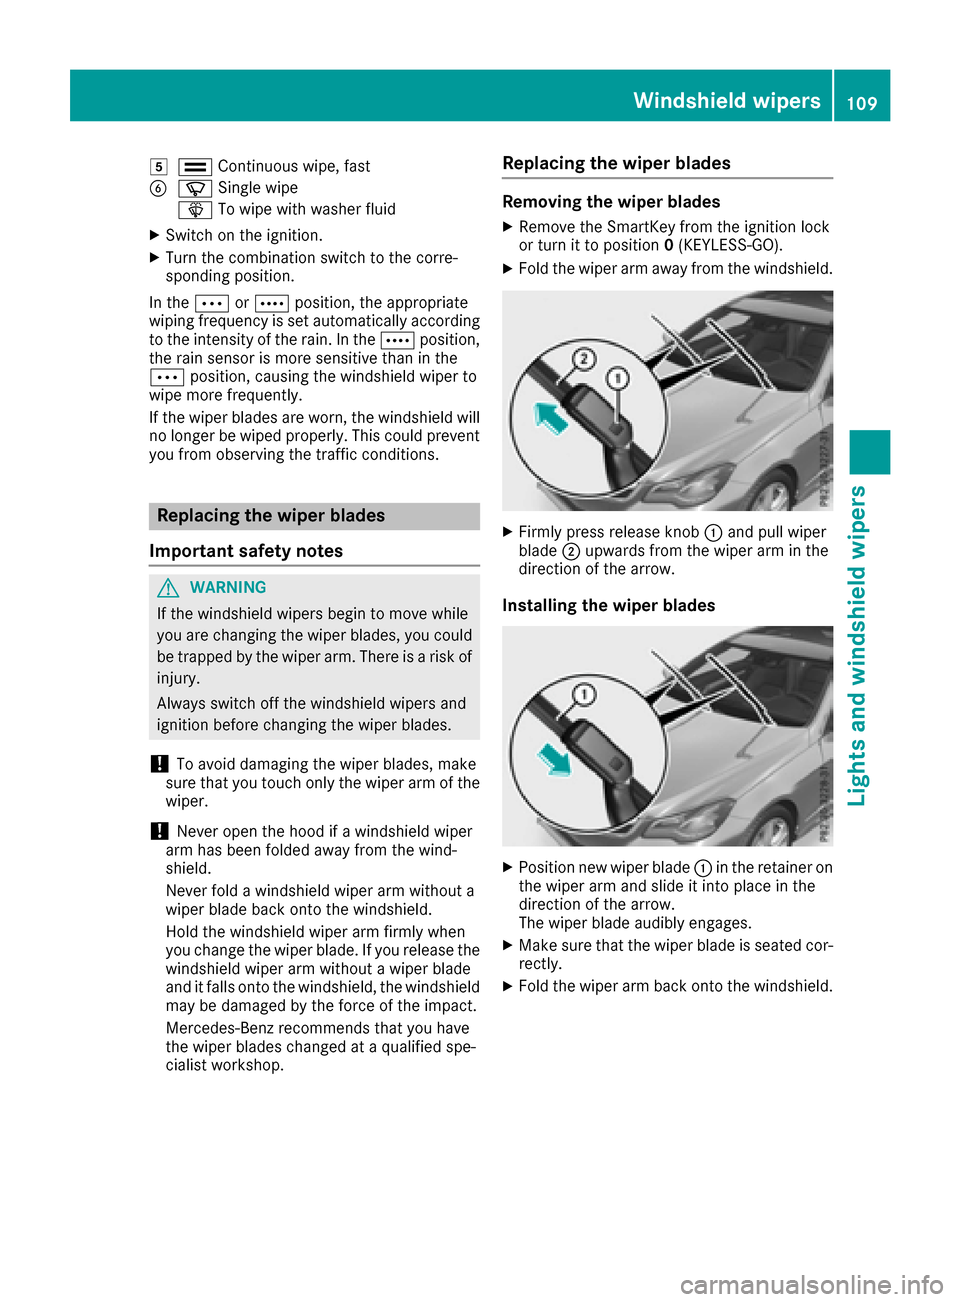
Removing the wiper blades
XRemo vethe SmartKey from the ignition lock
or turn itto position 0(KEYLESS -GO).
XFold the wiper arm away from the windshield.
XFirmly press release knob :and pull wiper
blade ;upwards from the wiper arm in the
direction of the arrow.
Installing the wiper blades
XPosition new wiper blade :in the retainer on
the wiper arm and slide it into place inthe
direction of the arrow.
The wiper blade audibly engages.
XMake sure that the wiperblade is seated cor-
rectly.
XFold the wiper arm back onto the windshield.
Windshield wipers109
Lights and windshield wipers
Z
Page 186 of 318
Important safety notes
GWARNING
If you operate information systems and com-
munication equipmen tintegrate din th evehi-
cle while driving ,you will be distracte dfrom
traffic conditions. You could also lose control
of th evehicle. Ther eis aris kof an accident.
Only operate th eequipmen twhen th etraffic
situation permits. If you are no tsur ethat this
is possible ,park th evehicl epayin gattention
to traffic condition sand operate th eequip-
men twhen th evehicl eis stationary.
You must observ eth elegal requirements for th e
country in whic hyou are currentl ydriving when
operating th eon-board computer.
GWARNIN G
If th einstrumen tcluste rhas faile dor mal-
functioned, you may no trecognize function
restriction sin systems relevan tto safety. The
operating safet yof your vehicl emay be
impaired .Ther eis aris kof an accident.
Drive on carefully. Hav eth evehicl echecke d
at aqualified specialist workshop immedi-
ately.
The on-board computer only shows message sor
warning sfrom certain systems in th emultifunc-
tion display. You should therefor emak esur e
your vehicl eis operating safely at all times .
If th eoperating safet yof your vehicl eis
impaired ,pull ove ras soo nas it is saf eto do so.
Contac t aqualified specialist workshop.
Fo ran overview, see th einstrumen tpanel illus-
tration (
Ypage 33).
Displays and operation
Speedometer with segments
The segments in th espeedometer indicat e
whic hspee drange is available.
RCruis econtrol activated (Ypage 145):
The segments ligh tup from th estore dspee d
to th etype-tested maximum speed.
RDISTRONI CPLU Sactivated (Ypage 147): On
eor two segments in th eset spee drange
ligh tup.
RDISTRONI CPLU Sdetects avehicl ein front:
The segments between th espee dof th evehi-
cle in fron tand th estore dspee dligh tup.
Tachometer
!
Do no tdriv ein th eoverrevving range, as this
could damag eth eengine.
The red ban din th etachometer indicates th e
engine's overrevving range.
The fuel suppl yis interrupted to protect th e
engin ewhen th ered ban dis reached.
Outside temperature display
You should pay special attention to road condi-
tion swhen temperatures are aroun dfreezing
point.
Bea rin min dthat th eoutside temperature dis-
play indicates th etemperature measured and
does no trecord th eroad temperature.
The outside temperature display is in th emulti-
function display (
Ypage 186).
The multifunction display shows changes in th e
outside temperature wit h adelay.
Coolant temperature display
GWARNIN G
Opening th ehoo dwhen th eengin eis over-
heated or when there is afir ein th eengin e
compartmen tcould expos eyou to hot gase s
or other servic eproducts .Ther eis aris kof
injury.
Let an overheate dengin ecool down before
opening th ehood. If there is afir ein th e
engin ecompartment, keep th ehoo dclosed
and contact th efir edepartment.
!A display message is shown if th ecoolan t
temperature is to ohigh .
If th ecoolan ttemperature is ove r24 8 ‡
(12 0†), do no tcontinue driving .The engin e
will otherwise be damaged.
The coolan ttemperature gauge is in th einstru-
men tcluste ron th eleft-han dside (
Ypage 33).
184Displays and operation
On-board computer and displays
Page 209 of 318
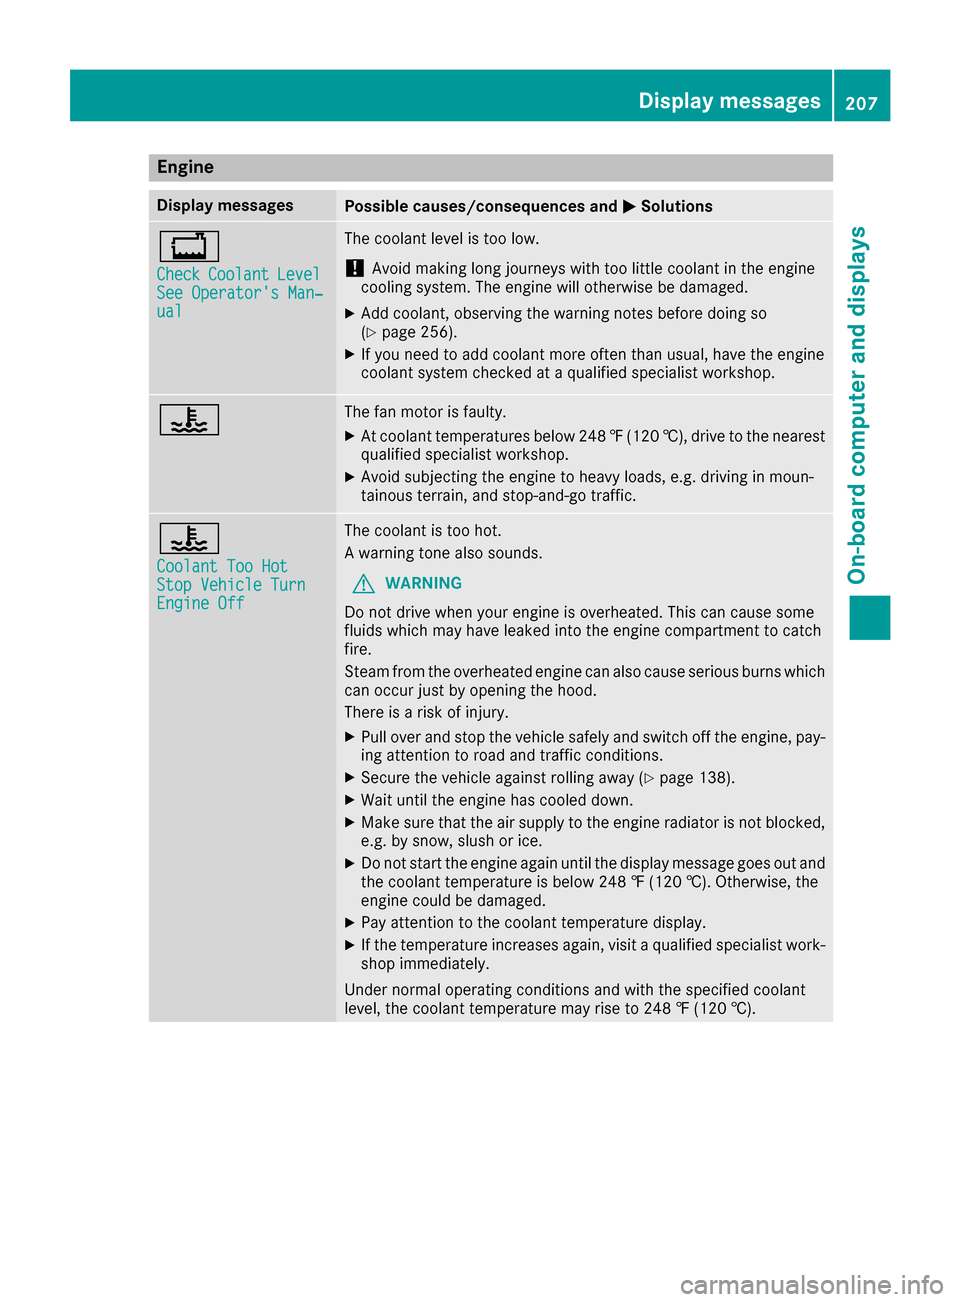
Engine
Display messagesPossible causes/consequences andMSolutions
+
CheckCoolantLevelSee Operator's Man‐ual
The coolant level is too low.
!Avoid making long journeys with too little coolant in the engine
cooling system. The engine will otherwise be damaged.
XAdd coolant, observing the warning notes before doing so
(Ypage 256).
XIf you need to add coolant more often than usual, have the engine
coolant system checked at a qualified specialist workshop.
?The fan motor is faulty.
XAt coolant temperatures below 248 ‡(120 †), drive to the nearest
qualified specialist workshop.
XAvoid subjecting the engine to heavy loads, e.g. driving in moun-
tainous terrain, and stop-and-go traffic.
?
Coolant Too HotStop Vehicle TurnEngine Off
The coolant is too hot.
A warning tone also sounds.
GWARNING
Do not drive when your engine is overheated. This can cause some
fluids which may have leaked into the engine compartment to catch
fire.
Steam from the overheated engine can also cause serious burns which
can occur just by opening the hood.
There is a risk of injury.
XPull over and stop the vehicle safely and switch off the engine, pay- ing attention to road and traffic conditions.
XSecure the vehicle against rolling away (Ypage 138).
XWait until the engine has cooled down.
XMake sure that the air supply to the engine radiator is not blocked,e.g. by snow, slush or ice.
XDo not start the engine again until the display message goes out and
the coolant temperature is below 248 ‡ (120 †). Otherwise, the
engine could be damaged.
XPay attention to the coolant temperature display.
XIf the temperature increases again, visit a qualified specialist work-
shop immediately.
Under normal operating conditions and with the specified coolant
level, the coolant temperature may rise to 248 ‡ (120 †).
Display messages207
On-board computer and displays
Z
Page 219 of 318
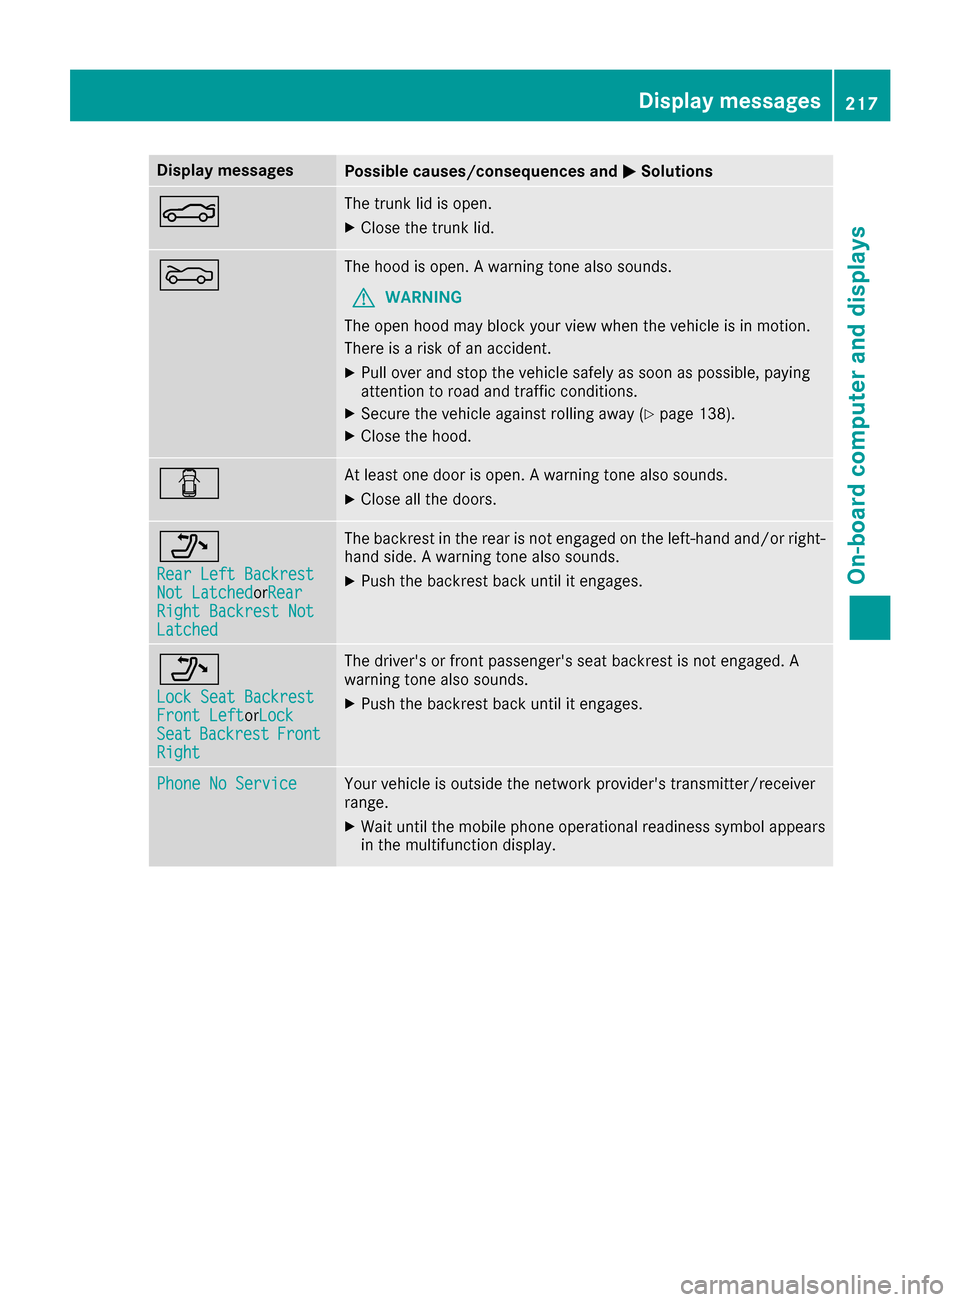
Display messagesPossible causes/consequences andMSolutions
NThe trunk lid is open.
XCloseth etrunk lid.
MThe hoo dis open . Awarning tone also sounds.
GWARNIN G
The open hoo dmay bloc kyour vie wwhen th evehicl eis in motion .
There is aris kof an accident.
XPull ove rand stop th evehicl esafely as soo nas possible, payin g
attention to roa dand traffic conditions.
XSecur eth evehicl eagainst rollin gaway (Ypage 138).
XCloseth ehood.
CAt least on edoor is open . Awarning tone also sounds.
XClos eall th edoors.
_
Rea rLef tBackrestNot Latche dorRea rRight Backrest NotLatche d
The backrest in th erear is no tengage don th eleft-han dand/o rright -
han dside . Awarning tone also sounds.
XPush th ebackrest bac kuntil it engages.
_
Loc kSea tBackrestFront Lef torLoc kSeatBackrestFrontRight
The driver's or fron tpassenger's seat backrest is no tengaged. A
warning tone also sounds.
XPush th ebackrest bac kuntil it engages.
Phone No Servic eYour vehicleis outside th enetwork provider' stransmitter/receiver
range.
XWait until th emobile phone operational readiness symbol appear s
in th emultifunction display.
Display messages21 7
On-board computer and displays
Z
Page 228 of 318
Warning/
indicator
lampNSignal type
Possible causes/consequences and M
Solutions
?NThe red coolant warning lamp comes on while the engine is running.
The coolant level is too low.
If the coolant level is correct, the airflow to the engine radiator may be blocked or
the electric engine radiator fan may be malfunctioning.
The coolant is too hot and the engine is no longer being cooled sufficiently.
XObserve the additional display messages in the multifunction display.
XPull over and stop the vehicle safely and switch off the engine, paying attention
to road and traffic conditions.
XSecure the vehicle against rolling away (Ypage 138).
XLeave the vehicle and keep a safe distance from the vehicle until the engine has cooled down.
XCheck the coolant level and add coolant, observing the warning notes
(Ypage 256).
XIf you have to add coolant frequently, have the engine cooling system checked.
XMake sure that the air supply to the engine radiator is not blocked, e.g. by snow,
slush or ice.
XDo not start the engine again until the coolant temperature is below 248 ‡
(120 †). Otherwise, the engine could be damaged.
XDrive to the nearest qualified specialist workshop.
XAvoid subjecting the engine to heavy loads, e.g. driving in mountainous terrain,
and stop-and-go traffic.
?N The red coolant warning lamp comes on while the engine is running. A warning
tone also sounds.
The coolant temperature has exceeded 248 ‡(120 †). The airflow to the engine
radiator may be blocked or the coolant level may be too low.
GWARNING
The engine is not being cooled sufficiently and may be damaged.
Do not drive when your engine is overheated. This can cause some fluids which
may have leaked into the engine compartment to catch fire.
Steam from the overheated engine can also cause serious burns which can occur
just by opening the hood.
There is a risk of injury.
XObserve the additional display messages in the multifunction display.
XPull over and stop the vehicle safely and switch off the engine, paying attention
to road and traffic conditions.
XSecure the vehicle against rolling away (Ypage 138).
XLeave the vehicle and keep a safe distance from the vehicle until the engine has
cooled down.
XCheck the coolant level and add coolant, observing the warning notes
(Ypage 256).
XIf you have to add coolant frequently, have the engine cooling system checked.
XMake sure that the air supply to the engine radiator is not blocked, e.g. by snow,
slush or ice.
226Warning and indicator lamps in the instrument cluster
On-board computer and displays
Page 254 of 318
Proceed as follows:
Rif you live in Canada
Rif you have difficulties programming the
garage door opener (regardless of where youlive) when using the programming steps
XPress and hold one of buttons ;to? on the
integrated garage door opener.
After a short time, indicator lamp :lights up
yellow.
XRelease the button.
Indicator lamp :flashes yellow.
XPress button Bof garage door remote con-
trol Afor two seconds, then release it for two
seconds.
XPress button Bagain for two seconds.
XRepeat this sequence on button Bof remote
control Auntil indicator lamp :lights up
green.
When indicator lamp :lights up green: pro-
gramming is finished.
When indicator lamp :flashes green: pro-
gramming was successful. The next step is to
synchronize the rolling code.
XRelease button Bof remote control Aof the
garage door drive.
If indicator lamp :lights up red: repeat the
programming process for the corresponding
button on the rear-view mirror. When doing
so, vary the distance between remote control
A and the rear-view mirror.
The required distance between remote con-
trol Aand the integrated garage door opener
depends on the garage door drive system.
Several attempts might be necessary. You
should test every position for at least
25 seconds before trying another position.
Problems when programming
If you are experiencing problems programing
the integrated garage door opener on the rear-
view mirror, take note of the following instruc-
tions:
RCheck the transmitter frequency used by
garage door drive remote control Aand
whether it is supported. The transmitter fre-
quency can usually be found on the back of
the garage door drive remote control.
The integrated garage door opener is com-
patible with devices that have units which operate in the frequency range of 280 to
433 MHz.
RReplace the batteries in garage door remote
control
A. This increases the likelihood that
garage door remote control Awill transmit a
strong and precise signal to the integrated
garage door opener.
RWhen programming, hold remote control A
at varying distanc es and angles from t he but-
ton which you are programming. Try various
angles at a distance between 2and 12 inches (5to 30 cm) or at the same angle but at varying
distances.
RIf another remote control is available for the
same garage door drive, repeat the same pro-
gramming steps with this remote control.
Before performing these steps, make sure
that new batteries have been installed in
garage door drive remote control A.
RNote that some remote controls only transmit
for a limited amount of time (the indicator
lamp on the remote control goes out). Press
buttonBon remote control Aagain before
transmission ends.
RAlign the antenna cable of the garage door
opener unit. This can improve signal recep-
tion/transmission.
Opening/closing the garage door
After it has been programmed, the integrated
garage door opener performs the function of the
garage door system remote control. Please also
read the operating instructions for the garage
door system.
XTurn the SmartKey to position 2in the ignition
lock (Ypage 122).
XPress button ;,=or? which you have
programmed to operate the garage door.
Garage door system with a fixed code: indi-
cator lamp :lights up green.
Garage door system with a rolling code: indi-
cator lamp :flashes green.
The transmitter will transmit a signal as long
as the button is pressed. The transmission is
halted after a maximum of ten seconds and
indicator lamp :lights up yellow.
XPress button ;,=or? again if necessary.
252Features
Stowage and features