set clock MERCEDES-BENZ E-CLASS COUPE 2017 Owners Manual
[x] Cancel search | Manufacturer: MERCEDES-BENZ, Model Year: 2017, Model line: E-CLASS COUPE, Model: MERCEDES-BENZ E-CLASS COUPE 2017Pages: 541, PDF Size: 10.71 MB
Page 233 of 541

Re
quirements:
Before coupling up the trailer, the ball neck must
be fully extended and engaged in the securely
loc ked position.
Tr ailers with a 7-pin plug can be connec tedto
th eve hicle:
R adap ter plug
R adapte r cable
In order forth e trailer tobe recognised bythe
ve hicle:
R the electrical connection must be set up cor‐
re ctly
R the trailer lighting sy stem must be in working
order
The operation of thefo llowing sy stems depends
on the trailer being connected cor rectly:
R ESP ®
R Parking Assist PARKTRONIC
R Parking Pilot
R Blind Spot Assist or Active Blind Spot Assi st
R Active Lane Keeping Assist Coupling up a trailer
* NO
TEDama getothe battery due tofull
discharge Charging
the trailer battery using the po wer
supply of the trailer can damage the batter y. #
Do not use the po wer supp lyto charge
th e trailer batter y. #
Remo vethe pr otective co vering from the ball
head and store it in a safe place. #
Position the trailer on a le vel sur face behind
th eve hicle and couple it up totheve hicle. #
Open the soc ket co ver. #
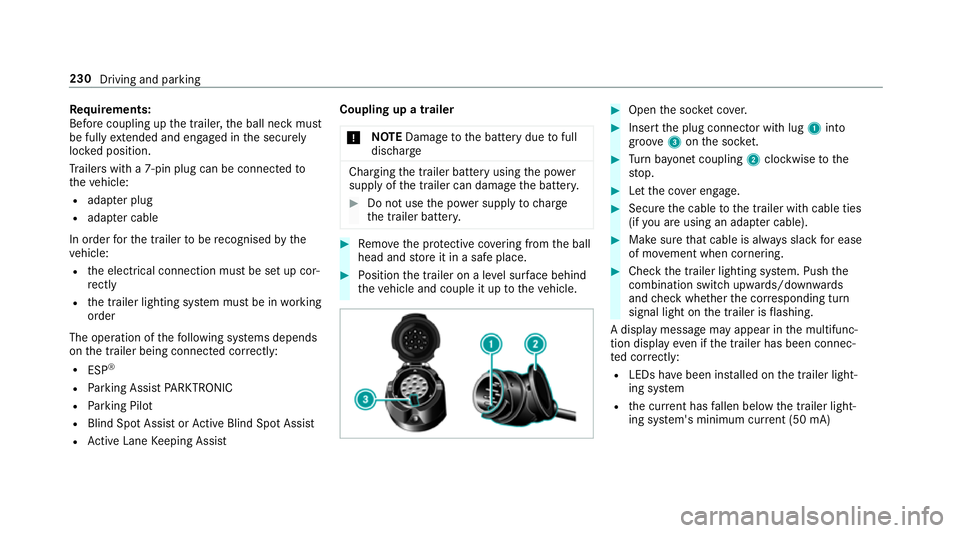
Insert the plug connector with lug 1into
groo ve3 onthe soc ket. #
Turn bayonet coupling 2clockwise tothe
st op. #
Let the co ver engage. #
Secure the cable tothe trailer with cable ties
(if you are using an adap ter cable). #
Make sure that cable is alw ays slack for ease
of mo vement when cornering. #
Check the trailer lighting sy stem. Push the
combination switch up wards/down wards
and check whe ther the cor responding turn
signal light on the trailer is flashing.
A display message may appear in the multifunc‐
tion display even if the trailer has been connec‐
te d cor rectly:
R LEDs ha vebeen ins talled on the trailer light‐
ing sy stem
R the cur rent has fallen below the trailer light‐
ing sy stem's minimum cur rent (50 mA) 230
Driving and pa rking
Page 404 of 541

R
Centring pin
R Folding wheel chock
R Ratchet for jack
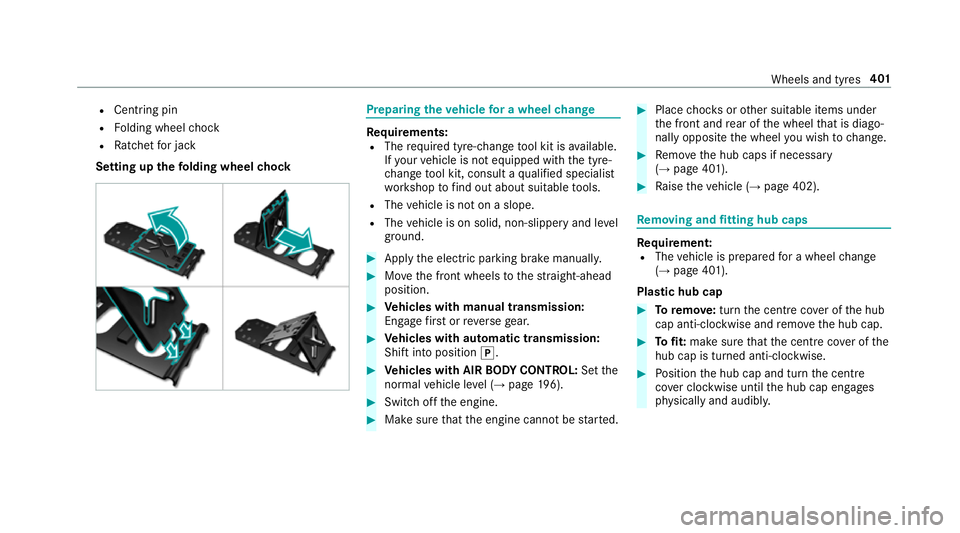
Setting up thefo lding wheel chock Prepa
ring theve hicle for a wheel change Re
quirements:
R The requ ired tyre-change tool kit is available.
If yo ur vehicle is not equipped with the tyre-
ch ange tool kit, consult a qualified specialist
wo rkshop tofind out about suitable tools.
R The vehicle is not on a slope.
R The vehicle is on solid, non-slippery and le vel
ground. #
Apply the electric parking brake manually. #
Movethe front wheels tothest ra ight-ahead
position. #
Vehicles with manual transmission:
Engage firs t or reve rsege ar. #
Vehicles with automatic transmission:
Shift into position j. #
Vehicles with AIR BODY CONT ROL:Set the
normal vehicle le vel (→ page 196). #
Switch off the engine. #
Make sure that the engine cann otbe star ted. #
Place choc ks orother suitable items under
th e front and rear of the wheel that is diago‐
nally opposite the wheel you wish tochange. #
Remo vethe hub caps if necessary
(→ page 401). #
Raise theve hicle (→ page 402). Re
moving and fitting hub caps Re
quirement:
R The vehicle is prepared for a wheel change
(→ page 401).
Pla stic hub cap #
Toremo ve:turn the cent recover of the hub
cap anti-clockwise and remo vethe hub cap. #
Tofit: make sure that the cent recover of the
hub cap is turned anti-clockwise. #
Position the hub cap and turn the cent re
co ver clockwise until the hub cap engages
ph ysically and audibly. Wheels and tyres
401