MERCEDES-BENZ E-CLASS COUPE 2018 Owner's Manual
Manufacturer: MERCEDES-BENZ, Model Year: 2018, Model line: E-CLASS COUPE, Model: MERCEDES-BENZ E-CLASS COUPE 2018Pages: 486, PDF Size: 6.31 MB
Page 371 of 486
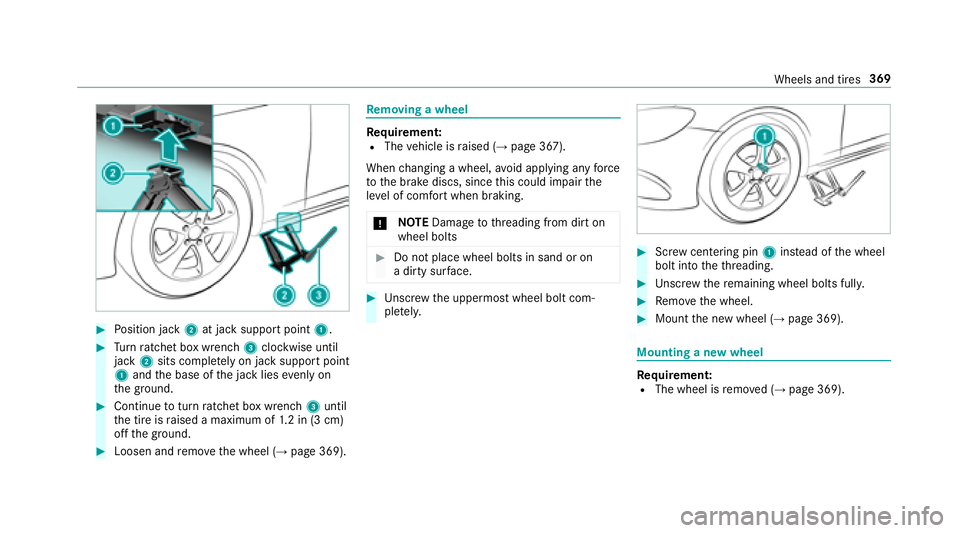
#Position jack 2at jack support point 1.
#Turn ratchet box wrench 3clockwise until
jack 2sits comple tely on ja cksupport point
1 and the base of the jack lies evenly on
th e ground.
#Continue toturn ratchet box wrench 3until
th e tire is raised a maximum of 1.2 in (3 cm)
off the ground.
#Loosen and remo vethe wheel (→page 369).
Re moving a wheel
Requirement:RThe vehicle is raised (→page 367).
When changing a wheel, avoid applying any forc e
to the brake discs, since this could impair the
le ve l of com fort when braking.
* NO
TEDama getothre ading from dirt on
wheel bolts
#Do not place wheel bolts in sand or on
a dirty sur face.
#Un scr ew the uppermost wheel bolt com‐
ple tely.
#Scr ew centering pin 1instead of the wheel
bolt into theth re ading.
#Un scr ew there maining wheel bolts fully.
#Re mo vethe wheel.
#Mount the new wheel (→page 369).
Mounting a new wheel
Re quirement:RThe wheel is remo ved (→page 369).
Wheels and tires 369
Page 372 of 486
&WARNING Risk of accident from losing a
wheel
Oiled, greased or damaged wheel bolt/wheel
nut thre ads or wheel hub/wheel mounting
bolt thre ads can cause the wheel bolts/
wheel nuts tocome loose.
As a result, you could lose a wheel while driv‐
ing.
#Ne ver oil or grease theth re ads.
#In theeve nt of damage totheth re ads,
con tact a qualified specialist workshop
immediatel y.
#Have the damaged wheel bolts or dam‐
aged hub thre ads replaced.
#Do not continue driving.
#Obser vethe information on thech oice of
tires (→page 362).
Fo r tires with a specified direction of rotation, an
ar row onthe side wall of the tire indicates the
cor rect dire ction of rotation. Observ eth e direc‐
tion of rotation when ins talling.
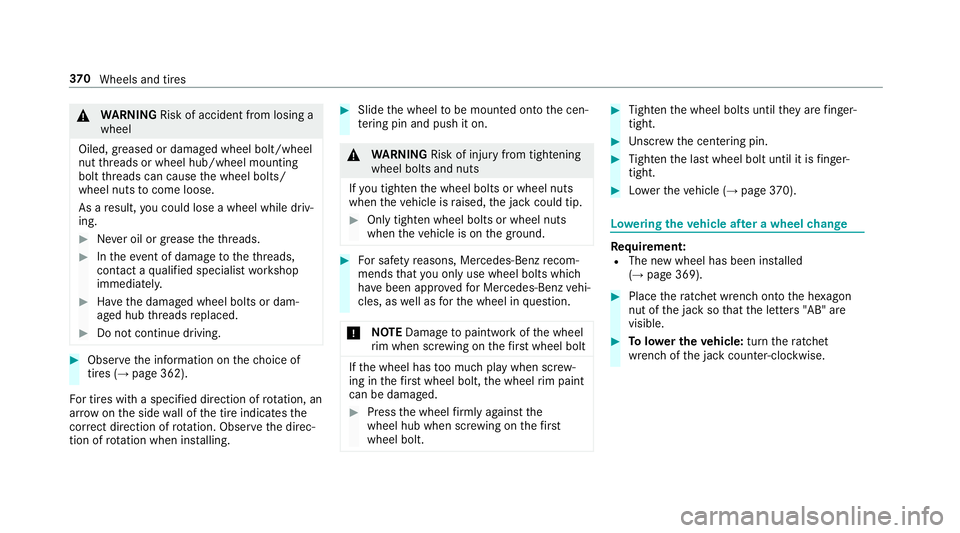
#Slide the wheel tobe mounted onto the cen‐
te ring pin and push it on.
&
WARNING Risk of injury from tightening
wheel bolts and nuts
If yo u tighten the wheel bolts or wheel nuts
when theve hicle is raised, the jack could tip.
#Only tighten wheel bolts or wheel nuts
when theve hicle is on the ground.
#Fo r saf etyre asons, Mercedes-Benz recom‐
mends that you only use wheel bolts which
ha ve been appr oved for Mercedes-Benz vehi‐
cles, as well as forth e wheel in question.
* NO
TEDama getopaintwork of the wheel
ri m when scr ewing on thefirs t wheel bolt
If th e wheel has too much play when scr ew‐
ing in thefirs t wheel bolt, the wheel rim paint
can be dama ged.
#Press the wheel firm lyagainst the
wheel hub when scr ewing on thefirs t
wheel bolt.
#Ti ghten the wheel bolts until they are finger-
tight.
#Un scr ew the centering pin.
#Tighten the last wheel bolt until it is finger-
tight.
#Lo we rth eve hicle (→page 370).
Lo weri ngtheve hicle af ter a wheel change
Re quirement:RThe new wheel has been ins talled
(→page 369).
#Place thera tchet wrench onto the he xagon
nut of the jack so that the letters "AB" are
visible.
#To lowe r the vehicle: turnthera tchet
wrench of the jack counter-clockwise.
37 0
Wheels and tires
Page 373 of 486
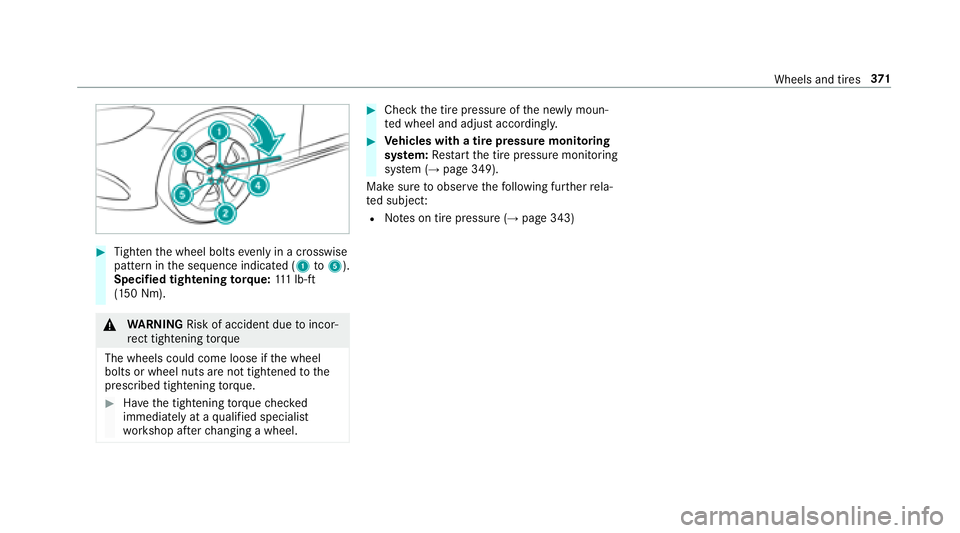
#Tighten the wheel bolts evenly in a crosswise
pattern in the sequence indicated (1 to5).
Specified tightening torq ue: 111 lb-ft
(150 Nm).
& WARNING Risk of accident due toincor‐
re ct tigh tening torque
Th ewheels could come loose if the wheel
bolts or wheel nuts are not tightened tothe
prescribed tightening torque.
#Ha ve the tightening torque checked
immediately at a qualified specialist
wo rkshop af terch anging a wheel.
#Check the tire pressure of the newly moun‐
te d wheel and adjust according ly.
#Ve hicles with a tire pressure monitoring
sy stem: Restart the tire pressure monitoring
sy stem (
→page 349).
Make sure toobser vethefo llowing fur ther rela‐
te d subjec t:
RNotes on tire pressure (→page 343)
Wheels and tires 37
1
Page 374 of 486
Notes ontech nical data
The data stated only appliestovehicles with
st andard equipment. You can obtain fur ther
information from an authorized Mercedes-Benz
Center.
Ve hicle electronics
Tw o-w ayradios
Note s on installing two-w ayradios
&
WARNING Risk of accident from incor‐
re ctly car ried out workon the RF trans‐
mitter
The electromagnetic radiation from RF trans‐
mitters can inter fere with theve hicle elec‐
tronics if RF transmitters are manipulate d or
re trofitted inco rrectly.
This could jeopardize the operating saf etyof
th eve hicle.
#Yo u should ha veall workon electrical
and electronic components car ried out
at a qualified specialist workshop.
&
WARNING Risk of accident from incor‐
re ct ope ration of the RF transmit ter
If yo u operate RF transmit ters incor rectly in
th eve hicle, the electromagnetic radiation
could inter fere with the on-board electronics,
e.g.:
Rif th e RF transmit ter is not connected to
an exterior antenna
Rif th eex terior antenna is not cor rectly
mounted or is not a lo w-reflection type.
This could jeopardize the operating saf etyof
th eve hicle.
#Ha ve the lo w-reflection exterior
antenna ins talled at a qualified special‐
ist workshop.
#When operating RF transmitters in the
ve hicle, alw ays connect them tothe
lo w- reflection exterior antenna.
* NO
TEInva lidation of the operating per‐
mit due tofailure tocomply wi th the
instructions for ins tallation and use
The operating permit may be in validated if
th e instructions for ins tallation and use of RF
transmitters are not obser ved.
#Only use appr oved frequency bands.
#Obser vethe maximum permissible out‐
put po wer in these frequency bands.
#Only use appr oved antenna positions.
37 2
Tech nical da ta
Page 375 of 486
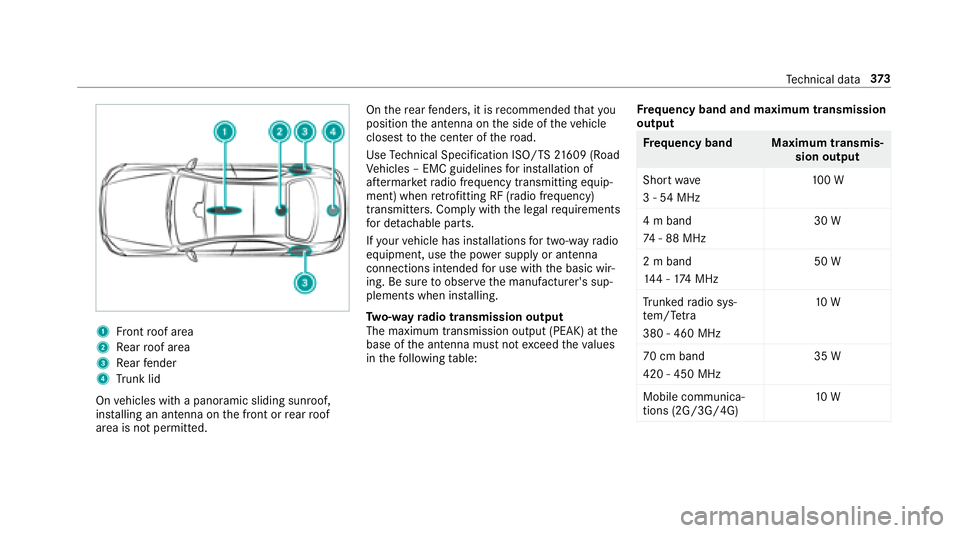
1Front roof area
2Re ar roof area
3Re ar fender
4Trunk lid
On vehicles with a panoramic sliding sunroof,
ins talling an antenna on the front or rear roof
area is not permitted. On
there ar fende rs, it is recommended that you
position the antenna on the side of theve hicle
closest tothe center of thero ad.
Use Tech nical Specification ISO/TS 21609 (Road
Ve hicles – EMC guidelines for ins tallation of
af te rm arke tra dio frequency transmitting equip‐
ment) when retrofitting RF (radio frequency)
transmitters. Co mply wi th th e legal requirements
fo r de tach able parts.
If yo ur vehicle has ins tallations for two-w ayradio
equipment, use the po wer supp lyor antenna
connections intended for use with the basic wir‐
ing. Be sure toobser vethe manufacturer's sup‐
plements when ins talling.
Tw o-w ayradio transmission output
The maximum transmission output (PEAK) at the
base of the antenna must not exceed theva lues
in thefo llowing table: Fr
equency band and maximum transmission
output
Fr equency band Maximum transmis‐
sion output
Sho rtwa ve
3 - 54 MHz 10
0 W
4 m band
74 - 88 MHz 30 W
2 m band
14 4 - 174 MHz 50 W
Tr unked radio sys‐
te m/T etra
380 - 460 MHz 10
W
70 cm band
420 - 450 MHz 35 W
Mobile communica‐
tions (2G/3G/4G) 10
W
Tech nical da ta37
3
Page 376 of 486
Thefollowing can be used in theve hicle without
re strictions:
RRF transmitter wi tha maximum transmission
output of up to100 mW
RRF transmitters with transmitter frequencies
inthe 380 - 410 MHz frequency band and a
maximum transmission output of up to2 W
(trunked radio sy stem/T etra )
RMobile phones (2G/3G/4G)
There are no restrictions when positioning the
antenna on the outside of theve hicle forth efo l‐
lowing frequency bands:
RTr unked radio sy stem/T etra
R70 cm band
R2G/3G/4G
Ve hicle identification plate, VIN and engine
number
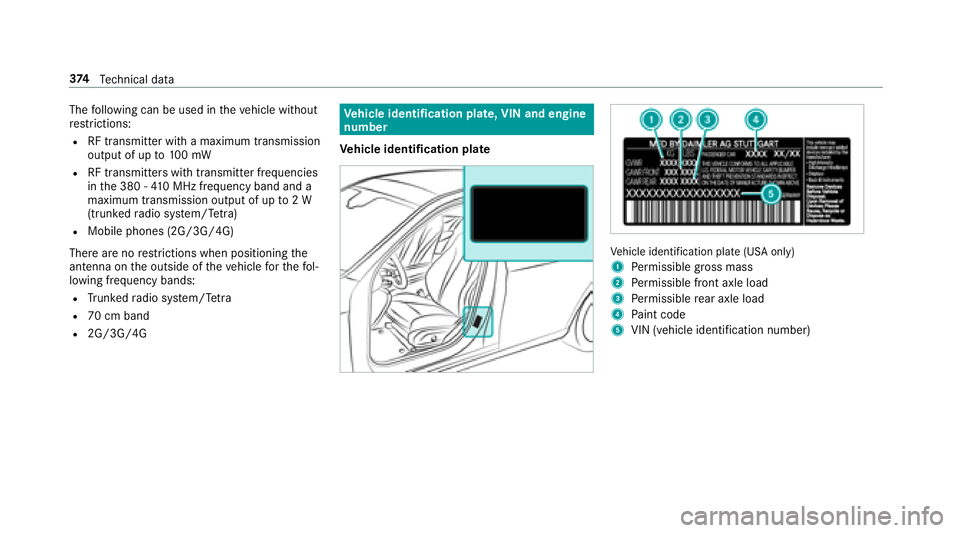
Ve hicle identification plate
Vehicle identification plate (USA only)
1
Pe rm issible grossmass
2Pe rm issible front axle load
3Perm issible rear axle load
4Pa int code
5VIN (vehicle identification number)
37 4
Tech nical da ta
Page 377 of 486
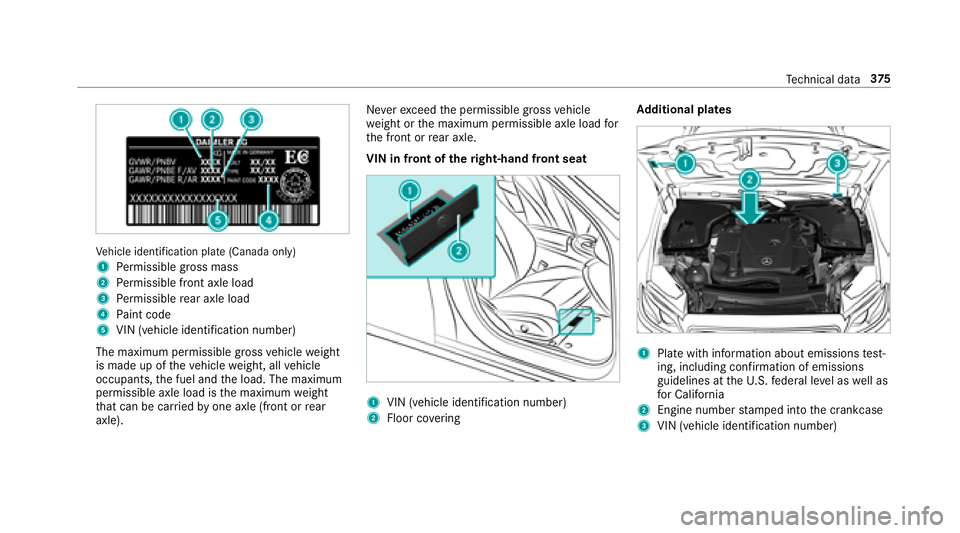
Vehicle identification plate (Canada only)
1
Pe rm issible grossmass
2Pe rm issible front axle load
3Perm issible rear axle load
4Pa int code
5VIN (vehicle identification number)
The maximum permissible gross vehicle weight
is made up of theve hicle weight, all vehicle
occupants, the fuel and the load. The maximum
permissible axle load is the maximum weight
th at can be car ried byone axle (front or rear
axle). Ne
verexc eed the permissible gross vehicle
we ight or the maximum permissible axle load for
th e front or rear axle.
VIN in front of theright-hand front seat
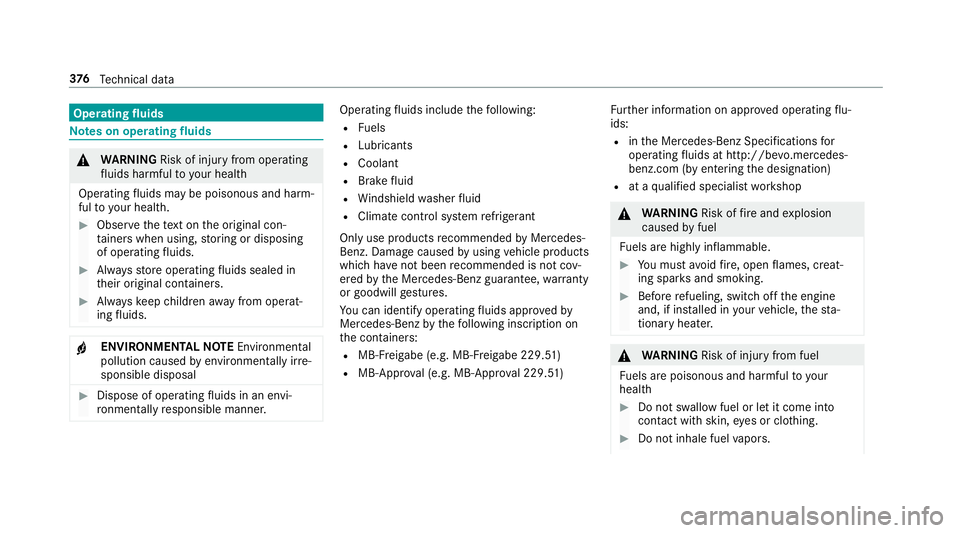
1VIN (vehicle identification number)
2Floor co vering Ad
ditional plates
1Pla tewith information about emissions test‐
ing, including con firm ation of emissions
guidelines at theU. S. federal le vel as well as
fo r California
2Engine number stamped into the crankcase
3VIN (vehicle identification number)
Te ch nical da ta37
5
Page 378 of 486
Operatingfluids
Note s on operating fluids
&
WARNING Risk of injury from operating
fl uids harmful to your health
Operating fluids maybe pois onous and harm‐
ful to yo ur health.
#Obser vethete xt on the original con‐
ta iners when using, storing or disposing
of operating fluids.
#Alw aysst ore operating fluids sealed in
th eir original conta iners.
#Alwayske ep children away from operat‐
ing fluids.
+ENV IRONMEN TALNO TEEnvironmental
pollution caused byenvironmen tally ir re‐
sponsible disposal
#Dispose of operating fluids in an envi‐
ro nmentally responsible manner.
Operating fluids include thefo llowing:
RFu els
RLubricants
RCoolant
RBrake fluid
RWi ndshield washer fluid
RClimate cont rol sy stem refrigerant
Only use products recommended byMercedes-
Benz. Damage caused byusing vehicle products
which ha venot been recommended is not cov‐
ered bythe Mercedes-Benz guarantee, warranty
or goodwill gestures.
Yo u can identify operating fluids appr ovedby
Mercedes-Benz bythefo llowing insc ript ion on
th e conta iners:
RMB-Freigabe (e.g. MB-Fr eigabe 229.51)
RMB-Approval (e.g. MB-App rova l 229.51) Fu
rther information on appr oved operating flu‐
ids:
Rin the Mercedes-Benz Specifications for
operating fluids at http://be vo.mercedes-
benz.com (byen tering the designation)
Rat a qualified specialist workshop
&
WARNING Risk offire and explosion
caused byfuel
Fu els are highly inflammable.
#You must avoidfire , open flames, creat‐
ing spar ksand smoking.
#Before refueling, switch off the engine
and, if ins talled in your vehicle, thest a‐
tionary heater.
& WARNING Risk of injury from fuel
Fu els are poisonous and harmful to your
health
#Do not swallow fuel or let it come into
contact with skin, eyes or clo thing.
#Do not inhale fuel vapors.
37 6
Tech nical da ta
Page 379 of 486
#Keep children away from fuel.
If yo u or other people come into contact with
fuel, obser vethefo llowing:
#Immediately rinse fuel off your skin wit h
soap and water.
#If fuel comes into contact with your
ey es, immediately rinse them thor‐
oughly with clean water.Seek medical
attention immediately.
#If yo u sw allow fuel, seek medical atten‐
tion immediatel y.Do not induce vomit‐
ing.
#Change immediately out of clo thing that
has come into con tact wi thfuel.
Fuel
Note s on fuel grades forve hicles with a gas‐
oline engine
Obser vethe no tes on operating fluids
(
→page 376). *
NO
TEDama gecaused bythe wrong fuel
Even small amounts of the wrong fuel could
re sult in damage tothe fuel sy stem, the
engine and the emission control sy stem.
#Only refuel with lo w-sulfur premium
grade fuel.
This fuel may contain up to10 %ethanol.
Yo ur vehicle is suitable for use with E10 fuel.
Do not refuel using:
RDiesel
RE15, E85, E100
RGasoline containing me thanol (M15, M30,
M85, M100)
RGasoline with additives con taining me tal
If yo u accidenta llyrefuel with the wrong fuel:
#Do not switch the ignition on.
#Consult a qualified specialist workshop.
Ifth eav ailable fuel is not suf ficiently low in sul‐
fur, this can produce unpleasant odors. Only
refuel with fuel that has at least the octane
number specified in the information table in the
fuel filler flap (
→page 140). This may reduce
engine output and increase fuel consum ption.
If yo uwa nt maximum engine output: only
re fuel with unleaded premium grade gasoline
with at least 91AKI/95 RON.
Ne verre fuel using gasoline with a lo werRO N.
* NO
TEPremature wear caused byunlea‐
ded regular gasoline
Unleaded regular gasoline can cause the
engine towe ar more quickly and impair lon‐
ge vity and per form ance.
If unleaded premium grade gasoline is
una vailable and you ha vetorefuel using
unleaded regular gasoline:
#Only fill th e fuel tank tohalf full with
unleaded regular gasoline and refill as
soon as possible with unleaded pre‐
mium grade gasoline.
#Do not drive at the maximum speed.
Te ch nical da ta37
7
Page 380 of 486
#Avoid sudden acceleration and engine
speeds over 3,000 rpm.
Fu rther information on fuel can be found:
RAt aga sst ation
RAt aqu alified specialist workshop
RUSA onl y:Un der http://www.mbusa.com
Information on additives in gasoline
Obser vethe no tes on operating fluids
(
→page 376).
* NO
TEDama gecaused bynon-app rove d
additives
Even small amounts of the wrong additive
may lead tomalfunctions occur ring.
#Only add cleaning additives recommen‐
ded byMercedes-Benz tothe fuel.
Mercedes-Benz recommends that you use fuel
br ands that ha veadditives.
The fuel grade available in some countries may
not be suf ficient. Residue could build up in the
fuel injection sy stem as a result. In this case, in consultation with an authorized Mercedes-Benz
Center,
the fuel may be mixed with the cleaning
additive recommended byMercedes-Benz.
Alw ays obser vethe no tes and mixing ratios
speci fied on the conta iner.
Ta nk capacity and reser vefuel le vel
Capacity
Model Total capacity
Al lmodels 17.4 gal (66.0 l)
Model Of whichreser ve
All model s1 .8gal(7.0 l)
Engine oi l
Notes on engine oil
Obser vethe no tes on operating fluids
(
→page 376).
* NO
TEEngine damage causedbyan
incor rect oil filter, incor rect oil or addi‐
tives
#Do not use engine oils or oil filters other
th an those which meet the specifica‐
tions necessary forth e prescribed
service inter vals.
#Do not alter the engine oil or oil filter in
order toachie velonger change inter vals
th an prescri bed.
#Do not use additives.
#Have the engine oil changed af terth e
prescribed inter vals.
37 8
Tech nical da ta