MERCEDES-BENZ E-CLASS ESTATE 2012 Owners Manual
Manufacturer: MERCEDES-BENZ, Model Year: 2012, Model line: E-CLASS ESTATE, Model: MERCEDES-BENZ E-CLASS ESTATE 2012Pages: 457, PDF Size: 11.62 MB
Page 311 of 457
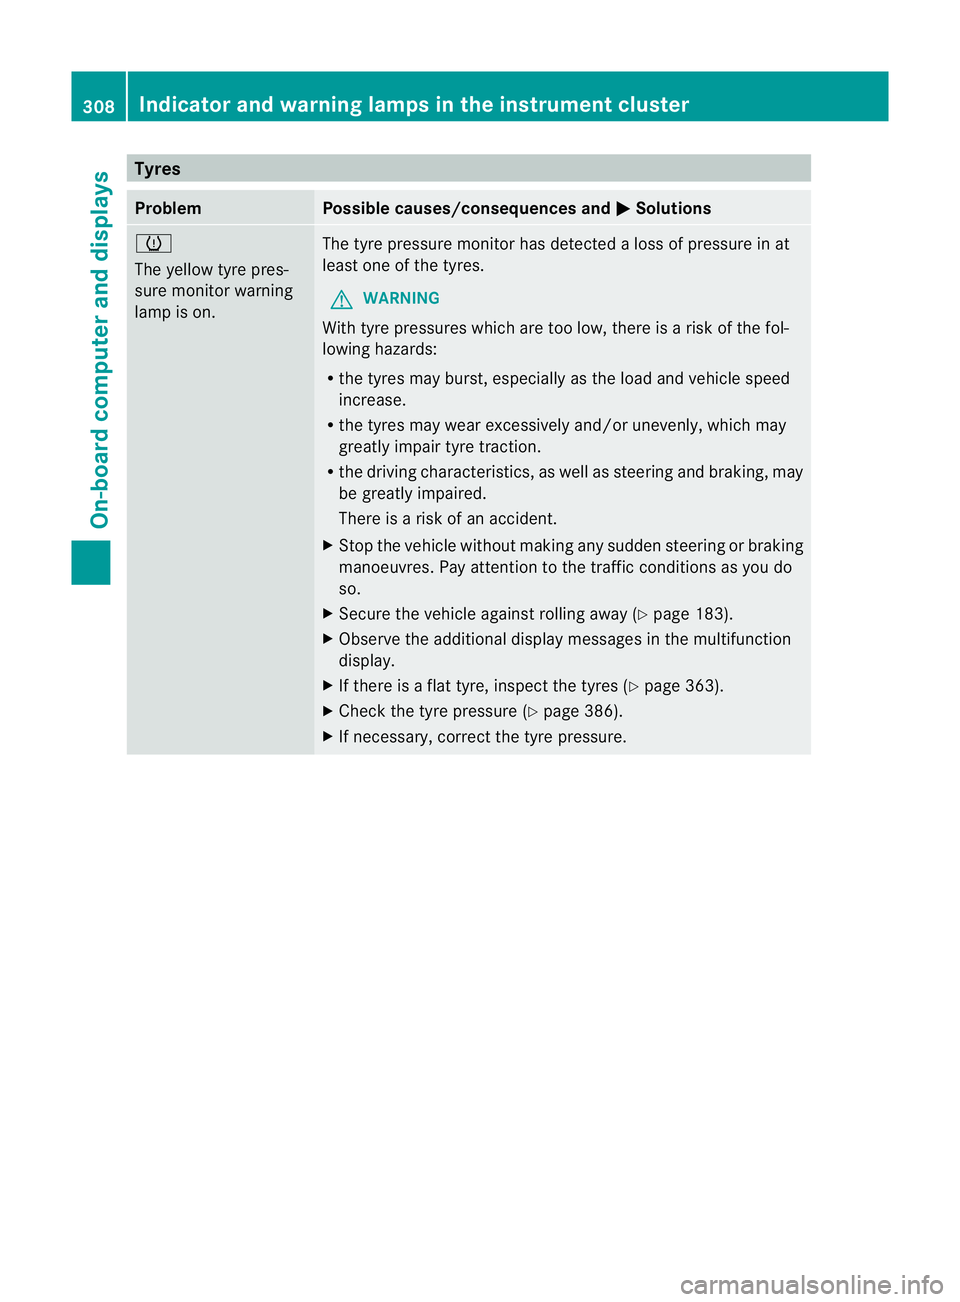
Tyres
Problem Possible causes/consequences and
M Solutions
h
The yellow tyre pres-
sure monitor warning
lamp is on. The tyre pressure monitor has detected a loss of pressure in at
leas
tone of the tyres.
G WARNING
With tyre pressures which are too low, there is a ris kofthe fol-
lowing hazards:
R the tyres may burst, especially as the load and vehicle speed
increase.
R the tyres may wear excessively and/or unevenly, which may
greatly impair tyre traction.
R the driving characteristics, as well as steering and braking, may
be greatly impaired.
There is a risk of an accident.
X Stop the vehicle without making any sudden steering or braking
manoeuvres. Pay attention to the traffic conditions as you do
so.
X Secure the vehicle against rolling away (Y page 183).
X Observe the additional display messages in the multifunction
display.
X If there is a flat tyre, inspect the tyres (Y page 363).
X Check the tyre pressure (Y page 386).
X If necessary, correct the tyre pressure. 308
Indicator and warning lamps in the instrument clusterOn-board computer and displays
Page 312 of 457
Useful information
............................310
Stowage areas .................................. 310
Features ............................................. 328 309Stowing and features
Page 313 of 457
Useful information
i This Owner's Manual describes all mod-
els, series and optional equipment for your
vehicle that were available at the time of
going to press. National variations are pos-
sible. Note that your vehicle may not be
equipped with all of the functions descri-
bed. This is also the case for systems and
functions relevant to safety.
i Read the information on qualified special-
ist workshops: (Y page 25). Stowage areas
Loading guidelines
G
WARNING
Secure and position the load as described in
the loading guidelines.
Otherwise, vehicle occupants could
be injured by the load being thrown around in
the even tofsharp braking, a sudden change
in direction or an accident.
You will find further information in the "Secur-
ing a load" section.
Even if you follow all the loading guidelines,
the load will increase the risk of injury in the
event of an accident. G
WARNING
Keep the boot lid/tailgate closed while the
vehicle is in operation. Otherwise, exhaust
fumes could enter the vehicle interior and poi-
son you.
The handling characteristics of a laden vehi-
cle are dependent on the distribution of the
load within the vehicle. For this reason, you
should observe the following notes when
transporting a load:
R when transporting a load, never exceed the
maximum permissible gross vehicle weight or the permissible axle loads for the vehicle
(including occupants).
R position heavy loads as far forwards as pos-
sible and as low down in the boot/luggage
compartmenta s possible.
R the load must not protrude above the upper
edge of the seat backrests.
R always place the load against the rear or
front seat backrests. Make sure that the
seat backrests are securely locked into
place.
R always place the load behind unoccupied
seats if possible.
R secure the load with sufficiently strong and
wear-resistant lashing material. pad sharp
edges for protection.
i Load restraints are available at any quali-
fied specialist workshop, e.g. a Mercedes-
Benz Service Centre. Stowage compartments
Important safety notes G
WARNING
The stowage compartments must be closed
when items are stored in them. Luggage nets
are not designed to secure heavy items of
luggage.
You or other vehicle occupants could be
injured by objects being thrown around if you:
R brake sharply
R change direction suddenly
R are involved in an accident
Sharp-edged and fragile objects must not be
placed in the luggage net.
Do not place hard objects in the map pockets.
Objects must not protrude from the map
pockets. 310
Stowage areasStowing and features
Page 314 of 457
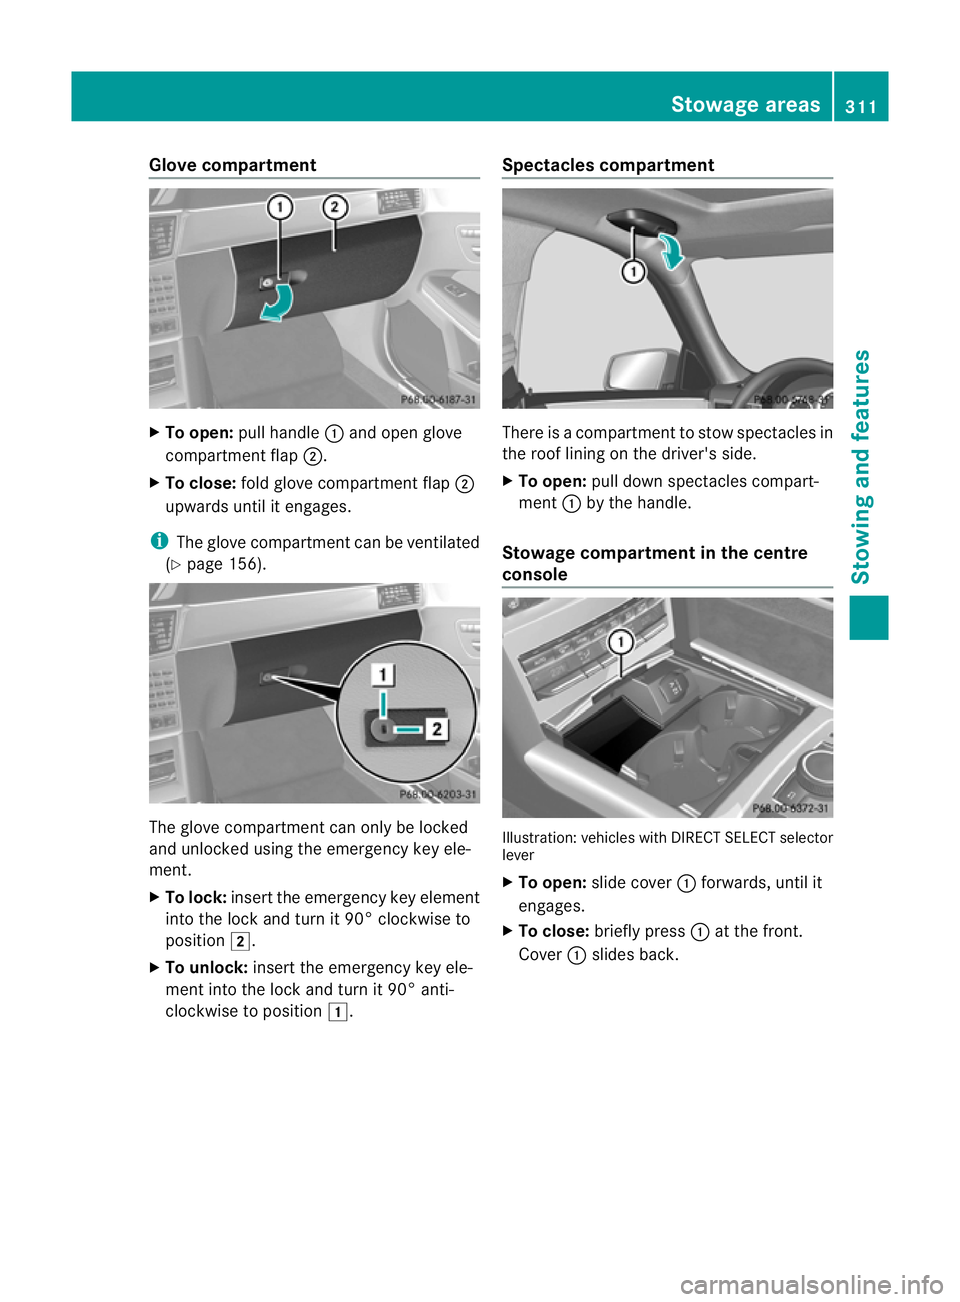
Glove compartment
X
To open: pull handle :and open glove
compartment flap ;.
X To close: fold glove compartment flap ;
upwards until it engages.
i The glove compartment can be ventilated
(Y page 156). The glove compartment can only be locked
and unlocked using the emergency key ele-
ment.
X To lock: insert the emergency key element
into the lock and turn it 90° clockwise to
position 2.
X To unlock: insert the emergency key ele-
ment into the lock and turn it 90° anti-
clockwise to position 1. Spectacles compartment There is a compartment to stow spectacles in
the roof lining on the driver's side.
X
To open: pull down spectacles compart-
ment :by the handle.
Stowage compartment in the centre
console Illustration: vehicles with DIRECT SELECT selector
lever
X
To open: slide cover :forwards, until it
engages.
X To close: briefly press :at the front.
Cover :slides back. Stowage areas
311Stowing and features Z
Page 315 of 457
Stowage compartment/telephone
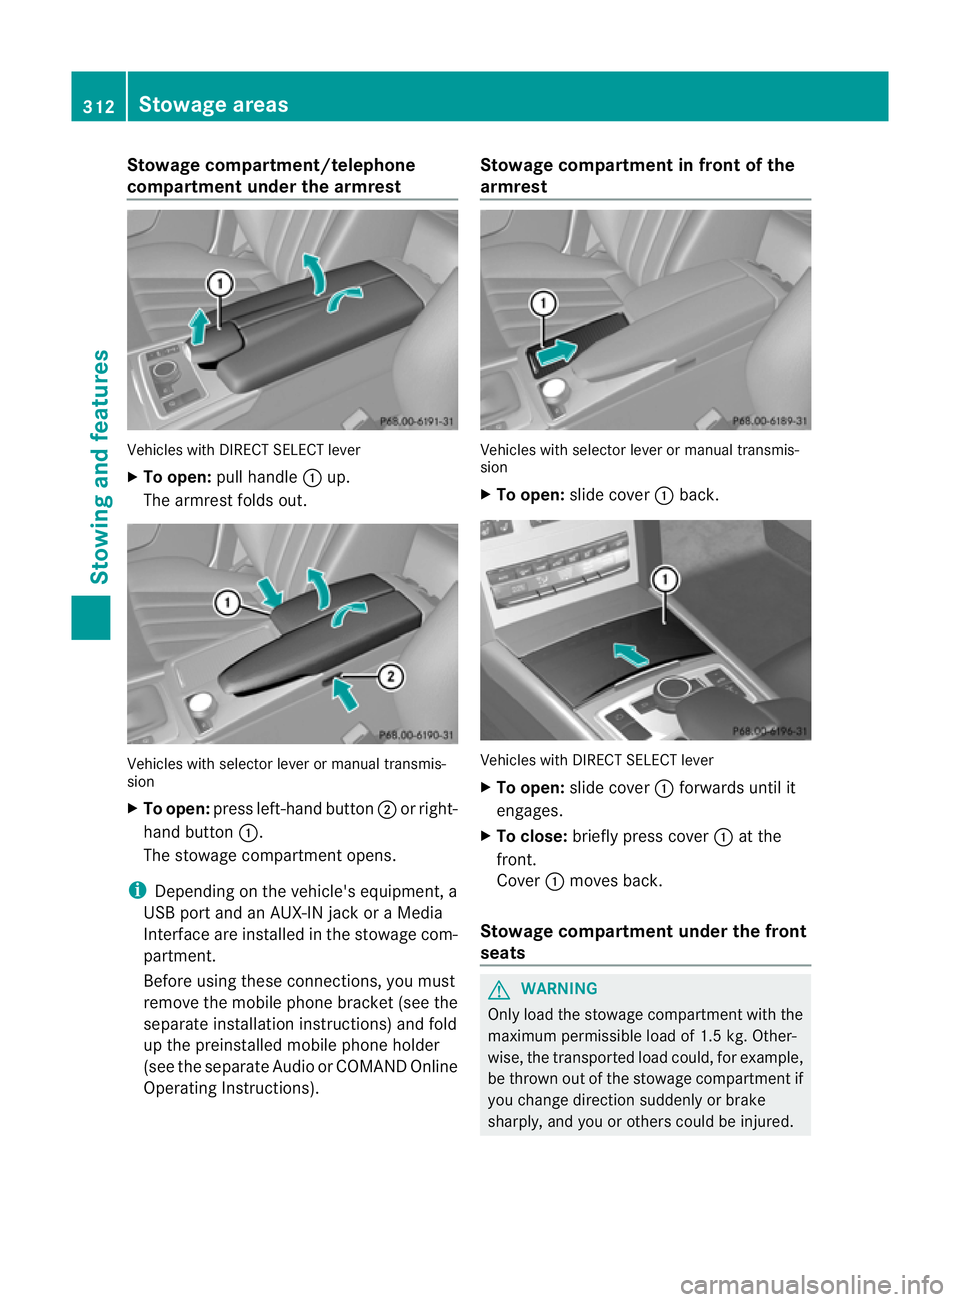
compartment under the armrest
Vehicles with DIRECT SELECT lever
X
To open: pull handle :up.
The armrest folds out. Vehicles with selector lever or manual transmis-
sion
X To open: press left-hand button ;or right-
hand button :.
The stowage compartmen topens.
i Depending on the vehicle's equipment, a
USB port and an AUX-IN jack or a Media
Interface are installed in the stowage com-
partment.
Before using these connections, you must
remove the mobile phone bracket (see the
separate installation instructions) and fold
up the preinstalled mobile phone holder
(see the separate Audio or COMAND Online
Operating Instructions). Stowage compartment in front of the
armrest
Vehicles with selector lever or manual transmis-
sion
X
To open: slide cover :back. Vehicles with DIRECT SELECT lever
X
To open: slide cover :forwards until it
engages.
X To close: briefly press cover :at the
front.
Cover :moves back.
Stowage compartment under the front
seats G
WARNING
Only load the stowage compartment with the
maximum permissible load of 1.5 kg. Other-
wise, the transported load could, for example,
be thrown out of the stowage compartment if
you change direction suddenly or brake
sharply, and you or other scould be injured. 312
Stowage areasStowing and features
Page 316 of 457
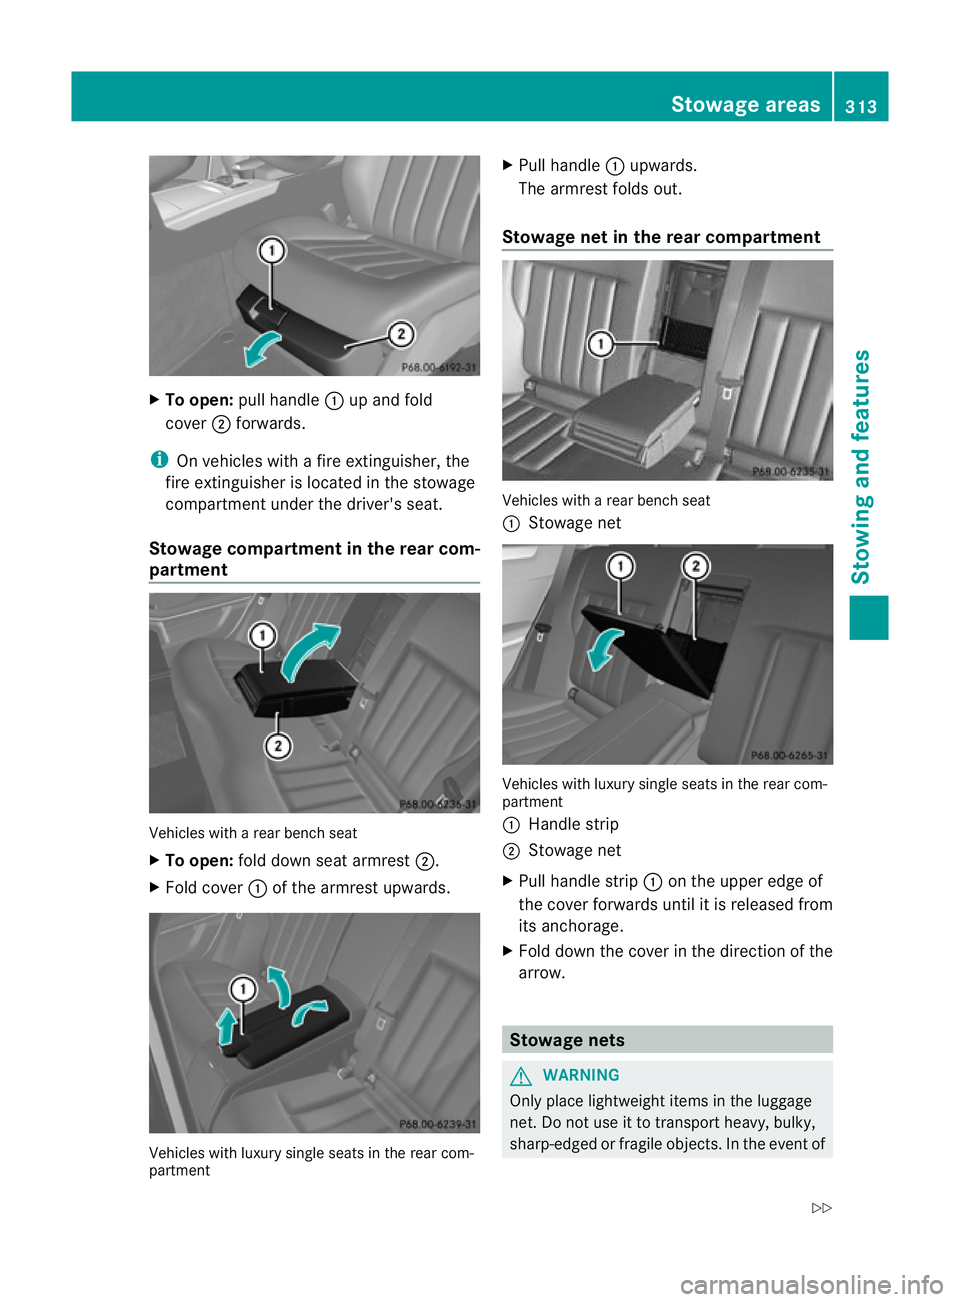
X
To open: pull handle :up and fold
cover ;forwards.
i On vehicles with a fire extinguisher, the
fire extinguisher is located in the stowage
compartment under the driver's seat.
Stowage compartmen tin the rear com-
partment Vehicles with a rear bench seat
X
To open: fold down seat armrest ;.
X Fold cover :of the armrest upwards. Vehicles with luxury single seats in the rear com-
partment X
Pull handle :upwards.
The armrest folds out.
Stowage net in the rear compartment Vehicles with a rear bench seat
:
Stowage net Vehicles with luxury single seats in the rear com-
partment
:
Handle strip
; Stowage net
X Pull handle strip :on the upper edge of
the cover forwards until it is released from
its anchorage.
X Fold down the cover in the direction of the
arrow. Stowage nets
G
WARNING
Only place lightweight items in the luggage
net. Do not use it to transport heavy, bulky,
sharp-edged or fragile objects. In the event of Stowage areas
313Stowing and features
Z
Page 317 of 457
an accident, the luggage net will no
tsecure
the transported goods.
Luggage nets are located in the front-
passenger footwell and on the left and right-
hand sides of the boot/luggage compart-
ment. Skibag
Unfolding the skibag and loading skis G
WARNING
The skibag is designed to carry up to four pairs
of skis. Do not use the skibag to carry any
other type of load.
The skibag must always be secured when
laden. Otherwise, injuries could be caused by
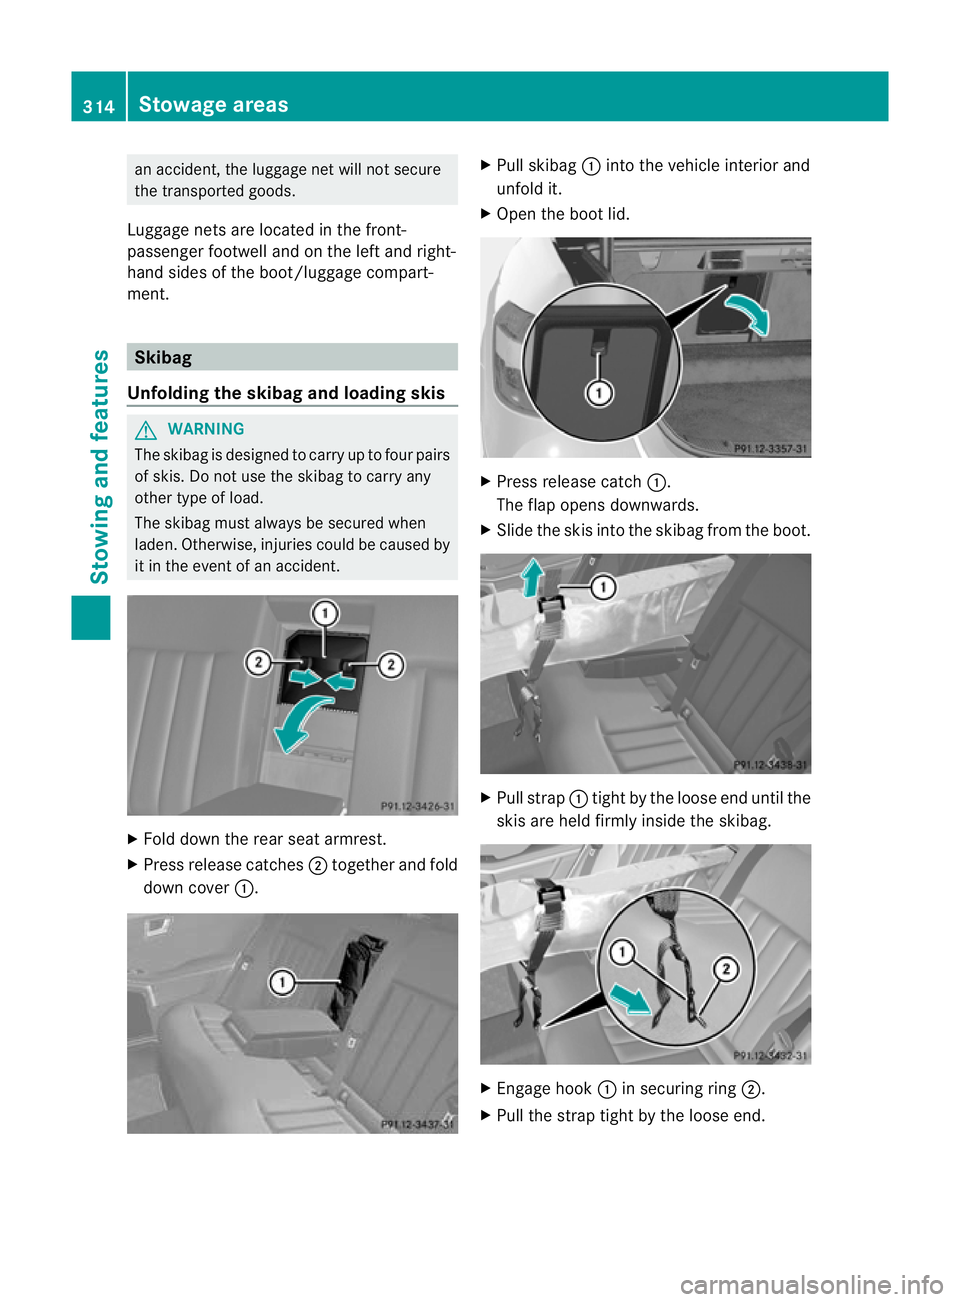
it in the event of an accident. X
Fold down the rear seat armrest.
X Press release catches ;together and fold
down cover :. X
Pull skibag :into the vehicle interior and
unfold it.
X Open the boot lid. X
Press release catch :.
The flap opens downwards.
X Slide the skis into the skibag from the boot. X
Pull strap :tight by the loose end until the
skis are held firmly inside the skibag. X
Engage hook :in securing ring ;.
X Pull the strap tight by the loose end. 314
Stowage areasStowing and features
Page 318 of 457
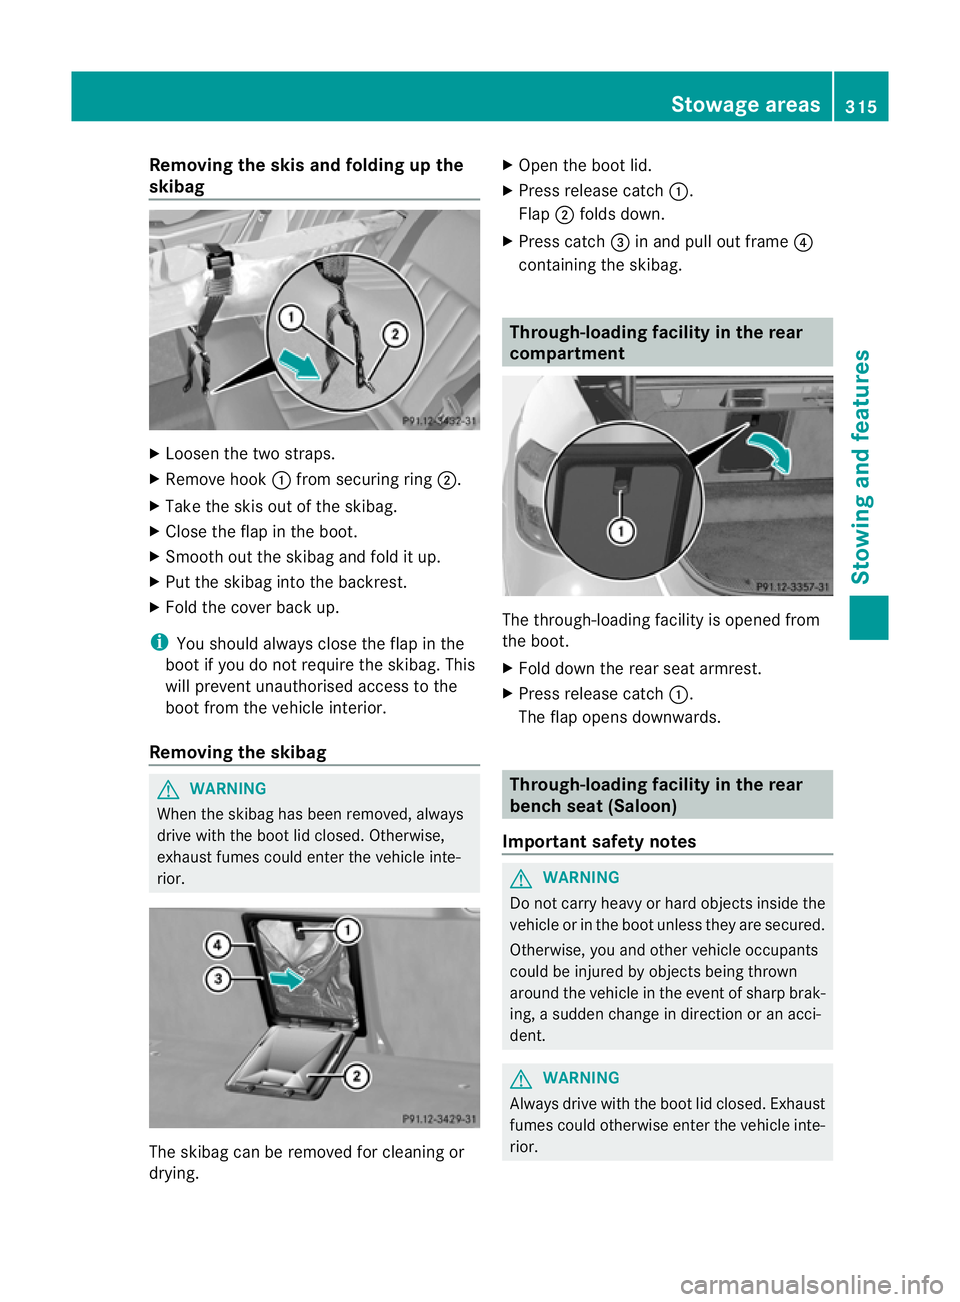
Removing the skis and folding up the
skibag
X
Loosen the two straps.
X Remove hook :from securing ring ;.
X Take the skis ou tofthe skibag.
X Close the flap in the boot.
X Smooth out the skibag and fold it up.
X Put the skibag into the backrest.
X Fold the cover back up.
i You should always close the flap in the
boot if you do not require the skibag. This
will prevent unauthorised access to the
boot from the vehicle interior.
Removing the skibag G
WARNING
When the skibag has been removed, always
drive with the boot lid closed. Otherwise,
exhaust fumes could enter the vehicle inte-
rior. The skibag can be removed for cleaning or
drying. X
Open the boot lid.
X Press release catch :.
Flap ;folds down.
X Press catch =in and pull out frame ?
containing the skibag. Through-loading facility in the rear
compartment
The through-loading facility is opened from
the boot.
X
Fold down the rear seat armrest.
X Press release catch :.
The flap opens downwards. Through-loading facility in the rear
bench seat (Saloon)
Important safety notes G
WARNING
Do not carry heavy or hard objects inside the
vehicle or in the boot unless they are secured.
Otherwise, you and other vehicle occupants
could be injured by objectsb eing thrown
around the vehicle in the event of sharp brak-
ing, a sudden change in direction or an acci-
dent. G
WARNING
Always drive with the boot lid closed. Exhaust
fumes could otherwise enter the vehicle inte-
rior. Stowage areas
315Stowing and features Z
Page 319 of 457
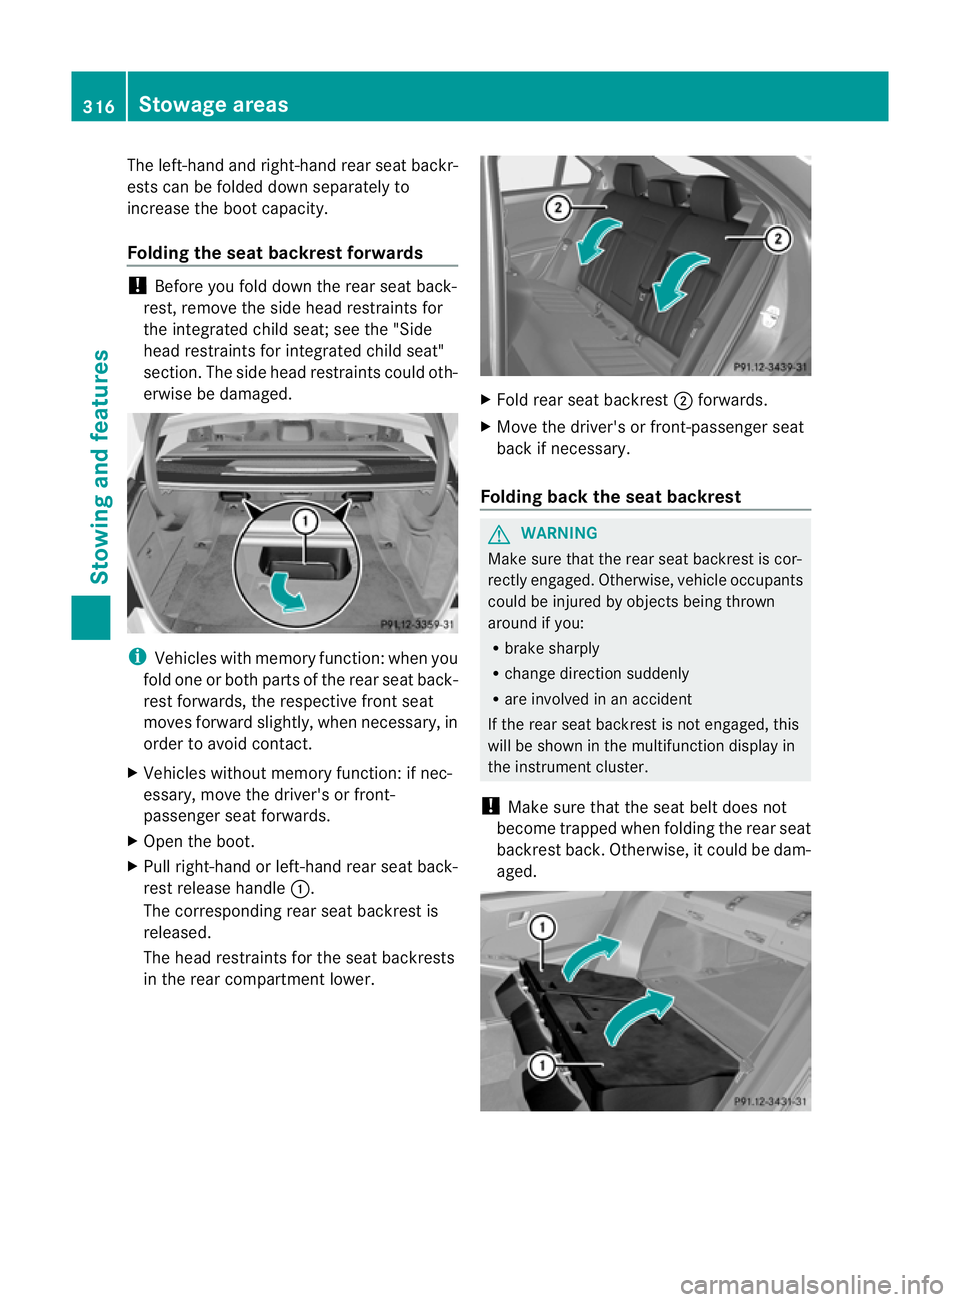
The left-hand and right-hand rear seat backr-
ests can be folded down separately to
increase the boot capacity.
Folding the seat backrest forwards
!
Before you fold down the rear seat back-
rest, remove the side head restraints for
the integrated child seat; see the "Side
head restraints for integrated child seat"
section. The side head restraints could oth-
erwise be damaged. i
Vehicles with memory function: when you
fold one or both parts of the rear seat back-
rest forwards, the respective fronts eat
moves forward slightly, when necessary, in
order to avoid contact.
X Vehicles without memory function: if nec-
essary, move the driver's or front-
passenger seat forwards.
X Open the boot.
X Pull right-hand or left-hand rear seat back-
rest release handle :.
The corresponding rear seat backrest is
released.
The head restraints for the seat backrests
in the rear compartment lower. X
Fold rear seat backrest ;forwards.
X Move the driver's or front-passenger seat
back if necessary.
Folding back the seat backrest G
WARNING
Make sure that the rear seat backrest is cor-
rectly engaged. Otherwise, vehicle occupants
could be injured by objects being thrown
around if you:
R brake sharply
R change direction suddenly
R are involved in an accident
If the rear seat backrest is not engaged, this
will be shown in the multifunction display in
the instrument cluster.
! Make sure that the seat belt does not
become trapped when folding the rear seat
backrest back. Otherwise, it could be dam-
aged. 316
Stowage areasStowing and features
Page 320 of 457
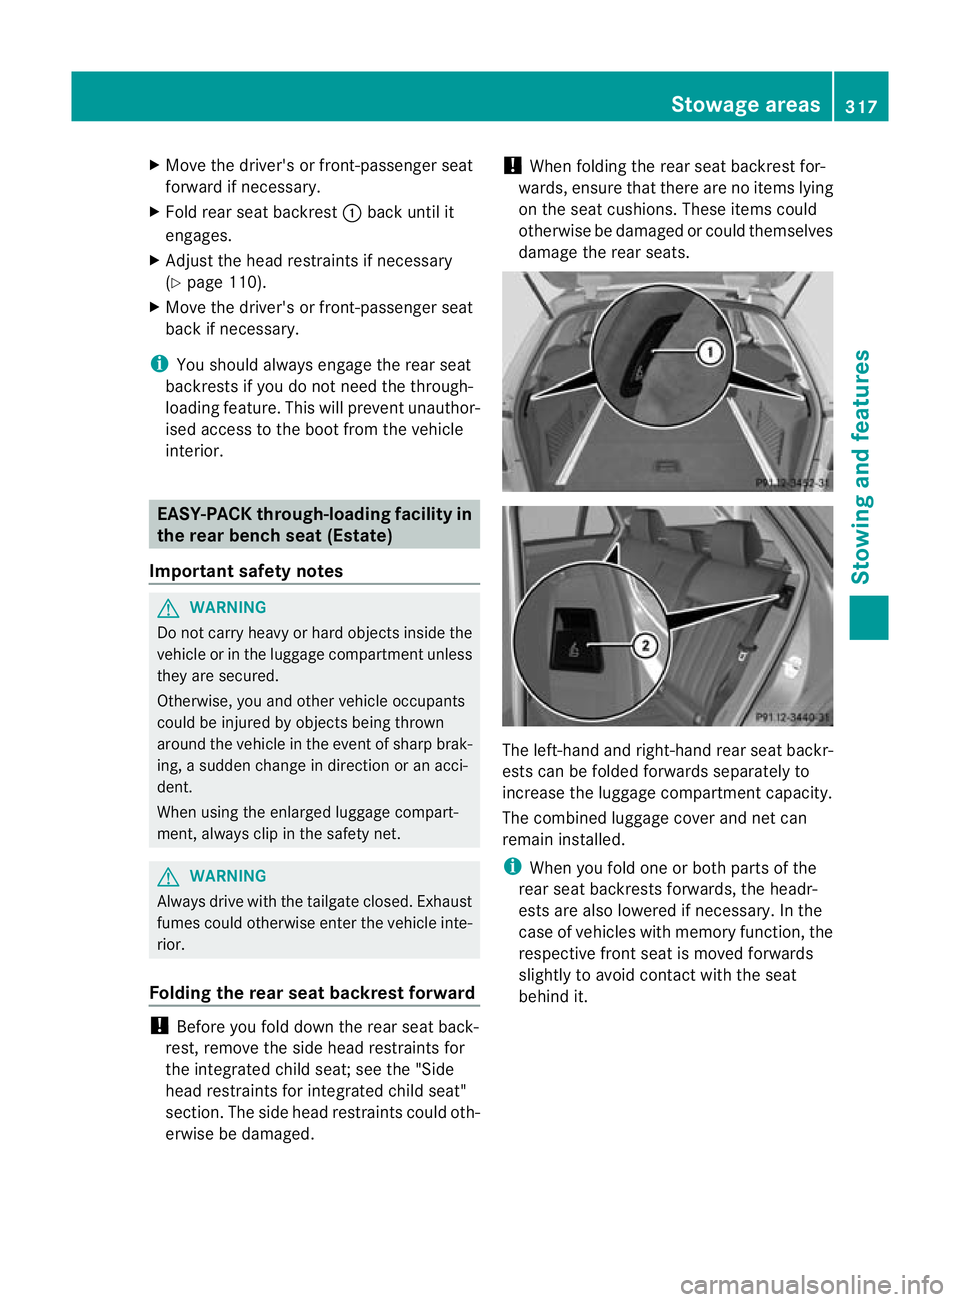
X
Move the driver's or front-passenger seat
forward if necessary.
X Fold rear seat backrest :back until it
engages.
X Adjust the head restraints if necessary
(Y page 110).
X Move the driver's or front-passenger seat
back if necessary.
i You should always engage the rear seat
backrests if you do not need the through-
loading feature. This will prevent unauthor-
ised access to the boot from the vehicle
interior. EASY-PACK through-loading facility in
the rear bench seat (Estate)
Important safety notes G
WARNING
Do not carry heavy or hard objects inside the
vehicle or in the luggage compartmen tunless
they are secured.
Otherwise, you and othe rvehicle occupants
could be injured by objects being thrown
around the vehicle in the event of sharp brak-
ing, a sudden change in direction or an acci-
dent.
When using the enlarged luggage compart-
ment, always clip in the safety net. G
WARNING
Always drive with the tailgate closed. Exhaust
fumes could otherwise enter the vehicle inte-
rior.
Folding the rear seat backrest forward !
Before you fold down the rear seat back-
rest, remove the side head restraints for
the integrated child seat; see the "Side
head restraints for integrated child seat"
section. The side head restraints could oth-
erwise be damaged. !
When folding the rear seat backrest for-
wards, ensure that there are no items lying
on the seat cushions .These items could
otherwise be damaged or could themselves
damage the rear seats. The left-hand and right-hand rear seat backr-
ests can be folded forwards separately to
increase the luggage compartmentc
apacity.
The combined luggage cover and ne tcan
remain installed.
i When you fold one or bot hparts of the
rear seat backrests forwards, the headr-
ests are also lowered if necessary. In the
case of vehicles with memory function, the
respective fron tseat is moved forwards
slightly to avoid contact with the seat
behind it. Stowage areas
317Stowing and features Z