service MERCEDES-BENZ E-CLASS ESTATE 2015 User Guide
[x] Cancel search | Manufacturer: MERCEDES-BENZ, Model Year: 2015, Model line: E-CLASS ESTATE, Model: MERCEDES-BENZ E-CLASS ESTATE 2015Pages: 497, PDF Size: 16.23 MB
Page 29 of 497
trapped
.Inthe cas eofdamage, contact a
qualified specialis tworkshop. G
WARNING
Modifications to electronic components, their software as well as wirin gcould affect their
functio nand/or the operatio nofothernet-
worked components. Thi scould in particular
also be the cas efor systems relevant to
safety .The ym ight not functio nproperly any-
mor eand/or jeopardise the operational
safety of the vehicle. There is an increased
ris kofana ccident and injury.
Do not attempt to modify the wirin gaswellas
electronic components or their software.
Alway shavew orkone lectrical and electronic
components carrie doutataq uali fied special-
is tw orkshop.
If yo umakea ny change stothe vehicl eelec-
tronics, the genera lope rating permi tisr en-
dered invalid.
! There is
ariskofd amag etothe vehicl eif:
R the vehicl ebecome sstuck, e.g .onahigh
kerb or an unpaved road
R yo ud rive too fast ove ranobstacle ,e.g.a
kerb or apothol eint he road
R ah eavy object strikes the underbod yor
parts of the chassis
In situations like this, the body ,the under-
body ,chassi sparts, wheels or tyres could
be damage dwithou tthe damage being visi-
ble. Components damage dinthisw aycan
unexpectedly fail or, in the cas eofanacci-
dent, no longe rwithstand the strain they
ar ed esig nedf or.
If the underbod ypanelling is damaged,
combustible material ssuchasl eaves,
grass or twigs can gathe rbetween the
underbod yand the underbod ypanelling. If
these material scome in contact with hot
parts of the exhaust system ,the yc an catch
fire.
In such situations, have the vehicle
checked and repaired immediatel yata
qualified specialis tworkshop .If, upon con- tinuing your journey
,you notice tha tdriving
safety is impaired ,pullo vera nd stop the
vehicl eimm ediately, paying attentio nto
roa dand traffi cconditions. In such cases,
consul taqualified specialis tworkshop. Declaration
sofconformity
Wireless vehicle components Th
ef ollowing information applie stoallcom-
ponents of the vehicl eand the information
systems and communication devices integra-
ted into the vehicl ewhich receive and/or
transmi tradio waves:
Th ec omponents of thi svehicl ethatreceive
and/or transmi tradio waves ar ecompliant
with the basi crequirements and al lothe rrel-
evant conditions of Directiv e1999/5/EC.
Yo uc an obtai nfurthe rinformation fro many
Mercedes-Benz Service Centre.
Electromagnetic compatibility Th
ee lectromagnetic compatibility of the vehi-
cle components ha sbeenc hecked and certi-
fie da ccording to the currentl yvalid version of
Regulatio nECE-R 10. Diagnostic
sconnect ion
Th ed iagn ostics connectio niso nlyi ntended
for the connectio nofdiagnosticequipment at
aq uali fied specialis tworkshop. G
WARNING
If yo uconnect equipment to adiagn ostics
connectio ninthe vehicle, it can affect the
operatio nofthe vehicl esystems. This may
affect the operating safety of the vehicle.
There is ariskofana ccident.
Do not connect any equipment to adiagn os-
tics connectio ninthe vehicle. G
WARNING
Objects in the driver's footwell ma yrestrict
the clearance around the pedals or block a 26
Introduction
Page 30 of 497
depressed pedal. This jeopardises the oper-
ating and road safety of the vehicle. There is a risk of an accident.
Stow all objects securely in the vehicle so that
they do not get int othe driver' sfootwell.
Always fit the floormat ssecurely and as pre-
scribed in order to ensure that ther eisalways
sufficien troom for the pedals. Do not use
loose floormat sand do not place several floor-
mats on top of one another.
! If the engin
eisswitched off and equip-
ment on the diagnostics connection is
used, the starter battery may discharge.
Connectin gequipment to the diagnostics
connection can lead to emission smonitoring
information being reset ,for example. This
may lead to the vehicle failing to meet the
requirements of the nex temission stest dur-
ing the main inspection. Qualified specialist workshop
Aq ualified specialist workshop has the nec-
essary special skills, tools and qualifications
to correctly carry out any necessary work on
your vehicle. This particularly applies to work
relevant to safety.
Observe the notes in the Service Booklet.
Always have the following work carried out at aq ualified specialist workshop:
R work relevant to safety
R servic eand maintenanc ework
R repair work
R modifications, installations and conver-
sions
R work on electronic components
Mercedes-Benz recommends that you use a
Mercedes-Benz Service Centre. Vehicle registration
Mercedes-Benz may ask its Service Centres
to carry out technical inspection soncertain vehicles. The quality or safety of the vehicle is
improved as aresult of the inspection.
Mercedes-Benz can only infor myou about
vehicle checks if it has your registration data.
It is possible that your vehicle has not yet
been registered in your name in the following
cases:
R if your vehicle was not purchased at an
authorised specialist dealer.
R if your vehicle has not yet been examined at
aM ercedes-Benz Service Centre.
It is advisable to register your vehicle with a
Mercedes-Benz Service Centre.
Inform Mercedes-Benz as soon as possible
about any chang einaddress or vehicle own-
ership. You can do this at aMercedes-Benz
Service Centre, for example. Correct use
If you remov eany warning stickers ,you or
other scould fail to recognise certain dangers.
Leave warning stickers in position.
Observe the following information when driv- ing your vehicle:
R the safety notes in this manual
R the vehicle technical data
R traffic rules and regulations
R laws and safety standards pertaining to
moto rvehicles Implied warranty
! Follow the instructions in this manual
about the proper operation of your vehicle
as well as about possible vehicle damage.
Damage to your vehicle that arises from
culpable contraventions against these
instructions are not covered either by
Mercedes-Benz implied warrant yorbythe
New or Used-Vehicle Warranty. Introduction
27 Z
Page 31 of 497
QR code for rescue card
The QR code is secured in the fuel filler flap
and on the opposite side on the B-pillar. In the
event of an accident ,rescue services can use
the QR code to quickly find the appropriate
rescue card for your vehicle. The curren tres-
cue card contains, in acompact form, the
most importan tinformation about your vehi-
cle, e.g. the routing of the electric cables.
You can find more information under https:// portal.aftersales.i.daimler.com/public/
content/asportal/en/communication/
informationen_fuer/QRCode.html. Data stored in the vehicle
Aw ide range of electronic componentsin
your vehicle contain data memories.
These data memories temporarily or perma-
nently stor etechnical information about:
R the vehicle's operating state
R events
R faults
In general, this technical information docu-
ment sthe stat eofac omponent,am odule, a
system or the surroundings.
These include, for example:
R operating conditions of system compo-
nents, e.g. fluid levels
R the vehicle's status messages and those of
its individual components, e.g. number of
wheel revolutions/speed, deceleration in
movement, lateral acceleration, accelera-
tor pedal position
R malfunctions and defect sinimportan tsys-
tem components, e.g. lights, brakes
R vehicle reactions and operating conditions
in special driving situations ,e.g. airbag
deployment, intervention of stability con-
trol systems
R ambient conditions, e.g. outside tempera-
ture This data is of an exclusively technical nature
and can be used to:
R assist in detecting and rectifying faults and
defects
R analyse vehicle functions, e.g. after an acci-
dent
R optimise vehicle functions
The data cannot be used to trac ethe vehicle's
movements.
When your vehicle is serviced, technical infor-
mation can be read from the event data mem- ory and fault data memory.
Services include, for example:
R repair services
R service processes
R warranty events
R quality assurance
It is read by employees of the service network (including manufacturers) using special diag-
nostic testers. More detailed information is
obtained from it, if required.
After afault has been rectified, the informa-
tion is deleted from the fault memory or is
continually overwritten.
When operating the vehicle, situations are
conceivable in which this technical data, in
connection with other information (if neces-
sary, under consultation with an authorised
expert), could be traced to aperson.
Examples include:
R accident reports
R damage to the vehicle
R witness statements
Further additional functions that have been
contractually agreed upon with the customer
allow certain vehicle data to be conveyed by
the vehicle as well. The additional functions
include, for example, vehicle location in case of an emergency. 28
Introduction
Page 48 of 497
See "Children in the vehicle" for further infor-
mation on children travelling in the vehicl eas
well as on child restraint systems
(Y page 58). Important safety notes
G
WARNING
If the restraint system is modified ,itmay no
longer work as intended .The restraint system
may then not perfor mits intended protective
function by failing in an accident or triggering
unexpectedly, for example. There is an
increased ris kofinjury ,possibly eve nfatal.
Neve rmodify parts of the restraint system. Do
not attempt to modify the wiring as well as
electronic components or thei rsoftware.
If it is necessary to modify an airba gsystem to
accommodate aperson with disabilities, con-
tact aMercedes-Benz Service Centre for
details. Restrain
tsystem warnin glamp
The functions of the restraint system are
checke dafterthe ignition is switche donand
at regular interval swhile the engine is run-
ning. Therefore, malfunctions can be detec-
ted in goo dtime.
The 6 restraint system warning lamp in
the instrument cluster lights up when the igni- tion is switche don. It goe soutno later tha na
few seconds afte rthe vehicl eisstarted. The
components of the restraint system are in
operationa lreadiness.
Am alfunction ha soccurred if the 6
restraint system warning lamp:
R doe snot light up afte rthe ignition is
switche don
R doe snot go ou tafte raf ew seconds with
the engine running
R lights up agai nwhile the engine is running G
WARNING
If the restraint system is malfunctioning,
restraint system components may be trig-
gered unintentionally or might not be trig-
gered at al linthe event of an accident with a
high rate of vehicl edeceleration. Thi scan
effect belt tensioner sorairbags, for example.
There is an increased ris kofserious or even
fata linjuries.
Hav ethe restraint system checke dand
repaired immediatel yataqualified specialist
workshop. PASSENGER AI
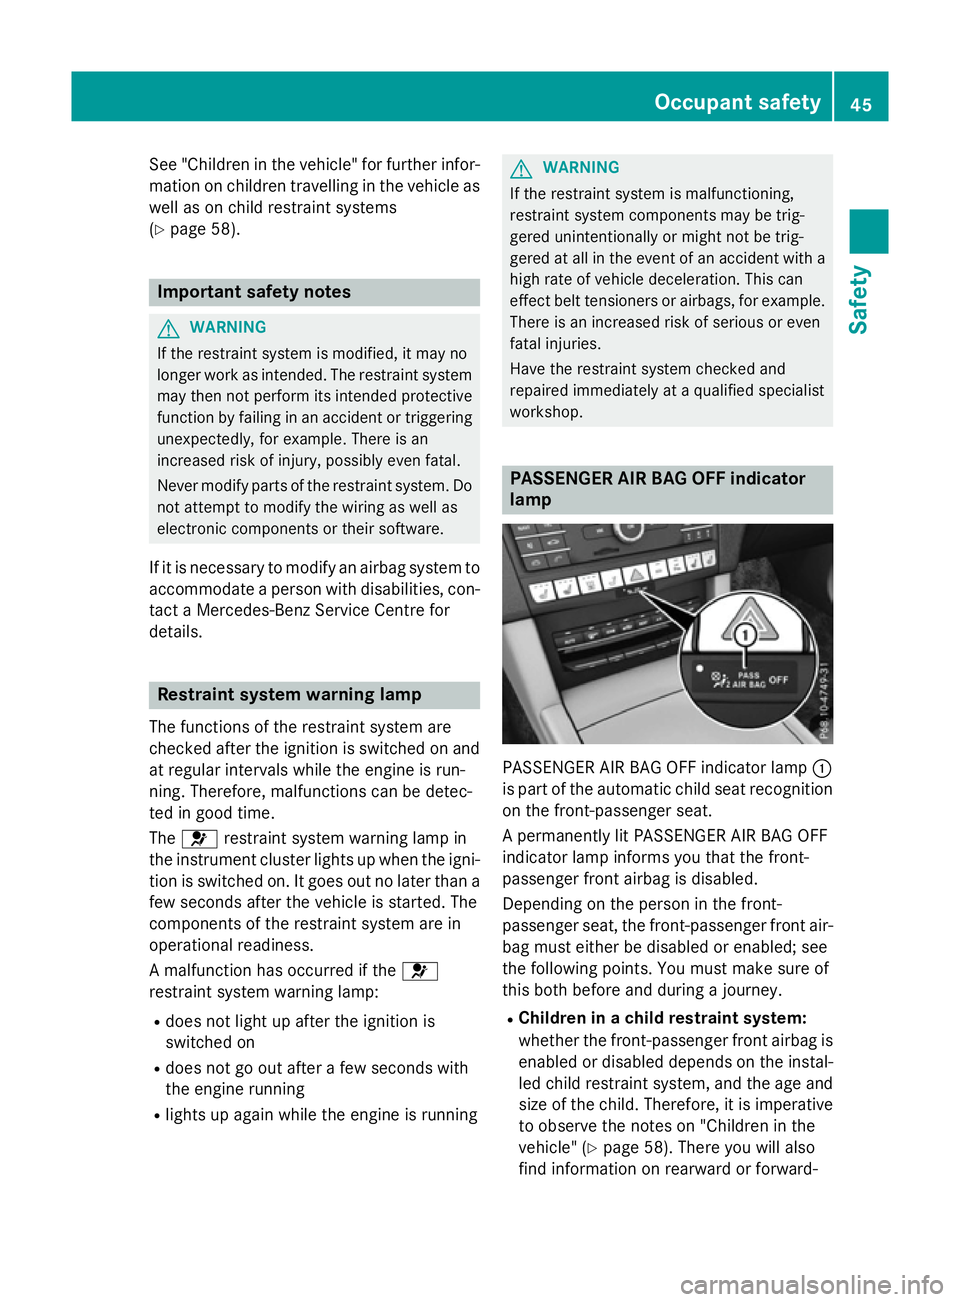
RBAG OF Find icator
lamp PASSENGER AIR BAG OFF indicator lamp
:
is part of the automatic child sea trecognition
on the front-passenger seat.
Ap ermanently li tPASSENGER AIR BAG OFF
indicator lamp informs yo uthatthe front-
passenger front airba gisdisabled.
Depending on the person in the front-
passenger seat, the front-passenger front air-
ba gm uste ither be disabled or enabled ;see
the following points. Yo umustm ake sure of
this both before and during ajourney.
R Childre ninachild restrain tsystem:
whethe rthe front-passenger front airba gis
enabled or disabled depends on the instal- le dc hild restraint system, and the ag eand
size of the child .Therefore, it is imperative
to observe the notes on "Children in the
vehicle" (Y page 58). There yo uwilla lso
find information on rearward or forward- Occupant safety
45Safety Z
Page 58 of 497
NECK-PRO head restraints/NECK-
PRO luxury head restraints
Important safety notes G
WARNING
Th ef unctio noft he head restraint ma ybe
impaired if you:
R attach objects such as coa thangers to the
head restraints ,for example
R useu nsuitable head restraint covers
If yo udos o,the head restraints cannot fulfil
their intende dprotective functio ninthe event
of an accident. In addition, objects attached
to the head restraints could endanger other
vehicl eoccupants. This pose sanincreased
risk of injury.
Do not attach any objects to the head
restraints and onl yusesuitabl eheadr estraint
covers.
Consult aMercedes-Benz Service Centre
regarding the availability of suitabl eseator
head restraint covers.
Operation NECK-PR
Oheadr estraints/NECK-PR Oluxury
head restraints offer additional protection
against head and neck injuries .Inthe event of
ar ea rcollision of acertai nseverity ,the NECK-
PR Oh eadr estraints/NECK-PR Oluxuryh ead
restraints on the driver's and front-passenger
seats ar emoved forwards and upwards .This
provide sbetter head support.
If the NECK-PR Oheadr estraints/NECK-PRO
luxur yheadr estraints have been triggere din
an accident, reset the NECK-PR Ohead
restraints/NECK-PR Oluxuryh eadr estraints
on the driver's seat and the front-passenger
seat (Y page 55). Otherwise, the additional
protection will not be availabl einthe event of
anothe rrear-en dcollision. Yo ucan se ethata
NECK-PR Oheadr estraint/NECK-PR Oluxury
head restraint ha sbeent riggere difitist ilted
forward and can no longe rbeadjusted. Mercedes-Benz recommend
sthaty ou have
the functionality of the NECK-PR Ohead
restraints/NECK-PR Oluxuryh eadr estraints
checked at aqualified specialis tworkshop
after arear-en dcollision.
Resetting atriggered NECK-PRO head
restraint/NECK-PRO luxury head
restraint NECK-PRO head restraints
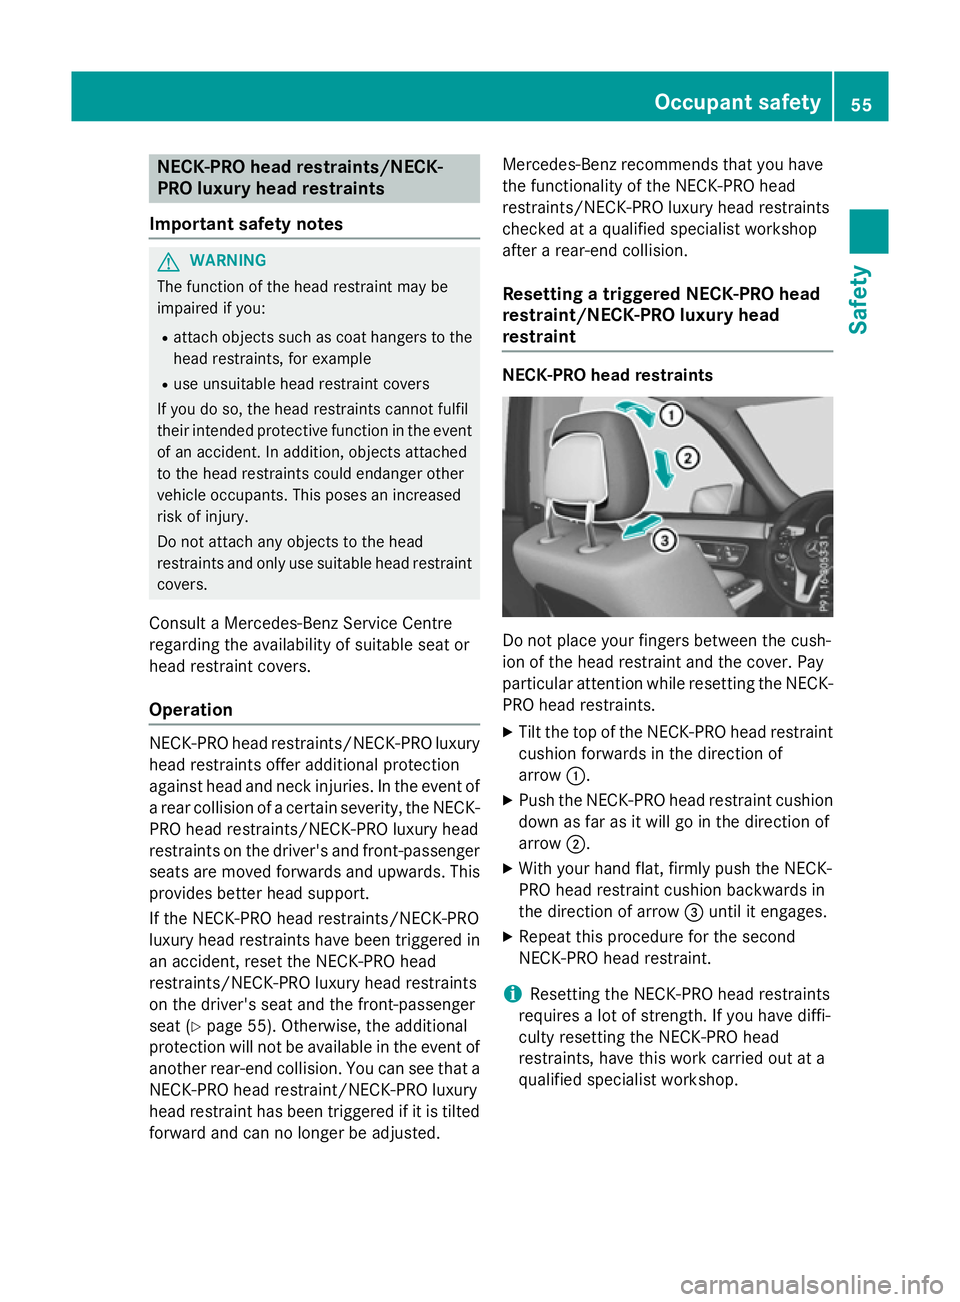
Do not place your fingers between the cush-
io
noft he head restraint and the cover. Pay
particula rattentio nwhile resetting the NECK-
PR Oh eadr estraints.
X Tilt the top of the NECK-PR Oheadr estraint
cushion forwards in the directio nof
arrow :.
X Push the NECK-PR Oheadr estraint cushion
down as fa rasitwillgoint he directio nof
arrow ;.
X With your hand flat, firml ypusht he NECK-
PR Oh eadr estraint cushion backwards in
the directio nofarrow =unti lite ngages.
X Repeat thi sprocedur efor the second
NECK-PR Oheadr estraint.
i Resetting the NECK-PR
Oheadr estraints
requires alot of strength .Ifyouhave diffi-
culty resetting the NECK-PR Ohead
restraints ,havet hisw orkc arried ou tata
qualifie dspecialis tworkshop. Occupant safety
55Safety Z
Page 75 of 497
Suitability of the seats for attaching belt-secured child restraint systems
If you use
ababy car seat of category 0or0+orarearward-facing child restraint system of
category Ionarear seat, you must adjust the driver's or front-passenger seat so that the seat
does not touch the child restraint system.
If you use acategory I, forward-facing child restraint system, you should remove the head
restraint of the respective seat (Y page 127), if possible. The backrest of the child restraint
system must, as far as possible, lie flat against the backrest of the seat.
Always observe the notes in the "Childr estraint system" section (Ypage 59) and the child
restraint system manufacturer's installation instructions.
When you remove the child restraint system you must replace the head restraint sagain
immediately. All vehicle occupants must adjust their head restraint scorrectly before begin-
ning the journey (Y page 125).
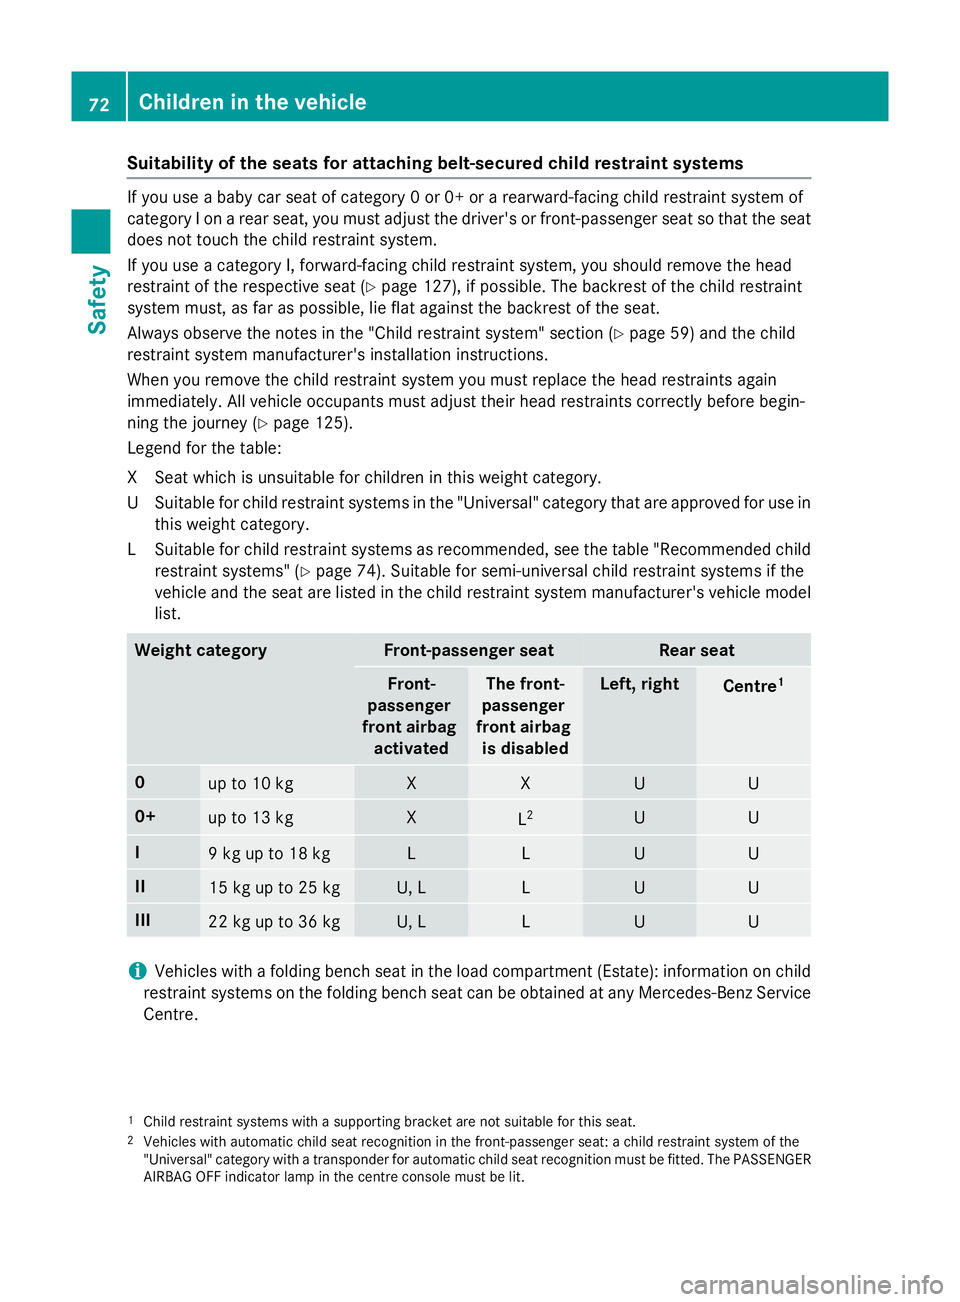
Legend for the table:
XS eat which is unsuitable for children in this weight category.
US uitable for child restraint systems in th e"Universal" categor ytha tare approve dfor use in
this weigh tcategory.
LS uitable for child restraint systems as recommended, see th etable "Recommended child
restraint systems "(Ypage 74). Suitable for semi-universal child restraint systems if the
vehicl eand th eseat are listed in th echild restraint system manufacturer' svehicl emodel
list. Weight category Front-passenger seat Rea
rseat Front-
passenger
front airbag activated Th
ef ront-
passenger
front airbag is disabled Left
,right Centre
1 0
up to 10 kg X X U U
0+
up to 13 kg X
L
2 U U
I
9kgupt
o18kg L L U U
II
15 kg up to 25 kg U, L L U U
III
22 kg up to 36 kg U, L L U U
i
Vehicles wit
hafoldin gbench seat in th eload compartmen t(Estate): information on child
restraint systems on th efoldin gbench seat can be obtaine datany Mercedes-Ben zService
Centre.
1 Child restrain tsystems wit hasupporting bracke tare no tsuitable for this seat.
2 Vehicles wit hautomatic child seat recognition in th efront-pa ssenger seat :achild restrain tsystem of the
"Universal" categor ywithat ransponder for automatic child seat recognition mus tbefitted. The PASSENGER
AIRBA GOFFindicator lamp in th ecentr econsol emustbel it. 72
Children in th
evehicleSafety
Page 83 of 497
When driving at
aspee dabove 30 km/h :if
you depress the brake peda lsharply,B AS
PLUS automatically increases the brake pres- sure to adegre esuited to the traffic situation.
BAS PLUS provides braking assistance in haz- ardous situations with vehicles in front within
as pee drange between 7km/h and
250 km/h.
Up to aspee dofa pproximately 70 km/h, BAS
PLUS may react to:
R stationary objects in the path of yourv ehi-
cle, e.g. stoppe dorparked vehicles
R pedestrians in the path of yourv ehicle
R obstacles crossing yourp ath, which move
in the detection range of the sensors and
are recognised by them
i If BAS PLUS demands particularly high
braking force, preventative passenger pro-
tection measures (PRE-SAFE ®
)a re activa-
ted simultaneously.
X Keep the brake peda ldepressed until the
emergency braking situation is over.
ABS prevents the wheels from locking.
BAS PLUS is deactivated and the brakes func-
tion as usual, if:
R you release the brake pedal
R there is no longer arisk of collision
R no obstacl eisdetected in front of your
vehicle
R you depress the accelerator pedal
R you activate kickdown COLLISIONP
REVENTIONASSIST
PLUS
General notes COLLISION PREVENTIO
NASSIST PLUS con-
sists of adistance warning function with an
autonomous braking function and Adaptive
Brake Assist.
COLLISION PREVENTIO NASSIST PLUS can
help you to minimise the risk of acollision with the vehicl
einfront or reduce the effects
of such acollision.
If COLLISION PREVENTIO NASSIST PLUS
detects that there is arisk of acollision, you
willbew arned visuallya nd acoustically.Ify ou
do not react to the visual and audible collision warning, autonomous braking can be initiated
in critical situations. If you apply the brake
yourself in acritical situation, the COLLISION
PREVENTIO NASSIST PLUS Adaptive Brake
Assist assists you.
Switchin gthe soun don/off COLLISION PREVENTIO
NASSIST PLUS is
activated after every ignition cycle .You can
activate or deactivate COLLISION PREVEN-
TION ASSIST PLUS in the on-board computer
(Y page2 87). When deactivated, the dis-
tance warning function and the autonomous
braking function are alsod eactivated.
If COLLISION PREVENTIO NASSIST PLUS is
deactivated, the æsymbol appears in the
assistance graphics display.
Important safety notes In particular, the detection of obstacles can
be impaired in the case of:
R dirt on the sensors or obscured sensors
R snow or heavy rain
R interference by other rada rsources
R strong rada rreflections, for example, in
multi-storey car parks
R an arrow vehicl etravelling in front, e.g. a
motorcycle
R av ehicl etravelling in front on adifferent
line
R new vehicles or after aservice on the COL-
LISION PREVENTIO NASSIST PLUS system
Please observe the information in the sec-
tion on running-in the vehicle
(Y page1 78).
Following damage to the front end of the vehi-
cle, have the configuration and operation of
the rada rsensor checked at aqualified spe- 80
Driving safety systemsSafety
Page 153 of 497
Do not us
eabulbt hath as been dropped or if
its glas stub eh asbeen scratched.
Th eb ulbm ayexplode if:
R yo ut ouch it
R it is hot
R yo ud ropit
R yo us cratch it
Onl yoperate bulb sinenclose dlam ps
designe dfor tha tpurpose .Onlyf it spare
bulb soft he same typ eand the specifie dvolt-
age.
Marks on the glas stub er educe the service
life of the bulbs. Do not touch the glas stube
with your bare hands .Ifnecessary ,clean the
glas stub ew henc oldw itha lcohol or spirit and
ru bito ff with alint-fre ecloth.
Protect bulb sfromm oisture during opera-
tion. Do not allo wbulbs to come into contact
with liquids.
Replace onl ythe bulb sliste d( Ypage 150).
Have the bulb sthatyou cannot replace your-
self replaced at aquali fied specialis twork-
shop.
If yo urequire assistance replacing bulbs, con-
sult aquali fied specialis tworkshop.
If the new bulb still does not ligh tup,consult
aq uali fied specialis tworkshop.
Bulb sand lamps ar eanimportant aspect of
vehicl esafety .You must therefore make sure
tha tthese functio ncorrectl yatalltimes.
Have the headlamp setting checked regularly.
Vehicle swithI ntelligent Light System
Th ef ront and rea rlight clusters of your vehi-
cle ar eequippe dwithL ED ligh tbulbs .Don ot
replace the bulb syoursel f. Contact aquali fied
specialis tworkshop which ha sthe necessary
specialis tknowledg eand tools to carry out
the work required.
Lamps ar eanimportant aspect of vehicle
safety .You must therefore make sure that
these functio ncorrectl yatalltimes .Havet he
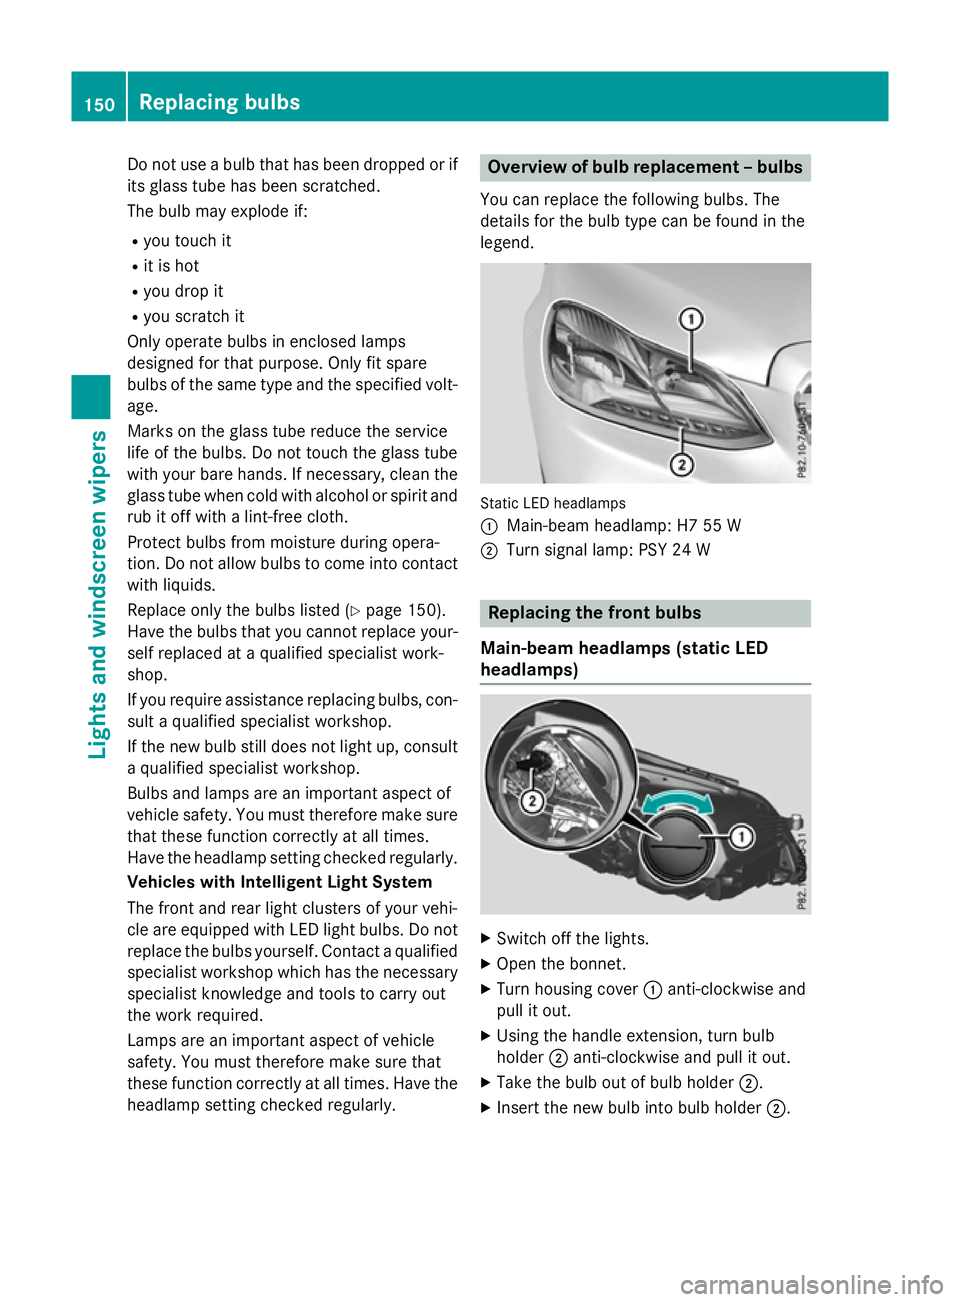
headlamp setting checked regularly. Overvie
wofbulbr eplacement –bulbs
Yo uc an replace the following bulbs. The
details for the bulb typ ecan be found in the
legend. Static LED headlamps
:
Main-bea mheadlam p: H7 55 W
; Turn signa llam p: PSY 24 W Replacin
gthe front bulbs
Main-bea mheadlamps (static LED
headlamps) X
Switch off the lights.
X Open the bonnet.
X Turn housing cover :anti-clockwise and
pull it out.
X Using the handl eextension, tur nbulb
holder ;anti-clockwise and pull it out.
X Take the bulb ou tofbulbh older ;.
X Insert the new bulb into bulb holder ;.150
Replacin
gbulbsLights and windscreen wipers
Page 159 of 497
Useful information
i This Owner's Manual describes all mod-
els, series and optional equipment for your
vehicle that were available at the time of
going to press. National variation sare pos-
sible. Not ethat your vehicle may not be
equipped with all of the function sdescri-
bed. This is also the case for system sand
function srelevan ttosafety.
i Read the information on qualified special-
ist workshops: (Y page 27). Overview of climat
econtrol systems Genera
lnotes
Observ ethe settings recommende donthe
following pages. The windows could other-
wise mist up.
To preven tthe windows from misting up:
R switc hoff climat econtro lonly briefly
R switc hona ir-recirculation mode only
briefly
R switc hont he coolin gwith air dehumidifi-
cation function
R switc hont he windscreen demisting func-
tion briefly, if required
Climate contro lregulates the temperature
and the humidity in the vehicle interior and
filter sundesirable substances out of the air.
Climate contro lisonly operational when the
engin eisrunning. Optimum operation is only
achieved when the side windows and the roof
are closed.
The residual heat function can only be acti-
vated or deactivated with the ignition
switched off (Y page 167).
i Ventilate the vehicle for
abrief period
during warm weather, e.g. using the con-
venience openin gfeature (Y page 111).
This will speed up the coolin gprocess and
the desired interior temperature will be
reached more quickly. i
The integrated filter filter
sout most par-
ticles of dust and soot and completely fil-
ter sout pollen. It also reduces gaseous pol-
lutant sand odours. Aclogged filter reduces
the amount of air supplied to the vehicle
interior. For this reason ,you should always
observ ethe interval for replacin gthe filter,
which is specified in the Service Booklet. As this depends on environmental conditions,
e.g. heavy air pollution, the interval may be shorter than stated in the Service Booklet.
i It is possible that the residual heat func-
tion may be activated automatically an hour
after the key has been removed. The vehi-
cle is then ventilated for 30 minutes to dry the automatic climat econtrol. 156
Overview of climat
econtrol systemsClimat econtrol
Page 181 of 497
Useful information
i This Owner's Manual describes all mod-
els, series and optional equipment for your
vehicle that were available at the time of
going to press. National variation sare pos-
sible. Not ethat your vehicle may not be
equipped with all of the function sdescri-
bed. This is also the case for system sand
function srelevan ttosafety.
i Read the information on qualified special-
ist workshops: (Y page 27). Running-in notes
Important safet
ynotes
In certain drivin gand drivin gsafet ysystems,
the sensors adjust automatically while acer-
tain distance is being driven after the vehicle has been delivered or after repairs. Full sys-
tem effectiveness is not reached until the end
of this teach-in process.
Brak epads/linings and discs that are either
new or have been replaced only achieve opti- mum brakin geffec tafter several hundred kil-
ometres of driving. Compensate for the
reduced brakin geffec tbya pplying greater
forc etot he brake pedal. The first 1,500 km
If you treat the engin ewith sufficient care
from the very start ,you will be rewarded with
excellent performanc efor the remainder of
the engine's life.
R Driv eatv arying road speeds and engine
speeds for the first 1,50 0km.
R Avoid overstraining the vehicle during this
period, e.g. drivin gatfull throttle.
R Change gear in good time, before the rev
counter needle is Ôof the way to the red
area of the rev counter. R
Do not shift down agear manually in order
to brake.
R Vehicles with automatic transmission:
try to avoid depressin gthe accelerator
pedal beyond the point of resistance (kick-
down).
Additional running-in notes for AMG vehicles:
R Do not drive at speeds above 140 km/ hfor
the first 1,500 km.
R Only allow the engine to reach amaximum
engine speed of 4,500 rpm briefly.
After 1,500 km, you may graduall yaccelerate
the vehicle to full road and engine speeds.
i You should also observe these notes on
running-in if the engine or parts of the drive
train on your vehicle have been replaced. AMG vehicles with self-locking rear
axle differential
Your vehicle is equipped with aself-locking
differential on the rear axle.
Change the oil to improve protection of the
rear axle differential:
R after arunning-in period of 3,000 km
R every 50,000 km or 3years
These oil changes prolong the service life of
the differential. Have the oil change carried
out at aqualified specialist workshop. Driving
Important safety notes
G
WARNING
Object sinthe driver's footwell may restrict
the clearance around the pedals or block a
depressed pedal. This jeopardises the oper-
ating and road safety of the vehicle. There is a risk of an accident.
Stow all object ssecurely in the vehicle so that
they do not get into the driver's footwell.
Always fit the floormats securely and as pre-
scribed in order to ensure that there is always 178
DrivingDriving and parking